Ultimate Series R8 XR1550 - Shaver REMINGTON - Free user manual and instructions
Find the device manual for free Ultimate Series R8 XR1550 REMINGTON in PDF.
| Product type | Rechargeable rotary shaver |
| Brand | Remington |
| Model | Ultimate Series R8 XR1550 |
| Power supply | 100-240 V AC adapter, cordless use |
| Charging time (R8) | 90 minutes for a full charge |
| Charging time (R7) | 4 hours for a full charge |
| Indicators | Charging indicator and battery level indicator (LED) |
| Shaving functions | Dry shaving or with shaving gel |
| Trimmer | Retractable integrated trimmer |
| Beard trimmer accessory | Beard trimming accessory with adjustable cutting guide |
| Cutting adjustment | Adjustment wheel for lengths from 0.4 mm to several mm |
| Cleaning | Washable under running water (head and hair reservoir) |
| Lubrication | Trimmer oil every six months |
| Waterproofness | Usable in the bath or shower |
| Safety | Separate the head from the body before washing with water; do not use if damaged |
| Spare parts | Rotary heads, blades, trimmer, cutting guide, cleaning brush, charging base |
| Repairability | Replaceable battery (by a professional) |
| Package contents | Shaver, charging base, adapter, beard accessory, cutting guide, cleaning brush, protective cover, vanity case |
Frequently Asked Questions - Ultimate Series R8 XR1550 REMINGTON
User questions about Ultimate Series R8 XR1550 REMINGTON
0 question about this device. Answer the ones you know or ask your own.
Ask a new question about this device
Download the instructions for your Shaver in PDF format for free! Find your manual Ultimate Series R8 XR1550 - REMINGTON and take your electronic device back in hand. On this page are published all the documents necessary for the use of your device. Ultimate Series R8 XR1550 by REMINGTON.
USER MANUAL Ultimate Series R8 XR1550 REMINGTON
Ultimate Series Rotary Shaver

R7/R8

Thank you for buying your new Remington® product. Please read these instructions carefully and keep them safe. Remove all packaging before use.
IMPORTANT SAFEGUARDS
- This appliance can be used by children aged from 8 years and above and persons with reduced physical, sensory or mental capabilities or lack of experience and knowledge if they have been supervised/instructed and understand the hazards involved. Children shall not play with the appliance. Cleaning and user maintenance shall not be done by children unless they are older than 8 and supervised. Keep the appliance and cable out of reach of children under 8 years.
- Always check the appliance before you use it. Do not use the appliance if it is damaged, as this may cause injury.
- The adaptor contains a transformer. Do not cut off the adaptor to replace it with another plug, as this causes a hazardous situation.
The shaver is suitable for cleaning under an open water tap.
Suitable for use in a bath or shower.
- WARNING: Detach the shaver from the charging adapter before cleaning it in water.
- Do not use the product with a damaged cord. A replacement can be obtained via our International Service Centres.
- This product should only be used with the charging adaptor supplied.
- Always replace a damaged adaptor with one of the original type.
- Do not use the shaver, charging adaptor, charging stand or any other part if it is damaged, as this may cause injury.
- This appliance should never be left unattended when plugged into a power outlet, except when charging.
- Keep the power plug and cord away from heated surfaces.
- Do not plug or unplug the appliance with wet hands.
- Do not twist or kink the cable, or wrap it round the appliance.
- This appliance is not intended for commercial or salon use.
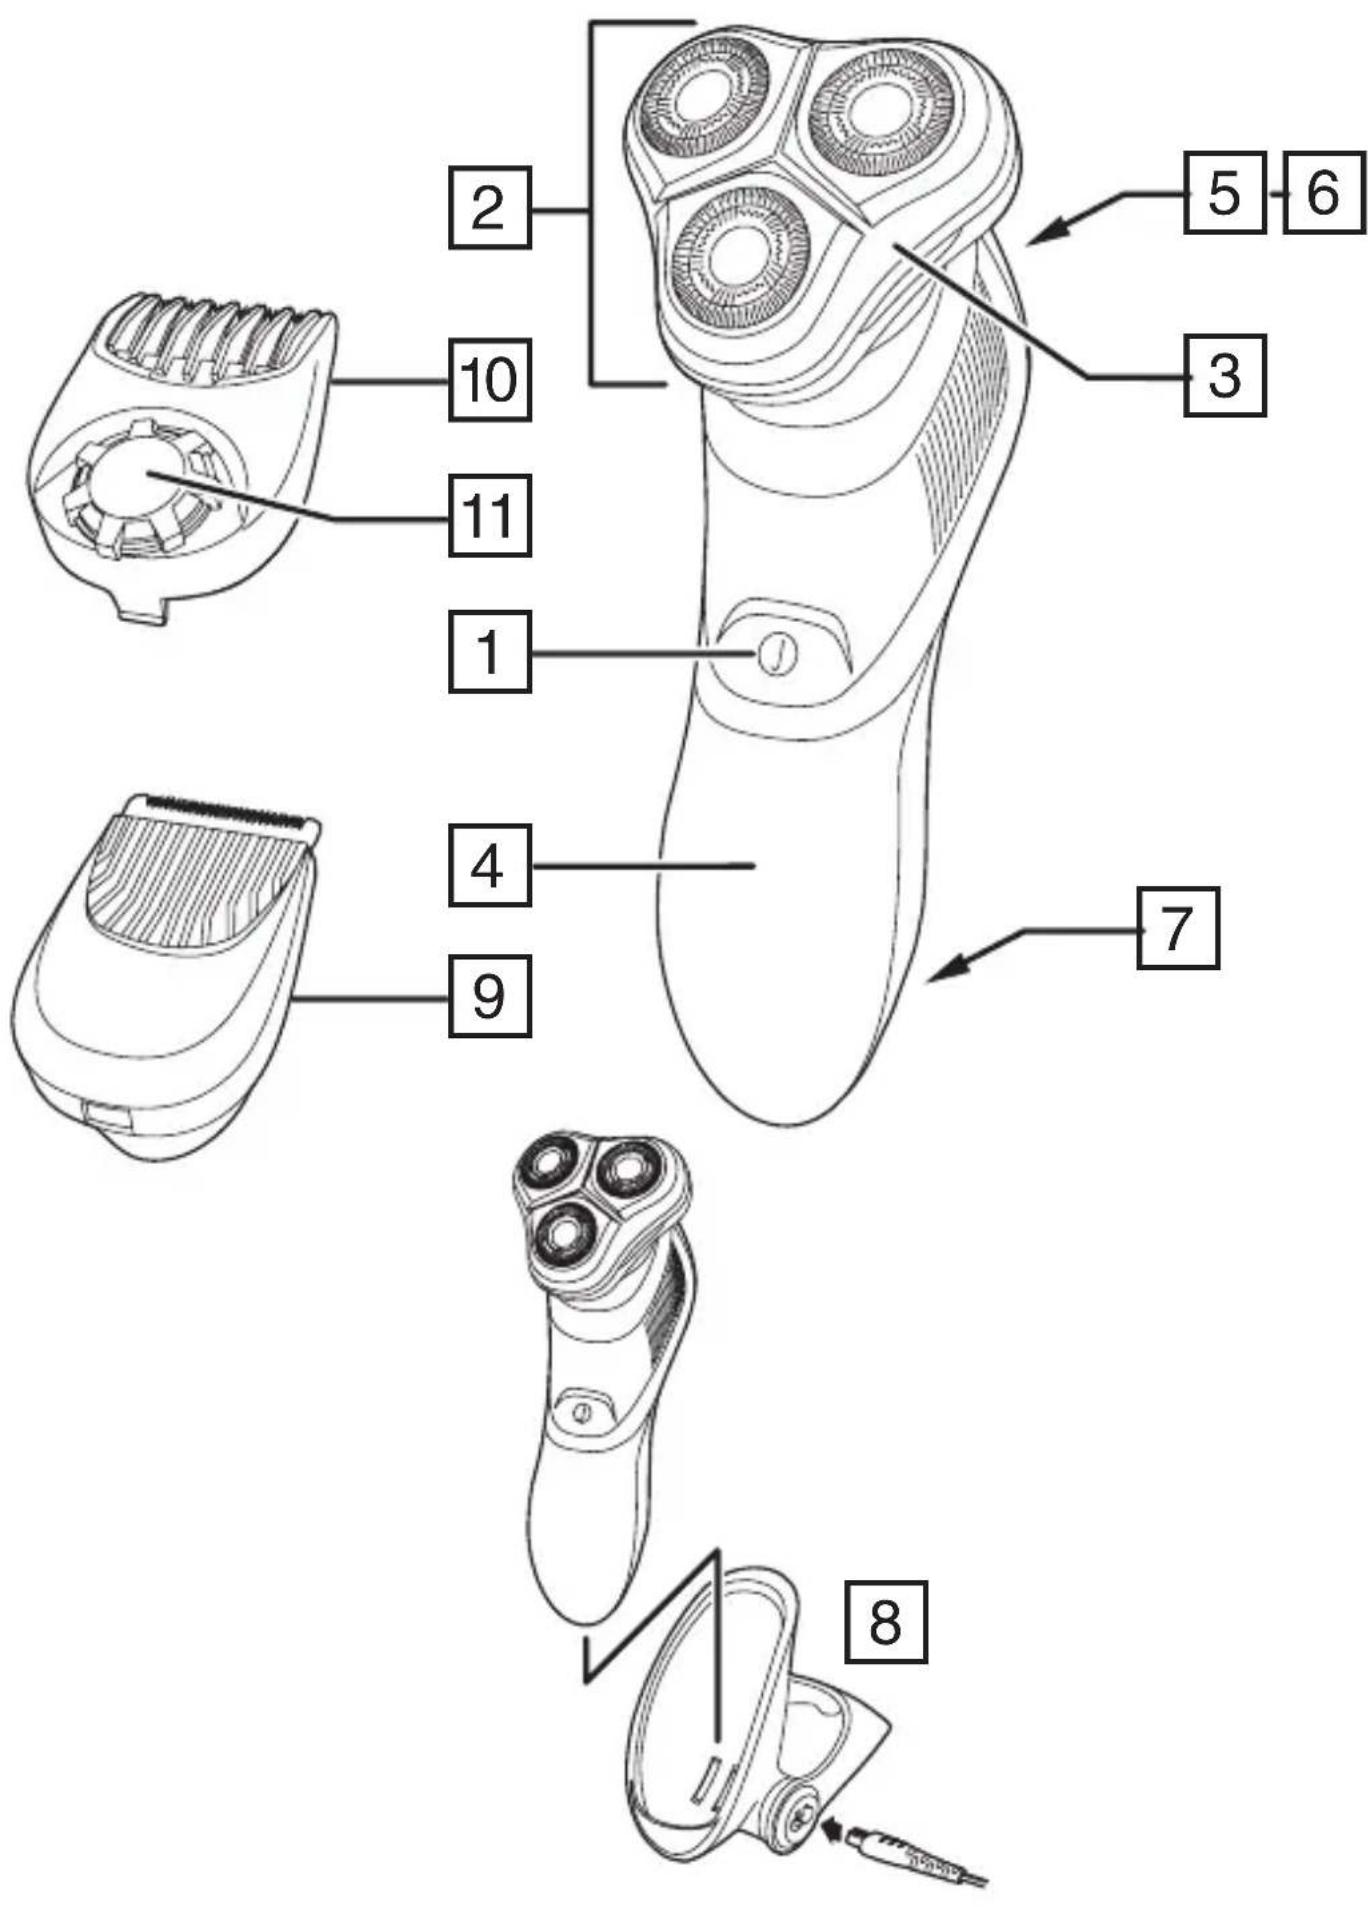
PARTS
- On/off switch
- Head and cutter assembly
- Hair pocket
- LED display
- Pop-up trimmer
- Trimmer release button
- Charging pins
-
Charging stand
-
Beard trimming attachment
-
Comb
- Comb adjustment dial
- Adaptor (not shown)
- Headguard (not shown)
- Cleaning brush (not shown)
- Storage case (not shown)
GETTING STARTED
CHARGE THE SHAYER:
Note: This shaver is for cordless use only.
- Ensure the appliance is turned off.
- Connect the charging stand to the adaptor and then to the mains.
- Place the shaver in the charging stand.
- Charge for at least 24 hours when using for the first time.
- To preserve the life of your batteries, let them run out every 6 months then recharge for 24 hours.
- The appliance adapts automatically to a mains voltage between 100V and 240V.
R7
- When the charge is low, the upper LED will illuminate red.
- When charging the lower LED will illuminate green. When fully charged both LEDs will be off.
- Allow 4 hours for a complete charge.
R8
- The fuel gauge will display the amount of charge left when the shaver is on. When charging, the LEDs cycle in a rotating pattern. When fully charged all LEDs will come on then turn off.
- Allow 90 minutes for a full charge.
INSTRUCTIONS FOR USE
It is recommended that you use your new shaver daily for up to four weeks to allow time for your beard and skin to become accustomed to the new shaving system.
SHAVING
- Switch the shaver on.
-
Stretch the skin with your free hand so the hairs stand upright.
-
Only apply light pressure on the shaving head while shaving (pressing too hard can damage the heads and make them vulnerable to breakage).
- Use short, circular strokes.
SHAVING WITH SHAVING GEL
- Follow the same instructions as dry shaving if using shaving gel.
- CAUTION After use with shaving gel, please rinse the head and cutters under warm water to clean away any excess gel and debris.
TRIMMING
- Push the trimmer button to release the detail trimmer.
- Hold the trimmer at right angles to your skin.
- Place the trimmer at desired trim line for a quick, easy, professional trim.
- To retract the trimmer, push down until it locks into position.
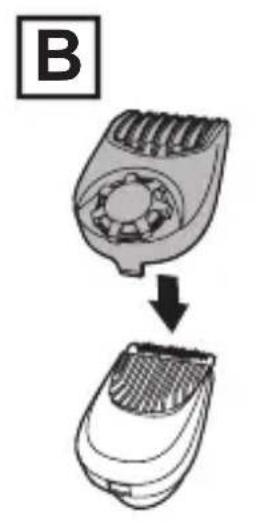
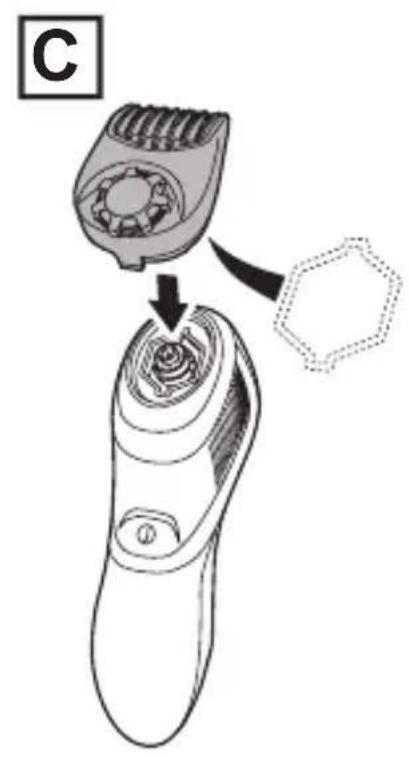
BEARD TRIMMER ATTACHMENT (R8)
To fit the beard trimmer attachment:
- Switch off your shaver.
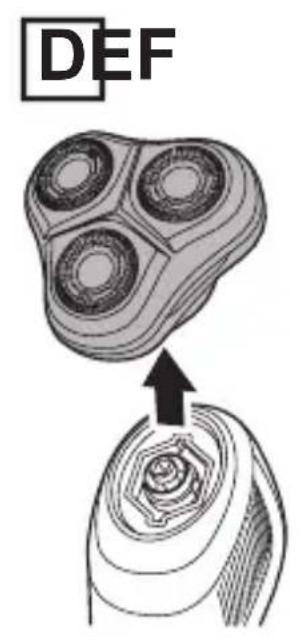
- Grasp the head and cutter assembly and pull it away from the body of your shaver (Fig A).
- If using, snap the comb to the beard trimming attachment (Fig B).
- Align the underside of the beard trimmer attachment with the hexagonal recess in the shaver body and click it into place (Fig C).
- Use the trimmer without the comb for trimming hair close to the skin. This will trim hair to 1mm , holding the blades perpendicular to the skin will trim hair to 0.4mm .
- Adjust the comb setting by rotating the adjustment dial on top of the comb clockwise to increase the cut length or anticlockwise to reduce the cut length. The selected setting is shown on the scale.
TIPS FOR BEST RESULTS
- Use moderate to slow stroking movements. The use of short circular motions in stubborn areas may obtain a closer shave, especially along the neck and chin line.
- DO NOT press hard against the skin in order to avoid damage to the rotary heads.
To ensure long lasting performance clean after each use.
-
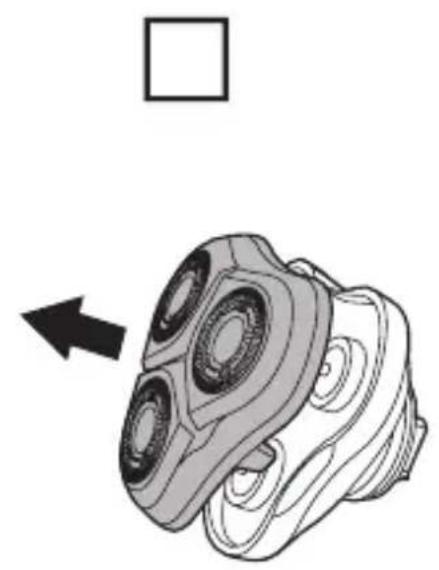
Grasp the head and cutter assembly and pull it away from the body of your shaver (Fig D).
-
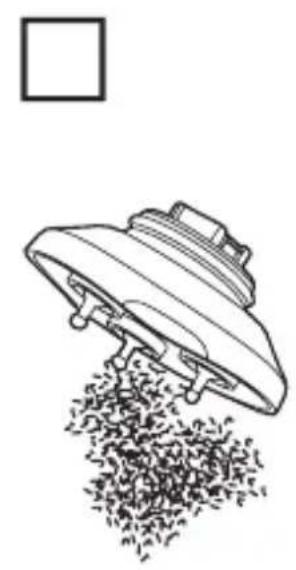
Pull the face off the hair pocket (Fig E).
- Tap out excess hair shavings from the hair pocket (Fig F). Hair clippings can also be washed out of the hair pocket and or shave face by rinsing these under the tap.
- Once dry, snap the face back onto the hair pocket.
- The easiest and most hygienic way to clean the appliance is by rinsing the appliance head after use with warm water.
- Lubricate the teeth of the trimmer every six months with a drop of sewing machine oil.
REMOVING THE RECHARGEABLE BATTERY
We strongly recommend that a professional removes the rechargeable battery. Parts of the shaver case, and tools have sharp edges and may cause injury if not handled correctly.
- The rechargeable battery must be removed from the appliance before it is scrapped.
-
Disconnect the charging adapter before removing the battery.
-
Run the shaver until the motor stops.
- Remove the head from the shaver (pull the head up and off).
- Using a small screwdriver, pry the 'collar' off the top of the handle.
- Using a small screwdriver, pry the front cover from the body.
- Remove three screws located on front of shaver.
- Using a small screw driver, pry up the newly unsecured inner housing to expose the battery.
- Pry the battery free from the circuit board.
- Used batteries must be removed from the appliance and disposed of at an appropriate official recycling/collection point.
- Do not attempt to operate the shaver once you have opened it.
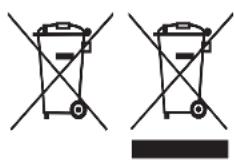
RECYCLING
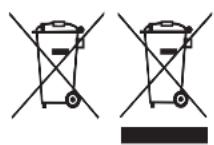
To avoid environmental and health problems due to hazardous substances, appliances and rechargeable and non-rechargeable batteries marked with one of these symbols must not be disposed of with unsorted municipal waste. Always dispose of electrical and electronic products and, where applicable, rechargeable and non-rechargeable batteries, at an appropriate official recycling/ collection point.
UW APPARAAT VERZORGEN
NAGRA GODA RÄD FÖR BÄSTA RESULTAT
RADY, JAK OSIAGNAC NAJLEPSZY WYNIK
EN IYI SONUÇLAR IÇIN IPUÇLARI
Tva toothe noeTe To KOTIKo EAptnma yia mouoi:
- Anevepyooinote Tnv Eupiotikn uynxavn.
- Iiaote to ouykpota kepaanc kai aeidac kai tpaBnEto yia va to aqaipoeet e ano to ouma tnC Eupiotiknc mynavnc (Eik.A).
- EFOOov Tn xPNOIOIeIe, OuvDcTe Tn XTeVa OTo KOnTIKO EApTma Yia Mouoi (Eik.B).
- Euθυγραμίσε Νν κάτω πλεύρα του κοπτικόν εξαρτήματος γία μούοι με την εξάγωνη Σθόχό στο σώμα τής ἐύριστικής μήχανός και ασφαλίσε το στη θέση του (Eik. C).
XpnoiopoioTe Tnv KOnTikn mNxavn XwpiC Tn XTeva yia va KoIeTe TpiEc KovTa oTo a .Etoi 0a KoIeTe TpiEc OTO 1 mm.Eav oi Ie iDc BpIOkovTai KaOeTa npoc to a ,oi TpiEc 0a konouv OTA 0,4 mm. - PpOoapmuOTe Tn puOuIion Tnc xTevac πeipotpeovvTac tov ENILOyEA puOuionc OTNV KOpUfn Tnc xTevac npoc ta deGia yia va auNoseTo uNKOC konnc n, npoc ta apIOTepa Yia va to eioe. H eIIeYEvn puOuion eupaviEeai naW Otnv klauka.
BAKJIIBI 3AXODN BE3NEKN
BVKOpNCTaHn3a3NaueHOro npnstpoI dItbMn BIKOM BiI 8 pOKiB,oc6aMn 3 06mExeHIMn o3uHIMn,ceHCOPHMn a6o pO3yMOBIMn MOxJIINBOCTaMn,6paKOM DoCBiDy a6o 3HaHb DOpyCKaETbcra BNIIOUHO 3a yMOBn DODaTKOBORo KOHTPOIIO a6o IHCTpykTaJxu YcBiIDOMJeHHa NOB'3aHnx i3 TaKIM BHKOpNCTaHHaM pN3NKiB.YKOHNOMy pa3i He I03BOJYte IITAM rpatncs3 npnstpoEm. UISeHnTa texHiuHe 06CnyROvBaHHa TcBOrO npnstpoI MoXe 3dIChIOBaTncs DaTbMM BIKIOUHO 3a yMOBn DoCgRHeHHa HIMN 8-piHoro BIKy Ta KOHTPOIIO 3 60ky 6aTBKiB. 36epiraTe npnstpi Ta KaBeIb Do HbOro IO3a 30HOIO DocxKHOCTi diTeM MoIoDme 8 pOKiB.
UcstahOBHTn Hacaiky Tpimepa dny 6opOu, BkOHaIte HaCTynHdi:
- BmKhItb 6puTBy.
- Bi3bmitbcra 3a roJOBky ta 6nok je3 i 3Himitb ix i3 Kopnyc 6pntbn (pnc.A).
- YKIO Heo6xio HcOpncTaTnca rpe6iHueBOIO HacadKOIO, BCTaHOBIb II Ha HacaKy TpIMepa Ira 6opOn (Pnc.B).
- BnpiBnIe HxHIO NOBepXHIO HacaIK TpIMepa IJI 60oJN 3a IecTnIpaHHM KOIO6KOM Ha Kopnyci 6pITbn, nCJI YORO 3aΦikcyIte Hacdky Ha MicU (BN MaTe noUYTN 3ByK KlaCaAHN, pnc.C).
Для пдстрогань ВОLOСь 6и3ько DoшКИВИКОPGИСТОВУТЕ ТРИМЕр 6e3 rpe6iHuceBOI Hacadkn.ТakIMЧИHOMДOBЖИHA CTPNJKKN CkJaDE 1 MM,aЯкso TpIMaTN le3a nepNeHdNKyIparHO Do shKIPn,ДOBЖИHA CTPNJKKN CkJaDE 0,4 MM.
BidperyIIOte HanaSTYBaHHr rpe6HnceBOi HacaIK, NOBepTaOUn DNCK peryIIOBaHH Ha BepXHi YaCTnHi HacaIK 3a rOdnHHNKOBIO CTpiIKoIO a60 npOTn Hei, 06 BiIOBIDHO 36InbWHTn a60 3MeHNITN DOBXINHy CTpIXKK. Bn6paHe HanaSTYBaHHa BiO6paKaTtMeTbcra Ha shKani.
CBAJIaHE HA BATEPnIaT
Cnilho npenopbunTeHno e da npe3apejdaaata ce 6atepya da 6bde cmeheHa ot Cneuainct. Yactte Ha Kopnyca Ha camo6pbchaukaTaN HCTpymEnrTe mMaT OcTpN KpaIua, Koeto MoKe Da Iobede Do HapaHbaHe, aKO He pa6OTe BHMAteHNo CTAX.
BaTePnIa Tp8Ba Da 6bIe n3BaIeHa npEi ypeBt Da ce npEaIe 3a cKpaI.
Korato OTCpaHbATE 6aTeepnTa, ypeBbT Tp8Ba Da 6bDe N3KJIoueH OT 3axpaHbAaTa MpeXa.
- OtctpaheTe rnaBata OT cAmO6pbchauKaTa (n3TerIeTe rnaBata Harope n otJeIeTe).
2.ИЗнолзвайк MaДКа OTВерТКа,ИЗВаде ТгорнATERЧАСТ Ha ДрьЖКаТa. - KaTo n3NoJ3BaTe MaIka OTBeptKa, OTJeIeTe npeHnKa KaNaK OT TaIonoT.
- OTePaHeTe TpuTe BnHTa B npEHaTa YaCT Ha cAmO6pbchauKaTa.
- Използваим малка OTвертka, OTделе OCBOбоденя Вьтpeшен Корпс, за се пokахе bateрета.
- OtdeleTe 6aTeepnTa ot nlaTkata.
BaTePnIe Tp6Ba Da ce n3XbPnT 6e3oNaCHO.

PEUKNJIUPAHE
3a da ce n36erHaT ekOJorHn H 3dpaBn npo6IeMn nopadn haJIuHne Ha onaChn cy6ctaHun, ypeiNe, akymlaTOPHnte N HeakymlaTOPHnte 6aTePnn, o603NaueHn c eHN OT Te3N CmBOJn, He Tp6Ba da ce n3XbPnT 3aeHNO C HecOpTnpaHn 6UHHcN OTnaDbuN. BInHarn n3XbPnIte eEKeTpnuCeckn n eEKeTPOHn npOdyKtN, KbDeTo e npINOxIMo, akymlaTOPHn H heakymlaTOPHn 6aTePnn, Ha NoDxOJaIO OphiuaHNo Macto 3a peuKnnpaHe/cb6npaHe.
J So 150
J 1 J 1
aale aie g c|e j
8 8 8 8 8 8 8 8 8 8 8 8 8 8 8 8 8 8 8 8 8 8 8 8 8 8 8 8 8 8 8 8 8 8 8 8 8 8 8 8 8 8 8 8 8 8 8 8 8 8 8
1
1jbs
i
.
. cail
·
J 1
aJ 1
.
·s + 1 + m + 1 = ( m + 1) !2
.
j 2
aL.11
.
jL = jL^
.
1
(On/off) /J.1
2
2x 个
(R8) 11
(R8) 12
(1) a4 = a1 + 3 = 4
()
()
()
4
(R7)
2xy
j6
1
AE
J 1
a211 4i5la j
bss Sswxu 12xu xu 0a aXla iyslo :
1
2
3
4
.
.
.
24 2d
Ref. No. XR1530 / XR1550
Remington® is a Registered Trade Mark of Spectrum Brands, Inc., or one of its subsidiaries
VARTA Consumer Batteries GmbH & Co. KGaA, Alfred-Krupp-Str. 9, 73479 Ellwangen, Germany www.remington-europe.com