Mixon 4 - DJ Equipment Reloop - Free user manual and instructions
Find the device manual for free Mixon 4 Reloop in PDF.
| Product Type | Professional MIDI controller with 4-channel sound card |
| Brand | Reloop |
| Model | Mixon 4 |
| Dimensions (approx.) | 520 x 310 x 85 mm |
| Weight (approx.) | 3.2 kg |
| Power Supply | External power adapter, AC input 100-240 V, 60/50 Hz |
| Compatible Software | Serato DJ, djay Pro, djay 2 (iOS/Android), VirtualDJ, Traktor Pro |
| Main Functions | 4 channels, touch-sensitive jog wheels, performance pads (Hot Cue, Loop Roll, Sampler, Slicer), built-in effects, filter, crossfader, adjustable curve |
| Audio Inputs/Outputs | Master XLR and RCA outputs, Booth RCA output, 3.5 mm and 6.3 mm headphone outputs, 6.3 mm microphone input |
| Connectivity | USB 2.0 for PC/Mac, Lightning connector for iOS, OTG for Android, external power supply |
| Minimum System Requirements | Mac OS X 10.9+, Windows 7+, iOS 8+, Android 5+ ; i3 processor, 4 GB RAM, USB 2.0 port |
| Cleaning and Maintenance | Slightly damp cloth; do not use solvents or aerosols; regularly check the condition of cables and knobs |
| Safety | Do not open the casing; avoid moisture and liquids; unplug before cleaning; use in an enclosed room |
| Spare Parts and Repairability | Replaceable fuses (same type); maintenance by qualified personnel; no user-serviceable internal parts |
| Box Contents | Mixon 4 controller, power adapter, USB cable, iOS cable, OTG cable, user manual |
Frequently Asked Questions - Mixon 4 Reloop
User questions about Mixon 4 Reloop
0 question about this device. Answer the ones you know or ask your own.
Ask a new question about this device
Download the instructions for your DJ Equipment in PDF format for free! Find your manual Mixon 4 - Reloop and take your electronic device back in hand. On this page are published all the documents necessary for the use of your device. Mixon 4 by Reloop.
USER MANUAL Mixon 4 Reloop
For your own safety, please read this operation manual carefully before initial operation! All persons involved in the installation, setting-up, operation, maintenance and service of this device must be appropriately qualified and observe this operation manual in detail. This product complies with the requirements of the applicable European and national regulations. Conformity has been proven. The respective statements and documents are deposited at the manufacturer.
BEDIENUNGSANLEITUNG
ACHTUNG!
03.... SETUP AND CONNECTIONS
04......HOW TO INSTALL SERATO DJ ON MAC OS X
04.....HOW TO INSTALL SERATO DJ ON WINDOWS
04....DJAY PRO / DJAY2 (IPAD / IPHONE) INSTALLATION
04.....DJAY 2 (ANDROID) INSTALLATION
05...... FEATURES
09...... MINIMUM SYSTEM REQUIREMENTS
09...... TECHNICAL SPECIFICATIONS
Congratulations on purchasing the Reloop Mixon 4. Thank you for placing your trust in our disc jockey technology. Before operating this equipment we ask you to carefully study and follow all instructions.
Please remove the Reloop Mixon 4 from its packaging. Before initial operation please make sure that the device has not been visibly damaged during transport. If you detect any damage to the power cable or the casing, do not operate the device and contact your specialised dealer.
SAFETY INSTRUCTIONS
CAUTION! Please exercise particular caution when handling AC 100 - 240 V, 60/50Hz power voltage. This voltage rating may lead to a critical electrical shock! Any damage caused by the non-observance of this operation manual excludes any warranty claims. The manufacturer is not liable for any damage to property or for personal injury caused by improper handling or non-observance of the safety instructions.
- This device has left the factory in perfect condition. To maintain this condition and to ensure a risk-free operation the user must observe the safety instructions and warnings contained in this operation manual.
- For reasons of safety and certification (CE) the unauthorised conversion and/or modification of the device is prohibited. Please note that in the event of damage caused by the manual modification to this device any warranty claims are excluded.
- The inside of the device does not contain any parts which require maintenance, with the exception of wear parts that can be exchanged from the outside. Only qualified staff must carry out maintenance, otherwise warranty does not apply!
- The fuse must exclusively be exchanged against fuses of the same class, with the same trigger features and nominal current rating.
- Make sure that the power will only be supplied after the device has been fully set up. Always plug in the mains plug last. Ensure that the mains switch is in the "OFF" position when connecting the device to power.
- Only use cables that comply with regulations. Make sure that all jacks and bushes are tightened and correctly hooked up. Refer to your dealer if you have any questions.
- Ensure that when setting up the product the mains cable is not squashed or damaged by sharp edges.
- Prevent the mains cable from coming into contact with other cables! Exercise great care when handling mains cables and connections. Never touch these parts with wet hands!
- Connect the power cable exclusively to appropriate shock-proof outlets. The only supply point to be used is a supply outlet in accordance with specifications of the public supply network.
- Disconnect the device from the supply outlet when not in use and before cleaning! Be sure to hold the mains plug by the body. Never pull the mains cord!
- Position the device on a horizontal and stable low-flame base.
- Avoid any concussions or violent impact when installing or operating the device.
- When selecting the location of installation make sure that the device is not exposed to excessive heat, humidity, and dust. Be sure that no cables lie around openly. You will endanger your own safety and that of others!
- Do not rest any containers filled with liquid that could easily spill onto the device or in its immediate vicinity. If, however, fluids should access the inside of the device, immediately disconnect the mains plug. Have the device checked by a qualified service technician before re-use. Damage caused by fluids inside the device is excluded from the warranty.
- Do not operate the device under extremely hot (in excess of 35^ ) or extremely cold (below 5^ ) conditions. Keep the device away from direct exposure to the sun and heat sources such as radiators, ovens, etc. (even during transport in a closed vehicle). Never cover the cooling fan or vents. Always ensure sufficient ventilation.
- The device must not be operated after being taken from a cold environment into a warm environment. The condensation caused hereby may destroy your device. Do not switch on or operate the device until it has reached ambient temperature!
- Controls and switches should never be treated with spray-on cleaning agents and lubricants. This device should only be cleaned with a damp cloth. Never use solvents or cleaning fluids with a petroleum base for cleaning.
- When relocating, the device should be transported in its original packaging.
• Devices supplied by voltage should not be left in the hands of children. Please exercise particular care when in the presence of children.
- At commercial facilities the regulations for the prevention of accidents as stipulated by the organization of professional associations must be observed.
- At schools, training facilities, hobby and self-help workshops the operation of the device must be monitored with responsibility by trained staff.
- Keep this operation manual in a safe place for later reference in the event of questions or problems.
APPLICATION IN ACCORDANCE WITH REGULATIONS
- This device is a professional DJ MIDI controller with integrated 4-channel soundcard that can control software. The device should be connected via USB cable to a computer or via iOS Connection cable to the iPad / iPhone.
- This product is authorised for connection to 100 - 240 V, 60/50 Hz AC via mains adapter (included) and is designed exclusively for indoor application.
- If the device is used for any other purposes than those described in the operation manual, damage can be caused to the product, leading to exclusion of warranty rights. Moreover, any other application that does not comply with the specified purpose harbours risks such as short circuit, fire, electrical shock, etc.
- The serial number determined by the manufacturer must never be removed to uphold the warranty rights.
MAINTENANCE
- Check the technical safety of the device regularly for damage to the mains cord or the casing, as well as for wearout of wear parts such as rotary knobs and sliding faders.
- If it is to be assumed that a safe operation is no longer feasible, then the device must be disconnected and secured against accidental use. Always disconnect the mains plug from the outlet!
- It must be assumed that a safe operation is no longer feasible, if the device bears visible defects, if the device no longer functions, following longer storage under unfavourable conditions or after major transport stress.
SCOPE OF DELIVERY
- Mixon 4 controller
- Power supply unit
- USB cable
- iOS connection cable
- OTG USB cable
SETUP AND CONNECTIONS
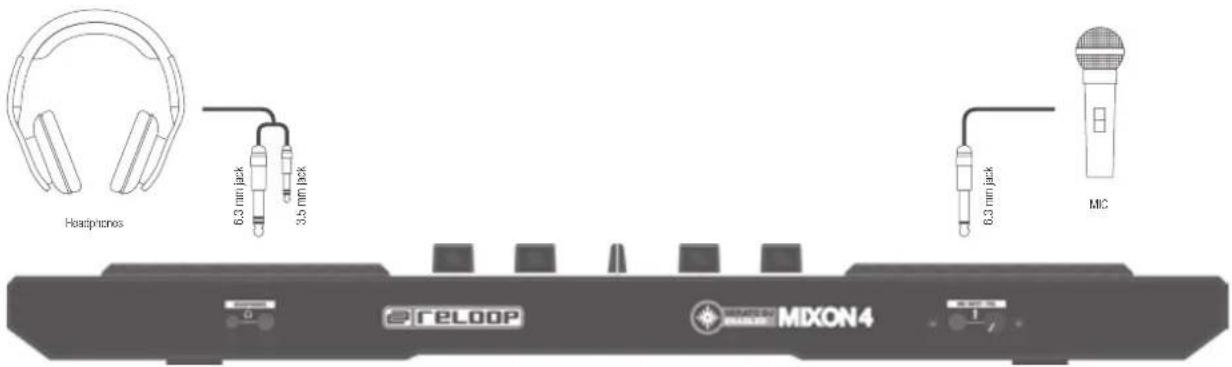
- Connect your output devices (headphones, speakers, etc.) to the Mixon 4. Audio output takes place via the master output (XLR and RCA) and the booth output.
- Connect your input devices (microphone) to the Mixon 4. The microphone input takes place directly on the master channel.
- Make sure that the Mixon is turned off and that the master and booth faders are in the 'min' position.
- Connect all devices to a power outlet and turn them all on.
- If you wish to use the Mixon 4 with Serato, please refer to the installation instruction further below for your next steps. If you wish to use djay, please also refer to the installation instruction further below for your next steps.
text_image
Headphones 6.3 mm jack 3.5 mm jack 6.3 mm jack MIC RELOOP MIXON4 MXON 4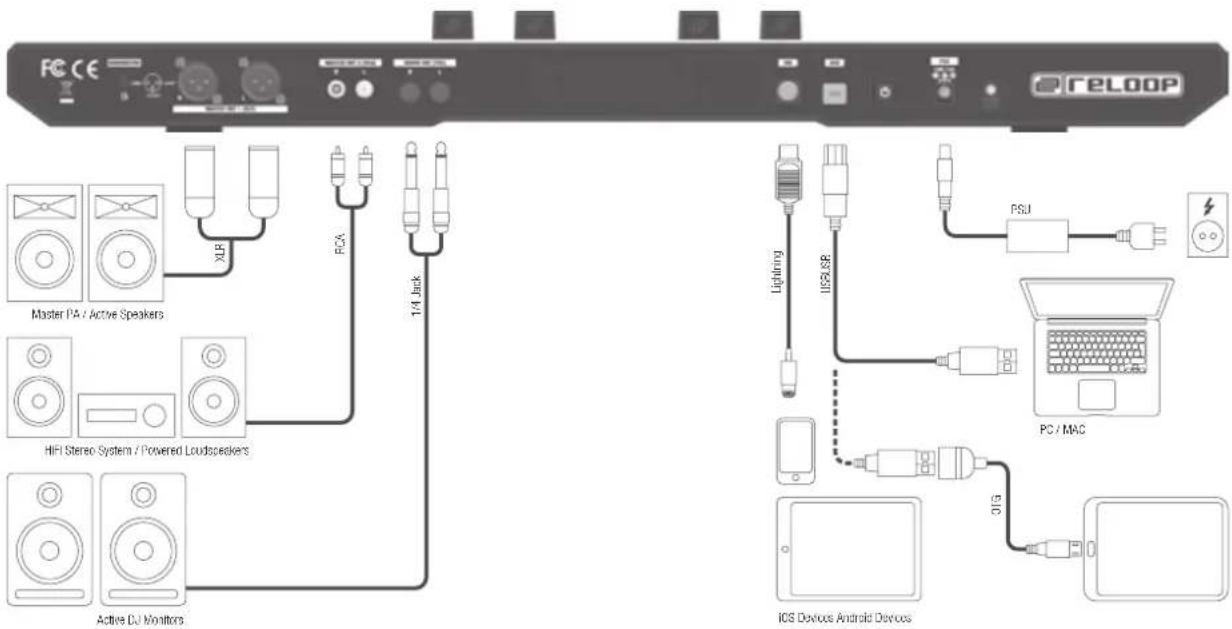
text_image
FCC CE Master PA / Active Speakers HIFI Stereo System / Powered Loudspeakers Active DJ Monitors XLR PCA 1/4 Back PSU Lightning IUSB SP PC / MAC 31G iOS Devices Android DevicesHOW TO INSTALL SERATO DJ ON MAC OS X
- Head to the http://serato.com/dj/downloads and choose "Download Serato DJ for Mac".
- Verify your account if not already logged into Serato.com, as per the example below, and click "Continue";
- You should see a blue banner near the top of your web browser page indicating the SeratoDJ---.dmg file has started downloading, as per the example below. Once this is down, locate the downloaded file and double-click it to start the process.
- Read the terms and conditions that appear, and click "Agree" when you're ready;
- Drag and drop the Serato DJ icon onto your 'Applications' folder icon to begin the installation
HOW TO INSTALL SERATO DJ ON WINDOWS
- Head to the http://serato.com/dj/downloads and choose "Download Serato DJ for Win".
- Verify your account if not already logged into Serato.com, as per the example below, and click "Continue";
- You should see a blue banner near the top of your web browser page indicating the SeratoDJ---.zip file has started downloading, as per the example below.
- The Windows installer for Serato DJ comes in a 'archived' zip file, which can be opened with Windows' Explorer, which has archive capabilities, or your favourite third-party archive manager, such as Winzip or 7zip.
- If using the Windows Explorer method, you can double-click the downloaded zip file, and you'll see the SeratoDJ executable.
- If using a third-party archive manager, such as Winzip or 7zip, you can simply right-click, and choose from the context sensitive menu options, and select "Extract Here", which will extract the Serato DJ executable file into the folder where you chose to download the original file;
- Double-click the resulting Serato DJ exe file from the archive, after extracting or opening the archive to initiate the setup process for Serato DJ. You will be met with the terms and conditions, which you can read, then check the "I agree to the license terms and conditions" tick box, and click "Install";
- It is necessary to install an ASIO driver under Windows: Go to www.reloop.com/mixon-4#download, download the ASIO driver, execute the downloaded driver file and install the driver by stepping through the installation.
DJAY PRO / DJAY2 (IPAD / IPHONE) INSTALLATION
The Mixon 4 supports the djay 2 app as well as the djay Pro app. Both can be purchased in the App Store as follows:
- Purchase and download your preferred app from the App Store.
- Place your iPad/iPhone in the docking station of your Mixon 4 and make sure that the Mixon 4 is turned off.
- Connect the included iOS Connection Cable to the Lightning connection of your iOS device and to the iOS connection on the rear panel of your Mixon 4. Make sure that the Mixon 4 is not connect via USB to any other device.
- Turn on the Mixon 4 and open the previously downloaded app djay 2 / djay Pro.
Your Mixon 4 will be recognized automatically and is ready for use. Your iOS device is now also being supplied with power.
NOTE: If you have a Spotify Premium Account, you can connect it to the djay 2 / djay Pro app to gain access to millions of tracks within you app. In order to use Spotify you always need an active internet connection.
DJAY 2 (ANDROID) INSTALLATION
If you wish to use an Android device with your Mixon 4, please check first whether your device is compatible. A list with all supported devices can be found on www.reloop.com
- Purchase and download the day 2 app from the Google PlayStore.
- Place your tablet in the docking station of your Mixon 4 and make sure that the Mixon 4 is turned off.
- Connect the included USB cable to the also included OTG cable. Then connect the Mixon 4 to your Android device, just as described on the connection drawing. Make sure that the iOS connection cable is not connected to the Mixon 4.
- Turn on the Mixon 4 and open the previously downloaded djay 2 app.
Your Mixon 4 will be recognized automatically and is ready for use. Please note that due to the Android architecture, your tablet/smartphone cannot be charged.
NOTE: If you have a Spotify Premium Account, you can connect it to the djay 2 / djay Pro app to gain access to millions of tracks within you app. In order to use Spotify you always need an active Internet connection.
FEATURES

text_image
reloop MXON4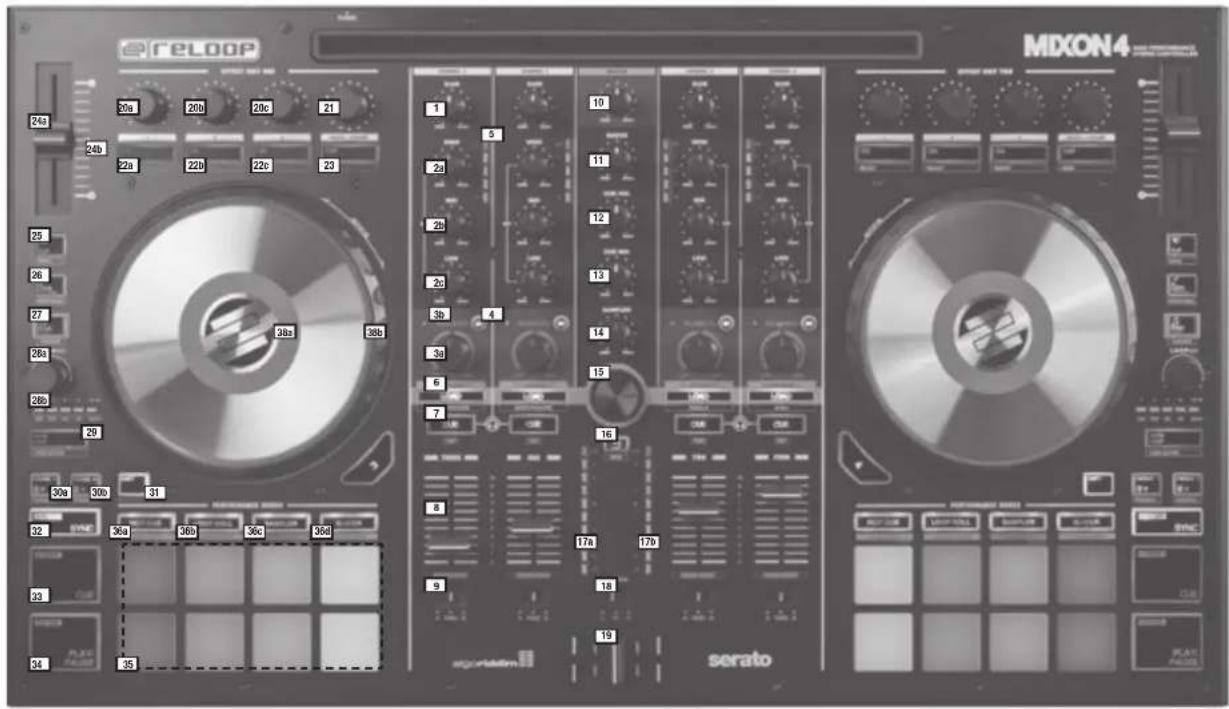
text_image
reLOOP MXON4 24a 20a 20b 20c 21 24b 22a 22b 22c 23 1 5 10 2a 2b 11 2b 2c 12 3b 4 13 3a 14 6 15 7 16 30a 30b 31 32 36a 36b 36c 36d 33 34 35 9 17a 17b 18 19 serato
text_image
FECE 29b 29b 40 41 42 46 RELOOP1: Requires Serato Pitch in Time plugin.
*2: Requires Sarato Flip Expansion Pack
| NO. CONTROL / ELEMENT SERATODJ DJAY PRO | |||
| 1 GAIN Adjusts channel gain Adjusts channel gain | |||
| 2a EQ HI Adjust high frequency for channels Adjust high frequency for channels | |||
| 2b EQ MID Adjust mid frequency for channels Adjust mid frequency for channels | |||
| 2c EQ LOW Adjust low frequency for channels Adjust low frequency for channels | |||
| 3a | FILTER | Turn left for low pass filter. Turn right for high pass filter effect | Turn left for low pass filter. Turn right for high pass filter effect |
| 3b | FILTER LED | LED lights up when Channel Filter is active | LED lights up when Channel Filter is active |
| 4 MacroFX | Adds an effect to the filter control.The MacroFX is automatically linked to the FX slot 1 of each unit.Decks 1/3 are linked to FX unit 1 (M1).Decks 2/4 are linked to FX unit 2 (M2).When turning the filter knob, the FX depth is being controlled simultaneously. | Adds an effect to the filter control.The MacroFX is automatically linked to the FX slot 1 of each unit.Decks 1/3 are linked to FX unit 1 (M1).Decks 2/4 are linked to FX unit 2 (M2).When turning the filter knob, the FX depth is being controlled simultaneously. | |
| 5 | CHANNEL PFL LED | Indicates volume level of channel via LED lights | Indicates volume level of channel via LED lights |
| 6 LOAD | Load selected track from library to deck. Instant Doubles by double click | Load selected track from library to deck. | |
| SHIFT + 6 | LOAD PREPAREOPEN PREPAREPANELSAREA | Controls different library sections:-> SHIFT+LOAD CH3: Load selected track into prepare list-> SHIFT+LOAD CH1: Opens/closes prepare crate area-> SHIFT+LOAD CH2: Cycles between available SDJ panels (FX, SP-6, Rec etc.)-> SHIFT+LOAD CH4: Cycles between Areas (Files, Browse etc.) | Controls various library sections:-> SHIFT+LOAD CH3: Loads the selected track in the queue list *3-> SHIFT+LOAD CH1: Opens/closes the queue list.*3-> SHIFT+LOAD CH2: Switches between the different deck views-> SHIFT+LOAD CH4: Switches between the different library sources (iTunes/Spotify/Video/History/Finder) |
| 7 | PFL CUE | Routes selected channel through cue channel. (Pre-listen channel) | Routes selected channel through cue channel. (Pre-listen channel) |
| SHIFT + 7 | TAP | Hold SHIFT and tap to the beat to adjust the track BPM manually. | Hold SHIFT and tap to the beat to adjust the track BPM manually. |
| 8 CHANNEL FADER | Adjusts channel volume | Adjusts channel volume | |
| SHIFT + 8 | FADER START | Automatically plays track from the current position when fader is moved up. When fader is moved down, playhead returns to floating cue point position and stops. | Automatically plays track from the current position when fader is moved up. When fader is moved down, playhead returns to floating cue point position and stops. |
| 9 | CF ASSIGNMENT | Assigns channel to either left or right of crossfader | Assigns channel to either left or right of crossfader |
| 10 | MASTER VOL | Controls master output volume (no. 39A, &39b) | Controls master output volume (no. 39A, &39b) |
| 11 | BOOTH VOL | Controls booth output volume (no. 40) | Controls booth output volume (no. 40) |
| 12 | PHONES VOL | Adjusts cue volume (Headphones / no. 45) | Adjusts cue volume (Headphones / no. 45) |
| 13 | CUE MIX | Blends between cue and master signals for pre-listening | Blends between cue and master signals for pre-listening |
| 14 SAMPLER VOL | Adjusts master volume of sampler output | Adjusts master volume of sampler output | |
| 15 | TRAX (turn) | Scrolls through itmes in currently focused list / selection | Opens library and scrolls through itmes in currently focused list / selection |
| SHIFT + 15 | TRAX (turn) | Scrolls through itmes in currently focused panel faster | Switches between the different library tabs. |
| 15 | TRAX (press) | Moves focus to next area of library or panel | Opens library and/or moves focus to next area of library or panel |
| 16 | BACK | Moves focus to previous area of library or panel | Closes library and/or moves focus to previous area of library or panel |
| SHIFT + 16 | VIEW | Cycles between available views | Enlarges the playlist view. |
| 17a | MST LED LEFT | Indicates master output level of left channel | Indicates master output level of left channel |
| 17b | MST LED RIGHT | Indicates master output level of right channel | Indicates master output level of right channel |
| 18 | CF CURVE | Determines curve of crossfader between cut and smooth slope | Determines curve of crossfader between cut and smooth slope |
| 19 | CROSSFADER | Fades between channels assigned to the left or right of crossfader | Fades between channels assigned to the left or right of crossfader |
| 20a | FX1-knob | ||
| Single FX | -> Adjusts FX parameter (FX depth) | -> N/A | |
| Multi FX | -> Adjusts FX depth of FX slot 1 | -> Adjusts dry/wet of FX slot 1 | |
| SHIFT + 20a | FX Select | N/A | |
| Single FX | -> Selects effect for FX unit | ||
| Multi FX | -> Selects effect for FX unit / Slot 1 | ||
| 20b | FX2-knob | ||
| Single FX | -> Adjusts FX parameter | -> N/A | |
| Multi FX | -> Adjusts FX depth of FX slot 2 | -> Adjusts dry/wet of FX slot 2 | |
| SHIFT + 20b | FX Select | N/A | |
| Single FX | -> N/A | ||
| Multi FX | -> Selects effect for FX unit / Slot 2 | ||
| 20c | FX3-knob | ||
| Single FX | -> Adjusts FX parameter | -> N/A | |
| Multi FX | -> Adjusts FX depth of FX slot 3 | -> Adjusts dry/wet of FX slot 3 | |
| SHIFT + 20c | FX Select | N/A | |
| Single FX | -> N/A | ||
| Multi FX | -> Selects effect for FX unit / Slot 3 | ||
| 21 BEATS / PARAMETER (turn) | Controls beats multiplier value for DJ-FX | Adjusts parameter for FX slots 1-3 | |
| 21 BEATS / PARAMETER (press) | Resets beats multiplier to value 1/1 | Sets the parameter of FX Slot 1-3 to its original value. | |
| 22a | FX1 ON | ||
| Single FX | -> Enables effect on or off | -> N/A | |
| Multi FX | -> Enables effect 1 on or off | -> Enables effect 1 on or off | |
| SHIFT + 22a | SELECT | Cycles down through the Effect Slot menus for FX slot 1 | Cycles down through the Effect Slot menus for FX slot 1 |
| 22b | FX2 ON | ||
| Single FX | -> Dis-/Enables various parameters | -> N/A | |
| Multi FX | -> Enables effect 2 on or off | -> Enables effect 2 on or off | |
| SHIFT + 22b | SELECT | Cycles down through the Effect Slot menus for FX slot 2 | Cycles down through the Effect Slot menus for FX slot 2 |
| 22c | FX3 ON | ||
| Single FX | -> Dis-/Enables various parameters | -> N/A | |
| Multi FX | -> Enables effect 3 on or off | -> Enables effect 3 on or off | |
| SHIFT + 22c | SELECT | Cycles down through the Effect Slot menus for FX slot 3 | Cycles down through the Effect Slot menus for FX slot 3 |
| 23 | TAP | Manually taps FX tempo for FX unit. Reset when held. | Activates FX Slot 1-3 as long as the button is being held. When released, the FX Slot 1-3 will deactivate. |
| SHIFT + 23 | MODE | Toggles between controlling/displaying Single or Multi FX modes | Sets a beatgrid marker at the current track position. |
| 24a | PITCH | Determines tempo of track | Determines tempo of track |
| 24b | PITCH LED | Lit when PITCH-fader is in 0% position | Lit when PITCH-fader is in 0% position |
| 25 SLIP | Enables Slip-mode on or off. When Slip-mode is active after various actions (e.g.: cue points or scratches) playback will continue at the point to where it would have been if you had not done anything. | Enables Slip-mode on or off. When Slip-mode is active after various actions (e.g.: cue points or scratches) playback will continue at the point to where it would have been if you had not done anything. | |
| SHIFT + 25 VINYL | Toggle between vinyl (touch sensitive scratch) and jog mode (only pitch bend) for platter. (-no. 38a) | Toggle between vinyl (touch sensitive scratch) and jog mode (only pitch bend) for platter. (-no. 38a) | |
| 26 KEY LOCK | Enables keylock on or off. When button is long pressed, tempo will be reseted. | Enables keylock on or off. When button is long pressed, tempo will be reseted. | |
| SHIFT + 26 | PITCH RANGE | Toggles between available pitch ranges. | Toggles between available pitch ranges. |
| 27 KEY SYNC*1 | Activate key sync to match the key of the current deck to the opposite one (harmonic mixing).When button is held, keys can be shifted with PARAMETER +/- buttons. When the button pressed quickly twice, the key will jump back to the root key. | Activate key sync to match the key of the current deck to the opposite one (harmonic mixing).When the button pressed quickly twice, the key will jump back to the root key. | |
| SHIFT + 27 | CENSOR Puts playhead in reverse for the period of time the button is held. Once the button is released, the playback will continue at the point to where it would have been if you had not done anything. | Puts playhead in reverse for the period of time the button is held. Once the button is released, the playback will continue at the point to where it would have been if you had not done anything. | |
| 28a | LOOP LENGTH | Halves/Doubles the loop length | Halves/Doubles the loop length |
| SHIFT + 28a | LOOP SHIFT | Loop is shifted to the left or right. | Loop is shifted to the left or right. |
| 28b | LOOP LENGTH LED | Displays the current selected loop length:1/32 -> LED 1 flashing1/16 -> LED 2 flashing1/8 -> LED 3 flashing1/4 -> LED 4 flashing1/1 -> LED 1 Lit2/1 -> LED 2 Lit4/1 -> LED 3 Lit8/1 -> LED 4 Lit16/1 -> LED 5 Lit32/1 LED 1-5 Lit | Displays the current selected loop length:1/32 -> LED 1 flashing1/16 -> LED 2 flashing1/8 -> LED 3 flashing1/4 -> LED 4 flashing1/1 -> LED 1 Lit2/1 -> LED 2 Lit4/1 -> LED 3 Lit8/1 -> LED 4 Lit16/1 -> LED 5 Lit32/1 LED 1-5 Lit |
| NO. CONTROL / ELEMENT SERATODJ DJAY PRO | |||
| 29 | AUTO LOOP | Enables an auto loop with the currently selected size. (-> no. 28b) | Enables an auto loop with the currently selected size. (-> no. 28b) |
| SHIFT + 29 | LOOP ACTIVE | Enables currently selected saved loop or previously active loop | Enables currently selected saved loop or previously active loop |
| 30a | PARAMETER 1- | Controls parameter function depending on active mode. (Decrease) | The track jumps back by one bar (quantized). |
| 30a | PARAMETER 2- Controls second layer parameter function depending on active mode. | Shifting key value on track by one semitone down each time button is pressed. | |
| SHIFT | (Decrease) | The track jumps forward by one bar (quantized). | |
| 30b | PARAMETER 1+ | Controls parameter function depending on active mode. (Increase) | Shifting key value on track by one semitone up each time button is pressed. |
| 30b | PARAMETER 2+ Controls second layer parameter function depending on active mode. | ||
| SHIFT | (Increase) | ||
| 31 | SHIFT | Enables 2nd layer functions as indicated on the controller. | Enables 2nd layer functions as indicated on the controller. |
| 32 SYNC Enables sync (Tempo) | De/-Enables sync (Tempo) | ||
| SHIFT + 32 SYNC OFF | Disables sync | N/A | |
| 33 | CUE | During playback: Track will return to temporary cue point and stop.During pause: A new temporary cue point will be set at the current position. When the cue button is pressed again, the temporary cue will be playback as long as cue is held. | During playback: Track will return to temporary cue point and stop.During pause: A new temporary cue point will be set at the current position. When the cue button is pressed again, the temporary cue will be playback as long as cue is held. |
| SHIFT + 33 | GO TO BEG | When pressed, playhead returns to the beginning of the track.Loads previous track when pressed within the 1sec of a track. | When pressed, playhead returns to the beginning of the track. |
| 34 PLAY/PAUSE | Activate playback / pause | Activate playback / pause | |
| SHIFT + 34 | STUTTER | Triggers the temporary cue and the playhead will continue from that point. | Triggers the temporary cue and the playhead will continue from that point. |
| 35 | Performance PADs | Colour-coded, velocity-sensitive drum pad section | Colour-coded, velocity-sensitive drum pad section |
| 36a HOT CUE-mode | Triggers the available 8 cue points per deck.The Hot Cue colours can be customized in the software and the pads will reflect this colour accordingly.Parameter buttons perform Flip functions*2:Play, Record, Loop, On/OffWhen Hot Cue-button is pressed for 2sec, Quantize-mode will be toggled on or off. | Triggers the available 8 cue points per deck. The cue point color will be displayed on pad. | |
| 36a CUE LOOP-mode | Triggers the available 8 cue points per deck and creates an auto loop in the currently selected loop size (starting from the cue point position). Parameter buttons halve and double loop size. | Activates an instant effect that has not to be selected first. Each pad (1-5) holds a different instant effect. | |
| 36b LOOP ROLL-mode | Each pad enables/disables a loop roll when holding a drum pad. Each pad is assigned to a specific loop length from 1/32 - 4/1. | Each pad enables/disables a loop roll. The loop roll size is fixed to a pre-determined length. | |
| 36b | SAVED LOOP-mode | You can save up to 8 loops. Each pad represents one loop slot. To save a loop, set an auto loop and press an empty pad. To activate a saved loop, press a loaded pad slot. Deactivate it by pressing once again. Redrigger the saved loop by holding shift and hitting the pad. | Each pad enables/disables an auto loop. The loop size is fixed to a pre-determined length. |
| 36c SAMPLER-mode | Pads 1-6 trigger the 6 available sample slots. Shift - Pad stops the sample. With the parameter buttons you can switch through the sample banks A,B,C,D.When SAMPLER-mode button is pressed for 2sec, PAD VELOCITY & AFTERTOUCH is enabled and the samples can be triggered at different volumes corresponding to the pressure hit. | Pads 1-6 trigger the 6 available sample slots. Shift + Pad stops the sample. Sampler-mode on the left deck controls samples 1-6. Sampler-mode on the right deck controls samples 7-12.When SAMPLER-mode button is pressed for 2sec, PAD VELOCITY & AFTERTOUCH is enabled and the samples can be triggered at different volumes.Note: Sampler View is only available 2-deck view. | |
| SHIFT + 36c | OPEN SAMPLER VIEW | Opens Sampler view. | Opens Sampler view. |
| 36c PITCH PLAY-mode | In conjunction with Pitch 'n Time DJ, allows you to play your cues across a range of different keys. There are 3 key ranges to choose from. To toggle between key ranges press the left or right PARAM 1 buttons. The root key pad (0) is always lit white, which will play the cue point at its regular pitch. When in Pitch Play mode, pressing a pad will pitch the currently selected cue point up or down the ranges. To select a different Hot Cue point, hold shift and select a different pad (Hot Cue). *1 | PITCH PLAY-mode allows you to play your cues across a range of different keys. There are 3 key ranges to choose from. To toggle between key ranges press the left or right PARAM 1 buttons. The root key pad (0) is always lit white, which will play the cue point at its regular pitch. When in Pitch Play mode, pressing a pad will pitch the currently selected cue point up or down the ranges. To select a different Hot Cue point, hold shift and select a different pad (Hott Cue). | |
| 36d SLICER-mode | When slicer is enabled, a specified range (or domain) of a track is divided into eight equal sections, and these eight sliced sections are assigned to the respective performance pads. When the playhead reaches the end of the domain, it moves beyond the current domain and creates a new domain area. | When slicer is enabled, a specified range (or domain) of a track is divided into eight equal sections, and these eight sliced sections are assigned to the respective performance pads. When the playhead reaches the end of the domain, it moves beyond the current domain and creates a new domain area. | |
| 36d SLICER LOOP-mode | When slicer is enabled, a specified range (or domain) of a track is divided into eight equal sections, and these eight sliced sections are assigned to the respective performance pads. When playhead reaches the end of the domain, it returns to the start of the domain and loops this groove. | When slicer is enabled, a specified range (or domain) of a track is divided into eight equal sections, and these eight sliced sections are assigned to the respective performance pads. When playhead reaches the end of the domain, it returns to the start of the domain and loops this groove. | |
| 37 | DECK | Switches deck related controls between deck 1/3 and deck 2/4. | Switches deck related controls between deck 1/3 and deck 2/4. |
| 38a | JOG-WHEEL | When Jog Touch (-> SHIFT + no. 25) is enabled, touching platter will hold playhead (or scratch). Also pitch bend is possible by nudging the rim. When Jog Touch is off (-> SHIFT + no. 25), turning the platter will pitch bend the deck only. | When Jog Touch (-> SHIFT + no. 25) is enabled, touching platter will hold playhead (or scratch). Also pitch bend is possible by nudging the rim. When Jog Touch is off (-> SHIFT + no. 25), turning the platter will pitch bend the deck only. |
| SHIFT + 38a | JOG SKIP | Performers a needle search/fast scroll through track | Performers a needle search/fast scroll through track |
| 38b JOG LED RING | The JogWheel illumination shows the floating playhead position.(Virtual needle position). | The JogWheel illumination shows the floating playhead position.(Virtual needle position). | |
| SHIFT + 38b | JOG LED RING | While holding shift, the JogWheel illumination shows the elapsed track time. | While holding shift, the JogWheel illumination shows the elapsed track time. |
| 39a MST OUT (XLR) | Master Volume Output (XLR) -> Controlled by no. 10 | ||
| 39b | MST OUT (RCA) | Master Volume Output (RCA) -> Controlled by no. 10 | |
| 40 BOOTH OUT (RCA) | Booth Volume Output -> Controlled by no. 10Same output as for Master out | ||
| NO. CONTROL / ELEMENT SERATODJ DJAY PRO | |||
| 41 iOS CONNECTION Connection for iPad/iPhone device | |||
| Only lightning generation is supportedIOS device will be charged through the controllerUSB and IOS can't be used at the same time. Only one connection can be active. | |||
| 42 USB INPUT USB connection to PC/MAC | |||
| 43 HEADPHONES OUT 3,5 mm & 6,3 mm Output | |||
| 44 MIC INPUT Microphone Input 6,3 mm. The audio signal from the microphone is routed directly to the master output. | |||
| 45 MIC VOL Microphone Input GAIN adjust | |||
| 46 POWER Power On/Off. Device requires external power supply. | |||
*3: Only available for clay Pro (Mac Edition)
Reloop also offers support for third-party suppliers such as VirtualDJ and Traktor Pro. ASIC drivers, firmware updates and current mappings can be downloaded under www.reloop.com
MINIMUM SYSTEM REQUIREMENTS
Mac:
• Mac OS X 10.9.+ / 10.10.+ / 10.11.+ (check serato.com / algoriddim.com for updates on OS)
• 32 bit/64 bit: i3 / i5 / i7 with min. 1.07 GHz
- minimum 4 GB RAM (If you have a large library, you will benefit from having more RAM)
- 5 GB free HDD space
• Min. screen resolution 1280*720
• Available USB 2.0 port
- Download latest Serato DJ / djay PRO versions on serato.com / algoriddim.com
Windows:
- Windows 7 / 8.1 / 10 (check serato.com for updates on OS)
• 32 bit/64 bit: i3 / i5 / i7 with min. 1.07 GHz
• AMD processors are not recommended and officially not supported - minimum 4 GB RAM (If you have a large library, you will benefit from having more RAM)
- 5 GB free HDD space
• Min. screen resolution 1280*720
• Available USB 2.0 port - Download latest Serato DJ / djay PRO versions on serato.com / algoriddim.com
iOS:
- iOS device (iPad or iPhone generation 4 or higher) with 8-Pin Lightning connection
- iOS 8 or higher (check algoriddim.com for updates on OS)
• Download latest djay 2 / djay PRO version from the App Store - Note: IOS devices will be charged when connected
Android:
- Compatible Android device (check reloop.com for further compatibility details)
- Android 5 or higher (check algoriddim.com for updates on OS)
- Download latest djay 2 version from the Google Play Store
• Google Nexus series recommended
• Note: Android Devices will not be charged via OTG
"Requires Serato DJ Pitch 'n' Time expansion pack
**Requires Sensia RIP expansion pack
**Note: A Spotify Premium subscription and an Internet connection is required to access the Spotify music catalog from day 4. A 7 day FREE trial of Spotify Premium is available to all day 2 / Pro users.
Mac. iOS, iPhone. iPad and OS X are trademarks of Apple Inc., registered in the U.S. and other countries.
Windows is a registered trademark of Microsoft Corporation in the United States and other countries.
Intel (3/5/7) and Intel Core are trademarks of Intel Corporation in the U.S. and other countries.
Seralo, Seralo DJ and the Seralo logo are registered trademarks of Seralo Audio Research
day is a registered trademark of algoridim GmbH.
TECHNICAL SPECIFICATIONS
| MEASUREMENT ITEM MEASUREMENT SIGNAL VR VOLUME SPECIFICATION REMARKS | ||
| Output Level | MASTER OUT (RCA) MIN 2.0 ± 0.2 V 0dB,1kHz No audio from PC, No Microphone Input | |
| BOOTH OUT MIN 2.0 ± 0.2 V 0dB,1kHz, No audio from PC, No Microphone Input | ||
| MASTER OUT BALANCED MIN 3.9 ± 0.2 V 0dB,1kHz, No audio from PC, No Microphone Input | ||
| HEADPHONE MIN 1.5 V ± 0.2V | 0dB,1kHz, No audio from PC, No Microphone InputHeadphone (load32Ω) | |
| MIC (RCA) MAX 1.5 ± 0.1 V | No audio from PC,+ 3mV Vrms MicrophoneInput,50-ohm UnbalancedAP audio generator output | |
INDEX
text_image
FCC CE Master PA / Active Speakers HIFI Stereo System / Powered Loudspeakers Active DJ Monitors XLR PCA 1/4 Back reLOOP Lightning I/USB SP PSU PC / MAC 31G iOS Devices Android DevicesSERATO DJ INSTALLATION FÜR MAC OS X
text_image
Technical diagram of a CD-ROM drive system with labeled components and part numbersNO. CONTROL / ELEMENT SERATODJ DJAY PRO
Mac. iOS, Phonic. iPad and OS X are trademarks of Apple Inc., registered in the U.S. and other countries.
Windows is a registered trademark of Microsoft Corporation in the United States and other countries.
Intel (3/15/7) and Intel Core are trademarks of Intel Corporation in the U.S. and other countries.
Seralo, Seralo DJ and the Seralo logo are registered trademarks of Seralo Audio Research
day is a registered trademark of algoridim GmbH.
TECHNISCHE DATEN
| MEASUREMENT ITEM MEASUREMENT SIGNAL VR VOLUME SPECIFICATION REMARKS | ||
| Output Level | MASTER OUT (RCA) MIN 2.0 ± 0.2 V 0dB,1kHz No audio from PC, No Microphone Input | |
| BOOTH OUT MIN 2.0 ± 0.2 V 0dB,1kHz, No audio from PC, No Microphone Input | ||
| MASTER OUT BALANCED MIN 3.9 ± 0.2 V 0dB,1kHz, No audio from PC, No Microphone Input | ||
| HEADPHONE MIN 1.5 V ± 0.2V | 0dB,1kHz, No audio from PC, No Microphone InputHeadphone (load32Ω) | |
| MIC (RCA) MAX 1.5 ± 0.1 V | No audio from PC,+ 3mV Vrms MicrophoneInput,50-ohm UnbalancedAP audio generator output | |
INDEX
18...... CONSIGNES DE SÉCURITÉ
18..... UTILISATION CONFORME
18.....ENTRETIEN
19......FOURNITURE
19.... CONFIGURATION ET CONNECTIQUE
20....INSTALLATION DE SERATO DJ POUR MAC OS X
20.... INSTALLATION DE SERATO DJ POUR WINDOWS
20.... INSTALLATION DJAY PRO / DJAY2 (IPAD / IPHONE)
20...... INSTALLATION DJAY2 (ANDROID)
21...... FONCTIONS
text_image
Headphones 6.3 mm jpk 3.5 mm jpk 6.3 mm jpk MIC RELOOP MELON4 MDXON 4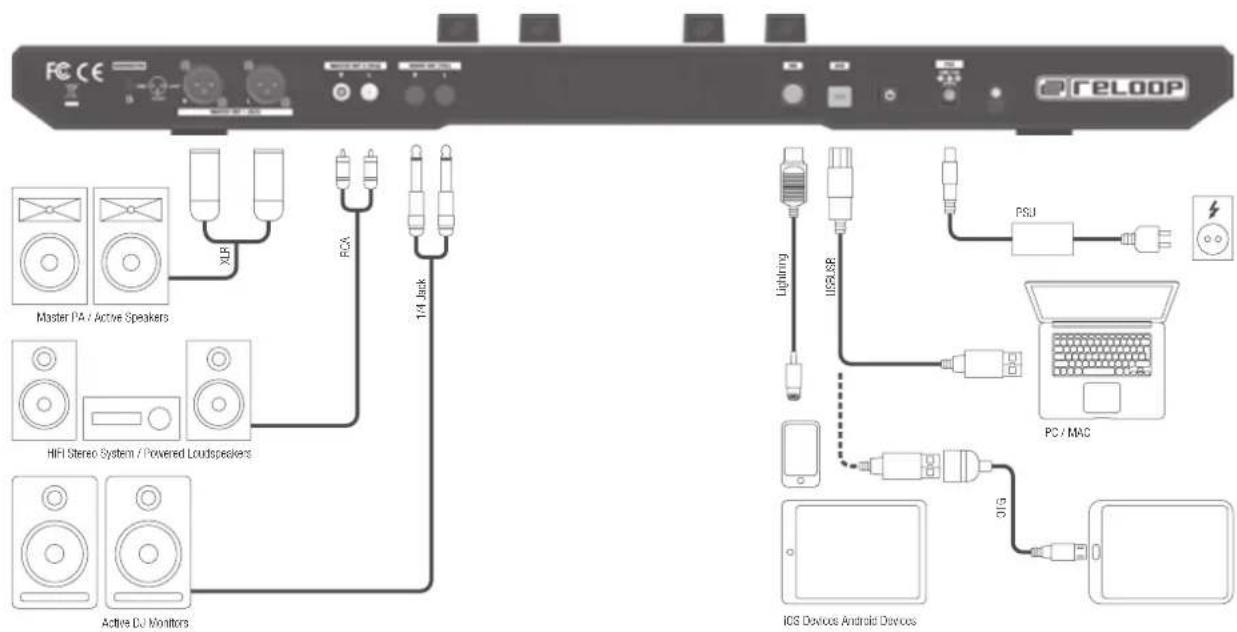
text_image
FC CE ReLOOP Master PA / Active Speakers HIFI Stereo System / Powered Loudspeakers Active DJ Monitors XLR RCA 1/4 Back Lightning IUSLSP PSU PC / MAC 01G iOS Devices Android DevicesINSTALLATION DE SERATO DJ POUR MAC OS X
Mac. iOS, iPhone. iPad and OS X are trademarks of Apple Inc., registered in the U.S. and other countries.
Windows is a registered trademark of Microsoft Corporation in the United States and other countries.
Intel (03/15/17) and Intel Core are trademarks of Intel Corporation in the U.S. and other countries.
Seralo, Seralo DJ and the Seralo logo are registered trademarks of Seralo Audio Research
djay is a registered trademark of algoridim GmbH.
CARACTÉRISTIQUES
| MEASUREMENT ITEM MEASUREMENT SIGNAL VR VOLUME SPECIFICATION REMARKS | |||
| MASTER OUT (RCA) MIN 2.0 ± 0.2 V 0dB,1kHz No audio from PC, No Microphone Input | |||
| BOOTH OUT MIN 2.0 ± 0.2 V 0dB,1kHz, No audio from PC, No Microphone Input | |||
| MASTER OUT BALANCED MIN 3.9 ± 0.2 V 0dB,1kHz, No audio from PC, No Microphone Input | |||
| Output Level | HEADPHONE MIN 1.5V ± 0.2V | 0dB,1kHz, No audio from PC, No Microphone InputHeadphone (load32Ω) | |
| MIC (RCA) | MAX 1.5 ± 0.1 V | No audio from PC,+ 3mV Vrms MicrophoneInput,50-ohm UnbalancedAP audio generator output | |
INDEX
text_image
FCC CE Master PA / Active Speakers HIFI Stereo System / Powered Loudspeakers Active DJ Monitors XLP RCA 1/4 Back Lightning I/RSI SR PSU PC / MAC 31G ICS Devices Android DevicesCÓMO INSTALAR SERATO DJ EN MAC OS X
Mac. iOS, iPhone. iPad and OS X are trademarks of Apple Inc., registered in the U.S. and other countries.
Windows is a registered trademark of Microsoft Corporation in the United States and other countries.
Intel (03/15/17) and Intel Core are trademarks of Intel Corporation in the U.S. and other countries.
Seralo, Seralo DJ and the Seralo logo are registered trademarks of Seralo Audio Research
djay is a registered trademark of algoridim GmbH.
DATOS TÉCNICOS
| MEASUREMENT ITEM MEASUREMENT SIGNAL VR VOLUME SPECIFICATION REMARKS | ||
| Output Level | MASTER OUT (RCA) MIN 2.0 ± 0.2 V 0dB,1kHz No audio from PC, No Microphone Input | |
| BOOTH OUT MIN 2.0 ± 0.2 V 0dB,1kHz, No audio from PC, No Microphone Input | ||
| MASTER OUT BALANCED MIN 3.9 ± 0.2 V 0dB,1kHz, No audio from PC, No Microphone Input | ||
| HEADPHONE MIN 1.5 V ± 0.2V | 0dB,1kHz, No audio from PC, No Microphone InputHeadphone (load32Ω) | |
| MIC (RCA) MAX 1.5 ± 0.1 V | No audio from PC,+ 3mV Vrms MicrophoneInput,50-ohm UnbalancedAP audio generator output | |
NOTES

WARNUNG!
To prevent fire or avoid an electric shock do not expose the device to water or fluids! Never open the housing!
ATTENTION!
Keep information for further reference!