
Midnight 45 - Oven Haeger - Free user manual and instructions
Find the device manual for free Midnight 45 Haeger in PDF.
| Product Type | Electric oven |
| Brand | Haeger |
| Model | Midnight 45 |
| Capacity | 42 liters |
| Power | 1800 W |
| Voltage | 230 V ~ 50 Hz |
| Dimensions (L × D × H) | 578 × 400 × 376 mm |
| Weight | 8.5 kg |
| Temperature range | 100 °C to 230 °C |
| Timer | Up to 60 minutes, automatic shut-off |
| Cooking functions | Top heat, bottom heat, top+bottom heat, convection (air flow), rotisserie (depending on model) |
| Included accessories | Grid, tray, handle for grid/tray, rotisserie spit with handle (depending on model) |
| Door material | Tempered glass |
| Interior light | Yes, turns on with the timer |
| Cleaning | Soft damp cloth; do not immerse; do not use abrasive products |
| Safety | Automatic shut-off, hot surface (caution burn), do not open the housing |
| Energy class | Not specified |
Frequently Asked Questions - Midnight 45 Haeger
User questions about Midnight 45 Haeger
0 question about this device. Answer the ones you know or ask your own.
Ask a new question about this device
Download the instructions for your Oven in PDF format for free! Find your manual Midnight 45 - Haeger and take your electronic device back in hand. On this page are published all the documents necessary for the use of your device. Midnight 45 by Haeger.
USER MANUAL Midnight 45 Haeger
natural_image
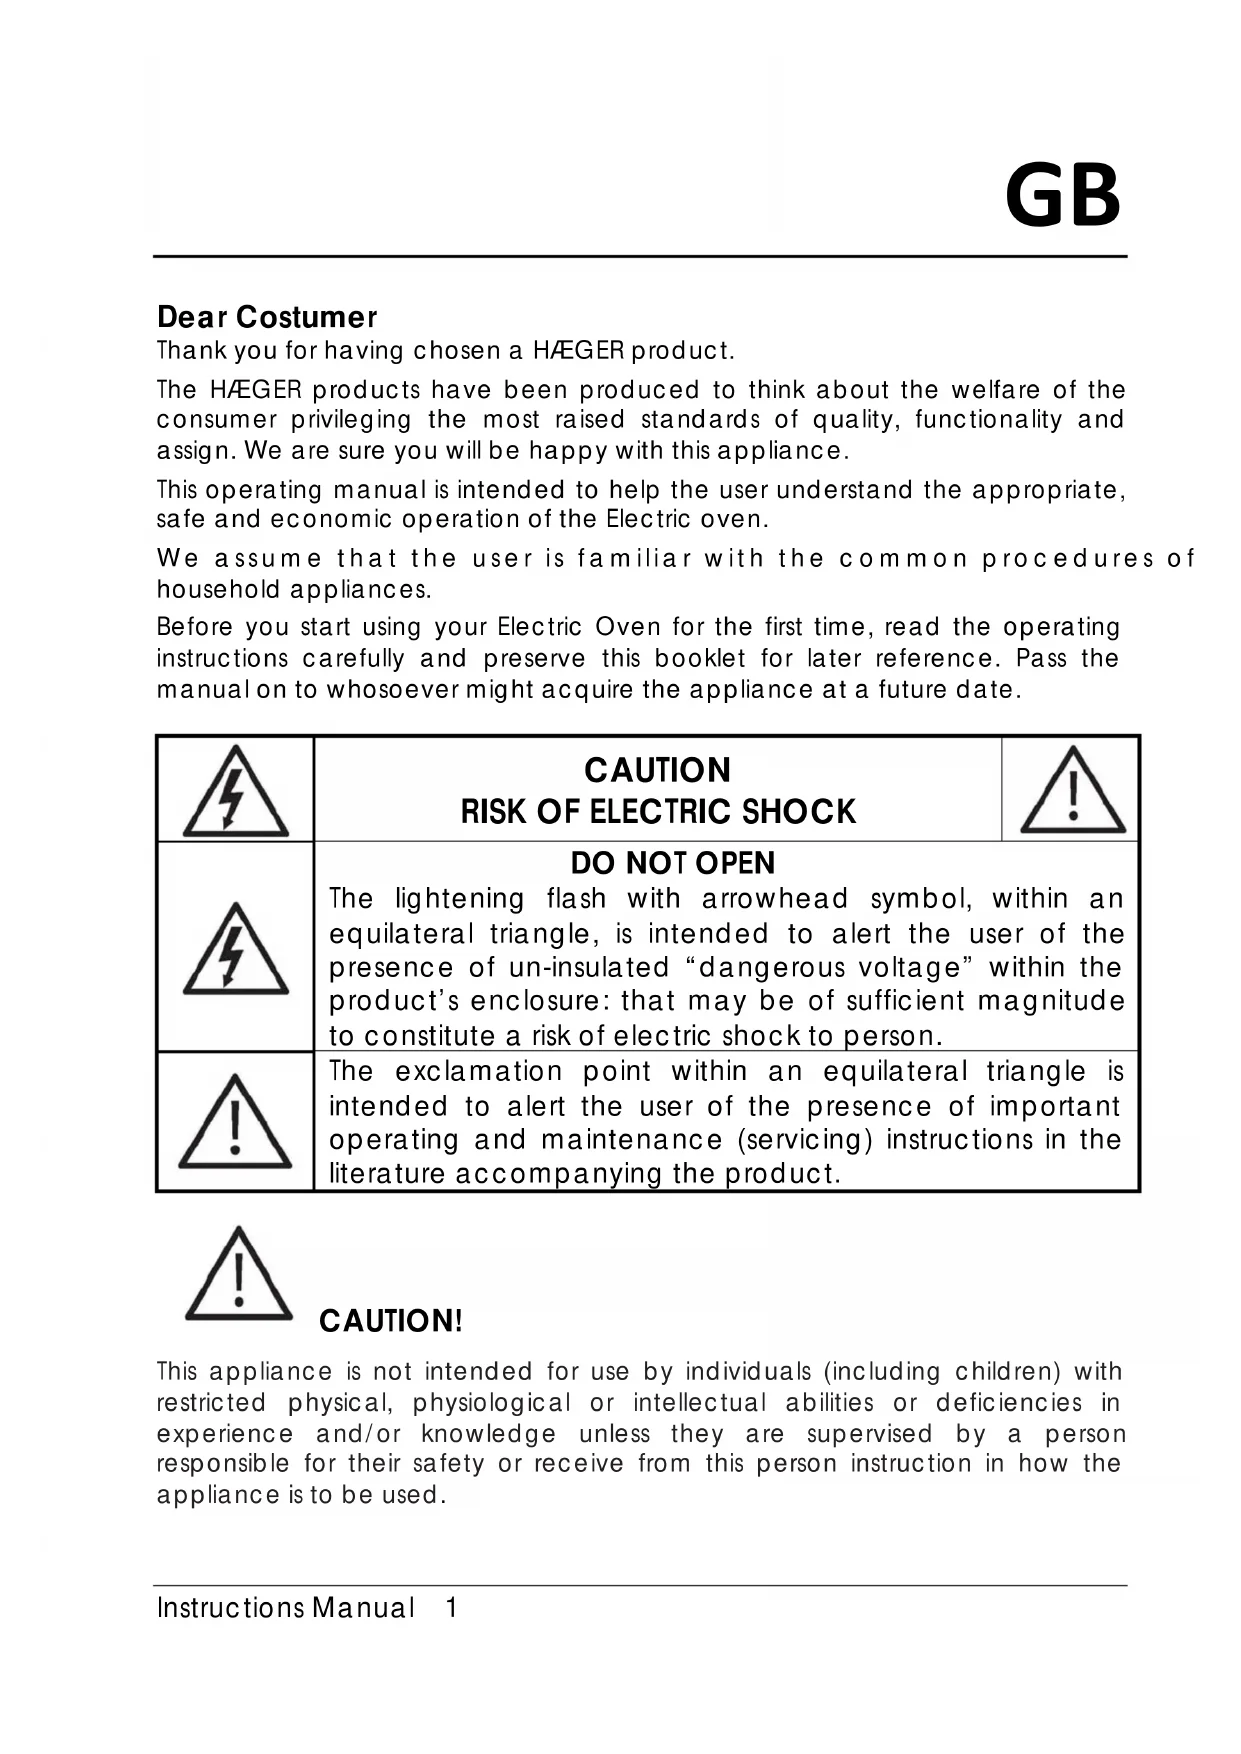
Exterior view of a Hager Monthly 16 electric toaster oven (no visible text or symbols on the device body)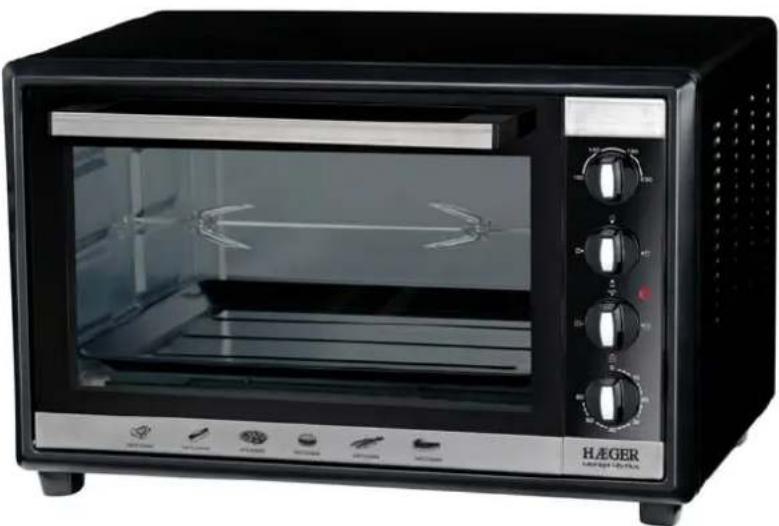
natural_image
Black HAEGER portable toaster oven with open glass door and control knobs (no visible text or symbols)Midnight 45 Plus
OV-45B.008B
CE
Instructions Manual
Thank you for having chosen a HÆGER product.
The HÆGER products have been produced to think about the welfare of the consumer privileging the most raised standards of quality, functionality and assign. We are sure you will be happy with this appliance.
This operating manual is intended to help the user understand the appropriate, safe and economic operation of the Electric oven.
We assume that the user is familiar with the common procedures of household appliances.
Before you start using your Electric Oven for the first time, read the operating instructions carefully and preserve this booklet for later reference. Pass the manual on to whosoever might acquire the appliance at a future date.
 | CAUTIONRISK OF ELECTRIC SHOCK |  |
 | DO NOT OPENThe lightening flash with arrowhead symbol, within an equilateral triangle, is intended to alert the user of the presence of un-insulated “dangerous voltage” within the product’s enclosure: that may be of sufficient magnitude to constitute a risk of electric shock to person. | |
 | The exclamation point within an equilateral triangle is intended to alert the user of the presence of important operating and maintenance (servicing) instructions in the literature accompanying the product. | |

CAUTION!
This appliance is not intended for use by individuals (including children) with restricted physical, physiological or intellectual abilities or deficiencies in experience and/or knowledge unless they are supervised by a person responsible for their safety or receive from this person instruction in how the appliance is to be used.
Important Safety Information
When using electrical appliance, basic safety precautions should always be followed, including the following:
- Do not leave the appliance unattended when it is in use.
- Children should be supervised in order to make sure that they do not play with the device.
- You may not open the housing of the appliance or carry out any repairs. Should you do so, the safety concept of the device may be compromised and the warranty becomes void. Arrange for defects on the appliance to be repaired only by the dealer or authorised specialists.
- Arrange for defective power plugs and/or cables to be replaced at once by qualified technicians or our Customer Service Department.
- Ensure that fluids cannot permeate into the housing of the appliance. Do not expose the appliance to humidity and do not use it outdoors. Additionally, DO NOT place fluid-filled receptacles such as flower vases on the appliance. This would increase the risk of fire and of receiving an electric shock! Should liquids permeate into the housing, unplug the appliance immediately and arrange for it to be repaired by a qualified technician.
- When the appliance is in use ensure that there are no easily inflammable materials close to it (e.g. dishcloths, oven cloths, etc.). NEVER dry out textiles or other objects on or above the appliance. This would increase the risk of fire!
- NEVER touch the heating rods or the viewing window when the appliance is in use, or before it has cooled down completely. Do not react cooking area when the appliance is in use. Wait until the appliance has cooled down. Otherwise, you could be burnt.

As the housing and the viewing window in the glass door become very hot during use, you must use an oven cloth or something similar to open the oven flap. Otherwise, you could be burnt.
- After use, allow the appliance to cool down completely before transporting it.
- NEVER grasp the appliance, power cable or power plug with wet hands. There is the risk of receiving an electric shock.
- To disconnect, always pull out the plug itself out of the power socket, do not pull the power cable.
-
Do not fold or crush the power cable.
-
Lay the power cable in such a way that no one can tread on or trip over it.
- Do not use extension cables.
- If you do not intend to use the appliance for an extended period, you must disconnect it from the power source. The appliance is completely free of electrical power only when you unplug it.
- Do not use an external timing switch or a separate remote control system to operate the appliance.
THIS PRODUCT IS INTENDED FOR HOUSEHOLD USE ONLY
Intended Use
The Electric Oven is intended for the heating, cooking and grilling of food. It is intended exclusively for these purposes and may only be used for them.
The user is also required to pay heed to all of the information in these operating instructions, especially the safety instructions. All other uses are deemed to be improper and may result in property damage or even in personal injury.
The manufacturer or importer accepts no liability for damage caused by improper use of the appliance.
Items supplied
The package contains:
- Electric Oven
- A baking rack
- A baking tray
• A handle for the backing tray
• A spit (OV-45B.008B)
• A handle for spit (OV-45B.008B)
• The operating instructions
Installation
Place the appliance on a firm, flat and heat-resistant base. Make sure that the area surrounding the appliance is adequately ventilated.

Risk of fire!
There must be a clearance of at least 10 cm between the back of the appliance and the wall, at least 30 cm above the top and 5 cm each on the sides. Therefore, do not place the appliance, for example, in a shelf or a narrow space. Lack of sufficient ventilation for the oven can cause a fire or damage the appliance.

Risk of fire!
Place the electric oven only on a firm, flat and heat-resistant base. Failing to do so can cause fire hazards or damage the appliance. The appliance may leave permanent marks, if placed on a soft surface.
Risk of electric shock!
Do not place the appliance directly next to a water source, for example, near washbasins, washtubs or in humid cellars. Such locations can be dangerous due to electrical shocks.
• DO NOT support your self on the glass door.
- DO NOT place objects on the glass door. This would cause damage to the hinges.
Operating Elements
- Housing 2. Temperature selector
- Function switch 4. Pilot lamp
- Timer selector 6. Door handle
- Glass door 8. Food tray
- Bake rack 10. Tray handle
- Handle for removing the spit 12. Roasting spit with retaining clips
Temperature knob: Choose desired temperature from 100^ C to 230^ C.
Timer knob: Turn control to the right (clockwise) and the oven will turn off automatically at the end of the selected time and a bell will ring. When setting the Timer to less than 5 min, turn it to more than 6 min. and then back to the selected time.
Internal Light: Internal light will work once time is setting.
Power Indicator: It is illuminated whenever oven is turned on.
Function selector (OV-45B.007A / OV-45S.014A)
Upper heat elements are selected for broiling.
☐ Lower heat elements are selected for grilling.
Both upper and down heat elements are selected for bake or toast.

Upper heating with convection function on.

Lower heating with convection function on.

Upper and lower heating with convection function on.
Function selector 1 (OV-45B.008B)

Rotisserie function selected + Convection functions selected.

Rotisserie function selected.

Convection functions selected.
Function selector 2 (OV-45B.008B)

Upper heating functions selected.

Lower heating functions selected.

Upper and lower heating functions selected.
Each function of selector 1 or selector 2 can be selected at the same time.
Starting to use the appliance
- Take the electric Oven and all accessories from the packaging.

Danger of contusion!
When opening and closing the door, do not place your fingers/hand between the door hinges. They could be crushed.
- Before using the appliance for the first time, it and all of the accessories must be cleaned free of possible packaging residues. Clean the accessories with a hand warm and mild detergent solution and then dry them ab.
- Wipe the appliance housing with a cloth lightly moistened with water and then dry it carefully.
- When the appliance is completely dry inside and out, insert the plug into a suitable power socket (220 - 240 V\~/50 Hz).
-
Now switch the appliance on, without the accessories and without foodstuffs. Leave the appliance door completely open.
-
Select the setting 230^ C with the temperature control switch. Place the main function switch to upper and lower heat.
- Place the timer switch at 15 minutes.

The appliance allows itself to be switched on with the timer switch. As soon as the time switch is set the control lamp glows.
As the heating elements are lightly greased, a slight smell may occur when first putting them into operation. This is harmless and stops after a short time. Open a window and provide for sufficient ventilation.
- When the appliance has switched itself off automatically, place the main function switch to OFF.
- Remove the plug from the power socket and wait until the appliance has cooled itself down.
- Then clean the grill and baking area with a cloth lightly moistened with water and then dry it carefully.
Operation
Grilling and baking
- Remove the roasting grill and baking tray from the appliance. If required, cover these with baking paper resp. smear the baking tray with butter or oil.
-
Allow the appliance to heat up for ca. 10 minutes (dependant on the setting) to the required temperature:
-
Select the required temperature with the temperature control knob.
- For grilling, you must always select the highest temperature (230°C).
- Then, select with the function switch either upper heat (e.g. for toppings), lower heat (e.g. for cakes) or upper and lower heat (e.g. for Pizza). If you want to grill, always select the setting upper heat with the function switch.
- With the time switch set the pre-heat time (ca. 10 minutes).
-
Close the glass door.
-
When the warm-up period is finished, place the foodstuffs on the roasting grill resp. the baking tray and slide it in on one of the runners. Ensure that there is sufficient space between the foodstuffs and the inner walls/heating elements of the appliance.

The most uniform baking results are obtained when the baking tray resp. the roasting grill are placed on the central runner.
- Close the glass door before starting the grill or baking process.

If you are cooking especially fatty foodstuffs, an increased smoke development can occur. In this case, do not close the glass door completely; instead, allow it to be slightly open:
If you carefully push the door to, it comes into this position shortly before closing.
- Adjust the time switch to the required grilling or baking time.
- The maximum grilling or baking time is 60 minutes.
- If the cooking time for the foodstuff amounts to less than 5 minutes, first of all place the time switch more then 6 minutes and then turn it back to the required grilling or baking time.
- The control lamp indicates that your electric oven is switched on. The switch of the time switch now rotates itself anti-clockwise towards OFF.

When your electric oven has reached the set temperature, the heating elements switch themselves off at intervals, to ensure that the temperature is maintained.
- The appliance switches itself off automatically on completion of the programmed time. If you wish to switch the appliance off prematurely, turn the time switch back to OFF. Place the function switch at the position OFF and remove the plug from the power socket. You will hear a signal sound and the control lamp extinguishes.

After the appliance has switched itself off, the time switch can continue to run for a short period.
-
To remove the roasting grill resp. baking tray, ALWAYS use the provided handle.
-
To lift the roasting grill out, you must engage the small hook of the handle in the grill from above.
-
To lift the baking tray out of the appliance, the large hooks of the handle must engage with the front edge of the baking tray.
-
After grilling or baking, place the function switch in the position OFF. Remove the plug from the power socket. Allow the appliance to cool down before cleaning it or switching it back on.
Grilling and baking with air circulating
As a general rule, if you are baking or grilling with air circulation you can dispense with a pre-heating of the cooking space. The cooking and browning results are more even with the use of circulating air.
Take note of the instructions given in the recipes when using air circulation.
-
Turn the function switch to the convection position. The ventilator will rotate in these positions.
-
The methods of operation are then the same as for grilling and baking without air circulation.
Roaster spit (OV-45B.008B)
The spit is for roasting meat and poultry by rotating around a heat source.
- Arrange the meat or poultry on the spit, securing it with the help of the clips. Make sure that the meat does not come in contact elements and that the spit turns smoothly.
Note: When cooking poultry, secure the legs and breasts with cocktail sticks so that the rotating movement is not obstructed during the roasting process.
-
To set the spit in place in the oven, insert the pointed end of the spit into the round piece on the right-hand side of the oven. Then position the left end of the spit in a downward direction by lining up the narrow groove in the spit with the groove on the left-hand side of the oven.
-
Place the metal tray under the spit to prevent fat or juice from dripping onto the heating elements.
Attention: Leave the door open while roasting with the spit.
- At the end of the roasting process, remove the spit using the handle for removing the spit.
Cleaning
Before you clean the oven, you must always remove the plug from the power socket. There is a risk of receiving an electric shock!

Risk of electric shock!
When cleaning it, under no circumstances may the appliance be submersed in water. There is a risk of receiving an electric shock!

Important!
Do not use household detergents or sharp/pointed objects to remove soiling. They could damage the special coatings on the inner walls of the Electric Oven.
➢ Should soiling occur, the electric oven can be cleaned with a soft cloth lightly moistened with a mild soapy solution.
Clean the baking tray and the roasting grill in a detergent solution. Allow stubborn soiling to be softened. Rinse them off with clear water.

Risk of electric shock!
The oven must be completely dry before using it again after cleaning. Therefore, after cleaning leave the appliance door opens.
Technical data
Main Voltage:.....230V \~50Hz
Nominal power:......1800W
Capacity:......42 Litres
Dimensions: 578 x 400 x 376mm
Weight: 8.5Kg
Troubleshooting
| Symptom Possible cause and solution | |
| The appliance does not heat up. | The timer switch is showing OFF.Adjust the timer switch to a time greater than 0 minutes (OFF).A household fuse on this line may be defective.Check the household fuses box and if necessary, replace the defective one.The power socket may be defective.Try on another power socket.The electric oven may be defective.Get the electric oven checked by a qualified technician. |
| The Electric oven cannot be switched off. | An electronic component is defective.Remove the plug from the socket and get the oven checked by a qualified technician. |
| The glass door is broken or it has developed cracks. | Get the electric oven repaired by a qualified technician. |
If a malfunction still cannot be rectified, please contact the shopkeeper or the manufacturer's service centre
Conformity CE

This device has been tested according to all relevant current CE guidelines, such as electromagnetic compatibility Directive 2004/108/CE, and low voltage Directive 2006/95/CE.
This device has been constructed in accordance with the latest safety regulations.
Disposal
Please consider our environment
Do not dispose of the appliance in your normal domestic waste. This product is subject to the European guideline 2002/96/EC.
Dispose of the appliance through an approved disposal centre or at your community waste facility. Observe the currently applicable regulations. In case of doubt, please contact your waste disposal centre.
Dispose of all packaging materials in an environmentally responsible manner.
When you wish to dispose of the appliance, remove the cable and dispose it in an environmentally friendly way (e.g. recycling plant).
Guarantee
This unit is covered by a 24 months (*) warranty, from the purchase date, and covers the repair free of charges of the damaged due to the manufacturer fault or defected components. The distributor reserves the right to change the unit for an equivalent model.
The warranty does not cover any damaged caused by incorrect use, lightning, incorrect installation, external factors or any intentional damaged. The warranty does not cover damage thus attributable to falls, blows, spill, exposure to extreme environmental conditions or deterioration caused by normal use of plastic parts or keyboards, as well as by the use of batteries other than those specified in this manual.
For the repairing, during the warranty period, the unit shall be sent to the distributor or reseller, or to the address indicated by them, and must be jointed the warranty certificated and the respective original invoice or selling ticket, where the buying date is expressed indicated.
The consumer is protected by the guarantee provided by Directive 1999/44/CE of European Parliament and Council of 25 May.
(*) Only fro European Union countries
Estimado Cliente
Fonction convection.
natural_image
Empty white image with a thin black horizontal line at the bottom (no text or symbols)Importer for EU:
HAEGERTEC, s.a.