AC20 - Surveillance Camera Pentatech - Free user manual and instructions
Find the device manual for free AC20 Pentatech in PDF.

| Product type | Wireless indoor surveillance camera |
| Brand | Pentatech |
| Model | AC20 |
| Dimensions (L x H x D) | 100 x 55 x 21 mm |
| Weight | Not specified |
| Power supply | Power adapter 5 V DC, 1 A; input 230 V~, 50 Hz |
| Power consumption | Max. 450 mA |
| Image sensor | CMOS 1/5 inch |
| Maximum resolution | 640 x 480 pixels (VGA) |
| Horizontal viewing angle | Approximately 38° |
| Night vision | Infrared LED up to 4 m |
| Microphone | Built-in, front |
| Storage | microSDHC card (max. 32 GB, class 10 recommended) |
| Connectivity | Wi-Fi 802.11 b/g/n, WPA/WPA2-PSK |
| Mobile app | OMGuard lite (iOS and Android) |
| Motion detection | Yes, adjustable (1-10) |
| Recording | Manual, on motion detection or scheduled |
| Operating temperature | -10 °C to +50 °C |
| Usage | Indoor only |
| Maintenance and cleaning | Unplug before cleaning; use a soft, slightly damp cloth |
| Safety | Instructions: keep out of reach of children, do not expose to water, use only the supplied adapter |
Frequently Asked Questions - AC20 Pentatech
User questions about AC20 Pentatech
0 question about this device. Answer the ones you know or ask your own.
Ask a new question about this device
Download the instructions for your Surveillance Camera in PDF format for free! Find your manual AC20 - Pentatech and take your electronic device back in hand. On this page are published all the documents necessary for the use of your device. AC20 by Pentatech.
USER MANUAL AC20 Pentatech
Operating instructions page 32
text_image
QR code image containing encoded data, no visible human-readable textGooglePlay

text_image
QR code image containing encoded data, no visible human-readable textiTunes
kostenlose App
"OMGuard lite"

natural_image
White wireless device with antenna and central screen (no visible text or symbols)
Bedienungsanleitung
1. Einleitung
text_image
Camera List Tap here to add camera 39 40 41 42 43 Camera Gallery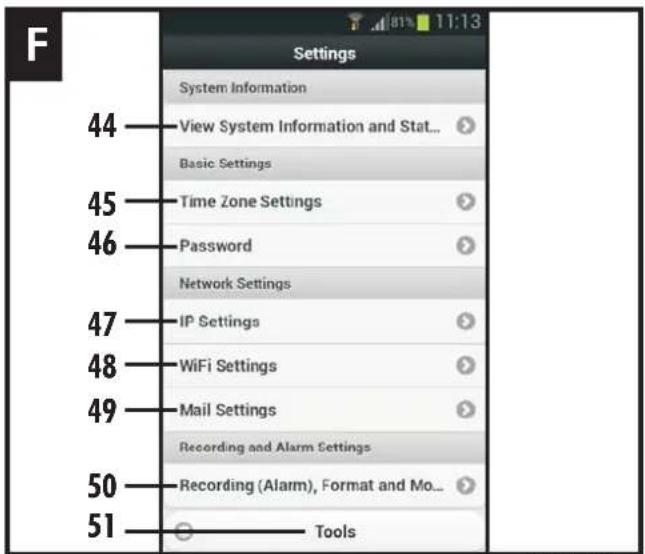
text_image
F Settings System Information View System Information and Stat... Basic Settings 44 45 46 47 48 49 50 51 Network Settings IP Settings WiFi Settings Mail Settings Recording and Alarm Settings Recording (Alarm), Format and Mo... ToolsAbmessungen 100x55x21mm
12.2.3 Kamera-Password[46-Password]
340 (8GB)/680 (16GB)/1360 (32GB)
Réseau
WLAN 802.11 b/g/n
Protocole TCP/IP, UDP, SMTP, NTP, DHCP, ARP
• Tikophetveld'Tapheretoaddcamera'[17].
- Tikophetveld'Wi-FiWizard'.
Operatinginstructions
1. Introduction
Read through these operating instructions fully and carefully. The operating instructions belong to this product and contain important points concerning bringing the appliance into service and its operation.
Always pay attention to all safety instructions. Should you have any questions or be unsure about operating the appliance ask a specialist. Keep these instructions in a safe place and should the need arise pass them on to a third party.
2. Properuse
The App Camera is to be used for the surveillance through video pictures and sound.
The operation of the camera and viewing of the images is carried out through an App (App for iPhone and Android is available free of charge, not suitable for Windows and Blackberry smartphones) on a smartphone or tablet PC (mobile device). The local connection is via a WiFi router. If the local network is connected to the internet then t he viewing through the App is possible via internet (a minimum upload speed or bandwidth of 1000 Kbps is required, >2000Kbps recommended). Thesystem is able to send an Email message to report motion detection.
Images from multiple cameras can be viewed on each mobile device. Up to three users can access the camera concurrently.
The plug and play technology of the AC20 automatically establishes a direct and secure connection between the mobile device and the camera. It is not necessary to setup an Paddressandaccess viabrowserisnotpossible. Details about the compatibility and availability of the App are available at www.indexa.de.
Video and sound can be recorded on a microSDHC card (max. 32 GB, not included) fitted in the camera. Recording can be started manually, automaticallythroughmotiondetectionorautomaticallyaccordingtoapre-set schedule.Eachrecordingissavedwithtimeanddateonthememorycard.Ifthe memory card is full, the oldest data are automatically overwritten (ring memory). The recordings can be viewed via App on a mobile device, or by puttingthecardintoareaderattachedtoaPCwithaviewerprogramme.
The camera is powered through the supplied mains adapter connected to a 230VAC,50Hzmainssupply.
If there is sufficient light a colour picture will be transmitted. At low ambient light levels the integrated Infrared LEDs are automatically switched on. In this case the immediate area (max. 4 m) will be illuminated and the video picture switchestoblackandwhitemodeforimprovedlightsensitivity.
Theinfraredfunctionmayleadtocolourdeviationsforcertaincolours.
If the surveillance is specifically required in dark environment, then additional lightings should be installed.
Thecameraissuitableforindoorsurveillance.
The camera is for use in private households. A video surveillance system does not replace your duty of careers supervision. Observ the regulations concerning videos surveillance in commercial and public areas.
Any other use or modification of the device is not authorised. Noliability will be accepted for consequential damages or for damages caused by improper use or incorrect operation. No liability will be accepted for consequential damages caused by any function or by malfunction. Unless any liability is specifically required by law, claims for damages, in particular those for personal injury or property damage caused by non-functioning or malfunctioning of the machine, are excluded.
This appliance is not intended to be used by people (including children) with restricted physical, sensory or mental capacities, or a lack of experience and/or knowledge, unless they are supervised by, or receive instructions how to set the appliance from person responsible for their safety.
3. Packagecontents(s.fig.A)
- Camera
• Mainsadapter5VDC(cablelength1.8m)
• Extensioncableforconnectiontothepowersupply1.8m - Fixingmaterial
- Usermanual
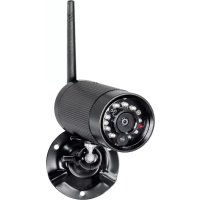
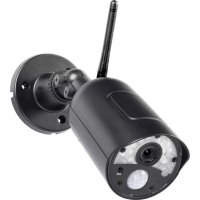
4. FeaturesandEquipment
Camera (s. fig. A)
1 Antenna
2 PowerLED
3 Lens
4 Infrared LEDs
5 Daylightsensor
6 Connection-LED
7 Microphone
8 Mains adapterconnection
9 SlotformicroSDHCcard
10 Balljoint
11 Bracket
12 Reset-button
13 Mainsadapter
14 Plugs
15 Screws
16 Extensioncable
Androidviews
Homepage: Cameralist(see Fig. C)
17 Field for registering a camera
18 Camera field
19 Connection indicator
20 Motion detection display
22 Connection strength
23 Camera list button
24 Camera name
25 Menu button
26 Folders button
21 Indicator showing that no micro-SD card is inserted
Live view page (see Fig. D)
27 Video data
28 Connection mode
29 Date and time
30 Live view
31 Screen display
32 Still image
33 Audio function
34 Audio data
35 Motion detection display
36 Manual recording
37 Resolution
38 Snapshot
Menu bar (see Fig. E)
39 List of recordings
40 Settings
41 Activate/deactivate motion detection
42 Change camera name
43 Unregister camera
Settings (see Fig. F)
44 System information
45 Date and time
46 Password
47 IP settings
48 WLAN settings
49 Email following motion detection
50 Automatic recording
51 Update firmware / Factory reset / Restart camera
5. Technicaldata
Camera
Picturesensor CMOS1/5inch
Viewingangle approx.38°horizontal
Lightsensitivity 3-4Lux(w/oIR-LEDs)
Daylightsensor 8Lux
Illumination 12InfraredLEDs
Nightvision max.4m
Microphone builtin front
Recording
microSDHC-Memorycard max.32GB(32GBrecommended)
Recordingformat .asf
imageresolution max.VGA640x480pixel
recordingrate max25fps
max.recordingcapacityin 320x240: 220(4GBmicroSDcard)/
minutes(1minute 440(8GB)/880(16GB)/1760(32GB)
correspondsto1 recording 640x480: 170(4GBmicroSDcard)/
triggeredbymovement) 340(8GB)/680(16GB)/1360(32GB)
Network
WiFi 802.11b/g/n
LAN Ethernet(10/100Base-T/Base-TX)
Protocol TCP/IP, UDP, SMTP, NTP, DHCP, ARP
Connections max.3concurrentusers
Security WPA/WPA2/WPA2-PSK(TKIP,128bitAES)
Recommendedrequirements formobile devicesused
iOS 7.0orlater
Android 4.0 or later
Hardware iOS: iPhone 4S/5/5S, iPad3 or later
Android: Dual-core CPU 1.0 G processor and 1 G memory
General
OperatingVoltage 5V ==DC(mainsadapter)
Currentconsumption 450mA
Fieldofapplication brind ooruseonly
Dimensions 100x55x21mm
Operatingtemperature -10°C to +50°C
Mains Adapter
OperatingVoltage 230V\~50Hz
Output 5V == DC,1,0 A
6. Safetyinstructions
The following instructions are provided for your safety and satisfaction during operation of the device. Note that non-observance of these safety instructions results in significant risks of accident.
Danger! If this point is not heeded life and health is endangered and it puts property at risk of damage.
- Do not leave small children unsupervised with the device, packaging material or small parts. Otherwise there is a risk of fatal injury due to choking or suffocation.
- Do not damage any gas, electricity, water or telecommunication lines during drilling and fixing work. Otherwise there are dangers of fire, personal and fatal injury.
- Treat the cables carefully. Lay these so that they cannot be damaged and do not present any tripping hazard. Otherwise there are dangers of fire, personal and fatal injury.
- If you use the device for monitoring babies or small children ensure that the camera and cable are out of reach of children. Otherwise there is a risk to life and limb!
- Do not pull the cables over sharp edges and do not crush or crimp them elsewhere. Otherwise there are dangers of fire, personal and fatal injury.
- Prevent the components from coming into contact with moisture and do not submerge in water. Otherwise there is a danger of fatal injury.
- Only operate the device from the supplied power supply. Before connecting the power supply to the mains, ensure that the mains current complies with 230 V \~, 50 Hz and is fitted with a fuse according to regulations. Otherwise there are dangers of fire and fatal injury.
- Protect the equipment and the cables against strong magnetic or electrical fields and against strong mechanical loads and vibrations.
- Do not place the equipment near fire, heat or in areas of high temperature.
- Only use the equipment with the supplied original parts or original accessories.
- Do not connect any damaged device (e.g. damage in transit). Repairs to the equipment must only be performed by specialists.
- Remove the mains adapter from the mains outlet when the device is not required for a longer time.
7. Location
Before mounting the camera check the wireless reception from the desired location. Check the operation of the camera and the connection in the proposed location.
Observe the following points:
- Position the camera so that no direct light or sunshine falls on the lens otherwise the picture may become overexposed. Check the camera image before mounting. Provisionally connect and commission the device and hold the camera in the desired position. If necessary, change the camera position until you have found the desired view.
- Select the distance between the camera and the subject according to the level of detail desired.
- The camera has infrared illumination for the close range. This is activated by the daylight sensor. You can improve the quality of the image at night by using additional illumination. The camera automatically switches to black and white in low light conditions and in artificial light.
- Ensure that there is a possible cable routing at the installation location.
- If you want to prevent unauthorised access to the camera or memory card, please ensure that the camera is installed out of reach.
- For night time viewing do not point the camera through window glass as the infrared light will be reflected into the image.
-
When using WiFi:
-
Ensure that the camera has a good WiFi connection with the WiFi router.
The maximum range of the WiFi is dependent on the environment and on the WiFi router. The transmission range is reduced through walls and floors (particularly those with steel reinforcement). Metal surfaces eg. refridgereators, shelving vapour-coated glass surfaces or mirrors will block the wireless transmission.
The WiFitransmission can also be affected by strong electric fields and other wireless equipment. Ensure an adequate distance of the camera and receiver to microwave ovens, cordless phones, mobile phones, devices using the same or similar frequency, electric motors and high voltagedevicesorpowercables. - If the WLAN connection is poor, change the position of the camera or theWLANrouterorusedaWLANrepeater.
8. Important notes on operating the camera via the Internet
o InordertoaccesstheregisteredcameraviatheInternet,
- theWLANroutermustbeconnectedtotheInternetand
- the camera must be connected to the WLAN router (green connection LED[6]islitcontinuouslywhenconnected).
- On the WLAN router, the encryption standard WPA/WPA2/WPA2-PSKand
theDHCPprotocolmustbeactivated, and theSSIDmustbepublic.
The camera identification number (SSID), which needs to be entered into yourmobiledevice, can be found on the label on the back of the camera.
Image and audio transmission are delayed (depending on the quality of the connections). TheworsetheconnectionbetweenthecameraandWLAN router,theworsethetransmissionmaybe.
- Uptothreeuserscansimultaneouslyaccessthesamecamera.
- Anynumberofcamerascanberegisteredtoonemobiledevice.
- The app is occasionally updated and improved. As a result, there may be deviations from the following details in certain circumstances.
Caution:
As with all mobile devices, substantial costs may be incurred when using an Internet connection. It is therefore recommended to set up a suitable flatrate plan.
9. Start-up
9.1 Initial start-up
For more information on how to first set up the camera and how to first access it via the app, please also refer to the enclosed quick-start guide.
Toaccessthecamerafromamobiledevice,
- the mobile device must be connected directly to the camera once. In this way, the data required to establish the connection from the camera to the WLANroutercanbeentered.
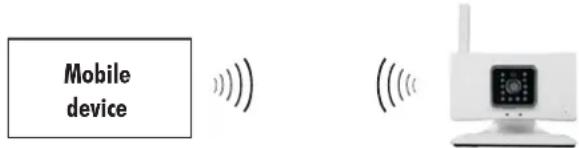
text_image
Mobile deviceAfter the camera has been successfully connected to the WLAN router (prerequisite: camera is in range of the WLAN router), you can access the camera through this WLAN router via the app on the mobile devices (via WLAN, provided the mobile device and camera are connected to the same WLANrouter, or via Internet).
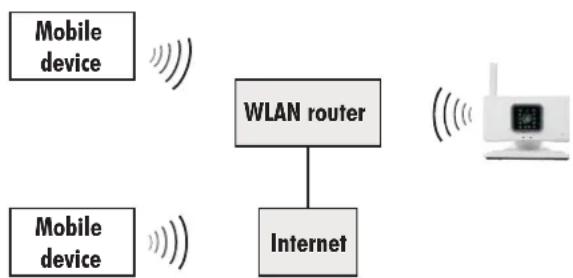
flowchart
graph TD
    A["Mobile device"] --> B["WLAN router"]
    C["Mobile device"] --> B
    B --> D["Internet"]
    D --> E["Satellite"]
Initialsetup
Downloadapp
- Download the "OMGuard lite" app from the Play Store / App Store to your mobile device (see QR code on the frontpage). If the iOS app is not found, go to the App Store settings and select "iPhone only" rather than "iPad only".
Insertmemorycard
- To make use of the recording function, insert a readable and unsecured Class10micro-SDHCard(max.32GB,brand-namecardrecommended) intotheslot[9]withthecontactsfacingforward.
Switchincamera
- Rotatetheantenna[1]upwards.
- If necessary, connect the camera's power supply port [8] with the plug of the power supply [13] using the extension cable [16], or plug the power supply directly into the camera's powersupply port.
- Plugthepowersupplyintoasuitablepowersocket.ThepowerLED[2]islit redandtheconnectionLED[6]flashes greento showthattheyareinsetup mode. If the connection LED does not blink, press the reset button [12], e.g. with a straightened paper clip, until the LED goes out. Then wait approximately30secondsuntilitstartstoblink.
Connectmobiledevicetocamera
- Activate the WLAN non your mobile device.
- Go to "WLAN" in the settings of your mobile device. Under iOS, activate "AvailableNetworks", or select "Search" if you are using Android.
- If the last 11 digits of the camera SSID (see back of camera) aren't automatically listed as an additional network(e.g. 000000-EFGHI), then select "Add Network" (Android) or "Select Network" "Other..." (iOS) to enter an additional network. Under "Name" (iOS) or under "Network SSID"(Android), enter the last six digits and five letters of the camera SSID (without dashes; seelabelonthebackofthecamera).
- Press the camera SSID to select the camera as a network. A field will appear in which you need to enter the password.
- Enter the password for the initial setup (factory setting: 12345678), press "Connect" and wait until your mobile devices has connected to the camera (which will be shown as "Connected" (Android) or a tick mark in front of the camera SSIS (iOS); the connection indicator [16] on the camera will keep flashing).
ConnectcamerawithWLANrouter
- Now launch the "OMGuard lite" app. The homepage will appear (see fig.C).
- Pressthe"Tapheretoaddcamera"field[17].
- Pressthe"WLANWizard"field.
- CheckthattheconnectionLED[6]isflashingandpress"Next".
- Onthefol lowingtwopages,press"Next".
- OnlyforiOS:Pressthe"IPC..."fieldthatwillappear.
- Then enter the camera password "123456" under "Password:" and, on Android, confirmwith "OK".
- Confirmwith"Next".
- Select your WLAN router, enter the password for this WLAN router and, on Android, confirmwith "OK".
- Confirmwith "Next" (Android) or "OK" (iOS). Oncethecameraisconnected with the WLAN router, the connection indicator [6] will be lit green continuously (prerequisite: cameraisinrangeoftheWLANrouter).
- Only for Android: Wait until the connection LED is lit continuously, then clickon "Next", and then on "Next" again on the following page.
Initial access via the app
- Inthefieldthatwillappearunder"Password:", enterthecurrentpassword,
thenenterthecamerapassword"123456"andconfirmwith"Save".
Now the camera field [18] will appear on the homepage. Once the mobile device has access to the camera (which may take a few minutes), the connection indicator [19] will appear. Under certain circumstances, it may be necessary to close and restart the app (on Android, you will have to close the appdowncompletely).
9.2 Access to a camera that is already registered on the WLAN router via additional mobile devices
- Download the "OMGuard lite" app from the Play Store / App Store to your mobiledevice(seeQRcodeonthefront page). If the iOS app is not found, go to the App Store settings and select "iPhone only" rather than "iPad only".
- Now launch the "OMGuard lite" app. The homepage will appear (see fig.C).
- Pressthe"Tapheretoaddcamera"field[17].
- Youthenhavethreeoptionstoaccessthecamera:
- QRCodeScan: afterpressingthisfield, hold your mobile device over the QR code on the back of the camera so that it is recognised. In the command prompt that will then appear, enter the desired name for the camera and the camerapassword (factory setting: 123456).
Note: OniOS the app needstohave access tothecamerabuilt into the mobile device (see the mobile device settings under OMGuard Lite\ "ALLOWACCESS") - LANsearch: If your mobile device is connected to the same WLAN router as the camera, press this field. The camera details will automatically appear in another field. Press this field and in the command prompt which will then appear, enter the desired name for the camera and the camerapassword (factory setting: 123456).
- Manualadd: youcanalsoenterthecameradetailsmanually:pressthis field. Enter the desired camera name and the complete SSID underneath (including dashes) from the back of the camera, under "Username" enter "admin", and in the last field enter the camera password(factorysetting:123456).
Note:
Uptothreeuserscansimultaneouslyaccessthesamecamera.
9.3 Bringing additional AC20 cameras into operation
In order to gain access from a mobile device to additional AC20 cameras, proceed as described under 9.1 from "Insertmemorycard".
10. App: Homepage
- Bypassing"Camera" [23]or"Came 26List"and "Gallery"[ ]or"Album", you can switch between the cameras on the list of cameras registered on the mobile device (see Fig. C) and the manually recorded and saved files (albums)ofallcamerasregisteredonthemobiledevice.
10.1 Live viewpage [seefig.D]
- In the camera list, press the camera field [18]. The live view [30] will appear.
10.1.1 Screendisplay[31]
- By moving the respective slider, you can adjust the brightness, contrast, saturation,hue(onlyonAndroid)andsharpness.
- The image can be flipped from left to right (mirror - vertical mirroring) and/orfromtoptobottom(flip-horizontalmirroring).
Factory setting: notmirrored
10.1.2 Resolution[37]
- Here you can choose between 640 x 480 pixels and 320 x 240 pixels. The 640x480setting takes up morestoragespaceforrecordingsanddisplays fewer images per second, but in return the picture is more detailed. The 320 x 240 settings takes up less storage space for recordings and shows moreimagespersecond, butinreturnthepictureislessdetailed.
Factory setting: 640x 480 pixels - Audio cache time(ms): by selecting your preferences with "+" and "-" you can adjust the audio buffer between 0 and 1000 ms (with smaller buffers, audio data can be heard faster but are less precise, with larger buffers the system has more time to better process the audio data, although they are played backdelayed).
Factory setting: 100ms
10.1.3 Audiofunction [33]
• Taptoswitchtheaudiofunctiononoroff(mutefunction).
Factory setting: Off
Note for iOS: If the audio function is switched off during manual recording, no soundwillbeaudiblewhenplayingbacktherecording.
10.1.4 Stillimage[32]
- To freeze an image, press “” [B2]. The still image will be shown (indicated by the fact that the time [29] in the picture stops running).
- To return to the live view, press “▶” (the time now displays the current time once again).
10.1.5 Manualrecording[36]
- To make a manual recording of the live view, press []. For the duration of therecording, theicon[] stilllightupred.
- To stop recording, press the icon [36] again, or return to the camera list and therecordingwillstopautomatically.
Notes:
The recordings will be saved in the "Album" on the mobile device with which they were made. On iOS mobile devices, you can only access these data via the app, not via the mobile device directly. In contrast to other Android mobile devices, this data will be deleted when the camera is deleted.
- On iOS mobile devices: If the audio function was switched off during manual recording, no sound will be audible when playing back the recording.
10.1.6 Snapshot[38]
• Totakeamanualsnapshotoftheliveview, press[38].
Notes:
The recordings will be saved in the "Album" on the device with which they were made.
On iOSmobile devices, you can only access these data via theapp, not via themobiledevicedirectly. In contrast to other Androidmobiledevices, this data will be deleted when the camera is deleted.
10.2 Album
All snapshots and manual recordings of the live view are saved in the "album" [26].
All registered cameras will be displayed, along with the number of snapshots and manual recordings in brackets.
- To delete all saved data, press the cog icon and then the recycle bin icon that will appear. IniOS, you alsoneedtoconfirmwith "YES".
- When you press the corresponding camera field, the saved data will be displayed by date and time recorded (see file name: e.g. 20141103111329.png" - Data from 03.11.2014 at 11:13 a.m.). The manualrecordingsareidentifiedbythe" "conontheimage.
- To delete a single file, press the recycle bin icon here and, on iOS, also confirmwith "YES".
- To view a snapshot or play back a recording, press the corresponding image. Toreturntothe list, pressthe "Back" buttononAndroid, andoniOS "Back" forsnapshotsor "Done" forrecordings.
11. Important notes on the recording function and the sending of emails
The camera has a motion detection function that can trigger a recording and possibly send an email. This function, as well as the automatic recording according to a schedule, requires the use of a formatted micro-SD card. If no micro-SD card is inserted, automatic recordings are not possible.
- If a micro-SD card is inserted, the automatic recording function is available. As soon as this software recognises apixel change in the image (= motion detection) when the motion detection and automatic recording functions are activated (see Chapter 12.2.7), a59-second video and audio recording will be initiated and saved on the micro-SD card (the audio will always berecorded, even if the sound is switched off). The sensitivity of the detection of pixel changes in images can be adjusted (see Chapter 12.2.7).
- After motion detection has been activated, an email with 1 to 10 images can besenttouptofouremailaddresses(seeChapter12.2.6).
- If the memory card is full, the oldest data are automatically overwritten (ringmemory).
- Rather than viewing the recordings via the app, you can also remove the micro-SD card and viewthe recordings on your PC(providing you have an appropriatevideoviewer/playerinstalled).
12. App: Menu
- Inthecamerafield[18],pressthemenuicon[25].Thefollowingitemswill appearinthemenubar[seeFig.E]:
12.1 Listofrecordings[39-Events]
Here you can access all automatically created recordings that have been saved on the micro-SD cardinthecamera.
Sorting: Firstbydate, thenbytime
Details: -Startofrecordingasatime
-Filesize
-Lengthofrecording
-Triggered by motion (motion detection) or by a schedule(Event:Schedule)
- To delete a recording, on iOS, press the recycle bin icon [x] and confirm with "YES" and, on Android, press the cog icon and then the recycle bin icon.
- Toplaybackarecording, press the " "ion.
- To stop the playback prematurely, press "Back" (iOS) or the "Return" button(Android).
12.2 Settings[40-Settings]
N.B.:
Anychangesmadeinthesettingsmustbesavedbypassing"Save".
12.2.1 System information [44 - View System Information and Status]
Here you will find information about the camera:
- DeviceID = SSID
- Alias: Thefactory-setnameofthecamera
- FirmwareVersion: Thecamera'sfirmwareversion
- WebUI Version: VersionoftheWebuserinterface
Alarm: "None" - detection of motion does not trigger an automatic recording, "Motion Detection" - detection of motion will trigger automaticrecording.
Record: "None" - detection of motion does not trigger an a recording based on a pre-set schedule, "Recording..." - detection of motion will trigger are cording based on apre-sets schedule.
Storage: Percentageoffreememoryonthemicro-SDcard - NTP: "No Action" - no synchronisation with the NTP Server, "Succeed" - synchronisationwiththeNTPServerisactivated(see"Timezone")
12.2.2 Dateandtime[45-TimeZoneSettings]
SyncwithNTPServer:
To ensure synchronisation with the actual time in your location and the date, keep "SyncwithNTPServer" settoON(synchronisationactivated). Factory setting: ON
o NTPServer:
SelectingtheNTPServer:Keepthefactorysetting "time.nist.gov".
- TimeZone:
Setthetimezoneofyourlocation(e.g.:Germany:GMT+01:00.)
Factory setting:GMT+01:00
DaylightSavingTime:
To adjust the time according to the changing clocks, select "+ 1 hour" for Daylight Saving Time and "None" for the standard time during the winter.
Factory setting: None
Note:
Don't forgettosaveyourchangeswith"Save"whenyouaredone.
12.2.3 Camerapassword[46-Password]
Hereyoucanchangethecamerapasswordtoaccessthecamera.
Under "Password", delete the current camera password (factory setting: 123456) and, oniOS, also confirm with "Done".
- Enterthenewcamerapasswordandconfirmwith"Save".
- Notedown the camerapassword and keep itina safe place. If you lose the password, perform a reset (Chapter 14).
Note:
Once the camera password has been changed, no mobile device will have completeaccess to the camera any longer, andafter launching the app, it is no longer possible to access the camera. To regain full access, you must delete the currentcamera password under "Edit" in themenuof thecorrespondingmobile device(seeChapter11.5),enterthenewpasswordandconfirmwith"Save".
12.2.4 IPsettings[47-IPSettings]
Keep the factory setting ON.
12.2.5 WLANsettings[48-WLANSettings]
Here you can find all settings for your chosen WLAN connection to the router. In general, it is not necessary to change these settings.
12.2.6 Email following motion detection [49 - Mail Settings]
You can pre-set up to four email addresses to which an email with up to ten imagesistobesentfollowingmotiondetection. Werecommendthatyousetup a dedicated Google Mail account to send these emails to (e.g.
SamSample@gmail.com).
- Complete or select all following fields marked with * in order to be able to sendemails.
- To check whether you have entered all details correctly, press the "Test" field. If all details are correct, all entered recipients will receive a test email.
- Savealldetailswith"Save".
Send Alarm Mail: Here you can specify whether an email is to be sent following motion detection ("ON") or not ("OFF"). If "ON" is selected, the setting "Number of pictures attached" will also appear. This is where you can specify how many images you would like to be attached to the email (thismaybe1to10images). Factory setting: OFF
- Sender's Email *: Enter your email address from which you want the emails to be sent here, and confirm with "Done" (e.g. SamSample@gmail.com).
- Receiver1/2/3/4 Email *: Enter up to four email addresses to which an emailistobesentfollowingmotiondetection, andconfirmwith "Done".
- SMTP Server:* Enter your provider's server data for outgoing emails (for GoogleMail:smtp.gmail.com) and confirmwith "Done".
- SMTPPort.* Selectthe appropriate port of your provider (for Google Mail: 587)andconfirmwith"Done".
- Transport Layer Security Protocol*: Select the appropriate transport layer security of your provider (for Google Mail: STARTTLS) and confirm with "Done".
- NeedAuthentication:* Keep"ON" Factory setting:ON
- Sender's SMTP Account *: Re-enter your email address from which you wanttheemailstobesenthere,andconfirmwith"Done".
- Sender'sSMTPPassword:* Enterthepassword for the email address (e.g. the password for SamSample@gmail.com) from which you want the emailstobesenthere, and confirmwith "Done".
- SendmailwhenInternetIPaddresschanges: Keepthefactorysetting. Factory setting: OFF
Notes:
- TheTLSencryptionprotocolthatisrequiredtosendemails isnotsupported by some providers. If necessary, set up a free email account, e.g. with Gmail(gmail).
- If your "Sender's Email" is a Google account, it may be necessary to activate access for "less secure apps" under "Security" in the email address settings.
12.2.7 Automatic recording following motion detection or according to a Schedule [50 - Recording (Alarm), Format and Motion Detection]
The followingsettingsarepossible:
■ Bothmotiondetectionandautomaticrecordingareactivated: BothsettingsaresettoOFF
■ Onlymotiondetectionisactivated, revolding:
Motion Detection is set to ON, Enable Recording is set to OFF
■ If motion is detected, a 59-second recording will automatically be saved onthemicro-SDcard:
"Motion Detection" and "Enable Recording" are set to ON - no time period is activated in the schedule
Compared to a continuous recording according to a schedule, recordings following motion detection require less storage space, and it is easier to search for events.
Note:
To be able to quickly switch on and off the recording following motion detection, first set "Enable Recording" to ON in the settings. This can be done directly via "Guard" [41] in the menu bar.
In accordance with the pre-set schedule, recordings are made during the specified time periods. In each case for four full hours, divided into sequential 15-minute files (i.e. 16 files are recorded during a 4-hour period). Therestofthetime, outsideofthespecifiedtimeperiods, thereare no recordings or, depending on the settings, no recordings following motiondetection.
"Enable Recording" is set to ON, at least one time period has been specified in the schedule (Edit Schedule), "Motion Detection" is set to ON or OFF.
EnableRecording(Alarm): WhensettoON, automaticrecordingisenabled (depending on other settings either following motion detection or accordingtoaschedule); whensettoOFF, itisdisabled Factory setting: ON
- Edit Schedule: Setting up the schedule for a continuous 4-hour recording, divided into 15-minute sequences. You can activate individual time periods, wholecolumnsorrows, ortheentireweek(markblue) Factory setting: No continuous recording IMPORTANT NOTE:
The revised schedule must be confirmed with "Save" two times: Once after the time periods have been set, and another time immediately afterwards.
- Recordframe: 15or30frames/secondarerecorded
Factory setting: 15 images/second (requires less storage space)
Format MicroSD Card: Here you can format the micro-SD card that is inserted in the camera. Please note, however, that all previously saved data will be deleted in the process.
EnableMotionDetection: WhensettoON, recordingis activatedbymotion detection; ifsettoOFF, itisdisabled Factory setting: ON - Sensitivity: Here you can adjust the motion detection sensitivity (1 - not very-sensitive/10-very-sensitive) Factory setting: 5
12.2.8 Update Firmware / Restore Factory Settings / Restart Camera [51 - Tools]
- Update Firmware: Only if required: press this field. The app will automatically search for new firmware. If a new one is detected, confirm with "OK" in the following field. The app will now load the firmware automatically, after which the camera will shut down and restart automatically. The connection LED [6] goes out. As soon as it is permanently lit again, the camera has restored the connection to the router. Now waituntiltheconnection indicator[19]appearsin the camera field(ifitdoesnotappear, closeandrestarttheapp).
- Restore Factory Settings: Here all settings are reset to the factory settings. At the same time the camera is restarted, so that access must be set up again on all mobile devices: Press this field and then confirm with "OK". Now deleted the camera field of the old connection with "Delete" [43]. Once the camera's connection LED [6] starts to blink, carry out the initial setup process as described in Chapter 6.1 from section six onwards. If more mobile devices had access to the camera, delete the camera field there too and then proceed as described in Chapter 9.2 from section two onwards.
- Restart System: To restart the camera automatically (retaining all settings), press this field and then "OK". The connection LED[6] will go out. Once it is permanently lit again, the camera has restored the connection to the router. Now wait until the connection indicator [19] appears again in the camera field (if it does not appear, close and restart the app).
12.3 Activate/Deactivate motion detection [41 - Guard]
• Hereyoucanswitchmotiondetectiononandoff.
- To saveyoursettings, press"Save".
Note:
Automaticrecording is not automaticallyswitched on/off too,i.e.changing the settings to "ON" will only trigger a recording following motion detection if "EnableRecording"isalso settoON.
12.4 Change the cameraname[42 -Edit]
Here you can change the camera name (Name) that is shown at the top of the camerafieldforthecorrespondingmobiledevice.
- In the "Name" field, enter the desired camera name and confirm with "Save".
Notes:
- Donotchangetheentryunder"Username".
- The camerapassword cannot be changed under "Password". To changethe camerapassword, procedas described in Chapter 12.2.3.
12.5 Deletecameraaccessonthemobiledevice [42-Delete]
- To delete camera access on your mobile device, press the recycle icon [43] and confirmwith "YES".
Note:
Access to the camera will only be deleted on this particular mobile device. If othermobiledeviceshaveaccesstothecamera,accesstothecameracanbeset up on additional mobile devices as described under 9.2. However, if access to the camera has been deleted on all mobile devices, access to the camera must besetupasdescribedunder9.1.ifrequired.
13. Installation
- Before fixing the camera permanently, test the quality of the connection and optimisethecameraview.
Thecameracanbewallorceilingmou nted(seefig.B:landII).
- Firstdisconnectthecamerafromthepowersupply.
- Toinstallthecameraonawallorceiling, affixthecamerainasuitablespot using the supplied screws [15] and, where applicable, wall plugs [14]. When mounted on the ceiling the camera's tilt angle may need to be flipped and the imagerotated by 180^ (see Chapter 10.1.1 "Flip").
- Alignthecamera.
- Rotatetheantenna[ ]sothatitpointsupwards.
- Connect the mains adapter with a suitable mains outlet. The POWER LED [2]lightsred.
14. Reset/lossofcamerapassword
- To reset the settings and the camera password to the factory settings, procedasdescribedinChapter12.2.8"ResetFactorySettings".
- Alternatively, you can press the reset button [12] on the camera, e.g. with astraightenedpaperclip, until the connection LED [6] goes out. Then wait approximately 30 seconds until it starts to link. Then proceeds described in Chapter 9.1 from "Connect cameratomobile device".
15. Maintenance and cleaning
- The product is maintenance-free: do not open the housing
- Check the safety and function regularly
- Remove the mains adapter from the mains socket before cleaning
- Use a soft, slightly moist cloth or brush to clean the surfaces
16. Disposal

Packaging material or electrical products must not be disposed of as household waste. Use your recycling system. Details are available from your local authority.
17. Declaration of conformity

Indexa GmbH, Paul-Böhringer-Str. 3, D-74229 Oedheim declares that this product AC20 complies with the basic requirements and the other relevant regulations of Directive 1999/5/EC. Conformity has been demonstrated. The complete declaration of conformity can be read at:www.indexa.de.
This product can be used in the following countries:

18. Warranty
In addition to the statutory guarantee from the vendor, the manufacturer warrants this product for 2 years from date of purchase (proof from receipt) according to following conditions. This warranty does not affect your legal rights.
The warranty covers use of the product in normal conditions in private households. It only covers manufacturing defects and is limited to the replacement or repair of the faulty components. It does not include wear and tear, orbatteries.
The warranty applies only when the product is used according to the operating instructions. It does not cover damage arising from misuse, improper handling, application of force, dust, dirt, water or other environmental factors, or from incorrect voltage from batteries or powersupply.
The warranty is void when the product has been repaired or tampered by unauthorised persons and when it has been used with components which are notspecifiedbythemanufacturer.
In case of a warranty claim please contact the vendor for details of how to proceed and how to return the product if necessary. Only carriage paid authorised returns will be accepted. Repairs can only be accepted when accompanied by a full description of the fault. After the warranty period has expired repairs will be charged and are not always possible. Warranty claims do not extend the warranty period and the warranty for replacement parts expires with the warranty for the product.
Unless there is a statutory obligation, the manufacturer is not responsible for further claims, including peronal or material damages, arising from the use of the product from nonfunctionormisfunctionoftheproduct.
Indexa GmbH
| Fault | Cause | Remedy |
| The app cannot find the camera (s) | When trying to set up access from another mobile device:- Access cannot be set up as during the initial setup- "Search in LAN": Camera and mobile device are not connected to the same WLAN router | - Set up access as described in Section 9.2- Connect the mobile device to the same WLAN router as the camera |
| Camera not powered | Check that the Power LED [2] on the corresponding camera lights. If not, check the mains adapter and cable connections | |
| Camera cannot be accessed | The camera is out of WiFi range | Reduce the distance between camera and WiFi router or use a WiFi repeater |
| Radio link was interrupted by objects | Remove large objects or change the location of camera | |
| Antenna [1] is not upright | Align the antenna [b]ight | |
| WiFi router is not connected to the internet or is not powered | Turn the router on and connect to internet | |
| Smartphone / tablet not connected to WiFi /internet | Connect the smartphone / tablet with WiFi / internet | |
| SSID is not open | Select open SSID | |
| DHCP is not activated on WiFi router | Activate DHCP on the WiFi router | |
| WPA/WPA2/WPA2-PSK encryption is not activated on WiFi | Activate WPA/WPA2/WPA2-PSK2 encryption on the WiFi router | |
| Flickering picture | router | Move the camera to another location |
| Picture is too bright | Strong lightsource shining into the camera lens | Change the direction or location of the camera |
| When motion is detected, images are recorded or emails are sent out inadvertently | Overexposure due to strong light sourceThe sensitivity of motion detection is set too high | Set the sensitivity to lower |
| Camera has not recorded | MicroSd card is not fitted or not formatted / The used card is not Class 10 card | Insert a microSD card and format it / use a Class 10 card |
| Automatic recording and/or motion detection turned off | Switch the automatic recording and/or motion detection on again (see Chapter 9.) | |
| The sensitivity of motion detection is set too low | Set the sensitivity to higher | |
| The movement occurs outside the coverage area | Align the camera accordingly | |
| Recording cannot be found | Time Zone setting is not correct | Search over a longer period |
| Set the right time zone | ||
| Snapshot / manual recording cannot be found | On Android, data are saved automatically in "Own Files\DCIM\OMGuard Lite", and on iOS only directly in the app's album | Android: Search in "Own Files" |
| The image file has not been updated | Update the file, activate a mediascan or restart the mobile device | |
| An App function no longer functions | A new version of the App is available | Download the latest App version or perform an app update |
| Colour variations on certain surfaces, e.g. fabrics or plants | Caused by the infrared function | Cannot be changed |
| The last recording cannot be found | Recording still in progress | Wait until the recording is finished |
| Camera cannot be operated properly | Software crash | Make a reset (see chapter 13) |
| If available download new Software (see chapter 9) |
I
Manualediistruzioni
1. Introduzione
Sicurezza WPA / WPA2/WPA2-PSK (TKIP, 128 bit
AES)
12.2.3 Password telecamera[46Password]
Quièpossibilemodificarelapassworddiaccessoallatelecamera.