NSP51 - Speakers YAMAHA - Free user manual and instructions
Find the device manual for free NSP51 YAMAHA in PDF.
| Product type | Speaker system (center + surround) |
| Brand | YAMAHA |
| Model | NSP51 |
| Category | Speakers |
| Center speaker type (NS-C51) | 2-way acoustic suspension, magnetic shielding |
| Surround speaker type (NS-B51) | 2-way acoustic suspension, magnetic shielding |
| Nominal input power (center) | 60 W |
| Maximum input power (center) | 180 W |
| Nominal input power (surround) | 50 W |
| Maximum input power (surround) | 150 W |
| Nominal impedance | 6 Ω |
| Frequency response (center) | 70 Hz - 36 kHz |
| Frequency response (surround) | 69 Hz - 36 kHz |
| Sensitivity (center) | 92 dB/2.83 V, 1 m |
| Sensitivity (surround) | 89 dB/2.83 V, 1 m |
| Dimensions (center W x H x D) | 415 x 135 x 167 mm |
| Weight (center) | 3.3 kg |
| Dimensions (surround W x H x D) | 148 x 252 x 150 mm |
| Weight (surround) | 2.1 kg |
| Power supply | Passive (requires external amplifier) |
| Main features | Magnetic shielding, 2-way acoustic suspension, wall-mountable |
| Care and cleaning | Dry, clean cloth; do not use chemical solvents |
| Safety | Do not expose to rain or moisture; do not modify or repair yourself |
| Spare parts and repairability | Consult an authorized Yamaha service; do not disassemble |
| General information | Home theater speaker system; compatible with AV amplifiers |
Frequently Asked Questions - NSP51 YAMAHA
User questions about NSP51 YAMAHA
0 question about this device. Answer the ones you know or ask your own.
Ask a new question about this device
Download the instructions for your Speakers in PDF format for free! Find your manual NSP51 - YAMAHA and take your electronic device back in hand. On this page are published all the documents necessary for the use of your device. NSP51 by YAMAHA.
USER MANUAL NSP51 YAMAHA
Please read the following operating precautions before use. Yamaha will not be held responsible for any damage and/or injury caused by not following the cautions below.
- To assure the finest performance, please read this manual carefully. Keep it in a safe place for future reference.
- Install the speakers in a cool, dry, clean place - away from windows, sources of heat, sources of excessive vibration, dust, moisture or cold. Avoid sources of electrical humming (e.g., transformers and motors). To prevent fire or electric shock, do not expose the speakers to rain or water.
- To prevent the enclosure from warping or discoloring, do not expose the speakers to direct sunlight or excessive humidity.
- Avoid installing the speakers where foreign objects may fall onto them and/or where they may be exposed to liquid dripping or splashing.
-
Do not place the following objects on top of the speakers:
-
Other components, as they might damage or discolor the surface of the speakers.
- Burning objects (e.g., candles), as they might cause fire, damage to the speakers or personal injury.
-
Containers of liquid, as they might spill and cause electric shock to the user or damage to the speakers.
-
Do not place the speakers where they are liable to be knocked over or struck by falling objects. Stable placement will also ensure better sound performance.
- Placing the speakers on the same shelf or rack as the turntable can result in feedback.
- Any time you note distortion, reduce the volume control on your amplifier to lower setting. Never allow your amplifier to be driven into "clipping". Otherwise, the speakers may be damaged.
- When using an amplifier with a rated output power higher than the nominal input power of the speakers, care should be taken not to exceed the maximum input of the speakers.
- Do not attempt to clean the speakers with chemical solvents as this might damage the finish. Use a clean, dry cloth.
- Do not attempt to modify or fix the speakers. Contact qualified Yamaha service personnel when service is needed. The cabinet should never be opened for any reason.
- Secure placement or installation is the owner's responsibility. Yamaha is not liable for accidents caused by improper placement or installation of speakers.
Information for Users on Collection and Disposal of Old Equipment
This symbol on the products, packaging, and/or accompanying documents means that used electrical and electronic products should not be mixed with general household waste.
For proper treatment, recovery and recycling of old products, please take them to applicable collection points, in accordance with your national legislation and the Directives 2002/96/EC.
By disposing of these products correctly, you will help to save valuable resources and prevent any potential negative effects on human health and the environment which could otherwise arise from inappropriate waste handling.
For more information about collection and recycling of old products, please contact your local municipality, your waste disposal service or the point of sale where you purchased the items.
[Information on Disposal in other Countries outside the European Union]
This symbol is only valid in the European Union. If you wish to discard these items, please contact your local authorities or dealer and ask for the correct method of disposal.
Taking care of the speaker
When you wipe this unit, do not use chemical solvents (e.g., alcohol or thinners, etc.): this might damage the finish. Use a clean, dry cloth. For difficult soils, dampen a soft cloth in water, wring it out, and then wipe with the cloth.
Contents
Package contents. 1
Installing the speakers. 1
Installing the center speaker. 2
Wall-mounting the speakers. 2
Connecting the speakers. 4
Connection diagram. 4
Specifications. 5
Package contents
Make sure the package contains the following items.
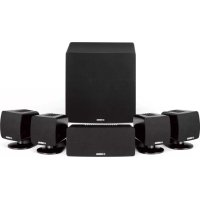
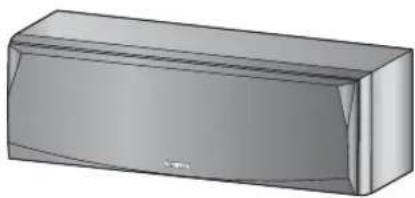
Center speaker (NS-C51)

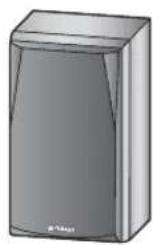
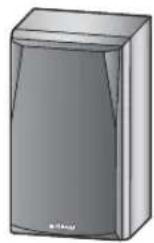
Surround speaker (NS-B51)


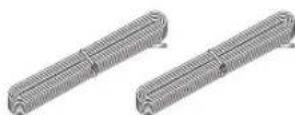
Fastener (for center speaker)

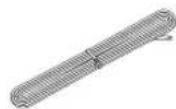
4m (13.1 ft.)
Speaker cable
10 m (32.8 ft.)
Installing the speakers

Before you connect the speakers, place each speaker in its respective location. Speaker positioning is very important as it affects the overall sound quality of the system. Place the speakers in locations that will optimize the sound quality at your listening position. Refer to the illustration.
Note
- Placing the speakers too close to a CRT-type TV may impair the picture color or cause a buzzing noise. In this case, move the speakers at least 20cm (8") away from the TV. This is not an issue with LCD and plasma TVs.
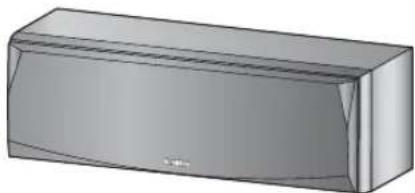
Installing the center speaker
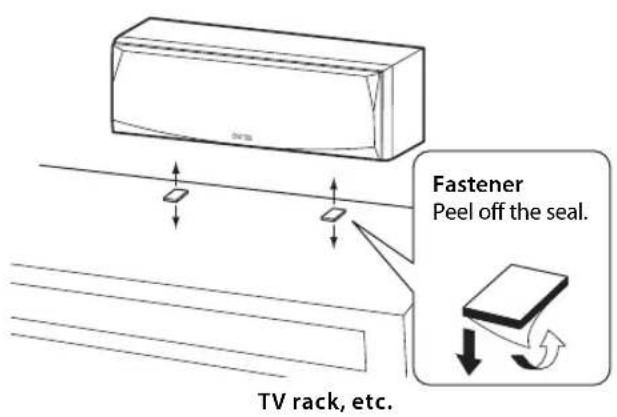
Place the center speaker centrally between the front speakers, facing directly forward.
When placing it on a flat surface (TV rack, etc), affix the supplied fasteners to bottom of the speaker. Refer to the illustration.
When wall-mounting it, see "Wall-mounting the speakers". (See below.)
Note
- Wipe the surface clean before affixing the fasteners. If the surface is dirty, oily or wet, adhesive strength is weakened and the speaker may fall.
Wall-mounting the speakers
You can mount the speakers on the wall as follows.
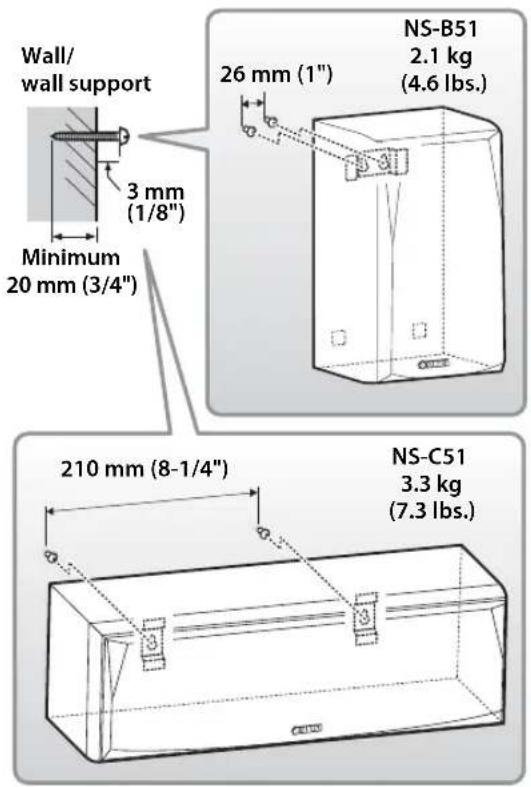
1 Install screws into a solid wall or wall support as shown in the illustration. Use 3.5 to 4mm (1 / 8^ ) diameter self-tapping screws.
2 Hang each speaker by its keyhole slots onto the protruding screws.
Note
- Make sure the shaft of the screw is seated in the narrow part of the keyhole slot. Otherwise, the speaker may fall.
Warning
- Do not mount the speakers on thin plywood or on a wall with a soft surface material. Otherwise, the screws may pull out of the surface and the speakers may fall, possibly damaging the speakers or causing personal injury.
- Do not affix the speakers to a wall using nails, adhesives, or unstable hardware. Long-term use and vibration may cause the speakers to fall.
- To avoid accidents resulting from tripping over loose speaker cables, affix the cables to the wall.
- Mount the speakers in a wall location that will be unlikely to result in injury to an individual's head.
- When using speaker brackets (commercially available) to mount the speakers on the wall or ceiling, we strongly recommend using safety wire (may be supplied with the bracket) between the speaker and bracket to prevent the speaker from falling.
- When installing these speakers on a wall mounted bracket, it is essential that they are firmly secured. Be sure to consult a reliable source about the best type of fastener for your particular wall/ceiling's construction.
■Mounting the center speaker on the Yamaha YTS-F500/YTS-T500 TV stand
You can use the screw holes [diameter: 6mm (1 / 4^ ) , hole depth: 16mm (5 / 8^ ) ] on the rear of this unit to mount the speaker on the YTS-F500/YTS-T500. For installation details, please refer to the owner's manual that came with the YTS-F500/YTS-T500.

NS-C51
Rear view
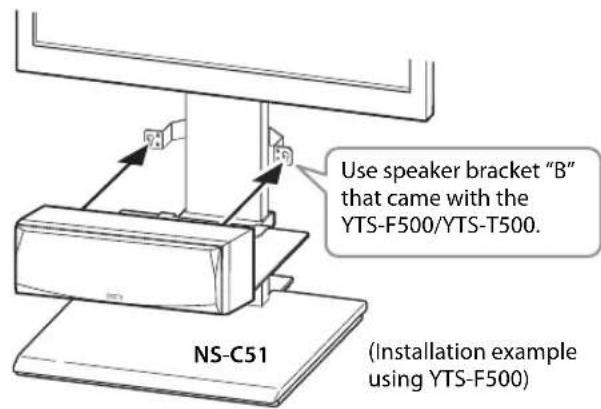
Note
- Be careful not to pinch the speaker cables between the speaker and the speaker bracket or speaker stand.
- Do not lean or place any object on the speaker. Otherwise, the TV stand bracket may be deformed.
Connecting the speakers
Caution: Make sure the power cables for your other AV components are disconnected from the AC wall outlets before making any connections.
Connection diagram
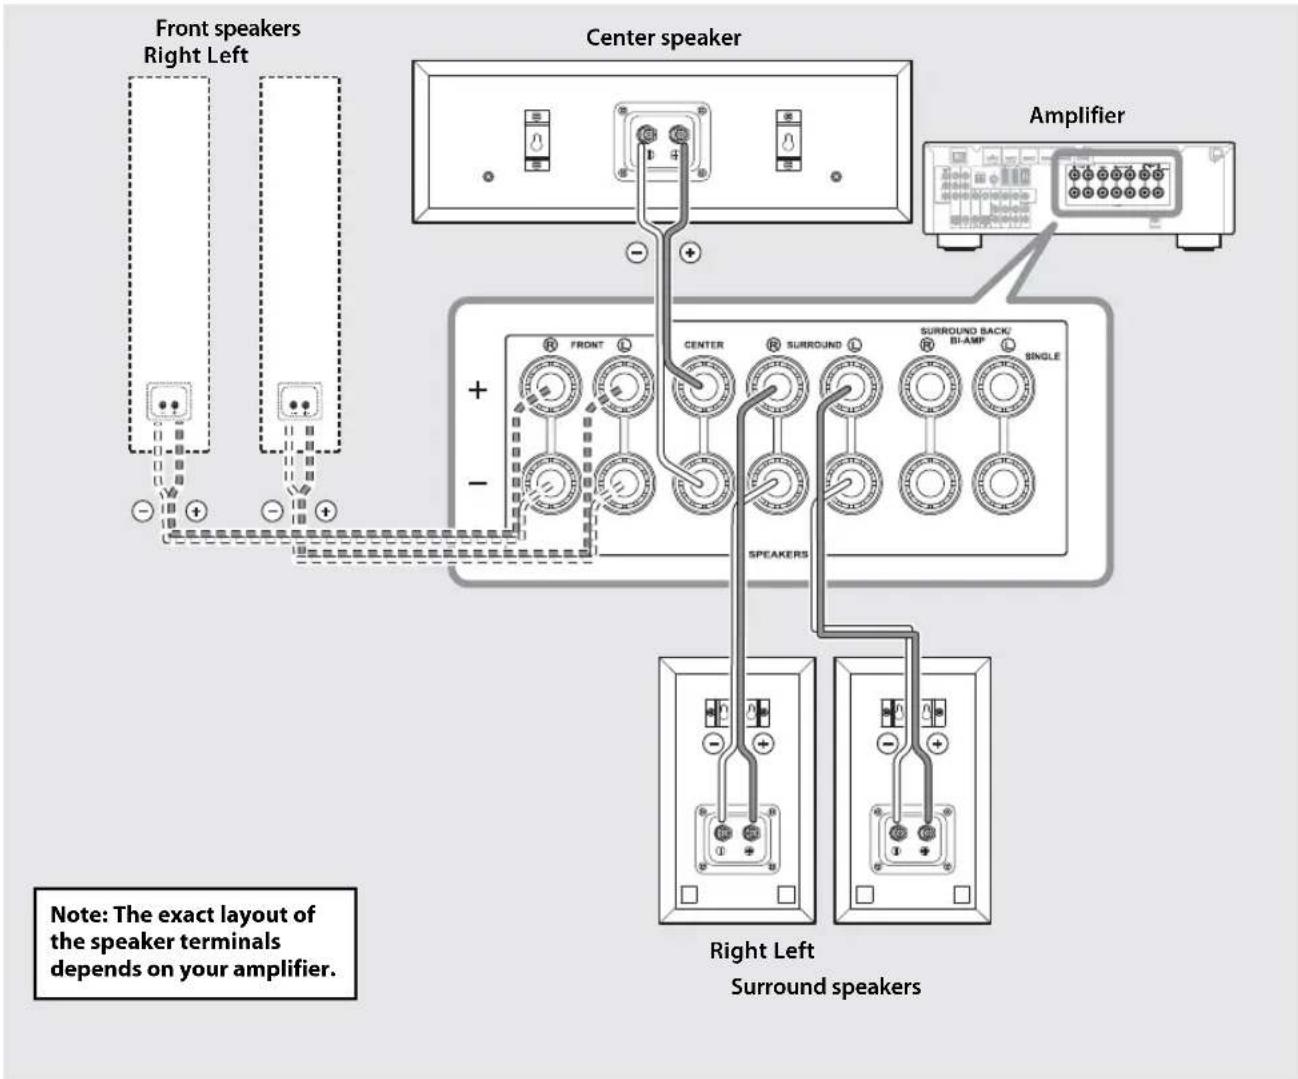
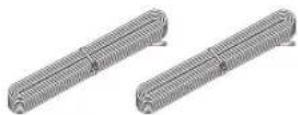
Preparing the speaker cables
Once you've positioned the speakers, you'll need to prepare the speaker cables for connecting the speakers.
1 Remove about 15mm (5 / 8^ ) of insulation from the end of each speaker cable.
Twist the bare wires tightly.
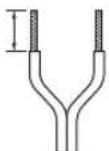
15 mm (5/8")
Good No Good

Note
- Do not bundle or roll up excess cable.
- Twist the bare wires tightly so the individual strands are not splayed.
- Be careful not to injure yourself while preparing the speaker cables.
■Operating the speaker terminals
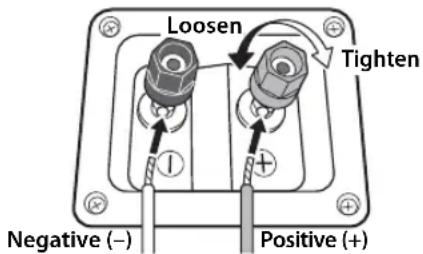
1 Rotate the speaker terminal counterclockwise to loosen it.
2Insert the bare wire.
3Rotate the speaker terminal clockwise to tighten it.
4 Test the security of the connection by pulling gently on the cable.
Note
- Make sure the terminal is gripping the bare wire, not the insulation.
- Make sure the bare wires do not touch each other, as this could damage the speaker or amplifier.
- If the connections are faulty, you will hear no sound from the speakers.
Connecting to an amplifier
Connect each speaker to the appropriate speaker terminals on your amplifier by using the cables you prepared earlier. For details, see the "Connection diagram" (page 4).
For the surround speakers only, connect one speaker to the left (marked L) terminals of your amplifier or receiver, and another speaker to the right (marked R) terminals.
Please refer to the owner's manual that came with your amplifier or receiver.
Note
- Make sure you connect the speakers with the correct polarity—positive (+) terminals to positive (+) terminals, and negative (-) terminals to negative (-) terminals. If you get them crossed over, the sound will be unnatural and lack bass.
- In your AV receiver's speaker size settings, specify small (or "S") for all of the speakers.
- The speaker may be damaged if certain sounds are continuously output at high volume level. For example, if sine waves from a test disc, bass sounds from electronic instruments, etc., are continuously output, or when the stylus of a turntable touches the surface of a disc, reduce the volume level to prevent the speaker from being damaged.
- Once you have connected all of the speakers, plug the amplifier and other AV components into suitable AC wall outlets.
- When using an amplifier with a rated output power higher than the nominal input power of the speaker, care should be taken never to exceed the speaker's maximum input.
When using a banana plug
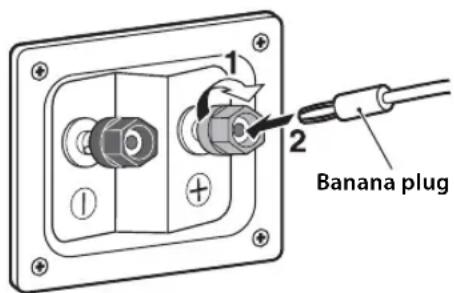
1 Tighten the terminal knob.
2Simply insert the banana plug into the terminal.
Specifications
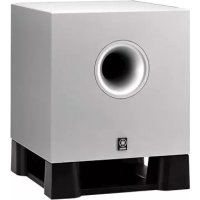
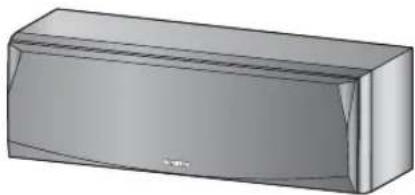
Center speaker (NS-C51)
Type. 2-way acoustic suspension Magnetic shielding type
Driver Woofer. 10 cm (4") cone type x 2 Tweeter. 2.2 cm (7/8") balanced dome type
Nominal input power 60 W
Maximum input power 180 W
Impedance Nominal 6Ω
Frequency response 70 Hz - 36 kHz
Sensitivity. 92 dB/2.83 V, 1 m
Dimensions (W x H x D) 415 x 135 x 167 mm (16-3/8" x 5-3/8" x 6-5/8")
Weight 3.3 kg (7.3 lbs)
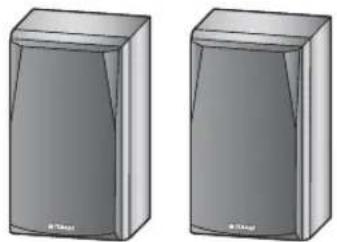
Surround speakers (NS-B51)
Type. 2-way acoustic suspension Non-magnetic shielding type
Driver Woofer. 10 cm (4") cone type Tweeter .2.2 cm (7 / 8^ ) balanced dome type
Nominal input power 50 W
Maximum input power 150 W
Impedance Nominal 6Ω
Frequency response 69 Hz - 36 kHz
Sensitivity. 89 dB/2.83 V, 1 m
Dimensions (W x H x D) 148 x 252 x 150 mm (5-7/8" x 9-7/8" x 5-7/8")
Weight 2.1 kg (4.6 lbs)
Specifications are subject to change without notice.
Précautions
Altavoz central (NS-C51)
Altavoz Surround (NS-B51)
Altavoz central (NS-C51)
Tipoi. Suspension acustica de 2 vias Tipo de proteccion magnetica
Altavoces Surround (NS-B51)
Tipo. Suspension acustica de 2 vias Tipo blindado no magnéticamente
MepbI npeIoocToPOxKHOCTN
IpoHTaTe OINHcAHne CJIeNyIOUHX MeP IpeIOCTOPOKHOCTn IIepeN HcIOJIb3OBAHHem aIIHapata.YamaHa He Hecet OTBeTCTBEHHOCtB 3a JIO6bIe IOBpeKJDeHn (H) TpaBMbl, Bbl3BaHHbIe HecO6JIIOJeHHem IIpNBcJIeHHbIX HnKe MeP IpeIOCTOPOKHOCTn.
1.ДяобснчнгHaJIyHcropc3yJbTaTa, NOXaJIyHCTa,BHNMaTcJIbHO H3yHTeJaHHyIO HHcTpYKIIHIO.XpaHHTe ee B 6e3OJIacHOM MeCTe JIЯ IaJIbHeIIIErO HcIIOJIb3OBaHHI.
2.ДаHHbIe KOJOHKn yCTaHaBJIHbaIte B IPOXJIaIHOM, cyXOM, YNCTOM MecTe -IOJaJIbIIIE OT OKOH, HCTOuHHKOB TEIIJIA, HCTOuHHKOB Upe3MePHoH Bn6paIiH; N36eRaIte NbIbIbHbIX, BJIaXHbIX IN XOJOIHybIX MecT. N36eRaIte ycTaHOBKn BO3JIe HCTOuHHKOB 3JIeKTPnueCKoTO IIyMa (HaIIpHMep, TpaHcΦopMaTOPOB IN MOTOPOB).ДЯпpeIOTbPaIeHn IOKapa IIN IOpaKeHn 3JIeKTPnueCKHM TOKOM He IIOJBepraIte KOJOHKn BO3IcIcTBHIO IOKJN IIN BOIbI.
3.IIpaTbpaHnHaJeΦopMnPoBaHHn HnO6ecuBaHHaKoPcya He IIOBepraHTeKOIOHKN BO3HeCTBHO IIpMaBIX COJIHCuHBIX JyChnHpye3MePHOBBJAxxHOCTH.
4.He yctaHaBnBaHTe KOJIOHKN B MecTax, TJe eectb PnCK IaChHn Ha HNX IOCTOPOHHX IIpcIMcTOB H (NJIN) rJe OHMOrY 6bITb He3aIIINIEHbI OT KaNaIOIHx HIN pa36pb13rHBAeMbIX XIKOCTeH.
5. Hc paioIaraiTc cBepxHa KOIOHkax CJIeIyIOuHc IpcIMctbI:
-ПочHe KOMIOHeHTbI, TaK KaK 3TO MOKeT
ПиВСТН K IOBpeKДсHИО HIN
OБССИВСИНBAHHIO IOBcpxHOCTH KOJIOHOK.
-TopnHe IpeIMeTbI (HaIIpHMeP, cBeuH), TaK KaK 3TO MOKCT IIpNBcCTN K IOXkapy, IOBpcKJcEHIO KOJOHOK HIN CTaTB IIpNHNOH TpaBMbl.
EMKOCTHcXHIXKOCTBIO,TaKKaK OHa MOKeT IIPOJINTbCnCTaTBIIpHUNHOIOPaKeHHIIOJIb3OBaTeJIgJEKTPNueCKHM TOKOM HIN IOBpeKJHeHHKOJOHOK.
6.He yctaHaBnBaHte KOJIOHN B MecTaX, Ie OH NMOrY 6bITb OIPOKHyTbI HIN NOBpeKJeHbI YnaBIMM IIpeMeTaM. JyHIIee KaueCTBO 3ByaHH TaKke 6yET ObecHeHO IIpH pa3MeHHeHH Ha ycToHBOH IOBepxHOCTN.
7.Pa3MeHHeK KOJIOHOH Ha OJHOH TOH Xe NOJIKe Hn HA IIOCTaBKe IPOOHpIBaTeJIg INCKOB MOKeT IIpHBecTH K IIOBJIChHIo 0ΦΦeKTa O6paTHOH CB3H.
8.EcJH BbYcTbHINTe NckKaXeHne 3Byka, HcO6XoJHMo YMcHbHHTB rPOMKocTb C IOMOIIbIO pcryIaTopa rPOMKocTH Ha ycJIHTcJIe. Hc IO3BOJIAIte YcNJIHTeJIHO pa60TaTB BpeKIMe "KJIINHHra".B IIpoTHBHOM cIyuae KOJOHKn MOrYT 6bITb IOBpcXJChbl.
9.Пи NCIOJIb3OBaHH yCHJITeJIЯ, HOMHaJIbHaB BIXOINHAR MOIIHOCt b KOTOPo BbIIIE, qEM HOMHaJIbHaB BXOINHAR MOIHOCTb KOJOHOK, 6yJBTC BHIMaTcJIbHbI, TTO6bI H cIOnyCTHTb IpcBbIIICHN MaKChMaJIbHOB BXOINHO MIOIHOCTH KOJOHOK.
10.He IINMCHHnTE XHMNIECCKHe paCTBOPHTeINIJI OYHCTKN KOJIOHOK, TAK KA K3O MOKET IIpNBecTH K pa3pyHIIHIO IOKpbIBaIOIeO cIIO. HcIOJIb3yIte YHCTyIO cyXyIO TKAHb.
11.He IIItaHTecb MoHnHnHnPOBaTb HIN peMOHTnpOBaTB KOJIOHN. IIpH Heo6XOIMOCTH O6paITeCB B cepBHCbI ueHtp YamaHa. HN B KOEM cIyuae He OTKpbIBaHTe KOpNc KOJOHOK.
12. BlaJeIeu annapata HeceT OTBeTCTBeHHocTh 3a erop a3MeHcHHe HnadeKHyU yctAHOBky. YamaHa He HeceT OTBeTCTBeHHocTh 3a JIObIe HeccactHbIe cIyuaH, BB3BaIIbIbe IIeppaBnJIbIbIM pa3MeHcHEm IIn yCTaHOBkoAkyCTHueCKoCHCTeMbl.
Hhopmaunna IIOIb3OBateJeI no c6opy u yTHIN3aunn CTapO aannapatypbI

3TOT 3Ha aIIIapatype, yIaKOBkax H B COIOPOBOIDTe.IbHbIX IOKymeHTax yKa3bIBaIOT Ha TO, YTO IIOePkaHHbIe 3JIeKTpUcckHe N 3JIeKTPOHHbIe IIp6OpB1 He IOJXHbI BBI6paCbIBaTBcB BMCCTe C O6bIuHbIM IOMaIHHM MyCOPOM.
JIpaBnIbHOJ O6pa6OTKN, XpaHeHHN H yTHIN3aHcCTapOaIIIAPAlypbI,IOXaJIyNcTa cJaBaHTe Hx B COOTBeTCTBYIOUHe c6OpHbIE IIYHKTBi, CORJIaCHO BaIeMy HAIIHOHaJIbHOMy 3aKOHOJaTeJIbCTBy I nIpeKTHB 2002/96/EC.
IIpnIpaBnIbHOMOTJeJIeHHN3THX TOBaPOB,BblIOMORAeTe COxpaHrTa IIeHHbIpeCypcbI INIpeIOTBpaIIaTb BpeIHoe BJIINHHe Ha 3IOpOBBe JIOJeI OKpyKaIOHJyIO cpeIy,KOTOpoc MOKeT BO3HNKHyTb H3-3a HeCOoTBeTCTByIOJeRO O6paSeHHNc OTXODAMH.
3a 6oJIe e IIOpO6Hoi HnΦopMaIueH O c6ope n yTHJIN3aIiH CTapbIX TOBAPOB IOKaJIyIcTa OpaIaIaHTecb B BAII JIOKaJIbHyO aIMMHNCtPaIHHO, B BAIII IIpHMeMHbI INYKTK HIN B MaRa3HHrDe BBI IIpHO6peJIn 3TN TOBApbl.
[InDopMaunno yTHJIN3aHNNB npyRnX cTpaHax 3a IIpeJIaMn Ebponeckoro Coio3a]
3TOT 3HAK DeHCTBHTCEJH TOJIbKO Ha TeppHTOpHN EBpOneCKoro CoIO3a. EcIN BbXOTHTe H36abHTbcr O TTHX IIpeIMeTOB, IOKaJIyNCTa O6paHTecb B BaIHy IOKaJIbHyU aDMHHnCTpaIuO HII INPODAIBy N CIPoCHTe O IIpaBNIbHOM cIOOCoe yTHIN3aIIHN.
YXoI3aKoJIOHKOI
JIYIYIYIYIYIYIYIYIYIYIYIYIYIYIYIYIYIYIYIYIYIYIYIYIYIYIYIYIYIYIYIYIYIYIYIYIYIYIYIYIYIYIYIYIYIYIYIYIYIYIY10000000000000000000000000000000000000000000000000000000000000000000000000000000000000000000000000000
Copepknne
Codepxmuoe ynaKOBkn 1
YctaHOBka KOLOHOK 1
YcTaHOBKaIeHTpaJIbHOn KOIOHKn 2
KpeHneHne KOIOHOK Ha CTeHy. 2
IopknoueHne KOJHOK 4
CxemaIOJIKIIOUeHn4
Texnueckne xapaktepuctukn 5
CopeKIMoe ynaKOBKn
Y6eITecb B TOM, YTO B COCTaB KOMIIeKta BXOJrT CneIyIOJIne H3JeINr.
LcHtpaIbHaKoJOnKa(NS-C51)
Kolonka 06bemHoro 3ByaHn (NS-B51)

Kpenexhbie 3IemeHtbl (dny ceHTpaBbHOJ KOHOKn)


Ka6eBb KonoHKn
10m4M
yctaHOBka KOJIOHOK
TnI. ⅡByXIOIOChA aKyCTNuecka CNCTeMa MaHTbI TIN 3aNTbI
TIOOBKa Hn3KoUaCTOTHbI dINHaMnK 10-cm KOHNueckn dINHaMnK x 2 BbICOKOAcTOTHbI dINHaMnK c6aJAHcnpOBaHHaI rOIOBKAkyIOJIbHOrTOIIa dNAmEtPOM 2,2cm
HomHaJIbHaB BXOJHaMa MoIHOCTb 60 Br
MaKcHmAbbHa BxOHa MaHocB 180 Br
HomHaJIbHbI HmIIeJaHc. 6Ω
YactothaXapaKTepeHCTHa 70T-36K
YyBCTBHTeJIbHIOCTb. 92πB/2,83B,1M
Fa6apHTbIe pa3MepbI (III x B x I) 415 x 135 x 167 MM
Macca 3,3 K
KolonHKo6bemHoro 3ByaHn (NS-B51)
TII. IByXIOIOCHa aKyCTHueCKa CNCTeMa C MaHTnTHbIM 3KpaHnpOBaHnEM
TolOBka Hn3KoUaCTOTHbI dINHaMVK 10-cm KOHNueCKN dINHaMIK BbICOKOaCTOTHbI dINHaMIK c6aJIaHCnPOBaHHaT OJIOBKAkyIObHOrTOIIa ImaTePOM2,2cm
HomHaJIbHaB BXOJaHaa MoIHoCTb 50 Bt
MaKcHMaJIbHaB BXOJHa MoIHHocTb 150BT
HomHaJIbHbI HmpeJaHc 6Ω
YactoTHaXapaKTepeHcTnKa. 69 T-36 K
YyBCTBNTeIbHOCTb. 89 JB/2,83 B,1 M
Ia6apHTbIe pa3MepbI (III x B x I).... 148 x 252 x 150 MM
Macca. 2,1 K
Texnueckne xapaKtepncnKMOyr n3MeHrbc6e3 yBeOMenHn.
| Important Notice: Guarantee Information for customers in EEA* and Switzerland | English |
| For detailed guarantee information about this Yamaha product, and Pan-EEA* and Switzerland warranty service, please either visit the website address below (Printable file is available at our website) or contact the Yamaha representative office for your country. * EEA: European Economic Area | |
| Remarque importante: informations de garantie pour les clients de l'EEE et la Suisse | Français |
| Pour des informations plus détaillées sur la garantie de ce produit Yamaha et sur le service de garantie applicable dans l'ensemble de l'EEE ainsi qu'en Suisse, consultez notre site Web à l'adresse ci-dessous (le fichier imprimable est disponible sur notre site Web) ou contactez directement Yamaha dans votre pays de résidence. * EEE : Espace Economique Européen | |
| Wichtiger Hinweis: Garantie-Information für Kunden in der EWR* und der Schweiz | Deutsch |
| Für{nahere Garantie-Information über diese Produkt von Yamaha, sowie über den Pan-EWR*- und Schweizer Garantieservice, besuchen Sieitte entweder die folgend angegebene Internetadresse (eine druckfähige Version befindet sich auch auf unserer Website), oder wenden Sie sich an den für Ihr Land zuständigen Yamaha-Vertrieb. *EWR: Europäischer Wirtschaftsráum | |
| Aviso importante: información sobre la garantía para los clientes del EEE* y Suiza | Espanol |
| Para una información detallada sobre este producto Yamaha y sobre el soporte de garantía en la zona EEE* y Suiza, visite la direction web que se incluye más bajo (la version del archivo para imprintir esta disponible en nuestro situ web) o póngase en contacto con el representante de Yamaha en su País. * EEE: Espacio Económico Europeo | |
http://europe.yamaha.com/warranty/

YAMAHA