Wipebot Pro - Robot vacuum Create - Free user manual and instructions
Find the device manual for free Wipebot Pro Create in PDF.
| Product Type | Window Cleaning Robot |
| Brand | Create |
| Model | Wipebot Pro |
| Power Supply | Mains adapter (AC cable) |
| Backup Battery | Rechargeable internal battery (20 minutes autonomy) |
| Minimum Glass Surface | 30 x 30 cm |
| Cleaning Method | Automatic S-path with water spray |
| Spray Function | Yes, selective left and right nozzles |
| Remote Control | Included (route planning and localized cleaning) |
| Bluetooth Connectivity | Yes, compatible with CREATE HOME app |
| Mobile App | CREATE HOME (iOS and Android) |
| Water Tank Capacity | Approximately 100 ml (estimated) |
| Included Accessories | 8 mop pads, dosing bottle, safety cable, adapter, remote control |
| Safety Cable | Yes, attach to stationary object |
| Dimensions (approx.) | 30 x 30 x 10 cm (estimated) |
| Weight (approx.) | 1.5 kg (estimated) |
| LED Indicators | Green (operating), red (low battery/error), flashing (issues) |
| Sound Alarm | Yes (beeps for error or cycle end) |
| Usage | Indoor and outdoor (not in rain/fog) |
| Maintenance | Regular cleaning of mop pads and water tank |
| Safety | Do not use on cracked glass, automatic stop if suction is lost |
| Housing Material | ABS plastic (estimated) |
| Operating Temperature | 0°C to 40°C |
| Warranty | Refer to manual or customer service |
Frequently Asked Questions - Wipebot Pro Create
User questions about Wipebot Pro Create
0 question about this device. Answer the ones you know or ask your own.
Ask a new question about this device
Download the instructions for your Robot vacuum in PDF format for free! Find your manual Wipebot Pro - Create and take your electronic device back in hand. On this page are published all the documents necessary for the use of your device. Wipebot Pro by Create.
USER MANUAL Wipebot Pro Create
Security instructions 6
Parts List 8
Box contents 8
Installation instructions 9
Instructions and precautions 11
Remote control 12
Route planning 12
Spot Cleaning Route 13
LED indicator light and sound 13
Bluetooth connection 13
Troubleshooting 14
Water tank maintenance 15
Cleaning 15
PORTUGUES
Thank you for choosing our windows cleaner. Before using the appliance, and to ensure the best use, carefully read these instructions.
The safety precautions enclosed herein reduce the risk of death, injury and electrical shock when correctly adhered to. Keep the manual in a safe place for future reference, along with the completed warranty card, purchase receipt and package. If applicable, pass these instructions on to the next owner of the appliance. Always follow basic safety precautions and accident prevention measures when using an electrical appliance. We assume no liability for customer failing to comply with these requirements.
SECURITY INSTRUCTIONS
The use of electrical appliances requires basic safety precautions. Please read all instructions carefully.
- Carefully check the safety cable, make sure it is not damaged and that it is securely attached to an immovable object.
- When the window cleaner is operating at a considerable height from the ground, place caution signs on the ground.
- Do not spray this appliance with water and do not use glass cleaner on cracked glass.
- When cleaning the housing of the appliance, turn it off. This will prevent possible personal injury due to the operation of the device.
- Do not touch the rotating parts or slots of this appliance directly with your hands or any other part of your body.
- When using it, follow the instructions in this manual. If you can't solve any problem, please contact customer service directly. Do not repair it without authorization as it may cause personal injury.
- This appliance is for home use only.
- Do not use third-party chargers, or remove the case, battery or charger without authorization.
- When there is any damage or crack on the appliance, do not use it and contact customer service.
- Keep the charger away from heat sources.
- If you want to transport the window cleaner, we recommend using the original packaging and turning off the device.
- If you are not going to use this product for a long period of time, please charge it fully and turn it off. Store it in a cool, dry place. This device should be charged at least once every three months to prevent the battery from being damaged by being stored for too long.
- Make sure the glass is dry. Do not use this appliance in rain or fog.
- Make sure the safety rope is not broken and fixed on an immovable object when using the robot. When you need to work at height outdoors, you should set up a safety warning on the ground to avoid accidental personal injury.
- Do not use on cracked or broken glass, confirm that the window area is greater than 30 × 30 ~cm in height before use. Check if the glass has super narrow frame, beveled frame, beveled glass, frameless or uneven glass glue, raised seams, leaking, gaps and other abnormal situations, use the remote control to control the robot if necessary.
Note: It is not recommended to use or use protection to use in the above situation, abnormal use environment may cause a fall.
- Be sure to turn off the robot when cleaning the surface of the robot to avoid danger during the movement of the robot.
- Please place the robot and accessories out of the reach of children and prohibit children from operating this product. When the robot is working, it is strictly prohibited for fingers and any parts of the body to touch this product.
- This appliance can be used by children over 8 years of age and persons with reduced physical, sensory or mental capabilities or lack of experience and knowledge if they are supervised or have been given instructions on how to use the appliance safely and are aware of its potential hazards.
- Please use this product at home ambient temperature of 0^ 40^ , when the temperature is lower, it is recommended to use antifreeze glass water.
- The storage environment should be dry, avoid direct light, do not store the robot with oil, gas or flammable items.
-
Charge the battery:
-
Do not use third-party adapters and do not disassemble or modify the robot, battery and adapter.
- Do not continue using the charger if it is damaged or broken, contact customer service.
- Place the adapter away from heat sources.
- If the product is to be sent, it is recommended that it be in its original packaging and always with the robot turned off.
- In case this product is not going to be used for a long period of time, please charge it fully and turn it off. Store this product in a cool, dry place. This product should be charged at least every three months to prevent the battery from being out of service due to prolonged storage.

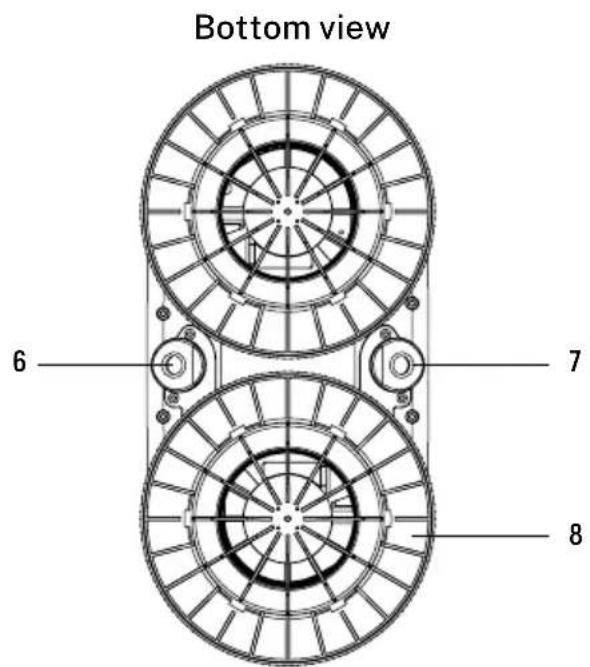

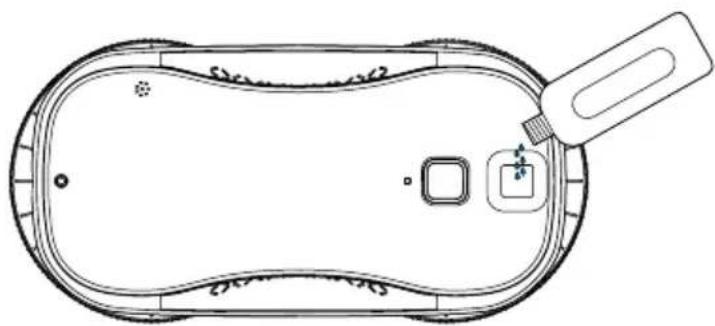
- Water tank
- On/off button
-
Indicator light
-
Sound output
- Power cord
-
Left injector
-
Right injector
- Mop holder
- Safety rope attachment
BOX CONTENTS
Window cleaning robot

Remote control Mops x8

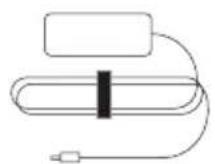

Dosing bottle User manual


AC Cable Adapter Security cable
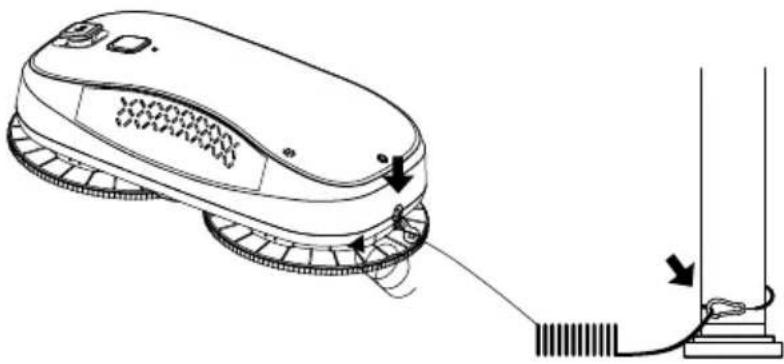
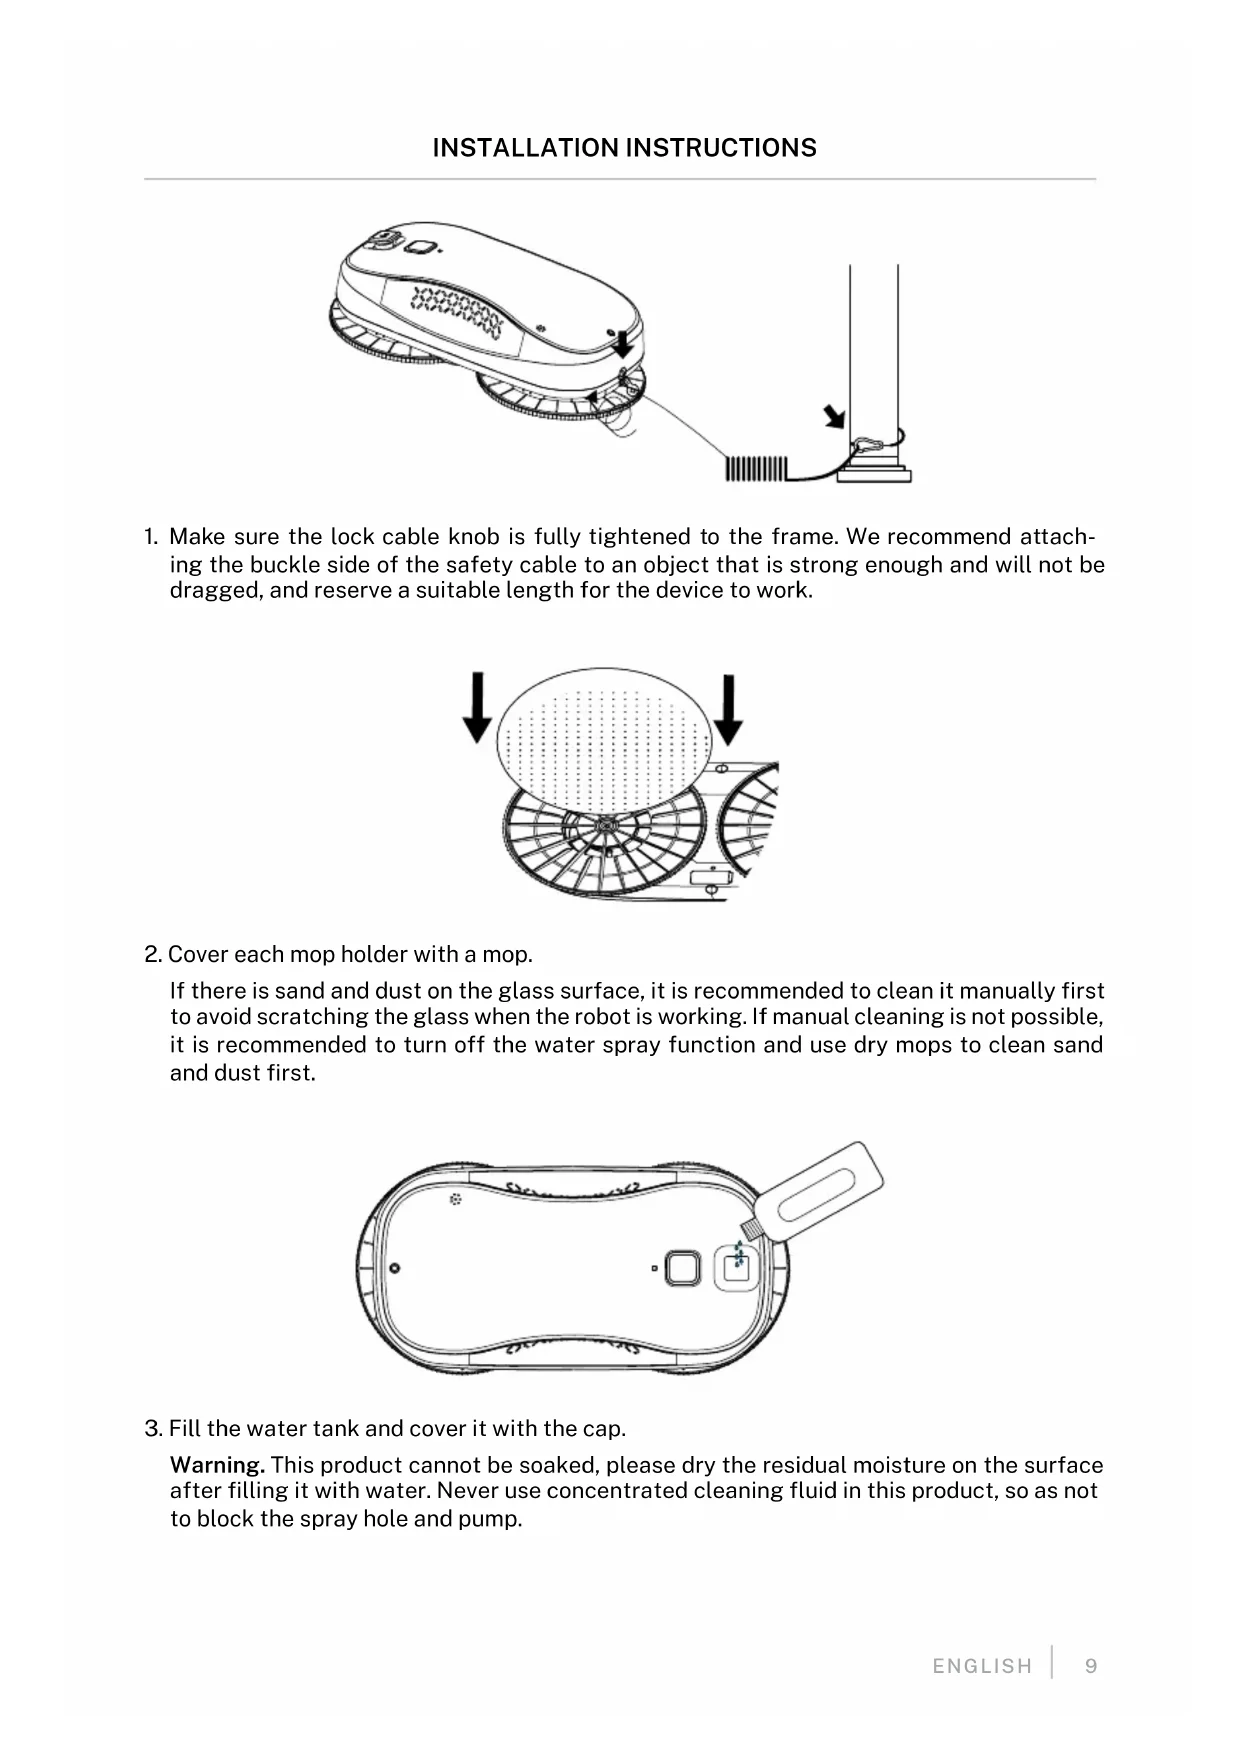
- Make sure the lock cable knob is fully tightened to the frame. We recommend attaching the buckle side of the safety cable to an object that is strong enough and will not be dragged, and reserve a suitable length for the device to work.
- Cover each mop holder with a mop.
If there is sand and dust on the glass surface, it is recommended to clean it manually first to avoid scratching the glass when the robot is working. If manual cleaning is not possible, it is recommended to turn off the water spray function and use dry mops to clean sand and dust first.
- Fill the water tank and cover it with the cap.
Warning. This product cannot be soaked, please dry the residual moisture on the surface after filling it with water. Never use concentrated cleaning fluid in this product, so as not to block the spray hole and pump.
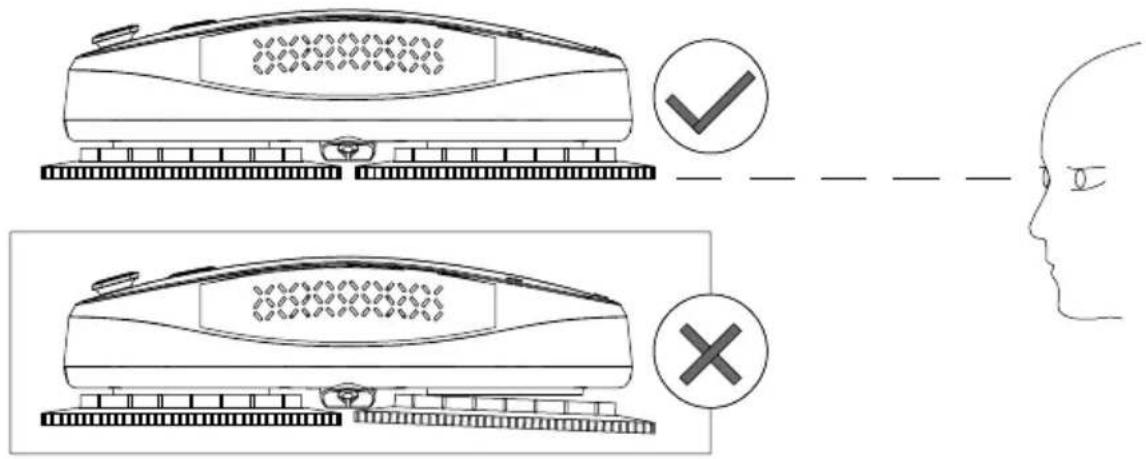
- Make sure the mop holder is installed in the correct position before use. After installing the bracket, observe from the sides at 360^ to make sure each snap is glued in place to prevent air leaks.

- Insert the wiper power cord into the end of the adapter and tighten them. Connect the two ends of the AC cable to the adapter and plug respectively.

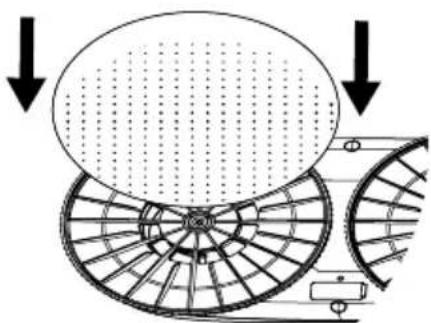
- Press and hold the power button for 3 seconds and the robot will turn on. After the fan is running, place the robot on the glass in a place away from the window frame. If the robot cannot suction the glass, check for an air leak.

Safety rope
Check if the safety rope is intact and on a stable object.

Work environment inspection
- Make sure the glass surface is dry, do not use it when it is raining or when the glass surface is foggy.
- Do not use on broken and cracked glass.
- If working at height outdoors is required, ground safety warnings should be set to prevent accidental personal injury.
- The robot cannot be used when there are adhesives or oil on the glass surface, to prevent the robot from slipping and falling from the glass.

Wet and dry mops
If there is sand or dust on the glass surface, it is recommended to clean it manually first to avoid scratching the glass when the robot is working. If manual cleaning is not possible, it is recommended to turn off the water spray function and use dry mops to clean sand and dust first.
If there are only dirt stains, it can be cleaned directly with the water spray (activate the water spray by default).
If there are slips and twists when the robot goes up, install a dry mop and turn on the water spray.
If there are small areas of stubborn stains, you can use "spot cleaning" and turn on the water spray.
If the robot experiences strong shaking or rattles, install a dry mop.

Begin
- Make sure the power cord and plug are fully connected.
- Press and hold the power button for 3 seconds and the robot will turn on.
- When the robot motor starts working, place the robot on the glass in a place away from the window frame. Make sure the robot has completely stuck to the glass and then release it.
- Short press the power button and the robot will start working.

Remove the robot from the glass
- When the robot is working, hold the safety cable with one hand and short press the power button to stop the robot and lower it with the other hand.
- If you can't reach the robot and don't have the remote control at hand, please stay close to the glass to drag the safety rope and slowly pull the robot to the accessible place by hand, then press the power button and remove the robot from the glass.
-
After completely disassembling the robot, press and hold the power button for 3 seconds to turn it off.
-
This robot is equipped with an internal battery, which can keep the robot powered on for 20 minutes in case the robot is accidentally disconnected from the power cord. The robot will give an audible and visual alarm, please remove the robot from the glass as soon as possible.
- When the indicator light is red before turning on the device, it means that the internal battery is too low to start the robot. Please keep the robot connected to electricity to charge until the red light goes off.
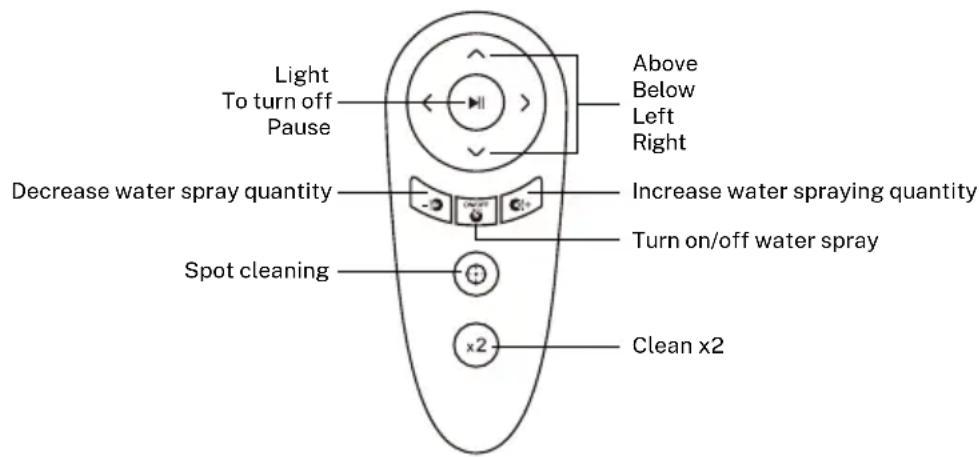
REMOTE CONTROL
ROUTE PLANNING

- Place the glass cleaner in the center of the glass, away from the window frame. Press and hold the power button to turn on the robot, and then short press the button to start it. The robot will automatically move up and then to the right until it reaches the top right corner of the glass.
- After the robot has reached the upper right corner, it will begin to clean the glass by drawing an S-shaped curve from top to bottom. If the robot's water spray function is activated, when the robot moves to the right, the right nozzle sprays water and the left nozzle does not spray water. When the robot moves to the left, the left nozzle
sprays water and the right nozzle does not spray water.
- After cleaning is completed, the robot will stop at the bottom left or right corner depending on the shape of the glass.
Note: When the robot starts working, it will rise to the upper right corner of the glass. The left and right nozzles will not spray water when the robot moves from the upper right corner to the upper left corner for the first time, even with the water spray function activated (default software setting).

Spot Cleaning:
In the area range specified by the user, the robot will start cleaning up and down in spot cleaning.
LED INDICATOR LIGHT AND SOUND
| Indicator | Light and sound | Reason and Solution Solution | |
| Status indicator | Green light · Working normal. | ||
| Green light and three long beeps | · Window cleaning is complete. | ||
| Charge indicator | Red light · Battery power is insufficient. | · Charge for 15 more minutes to turn the robot back on. | |
| Status indicator | Flashing red | · The robot is offline. · Insufficient suction power. · The friction with the glass is too great or too small. | · Plug in the power supply or remove the robot from the glass. · Check the robot for air leaks. · Replace the cleaning cloth as appropriate. |
| Alternating light red and green | · Robot error. | · Please contact customer service staff. | |
BLUETOOTH CONNECTION
-
Reset the robot's bluetooth:
-
Turn off the robot, unplug from the power source and plug back into the power source.
- Press and hold the power button for more than 8 seconds.
-
When the reset is successful, the fan will stop working and then beep for 2 seconds.
-
Turn on the Bluetooth of your mobile phone.
-
Download the CREATE HOME app and register or log in to the app if you already have a user.
- Add the device by pressing "+" and follow the instructions in the app until you finish connecting your device.


iPhone OS Android OS
-
When the error indicator flashes red with short continuous beeps, check whether:
-
The power cord plug is loose or damaged causing power outage or poor contact.
- The glass or mop is too wet and the friction is too low.
- The glass has impurities attached and causes too high friction.
- The mop holder is installed incorrectly causing air leaks.
-
The glass surface is sticky.
-
The error indicator flashes red and green alternately with an alarm beep.
-
It means that a problem occurs in the internal hardware of the robot, please contact customer service.
- In the case of special glass, when cleaning the bottom of the glass, it needs more time to clean, please use the remote control.
-
In case the robot cannot walk freely, change the mop or inspect the screws of the cleaning roller, make sure they are not loose.
-
In case the robot cannot walk freely, replace the mop or inspect the screws of the cleaning roller and make sure they are not loose.
- If the robot mop holder shakes too hard when the robot is working, check whether the mop is too wet and replace it with a dry mop.
- There will be a little delay in water spraying when the robot starts working, this is a normal phenomenon.
- After cleaning, there are residual round marks left on the glass surface, please change the mop again.
- After completing the entire cleaning process, the robot continues to move and does not stop automatically. Press the pause button and take him down.
- When in use, errors may occur occasionally, please restart the robot as a solution.
-
If there is downward sliding when the robot is working, check whether:
-
The mop is too wet or too dirty.
- The robot cannot resume work after a while, please replace the mop with a clean and dry one.
-
The mop is too dry to cause slipping, turn on the water spray function to moisten the mop and then the robot can resume work.
-
Cause of air leak, check if:
-
The mop holder is installed correctly.
- The installation of the cleaning mop to achieve flatness.
- The surface of the glass or other target surface is curved or covered with irregular surfaces, such as stickers.
-
The robot goes to the window frame, the mop holder will be deformed to produce a wide range of air leaks.
-
Make sure that water or solution does not spill out of the water tank. If accidentally spilled, dry it immediately to prevent water from damaging the robot.
- When the robot is not in use, make sure there is no residual liquid in the water tank. If you use a solution for cleaning, it is recommended to pour the solution and then fill it with some fresh water to clean the water tank and not leave any water in the tank.
Note: Make sure there are no impurities in the added solution to avoid blocking the nozzle and pump.
CLEANING
- In case of sand or dust on the surface of the glass, please clean it with a dry mop, otherwise the wet mop will mix with the sand or dust and scratch the glass.
- When there is no sand or dust, lightly spray clean water or detergent several times on the mop or glass, without overwetting it.

In compliance with Directives: 2012/19/EU and 2015/863/EU on the restriction of the use of dangerous substances in electric and electronic equipment as well as their waste disposal. The symbol with the crossed dustbin shown on the package indicates that the product at the end of its service life shall be collected as separate waste. Therefore, any products that have reached the end of their useful life must be given to waste disposal centres specialising in separate collection of waste electrical and electronic equipment, or given back to the retailer at the time of purchasing new similar equipment, on a one for one basis. The adequate separate collection for the subsequent start-up of the equipment sent to be recycled, treated and disposed of in an environmentally compatible way contributes to preventing possible negative effects on the environment and health and optimises the recycling and reuse of components making up the apparatus. Abusive disposal of the product by the user involves application of the administrative sanctions according to the laws.