
AVDW1100V - Car entertainment screen PIONEER - Free user manual and instructions
Find the device manual for free AVDW1100V PIONEER in PDF.

| Product type | Car entertainment screen |
| Brand | PIONEER |
| Model | AVDW1100V |
| Screen dimensions (W x H x D) | 297 x 181 x 42 mm |
| Screen weight | 1.39 kg |
| Remote unit dimensions (W x H x D) | 178 x 157 x 30 mm |
| Remote unit weight | 0.68 kg |
| Power supply | 14.4 V DC (10.8 V to 15.1 V possible), negative ground |
| Screen size | 11.0 inches wide VGA, 16:9 format |
| Resolution | 1,152,000 pixels (800 x 480 x 3 RGB) |
| Color standard | NTSC/PAL/SECAM (auto or manual) |
| Built-in speaker | Diameter 36 mm |
| Headphone output level | 8 mW + 8 mW into 16 Ω |
| Operating temperature range | -10 °C to +50 °C |
| Storage temperature range | -20 °C to +80 °C |
| Main functions | Image adjustment (brightness, contrast, color, hue), wide display modes (FULL, JUST, CINEMA, ZOOM, NORMAL), ambient brightness sensor, VCR1 inputs (RCA and component) and VCR2 (RCA), component and RCA outputs, power control from a main device, microprocessor reset |
| Maintenance and cleaning | Use a soft dry cloth; do not use chemical detergents, gasoline or thinners; do not touch the screen with hard objects |
| Safety | Do not install where the driver can see the screen; start the engine before use; avoid moisture; entrust installation and maintenance to a qualified professional; use a fuse with the same amperage |
| Spare parts and repairability | Consult an authorized PIONEER dealer or service center; do not disassemble the screen (risk of electric shock); fluorescent tube lifespan approximately 10,000 hours |
Frequently Asked Questions - AVDW1100V PIONEER
User questions about AVDW1100V PIONEER
0 question about this device. Answer the ones you know or ask your own.
Ask a new question about this device
Download the instructions for your Car entertainment screen in PDF format for free! Find your manual AVDW1100V - PIONEER and take your electronic device back in hand. On this page are published all the documents necessary for the use of your device. AVDW1100V by PIONEER.
USER MANUAL AVDW1100V PIONEER
This product conforms to new cord colors.
Please Read All of These Instructions Regarding Your Display and Retain them for Future Reference 2
Fitting and Removing the Display 3
To fit the display 3
To remove the display 4
IMPORTANT INFORMATION.5
About This Product 5
Product Registration 5
Precaution 5
In Case of Trouble 5
Before Using This Product 6
To Avoid Battery Exhaustion 6
To Protect the LCD Screen of the Display 6
When Viewing is Difficult, use [BRIGHT] and [DIMMER] to Adjust 6
About the Video and Audio Outputs of this Unit 6
Resetting the System 7
- Resetting the Microprocessor
Key Finder 8
Component Parts and Features 8
Basic Operation 9
Turn On Power 9
Volume Adjustment 10
Selecting a Source 11
Changing the Wide Screen Mode 12
- Wide Modes Available
Adjusting the Screen 14
Picture Adjustment (BRIGHT/CONTRAST/ COLOR/HUE) 14
Picture Adjustment (DIMMER) 16
Settings 18
Input Setting (VCR1/VCR2) 18
Power Control Function 19
Using the Display Correctly 20
Handling the Display 20
About the Liquid Crystal Display (LCD) Screen 21
Keeping the Display in Good Condition 21
About the Small Fluorescent Tube 21
Connecting the System 22
Names and Functions of Connection Terminals 24
Connecting the Power Cable 25
Connection Diagram (VIDEO input) 26
Connecting the Audio and Video Output 27
Connecting with Pioneer Head Unit with Component Cable 28
Installation 29
Before Installing and Fixing 30
Before Affixing the Adhesive Tape 30
Installing the Hide-away Unit 31
- Installation Precautions
- Hide-away Unit Installation
Specifications 32
Please Read All of These Instructions Regarding Your Display and Retain them for Future Reference
- Read this manual fully and carefully before operating your display.
- Keep this manual handy for future reference.
- Pay close attention to all warnings in this manual and follow the instructions carefully.
- Never allow others to use the system until they have read and understood the operating instructions.
- Do not install the display where it may (i) obstruct the driver's vision, (ii) impair the performance of any of the vehicle's operating systems or safety features, including airbags, or (iii) impair the driver's ability to safely operate the vehicle.
- As with any accessory in your vehicle's interior, the display should not divert your attention from the safe operation of your vehicle. If you experience difficulty in operating the system, please park safely before making adjustments.
- Do not attempt to install or service your display by yourself. Installation or servicing of the display by persons without training and experience in electronic equipment and automotive accessories may be dangerous and could expose you to the risk of electric shock or other hazards.
- Please remember to wear your seat belt at all times while operating your vehicle. If you are ever in an accident, your injuries can be considerably more severe if your seat belt is not properly buckled.
- Never install this product in a place where it is visible to the vehicle's driver. Failing to do so could result in distracting images being potentially visible to the driver while the vehicle is in motion.
Use of this product is subject to any government laws regarding placement or use. PIONEER does not accept any liability for any problems, damage or loss incurred as a result of the product being used with an incorrect setting or in violation of any government laws.
Precaution:
- To prevent failure, be sure to turn the ignition switch or system power OFF before fitting or removing the display. Also take care not to grip the screen or buttons too firmly or to drop the display.
- Do not let any water get on the terminals on the display or on the cable and do not allow the terminals to be shorted by a metal object or the like. This can cause system breakdown.
- Be careful not to touch terminals on the display or on the cable. Doing so may cause connection failures. If any terminals are stained, wipe them with a clean dry cloth.
Note:
- The mounting arm described below is sold separately. For more information on the installation, refer to the instruction manual or consult your nearest dealer.
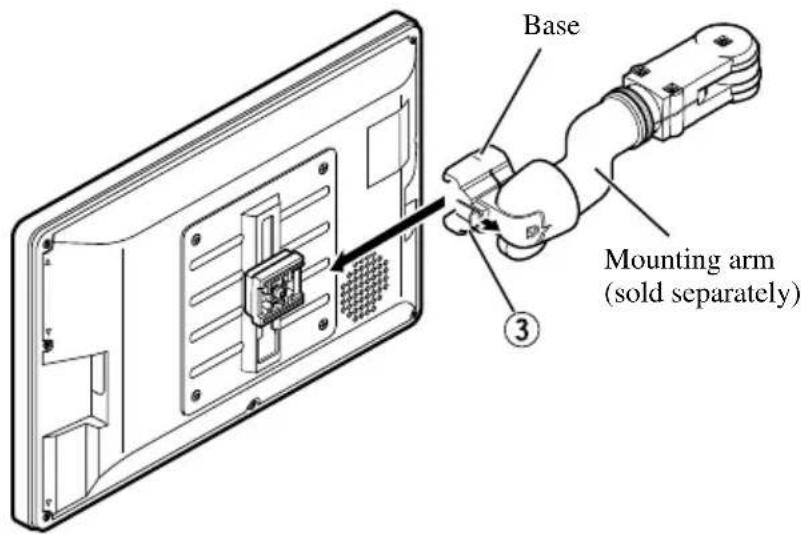
To fit the display
- Fit part ①of the bracket into the grooves ②of the base.
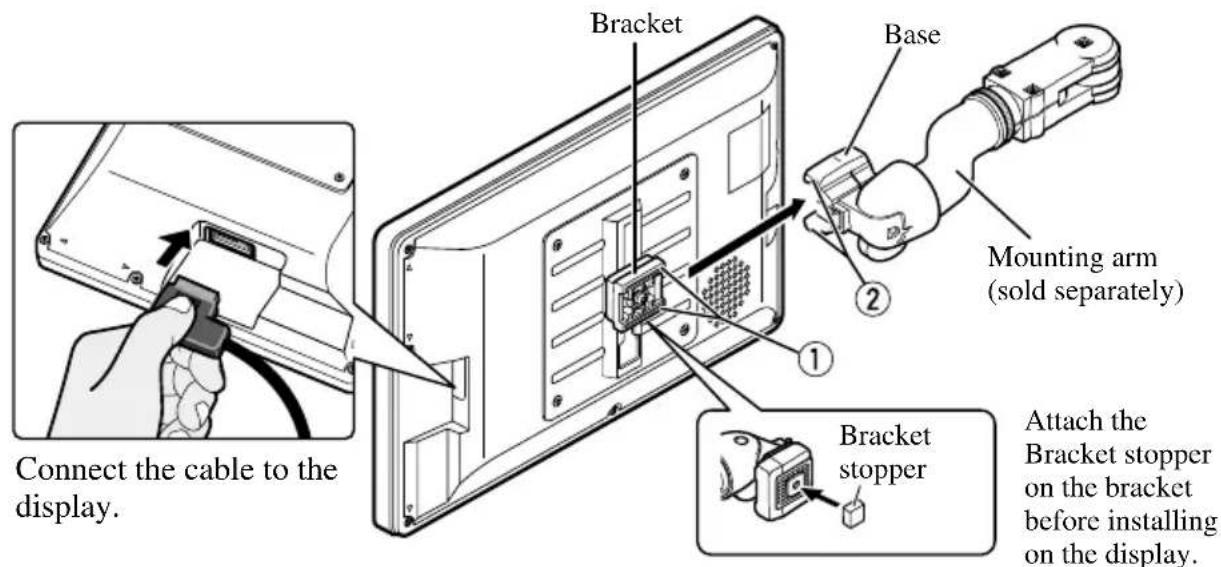
- Slide the display until it clicks into place.

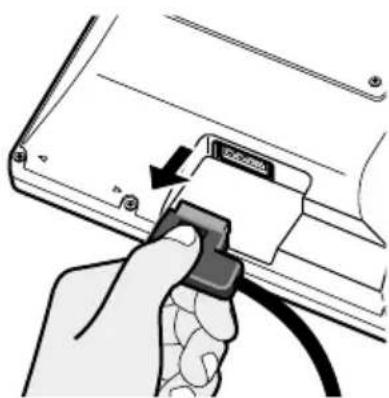
To remove the display
- Pull and hold the lock release lever ③ , then slide the display and detach from the base.
- To prevent theft of the display, remove the display when leaving the vehicle.
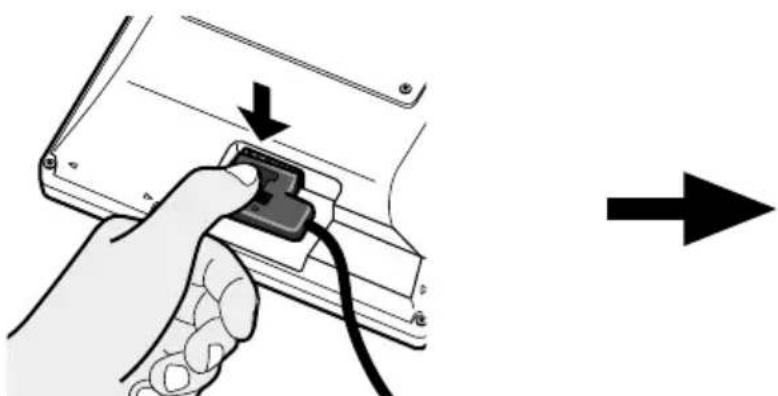
Press the lock release button. Keep holding the button and
unplug the connector.

If you want to dispose this product, do not mix it with general household waste. There is a separate collection system for used electronic products in accordance with legislation that requires proper treatment, recovery and recycling.
Private households in the 25 member states of the EU, in Switzerland and Norway may return their used electronic products free of charge to designated collection facilities or to a retailer (if you purchase a similar new one).
For countries not mentioned above, please contact your local authorities for the correct method of disposal.
By doing so you will ensure that your disposed product undergoes the necessary treatment, recovery and recycling and thus prevent potential negative effects on the environment and human health.
About This Product
- Do not place the display in a position where it will impede the driver's visibility or affect the operation of your vehicle's airbags or headrests.
- This product is designed solely for use from the rear seats. Never install the display in a location that enables the driver to watch the picture while driving.

CAUTION
Do not allow this product to come into contact with liquids. Electrical shock could result. Also, this product damage, smoke, and overheat could result from contact with liquids.
Product Registration
Visit us at the following site:

- Register your product. We will keep the details of your purchase on file to help you refer to this information in the event of an insurance claim such as loss or theft.
We offer the latest information about Pioneer Corporation on our website.
Precaution
- Always keep the volume low enough for outside sounds to be audible.
- Protect the product from moisture.
In Case of Trouble
Should this product fail to operate properly, contact your dealer or the nearest authorized Pioneer service facility.
To Avoid Battery Exhaustion
Always run the vehicle engine while using this unit. Using this unit without running the engine can result in battery drainage.
To Protect the LCD Screen of the Display
- Do not allow direct sunlight to fall on the Display when this unit is not being used. Extended exposure to direct sunlight can result in LCD screen malfunction due to the resulting high temperatures.
- When using a portable phone, keep the antenna of the portable phone away from the Display to prevent disruption of the video by the appearance of spots, colored stripes, etc.
When Viewing is Difficult, use [BRIGHT] and [DIMMER] to Adjust
Due to its construction, the view angle of the LCD screen is limited. The viewing angle (vertical and horizontal) can be increased, however, by using [BRIGHT] to adjust the black density of the video. When using for the first time, adjust the black density in accordance with the viewing angle (vertical and horizontal) to adjust for clear viewing.
[DIMMER] can also be used to adjust the brightness of the LCD screen itself to suit your personal preference.
About the Video and Audio Outputs of this Unit
When you connect a separate piece of AV equipment such as another display to COMPO- NENT OUT or VCR OUT (the RCA video and audio output) jacks of the hide-away unit, you can select the source for output with the SOURCE/POWER button.
- The video and audio source of the COMPONENT/RCA outputs of this unit cannot be selected independently.
- VOL-, VOL+ buttons will have no effect even if operated.

CAUTION
Never position the display in a place where the driver can view the picture while the vehicle is moving.
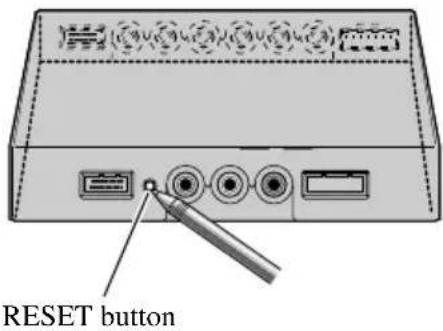
Resetting the System
Resetting the Microprocessor
Pressing the RESET button lets you reset the microprocessor to its initial settings, erase all memorized settings, and return the setup function to their initial (factory) settings.
Reset the microprocessor in the following cases:
When using this product for the first time after installation.
When the product fails to operate properly.
When strange (incorrect) messages appear on the display.
- To reset the microprocessor, press the RESET button on the hide-away unit with a pen tip or other pointed instrument.
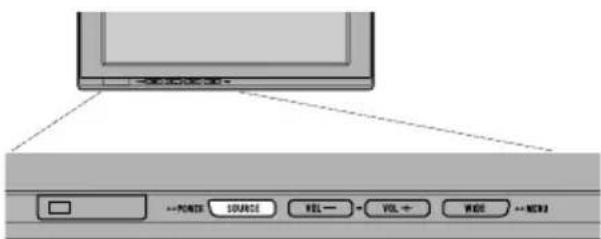
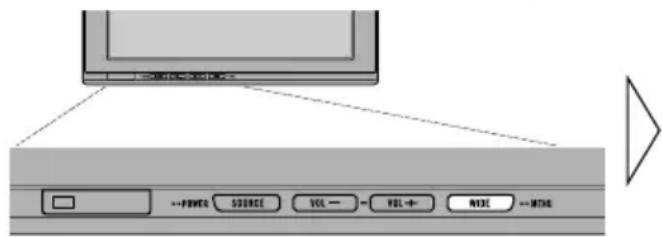
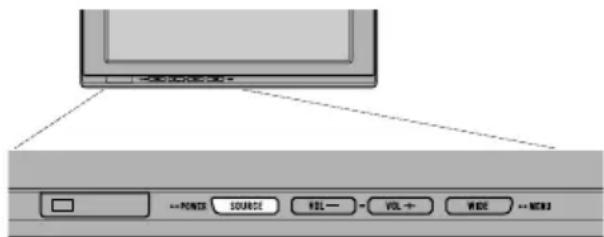
Component Parts and Features
■Display Unit
①Built-in speaker
Outputs sound from audio equipment connected to this product.
② Headphone jack
Connects a headphone with a 3.5mm stereo mini-plug.
③ Ambient light sensor
Senses ambient light. With this system, the brightness of the LCD screen automatically adjusts to ambient light.
④SOURCE/POWER button
Switches between sources.
Switches power ON/OFF.
⑤VOL-, VOL+ buttons
Adjust the volume of the built-in speaker ①, or adjust headphone volume when connected.
Change the settings when the setup function is displayed.
Note:
- Never set the volume so high that you cannot hear outside traffic and emergency vehicles.
⑥WIDE/MENU button
Changes the method of enlarging 4:3 video to 16:9 video. Press and hold this button displays the setup menu or picture adjust menu. Once the setup menu or picture adjust menu is displayed, its function is switched each time the button is pressed.

WARNING
Never install this product in a place where it is visible to the vehicle's driver. Failing to do so could result in distracting images being potentially visible to the driver while the vehicle is in motion.
Use of this product is subject to any government laws regarding placement or use.
PIONEER does not accept any liability for any problems, damage or loss incurred as a result of the product being used with an incorrect setting or in violation of any government laws.
Turn On Power
Remember to start the vehicle engine before turning on the power to preserve battery life.
1. Start the vehicle engine.
2. Turn on the system.
Press the SOURCE/POWER button.
To turn off the system, press and hold the SOURCE/POWER button.
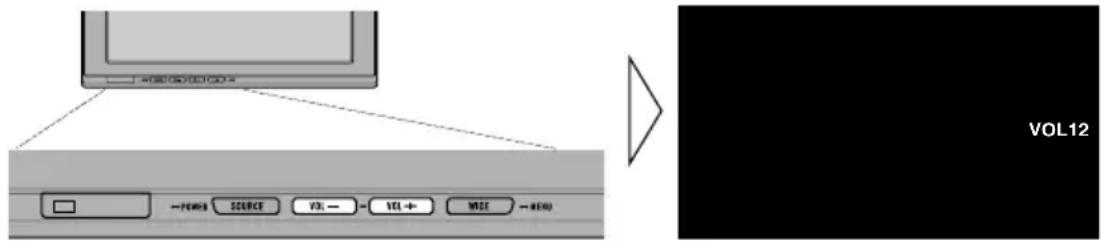
Volume Adjustment
Adjust the volume of audio output from the built-in speaker.
1. Adjust the speaker volume.
Press the VOL- or VOL+ button.
VOL+: Turn up
VOL:: Turn down
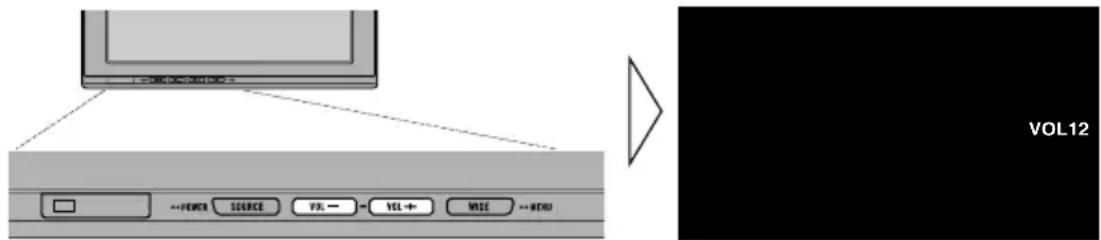
The volume of the built-in speaker can be adjusted in a range of 0 to 30.
Note:
- VOL-and VOL+ buttons adjust headphone volume when connected.
- Audio from the built-in speaker is turned off when headphones are connected.
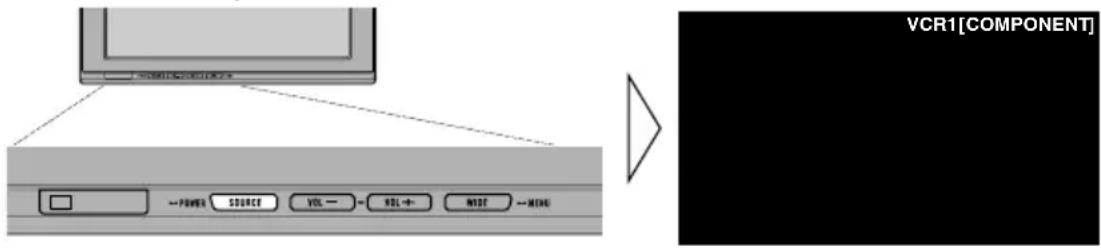
Selecting a Source
Switches video and audio source inputs from the AV equipment connected to VCR1 IN, VCR2 IN, or COMPONENT IN.
1. Select a source.
Press the SOURCE/POWER button. Each press of the button selects the desired source in the following sequence:
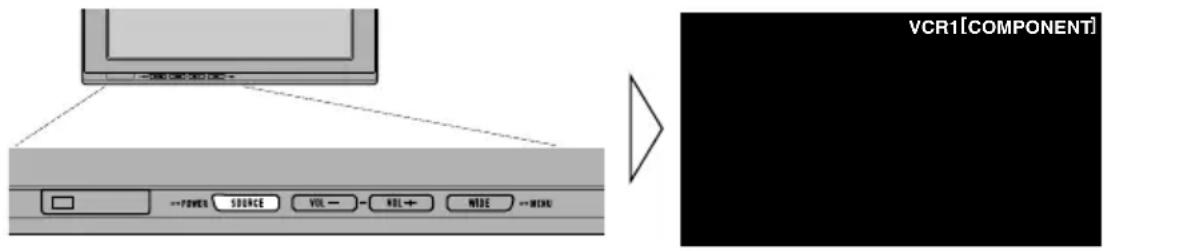
[VCR1 (COMPONENT)] or [VCR1] [VCR2] Exit to [VCR1 (COMPONENT)] or [VCR1]
Note:
- This product has two source inputs; VCR1 IN and VCR2 IN.
VCR1 IN has a component video input [VCR1(COMPONENT)] as well as an RCA video input [VCR1].
- [VCR1 (COMPONENT)] is a component video from the AV equipment connected to the VCR1 IN COMPONENT terminal. 26pin component cable (CD-CP300), which is sold separately is required. (Refer to page 28.)
- VCR1 COMPONENT input is given priority over VCR1 RCA input when both input are connected at the same time.
- A video input terminal which is not connected cannot be selected even if the SOURCE/POWER button is pressed.
- [VCR1] is selected when no connection is made for both VCR1 and VCR2 input.
Changing the Wide Screen Mode
You can change the way in which normal video (aspect ratio 4:3) enlarges to wide video (16:9). Select wide modes to suit the kind of video you are viewing.
1. Display a source to view. (Refer to page 11.)
2. Select a wide mode.
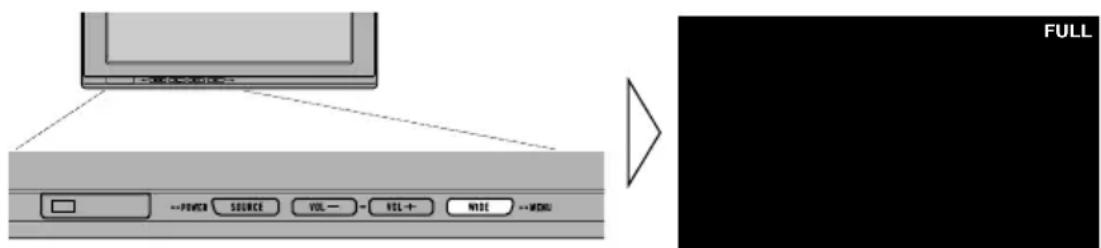
Each press of the WIDE/MENU button selects the wide mode in the following order: [AUTO] or [FULL] [JUST] [CINEMA] [ZOOM] [NORMAL] Exit to [AUTO] or [FULL]
Note:
- Settings are stored for each source (COMPONENT, VCR1, or VCR2).
- When video is viewed in a wide mode that does not match its original aspect ratio, it may appear differently.
- [AUTO] is selectable only if the AV equipment is connected to the COMPONENT IN video input terminal. When wide mode information is included in the video signal, the wide mode adjusts automatically according to the information.
- Remember that using the wide mode feature of this system for commercial or public viewing purposes may constitute an infringement on the author's rights protected by the Copyright Law.
Basic Operation
Wide Modes Available
FULL
Video with an aspect ratio of 4:3 enlarges only horizontally. Enjoy viewing video widened without missing parts.
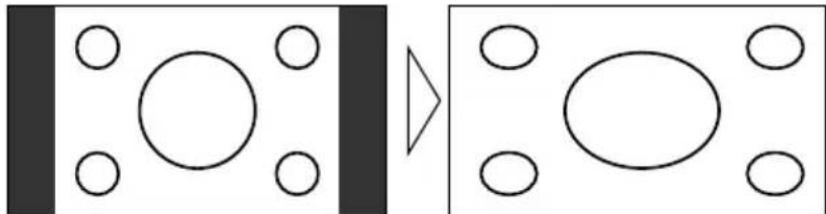
JUST
Video appears more extended horizontally as it gets closer to both edges of the screen. Because video appears in about the same size as regular video around the middle of the screen, enjoy viewing it without feeling out of place.
CINEMA
Video enlarges vertically with a aspect ratio falling between FULL and ZOOM. This wide mode is suited for horizontally long video, such as movies, in which titles are displayed in black areas outside the video.
ZOOM
Video with an aspect ratio of 4:3 enlarges with the same aspect ratio in both vertical and horizontal directions. This wide mode is suited for horizontally long video, such as movies, in which titles overlap the video.
NORMAL
Video with an aspect ratio of 4:3 appears without enlarging. Enjoy viewing TV in the same video as it is broadcast.

Note:
- Video will appear roughened when viewed in CINEMA or ZOOM mode.
This system offers a number of functionality setup and adjustment features to make it easier to use. Customize the settings to suit your taste and environment.
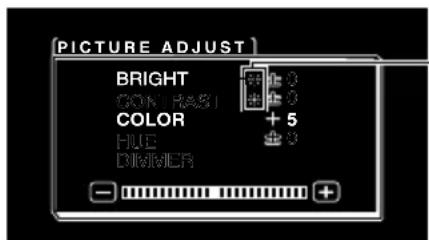
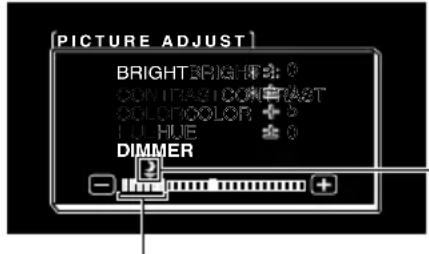
Picture Adjustment (BRIGHT/CONTRAST/COLOR/HUE)
You can change the brightness [BRIGHT] of black, contrast [CONTRAST], darkness of colors [COLOR], and the hue [HUE] of video to taste. Separate settings are stored for video from VCR1 (COMPONENT), VCR1, and from VCR2.
1. Display a source to view. (Refer to page 11.)
2. Display a menu screen.
Press and hold the WIDE/MENU button for 2 seconds or longer.
The [PICTURE ADJUST] screen is displayed.
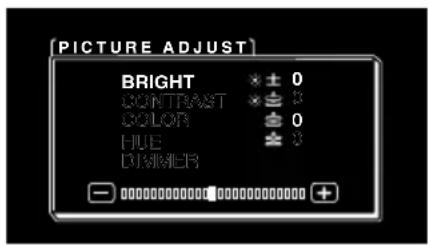
3. Select an item to adjust.
Press the WIDE/MENU button. Selected item turns to blue.
Each press of the WIDE/MENU button selects the item in the following order:
[BRIGHT] [CONTRAST] [COLOR] [HUE] [DIMMER] Exit to
[BRIGHT]
4. Adjust the item.
Press the VOL- or VOL+ button.
VOL+: Increase values.
VOL-: Decrease values.
The external light sensor of the display senses the ambient brightness and displays a mark indicating the current brightness.
(blue): when dark (nighttime)
red):whenbright(daytime)
Each item can be adjusted within the range of -24 to +24 .
5. Complete the setting.
Press and hold the WIDE/MENU button for 2 seconds or longer to close the menu and complete the setting.
| Adjustment item | side + side | ||
| BRIGHT | Brightness of black | Makes black appear darker. | Makes black appear lighter. |
| CONTRAST | Contrast Narrows the | gap between Widens the gap between black and white (darken). | between black and white (brighten). |
| COLOR | Color darkness | Makes colors appear lighter. | Makes colors appear darker. |
| HUE Hue Increases red. Increases green. | |||
Note:
- The settings of [BRIGHT] and [CONTRAST] are stored separately for light ambient (daytime) and dark ambient (nighttime).
- A red mark () or blue mark () is displayed to the right of [BRIGHT] and [CONTRAST] on the screen, respectively, as the ambient light sensor determines brightness or darkness.
- If you do nothing for about 30 seconds after displaying the picture adjust menu, the menu screen will disappear.
- [HUE] can be adjusted for NTSC video only.
Picture Adjustment (DIMMER)
Viewing can become difficult after extended video viewing if the screen is too bright at night or when the ambient brightness becomes dark. This device automatically adjusts the brightness of the LCD screen in accordance with the ambient brightness (3-point intelligent dimmer). The automatically set brightness can also be adjusted by setting to the desired brightness.
1. Display a menu screen.
Follow step 1 and step 2 in the "Picture Adjustment (BRIGHT/CONTRAST/COLOR/HUE)". (Refer to page 14.)
2. Select [DIMMER].
Press the WIDE/MENU button repeatedly until [DIMMER] is selected.
![PIONEER AVDW1100V - Select [DIMMER]. - 1](/content/2026/03/445773/images/cd184033f55a252bc41b98956a02030a94cb0311cbfabf60974cc6cc928418a4.jpg)
The external light sensor of the monitor screen senses the ambient brightness and changes the color, shape and position of the mark according to the current brightness (external light level).
![PIONEER AVDW1100V - Select [DIMMER]. - 2](/content/2026/03/445773/images/929f5e4258f7a218dbb60e4736f0f67a84ceb7ab327661304dd7e618962390c2.jpg)
Blue: dark (night time)
Note:
- The external light level used as the standard for adjusting [DIMMER] is indicated by the mark shown in step 2 and its position. The marks indicating the current ambient brightness used for adjusting [BRIGHT] and [CONTRAST] may differ slightly.
3. Adjust brightness.
Press the VOL- or VOL+ button.
VOL+: Brighten.
VOL-: Darken.
The more the yellow mark extends to the right, the brighter the screen appears.
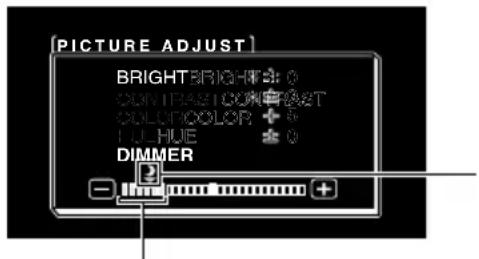
With this screen, the brightness setting of the screen can be adjusted when it is dark ( ).
This level indicates the brightness of the screen being adjusted.
The farther yellow moves to the right, the brighter the screen.
- The current external light level is set and the screen brightness is adjusted.
- The external light level can be adjusted to Dark, Intermediate or Bright and the setting saved.
4. Complete the setting.
Press and hold the WIDE/MENU button for 2 seconds or longer to close the menu and complete the setting.
Note:
- If you do nothing for about 30 seconds after displaying the picture adjust menu, the menu screen will disappear.
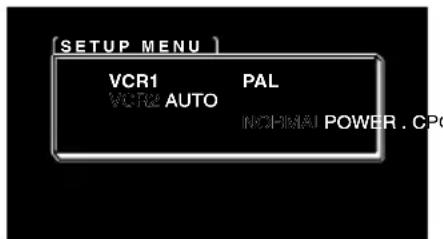
Input Setting (VCR1/VCR2)
Video formats such as NTSC, PAL, and SECAM can be selected depending on the format of the AV equipment connected to this unit.
1. Turn off the system.
Press and hold the SOURCE/POWER button.
2. Display a setup menu.
Press and hold the WIDE/MENU button for 2 seconds or longer. The [SETUP MENU] screen is displayed. [VCR1] has already been selected.
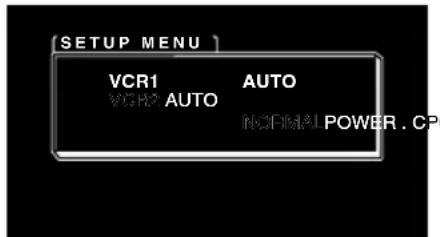
3. Select between [VCR1] and [VCR2].
Press the WIDE/MENU button. Selected item turns to blue.
4. Select video format.
Press the VOL+ button. The video system switches.
Each press of the VOL+ button selects the item in the following order: [AUTO] [NTSC] [PAL] [SECAM] Exit to [AUTO]
Note:
- Pressing the VOL- button selects the item in the reverse order of the VOL+ button.
5. Complete the setting.
Press and hold the WIDE/MENU button for 2 seconds or longer to close the menu and complete the setting.
Note:
- If [AUTO] is selected, NTSC, PAL, and SECAM are automatically identified and displayed.
- Broadcast reception may be inferior when [AUTO] is selected.
- If you do nothing for about 30 seconds after displaying the setup menu, the menu screen will disappear.
Power Control Function
When connecting with a head unit which has Power Control function, such as the AVH-P7800DVD, you can turn the AVD-W1100V ON or OFF through the head unit.
1. Display a setup menu.
Follow step 1 and step 2 in the "Input Setting (VCR1/VCR2)". (Refer to page 18.)
2. Select [POWER.C].
Press the WIDE/MENU button. The selected item turns to blue.
![PIONEER AVDW1100V - Select [POWER.C]. - 1](/content/2026/03/445773/images/e449a7fa8a8ba2b0e86f5c5ddc7727ade9c063e53cb7ab533288e64c9ea5d8db.jpg)
3. Select Power Control function.
VOL-: [NORMAL]
You can turn this unit ON/OFF by pressing the SOURCE/POWER button.
VOL+: [FRONT]
You CANNOT turn this unit ON/OFF by pressing the SOURCE/POWER button.
ON/OFF control is provided by a head unit with Power Control function connected by the CD-CP300 26pin component cable. (sold separately.)
e.g., when connected with AVH-P7800DVD.
Pressing REAR ON button on AVH-P7800DVD turns this unit ON. Press and hold the button on the AVH-P7800DVD to turn the unit OFF.
4. Complete the setting.
Press and hold the WIDE/MENU button for 2 seconds or longer to close the menu and complete the setting.
Note:
- If you do nothing for about 30 seconds after displaying the setup menu, the menu screen will disappear.

CAUTION
- If moisture or foreign matter should get inside the unit, turn OFF the power immediately and consult your dealer or the nearest authorized PIONEER service facility. Using the unit in this condition may result in a fire, electric shock or other failure.
- If you notice smoke, a strange noise or smell, or any other abnormal signs from the display, turn OFF the power immediately and consult your dealer or the nearest authorized PIONEER service facility. Using the unit in this condition may result in failure of the system.
- Do not remove the rear cover of the display, as there are high-voltage components inside which may cause an electric shock. Be sure to consult your dealer or the nearest authorized PIONEER service facility for internal inspection, adjustments or repairs.
Handling the Display
- When the display is not being used, never leave it under the direct sunlight or in extreme temperatures.
- The display should be used within the temperature ranges shown below.
Operating temperature range: -10^ to +50^
Storage temperature range: -20^ to +80^
At temperatures higher or lower than the operating temperature range, the display may not operate normally.
- The LCD screen of this product is exposed to improve view ability in the vehicle. Do not push the LCD screen strongly. This could break it.
- Do not touch the LCD screen. This could cause scratches or soiling.
About the Liquid Crystal Display (LCD) Screen
- If the display is installed near the vent of an air conditioner, make sure that air from the air conditioner is not blowing on it. Hot air may break the LCD screen, and cool air may cause moisture to form inside the display resulting in possible damage. Also, if the display is cooled down by cool air, the screen may become dark, or the life span of the small fluorescent tube used inside the display may be shortened.
- Small black dots or white dots (bright dots) may appear on the LCD screen. These are due to the characteristics of the LCD screen and do not indicate a problem with the display.
- At low temperatures, the LCD screen may be dark for a while after the power is turned ON.
- The LCD screen will be difficult to see if it is exposed to direct sunlight.
Keeping the Display in Good Condition
- When removing dust from the screen or cleaning the display, first turn the system power OFF, then wipe with a soft dry cloth.
- When wiping the screen, take care not to scratch the surface. Do not use harsh or abrasive chemical cleaners.
- Do not use a wet cloth for cleaning. Do not use organic solvents, such as benzine, thinner.
About the Small Fluorescent Tube
-
A small fluorescent tube is used inside the display to illuminate the LCD screen.
-
The fluorescent tube is an expendable part and has a limited service life.
- The fluorescent tube should last for approximately 10 000 hours, depending on operating conditions. (Using the display at low temperatures reduces the service life of the fluorescent tube.)
- When the fluorescent tube reaches the end of its useful life, the screen will be dark and the image will no longer be projected. If this happens, consult your dealer or the nearest authorized PIONEER service facility.

CAUTION
- PIONEER does not recommend that you install or service your display yourself. Installing or servicing the product may expose you to risk of electric shock or other hazards. Refer all installation and servicing of your display to authorized Pioneer service personnel.
- Secure all wiring with cable clamps or electrical tape. Do not allow any bare wiring to remain exposed.
- Do not drill a hole into the engine compartment to connect the yellow lead of the unit to the vehicle battery. Engine vibration may eventually cause the insulation to fail at the point where the wire passes from the passenger compartment into the engine compartment. Take extra care in securing the wire at this point.
- It is extremely dangerous to allow the display lead to become wound around the steering column or gearshift. Be sure to install the display in such a way that it will not obstruct driving.
- Make sure that wires will not interfere with moving parts of the vehicle, such as the gearshift, parking brake or seat sliding mechanism.
- Do not shorten any leads. If you do, the protection circuit may fail to work properly.
Note:
- This unit is for vehicles with a 12-volt battery and negative grounding. Before installing it in a recreational vehicle, truck, or bus, check the battery voltage.
- To avoid short circuit in the electrical system, be sure to disconnect the battery cable before beginning installation.
Refer to the owner's manual for details on connecting other units, then make connections correctly. - Secure the wiring with cable clamps or adhesive tape. To protect the wiring, wrap adhesive tape around them where they lie against metal parts.
- Route and secure all wiring so it cannot touch any moving parts, such as the gear shift, handbrake and seat rails. Do not route wiring in places that get hot, such as near the heater outlet. If the insulation of the wiring melts or gets torn, there is a danger of the wiring short-circuiting to the vehicle body.
- Don't pass the yellow lead through a hole into the engine compartment to connect to the battery. This will damage the lead insulation and cause a very dangerous short circuit.
- Never feed power to other equipment by cutting the insulation of the power supply lead of the unit and tapping into the lead. The current capacity of the lead will be exceeded, causing overheating.
-
When replacing a fuse, be sure to use only fuses of the rating prescribed on the fuse holder.
-
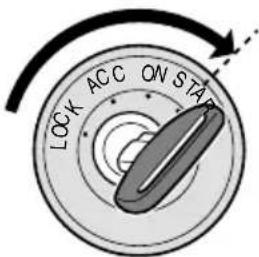
If this unit is installed in a vehicle that does not have an ACC (accessory) position on the ignition switch, the red lead of the unit should be connected to a terminal coupled with ignition switch ON/OFF operations. If this is not done, the vehicle battery may be drained when you are away from the vehicle for several hours.


No ACC positionACC position

CAUTION
- Cords for this product and those for other products may be different colors even if they have the same function. When connecting this product to another product, refer to the supplied Installation manuals of both products and connect cords that have the same function.
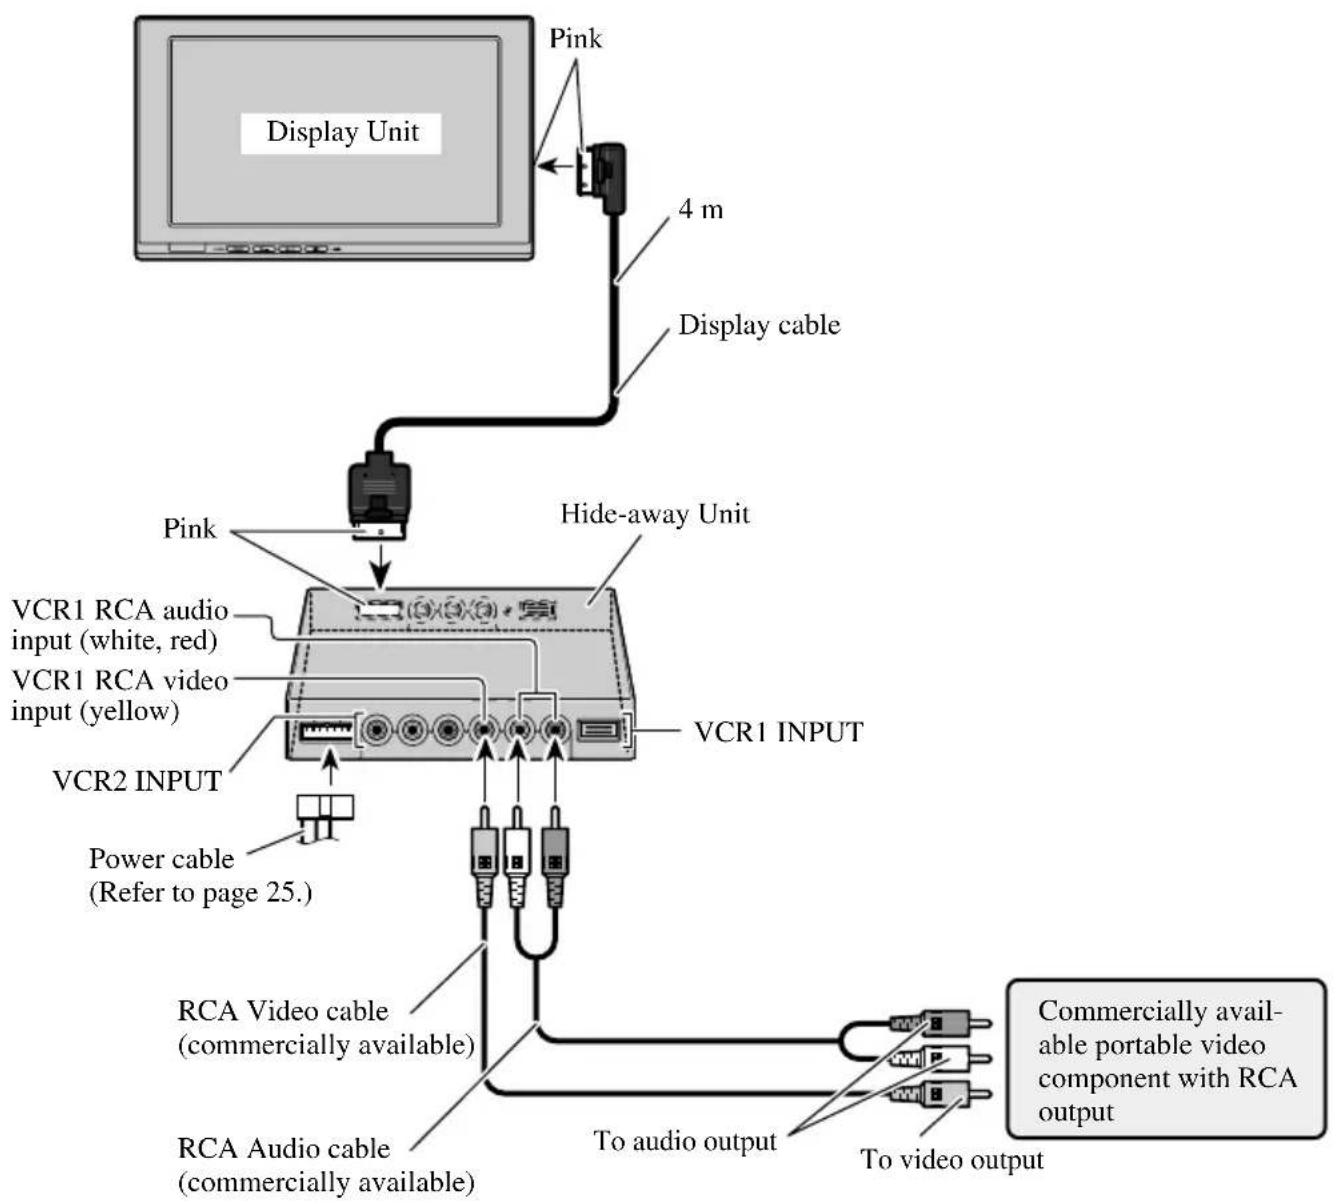
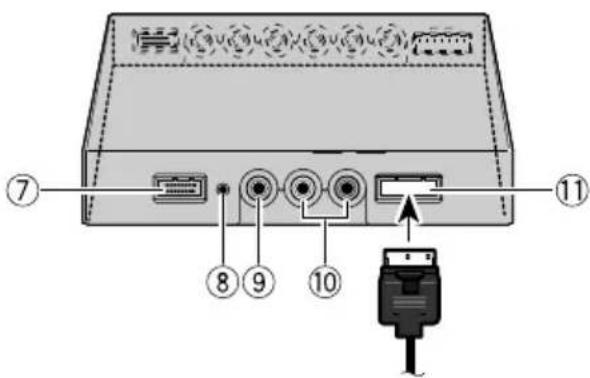
Names and Functions of Connection Terminals
■Hide-away Unit
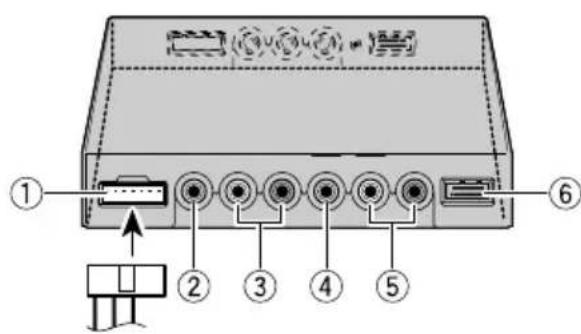
①Power Supply
Receives the power cable supplied.
② VCR2 RCA video input (yellow)
Receives video, as from a VCR, DVD or other AV equipment.
③VCR2 RCA audio input (white, red)
Receives stereo audio, as from a VCR, DVD or other AV equipment.
(4)VCR1 RCA video input (yellow)
Receives video, as from a VCR, DVD or other AV equipment.
⑤VCR1 RCA audio input (white, red)
Receives stereo audio, as from a VCR, DVD or other AV equipment.
⑥VCR1 COMPONENT Video input (white)
Receives component video, as from a VCR, DVD or other AV equipment which has component video output.*
VCR1 COMPONENT Video input is given priority when both VCR1 RCA video input and VCR1 COMPONENT Video input are connected.
- CD-CP300 26pin component cable (sold separately) is required.
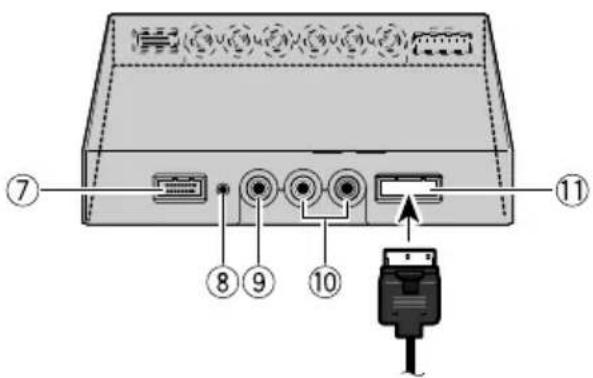
⑦COMPONENT Video output (blue)
Video and stereo audio from VCR1 input are directed to this terminal. Connection to another AVD-W1100V is possible with the 26pin component cable CD-CP300 (sold separately).
⑧Reset button
Resetsthedisplaymicroprocessor.
Press with the tip of a ballpoint pen or similar object.
⑨ RCA video output (yellow)
Connects to other AV equipment. Video selected with this display is directed to this terminal.
⑩ RCA audio output (white, red)
Connects to other AV equipment. Audio selected with this display is directed to these terminals.
⑪Display output (pink)
Connects to the display unit.
Connecting the Power Cable
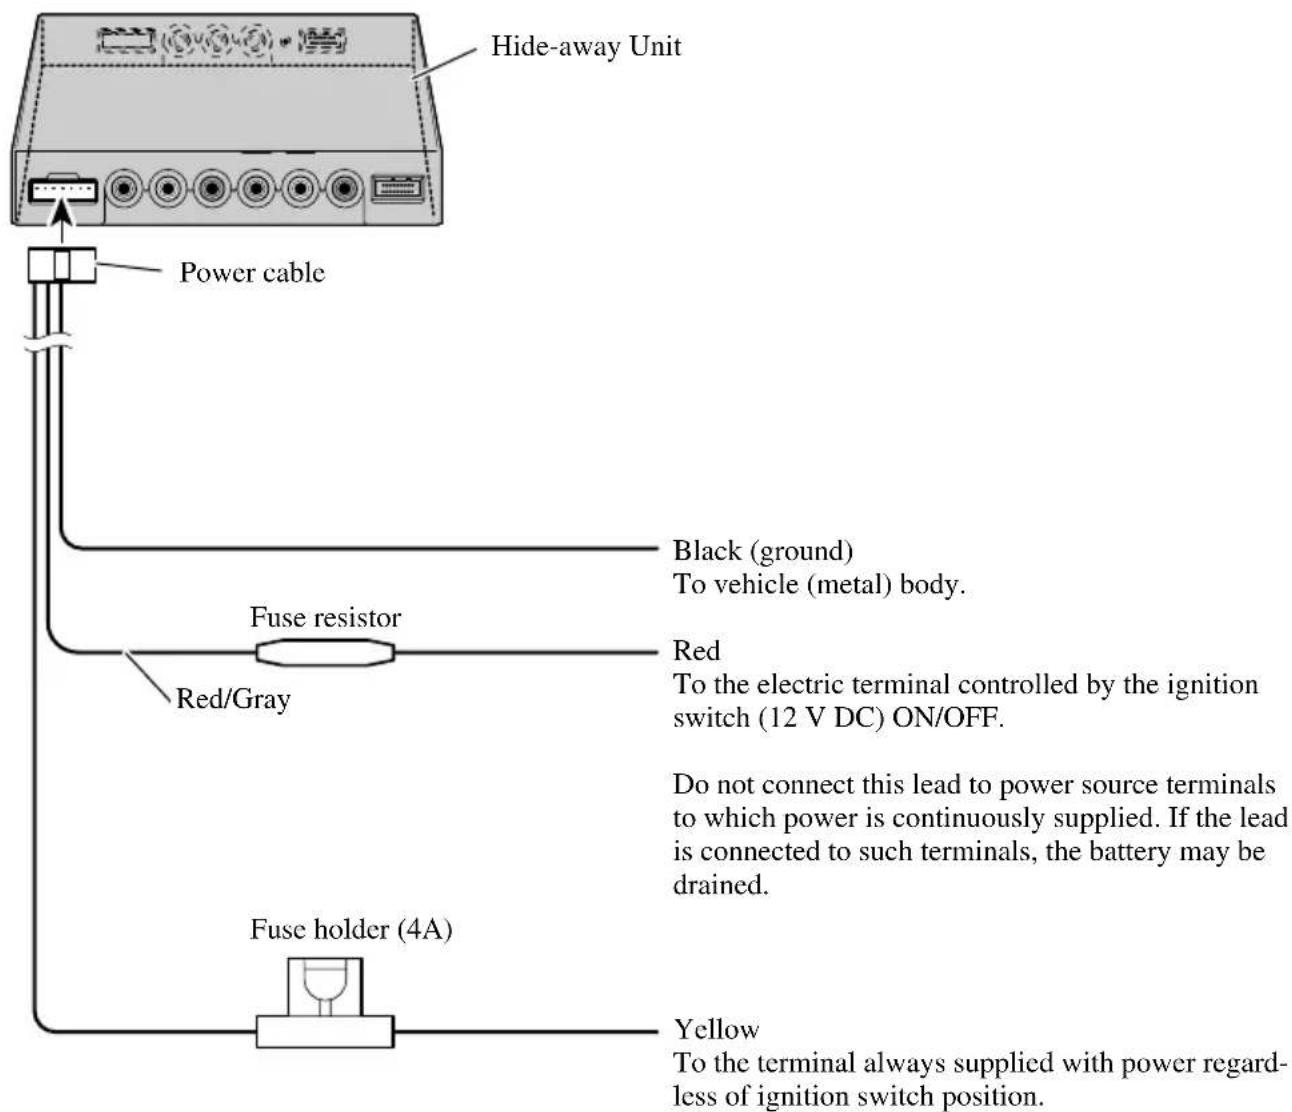
Connection Diagram (VIDEO input)
Note:
- Never install the display in a place where it is visible to the vehicle's driver.
Connecting the Audio and Video Output
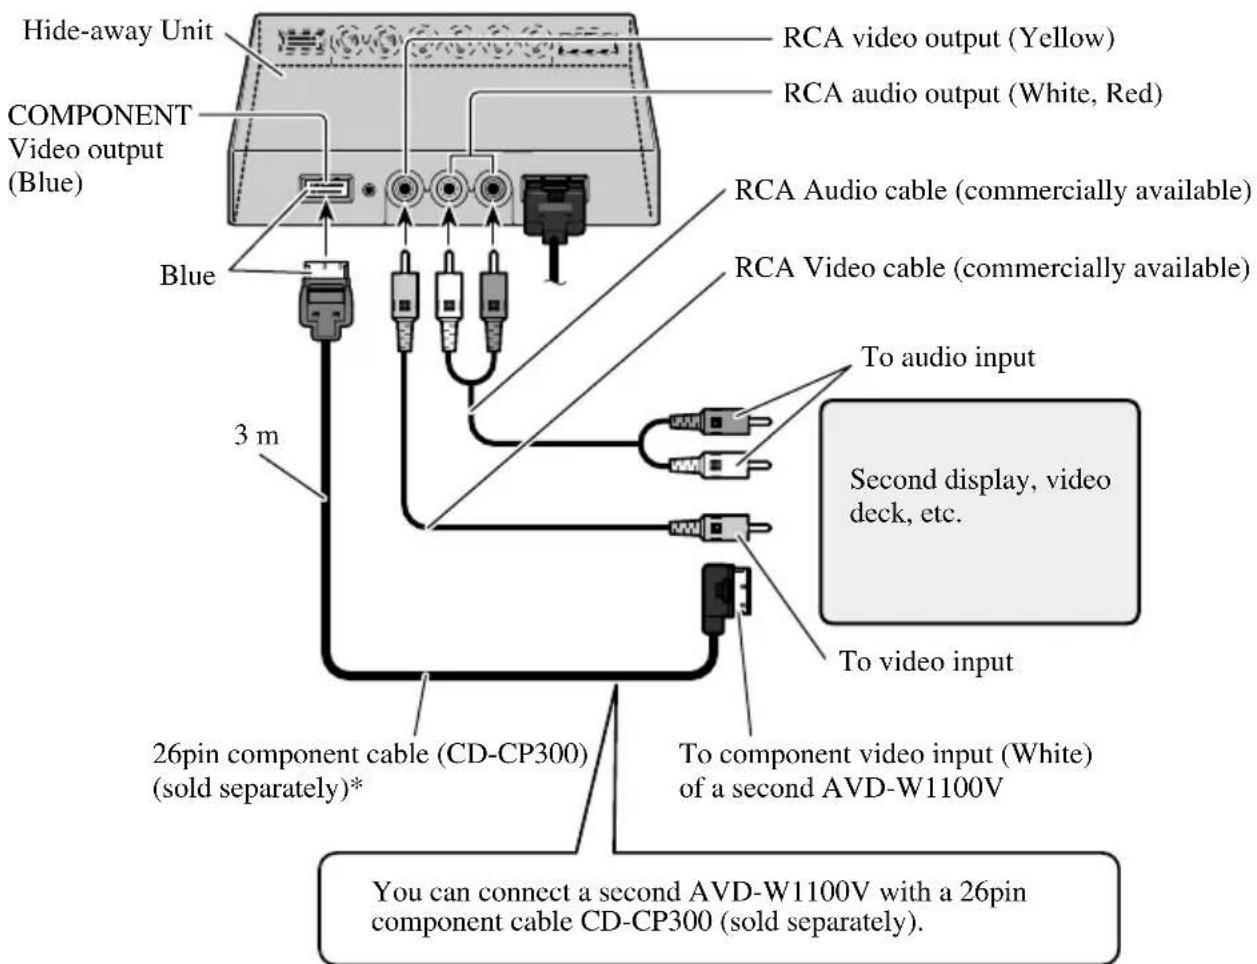
*: Use CD-CP301E 26pin component extension cable for extension (3m).
Note:
- The signal from COMPONENT video and RCA audio/video is not output when the power of this product is turned off.
Connecting with Pioneer Head Unit with Component Cable

*: Use CD-CP300 26pin component cable for Pioneer products.
- Use CD-CP301E 26pin component extension cable for extension (3m).
Note:
- When you watch DVD (built-in DVD player of AVH-P7800DVD) on both AVH-P7800DVD and this product, audio is not output from the built-in speaker of this product.

CAUTION
- For instructions on how to mount the display, consult your dealer.
- Do not install the display where it may (i) obstruct the driver's vision, (ii) impair the performance of any of the vehicle's operating systems or safety features, including airbags, or (iii) impair the driver's ability to safely operate the vehicle.
- PIONEER does not recommend that you install or service your display yourself. Installing or servicing the product may expose you to risk of electric shock or other hazards. Refer all installation and servicing of your display to authorized PIONEER service personnel.
- Install the display between the driver's seat and front passenger seat so that it will not be hit by the driver or passenger if the vehicle brakes sharply.
- Do not install the display in a position where the fully opened air bag will be obstructed by it.
- Do not install the display in a place where it will impair the performance of any of the vehicle's operating systems, including airbags and headrests.
- Make sure there is nothing behind the panels when drilling holes in them. Be careful not to damage fuel lines, brake lines or power cables.
- When using screws, do not allow them to come into contact with any electrical lead. Vibration may damage wires, leading to a short circuit or other damage to the vehicle.
- It is extremely dangerous to allow the display lead to become wound around the steering column or shift lever. Be sure to install the display in such a way that it will not obstruct driving.
-
Make sure that leads cannot get caught in a door or the sliding mechanism of a seat, resulting in a short circuit.
-
Never install this product in a place where it is visible to the vehicle's driver. Failing to do so could result in distracting images being potentially visible to the driver while the vehicle is in motion.
Use of this product is subject to any government laws regarding placement or use.
PIONEER does not accept any liability for any problems, damage or loss incurred as a result of the product being used with an incorrect setting or in violation of any government laws.
- To ensure proper installation, use the supplied parts in the manner specified. If any parts other than the supplied ones are used, they may damage internal parts of the unit or they may work loose and the unit may come off.
Before Installing and Fixing
- Make temporary connections first to check that the unit and system are working properly.
- Press the RESET button with the tip of a ball-point pen or similar object, when a connection is completed.
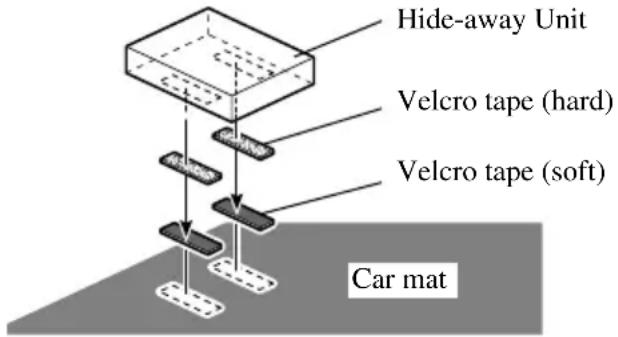
Before Affixing the Adhesive Tape
- Make sure the surface is free of moisture, dust, grime, oil, etc. before affixing the tape.
Installing the Hide-away Unit
Installation Precautions
-
Never install in locations such as the following because of the danger of malfunction due to high temperatures or humidity:
-
Locations such as a dashboard or rear tray where there is exposure to direct sunlight.
- Near heater outlets.
-
Near doors, etc., where there is danger of exposure to rain.
-
When installing under the front seat, make sure there is no hindrance to sliding of the seat.
-
Direct installation on the carpet is possible if the hard Velcro tape will adhere to the carpet. Do not use the soft Velcro tape in this case.
Hide-away Unit Installation
Adhere the hard Velcro tape (supplied) to the bottom of the hide-away unit and adhere the soft Velcro tape (supplied) to the installation location.
General
Power source 14.4 V DC (10.8 V to 15.1 V allowable)
Grounding system Negative type
Max. current consumption 4.0 A
Storage temperature range -20^ to +80^
Display Unit
Dimensions 297 (W) × 181 (H) × 42 (D) mm
Weight 1.39 kg
Screen size/Aspect ratio 11.0 inch wide VGA/16:9
(effective display area: 245.6 × 139.5 ~mm )
Pixels 1152000[800(Horizontal) × 480(Vertical) × 3(RGB)]
Display Method TFT active matrix driving
Color system NTSC/PAL/SECAM compatible
Built-in Speaker. 36 mm
Headphone output level. 8 mW+8 mW/16 Ω
Operating temperature range -10 ^ C to +50~^ C
Hide-away Unit
Dimensions 178 (W) × 157 (H) × 30 (D) mm
Weight 0.68 kg
Video input level NTSC, PAL, SECAM 1 Vp-p/75 Ω
Max. audio input level. 1.5 V/22 kΩ
Video output level. NTSC, PAL, SECAM 1 Vp-p/75Ω
Max. audio output level 1.5 V/1 kΩ
Component input level Y: 1 Vp-p/75 Ω
Cb, Cr: 0.7 Vp-p/75 Ω
Component output level. Y: 1 Vp-p/75 Ω
Cb, Cr: 0.7 Vp-p/75 Ω
Operating temperature range. -10^ to +60^
Note:
The specifications and design are subject to change without prior notice. Products purchased may differ in details from illustrations in this manual.
Contenido 1
PRECAUCIONES IMPORTANTES 2
Consummation maxima 4,0 A
A Anything to be considered as a good candidate for the use of this technique is to use it in the case of an audio video. This is not the case with the use of a CD-CP300, which is a recording of 128 bits. The CD-CP300 is a recording of 168 bits.
⑧Tasto RESET
2. Selecteer [POWER.C].
③VCR2 RCA audio-ingang (wit, rood)
⑤ VCR1 RCA audio-ingang (wit, rood)
⑩ RCA audio-uitgang (wit, rood)
BBoI yCTaHOBKn (VCR1/VCR2) 18
Функцн KoHTpoJIЯ ПИТаHHI 19
IpaBnJIbHoe POnb3OBaHne DncnIeem 20
OnepnoBaHne IncIIJeem 20
O KnKOKpHcTaJIJIHueCKOM (LCD) 3KpaHe HncJIeI 21
XpaHHTe IucnIeB XopoIHx YcIOBHx ... 21
O MaJIeHbKoI ΦJyopecueHTHOI Tpy6Ke ... 21
IoiKJIIOUeHHe AyIO H BnDeo BbIXOJa 27
IIOKJIIOUeHHe FOIOBHOPO IIN6Opa PIONEER c KOMIOHEHTbIM Ka6eJEM 28
YcTaHOBka 29
IpeπyUcTaHOBkoI 3aKpeJIeHHem 30
IpeepnPKpeJIeHHem KJIeKoi JeHTe 30
YcTaHOBKa cKpbBaIOJIero npH6opa 31
- MepbippeoctopokxHocTHyctaHOBKN
y cTaHOBkaCKpbIbAIOHIO npH6opa
Texhueckne xapaKtepcntuKn 32
IoxaJyNcTa, IpoUHTaIe Bce n3 3Tnx HnCTpyKzni, KacaIoZneC8 BaWero DIncPJIe N CoXpaHITe INx dJaJIbHeiJwero pyKOBoIDCTBa
1.ПрочитaleaHHoe pyKOBODCTBO NOJIHOCTbIO IN BHHMaTeJIbHo IepeI NaHaJLO mpa60TbI BaIIeRo DnCIIJe.
2. XpaHnTe IaHHoe pyKOBODCTBO IOI pyKoI IJIaJIbHeIIeIro o6paIeHnK HeMy.
3. 06paTHe ocoboe BHHMaHHe Ha BCE IIpeIyIIpeJKeHnB IaHHOM pyKOBODCTBe, H BHHMaTeJIbHo cJIeIyIte HHCTpyKIIHM.
4. HNKoIa He IIO3BOJIaIte KOMy-JIb60 IOJIb3OBAtbc8 cHCTeMoI, IOKa OHH He IIpoHTaIOT H IOMyT pa6OuyI0 HHcTpyKIIIO.
5. He yctaHaBJIbBaIte IncIIeTAM, rDe OH (i) MoKet MeIaTb 063Opy BoIHTeJI, (ii) yxuIbATb pa6OTy IIO6bIX pa6OuHX cHCTem TpaHCnOpTHoro CpeIcTBa HJN fYHKUH 6e3OIIacHOCTH, BKJIouaI IOyIckN 6e3OIIacHOCTH, HJN (iii) yxuIbATb cIOco6HOCTb BOITeJI 6e3OIIacHO OIEpHpOBaTb TpaHCnOpTHbIM CpeIcTBOM.
6. KaK n JIObIe akceccyapbl HHTepbepa BaIIeTo TpaHcNOpTHOrO cpeIcTBA, IINJIeH He IOJIKeH OTBJIeKaTb BaIIe BHNMaHne OTe 6e30IaChOro OIIepnPoBaHHaBIM aBTOMo6HJIeM. EcJIn Bbl NcIIbITbIBaete 3aTpUdHeHne B yIIpaBJIeHHn cHCTeMo, IIOkaJIyIcTa, oCTOpOxHO IIpHIaPkyIteCb, YTO6bl CDeJIaTb peYJInpOBKy.
7. Пожалуньста, He nbitaTecb yctaHaBJIIBaTB nJIn 06cIyKINBaTB BaII nHcIIeI caMOCTOReJIbHo. YcTaHOBka n 06cIyKINBaHne nHcIIeI JIOIbMn 6e3 obyuEHHa H OIIbITa pa6oTBi C 3JIeKTPoHHbIM o6OpyIDOBaHHem H aBTOMO6HJIbHBIMn IIpHnAJIeXKHOCTaMH MoKeT 6bITb OIIaCHA n IIOIbepraet Bac pncKy IIOLyuEHHa 3JIeKTPnueckoro IIoka nJIn dpyTHx HechactHbIX cJIyuaEB.
8. Пожалуньста, He 3abibaaite Bceira npncteHbatapeMehb 6e3oNaacnoB BO BpeMa DBIKeHHaIIero aBTOMoBHJI. EcJN Bbl KOrJa-JIN60 nOHaTe B aBaAPHO, To BaIH NIOBpeKDeHHaMOyT 6bITb 3NaHTeJIbHO 60JIee TJAKeJIbIMH, ecJN BaIH peMeHb 6e3oNaChocTH HeINpaBHJIbHO npnCTeHHT.
9. HNKoIa He yctaHaBJIbBaIte DaHHoe N3JeJIne B MecTe, rIe BOJNTeJIb aBTOMO6HJIa MoKet erO BnIeTb. B pe3yJIbTaTe 3TO MoKet IaTb OTBJIeueHHbIe N3O6paJKeHn cyIeCTByIOIeRo IOTeHnHaJIbHO rIpocMOTpa BOJNTeJIIO BO BpeMa IIBHXeHn aBTOMO6HJIa.
HcnoJIb30BaHne DaHHoro H3JeJnra YBJIaETcna IpeIMeTOM JIO6bIX IIpaBHTeJIbCTBeHHbIX 3aKoHOB, KacaIOuHXcra ero yCTaHOBKn JIN HCIOJIb30BaHHa.
PIONEER He Hecet OTBETCTBEHOCTH IO JIO6bIM Ipo6JIeMaM, IOJOMKaM HJN yTePAM, IOJIyueHHbIM B pe3yJIbTaTe HcIIOJIb3OBaHNr N3JeJIINr C HeIIpaBHJIbHbIMu YcTaHOBkAmn JINB HApUHeHne JIO6bIX IIpaBHTeJIbCTBeHHbIX 3aKOHOB.
IIpeocTopoJkHocTB:
- IJIpeIOBpaueHn aBapHH, y6eIITecb, YTO BBIKJIOHUN JIN KJIOU 3aKHaHn Hn CHCTEMBI INTahHn IpeI yCTAHOBKO HJIN CHATHEM DHCJIe. TaKe 6yJBTe OCtOPOXHBi, He HaJHMaTe Ha 3KPAH HJIN KHOJKC JINIKOM CJIbHO HJIN He KaaiTe Ha DHCJIe.
He IOnyckaiTe, YTo6bI BOa IOnaJaHa KJIeMMbI Ha HcHJIe ee HJH Ha Ka6eJIb, YTo6bIKJIeMMbI 6blIIN 3aKOpOeHbMeTaJIINueCKHM IIpeIMeTOM HJIN YEM-TO IOIO6HBIM. T0MOKeT AIBTBcI INPHHOII NOJOMKn CHCTeMBI. - ByIbTe oCtOpOxHbI, He IOTparHbaiTecb IO KJIeMM Ha IINCIJIe HJIN HA Ka6eJIe. 3THM MoKet BbI3BaTb NOBpeXdEHHc coeHNHeHHa. EcJH KaKHe-JIN60 KJIeMMbI HcIIaYKaHbI, BBITpHTe HX YHCToI cyXoi TKaHbIO.
Ppimechanee:
- HecyIbIpyar, onHcaHHbI HnKe, npOaETcra OTJeJIbHO. JIa 6oJIbIIe IHHΦopMaIIH IO yCTaHOBKe ObaTHeCb K TEXHOJIorHueCKo II HcTpyKIIH II K KOHCyJIbTaHTy BaIIIErO 6JHXaIIIErO dJIepa.
YCTaHOBNTb IINcPJIeI
O BnIeO n Aydno BbIXoJax daHHoro N3dJIy
Korda BbIOJIKJIOUaTe OTJeIbHbIe uactn o6OpyIOBaHNy AV,HaipHMep npyroi INcJIeK COMPONENT OUT HIN VCR OUT (BHeo RCA N BbIXoAayNo) rHe3dAm cKpbBaIOuIero np6opa, BbIMOKeTe BB6paTb HCTOuHHK IJIa BBIXoJa KHOIIKOI SOURCE/POWER.
- BbIXOJIbI COMPONENT/RCA BnIeO n ayIHO hCTOuHHKa daHHoro H3IeJIHr He MOryT 6bITb BBbpaHbI caMOcTOrTeJIbHo.
· KHOIIKNVOL-,VOL+He6yIyTneIeCTBOBaTB,daKe,eJHnH3JeJIHe pa6oTaet.

OCTOPOXHO
HnkOrda He yctaHaBJIbBaTe IncIIeB MeCTo, KOtOpoe I03BOJNT BOJIteJIIO cMOtpeTb H3O6paJKeHHe BO BpeMЯ IbHJKeHNA BTOMo6NJIA.
IpeyectahOBka CnCTembl
IpeyectaHOBKa MmKpOpoceccopa
HaKaTHe KHOJKN RESET IO3BOJNT Bam nepeyctaHOBHTb MHKpOpioueCCOP B erO IepBOHauJIbHbIe yCTaHOBKn, CtepeTb BCE 3aIOJKeHHbIe yCTaHOBKn II BepHyTb YHKIIIO UcTaHOBKn K HX IepBOHauaJIbHbIM (3aOBIDcHM) yCTaHOBKaM.
IpeycTaHaBJIHBaIte MHKpOIIPOeCCOp B cJeIyIOuHX cLyuaX:
Korda hnoJIb3yeTe daHoe H3JeJHe npBbI pa3 nocJe yctaHOBKn.
KornaH3deJHe pa6oTaet HnpaBnIbHo.
KordaHa3KpaHcIOBJIaOTcCTpaHHbIe (HeippaBNbHbIe) COO6ueHHn.
HaKMHTe KHOINKy SOURCE/POWER.
YTO6bI BBIKJIIOHHTb CnCTeMy, HaxMMTe I yndeepKHBaITe KhoNkY SOURCE/POWER.
PergunpoBaHne TpomKoCTn
PeryIpyIte rpoMkoCTb ayIIO BBIXOJa I3 BCTpoEHORO DHHAMHKa.
1. PeryJInpObKa rpoMkoCTH dHHaMHka.
HaKMHTe KHOIIKy VOL- or VOL+.
VOL+: YBeJIInueHne
VOL-: yMeHbIeHHe
Грмкocь BCTpoeHHOrO ДИHamнka может 6ыть OTpeRyJIHpoBaHaВДиЯЗоHe ot 0do30.
Приимechanical:
- KhoNKN VOL- n VOL+ peryJnpyoT rpoMKocTB hayuHKnOB, kOrda OHn NOKJIIOueHbI.
- AyINO H3 BCTpoEHHORO INHAMHKa BbIKJIOHaeTcR, KOrJa IIOJKIIOUHeHb HayIHINKN.
BbI6Op NcToUHnKa
Bклочпь BXOДБИ Bndeои aydno nctochnka ot AV obopydoBaHna, NOДКЛHOeHHOROK VCR1 IN, VCR2 IN, IN COMPONENT IN.
1. BbIepeHte nctouHnK.
HaXMMte KhoNky SOURCE/POWER. KaXdoe HaXaTne KHOIN BbIbHpaTe JeJaembl HCTOuHHK B cJeDyUoSei NocJeIOBaTeJbHocTH:
[ \text{[VCR1 (COMPONENT)] Или [VCR1] \rightarrow [VCR2] \rightarrow Bыхов [VCR1 (COMPONENT)] Или [VCR1]} ]
Приимechanical:
-ДанhoeинделпсимeETДва bblxOda nctouHnka; VCR1 IN n VCR2 IN.
VCR1 IN HMeET KOMIOHENTy BnIeO BXoI [VCR1(COMPONENT)], a TaK JKe RCA BnIeO BXoI [VCR1].
- [VCR1 (COMPONENT)]яВяЯтся KOMПОЕНTOI BИДEO OT AV obopydOBaHn, NOДКЛHоeHHOrO K TepMHHaJIy VCR1 IN COMPONENT. 26-Пн KOMПОЕHTa Ka6eJr (CD-CP300), KOtOpbI IpoDAeTcR OTДeJIbHo NO 3aIIpocy. (ObpaTHTEcsK CTpaHnue 28.)
VCR1 COMPONENT BxoДЯET npHOpHTeT haI VCR1 RCA BxOIOm, KOrla oBa BxoJa IIOJKNIOUChbI B OJHO H TOKe BpeMa.
- TepMHHaJI BnDCO BXoJa, KOTOpbI Hc IIOKJIHOCh, Hc MOKeT 6bITb BB6paH, IaJKe ecJH HaKaTa KhoII Ka SOURCE/POWER.
[VCR1] Bb6paH, KOrIa Hc IIOKJIIOUeHHe CdeJaHO IJIaOBoX BXoIOB VCR1 H VCR2.
I3MeHeHne IInpHbI 3KpaHHoro Pexnma
BbMOKeTe H3MeHHTb OTHOWeHne B KOTOpOM HopMaJIbHoe BNDeO (ΦopMaTHoe COOTHOWeHne 4:3) paUHpAeTcB IIHpOKoe BNDeO (16:9). Bb6epHTe IIHpHHy peKHMOB, YTO6bl COOTBeTCTBOBaJIH KJIaccy BNDeO, KOtOpbI Bbl IPOcMaTpHBaete.
1.Появлесне�СТОУнkaДЯпрсмOTpa.(ObpaTHTeCbКстраHHe 11.)
2. BbIbepeHte IINpHHy peJHMa.

Kajdoe haxatne Khoikn WIDE/MENU Bbiohpaet HnpHy pejHMa B cJeIyOiem IopRke:
[AUTO]илн[FULL] [JUST] [CINEMA] [ZOOM] [NORMAL] BbIXoI K[AUTO]илн[FULL]
Приимechanical:
- YctaHOBKn 3aIOMHHaOTcJ IJI KaKIOrO HCTOuHnKa (COMPONENT, VCR1, HIN VCR2).
- KorДа BnIeO IOKa3bIbAeT B IIHpoKOM peXHMe, KOToPbI He BbIpaBHNBaET erO HcXoJHOe φOpMaTHOE COOTHOUHeH, OH MOKeT IIOBJIrTBcI IO-pa3HOMy.
[AUTO] BBbIbHpaTeTcra ToJIbKO, ecJH AV o6OpyIOBaHHe IOJKJIHOeHO K TepMHaJy BIIDeO BXoJa COMPONENT IN. Korda HhΦopMaunu IHHpOKOro peXHM BAJIHOyeHa B BIIDeO cHrHaJI, To IIHPOKn peXHM peryJIHpYeTCra aBTOMaTHueCKn, COOTBeTCTBeHHO HhΦopMaunn. - IOMHHTe, YTO HcIOJIb3OBAHHe BO3MOXHOCTH IIHPOKOTO peKHMa DaHHoI CHCTeMbI B IeJIAX KOMMepueckoro HIN IIy6JIuHOrO IPOCMOTpa MOKeT COCTaBJrTb HApYIIeHHe 3aKOHa aBTOpCKHX IIpaB, 3aIIHIIeHHbIX 3aKOHOM o6 aBTOpCKHX IIpaBX.
BnDeo 6yIeT IIOBJIaTBcH He IJIaBHO, KOrJa IIpoCMOTp HcET BpeKHMc CINEMA HJH ZOOM.
Данная систema прдлагает HeKOTOpoe KoJIHueCTBO ФункИногаЛьHoŋ yctaHOBKN H perуларOBKN BO3MOxHOCTe, DeJaIOxNx ПОЛьЗOBaHne cHcTeMoI JERYe. BheCHTe N3MeHeHHA B yCTaHOBKN, YTO6bl ydoBJIeTBOPHTb CBOI BKyc H OKpykaOuHX.
HacrtpoiKa N3o6paXeHnA (BRIGHT/CONTRAST/COLOR/HUE)
BbMoKeTe H3MeHHTb JaPKoCTb [BRIGHT] YepHoro, KOHTpact [CONTRAST], HaCbIeHHocTb IBeTa [COLOR] N ToHaJIbHoCTb [HUE] BnDeo IO BKycy. OTJeJIbHbIe yCTaHOBKn CoXpaHNTe IJIa BnDeo c VCR1 (COMPONENT), VCR1, n c VCR2.
HaKMHTe KhoNky VOL- HJH VOL+.
VOL+: Jpue.
VOL-: TemHee.
BoJee JKeJIrIyPOBHeH IJIHTcra CnpaBa, NOBJIeTcra OCBeJIeHHe 3KpaHa.
C 3THM 3KpaHOM, yCTaHOBka npKOCTH 3KpaHa MoKeT 6bITb OTpeRyJInpObaHa, KOrIa TEMHO ( ).
JaHHbI yPOBeH IOKa3bIBaET cyIeCTByIOUyIO npKoCTb 3KpaHa.
KeIbI BnBraETcnaJIbIe BnpaBO,OCBeTJRA 3KpaH.
- TekyuynyypOBeHb BHeUHero CBeTa yCTaHOBJIeH nApKocTb 3KpaHa OTperyJInpObaHa.
- YpoBHeHb BHeIHHero CBeta MoKet 6bITb OTpeRyJIHpOBAH B TeMHbI, CpeIHHn HJIH JpkHn H yCTaHOBka coXpaHeHa.
4. 3aBepINHTb yCTaHOBky.
Haekmte n ydepKnBaTe KhoNky WIDE/MENU 2 cekyHbI HIn doJIbSe, 3aKpoTEmeHIO n 3aBepHTe ycTaHOBKy.
PpimmeaHHe:
- EcJH Bbl Hnuero He neJaTe B TeueHne 30 cekyHIO nocJe TOrO, KaK IOBJIaETcKapTHKa HactpoiHK MeHIO, To MeHIO Hcye3aEt C KpaHa.
BBoI YcTaHOBKn (VCR1/VCR2)
Bndeo φopMaT, TaKoi KaK NTSC, PAL, n SECAM MoKeT 6bITb BbIbpaH B 3aBHCMOCTH OT φopMaTa AV o6OpyIOBaHnI, IOnKJIHOeHHORO K DaHHOMy H3DeJIHIO.
1. BbIKJIIOueHHe cHCTeMbI.
HaKmIte n yIepKbaiTe KhoNkY SOURCE/POWER.
HaKMITE KHOK Ky WIDE/MENU. Bb6paHbI IyHKT H3MeHTcR Ha cHnH.

3. BbI6op 4yHKiHn KoHTpoJIa PtHaHn.
VOL-: [NORMAL]
Bb MoKeTe BKJI/BbIKJI DaHHoe ycTpoIcTBo HaXaTHem KHOIIKIN SOURCE/POWER.
VOL+: [FRONT]
BbHE MOXETE BKJI/BbIKJI DaHHoe yctpoCTBO HaKaTHeM KHOIIKNSOURCE/POWER.BKJI/BbIKJI KOHTPOJB o6ecneHBAeTcra FOIOBHbIMI np6opom c cyHKnHei KoHTpOJI PHTaHn, IOnKJIIOueHHO CD-CP300 26-PIHKNOMIOHEHTHBIM Ka6eJem. (IpOJaTeCra OTJeJIbHo)
HaipnMep:KoRJaIIOkJIIOueHcAVH-P7800DVD.
HaKaTHe KHOIIKN REAR ON Ha AVH-P7800DVD BKJIIOuaeT daHHoe yCTpoIcTBO.HaKMnTe H yIepXHBaIte KHOIIKy AVH-P7800DVD, YTO6bI BbIKJIIOHTb yCTpoIcTBO.
4. 3aBepHHe yctaHOBKn.
HaKMMTe H yIepKHBaiTe KHOJky WIDE/MENU 2 cekyHbI HIn DoJIbIe, YTO6bI 3aKpbITb MeHIO H 3aBepHHTb yCTaHOBKy.
Приимechanical:
- EcJH Bb Hnqero He JeJaTe B TeueHne 30 cekyHIOcJIe TOrO, KaK IOBJIaETcKapTHKa HAcTPOIKN MeHIO, TO MeHIO HCue3aet C KpaHa.

OCTOPOXKHO
- EcJH BJIaRa HJN HnOpOHNbI MaTePHaJI IOnaJeT BHyTpB yCTpoiCtBa, HeMeJIeHNO OTKJIIOUHTe PINTaHne H IpoKoHcyJBTHpyIITecb y BaIIIErO DJIePa HJN B 6JIINKaIIeM aBTOpH3OBaHHOM cepBnCHOM IeHTpe PIONEER. HcIOJIb3OBaHHe ycToPcTBa B 3THX ycIOBHX MoKeT IOBJIeYb BO3rOpaHHe, 3JIeKTpHuYeCKn IIOK HJN dpyrHe NOBpeKJDeHn.
- EcJH BbI 3aMeHTe IbIM, cTpaHHbI 3ByK, 3aIIax HJI INpyrHe Heo6bIuHbIe IIpH3HaKN H3 DnCIIJIeA, HeMeJLeHHO OTKJIIOHTe IITaHNe H IIpOKOHcyJIbTHpyIteCb y BaIIErO dJIePa HJI N B 6JIINKaIWeM aBTOpN3OBaHHOM cepBnCHOM ueHTpe PIONEER. HcIOJIb3OBaHHne ycTpoIcTBa B 3THX ycIOBHX MOKeT CTAb pe3yJIbTaTOM HeINpaBnJIbHOI pa60TbI CHCTeMbI.
He cHmMaIte 3aDHHO KpbIHKy IINJIe, TaK KaK BHyTpN HaxoJITcKOMIOHeNTb BbICOKOHaIIpJxKeHH, KOtOpBIE MOrYT 6bITb IIpHuHoi3JIeKTPnueCKOTo IIIoka.ДЯ yBepeHHocTH IpoKOHcyIbTHpyHTecb y BaIIeroIJIepa NJIH B 6JIIXKaIWe m ABTOPH3OBaHHOM cepBHCHom IeHTpe PIONEERДЯ BHyTpeHHeI pOBepKN, HAcTPOIKN H peMOHTa.
Опершовке Диспем
- Korda IIcIIeI He 6yIeT HcNOJIb3OBA TbC8, HNKoIa He OCTaBJIaIe erO Ha COJIHeHOM MeTe IJIu IIpN 3KCTpeMaJIbHOI TeMIIepaType.
-Дисплелдолженнспгьзоваьсяпгптмпературном ржимe,уka3aHHOM Hнже. Pa6очн Temпературньднana30н: -10°Cdo+50°C TeMпературньднana30нхранен: -20°Cdo+80°C Прн Temперatype Bblse Или HnЖe pa6очero Temпературного днana30нa,Дисплел Moжет HeПpaBnJIbHo pa6OTaTb. - TTo6bI yJyuHHTb BO3MOxHOCtB IPOcMoTpa B aBTOMo6HJIe, LCD 3KpaH daHHoro H3JeJIHn He3aUHHeH. He DaBHTe cHJIbHO Ha LCD 3KpaH. 3TO MoKet erO IOBpeHTb.
He TporaiTe LCD 3KpaH. 3To MoKET 6bITb npuHHoI uapaHH HJIN 3aRpa3HeHH.
O XndkokpnctaJInuyeckOM (LCD) 3KpaHe DIncPJIeJ
- EcJH dncJIe yCTaHOBJIeH B6JIH3n BeHTNJIaTopa HJH KOHNIOHepa, y6eIHTecb, YTO BO3dYx H3 KOHNIOHepa He dyet Ha Hero. TOpayH BO3dYx MoKTe NOBpeHtB LCD 3KpaH, a XOJOIDbI B03dYx MoKTe CTAb IIpNHIOI IOBJIeHNA JlaRr BHyTpH dncJIe, YTO IIpNBcET K erO IOBpeJdeHNo. TaKKe, ecJH dncJIe OXJaJdaetcXoJOIDbIM BO3dYxOM, 3KpaH MOKTe CTAb TeMHbIM HJN cPOK cJyXbI MaJIeHBKOI LyopeceHTHO Tpy6KN, HcNOJB3yeMOH BHyTpH dncJIeA, MOKTe YMeHBINITbCra.
·Ha LCD 3KpaHe MOryT IIOABHTbcra MaJIeHbKHe UepHbIe TOUKN HJN 6eJIbIe TOUKN (ApKHe ToUKN).OHH cyIueCTByOT 6laIogApxapaKaTePcHtHKaM LCD 3KpaHa H He O3HaauHr HaJIuHne IIpo6JIemblc DHCIIJeEM.
-Приинзкх Temпepa typax LCD кран может NotemHcTb Ha BpeMЯ,пocл e OTKJIIOUeHnI ПИТаHnI. - LCD ькан 6удET TrpyДнОсМOTpeTB, ecJIN OH ПОДВергаETСЯ пямOMy COЛHeHOMy CBety.
XpaHnTe DncnpeB XopoOnx YcNoBnA
- Korda ydaJareTe nbIb c 3KpaHa nHn uHCTHTe HcHJIeN, BO-NepBbIX, OTKJIIOHTe CHCTemy IHTaHHa, 3aTEM BbITpHTe eRO MArKOi cyXoi TKAHbIO.
KorIa BbITnpaTe 3KpaH, 6yIbTe oCTOpOxHbI, He IIOuapanaiTe NOBepXHoCTb. He HcIOJIb3yIte JecTKHe HJIn a6pa3HBHbIe XHMnueckHe OYHCTHTeJIN.
He nCnoJIb3yIe BJIaJxHyIO TkaHb IJIa OUnCTKn. He nCnoJIb3yIe opraHnueckne pactBOpHTeJIH, TaKHe KaK 6eH3HH, pactBOpHTeJIb.
O MaJIeHbKOI ΦIyopecIeHTHOJ Tpy6Ke
MaJIeHbKaJyIyopeCHeHTHaTpy6Ka HcIOJIb3YeTeC8 BHyTpH dHcIIeJ, YTObIocBeeaTaB LCD əKpaH.
* lyopeceHTHna Tpy6ka 3TO yactb HeJNTeJIbHOrO NOJB3OBaHHn HmeeT KOpOTKn cPOK cJyK6bl.
ΦλγοpecüeHTHOI Tpy6KN XBaHT IprH6JIH3HTeJIbHO Ha 10 000 YacOB, B 3aBnCHMOCTH OT pa6OuHX yCIOBHI. (IcnoJIb3OBAHne IHCIIpeI prn Hn3KHX TeMnepaTypax, yMeHb7aet cPok cIyX6bl φλγopecüeHTHOI Tpy6KN.)
KorIDA ФлуорецHTня Трубka ДостагаТ КОИа eссрka слжбы, Экраз CTaHOВТСЯ TemHBIM ИЗБбражЕпд ДOLьшп Рошчретс.ЕсЛН STO понсхДNT, ПКOKOHcYЛьТИрУПТecь y Baшero ДИлега Или B 6Лижайшem aВТOPИЗОВAHHOM cepвсHOM цENTpe PIONEER.

OCTOPOXKHO
PIONEER He pekomeHdyet Bam yctaHaBJIbBaTb HIn 06cJyKHBaTb HncJIeIcMoCToTeJIbHo. YcTaHOBka HIn 06cJyKHBaHHe H3JeJIH MoXeT IIpNBecTH K pNcky IIOJyuEHH NJIeKTPnueCKOro IIOKa HIn IpyrHex IOBpeKJdeHn. IJIa Bcex yctaHOBOK N 06cJyKHBaHH BaIIeRo IINcIIeJ o6paHTecb K IepcoHaJIy aBTOpN3OBaHHOro cepBnCHOrO ueHTpa Pioneer.
3aIHTte BcIO 3JIeKTPoIIPOBOk Ky Ka6eJIbHbIMN 3aJKMamn HJIH3OJIauHHO Ka6eJIbHOJ JeHToi. He IOnyckaIte JIO6Oro 06HaJKeHHaJIeKTPoIIPOBOkKn, ocTaBJIa eE He3aUuIeHHoI.
He IpocBepJIbBaIte OTBepCTHe BHytpb OTceKa DBrHgATEJIa, YTO6bl IIOJKJIOUHTb JKeJTbI IIPOBOHNK yCTpoHCtBA K aKKyMylTOpHO bAtapee ABTOMO6JIa. Bn6paIIraI DBHgATEJI MoKet CO BpeMeHem CtaTB IIprHNoH IOBpeJKeHn H3OJIauHNOHHOro MaTePHaJa B ToUKe, IDe IIpoBoI IIpoXoIHn H3 IaccAKnpcKOrO caIoHa B OTcK DBrHgATEJIa. ByIbTe ocObo ocTopoxHbI IIpn 3aIHTe IIpoBOJa B 3ToI TOUKe.
- Upe3BbIaHNo OIIacHO IOnyScKaTb, YTO6bl IpoBOJ IHCIIJIeA cTaJI NaKpyuHBaTbC8 BOKpyr pyJIeBOJ KOJOHKn IJIIN pbIuraga IIpeKeJIIOUeHnI nepeJaI. IIpr yCTaHOBKe IHCIIJIeB TaKOM HApPabJIeHnI, 6yIbTe yBepeHbI, YTO OH He 6yIeT MeHaATb DBHXKeHHIO.
- Y6eIHTecb, yTO npoBOna He IpeceKaHOTcC DnKJyMmNc yactMa n ABToMo6HJI, TAKHM KAc pbUar IpeKJIIOueHn Ipepa, CToJHOuHbI TopMO3 HJI MExaHH3M DnJKeHn cHDeHbJ.
- He ykopauHbAaTe JIO6bIe IPOBOJa. EcJH BbI cJeJaete 3To, cxema 3aHTbIMoKeT pa6OtaTb HEPpaBnIbHo.
Приимechanical:
-Данhoe yctpoiCTBO npedHa3HaueHO JIA aBTOMO6HJIe i 6aTaapee12B n OTPuaTeJbHbIM 3a3emJIeHHem. IpeE YcTaHOBKOJ yCtpoiCTBa B TpaHCIOPTHom cpeICTBE JIA OTdbixa, rpy3OBOM aBTOMO6HJIe HJIH aBTObyce, pOBepbTe HaipjxKeHHe 6aTapeH.
- YTO6bI H36eXaTb KOpOTKOrO 3aMbKaHHB 3JIeKTpHueCKoCnCTeMe, IpeJ yCTaHOBKOIO68aTeJIbHo OTcoEINHHTe Ka6eJIb 6aTapen
O3HaKOMbTecb c HOpMaueHneIIO IOIKJIIOUeHHIO IpyTHX ycTpoHCTB, IIpHBedeHHoB B HHCtpyKuHHIO EKCJLYaTaHH, 3aTeM BBIOJIHNTE IOIKJIIOUeHHe JOJXHBIM O6pa3OM.
3aKpeHHTe IPOBOda Ka6eJbHBIMn 3aXHMamn HJIH JINIKOHN3OJUHOHOJJeHToJ.JIa 3aIHTbI IPOBOOB, O6MOtaJIteHX JINIKOHN3OJUHOHOJJeHTOITam, rDe OHN COIIpHKACAOTcC MTeaJIJIueCKHMn YacTAMN.
IIpoBHeIte H 3aKpeHITe IpoBOHa TaKHM O6pa3OM, YTO6bI OHn He COINPKACAJIHc b C IBHraIOUIMMCSaCTaMH, TaKHM KaK pbuAr KOpO6Kn IpeDaay, pyHoi TOpMO3 H AnpabJIAHOUIne IJIY BbIDBHXeHHn CHJeHBn. He IPOBOHTe IPOBOda B MecTaX, IOIBepKeHHbIX BO3dEICTBHIO BBICOKoTMeIIepaTypbI, TaKOMy KaK PAnOM C BbIpyCKOM O6OrpeBaTeJI. EclN H3OJIaIIpaBHtCn HIn O6OpBeTc, TO BO3HNKHeT OIIaCHOCTb KOpOTKOTo 3aMbIKaHHa Ha KOpIyc aBTOMO6NJ.
He npoBOHnTe JKeIbI npoBOI uepe3 OTBepCTHe BOTcKe DBHrAteJIa IJIa TOrO, YTO6bl IOKJIIOHTb erO K 6aTapee. 3To npHBeET K IOBpeJDeHHO H30JIaIIIN npoBOHa H OueHb ONaCHOMy KOpOTKOMy 3aMbIKaHHO.
- HNKOrIa He IIOJaBAHte 3JIeKTPoHnTaHHe Ha pyrOe O6OpUIOBaHHe, IocpeIcTBOM cHrTHn H3OJIuHH cHIOBOrO Ka6eJr YcTPOIcTBA H IOkJIIOUeHn erO K IpoBOy. IIpOnyckHa nCNoCo6HOCTb IPOBOda 6yJeT IpeBbIiHa, YTO npHBeDet K erO nepeRpeBy.
- IIpn 3aMeHe IJIaBKOro IpeOxpaHHTeJIa, O6aTeJbHO HcIOJIb3yIte IpeOxpaHHTeJIb c HOMHaJIOM, yKa3aHHOM Ha NaTpOHe IJIaBKOro IpeOxpaHHTeJIa.
- EcJIN daHHOC yCTPOiCTBO yCTaHO B aBTOMO6HJIe, Ha 3aMKe 3aXnHaHH KOTOPORo He npcIyCMOTpeHO ACC (BCIOMOraTeJIbHbIe np6Opbl), TO KpaChBII npOBoi yCTPOiCTBa DOJIkeH 6bITb IOIKJIIOUeH K KJIeMe, CB83aHHOc IIpeKJIIOUeHNEM BKJI/BbIKJI Ha 3aMKe 3aXnHaHH. EcJIN 3TO He 6yJeT cDeJaHo, 6aTapeA aBTOMO6HJIa MoXeT pa3pIHTbcR, KOrDa BbI 6yJeTe OTCyTCTBOBaTb HeCKOJIbKO YacOB.


HeT ACC noJIOxKeHHAACC noJIO2
OCTOPOXHO
Ka6eJIN daHHoro ycTpoiCTBa H npyrHx yctpoiCTB MOryt 6bIb pa3Horo IBeTa, JaXe ecJIn OHN BblIOJIHHOT OINHaKOBbie fYHKUHN. IIpn IOJKJIHOyeHH INaHHoro ycTpoiCTBa C dpYHM ycTpoiCTBOM O3HaKOMbTEcB c HHCTpyKIIHmK KaJIOrO ycTpoiCTBa H COeIHHTe Ka6eJIn, BblIOJIHHIOIIHe OINHaKOBbie fYHKUHN.
Ha3BaHnI ΦyHKcIIN PoiKJIIOUaEmbIX KJIeMM
CkpbBaHouu np6op

①Злектосяжени
BxOHNbIe rHe3da Ka6eJra 3JeKtpoCHa6KeHn.
② VCR2 RCA BnIeO BXoI (KeJIrIbI)
BxoHoe rHe3IO BnIeO c VCR, DVD nJIN pyroro AV o6OpyIOBaHHa.
③ VCR2 RCAaynoBxO(6eIbI, KpaCHbI)
BxoHbIe rHe3a cTepeo aynOc VCR, DVD nn pyroro AV o6opydoBaHna.
④ VCR1 RCA BnIeO BXoI (KeJIrIbI)
BxoHoe rHe3IO BnIeO c VCR, DVD nIIN dpyroro AV o6OpyIOBaHn.
⑤VCR1 RCA aydno BXoD (6eIbI, KpaCHbI)
BxoHbIe rHe3da cTepeo aynO c VCR, DVD nIpyrOro AV o6OpyIOBaHnI.
⑥VCR1 COMPONENT BnJeo BXOJ (6eJIbI)
BxOaHbIe THe3Ja KOMIOHeHT BnDeo C VCR,DVD Hn DpyrOro AV oobopyuObaHHa, KOtOpoe HmeeT KOMIOHeHT BnDeo BbIXoJ.* VCR1 COMPONENT BnDeo BXoJ a npOpHTe,T KOrDa IOnKJIHOueHbI O6a VCR1 RCA BnDeo BXoJ H VCR1 COMPONENT BnDeo BXoJ.
* Tpe6yeTcya CD-CP300 26-nHH KOMIOHEnr Ka6eJIb (IpoJaTeCra OTJeJIbHO).
⑦COMPONENT BnIeO BbIXoI (cHHn)
BnJeO n cTepeo ayHNO ot VCR1 BXoI HappaBJIeHbI K 3ToII KJIeMMe. Bo3MOxHO IOnKJIIOueHne K npyroAVD-W1100Vc 26-IMN KOMIOHeHT Ka6eJEM CD-CP300 (PpOJaETcR OTJeJIbHo).
⑧KhoNka RESET
IpeyeCTaHOBHTb MKNpOIpOeCCOp IINJIe. HaKMITE Ha KHOIIky KOHNKOM pyuKN HJIN dpyHM IOIOOBHbIM IpeImetOM.
Ipeed YcTaHOBKoN 3aKpenJIeHNHeM
CneJaIe IepBoe BpeMeHHoe IOKJIIOueHHe H IpOBepbTe, YTO yCTpoIcTBO pa6oTaet JOJXHBIM 6pa3OM.
- Haxmte KhoIky RESET ⅢapNKOBoi pyKoi IIN npyHM IOIO6HbIM IppeDMeTOM, KOrIa NODKJIIOUcHHe 3aBepHcHo.
YpOBeHb KOMIOHeHTbI BbIXOJa Y:1Vp-p/75Ω
Cb, Cr: 0.7 Vp-p/75 Ω
Hana30n pa6oey TeMpepaTypb1 -10°C 10 +60°C
PpHmeeaHHe:
- TexHHueckne xapaKtepHCTHKn HIN3aH INPHoopa MOryT MeHrTbc8e3 IpeBapHTeJbHOrO COOOHeHH. IpoJaBaemble H3deJIHr MOrYr OTJNuATbcra B DeTaJxOT HJIIOCTpHPOBAHHbIX B DaHHOM pyKOBOIcTBe.

Visit www.pioneer.co.uk (or www.pioneer-eur.com) to register your product.
PIONEER ELECTRONICS (USA) INC.
P.O.Box 1540, Long Beach, California 90801-1540,U.S.A.
TEL: (800) 421-1404
PIONEER EUROPE NV
Haven 1087, Keetbergraan 1, B-9120 Melsele, Belgium
TEL: (0) 3/570.05.11
PIONEER ELECTRONICS ASIACENTRE PTE. LTD.
253 Alexandra Road, #04-01, Singapore 159936
TEL: 65-6472-7555
PIONEER ELECTRONICS AUSTRALIA PTY. LTD.
178-184 Boundary Road, Braeside, Victoria 3195, Australia
TEL: (03) 9586-6300
PIONEER ELECTRONICS OF CANADA, INC.
300 Allstate Parkway, Markham, Ontario L3R OP2, Canada
TEL: 1-877-283-5901
PIONEER ELECTRONICS DE MEXICO, S.A. de C.V.
Blvd. Manuel Avila Camacho 138 10 piso
Col.Lomas de Chapultepec, Mexico, D.F. 11000
TEL: 55-9178-4270
先锋股份有限公司
總公司:台北市中山北路二段44號13樓
電話:(02)2521-3588
先鋒電子(香港)有限公司
Published by Pioneer Corporation.
Copyright © 2006 by Pioneer Corporation.
All rights reserved.
Publication de Pioneer Corporation.
Copyright © 2006 Pioneer Corporation.
- Fitting and Removing the Display 3
- IMPORTANT INFORMATION.5
- Before Using This Product 6
- Key Finder 8
- Basic Operation 9
- Adjusting the Screen 14
- Settings 18
- Using the Display Correctly 20
- Connecting the System 22
- Installation 29
- Specifications 32
- Please Read All of These Instructions Regarding Your Display and Retain them for Future Reference
- Precaution:
- Note:
- To fit the display
- To remove the display
- About This Product
- CAUTION
- Product Registration
- Precaution
- In Case of Trouble
- To Avoid Battery Exhaustion
- To Protect the LCD Screen of the Display
- When Viewing is Difficult, use [BRIGHT] and [DIMMER] to Adjust
- About the Video and Audio Outputs of this Unit
- Resetting the System
- Resetting the Microprocessor
- Component Parts and Features
- ■Display Unit
- ①Built-in speaker
- ② Headphone jack
- ③ Ambient light sensor
- ④SOURCE/POWER button
- ⑤VOL-, VOL+ buttons
- ⑥WIDE/MENU button
- WARNING
- Turn On Power
- Start the vehicle engine.
- Turn on the system.
- Volume Adjustment
- Adjust the speaker volume.
- Selecting a Source
- Select a source.
- Changing the Wide Screen Mode
- Display a source to view. (Refer to page 11.)
- Select a wide mode.
- Basic Operation
- Wide Modes Available
- FULL
- JUST
- CINEMA
- ZOOM
- NORMAL
- Picture Adjustment (BRIGHT/CONTRAST/COLOR/HUE)
- Display a menu screen.
- Select an item to adjust.
- Adjust the item.
- Complete the setting.
- Picture Adjustment (DIMMER)
- Display a menu screen.
- Select [DIMMER].
- Adjust brightness.
- Complete the setting.
- Input Setting (VCR1/VCR2)
- Turn off the system.
- Display a setup menu.
- Select between [VCR1] and [VCR2].
- Select video format.
- Power Control Function
- Display a setup menu.
- Select [POWER.C].
- Select Power Control function.
- Handling the Display
- About the Liquid Crystal Display (LCD) Screen
- Keeping the Display in Good Condition
- About the Small Fluorescent Tube
- Names and Functions of Connection Terminals
- ■Hide-away Unit
- Connecting the Power Cable
- Connection Diagram (VIDEO input)
- Connecting the Audio and Video Output
- Connecting with Pioneer Head Unit with Component Cable
- Before Installing and Fixing
- Before Affixing the Adhesive Tape
- Installing the Hide-away Unit
- Installation Precautions
- Hide-away Unit Installation
- General
- Display Unit
- Hide-away Unit
- PRECAUCIONES IMPORTANTES 2
- Selecteer [POWER.C].
- IpaBnJIbHoe POnb3OBaHne DncnIeem 20
- YcTaHOBka 29
- Texhueckne xapaKtepcntuKn 32
- IoxaJyNcTa, IpoUHTaIe Bce n3 3Tnx HnCTpyKzni, KacaIoZneC8 BaWero DIncPJIe N CoXpaHITe INx dJaJIbHeiJwero pyKOBoIDCTBa
- IIpeocTopoJkHocTB:
- Ppimechanee:
- YCTaHOBNTb IINcPJIeI
- O BnIeO n Aydno BbIXoJax daHHoro N3dJIy
- OCTOPOXHO
- IpeyectahOBka CnCTembl
- IpeyectaHOBKa MmKpOpoceccopa
- PergunpoBaHne TpomKoCTn
- PeryJInpObKa rpoMkoCTH dHHaMHka.
- Приимechanical:
- BbI6Op NcToUHnKa
- BbIepeHte nctouHnK.
- I3MeHeHne IInpHbI 3KpaHHoro Pexnma
- 1.Появлесне�СТОУнkaДЯпрсмOTpa.(ObpaTHTeCbКстраHHe 11.)
- BbIbepeHte IINpHHy peJHMa.
- HacrtpoiKa N3o6paXeHnA (BRIGHT/CONTRAST/COLOR/HUE)
- 3aBepINHTb yCTaHOBky.
- PpimmeaHHe:
- BBoI YcTaHOBKn (VCR1/VCR2)
- BbIKJIIOueHHe cHCTeMbI.
- BbI6op 4yHKiHn KoHTpoJIa PtHaHn.
- 3aBepHHe yctaHOBKn.
- OCTOPOXKHO
- Опершовке Диспем
- O XndkokpnctaJInuyeckOM (LCD) 3KpaHe DIncPJIeJ
- XpaHnTe DncnpeB XopoOnx YcNoBnA
- O MaJIeHbKOI ΦIyopecIeHTHOJ Tpy6Ke
- Ha3BaHnI ΦyHKcIIN PoiKJIIOUaEmbIX KJIeMM
- CkpbBaHouu np6op
- Ipeed YcTaHOBKoN 3aKpenJIeHNHeM
- PpHmeeaHHe:
- PIONEER ELECTRONICS (USA) INC.
- PIONEER EUROPE NV
- PIONEER ELECTRONICS ASIACENTRE PTE. LTD.
- PIONEER ELECTRONICS AUSTRALIA PTY. LTD.
- PIONEER ELECTRONICS OF CANADA, INC.
- PIONEER ELECTRONICS DE MEXICO, S.A. de C.V.
- 先锋股份有限公司
- 先鋒電子(香港)有限公司
Brand : PIONEER
Model : AVDW1100V
Category : Car entertainment screen