
Ninebot eKickScooter E2 Plus E II - Electric scooter SEGWAY - Free user manual and instructions
Find the device manual for free Ninebot eKickScooter E2 Plus E II SEGWAY in PDF.
| Product type | Foldable electric scooter |
| Model | Ninebot eKickScooter E2 Plus E II (ref. 051402ET) |
| Brand | Segway / Ninebot |
| Unfolded dimensions (L x W x H) | 1081 x 475 x 1177 mm |
| Folded dimensions (L x W x H) | 1081 x 475 x 548 mm |
| Net weight | 16.8 kg |
| Maximum load capacity | 90 kg |
| Recommended age | 14 to 60 years |
| User height | 130 – 190 cm |
| Maximum speed | 25 km/h (Sport mode) |
| Maximum range | 25 km (Drive / Standard mode) |
| Maximum slope | 12 % |
| Battery | Lithium-ion 21.6 V – 220 Wh – 10.2 Ah |
| Charging time | About 7.5 hours |
| Nominal / max motor | 300 W / 500 W |
| Tyres | 8.1 inch pneumatic tyres with shock absorption |
| Brake | Rear drum brake |
| Lighting | Front light, rear light, front and rear turn signals |
| Connectivity | Bluetooth 2.4 GHz (max range 20 mW) – Segway-Ninebot app |
| Speed modes | 3 modes: Eco (E, 15 km/h), Drive (D, 20 km/h), Sport (S, 25 km/h) |
| Protection rating | IPX4 (splash resistant) |
| Operating temperature | -10 °C to 40 °C |
| Maintenance | Every 3 months or 500 km: check frame, screws, functions, battery |
| Certifications | ANSI/UL 2272, battery UL 2271, RED directive 2014/53/EU, RoHS |
Frequently Asked Questions - Ninebot eKickScooter E2 Plus E II SEGWAY
User questions about Ninebot eKickScooter E2 Plus E II SEGWAY
0 question about this device. Answer the ones you know or ask your own.
Ask a new question about this device
Download the instructions for your Electric scooter in PDF format for free! Find your manual Ninebot eKickScooter E2 Plus E II - SEGWAY and take your electronic device back in hand. On this page are published all the documents necessary for the use of your device. Ninebot eKickScooter E2 Plus E II by SEGWAY.
USER MANUAL Ninebot eKickScooter E2 Plus E II SEGWAY
F N The manufacturer reserves the right to make changes to the product, release formulae updates, and update this manual at any time. Will weagesayag or a
F I t 1054
The Herderl Schalb hahs che Srtt v. 0edert Vndanr an m Prohivnizum, Ierimro-udates zu vertiflii and dssch Handbau zu D im Hein der 2018 und 2020 fuchst als schaal in die Jegelvich Nibohop-Vap. und die Schalb von 2019 und 2020 fuchst als schaal in die Beteiligung entzeltbar.
I. I
E 5
P 1
Do badfakht beahant hich he rortn o om elp monamnt wrgjing an het product a te braing, freware updates ut to braing on ezns handling bi te wenker. Ge aan mowqovcij of beh 6egyNne-neru-oum et h enoicwitee gebruiersmaaie in downloaden. u reed at the
U Fabricante resive-se o direito de fazer alteracoes no produto, lancer atralizacoes de firmware e atualizar oste manuai a quaker momento visce www.sequcoj.com ou verificar a aplicacao Sequentirei para descarguer os materiais de utilizcior mais recentes. Deve instalar a aplicacao, alhar a sua KikKrotor e ocitar as ultimas usacilias e inatulas de seguros.
P T

Baccolta Carta
EN The pictures shown are for illustration purposes only. The actual product may vary.
FR Les images sont presentees a titre indicatil quieuement. Le produit reel peut voter.
DCDie gezeigen Aabnugien brien fur zur vanschauung, das tacsche Prooekt karndavon abweilen.
11 Le HInagini Hsroate sio hio a scopa ilustrativ. i plootb eHutvo puo subre vanaioni
ES Las imagenes que se muestan san solo para fines ilustrativos. D producto real quod variar.
PL Predstawlne obary slzq wylacnlo do celw ilustracyjny. Faktycny produkt moe wyglacn inaej.
NL De getoonde foto's zijn alleen ter Ilustratie. Het werkeilje product kan varieren.
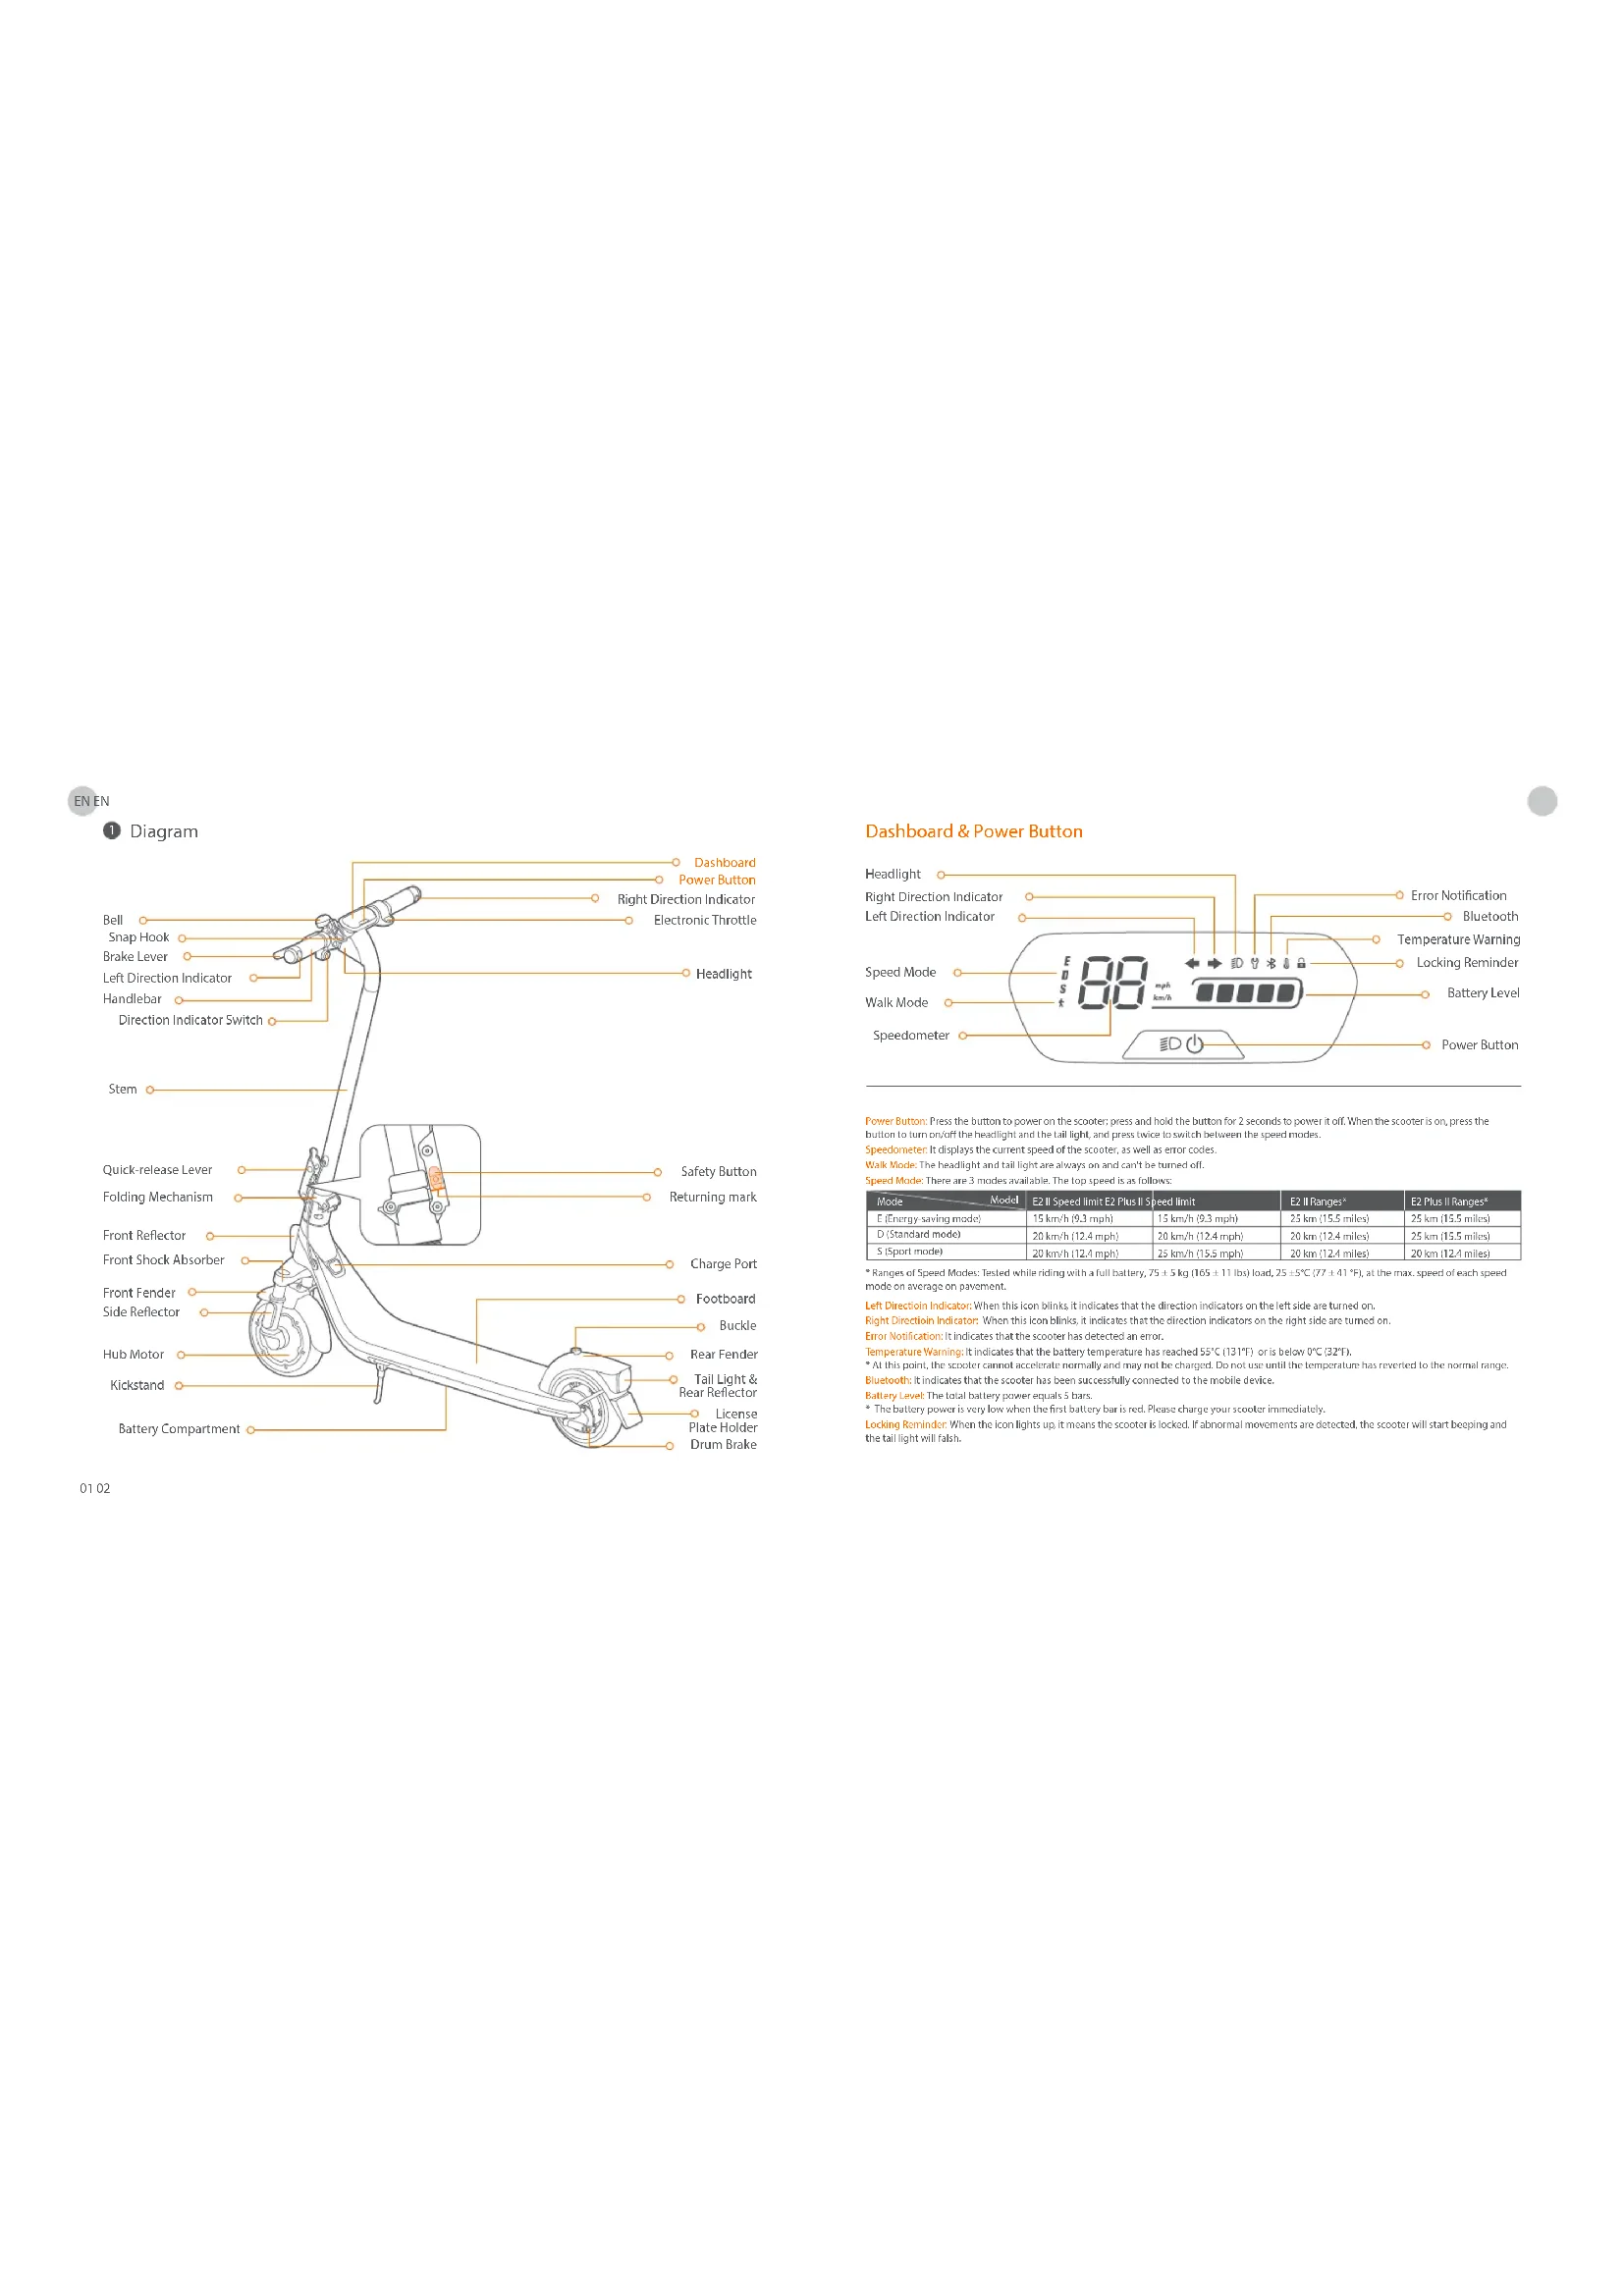
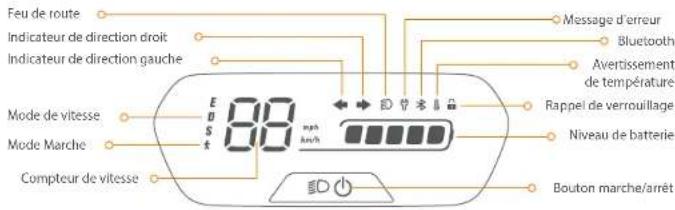
Dashboard & Power Button
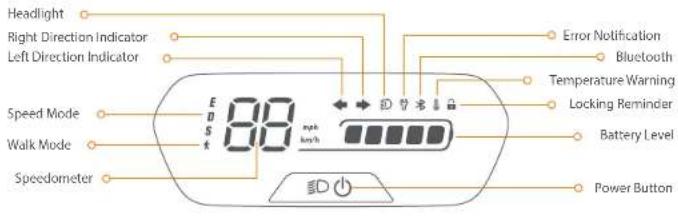
Power Button Press the button to power on the scooter: press and hold the button for 2 seconds to power it off. When the scooter is on, press the button to turn off the headlight and the tail lights; and press twice to switch between the speed modes.
Speedometer it displays the current speed of the scooter, as well as error covariance.
Walk Mode: The headlight and tail lights are always on and can't be turned off.
Signed Media: There's arg 3 p
| Mode | Model | C2 II Speed limit | C2 Plus II Speed limit | C2 II Ranges* | C2 Plus II Ranges* |
| E (energy saving mode) | 15 km/h (9.3 mph) | 15 km/h (9.3 mph) | 25 km (15.5 miles) | 25 km (15.5 miles) | |
| D (standard model) | 20 km/h (12.4 mph) | 20 km/h (12.4 mph) | 20 km (12.4 miles) | 25 km (15.5 miles) | |
| S (sport mode) | 20 km/h (12.4 mph) | 25 km/h (15.5 mph) | 20 km (12.4 miles) | 20 km (12.4 miles) |
- Changes of Speed Modes: Tested while riding with a full battery, 75 ± 5 kg (165 ± 11) Ibs load, 25 ± 5°C (17 ± 4)°C at the max. speed of each speed mode on average on pavement.
Left Direction Indicator When this icon blinks it indicates that the direction indicators on the left side are turned on.
Right Direction Indicators: When this icon blinks, it indicates that the direction indicators on the right side are turned on.
Error Notification: It indicates that the scroller has detected
Ternatralnre Warrin, Itindicates that the atalry temperature has reached 55oC/131oC or is below 0oC/132oF.
- At this point, the scooter cannot accelerate normally and may not be charged. Do not use until the temperature has reverted to the normal range, asphyxiation indicates that the scooter has been successfully connected to the mobile device.
Equity level: The total battery power equals 5 bars.
The battery power is very low when the first battery bar is red. Please charge your scooter immediately.
Locking limnber when the icon light up, it means the stover is locked. If abnormal movements are detected, the scatter will start peeling and the tail light will fall.

Specifications
| Item Parameter | |||
| Product | Name | Ninobot eKickScooter E2 II | Ninobot eKickScooter E2 Plus II |
| Model | 051401D0 | 051402ET | |
| Length x Width x Height | Approx. 1081 x 475 x 1177 mm(42.6 x 18.7 x 46.3 in) | Approx. 1081 x 475 x 1177 mm(42.6 x 18.7 x 46.3 in) | |
| Folded: Length x Width x Height | Approx. 1091 x 475 x 548 mm(42.6 x 18.7 x 21.6 in) | Approx. 1091 x 475 x 548 mm(42.6 x 18.7 x 21.6 in) | |
| Approx. 16.2 kg (35.7 lbs)Net Weight | Approx. 16.8 kg (57.0 lbs) | ||
| Rider | Max. Payload | 90 kg (198 lbs) | |
| Recommended Age | 14-60 years old | ||
| Required Height | 130-150 cm (43"~62") | ||
| Machine | Max. Speed | Approx. 20 km/h (12.4 mph) | Approx. 25 km/h (15.5 mph) |
| Range at Max. Speed | Approx. 20 km (12.4 miles) | ||
| Max. Slope | Approx. 12% | ||
| Troughable Terrain | Mostly smooth roads or normal asphalt, terrain roads | ||
| Operating Temperature | -10-40°C (14-104°F) | ||
| Storage Temperature | -10-50°C (14-122°F) | ||
| IP Rating | IPX4 | ||
| Duration of Charging | Approx. 7.5 h | ||
| Battery | Nominal Voltage | 21.6V = | |
| Max. Charging Voltage | 25.2V = | ||
| Charging Temperature | 0°C -44°C (32-111°F) | ||
| Nominal Energy | 220 Wh | ||
| Nominal Capacity | 10.2 Ah | ||
| Battery Management System | Protection against overvoltage/undervoltage/short circuit/overcurrent/over temperature | ||
| Motor | Nominal Power 0.25 kW, 250 W | 0.3 kW, 300 W | |
| Max. power 0.45 kW, 450 W | 0.50 kW, 500 W | ||
| Charger | Model | NBW250201DSN-EU | |
| Output Power | 36.3 W 100-240 | ||
| Input Voltage | V~50-60 Hz | ||
| Max. Output Voltage | 25.2 V = | ||
| Rated Output | 24.2 V =L.5 A | ||
| Tire | Tires | 8.1-inch inner hollow shock-absorbing tires | |
| Other | Direction Indicators | Front and rear direction indicators | |
11: Ringo at Mab, Spacc tailed while riding with a full battery. 73 ± 5 kg (65 ± 11 lit) load, ambient temperature, and 25^ × 07 = 41^ , at the max. speed on average on pavement. 03 Reference of the factors that affect range include speed, load, number of turns and steps, ambient temperature, and
Certifications
This product is certified to ANSI/CMN/UL-2272 by TUV Rheinland.
The battery complies with UN/DO T 38.3
The battery complies with ANSI/CAN/UL 2271.
European Union Compliance Statement
Important WEEE information

This symbol on the product or on its packaging indicates that used electrical and electronic products should not be mixed with unsorted municipal waste. For proper treatment, it is your responsibility to dispose of your waste equipment by arranging to return it to designated collection points.
Disposing of this product correctly will help save valuable resources and prevent any potential negative effects on human health and the environment, which could otherwise arise from inappropriately waste handling.
Penalties may be applicable for incorrect disposal of this waste, in accordance with your national legislation.
Please contact your local authority for further details of your nearest designated collection point.
Battery recycling Information for Users

This symbol means that batteries and accumulators, at their end of life, should not be mixed with unsorted municipal waste. Your participation is an important part of the effort to minimize the impact of batteries and accumulators on the environment and on human health. For proper recycling you can return this product or the batteries or accumulators it contains to your supplier or to a designated collection point.
Disposing of this product correctly will help save valuable resources and prevent any potential negative effects on human health and the environment, which could otherwise arise from inappropriate waste handling.
Penalties may be applicable for incorrect disposal of this waste, in accordance with your national legislation.
there are separate collection systems for used batteries and accumulators.
Please, dispose of batteries and accumulators correctly at your local community waste collection/recycling center.
Radio Equipment Directive
Nineobot (Changzhou) Tech Co., Ltd. hereby declares that the product listed in this section comply with the essential requirements and other relevant provisions of the Radio Equipment Directive 2014/53/EU.
Restriction of the use of certain hazardous substances [RoHS] Directive
Ninobot (Changzhou) Tech Co., Ltd. hereby declares the whole product including parts (cables, cords, and so on) meets the requirements of RoHS Directive 2011/65/EU and amendment Commission Delegated Directive (EU) 2015/63 on the restriction of the use of certain hazardous substances in electrical and electronic equipment ("RoHS recast" or "RoHS 2.0").

Machinery Directive
Ninobot (Changzhou) Tech Co., Ltd. hereby declares that the product listed in this section comply with the essential requirements and other relevant provisions of the Machinery Directive 2006/42/EC.

Rised Rreprentatives
Segway-Ninebot Europe
Dynamastaat 7, 1014 BN Amsterdam, The Netherlands.
Ninobot (Changzhou) Tech Co., Ltd. hereby declares that the product model: 051401DD, 051402EE comply with the essential requirements and other relevant provisions of the Radio Equipment Directive 2014/53/EU, the machinery directive 2006/42/EC, and the RoHS Directive 2011/65/EU and amendment Commission Delegated Directive (EU) 2015/863.
The declaration of conformity can be viewed at the following address: https://european-segway.com/instruction-manuals
| Bluetooth | Frequency Band(s) | 2.4000-2.4835GHz |
| Max. RF Power | 20 mW |

Trademark
Ninebot is the trademark of Ninebot (Beijing) Tech Co. Ltd, Segway and the Rider Design are the registered trademarks of
Segway Inc., App Store and Apple Logo are trademarks of Apple Inc. Google Play and the Google Play logo are trademarks of Google
LLCTheo"word mark and logos are registered trademarks owned by Bluetooth SIG, Inc. and any use of such marks by
We have attempted to include descriptions and instructions for all the functions of the KickScooter at the time of printing. However, due to
constant improvement of product features and changes of design, your KickScooler may differ slightly from the one shown in this
document. Scan the QR code or visit the Apple App Store (iOS) or the Google Play Store (Android) to download and Install the App.
Please note that there are multiple Segway and Ninebot models with different functions, and some of the functions mentioned here may not be applicable to your unit. The manufacturer reserves the right to change the design and functionality of the KickScooter product and documentation without prior notice.
2024 Ninebot (Beijing) Tech Co. Ltd. All rights reserved.
The Segway-Ninebot App can support KickScooter with built-in Bluetooth

Common Failures
| Possible causes/Error code Solution | ||
| 10 | Bluetooth communication failure | Check the connection of the dashboard communication wire and the control cable, or contact after-sales service or an authorized dealer. |
| 11 | Abnormal 1A phase current sampling of motor | Please contact after-sales service or an authorized dealer. |
| 12 | Abnormal 1B phase current sampling of motor | |
| 13 | Abnormal IC phase current sampling of motor | |
| 14 | Abnormal throttle hall sampling | Check whether the throttle is pressed when powered on, or contact after-sales service or an authorized dealer. |
| 15 | Abnormal brake hall sampling | Check whether the brake lever is squeezed when powered on, or contact after-sales service or an authorized dealer. |
| 24 | Abnormal default voltage | Check whether the wire connected with the battery cable and the controller is loose, or contact after-sales service or an authorized dealer. |
| 26 | Abnormal data writing/reading | Please contact after sales service or an authorized dealer. |
| 31 | Incorrect FLASH operation | |
| 35 | Default S/N | Check whether the KickScooter's S/N is the default S/N. |
| 39 | Abnormal battery temperature | Check the working environment of battery, or contact after-sales service or an authorized dealer. |
| 40 | Abnormal controller temperature | Controller temperature is too high, please contact after-sales service or an authorized dealer. |
| 41 | Abnormal motor temperature | Please contact after sales service or an authorized dealer. |
| 42 | Motor not calibrated | |
| 45 | Abnormal bus current sampling | |
| 50 | Motor phase loss | Check whether the wire connected with the motor and the controller is loose, or contact after-sales service or an authorized dealer. |
| 52 | Motor stalled | Check whether the KickScooter is overload, or contact after sales service or an authorized dealer. |

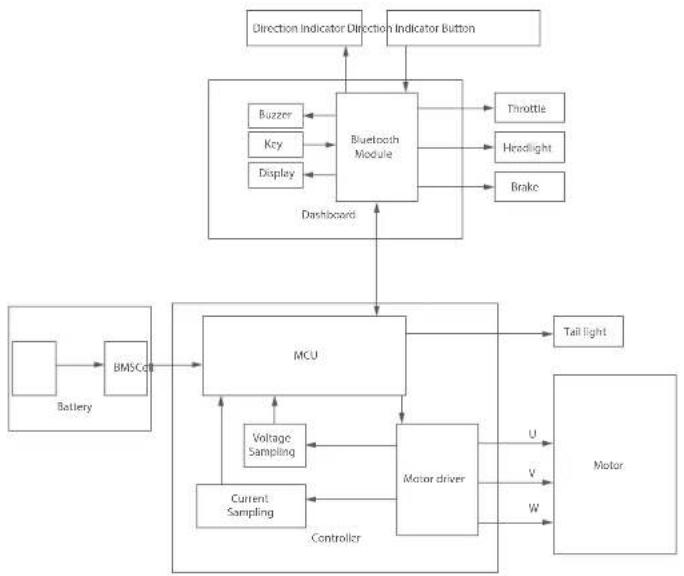
Wiring Diagram
Recommended Maintenance Schedule
To ensure safe riding, day to day care and regular maintenance are essential. You, the owner, have control and knowledge of how often you use your scooter, how hard you use it and where you use it. It is the owner's responsibility to perform regular checks and bring your scooter to authorized service center for inspection and service. Please refer to the maintenance schedule below.
Note: This maintenance schedule charges a service fee.
| Item Component | Maintenance Method | Every 3 months | Every 6 months of every 2001km (3.11 miles) | After 2 years or the total mileage ≥5,000 km (4.109 miles) | |
| Mainframe maintenance | Mainframe parts Use a soft, wet cloth to wipe the mainframe clean. | √ | √ | √ | √ |
| Tire wear | Check if the tires are cracked, deformed, or significantly worn. | √ | √ | √ | |
| Screws on the stem top | Tighten the tire screws fixed with the handlebar and the stem. The suggested torque is 5.5+0.8 N-m. | √ | √ | √ | |
| Tighten the screw on the throttle. The suggested torque is 2-0.1 N-m. Tighten the screws on the brake levers. The suggested torque is 5-0.1 N-m. Tighten the screws on the stem top. The suggested torque is 2-0.1 N-m. | √ | √ | √ | ||
| Function Inspection | Hub motor | To accelerate and decelerate, check if the hub motor is stalled or has abnormal sounds. | √ | √ | √ |
| Rear wheel maintenance | Check if the rear wheel is stalled or gets shaky, or the axis shall be unbalanced. | √ | √ | √ | |
| Drum Brake | 1) Spin the rear wheels; it spins normally. The rear wheel shall not shuck or make abnormal sounds. Note: 'Slight noise does not affect riding safety. But if the drum brake makes a loud noise when you apply brakes, please contact customer service for support. 2) Squeeze the brake lever, the rear wheel stops moving. | √ | √ | √ | |
| Item Component | Maintenance Method | Every 3 months | Every 6 months or every 500 km (1310 miles) | After 2 years or the total mileage >5000 km (3,107 miles) | |
| Function Inspection | Headlight Check: the headlight and soot if it lights brightly. | ✓ | ✓ | ||
| Direction Indicators | Toggle the direction indicator switch to the left/right respectively, check if the direction indicators on the left/right side flash normally. | ✓ | |||
| Dashboard Power On: the scooter, the dashboard works properly. | ✓ | ✓ | |||
| Throttle | Press and hold the throttle, then release it, checking for acceleration and deceleration. | ✓ | |||
| Fault detection | After connecting with the Segway Ninebot app:1) Update the firmware to the latest version.2) Check if the notification of the corresponding error code and possible causes will prompt when the scooter detects an error. | ✓ | |||
| Charging | Charge the scooter:1) Check if the current battery power displays on the dashboard.2) Check the LED indicator on the battery charger. Charging red, fully charged green. | ✓ | |||
| Builts | Press or toggle the button 3 times without failure. | ✓ | |||
| Steering | Test with left turns and right turns (the steering angle is 55). No resistance or lag when turning. | ✓ | |||
| Important parts | Battery assembly | The battery need to be replaced when it is charged and discharged for 500 times or the total mileage is more than 10,000 km (6,213 miles).Note: It is recommended to charge once every 60 days for long-term storage. | |||
| Controller | It is required that original Segway-Ninebot parts shall be used for repairs and replacements. | ||||
| Hub motor | |||||
| Item Component | Maintenance Method | Every 3 months | Every 6 months or every 50km (510 miles) | After 2 years or the total mileage >5000 km [5,107 miles] |
| Functional parts | Rear wheel assemblyIt is required that original Signway Ninebot parts shall be used for repairs and replacements. | √1 | ||
| Throttle & Brake levers | ||||
| Front fork assembly | ||||
| Folding mechanism | ||||
| Drum brake assembly | ||||
| Dashboard |

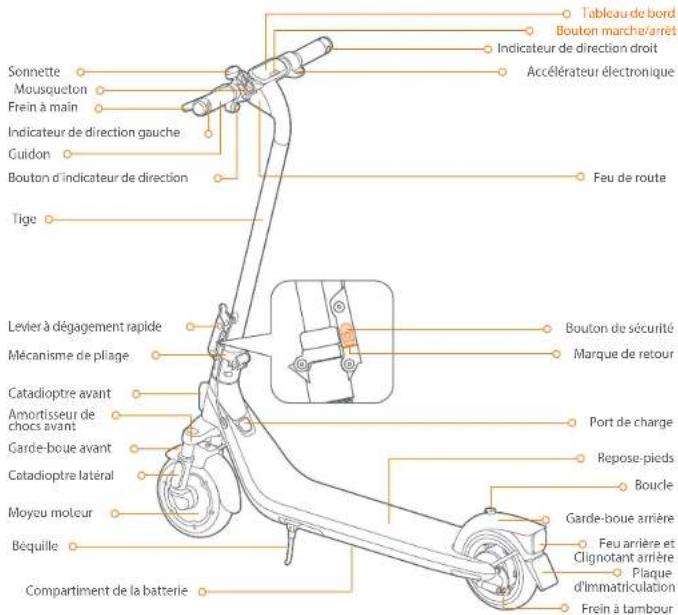
1 Diagramme
01
Tableau de bord & bouton marche/arret
Segway-Ninebot Europe
Segway-Ninebot Europe
Dynamostraat 7,1014 BN Amsterdarn Paesi Bassi.
Segway Ninebat Europe
Dynamostraat 7, 1014 BN Amsterdam, NiderLandy.
[ \text{Dashboard} ]
![SEGWAY Ninebot eKickScooter E2 Plus E II - [ \text{Dashboard} ] - 1](/content/2026/03/445622/images/8c6c235933c8ca7f25520c6a42a0e3c99102cf40ec40dc62353a1d8ee3c45118.jpg)
Dil product is gecertificareed volgens ANSI/CAN-UL-2272 door TUV Rheinland.
De accu is conform UN/DOt 38.3.
Segway-Ninebat Europe
Segway-Ninebot Europe
Dynamosstraat 7, 1014 BN Amesterdo, Paises Baixos.
Brand : SEGWAY
Model : Ninebot eKickScooter E2 Plus E II
Category : Electric scooter