
TQ713R03 - Coffee maker SIEMENS - Free user manual and instructions
Find the device manual for free TQ713R03 SIEMENS in PDF.

| Features | Details |
|---|---|
| Machine type | Automatic coffee machine |
| Water tank capacity | 1.7 liters |
| Pump pressure | 15 bars |
| Heating system | Thermoblock |
| Functions | Coffee preparation, built-in milk frother |
| Maintenance | Automatic cleaning programs |
| Dimensions | 24 x 34 x 45 cm |
| Control panel | Touchscreen |
| Energy consumption | 1400 W |
| Weight | 7.5 kg |
| Warranty | 2 years |
Frequently Asked Questions - TQ713R03 SIEMENS
User questions about TQ713R03 SIEMENS
0 question about this device. Answer the ones you know or ask your own.
Ask a new question about this device
Download the instructions for your Coffee maker in PDF format for free! Find your manual TQ713R03 - SIEMENS and take your electronic device back in hand. On this page are published all the documents necessary for the use of your device. TQ713R03 by SIEMENS.
USER MANUAL TQ713R03 SIEMENS
m = 311
15

16
17
19

21
23
25


Further information and explanations are available online:

Table of contents
1 Safety 8
1.1 General information 8
1.2 Intended use 8
1.3 Restriction on user group.. 8
1.4 Safety information.. 8
2 Environmental protection and saving energy 12
2.1 Disposing of packaging 12
2.2 Tips for saving energy 12
3 Installation and connection.... 12
3.1 Scope of delivery.. 12
3.2 Installing and connecting the appliance 12
4 Familiarising yourself with your appliance. 13
4.1 Appliance 13
4.2 Controls 13
5 Accessories 14
6 Before using for the first time .. 14
6.1 Preparing and cleaning the appliance 14
6.2 Checking the water hardness 14
6.3 Water filter 15
6.4 Performing initial start-up 15
6.5 General information 16
7 Basic operation 16
7.1 Switching the appliance on or off 16
7.2 Dispensing beverages 17
7.3 doubleShot and tripleShot..... 17
7.4 Slow Brew and Cold Brew 17
7.5 Dispensing a coffee beverage with milk 17
7.6 Dispensing two cups at once.. 18
8Grinder 18
8.1 Adjusting the grinding level.... 18
9 Childproof lock. 19
9.1 Activating the child-proof lock 19
9.2 Deactivating the childproof lock 19
10 Cup heater1 19
10.1 Activating and deactivating the cup heater1 19
11 Favourites. 19
11.1 Saving beverages from the beverage selection 19
11.2 Saving the beverage in the menu 20
11.3 Changing beverage settings 20
11.4 Deleting favourites 20
11.5 Sorting favourites 20
12 Home Connect 20
12.1 Setting up the Home Connect app 20
12.2 Setting up Home Connect.... 21
12.3 Home Connect settings.. 21
12.4 Remote diagnostics 22
12.5 Data protection 22
13 Basic settings. 22
13.1 Changing the basic settings 22
13.2 Overview of the basic settings 22
14 Cleaning and servicing. 24
14.1 Dishwasher-safe components 24
14.2 Cleaning agent 24
14.3 Cleaning the appliance 25
14.4 Cleaning the drip tray and coffee dregs container 25
14.5 Cleaning the milk container .. 26
14.6 Service programmes 26
15 Troubleshooting 28
16 Transportation, storage and disposal 33
16.1 Activating frost protection .... 33
16.2 Disposing of old appliance ... 33
17 Customer Service 33
17.1 Product number (E-Nr.), production number (FD) and consecutive numbering (Z-Nr.) 33
18 Technical specifications. 34
18.1 Information regarding Free and Open Source Software... 34
19 Declaration of Conformity 34

1 Safety
Observe the following safety instructions.
1.1 General information
- Read this instruction manual carefully.
- Keep the instruction manual and the product information safe for future reference or for the next owner.
- Do not connect the appliance if it has been damaged in transit.
1.2 Intended use
Only use this appliance:
for preparing hot drinks.
- in private households and in enclosed spaces in a domestic environment.
up to an altitude of max. 2000m above sea level.
1.3 Restriction on user group
This appliance may be used by children aged 8 or over and by people who have reduced physical, sensory or mental abilities or inadequate experience and/or knowledge, provided that they are supervised or have been instructed on how to use the appliance safely and have understood the resulting dangers.
Do not let children play with the appliance.
Children must not perform cleaning or user maintenance unless they are at least 8 years old and are being supervised.
Keep children under the age of 8 years away from the appliance and power cable.
1.4 Safety information
WARNING - Risk of suffocation!
Children may put packaging material over their heads or wrap themselves up in it and suffocate.
- Keep packaging material away from children.
- Do not let children play with packaging material.
Children may breathe in or swallow small parts, causing them to suffocate.
- Keep small parts away from children.
- Do not let children play with small parts.

WARNING - Risk of electric shock!
Incorrect installation is dangerous.
- Connect and operate the appliance only in accordance with the specifications on the rating plate.
- Connect the appliance to a power supply with alternating current only via a properly installed socket with earthing.
The protective conductor system of the domestic electrical installation must be properly installed.
If the appliance or the power cord is damaged, this is dangerous.
- Never operate a damaged appliance.
- Never operate an appliance with a cracked or fractured surface.
- Never pull on the power cord to unplug the appliance. Always unplug the appliance at the mains.
- If the appliance or the power cord is damaged, immediately unplug the power cord or switch off the fuse in the fuse box.
- Call customer services. Page 33
Improper repairs are dangerous.
- Repairs to the appliance should only be carried out by trained specialist staff.
- Only use genuine spare parts when repairing the appliance.
- If the power cord of this appliance is damaged, it must be replaced by the manufacturer, the manufacturer's Customer Service or a similarly qualified person in order to prevent any risk.
An ingress of moisture can cause an electric shock.
- Never immerse the appliance or the power cord in water.
- Liquids must not be spilled on the appliance plug connection.
- Only use the appliance in enclosed spaces.
- Never expose the appliance to intense heat or humidity.
- Do not use steam- or high-pressure cleaners to clean the appliance.
WARNING - Risk of fire!
The appliance will become hot.
- Ventilate the appliance adequately.
- Never operate the appliance in a cabinet.
It is dangerous to use an extended power cord and non-approved adapters.
- Do not use extension cables or multiple socket strips.
- Only use adapters and power cords approved by the manufacturer.
- If the power cord is too short and a longer one is not available, please contact an electrician to have the domestic installation adapted.
WARNING - Risk of burns!
Some parts of the appliance become very hot.
- Never touch hot appliance parts.
After use, allow hot appliance parts to cool down before touching.
WARNING - Risk of scalding!
Freshly prepared drinks are very hot.
- Leave drinks to cool down if necessary.
- Do not let escaping liquids or steam come into contact with your skin.
A remote start via the Home Connect app while the appliance is unattended may cause scalding to third parties.
- Do not reach under the coffee outlet during the dispensing of drinks.
- Keep other persons, in particular children, away from the appliance.
WARNING - Risk of injury!
Improper use of the appliance may endanger the user.
- To avoid injuries, only use the appliance for its intended purpose.
Trapped fingers when closing the appliance door.
- Be careful of your fingers when closing the appliance door.
The grinder rotates.
- Never reach into the grinder.
WARNING - Danger: Magnetism!
The appliance contains permanent magnets. These may affect electronic implants, e.g. pacemakers or insulin pumps.
- People with electronic implants must stand at least 10cm away from the appliance.
- This minimum distance of 10cm must also be observed for the water tank when removed.
WARNING - Risk of harm to health!
Soiling on the appliance may be harmful to health.
- To ensure hygiene, follow the cleaning instructions for the appliance.
2 Environmental protection and saving energy
2.1 Disposing of packaging
The packaging materials are environmentally compatible and can be recycled.
- Sort the individual components by type and dispose of them separately.
2.2 Tips for saving energy
If you follow these instructions, your appliance will use less energy.
Set the interval for automatic switchoff to the smallest value.
If the appliance is not being used, it will switch itself off earlier. "Basic settings", Page 22
Do not interrupt the dispensing process prematurely.
- The amount of water or milk that is heated is used optimally.
Descale the appliance regularly.
Limescale deposits increase the appliance's energy consumption.
3 Installation and connection
3.1 Scope of delivery
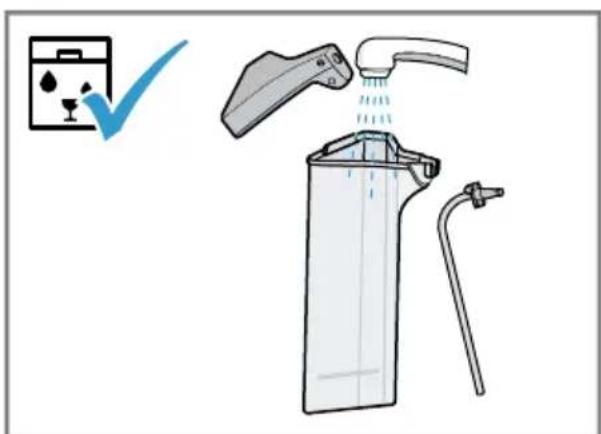
After unpacking all parts, check for any damage in transit and completeness of the delivery.
Note: Different accessories are enclosed depending on the appliance model. This accessory is shown in a frame with a dashed line.
Fig. 1
| A | Fully automatic coffee machine |
| B | Milk container |
| C | Milk tube |
| D | Adapter for milk containers1 |
| E | User manual |
| F | Insertion aid for water filter |
| G | Descaling tablet1 |
| H | Cleaning tablet1 |
| I | Water filter |
| J | Water hardness testing strip |
1 Depending on the appliance specifications
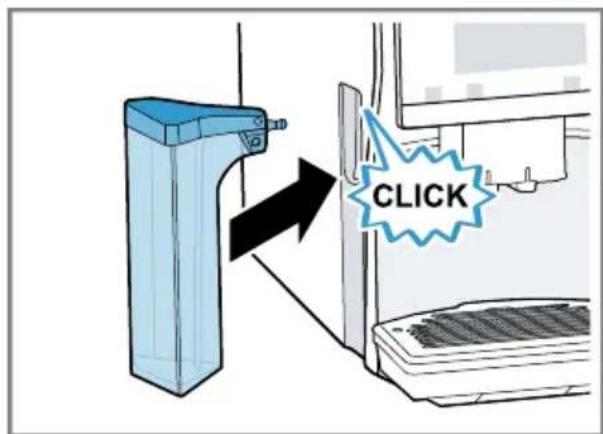
3.2 Installing and connecting the appliance
ATTENTION!
Risk of damage to the appliance. If the appliance is not started up correctly, it may be damaged.
- Use the appliance in frost-free rooms only.
-
If the appliance has been transported or stored below 0^ , wait 3 hours at room temperature before starting it up.
After plugging in, always wait approx. 5 seconds. -
Place the appliance on a level, water-resistant surface that is capable of bearing its weight.
-
Using the mains plug, connect the appliance to an earthed socket that has been correctly installed.
4 Familiarising yourself with your appliance
4.1 Appliance
You can find an overview of the parts of your appliance here.
Note: Individual details and colours may differ, depending on the appliance model.
Fig. 2
| 1 | Milk container |
| 2 | Touch fields |
| 3 | Cup heater1 |
| 4 | Aroma lid |
| 5 | Bean container |
| 6 | Rotary selector for grinder setting |
| 7 | Tablet compartment |
| 8 | Cover for water tank |
| 9 | Water tank |
| 10 | Touch display |
| 11 | Brewing chamber door |
| 12 | Cup lighting |
| 13 | Rating plate |
| 14 | Milk system |
| 15 | Beverage outlet cover |
1 Depending on the appliance specifications
16 Drip tray
Depending on the appliance specifications
4.2 Controls
You can find an overview of the controls for your appliance here.
Touch fields
Here you can find an overview of the symbols that are always visible.
| ① | Switch the appliance on or off. |
| ② | Dispense two cups. |
| ③ | Open or close the service programmes. |
| ④ | Open or exit the settings. |
Touch display
| The touch display functions both as a display and a control. | |
| Favours | Select saved beverages with personal settings. → Page 19 |
| Classic | Select standard beverages. |
| coffee-World | Select basic beverages which can be extended in conjunction with Home Connect. |
| Cup warmer is switched on. | |
| Appliance is connected to Home Connect. | |
Note: When the appliance is switched on, you have additional operating options with relevant displays and messages, e.g. beverage settings.
| ① | Set strength. |
| ② | Set per-cup quantity. |
| A | Set milk ratio. |
| B | Set aroma. |
| 8 | Set temperature. |
5 Accessories
Use original accessories. These have been made especially for your appliance.
| Accessories Retail Customer service | ||
| Cleaning tablets TZ80001A | TZ80001B | 00312097 00312098 |
| Descaling tablets TZ80002A | TZ80002B | 00312094 00312095 |
| Water filter TZ70003 00575491 | ||
| Water filter pack of 3 TZ70033A - | ||
| Microfibre cloth - 00460770 | ||
| Care set TZ80004A | TZ80004B | 00312105 00312106 |
| Adapter for milk containers TZ70001 17006005 | ||
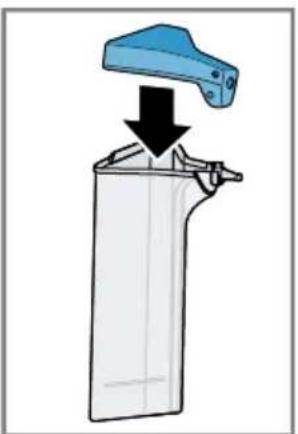
6 Before using for the first time
Prepare the appliance for use.
6.1 Preparing and cleaning the appliance
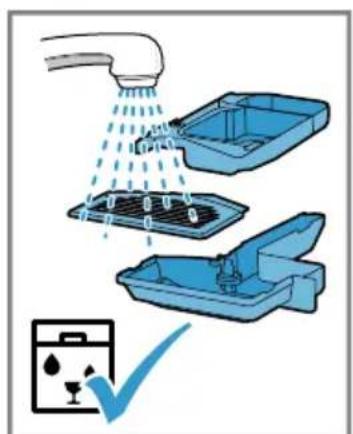
Remove the protective foils and clean the appliance and individual parts. Follow the illustrated instructions at the beginning of this manual.
ATTENTION!
Unsuitable beans can block the grinder.
- Only use pure, roasted bean mixes that are suitable for use in fully automatic coffee or espresso machines.
Do not use glazed coffee beans. -
Do not use caramelised coffee beans.
-
Do not use coffee beans that have been treated with additives containing sugar.
- Do not add instant coffee.
Fig. 3 - 24
Note: Fill the water tank each day with fresh, cold, non-carbonated water.
Tip: To keep the coffee beans at their best, store them in a sealed container in a cool place.
You can keep the coffee beans in the bean container for several days without them losing their aroma.
6.2 Checking the water hardness
It is important to set the water hardness correctly so that your appliance indicates in good time that it needs
descaling. You can use the enclosed test strip to check the water hardness or ask your local water company.
- Briefly dip the test strip in fresh tap water.
- Allow the water to drain off the test strip.
- Read the water hardness off the test strip after 1 minute. The table shows allocation of the levels to the different degrees of water hardness:
| Level German degrees in °dH | Total hardness in mmol/ l |
| 1 1-7 < 1.3 | |
| 2 8-14 1.3-2.5 | |
| 3 15-21 2.5-3.8 | |
| \( 4^1 \) | 22-30 > 3.8 |
Factory setting
Note: Please use the test strip even if you have a water softening system installed as they generate different water hardnesses.
Tips
- You can change the settings at any time.
→ "Basic settings", Page 22
If the water hardness exceeds 21^ (3.8 mmol/l), you can fill the water tank with prefiltered water to reduce limescale deposits.
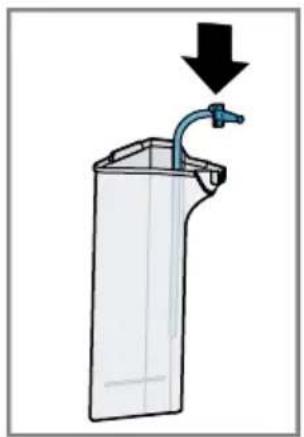
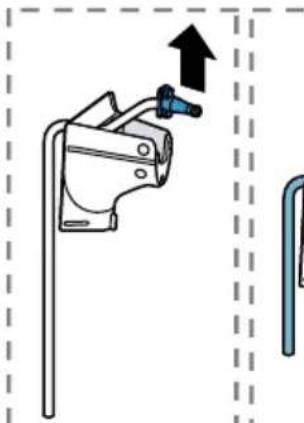
6.3 Water filter
You can use a water filter to minimise limescale deposits and reduce impurities in the water.
Inserting the water filter
ATTENTION!
Possible damage to the appliance due to limescale build-up.
- Change the water filter in good time.
- Change the water filter after 2 months at the latest.
-
Observe the display messages.
-
Press
- Press "INTENZA filter" and follow the instructions on the display.
Changing or removing the water filter
You can also operate your appliance without a water filter.
- Press
- Press "INTENZA filter".
- Press "Replace" or "Remove" and follow the instructions on the display.
Tips
- You should also change your water filter for reasons of hygiene.
- With a water filter you need to descale your appliance less frequently.
If you use a water filter, your coffee will be more flavoursome.
If your appliance has not been used for a long time, for example if you were on holiday, you should rinse the water filter before use by dispensing a cup of hot water.
The water filter can be purchased from retailers or customer service. "Accessories", Page 14
6.4 Performing initial start-up
After connecting the appliance to the power supply, configure the settings for initial start-up. Initial start-up only appears when switching on for the first time.
en Basic operation
- Press to switch the appliance on.
- Follow the instructions on the display.
The display will guide you through the programme.
Notes
If you want to set up Home Connect now, follow the instructions in the Home Connect app.
"Setting up Home Connect", Page 21
If "Demo mode" is selected, only the displays will work. You cannot dispense a beverage or run a programme.
6.5 General information
Please bear this information in mind so that you can get the best out of your appliance.
Notes
The appliance has been programmed at the factory with standard settings for optimum operation.
The grinder has been factory-set for optimum operation. If coffee is only dispensed drop by drop or is too thin and with too little crema, you can adjust the grinding level when the grinder is running. "Adjusting the grinding level", Page 18
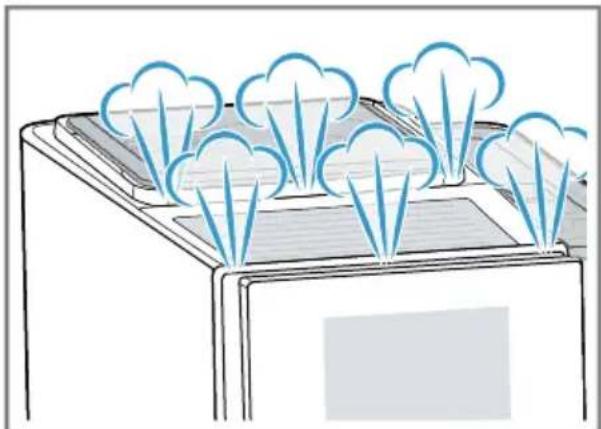
During operation water droplets may form at the ventilation slits and on the lid of the tablet compartment.
If you do not perform any actions on the appliance for a certain period, it will switch off automatically. You can change the duration in the basic settings.
- For technical reasons steam can escape from the appliance.
The first beverage will not yet have its full aroma if:
- You are using the appliance for the first time.
- You have run a service programme.
- You have not used the appliance for a long time.
Do not drink the beverage.
Tip: You will get a stable, fine-pored crema after you have started up your appliance and dispensed a few cups.
7 Basic operation
7.1 Switching the appliance on or off
Press
When the appliance switches on, the display shows the logo. When the appliance is switched on or off, it will rinse itself automatically. When switched off, the appliance will emit steam into the drip tray for cleaning. The appliance will not rinse itself if the appliance is still warm when switched on or if no beverage was dispensed before it was switched off.
7.2 Dispensing beverages
Find out how to prepare a drink of your choice.
WARNING
Risk of scalding!
Freshly prepared drinks are very hot.
- Leave drinks to cool down if necessary.
- Do not let escaping liquids or steam come into contact with your skin.
Notes
- With a number of settings your coffee is prepared in several steps. Wait until the process is fully completed.
If you are dispensing a beverage with milk, always connect the milk container filled with milk or the milk adapter to a milk carton. - You can only connect the milk container or milk adapter if the milk system is fitted with the adapter and the hose in the beverage outlet cover.
- The milk container is specially designed for this appliance. Only use the milk container for storing milk in the refrigerator and in the house.
If the milk system has not been cleaned, small amounts of milk may escape when hot water is dispensed.
7.3 doubleShot and tripleShot
Your appliance grinds the coffee two or three times.
To ensure that only pleasant-tasting and easily digestible aromatic substances are released, coffee beans are freshly ground and brewed again by the appliance.
The longer coffee brews, the more bitter substances and undesirable aromas are released. These bitter substances and undesirable aromas affect the taste and digestibility of coffee.
Note: The functions "doubleShot" and "tripleShot" depend on the beverage strength and beverage size selected.
7.4 Slow Brew and Cold Brew
Slow Brew and Cold Brew are slowly brewed beverages that your appliance dispenses in a pulsating beverage flow that is not continuous. This type of coffee preparation exists as a hot and a cold version. Dispensing of the beverage takes several minutes.
Note: Fill the water tank with fresh, cold, non-carbonated drinking water before dispensing drinks.
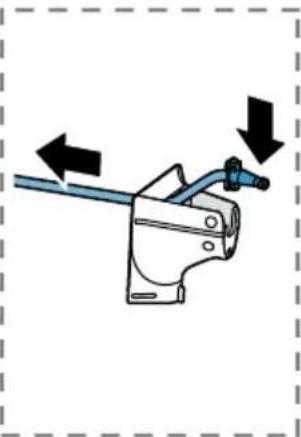
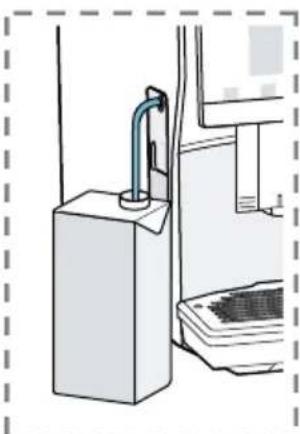
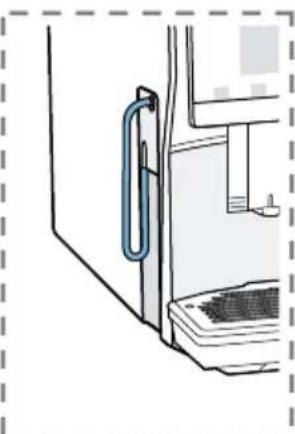
7.5 Dispensing a coffee beverage with milk
An example explains how to make a latte macchiato.
WARNING
Risk of burns!
The milk system can become extremely hot.
- Never touch the milk system when it is hot.
- Allow the hot milk system to cool down before touching it.
Requirements
- The milk container or milk adapter is connected.
-
The milk container is filled with milk or the milk adapter hose is immersed in milk.
-
Place a glass underneath the beverage outlet.
- Press "Classic".
enGrinder
-
Select and press the beverage symbol for latte macchiato.
-
To change the strength, press .
- To change the per-cup quantity, press .
-
To change the milk ratio, press A
-
Press "Start" and wait until the process is complete.
-
To completely stop dispensing the beverage, press "Stop".
- To only stop the current dispensing step, press "Skip".
After preparing the beverage, the milk system will automatically clean itself with a short jet of steam.
Notes
If you do not change any settings for approx. 30 seconds, the appliance will exit settings mode.
The appliance saves the settings automatically.
Tips
- You can also pre-heat cups before dispensing using hot water or the cup heater1.
- You can also use plant-based alternatives to milk, e.g. soya milk.
The quality of the milk froth depends on the type of milk or plant-based alternative used.
7.6 Dispensing two cups at once
Depending on your beverage, you can make 2 cups at the same time.
Note: If the "doubleShot" or "tripleShot" function is active, the function for dispensing two cups at once is not possible.
-
Press the symbol for your desired drink.
-
Press
The display shows the setting.
- Place two cups on the left and right underneath the beverage outlet.
- Press "Start".
The beverage is prepared in 2 steps. The beans are ground in 2 grinding operations.
- The beverage is brewed and then runs into the cups.
- Wait until the process is complete.
8 Grinding
Your appliance has an adjustable grinder, which you can use to customise the grinding level of your coffee beans.
8.1 Adjusting the grinding level
Set the desired grinding level while the coffee beans are being ground.
WARNING Risk of injury!
The grinder rotates.
- Never reach into the grinder.
ATTENTION!
Risk of damage to the grinder. The grinder may be damaged if the grinding level is not set properly.
- Only set the grinding level when the grinder is running.
- Select the grinding level using the rotary selector step by step.
Grinding level Setting
Fine grinding level for lightly roasted beans
Turn rotary selector anticlockwise.

Coarse grinding level for dark-roasted beans
Turn rotary selector clockwise.

The grinding level setting only takes effect after the second cup.
Tip: If the coffee is only dispensed drop by drop, set a coarser grinding level. If the coffee is too thin with too little crema, set a finer grinding level.
9 Childproof lock
You can lock the appliance, to protect children against scalding and burns.
9.1 Activating the child-proof lock
Requirement: The appliance is switched on.
Press and hold for at least 3 seconds.
The childproof lock is activated.
9.2 Deactivating the childproof lock
Press and hold for at least 3 seconds.
The childproof lock is deactivated.
10 Cup heater1
You can use the cup heater to preheat your cups.
10.1 Activating and deactivat ing the cup heater
WARNING Risk of burns!
The cup heater can become very hot.
- Never touch the cup heater1 while hot.
- Allow the hot cup heater1 to cool down before touching it.
Tip: Place the cups with their base on the cup heater to warm them to optimum effect1.
11 Favourites
Save beverages with your personal settings as a favourite.
You can mark your favourites with a colour. A favourite is a beverage with personal settings. You can change the settings at any time.
Note: To exit the settings, press or start dispensing the beverage.
11.1 Saving beverages from the beverage selection
- Select a beverage from "Classic" or "coffeeWorld".
- Select the personal beverage settings.
- Press "Favourite".
- Select the required colour for the beverage.
- Press "Save".
11.2 Saving the beverage in the menu
- Press "Favourites".
- Press
The display shows all available beverages.
3. Select the required beverage.
4. Select the personal beverage settings.
5. Press "Next".
6. Select the required colour for the beverage.
7. Press "Save".
11.3 Changing beverage settings
- Press "Favourites".
- Select the beverage and press briefly.
- Change the beverage settings.
- Press "Apply".
The new settings are saved.
11.4 Deleting favourites
- Press "Favourites".
- Select the beverage.
- Press the beverage for at least 3 seconds.
- Confirm "Delete".
11.5 Sorting favourites
- Press "Settings".
- Press "Personalisation".
- Press "Sort favourites".
- Sort favourites, e.g. by name or colour.
12 Home Connect
This appliance is network-capable. Connecting your appliance to a mobile device lets you control its functions via the Home Connect app, adjust its basic settings and monitor its operating status. The Home Connect services are not available in every country. The availability of the Home Connect function depends on the availability of Home Connect services in your country. You can find information about this at: www.home-connect.com. To be able to use Home Connect, you must first set up the connection to the WLAN home network (Wi-Fi1) and to the Home Connect app.
The Home Connect app guides you through the entire login process. Follow the instructions in the Home Connect app to configure the settings.
Tip: Please also follow the instructions in the Home Connect app.
Notes
- Please note the safety precautions in this instruction manual and make sure that they are also observed when operating the appliance via the Home Connect app. "Safety", Page 8
- Operating the appliance on the appliance itself always takes priority. During this time it is not possible to operate the appliance using the Home Connect app.
12.1 Setting up the Home Connect app
-
Install the Home Connect app on your mobile device.
-
Start the Home Connect app and set up access for Home Connect. The Home Connect app guides you through the entire login process.
12.2 Setting up Home Connect
Requirements
-
The Home Connect app has been installed on your mobile device.
The appliance is receiving signals from the WLAN home network (WiFi) at its installation location. -
Open the Home Connect app and scan the following QR code.

- Follow the instructions in the Home Connect app.
12.3 Home Connect settings
Adapt Home Connect to your needs. You can find the Home Connect settings in the basic settings for your appliance. Which settings the display shows will depend on whether Home Connect has been set up and whether the appliance is connected to your home network.
Overview of the Home Connect settings
You can find an overview of the Home Connect settings and network settings here.
| Basic setting Selection Description | ||
| WiFi connection On | Off | Switch off the wireless module during long absences or to save energy. Note: In networked standby mode your appliance requires max. 2 W. |
| Remote start On | Off | Switch remote start on the appliance on and off. Note: With the Home Connect app only switch-off is possible. |
| Add mobile device | - Connect the appliance to the "Home Connect" app or additional accounts. | |
| Network information | - Display network information and appliance information. | |
| Delete network settings | - Note: You cannot operate your appliance via the "Home Connect" app without a network connection. | |
Basic setting Selection Description
Software update - Note: This setting is only available with a software update.
12.4 Remote diagnostics
Customer Service can use Remote Diagnostics to access your appliance if you contact them, have your appliance connected to the Home Connect server and if Remote Diagnostics is available in the country in which you are using the appliance.
Tip: For further information and details about the availability of Remote Diagnostics in your country, please visit the service/support section of your local website: www.home-connect.com.
12.5 Data protection
Please see the information on data protection.
The first time your appliance is registered on a home network connected to the Internet, your appliance will transmit the following types of data to the Home Connect server (initial registration):
- Unique appliance identification (consisting of appliance codes as well as the MAC address of the Wi-Fi communication module installed).
-
Security certificate of the Wi-Fi communication module (to ensure a secure data connection).
-
The current software and hardware version of your appliance.
Status of any previous reset to factory settings.
This initial registration prepares the Home Connect functions for use and is only required when you want to use the Home Connect functions for the first time.
Note: Please note that the Home Connect functions can only be utilised with the Home Connect app. Information on data protection can be retrieved in the Home Connect app.
13 Basic settings
You can configure the basic settings for your appliance to meet your needs and call up additional functions.
13.1 Changing the basic settings
- Press
- The display shows the list of basic settings.
- Change the required basic setting.
- The appliance saves the basic setting automatically.
- To exit the basic settings, press
13.2 Overview of the basic settings
You can find an overview of the basic settings here.
Beverage setting Brewing temperature Set the brewing temperature.
1 Depending on the appliance specifications
| Milk sequence Select the sequence for milk and coffee. | ||
| Latte macchiato pause Select the pause between milk and coffee. | ||
| Resetting beverage para-meters | Reset the beverage set-tings. | |
| Appliance setting Cup heater1 | Switch the cup heater1on or off. | |
| Automatic switch-off Set the time after which the appliance switches off. | ||
| Display brightness Set the brightness in steps. | ||
| Sounds • Switch sounds on and off. • Set the volume. | ||
| Water hardness Set the water hardness. | ||
| Language Set the language. | ||
| Factory settings Reset the appliance to the factory settings. | ||
| Personalisation | ||
| Operation after switch-on Set the display screen for "Favourites", "Classic" or "coffeeWorld". | ||
| Sort favourites Set the sequence of favours. | ||
| Home Connect Information about Home Connect | → "Setting up Home Connect", Page 21 | |
| Appliance information Beverage counter Display the number of beverages dispensed. | ||
| Cleaning information Time until the water filter should next be changed or a service programme started. | ||
| Version information | Display network informa-tion and appliance in-formation. | |
| Licence information | Display FOSS licence text. | |
| 1 Depending on the appliance specifications | ||
| Mode for demo purposes | Switch "Demo mode" on or off. | |
| 1 | Depending on the appliance specifications | |
14 Cleaning and servicing
To keep your appliance working efficiently for a long time, it is important to clean and maintain it carefully.
14.1 Dishwasher-safe components
Here you can find an overview of the components you can clean in the dishwasher.
ATTENTION!
Some components are sensitive to heat and may be damaged if they are cleaned in a dishwasher.
-
Follow the operating instructions of the dishwasher.
-
Only clean dishwasher-safe components in the dishwasher.
- Only use programmes that do not heat the components above 60^ .
Suitable:
Drip tray
- Drip plate
- Coffee dregs container
- Mechanical fill level indicator
Milk system with adapter
Milk container with lid
Not suitable:
Water tank
Water tank lid
Brewing unit
- Beverage dispenser cover
14.2 Cleaning agent
Only use suitable cleaning agents.
ATTENTION!
Unsuitable cleaning products may damage the surfaces of the appliance.
- Do not use harsh or abrasive detergents.
- Do not use cleaning agents containing alcohol or spirits.
- Do not use hard scouring pads or cleaning sponges.
Unsuitable cleaning and descaling agents may damage the appliance.
- Do not use pure citric acid, vinegar or any vinegar-based agents to descale the appliance.
- Do not use descending agent with phosphoric acid.
Only use cleaning tablets and descaling tablets that have been specially developed for the appliance. "Accessories", Page 14
Tips
- Wash new sponge cloths thoroughly to remove any salt adhering to them. Salt can cause rust film to develop on stainless steel surfaces.
Always remove any residues of limescale, coffee, milk and cleaning/descaling solutions immediately to prevent corrosion.
14.3 Cleaning the appliance
#
WARNING
Risk of electric shock!
An ingress of moisture can cause an electric shock.
- Never immerse the appliance or the power cord in water.
- Liquids must not be spilled on the appliance plug connection.
- Do not use steam- or high-pressure cleaners to clean the appliance.
#
WARNING
Risk of burns!
Some parts of the appliance become very hot.
-
Never touch hot appliance parts.
After use, allow hot appliance parts to cool down before touching. -
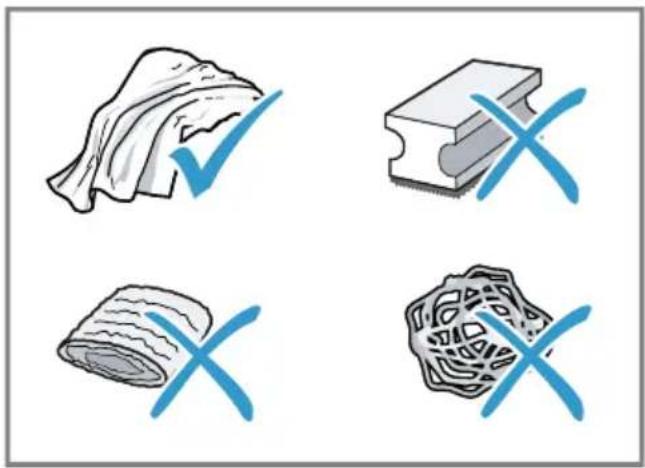
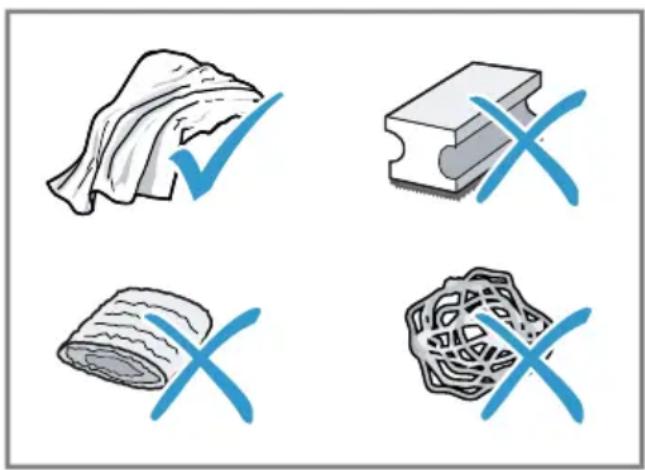
Clean the housing, the high-gloss surfaces and the control panel with a microfibre cloth.
- Clean the outlet system with a soft, damp cloth after beverages have been dispensed.
- Rinse the water tank with fresh, clean water.
- If the appliance has not been used for a long time, e.g. after a holiday, clean the entire appliance, including moving parts such as the brewing unit or water tank.
Note: The appliance will rinse itself automatically if you switch it on when it is cold or switch it off after it has dispensed coffee. The system is therefore self-cleaning.
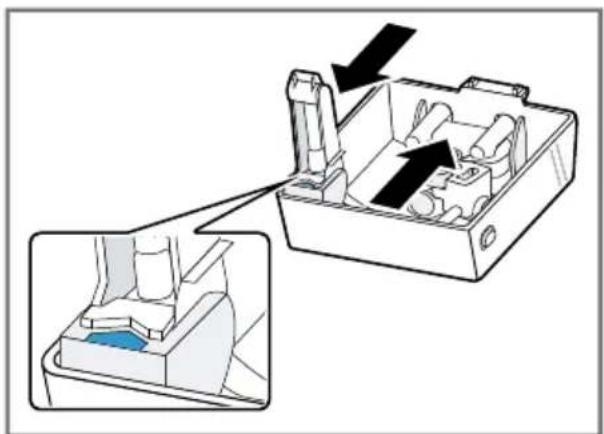
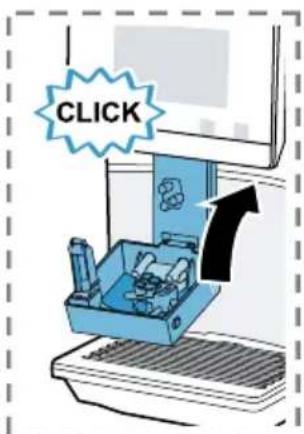
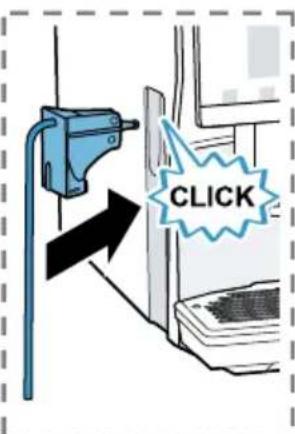
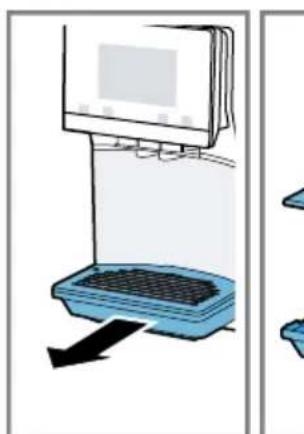
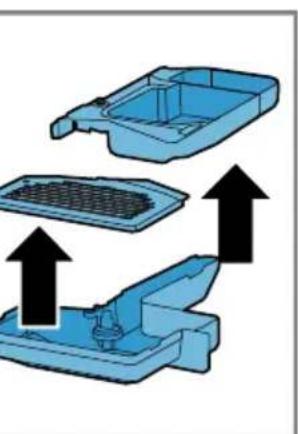
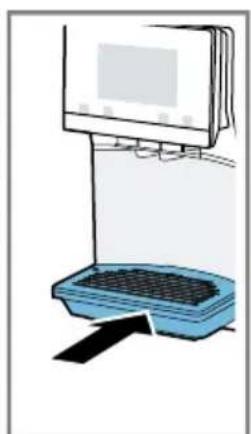
14.4 Cleaning the drip tray and coffee dregs container
Clean and empty the drip tray and coffee dregs container every day to prevent deposits.
-
Pull the drip tray and the coffe dregs container forwards and out.
-
Insert the coffee dregs container in the drip tray and put the drip plate on top.
Fig. 25 -
Clean and dry all parts.
-
Insert the coffee dregs container in the drip tray and put the drip plate on top.
- Insert the drip tray with the coffee dregs container in the appliance.
Fig. 26
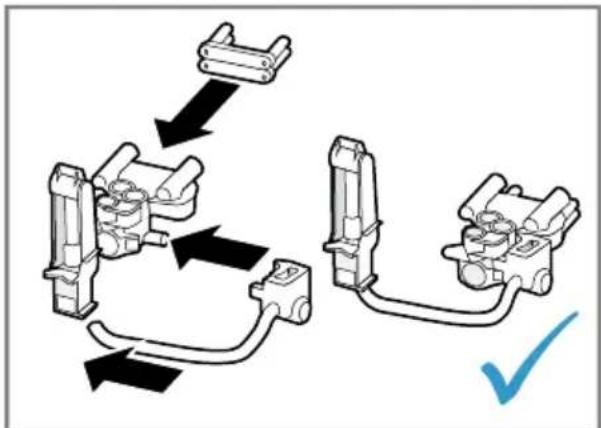
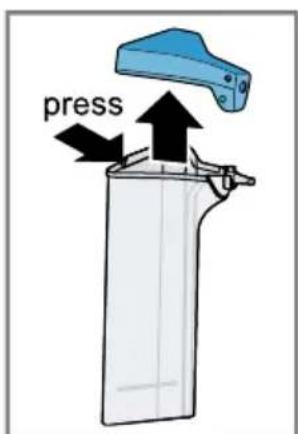
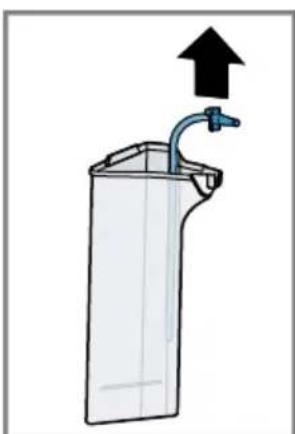
14.5 Cleaning the milk container
Clean the milk container regularly for hygiene reasons. You can clean the milk container in the dishwasher. Follow the illustrated instructions at the beginning of this manual.
Fig. 17 - 18
14.6 Service programmes
Use the service programmes if you insert or remove a water filter or in order to clean your appliance thoroughly. Your appliance will tell you when you need to perform a service programme, e.g. cleaning.
ATTENTION!
Improper cleaning and descaling or a delay in doing so may damage the appliance.
-
Immediately perform the descending process in accordance with the instructions.
-
Only use cleaning tablets in the tablet compartment.
- Do not put descending tablets or other products in the tablet compartment.
Notes
The display indicates the progress of the descending or cleaning process.
If your appliance has been locked, you can only operate it again once the descending process has been carried out.
Tip: In addition to the automatic rinsing process, regularly also remove and clean the brewing unit.
Using the service programmes
- Press ^+
- Press the symbol for the required programme.
The display will guide you through the programme.
Overview of service programmes
You can find an overview of the service programmes here.
Note: The start image shows the remaining number of beverages that can be dispensed until running the programme and the duration.
| BRITAX | INTENZA filter Insert, replace or remove the water fil-ter. |
| Milk system cleaning Rinse the milk system automatically. | |
| calc'nClean Combine cleaning and descaling. Remove residues of limescale and cof-fee from the pipes. | |
| Cleaning Remove residues of coffee from the pipes. | |
| Descaling Remove residues of limescale from the pipes. | |
| Brewing unit cleaning The display shows optimum cleaning of the brewing unit step by step. | |
| Beverage outlet cleaning The display shows optimum cleaning of the outlet step by step. | |
| Frost protection Drain the pipes to protect the appliance during transport or storage. | |
| Special rinsing If a service programme is interrupted, e.g. due to a power failure, it will rinse itself automatically. The appliance is then ready for use again. |
Tips
If you are starting the "Descaling" or "calc'nClean" programme, keep a container with a capacity of min. 1 I at the ready.
If you use a water filter, this will prolong the time until you have to run a service programme.
- You can combine "Descending" and "Cleaning" with the "calc'nClean" service programme.
15 Troubleshooting
You can rectify minor faults on your appliance yourself. Read the troubleshooting information before contacting after-sales service. This will avoid unnecessary costs.

WARNING
Risk of electric shock!
Improper repairs are dangerous.
- Repairs to the appliance should only be carried out by trained specialist staff.
- Only use genuine spare parts when repairing the appliance.
- If the power cord of this appliance is damaged, it must be replaced by the manufacturer, the manufacturer's Customer Service or a similarly qualified person in order to prevent any risk.
Fault Cause and troubleshooting
| Appliance no longer responds. | Appliance has a fault. 1. Pull out the mains plug and wait 60 seconds. 2. Re-insert the mains plug. |
| Home Connect is not working properly. | Different causes are possible. → Go to www.home-connect.com. |
| Appliance only dis-penses water, not cof-fee. | Empty bean container is not detected by the appli- ance. → Pour in coffee beans. |
| Coffee shaft on brewing unit is blocked. → Clean the brewing unit. | |
| Coffee beans are too oily and do not fall into the grinder. → Gently tap the bean container. → Change the coffee variety. → Do not use oily beans. → Clean the empty bean container with a damp cloth. | |
| Brewing unit is not inserted properly. 1. Check whether the brewing unit is inserted correctly and is securely locked. 2. Push the red lever up to the left. 3. Insert the brewing unit cover. | |
| Appliance is not dis-pensing milk froth. | Milk system is soiled. → Clean the milk system in the dishwasher. |
| Milk tube not immersed in milk. → Use more milk. | |
| Fault Cause and troubleshooting | |
| Appliance is not dis-pensing milk froth. | Check whether the milk tube is immersed in the milk. |
| Heavy build-up of limescale in the appliance. Descale the appliance. | |
| No milk intake by the milk system. | The milk system is assembled incorrectly. Assemble the milk system correctly. |
| Order for connecting the milk container and milk sys-tem is wrong. First insert the milk system into the outlet and then the milk container. | |
| Milk tube not immersed in milk. Use more milk. Check whether the milk tube is immersed in the milk. | |
| Milk froth is too cold. Milk is too cold. Use lukewarm milk. | |
| Cold-brewed beverage is not cold enough. | Water in water tank is warm. 1. Fill the water tank with fresh, cold, non-carbonated drinking water. 2. You can add ice cubes to cool the beverage down even more. |
| Appliance is not dis-pensing hot water. | Milk system is soiled. Clean the milk system in the dishwasher. |
| Milk system cannot be assembled or dis-as-sembled. | Order of assembly is wrong. First connect the milk system and then the milk container. When disassembling, you must first remove the milk container and then the milk system. |
| Appliance is not dis-pensing drinks. | Air is in the water filter. 1. Immerse the water filter in water with the opening facing upwards until no more air bubbles escape. 2. Reinsert the filter. Firmly press the water filter straight down into the tank connection. |
| Residues of limescale remover are blocking the water tank. 1. Remove the water tank. 2. Clean the water tank thoroughly. | |
| There is dripping wa-ter on the inner floor of the appliance. | Drip tray was removed too soon. Wait a few seconds after the last drink was dispensed before removing the drip tray. |
| Brewing unit cannot be removed. | Locking device cannot be released, brewing unit is jammed. • Switch the appliance off and back on after 3 minutes. |
| Grinder won't start. Appliance is too hot. 1. Disconnect the appliance from the mains. 2. Wait 1 hour so the appliance can cool down. | |
| Grinder is not grinding any coffee beans despite full bean container. | Coffee beans are too oily and do not fall into the grinder. • Gently tap the bean container. • Change the coffee variety. • Do not use oily beans. • Clean the empty bean container with a damp cloth. |
| Coffee or milk froth quality varies widely. | Build-up of limescale in the appliance. • Descale the appliance. |
| Milk froth quality varies widely. | Milk froth quality depends on the type of milk or plant-based alternative used. • Optimise the result through the selection of the milk or vegetable-based drink type. |
| Coffee is not dispensed or has slowed to a trickle. Set quantity is not reached. | Grinding level is set too fine. • Set a coarser grinding level. → "Adjusting the grinding level", Page 18 |
| Heavy build-up of limescale in the appliance. • Descale the appliance. | |
| Air is in the water filter. 1. Immerse the water filter in water with the opening facing upwards until no more air bubbles escape. 2. Reinsert the filter. | |
| Appliance is soiled. • Clean the brewing unit. • Descale and clean the appliance. | |
| Coffee has no crema. | Type of coffee is not optimal. • Use a coffee variety with a higher proportion of Robusta beans. • Use beans with a darker roast. |
| Coffee beans are no longer freshly roasted. • Use fresh coffee beans. | |
Grinding level is not appropriate for coffee beans.
| Fault Cause and troubleshooting | |
| Coffee has no crema. ▶ Adjust the grinder to a finer setting. → "Adjusting the grinding level", Page 18 | |
| Coffee is too acidic. Grinding level is set too coarse. □ Adjust the grinder to a finer setting. → "Adjusting the grinding level", Page 18 | |
| Type of coffee is not optimal. □ Use a coffee variety with a higher proportion of Ro-busta beans. □ Use beans with a darker roast. | |
| Coffee is too bitter. Grinding level is set too fine. □ Set a coarser grinding level. → "Adjusting the grinding level", Page 18 | |
| Type of coffee is not optimal. □ Change the coffee variety. | |
| Coffee tastes burnt. Grinding level is set too fine. □ Set a coarser grinding level. → "Adjusting the grinding level", Page 18 | |
| Type of coffee is not optimal. □ Change the coffee variety. | |
| Coffee temperature setting is too high. □ Set the coffee temperature lower. | |
| Coffee grounds are not compact and are too wet. | The grinding level is not set optimally. □ Adjust the grinder to a coarser or finer setting. → "Adjusting the grinding level", Page 18 |
| Coffee beans are too oily. □ Use a different type of bean. | |
| Display shows "Please insert brewing unit". | Cover is wrongly inserted. 1. Check whether the brewing unit is inserted correctly and is securely locked. 2. Push the red lever up to the left. 3. Insert the brewing unit cover. |
| Display shows "Please fill water tank." despite the fact that the water tank is full. | Water tank is wrongly inserted. □ Insert the water tank correctly. |
| Carbonated water is in the water tank. □ Fill the water tank with fresh tap water. | |
| Float is stuck in the water tank. 1. Remove the water tank. 2. Clean the water tank thoroughly. | |
| New water filter was not rinsed as per instructions. | |
| Display shows "Please fill water tank." despite the fact that the water tank is full. | 1. Rinse the water filter according to the instructions. 2. Place the water filter into operation. |
| Air is in the water filter. 1. Immerse the water filter in water with the opening facing upwards until no more air bubbles escape. 2. Reinsert the filter. | |
| Water filter is old. ► Insert a new water filter. | |
| Limescale deposits in the water tank are blocking the system. 1. Clean the water tank thoroughly. 2. Start the descaling programme. | |
| Display shows "Please clean brewing unit". | Brewing unit is soiled. ► Clean the brewing unit. |
| Mechanism of brewing unit is stiff. ► Clean the brewing unit. | |
| Display shows "Over-voltage or under-voltage". | There are problems with the power supply. ► Only operate the appliance at 220 - 240 V. |
| Display shows "Error in water system. Please restart appliance". | Appliance has a fault. 1. Pull out the mains plug and wait 60 seconds. 2. Re-insert the mains plug. |
| Display very frequently shows "Please run calc'nClean programme!". | Decalcified water still contains small amounts of lime. 1. Insert a new water filter. 2. Set the corresponding water hardness. |
| Incorrect or too little descaling agent used. ► When descaling, only use suitable tablets. | |
| Service programme has not been carried out in its entirety. ► Start the "Special rinsing" service programme. → "Service programmes", Page 26 | |
16 Transportation, storage and disposal
of used appliances as applicable throughout the EU.
16.1 Activating frost protection
Protect your appliance from frost during transport and storage.
ATTENTION!
Residues of liquid in the appliance may damage it during transport or storage.
-
Empty the pipe system before transport or storage.
-
Run the "Frost protection" programme.
- Disconnect the appliance from the power supply.
16.2 Disposing of old appliance
Valuable raw materials can be reused by recycling.
- Unplug the appliance from the mains.
- Cut through the power cord.
- Dispose of the appliance in an environmentally friendly manner. Information about current disposal methods are available from your specialist dealer or local authority.
This appliance is labelled in accordance with European Directive 2012/19/EU concerning used electrical and electronic appliances (waste electrical and electronic equipment - WEEE). The guideline determines the framework for the return and recycling
17 Customer Service
Function-relevant genuine spare parts according to the corresponding Ecodesign Order can be obtained from Customer Service for a period of at least 7 years from the date on which your appliance was placed on the market within the European Economic Area.
Note: Under the terms of the manufacturer's warranty the use of Customer Service is free of charge.
Detailed information on the warranty period and terms of warranty in your country is available from our after-sales service, your retailer or on our website.
If you contact Customer Service, you will require the product number (E-Nr.), the production number (FD) and the consecutive numbering (Z-Nr.) of your appliance.
The contact details for Customer Service can be found in the enclosed Customer Service directory or on our website.
17.1 Product number (E-Nr.), production number (FD) and consecutive numbering (Z-Nr.)
You can find the product number (ENr.), the production number (FD) and the consecutive numbering (Z-Nr.) on the appliance's rating plate.
Make a note of your appliance's details and the Customer Service telephone number to find them again quickly.
18 Technical specifications
| Voltage 220- | 240 V ~ |
| Frequency 50 Hz | |
| Connection rating 1500 W | |
| Maximum static pump pressure | 20 bar |
| Maximum capacity of water tank (without filter) | 2,6 l |
| Maximum capacity of bean container | 350 g |
| Length of the power cable | 100 cm |
| Appliance height 38 cm | |
| Appliance width 30 cm | |
| Appliance depth 46,7 cm | |
| Weight, empty 9 kg | |
| Type of grinder Ceramic |
This product contains light sources from energy efficiency classes D and F. These light sources are available as spare parts and may only be replaced by trained specialist staff.
18.1 Information regarding Free and Open Source Software
This product includes software components that are licensed by the copyright holders as free or open source software.
The applicable licence information is stored on your home appliance. You can also access the applicable licence information via your Home Connect app: "Profile -> Legal
information -> Licence Information". You can download the licence information on the brand product website. (Please search on the product website for your appliance model and additional documents). Alternatively, you can request the relevant information from oss-
The source code will be made available to you on request.
Please send your request to ossrequest@bshg.com or BSH Hausgeräte GmbH, Carl-Wery-Str.34, 81739 Munich, Germany.
Subject: ,OSSREQUEST"
The cost of performing your request will be charged to you. This offer is valid for three years from the date of purchase or at least as long as we offer support and spare parts for the relevant appliance.
19 Declaration of Conformity
BSH Hausgeräte GmbH hereby declares that the appliance with Home Connect functionality conforms to the essential requirements and other relevant provisions of Directive 2014/53/EU.
A detailed RED Declaration of Conformity can be found online at siemens-home.bsh-group.com among the additional documents on the product page for your appliance.

Hereby, BSH Hausgeräte GmbH declares that the appliance with Home Connect functionality is in compliance with relevant statutory requirements. A detailed Declaration of Conformity can be found online at siemens-home.bsh-group.com/uk/ among the additional documents on the product page for your appliance.

2.4 GHz band (2400-2483.5 MHz): Max. 100 mW
5 GHz band (5150-5350 MHz + 5470-5725 MHz): max. 200 mW
| BE BG CZ DK DE EE IE EL ES | |||||||
| FR HR IT CY LI LV LT LU HU | |||||||
| MT NL AT PL PT RO SI SK FI | |||||||
| SE NO CH TR IS UK (NI) | |||||||
| 5 GHz WLAN (Wi-Fi): For indoor use only. | |||||||
| AL | BA | MD | ME | MK | RS | UK | UA |
| 5 GHz WLAN (Wi-Fi): For indoor use only. | |||||||
7.3 doubleShot tripleShot
7.4 Slow Brew e Cold Brew
WAARSCHUWING Kans op letsel!
12.1 Home Connect app instellen
12.3 Home Connect instellin-gen
7.3 doubleShot tripleShot
7.4 Slow Brew i Cold Brew
7.3 doubleShot a tripleShot
7.4 Slow Brew a Cold Brew
12.3 Home Connect Nastaveni
He donyckaTe deteMnaDme 8 let K npnbopy n ero cetebomy npoBody.
I P E D U N P E X J D E H N E - O n a c h o c t b B 0 3 r o p a n h y!
Прибор награваетс.
Obecneyte doctatoHyIO BENTnIaIIO np6opa.
▶ Kateropnueckn 3anpeeHa 3Kcnpnyataun npnbopa B shkafoy.
I P E D U N P E X K I E H N E - O n a c h o c t b o w n a p u b a n h y!
CbeKeepnroToBneHHbIe HAnNTKn OueHb rOpAyne.
Ecnn notpebyetc, daTe octbItb HapNTkam.
H36eTaTe KOHTaKTa BbIeJIHOUHXcR JnIDKOcTei n napOB c KoJKei. BeckoHTpOlbHbI dNCTaHcUHOHbI 3aNyCK uepe3 npInIoJKeHne Home Connect MoKet npNBecTn K OShnapBaHNIO TpeTbNx IuC.
Bo Bpemr po3nBa HAnITka pyKn He doJXHbI HaxOaNTbcr PoD dnc- neHcepom drr Kofoe.
He npynyckaite K npbopy IIOe, ocobehno deTei.
I P E D U N P E X K I E H N E - O n a c h o c t b T p a B M n p o B a H N A!
I P E D U N P E X K I E H N E - O n a c h o c t b: m a r h e T n 3 m!
Прибор сODEржNT NOCTOЯньie MaHHTbI. OHI MOryT BO3deiCTBOBaTb Ha эл ekтpoHHbI e MMJIaHTaTbI, HApPIMeP, Ha KapdnoCTMMyJrTOpbl IJI INHKeKTopbl INHcyJIHa.
- Пицам с оленьим ИмпаHTamN 3anpeuaetc npn6nKatbC K np60py 6nke, yem ha 10 cm.
- CobIoJaIe TaKHe MInHmAlbHoe pacCTOaHne 10 cm Do BbHyToPo pe3epByapa dIy BoDbI.
IPEdUYPExKDEHNE-PnckHaHeceHHaBpeDa3OpOBbIO!
3arpa3HeHn np6opa moryt pndctabTb onaCHOCTb Ira 3doPobBja.
Co6IIOdaIte yka3aHnI NO OYnCTKe npnbopa IJIy oBeCneueHnIeHbI.
2 3auntata okpykaoucei cpebln 3koHOMN
2.1 YTNJIH3aUNyNAKOBKN
YnakoBouHbI MaTePnaJIbI 3KoJIoRnueCKN 6e3ONaChbI N MoTy HcNoJIb3OBaTbCra NOBTOpHO.
- YtHn3npyIe OTeJIbHbIe qactN, npeD-BapHTeJbHO paccOpTnpoBaB HX.
2.2 3neproc6epekeHne
Pn co6JIODeHnn 3Tnx yka3aHn np6op 6ydet pacxoOBoTaMehbIe 3Heprn.
YCTaHOBNTe HHTepBaJ DnA aBTOMaTHueCKOTo OTKJIooHEn Ha MmHmAlbHoe 3Ha-ueHne.
Ecn np6op He nCnoB3yeTc, OH OTKIOUaETc paHbwe.
"Ba30BbIe yCTaHOBKn", CtpaHnua 211
He npepbBaIte npexKdEeBpeMeHNO npiroTOBJIeHne HAnNTka.
HarpeToe KOJIueCTBO BOIbI INMMOKc HcNoIb3yETcOnTImaJIbHO.
Pergno ouuau Te np6op ot haknn.
HaKnIb npNBOiNT K NOBblSeHHOMy 3HepronOTpe6JIeHNo.
3 YctaHOBka N IOdkJIIOUeHne
3.1 Komnlektaun
Iocne pacnaKOBKn npOBepbTe BCE DeTaJIH Ha OTCyTCTBnE TpaHCnOpTHbIX NOBpeXKeHn, a TaKHe KOMnEeKTHoCTb NoCTaBKn.
3aMeTka: B 3aBnCmOCTn OT Tnna npH6o-pa OH nocTaBnETCa C pa3nUHbIMn npHnHaJIeKHOCTMa. 3Tu npHaIeJXHOCTN 0603HaueHbI WtprxOBaHHo paMKoI.
→Pc.1
3aMeTka: NcnoIb3yIte HndnKaToPHyIO noIocKy TaKke npHaJIuHn YCTaHOBKn DnayMraYeHn BODbl, TaK KaK OHa He oBeCneYnBaET NOCToHHyIO JKeCTKOcTB BObl.
PeKoMeHdaaun
BbMOKeTe H3MeHnTb yCTaHOBKn BJIIO- 6oe BpeM. "Ba3OBbie yCTaHOBKn", CtpaHnua 211
EcnJxKecTKocTb BOdbI Bblwe 21 HemeuKnx rpaDycob JxcetKocTn (3,8 MMoJIb/π),MOXHO HApONHnTB pe3epByap dJa BOdI npEdBaPHTeJIbHO OTΦINbTpOBAHHo BOdO, YTO6bl yMeHbWntb O6pa30BaHne HaKInN B pe3epByape dJa BOdbI.
6.3 ΦильТр ДЯ ВОДы
ФильТР ДЯ ВОды CHИЖаeТ OБра3OBaHne HaKINn, a TaKKe B 3HaЧиTeьн Мepe Oчицaet BODY OT 3aГР3HeHn.
HcnoIb3OBaHne fNlbTpapnBODbl
BHIMAHHE!
Bo3MOxHNO NOBpeKdEHNe np6opa B pe-3yIbTaTe 06pa3OBaHnHaKnHn.
CboeBpeMeHHo 3aMeHnTe fNbTp dJIy BOdbl.
3aMeHnTe ΦnIbTp IJI BODbl CaMoe nO3dHee Upe3 2 Meca.
YuHTbIbAte COO6UeHnHa DnCnnee.
- Haxmnte
- Haxmte "ΦnIbTp INTENZA" n cneyuTe yka3aHnM Ha dncnnee.
3aMeHa Hn CHrTne HnIbTp a IJI BODbl
BaW np6op MoKet pa6oTaTb n 6e3 HnIbTp a DnB ODbI.
- Haxmnte
- HaKMnte "ΦnJIbTp INTENZA".
- Haxmte "3aMeHnTb" nnn "YdaNtB" n cJeDyIte yKa3aHnM Ha dncnnee.
PeKoMeHdaaun
■ФильтprДЯВODы Heo6xOДМоЗamHeHrTb TaKKe NO TnRHeHnueckm COO6paJxHnM.
PnHcNoB3OBaHHNΦIbTpapdI BODbl Tpe6yETcpeKeOuHaTaB npn6OpOT HaKnn.
IcnoB3OBaHneΦnBtpaДЯВOdbI ynyuzaET BKyc KofoeHbIX HAnITKOB.
Ecn np6op He nCnoJb3oBaIcA dInTeIbHoe BpeM, HApimep, ecn Bbl 6bln B OTnycke, To nepei npiroTOBHeHnem HAnITka IpomOte yCTaHOBHeHbIΦnIbTp DnRA BObl, npiroTOBVB np6ope qawky ropaye Bobl.
■ФильтprДЯВODыMOЖHOпрнобpeCTNBMara3nHaxИнЧepe3 cepBnchHyocnyK6y.
"Akeccyyapb", CtpaHnua 202
Pn6op Pn BkHoueHn eue HarpeT Nn npeB BbIKHoueHem HAnITOK He ROTOBnC, npOMbIBKa Pn6opa He Bbl-NOJHReTc.
CBeKe nproTOBHeHHbIe HAnNTKn OueHb roPraYe.
Ecnn noTpe6yeTcra, daHTe oCTbITb HAnNTkAm.
H36eraIte KOHTaKTa BbldeJIIOUHXCA HNDKOCTe I NaPoB C KOKei.
PpimmeaHnA
HeKOTOpbIe HacTPOkN npEiNoIaraiot npnroTOBLeHne KoFe B HeCKoJIbKO Ia- roB. DoJntecb OkOHcTeJIbHOrO 3a- BePseHnI npoucecca.
ДлгпригOTOBЛЕнгHAнNTka CMOLOKOM CLEdyeT Bcerda NOДСоЕДИНТь 3a-ПОЛHEHHYIO MOLOKOM EMKOCTb ДлгMOLOKa Ин aадаNTep C MOnOчБIM NaKeTOM.
BbIMoKeTe NOcOeHHTb EMKocTb DnMoloka HnnaAanTeP dIaMOnOuHbIX NaKeTOB NlMb B TOM Cnyuae,ecnMolouHaCnCTema C aAnTePOM n ShlaHROM BMOHTnpOBaHa B KpbIwky Do-3aTopa HnNTKOB.
EMKOCtB DnM OLOKa CneuHaNbHO pa3pa6OtaHa DnA 3TOro np6Opa.EmKocbDnM OLOKa PpeHa3HaueHa NCKIOHTeIbHO DnA TOrO, YTObI XpaHITb MOIOKO B 6bITOBbIX YCNOBHX IN BXOJOnJIbHNKe.
Ecnn CnCTema Nodaun MOlOKa He Oun- 1eHa,To npn HauBaHnn Topayen BoDbl C Hei MoKeT BbIXOHTb He6oJbUoe KOJIuYeCTBO MOlOKa.
7.3 doubleShot n tripleShot
Pn6op Dba nn Tpr pa3a Melet Kohe.
YTObI BbICBO6OHTb TOnbKO JERKoyCBOReMble I npTbIe Ha BKyc apOMaTnueckne BeIecTBA, np6Op NOBtOPHO nepMaJIiBaET N 3aBapNBAeT KofoHbIe 3epHa.
YemdoJIbWe 3aBapnBaETcKoFe,TeM 6OJIbWe TOpbKHX BeIeCTB HHeKeJIaTeJIbHbIX apOMaTOB IOnaIaET B HAnITOK. TOpbKne BeIeCTBA N HeKeJIaTeJIbHbIe apOMaTbI OTPuCaTeJIbHO BInrIOT Ha BKyc N DeJaIOT KoFe MeHee npAHTbIM dIy yNoTpe6JIeHHJ.
3aMeTka:ФyHKcHn "doubleShot" n "tripleShot" 3aBncrOT BbIbpaHHo KpeNoCTn HAnNTKa I erO obbema.
7.4 Slow Brew n Cold Brew
Slow Brew in Cold Brew - 3TO MeJenHNO npnroTaBnBaembIe HAnNTK, KOTOpbIe npnbop Bbydaet NopzmaN, a He HenpePpbHBIM NOTOKOM. 3TOT BND npnroTOBHeH NKe Bo3MOKeH B TropaEm H XoJODHom BapnaTe. PnproTOBHeHne HAnNTKa DInTcR HeCKOJIbKO MInHyT.
3aMeTka: IpepeI npHrTOBJIeHNHeM HaNITKa HAnOJIHnTe EMKoCTb DJI BODbl CBExKei N XOJODHOI NHTbeBOI BOOn 6e3 yrJIeKNC-JOTbl.
7.5 ПпгOTOBЛЕне Кофейногу НаHTKa C MONOKOM
PpBBeDm npMep, KaK MOxHNo pNFOToBNTb NaTte-MaKaNaTO.

PPEyIeHNE
Onachoctb oXora!
CnCTema noaun MOIoka cnIbHO HarpeBa-etcra.
HnB Koem cnyae He npKacaiTecb K cnCTeMe NOaUN MOLOka.
- IpepeKoHTaKTOM c ropuee CnCTeMoN noDAuH MOJOKa DaIte ee OCTbITb.
ru Kofoemolka
Tpe6oBaHHa
EMKOCbIyMOJOKaHn aIaITeP dJIy MOJIOUHbIX NaKeTOB NOCDoeINHeHbl.
EMKocTb dIa MoIoka HAnOJIHeHa MOIOKOM INIIN IJNaHr aIaITepa dIa MOnOu-HbIX NaKeTOB NOrpyKeH B MOIOKO.
- NocTaBbTe cTaKaH NOd DO3aTOp HAnNTKOB.
- Haxmte "Klaccnka".
- BbIbePte cHMBoN haNTka dJa NaTTe MaKNaTo HaXKMnte Ha Hero.
-ДЯИЗМЕHEHЯКрпocтнHaЖмITE ①.
-ДЯи3MeHHeHЯобьemaHaXMMTe
-IMnH3MeHeHnI DOJI MOnOKa HaKMMTe 8.
- Haxmte "Start" ndoxndtecb okohataIeIbHoro 3aBepWeHn npocecca.
-TO6bI NOHOCbIO 3aKOHHTb IpHrTOBJIeHHe HAnITKa, HaKMITE Ha "Stop".
- UTo6bI 3aKoHcHTb TOnbKO TeKyuNn 3Tan npnroTOBHeHn, HaKMnte Ha "PpOncyTb".
Molouhna cncTeMa nocIe npHroTOBHeHHaHNTka aBTOMaTHueCKn OUnuaeTcKpaTKOBpeMeHHoN NOaueNnapa.
PpimmeaHnA
EcnB TeueHne np6n.30 cekyHn Hn OHa n3 HactpoeK He 6ydt n3MeHeHa, np6op BbIXoNT n3 peKIma HactpoeK.
■ПиборзанOMHaeTнactpoиKn aBToMaTHnueCKN.
PekomeHdaqun
BbMoKeTeNoDOrpeTbUaShKnnepeI npHrToBJIeHNEm HaHTKa NocpeDCTBOM rOpRueBBoBbI HnN NoDOrpeBaTeJIa uWeK1.
BbIMoKTe BMeCTO MOJOKa TaKKe HcNoJIb3OBaTb HaNTKN I3 paCTHTeJIbHOrO cbIPbI,HaNPIMep,I3 CON.
KaueCTBO MOLOUHONIeHbI 3aBnCHTOT BnDa IcNoIb3yEmOro MoIoka HnHaNITKa n3 paCTtTeNbHO rCbIpBa.
He npKacaiTecb K BHyTpEHNM ya-CTAM KOΦeMOJKN.
BHIMAHHE!
Onachoctb NOBpeKdEHNK KOFeMOLKN.
Pn HnPaBnBHOYcTaHOBKe CTeNEH NOMOJa BO3MOXHO NOBpeKdEHNK KOFeMOLKN.
YcTaHaBnBaIte CTeNeHb NOMoA TOJIbKO npu pa6OtaUoSei KoΦemOnKe.
CTeneHb nomola yctaHaBnBaetcTc TyeHauTo NOBOpOTbIM nepeKluOaTelem.
CTeNEHb NOMO- YcTaHOBka Ja
MeIkn NOMON ⅡIa3epeH CBETIOI O6XapKn
IobepHnTe nepeKluoyaTeIb npOTNB YacOBoC TpeJIKN.

KpynhbI nomoi ⅢJI3epeH TeM-HoJ o6kapKn
IobepHnte nepeKIOUaTeJIb no uacOBoCtpeJIke.

HactpoKa cTepeHn nomola deNCTByeT TOIbKO nOcNe BTOPOuAaKu.
PekomeHaia: Ecni KoFe BbIXOHT NlUb OTdEJIbHbIMn KaIpMa, yCTaHOBtTe 6oJee KpyNbI NOMoI.
EcnKoFe cHsKOM KnIKn n CnHKOM MaNo neHKn, yCTaHOBHTe 6OJee MeKn NOMoI.
9БлokнрвkaДЯ6e3oNaCHOCTN DeTei
UTo6bI npedOTbpaTb OwnpnBaHne n OxKOrn y DeTei, np6op MoJHo 3a6JoknpoBaTb.
9.1 AkTnBaun 6JIOKnpOBKn OT JeTei
Tpe6oBaHne: Pn6op BkIoueH.
HaKMaITe MInHmym 3 cekyHdbI.
BIOKINPOBka IJIa 6e3oNaChOCTn DeTei aKTINBnPOBaHa.
9.2 BbIKJIIOUeHHe 6JOKNPOBKN IJIa 6e3ONaChOCTn DeTei
HaKMaTe MNHmym 3 cekyHdbI.
BIOKINPOBkaIJI6e3ONaCHOCTHJeTei DeaKTINBnPOBaHa.
10Подогрвасть чашек
aMIOxHO NOOrpeb, NOb3yrcb NOOrpeBaTeIeM aWeK.
10.1 BkIIOUeHne N BbIKIOUeHne NOIOrpeBa YaWeK
I PENEYNPEXKDEHNE
Onachoctb okora!
IodorpeBaTeIb yawek' cnIbHO HarpBa-etc.
HnB Koem cnyae He npKacaiTecsb K ropaemy noDorpeBaTeIHO yaWeK'.
- Ipeed KOHTaKTOM C ropaym noDorpeBaTeIeM yauek' daIte emy OCTbITb.
PekomeHaau: Iy ONTImaIbHOro NOorpeBa yCTaHaBnBaIte YaWK NHom Ha NoorpeBaTeIb 1.
11 H36paHHoe
CoxpaHnTe HAnrKn C nepcoHaJIbHbIMn HAcTpoiKaMn B n36paHHOM. Bb MoKeTe 06o3HaUaTb n36paHHbIe HAnrTkOnPpeJeHbIM uBeTom. KaJdbIe 3IeMeHT n36paHHoro - 3TO HAnrTOc nepcoHaJIbHbIMn HAcTpoiKaMn. HAcTpoiKn MOxHOb N3MeHnTb B IIO6oe BpEMy.
3aMeTka:ДЯ BBIXOda n3 peXnMa HaCTpoeK HaxMnte <HJIH NaHHTe npuroTOBJIeHne HAnNTKOB.
11.1 CoxpaHHe HAnNTKa n3 BbI6Opa HAnNTKOB
- Быбэрпец haNTOK n3 "KlaCCnKa" nIn "coffeeWorld".
- 3aainTe nepcoHaJIbHbIe HacTpoiKn IJa HAnITKa.
- HaxMMte "H36paHHoe".
- BbIbePte XeHaembl uBET dJa HAnNTKa.
- Haxmte "CoxpaHntb".
11.2 CoxpaHeHne HAnNTka B MeHIO
- Haxmnte "H36paHHoe".
- Haxmnte
Ha nncnnee oTo6paKaHOTcB Ce mHeo- uinec HAnNTK.
3. BbIepeHTe HxKhBn HaHNTOK.
4. 3aaiTe nepcoHaJIbHbIe HacTpoiKn IJa HaNTka.
5. Haxmte "Дальшe".
6. BbIbePte XeHaembl uBET dna HannTka.
7. Haxmite "CoxpaHntb".
UTo6bI BocnoB3oBaTbcra yHKnuei
Home Connect, Bnauane ycTaHOBnte
CBa3b c DomaunHei ceTbIO WLAN (Wi-Fi1)
IC npInoJxHem Home Connect.
PpnoJKeHneHomeConnectnomoKeT Bam npoTN BeCb npocecc pernctpaun. Iy BbIOpHeHnHaCTpoeK cJeDyTe yka3aHmBnpnoJKeHnHome Connect.
PekomeHa: TaKke co6JIoJaTe yKa3aHn, npBBeDeHHbIe B npNIOKeHn Home Connect.
PpimmeaHnA
12.2 HacrtpoiKa Home Connect
Tpe6oBaHnA
■ПиноженeHomeConnectHactpoeHoHaMObNbHomyCTpoiCTBe.
MecTo yctaHOBKn npnbopa haoiNTcB paDnCy DeIcTBnI DomaunHe cETN WLAN (Wi-Fi).
- OtkpoTe npinoJKeHne Home Connect n otckaHpyTe cIeDyUoUsn QR-KoJd.

- CnédyuTe yka3aHnM B npINOxKeHn Home Connect.
12.3 Home Connect YctaHOBKn
BbIOnHnTe HacTpoKy Home Connect B COOTBETCTBn C BaUHMN NOTpe6HOCTaMn. HAcTpoKn Home Connect Bbl HaNdTe B MeHIO 6a3OBbIX yCTaHOBOK BaUeO np6oopa. IepueHb HacTpoE, OTo6paXaEMbIX Ha DInCnJIee, 3aBNCHT OT TORO, yCTaHOBLeHo nn npNoJKeHne Home Connect n noDknIOu-uen nn np6Op K DomauHei cEtN.
O63op Hactpoek Home Connect
3decb bbl haIndete o63op hactpoek Home Connect n ceteBbix hactpoek.
Баазовая насторьа Быбор Onисане
ПОДКЛЮЧЕНИЕ K WLAN
Bkn. BbIK.
Pn dInTeIbHOM OTCyTCTBHN HIN B CEJAX 3KOHOMnn 3JIeKTPo3HeprN CNeDyeT BblKIIHOHTb paDNOMOdyIb.
13 Ba3Obble yCTaHOBKN
BbMoKeTe 3aDaTb 6a3OBbIe yCTaHOBKn
Pn6Opa B COOTBeTCTBUN C BaUMN NO-
Tpe6HOCTAMN N Bbl3BaTb DOONHITeJIbHbIe
fYHKcU.
-ⅠoДоHнК
-KoHTeHepIJIaKoFeHOrIyU
-MexaHnueckn yka3aTeIb ypoBHa HanoJIHeHn
CnCTema nOdaun MoIoka c aadantepom
EMKoCTbДЯMOJOKaC KpbIuKOi
KpbiUka eMKoCTn JIa BOdbI
3aBapouhBn6nOK
KoKyx dncnHcepa
14.2 YnctTaeee cpeDCTBO
HcnoIb3yIte TOnbKO NODXOHaIe YNCTA.
Iune cpeIcTBA.
BHIMAHHE!
Henodxoadyne ynctaune cpeCTBa MoryT nobpeintb NOBepxHoctn np6opa.
He nCnoJIb3yIte arpeCnBhIe nn a6pa- 3NBHbIe YNCTaUne CpeDCTBa.
He nCnoJb3yIte yHCTaUne cpeIcTBA, coedePkaune aankoroJIb/cnIPT.
He nCnoB3yIte JxecTkne MoaJIKN nn r6Kn.
HenodxoJnue nctTae cpeDCTBa n CpeDCTBa dIy ydaJIeHn HaKInN MoYr NOBpeDntb np6op.
Дя удаленин Накни He И спользуITE chCTYIO JIMMOHHyO KNCLOTy, yKCyc ИИС cpeДCTBa Ha OCHOBE yKCyca.
He nCnoJIb3yIte cpeIcTBo Inra ydaIeHnHaKnPi,coepKaUee φocΦopHyIO KNCIoTy.
HcnoB3yIte Toblko CneuaJIbHO pa3pa6OtaHHbIe NOd KOHKpeTHbI np6Op Ta6NeTKn DJIaJaEHNHaKUNN OUNCTKN.
"Akeccyyapbl", CtpaHnua 202
PeKoMeHdaaun
TtataeIbHo npomOte HOBbie ry6aTbie caJIΦETK, YTObI ydaIHTb CoII, KOTOpbIe MOrYT HmEtbcra Ha HIX. CoII MoryTpnpVBecTI K O6pa3oBaHnIO HaJeTa pKaBcHHbHa NOBepxHOCTaX I3 CTaII.
OcTaTKn HaKnH, KoFe, MoIOKa, MOIOx CpeDCTB n CpeDCTB dJa ydaJIeHnHaKnH BceIa ydaJIaIte HeMeIeHHo, YTO6bI IpeDOTBpaTHTb O6pa3OBaHne Kopp03H.
14.3 OuNTka npnbopa
I PENEYNPEXKDEHNE
OnachocTb nopaxeHn 3JneKtpnuecknM TOKOM!
PpOHHKwA B npNbOp Bnara MoKeT cTaTb PpUHNOI NopaKeHn TOKOM.
Kateropnueckn 3anpeaetc npry- katb np6op nnn ceteboB BOdy.
3anpeuetaetc nonadaHne KndKocTei Ha uTekephoe coeHNHeHne npnbopa.
He nCnoJb3yIte dIra OUHCTKn npH6opa napooOuHCTHTeJI NII OUHCTHTeJI N BbICOKoro daBLeHna.
I P E D U N P E X D E H N E
Onachoctb oXora!
HeKOTOpBie qactn npbopa cnIbHo HarpeBaIOTc.
He npikacaiTecb K ropaHm qactam npnbopa.
HcnoIb3OBaB npnbop,pepeKoHTaKTOM C rOpAum YacTAMn DaTe NM OCTbITb.
- OuHCTnTe Kopnyc, noInpoBaHHbIe NOBepxHOCTN n NaHeIb ynpaBneHnMnKpOΦn6pOBoB caIΦeTkoI.
ru OuHCTKa n yXoJ
- После пигOTOBЛЕня HanNTka OчИCTnTe CnCTeMy Do3aTopa МгКоB ВlaЖHоN TKAHbIO.
- ПомоTe emKocTb ДЯ BODbl CBeJKe YNCTOu BOdOy.
- Ecn np6opom DoIro He noIb3Oba- nIcB (HaIpIMep, BO BpeM oTnycka), Nouchte BeCb np6Op BKIOUHTeJIbHO C NOdBHXHbIM NactyMn (HaIpIMep, 3aBaOpOHbIM 6IOKOM IIN eMKoCTbIO dJIra BoIbl).
3aMeTka: Ecn np6op BkIouaetcB XOIOHOM COCToHHN HIN BbIKHOuaeTcNOcNE npnroTOBHeHn KOpE, IpombIBKa np6opa BbINOHNrTcA bTOMaTHueckn. TaKIM O6pa3OM CnCTema OUnuaeTcCaMOCTOReNbHO.
14.4 OuHCTka POnDoHa N eMkoCTn IJIa KoΦeHNo rUuN
EkeHHeBHO ouHuaTe n onOpoxnHte IODoH n eMKocTb dJa KofoeHOn rUuN BO n36eKaHne cNoEB OTIOKeHn.
poB (waste electrical and electronic equipment - WEEE).
ДанныеHopMbIОпедл- IOТ DeHCTByUOuNHe Ha TeppnTOpIN EbpocOHO3a npaBnla BO3Bpata N yTuHn3aunn CtaPbIX npH6OpOB.
17 CepBnchna cnjx6a
BaJHbIe IJIyHKUHOHPOBAHnI np6bopa opHnHaJIbHbIe 3aIuaCTn, COOTBeTCTByO- Une DInpeKTHBe EC no 3KOJIoRNUeCKOMy npoeKTHoPAHnIO 3JIeKTPoNtpe6JIHOuSeI npOdyKcII, Bbl MoKeTe 3aKa3aTb B HaWei cepBnCHOn ClyX6e, KaK MHHmym, B TeueHne 7 let c MOMeHTa npOdaJN BaWero np6bopa B npedeJax Ebponeckoro 3KOHOMnueCKOro npocTpaHCTBa.
3aMeTka: Pn BbIOJHHeHH rapaHTnHbIX yCIOBn Ipon3BOJnteIpa6Otbl BbIOJHrIOTc cepBnCHOH cnyK6oB 6ecnIaTHo.
IopnoHyu HOpMaunO rapaHTnHOM cpoKe uCIOBnX rapaHTn B BaWei CTpaHe Bb MOKeTe 3aPocntb B HaWei cepBnCHo CnyK6e, y BaWero npodaBaua IIN HaTn Ha Haem caTe.
Ampc H Tepeoh cepBnCHoN cnyK6bI MOxHO HaHTN B npnilaraemom nepeueHe cepBnCHbIX cnyK6 nHn HaHaWeM Be6caite.
Дяdoctyna K KOHTaKTam CnyK6 KIneHTCKORO cepBnca, Bbl TaKKe MOKeTe Nc-NoIb3OBaTb DaHbY QR KoI.https://www.siemens-home.bsh-group.ru

HmnpTeP/OpraHn3aun, npHmHaOua
npTeH3n no KaueCTby/TOO «BSH Home
Appliances (BCX Xoym AnnaaHcoc) Pecny6nka Ka3axctan, r.AmTabl, yI.
XadKn Mykana, 22/5, 7 3tak
e-mail: ala-infokz@bshg.com
CpOK cnjK6bl ycTpoiCTBa-7 let.
Ha TeppHTopn H Pecny6nkn Ka3axctan,
pn O6hApJxHeHH HeNCnPpaBHOCTN, 3BOHN-
Te B cepBnCHbIKoHTaKT-ueHTp 5454
(TolbKO dIy Mo6nIbHbIX TeJeFOHOB).
CdeHaOB CNoBeHH
5-GHz-Band (5150-5350 MHz +
5470-5725 MHz): max. 200 mW

BE BG CZ DK DE EE IE EL ES
FR HR IT CY LI LV LT LU HU
MT NL AT PL PT RO SI SK FI
SE NO CH TR IS UK (NI)
3a6oponeHOnPiHocHTn pyky iDIO3aTOpPiJ uac BnJaHi HanoHO.
He pndny too.
YBAGA! - He6e3neKa TpaBMyBaHHa!
HenpaBnIbHe BnKOpNCTaHHn IprnlaNy MoKe CTBOpNTn He6e3neKy dIy KOpNCTyBaHa.
Lio6 yHnKHyTn TpaBM, KopnCTyIeTcR npIaIom Iiue 3a npN3HaueHHaM.
3aTnCKaHH naIbciB nID yac 3aunHeHHn DBepuT npnilady.
3aunHouynDbepaTapnilady,bepejItb naIbci.
Kabomolka oboptaetbca.
He npocobyte naIbci B KaBOMoky.
YBAGA! - He6e3neka: marHeTn3M!
Ley npilad miCTnb noctiHi marHITn. BOH moKytb BnIbATn Ha eIeKtpoHHi iMnlaHTaTn, Hapniklad kapdioCTmMyJrTopn nn IHCyIHOBI NOMN.
Людам 3[elektroними IMпаHTaTamn Heo6xIDHO TpmaTncaHa 6e3neuHi BiIcTaHi - npHaMHi 10 cm BiI npilaNy.
- Be3neuHy BiDcTaHb y 10 cm cIiD TrpMaTn BiD BnHrTOrO pe3epByapa dIy BoN.
YBAGA! - He6e3neKa shKOdn 3dOpOB'HO!
3a6pydHeHH npilady moKe cTaHOBHTn He6e3neky dIy 3OpOB'J.
BnkohyTe Bka3iBkn 1oDo ririHicHoro uHneHH npnaNy.
2 Oxopoha IOBkijnna OuaJIInBe KOpNCTyBaHHa
2.1 Ytni3aia ynaKOBKn
NaKyBaJIbHi MaTepiAn eKoIorIuHO 6e3neuHi i MOxTyB BnKOpNCTOByBaTnCra NOBTOpHO.
- Okpei ckslaHnKn Notpi6Ho po3-copTyBaTu n yTuJIi3yBaTu p03-dIbHO.
He nepepeBaIte npriroTyBaHnHaHOIB npepaacHo.
Harpita KijbkiCTb BOAn a6o MoIoka 6ynde BnKOpncTaHa ONTImaJIbHO.
Perylaepno BuaaIaIte 3 npnaNy HauPi.
BiklaHnHaKnnyPiBnUyOteheprocnoXnBaHHa.
3 YcTaHOBJIeHHa N iD-KJIHOUeHHa
3.1 Komnlekt noctabkn
Picra po3naKyBaHHn nepeBipTe, uKOMnIeKT NOBn i uH He N0uKOAnIOrKicb YactuHn Ni d uac TpaHcnpTyBaHHa.
3ayBaKeHHa: 3aJexKHO BiD MoJeI npJaNy B KOMJIeKT BXOJrTb pi3Hi akceCyapn. Joatkoi akceCyapn no- 3HaueH I NyKTHuPHo paMKoI.
→MaJI. 1
A KaBOMaunHa
B Emhictb dIy MoIoka
C Tpy6ka JnMoloka
D AanTep emHOCTi nMoloka
E I nctpykci 3 ekcnnyatauii
F DOnomixHa HnPmHa IJBACTaHOBHeHHa iIbTpA.
G TaBneTka IJIa BnIaJIeHHaKIny 1
H TaBneTka dIa OunuEHHa
BodnHnΦilbTp
J Cmyxka IJIy Bn3HaueHnJ KOpCTKoCTI BOIN
1 3aIeXHOBiD KOMnJIeKTaUcII npuHa- dy
3.2 YctaHOBJIeHHn IpiKJIO-ueHH npHaNy
YBAGA!
He6e3neKa noWKoJxHn npIaNy. HenpaBnIbHe BBeJeHHn B eKcNlyata zuIO MOKe noWKoJNTn npIaI.
BukopncToByte npnilad Iiue B npMiuieHHx, 3axuieHnx BiD MOp03y.
- RaKIO npIaI TpaHcNOpTyIOTb a6o 36epiraIOTb 3a TeMnepaTpyn, HxKyoi BiD 0^ , nepei BBeJeHHrM B EKcNlyatauio CII D BHTpMaTu NOro 3 roJ. 3a KIMHaTHOI TEMnepaTpyn.
-Пися Кожного пдклоченг слд почekати рпблн3н 5 c.
1. YctaHOBIb IprnlaHa pIBHi BOIOCTiIKI IOBepxHi, 3daTHH BHTpIMATN Ioro Bary.
2. BCTaBTe 7TeNceIbHy BNkky npnla- dy Do HaleXHm YHOM BCTaHOBeHOi PO3eTKn.
4 3HaioMCTBO
4.1 Прлад
Tyt moxHa n03HaHOMNTnC8 3i CKlaADnKamn npnaay.
3ayBaKeHHa: 3aIeJHo BiM MoJeI npuJaMy MOJIbI JeKi BiIMHOCtI KOJIbOpy Ta DetaleN.
→MaJ. 2
1 3aBODcbKa HacTpoiKa
3ayBaKeHHaHabTbMaIOuN npnCTpiI dIy NOM'KWeHHBODN,CKOpNCaTteCnIHdNKaTOPHO CMyKkoO,60 TBepDiCTb BOH Na BHXoPi3HNbCS BiD pncToIO Do npncToIO.
PopaH
HaIaHTyBaHHa MoKHa 3MiHHTN B 6yIb-IAKN MOMENT. "OCHOBHI napameTpN", CToP.274
■ 阿卡托夫瓦夫斯克市 21°dH (3,8 MMolb/),MOXHa 3aHTN B pe3epByap nonepedhbo BiΦIbTpOBAHy BOy,IO6 3MeHHTN iHTeHCNBHICTb yTBOpEH H BAHNKOBNX BiKlaIbI.
6.3 BODHnIbTp
3a donomoroq pfjbtpa Iy BODn MoXHa CNOBilbHOBATN NOBy HaKuny npoBNTN BDOy uNCTiwoIO.
BcTaBneHnIpbTpa IJRA BOnN
YBAGA!
MozJIInBe N0UKOJKeHnI npUaIy BHaCJIiOK NOBn HaKIny.
CboeacHO 3aMIHIOIte fIbTp IJIABOIN.
3amHHTn fijbTp dna BODn nOTpi-6Ho He ni3Hiwe HIX uepe3 2 Mic..
3BaJaTe Ha dncnneHy iHnka- zuio.
uk Npeed nepwIM BnKOpncTaHHaM
1.HaTnCHiB
2. Hatncitb "ΦiNbTp INTENZA" i BnKoHynte Bka3iBKn, lo 3'raTmMyTbcr Ha dinCnIeI.
3amHa a6o BndaJeHHa iNbTpapdIy BoH
PpnilaIOM MOxHa KOpNCTyBaTnCn I 6e3 pIbTpA DnB ODN.
1.HaTnCHiTb
2. HataChItb "DiIbTp INTENZA".
3. HaTnCHiB "3amHHTn" a6o "PpN-6paTN" i BnKOHyIe Bka3IBKN, IIO 3'ABLANTMyTbCra Ha DnCnJIeI.
Iopapn
3amHrtn pIbTp dIy BOn cIi TaKoX i3 ririEHiuHx MipKyBaHb.
3a HaBHOCTI BOHOrO pInbTp a BuaTn HAKIN i3 npuAny MoXHa piJe.
3a HaBHOCTi fIbTpA dIa BOIN KaBOBi HANOI BHXOJrTb CMaUHiuMN.
■HKIO Bn DOBRO He KOpNCyBaJIncra npIaIOM (HaNPKlaI, 6yIu y BiIpyCTci),TO npeI KOpNCyBaHHM npOMnIte BCTaHOBLeHNI BOJHNI φilbTp, pnproTsyBaBUn YaShKy rapaYOi BOJN.
■ПиДбати Фільтpr Дя ВODи можнав МагаЗиHi a6O cepBicHOMy ueHTpri. "PpINAДЯ",CTop.264
6.4 Першевскорецаннaya прILAду
Iicna nID'edHaHHdo eNeKtpomepeXi HanaWtTyte npnlaDnepwOro BNkOpncTaHH. MeHIO BBeDeHHB eKCnnyatauio 3'ABnEeTbcra TilbKn nicna nepwOro BBIMKHeHHa.
1.YbIMKHiTb npnlaKHOKNKOIO
2. BnKohyIe Bka3iBKN, 3'ABJrNMyTbCnHa DnCnJIeI.
Ha nucnnei 3'ABnA TmYtbcra iH- ctpyKci 3 BnKOHaHH nporpaMn.
Bka3iBKN
7.3 doubleShot tripleShot
PpnilaMmeKabYDbiayaboTpui.
UoB BnBilbHraIncs TIlbKn npneMHi Ha
cMaK i dope 3acBOHOBaHi apomatN
uHi peOboHH, PpnilaD 3aHOBo MeJe
3epHa N 3aBapIOc KaBy.
uk OCHOBHI BiIDOMOCTI npo KOpNCyBaHHA
YIM IOBwe 3aBapIOeTbcra KaBa, TIm 6Ibwe ripKnx peOBoHH i HebaXaHx apOMatIB BnBIJIbHReTbcra. IpiKi peOBOHNi HebaXaHI apOMATNI poripWHyOTb CMAk i 3acBOIOBaHicTB KaBN.
3aybaKeHHa: DvnKcii "doubleShot" i "tripleShot" 3aIeXaTb BiD Bn6paHnx MiHocTi Ta 06'Emy HanoIO.
7.4 Slow Brew Ta Cold Brew
Slow Brew i Cold Brew - ue NOBIbHO 3aBapIOBaHI Hanoi; npnilaI HaJIbBae ix IMnyIbCaMN, a He cyciIbHIM NOTOKOM. TaKni cNoCi6 3aBapIOBaTI Kaby MaE rapAun I xOIoHN pI3HOBNi. PpIroTuBaHHa HANOIO TPNBaE KINbKa XBNInH.
3ayBaKeHHa: Npei npiroToyBaHHaHnHO 3anOBHitb pe3epByap dIra BOIN CBIXOIO I XoIoHOIO Hea-30BaHOIO NTHOIO BOHO.
IiJ uac MOJOTT KaBOBx 3epeH MoXHa BCTaHOBJIOBaTn 6aKaHn CTyPiHb NOMeLy.
yBArA!
He6e3neKa TpaBMyBaHHa!
Kabomolka oBepTaetbca.
He npocobyte naIbci B KaBOMOJky.
YBAGA!
Hebe3neKa NookoJKeHHaKABOMOJIKN. HenpaBnIbHe BCTaHOBJIeHHaCTynHn NOMEly MoKe CNpUHNHTN NOOKoJKeHHaKABOMOJIKN.
YCTaHOBJIIOHTe CTyINb NOMEJy TiJIbKN TOi, KOJI NaBOMOJa npa-UCOe.
CTyniHb nomely moXHa cTyniHuacto peYIIOBaTN NOBOPOTHM peYJATOPOM.
Стуниьnomелу
ToHsIn
NOMeI DJIa
CBITNOO6Cma-
XeHnX 3epeH
YcTaHOBJIeHe 3HaueHn
NoBepHitb peryIaTOp npOTn
TODNHHNKBOOI
CTPIIKN.

Грубішн
NOMeIДЛ
TEMHOOCma-
JXeHnX 3epeH
NoBepHitb peryIaTOp 3a rOdnH
HNKOBOHO
CTPIIKOIO.

YctaHOBHeHn CTyniHb NOMeLy 3aCTOCOByETbcra TIlbKn NiCna DpyroIyauKn.
Iopada: RaKIO Kaba Teue IINe KpaIaMn, yCTaHOBIT rpyoIiN CTynIHb NOMEJy.
Kku KaBa HaTo pKa N Mae 3AmaIO NiHKn, yCTaHOBITb TOHnI CTynIHb NOMeLy.
9БлokуваньВIDdoctynyдITEH
3axnCTNTIteBid OwnapeHnTa oniKIB, npnaMozHa 3a6IOky-BATN.
9.1 AKTINBaCiIyHKnCii 6IoKvBaHHaBnB iD nOCTyni DiTei
Bhmora: Ppnilad yBIMKHeHo.
HATnCHiTb BTPmMyTe ⅢO-HaMHeHwe 3 c.
ΦyHKciIO «БLOkyBaHHBiДdoCTyny DiTei»akTNUBOBaHO.
9.2ДeakTnBaui6JokyBaHHaBIDIOCTyniDITEH
HaTnCHiTB BTPMMyTe OHaIMeHwe 3 c.
BLOkyBaHHa BID DOCTyNy DIteiAKTINBOBaHe.
10Пдирь чашok
UaMKn MoKHa Niirpibatn 3a DonomoroIO NiirpiBaay awoK.
10.1 AkTnBaCi i DeaKtNBaCi nidiRpiBaua qawok
yBABA!
He6e3neka onikib!
Пдирьачашok' дуже harpiBaetbca.
Hikon He TopkaTecra rapuoro nirpiBaua awoK.
-Першниж Торкатися rapячoro ni-dirpiBaaya quaWOK, daIte ИOMy OXOLOHHTN.
Iopada:ДЯ ONTIMaJIbHOrO NiirpiBy чашOK CTaBTe YaWK NdHom Ha NiirpiBaY.
11 YIIO6JIeHe
Hanoi 3 nepcohaJIi3OBaHmN HaJa- uTyBaHHMa MoXHa 36epiratn k yIIO6JIeHi.
YIIO6JIeHI HANOI MOXHa N03HaayatN KOJIbOpOM. YIIO6JIeHn HAni -Ze Hani 3 nepcoHaJIi3OBaHmN Hana- STyBaHHaMn. 3MiHTn HanaSTyBaHHa HANOIO MOXHa B Oyd-b-AKNI MOMENT.
3ayBaKeHHa: 5o6 BnTn 3 MeHbHaIaHTyBaHH, HATNCiTB <a03anyCTiTb npriOTyBaHH HaHO.
11.1 36epeXeHHaHIO 3 MeHIO Bn6Opy
12.1 BcTaHOBJIeHHa3acTocyHky Home Connect
- 3actocyHok Home Connect BCTaHOBJIeHn Ha MObIbHOMy npNU- cTpoi.
- 3anyctitb 3actocyHOK Home Connect Ta halaustyIte doctyn Do Home Connect.
uk Home Connect
3acTocyHok Home Connect DOnomOxKe npoITn Bci KpOKn peecCTpaui.
12.2 Hanaштуванг Home Connect
BHMORN
Ha MobijbHomy KInCeBOMy npnctpoi BCTaHOBHeHO 3aCTOCyHOK Home Connect.
Ha micci BCTaHOBHeHH npnlaI npnMae CnHaJ DOMaHbOi MepeXi WLAN (Wi-Fi).
-
BiДкриTe 3aCTOCyHOK Home Connect Ta npocKaHyIte HacTyuHi QR-KoDiN.
-
BnkoHyTe iHCTpyKci, 3'ABnTnMyTbC8 B 3aCTOCyHky Home Connect.
12.3 Napametpn Home Connect
Aaantyute Home Connect do cboix
notpe6.
Iapametpn Home Connect moxna
3HaHTB MeHIO OCHOBHIX
napametpiB npnilady. Jki napametpn
BIDOBpaKATMUTbcra Ha dinCnJIe,
3aJExKITb BiT TORO, uHaNA
uTobHoHome Connect i nnPiKnIO-
yeHO npnilad do domaunHbOI MEPexi.

OrnaynapaMeptipbHomeConnect
Tyt haVeHn oIyI napametpiB Home Connect i mepeki.
13.1 3miHa OCHOBnHex HaJa- StTyBaHb
- Hatachitb
Диспелов поka3уec синок OCHOBHNXnapaMeTpib.
2. 3miHitb NOTpi6Hn OCHOBn npaMeTp.
Пилад abTomatuHо 36epirac OCHOBнй napaMeTp.
3. Βοδ BΗΙΝι 3 OCHOΒΗΧ ἀραμεTpιB, ḤατιςχίΤβ
13.2 OrlaOCHOBHnX npaMeTpib
TytHaBeHeHnOrIaOCHOBHXnapaMeTpB.
14.1 PnndaTHicTb Do MHTB NocydomnHi MaunHi
Tyt haBeHn OgIaIe, npuaTHnx Do MTTB NocydomHi MaunHi.
YBARA!
JeaKi DeTani CyTnBi Do Tempeatpyu MoKyTB 6yTN N0WKoJKeHi BHaCNI-DOK MTTA B NOCyDOMNHi MaUNHi.
-ДOTpIMyIteCn BmOr iHCTpyKu3 eKcNlyatauII NocydomnHOI MaUNHn.
Mnute B nocydomnHi MaunHi TiIbKn npndaTHi Dnla cboRo deTani.
BukopncToByte TijbKn Ti npo- rpaMn, KOTpi He Harpiaotb Detani noHaD 60^
PpndaTHi:
■ПдондяКpaneь
- Pešitka
-KoHTeHepIa KaBOBoI rUzI - MexaHuiuHn iHdNkAToP pIBHa
Molouha cnCTema 3 aDanTepom
EMHICTbIaMOnoka3KpNtKOIO
HenpiNtHi:
Pe3epByap IJIa BOIN
Kpnka pe3epByapa nla BOIN
BLOK 3aBapIOBaHHA
Kpnska do3atopa
14.2 3acobn dlya ouhneHHa
BnKOpncToByIte IInIe cneuaIbHi 3acO6n dIy uNueHn.
YBAGA!
HenpndaTHi 3acO6n IJyUHHeHHaMOxytb NOKoKjYBaTn NOBepxHi npna-ny.
He 3actocobyTe roctpi nn a6pa3nBHI 3acO6n dIa NnueHHa.
He BnKOpNCToBvIe 3acO6n dIa HnIeHH, IIO MICTaTb CnIPT.
He 3actocobyte kopctki a60 metaJIeBi ryOKn.
Henpiadhi 3acobn dnyuueHHy BuaaehnHaKny MoKyb NOoKOiTN npnilad.
He BuaJTe HaKn 3a DOnOMO-TOU YnCTOI JIMOHHOI KNCLOTN, OUY aO 3acobIB Ha OCHOBI OUY.
He BnKOpNCTOByIte 3acO6n IJIa BnJaJIeHHHaKIny, IIO MICTaTb focOfOpHy KNCLOTy.
BukopncToByte Inwe cneuaIbHo po3pO6JIeHI nID KOHKpeTHNI npIaTaeTKN dIy BuaJeHHaKIny NuHHeHH.
"PpuiIaIaIa", CToP. 264

PopaДи
PeteIbHO MInTe HOBi ryokn, 106 BnDaJIHTN MOxJIuBI peUeTKn CoJe. CoI MoKyTb cnpuHrTn NOBy HaIbOTy ipXi Ha MeTaJIeBux IOBepXHx.
- 3a06 3anobitn Kopo3ii, 3aBXdN HeBiklaIHO npuopaTe 3aIIuKn HaKIny, KaBn, MoLoka, po3uHIB DnOuIeHHn BnJaIeHHn HaKInny.
14.3Чишина рпладу
yBATA!
He6e3neKa ypaKeHHa eJeKtpnHm cTpyMOM!
PidnHa,IO BnteKna,MOKe CnpuHnTu ypaXeHH eJeKtpnHm CTpyMOM.
Hikon He 3aHypOHTe Hi npnla, Hi Ka6eIb XINBHeHHy BODY.
Ha po3HIMn 3'eDHyBaU npuIaNy He MaE NOTpanJIaTI pINHa.
He MoxHa YnCTHTn npIaJ 3a DOIOMOHO napOBOr aOo BnCOKOTNCKOBOr npIaJy.
yBATA!
He6e3neKa onikib!
Дяк即时иприладу духе нарпьотс.
He TopkaTecr rapaunx Detanei npnilady.
Пися Користувандаite rapaym DeTaIaM npuIaNy OXOJOnHyTn.
- Kopnyc, Блискуvi NOверхий панел упразынгл Anyotupaite cepBetkoIO 3 MIKPOBOLOKHA.
2.Пиготувавин Hani,пotираite CnCTeMy Do3aTopa M'ЯКоIO BOLO-TOIO raHчipKOIO.
3.ПомиTe pe3epByap cBiXoIO uNCTOIO BOIOI.
4.Якшо npILAДOM DoBRO He KopnCTyBaJIncsra (HaNPKlaI,ПID Yac BiIpyCTKN), NOUHCTbTe NOrO BeCb (3OKpeMa I pyXOMI DeTalI, JK-OT 3aBapIOBaJIbHn 6lOk a6o pe3ePByap dIra BODN).
3ayBaKeHHa: Ppnila aBTOMaTnUHO npOMuBaCTbCra, kKIO BBIMKHHTN INOB XOJODHOMy CTaHI a6O BUMKHHTN iICNA pPnroTyBaHHa KABN. TaKIM uHOM BiOByBaETbCra CamOoHsEHHa CNTeMn.
ImnopTeP:TOB"BCX NObyToBaTexhiKa",03124,M.KnIB,ByI.BoHOBacbKa,10/14kopn.B, YkpaHa
KoHTaKTHi DaHI cepBicHOrO ueHTpy MoXHa 3HaIeTn B DOJyueHOMy IOBIDHNky a60 Ha HauWOMy caTti.
Valid within Great Britain:
Imported to Great Britain by
BSH Home Appliances Ltd.
Grand Union House
Old Wolverton Road
Wolverton, Milton Keynes
MK12 5PT
United Kingdom
BSH Hausgeräte GmbH
Carl-Wery-StraBe 34
81739 Munchen, GERMANY
siemens-home.bsh-group.com

8001306647 (040126)
en, fr, it, nl, pl, cs, ru, de, uk
