K8100 - Musical instrument LEXIBOOK - Free user manual and instructions
Find the device manual for free K8100 LEXIBOOK in PDF.
| Product Type | Bluetooth® Karaoke with Speaker |
| Brand | Lexibook |
| Model | K8100 |
| Dimensions (W × D × H) | 202 × 201 × 490 mm |
| Weight | 4.9 kg |
| Power Supply | AC 100-240 V ~ 50/60 Hz; Built-in rechargeable lead-acid battery 12 V / 4000 mAh |
| Output Power | 18 W RMS |
| Main Functions | Bluetooth®, USB, AUX IN, FM Radio, Karaoke, Instrument Speaker |
| Bluetooth® Profile | Bluetooth 3.0 A2DP |
| Bluetooth® Range | 10 meters (unobstructed) |
| Ports | 2 × USB (for USB drive), 1 × AUX IN (3.5 mm), 1 × mic input (6.35 mm), 1 × guitar input (6.35 mm) |
| Supported Audio Formats | MP3, WMA, WAV (via USB) |
| Microphone Included | Yes, 1 wired microphone |
| Sound Adjustments | General volume, mic volume, echo, treble, bass |
| Lighting | Flashing LED light to the rhythm of the music |
| Operating Temperature | 0 °C to +40 °C |
| Package Contents | 1 × Bluetooth® Karaoke, 1 × microphone, 1 × AC cable, 1 × instruction manual |
| Maintenance and Cleaning | Unplug before cleaning; wipe with a soft cloth; for plastic parts, use mild soap and a damp cloth |
| Safety | Do not expose to water or moisture; avoid heat sources; use only specified accessories; unplug during storms or prolonged non-use |
| Reparability | No user-serviceable parts; contact qualified service for any repairs |
| Warranty | 2 years (excluding misuse) |
Frequently Asked Questions - K8100 LEXIBOOK
User questions about K8100 LEXIBOOK
0 question about this device. Answer the ones you know or ask your own.
Ask a new question about this device
Download the instructions for your Musical instrument in PDF format for free! Find your manual K8100 - LEXIBOOK and take your electronic device back in hand. On this page are published all the documents necessary for the use of your device. K8100 by LEXIBOOK.
USER MANUAL K8100 LEXIBOOK
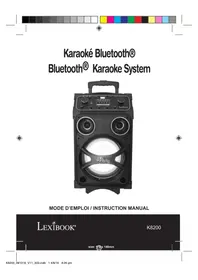
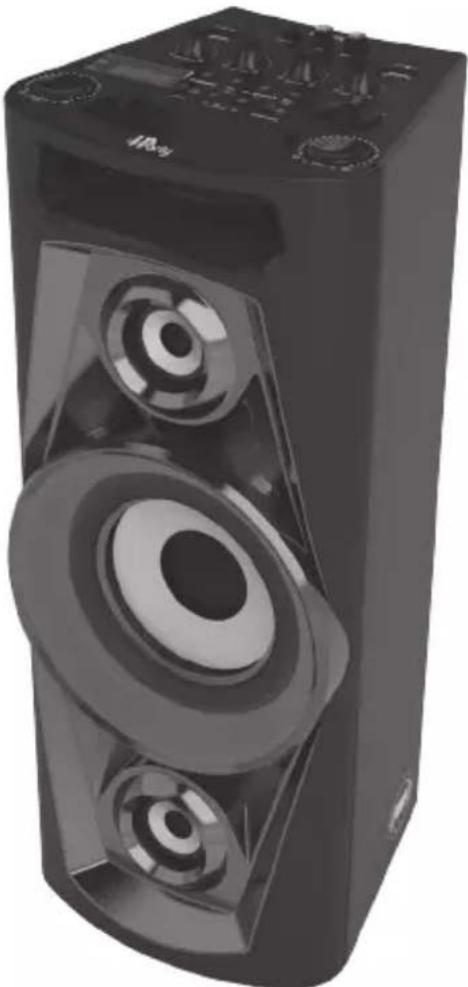
Karaoke Bluetooth® Bluetooth® Karaoke System
MODE D'EMPLOI / INSTRUCTION MANUAL
LEXIBOOK
K8100
size:125x148mm
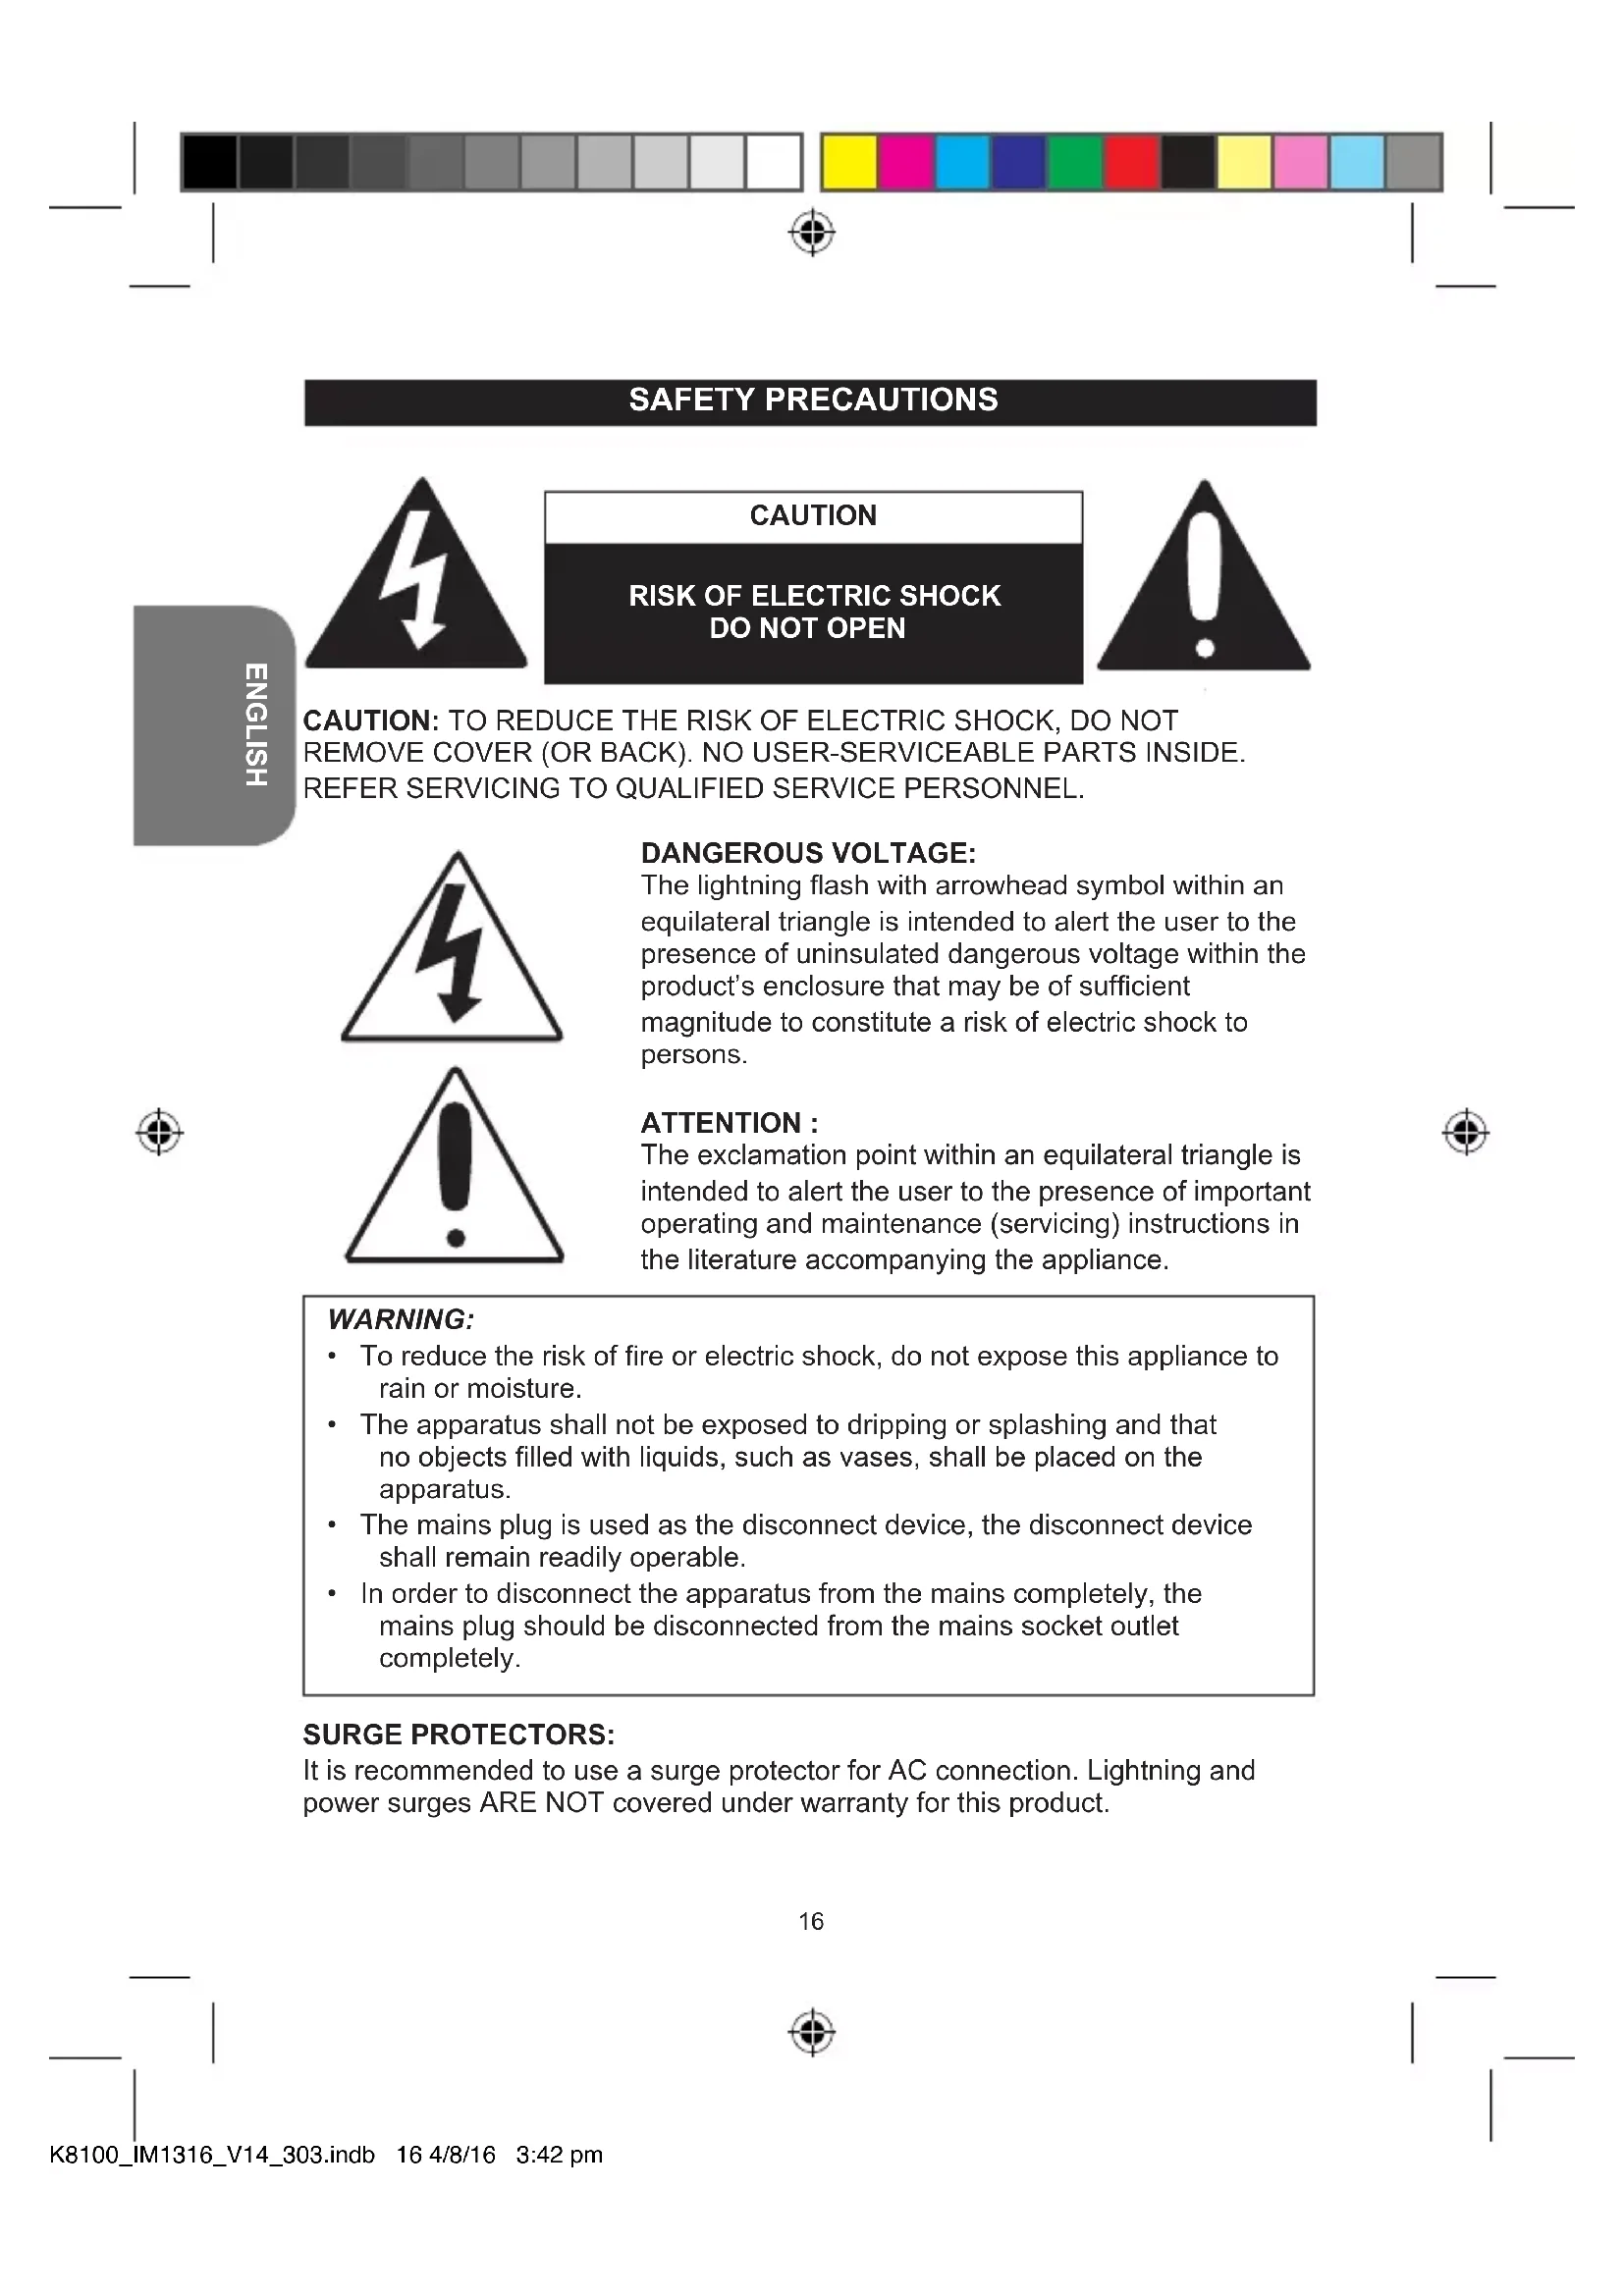
MESURES DE SECURITE

MISE EN GARDE
RISQUE D'ÉLECTROCUTION NE PAS OUVRIR

FRANÇAIS
MISE EN GARDE: AFIN DE RÉDUIRE LES RISQUES D'ÉLECTROCUTION, NE PAS ENLEVER LE COUVERCLE (NI L'ARRÊRE). NE CONTIENT AUCUNE PIECE POUVANT ÉTRE RÉPARÉE NI REMPLÉE PAR L'UTILISATEUR. CONFIER TOUTE RÉPARATION À UN TECHNICIEN QUALIFIÉ.

EMPLACEMENT DES TOUCHES
Panneau du haut
- ECRAN
- VOYANT BLUETOOTH®(« PAIR »)
- VOYANT DE CHARGE (« CHARGE »)
- BOUTON-P-MODE/M
- BOUTON /TUN.-
- BOUTON D'ÉCLAIRAGE
- BOUTON FOLDER/10/M. -
- BOUTON PLAY/PAUSE/PAIR/SCAN
- BOUTON/TUN.+
- INTERRUPEUR DE MISE EN MARCHE/ARRET
- BOUTON FONCTION/ BOUTON
- BOUTON FOLDER/10/M. +
- BOUTON DU VOLUME
- BOUTON DU VOLUME GUITARE
- BOUTON DE CONTRôle DES AIGUS
- BOUTON DE CONTROLE DE LA BASSE
- BOUTON DE CONTRôle ÉCHOS DU MICRO
- BOUTON VOLUME DU MICRO
- PORT USB 2
- PRISE MICRO6.3MM
- PRISE GUITARE 6.3MM
- PRISE AUXILIAIRE 3.5MM
- PORT USB 1
- POIGNEE
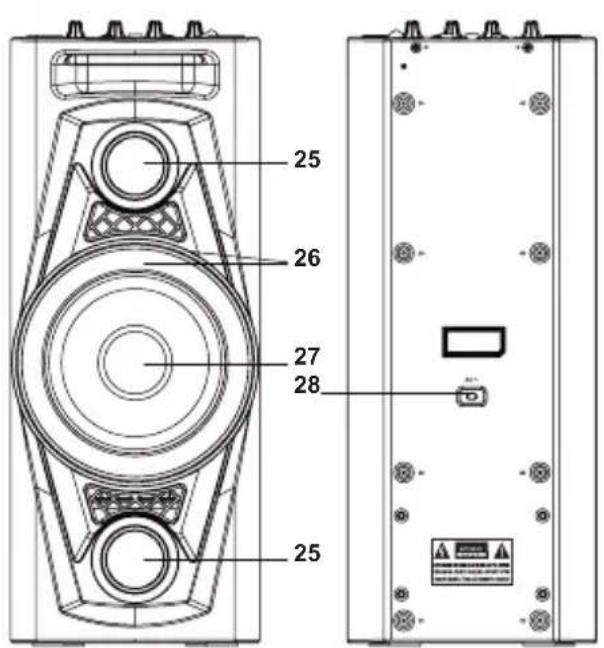
Avant
- HAUT-PARLEURSAIGUS
- LUMIÈRE
- HAUT-PARLEUR
Arrière
- PRISE CA
SIYONN
FONCTIONS GÉNÉRALES
FONCTIONS
© 2016 Bluetooth SIG, Inc.
The lightning flash with arrowhead symbol within an equilateral triangle is intended to alert the user to the presence of uninsulated dangerous voltage within the product's enclosure that may be of sufficient magnitude to constitute a risk of electric shock to persons.

ATTENTION :
The exclamation point within an equilateral triangle is intended to alert the user to the presence of important operating and maintenance (servicing) instructions in the literature accompanying the appliance.
WARNING:
- To reduce the risk of fire or electric shock, do not expose this appliance to rain or moisture.
- The apparatus shall not be exposed to dripping or splashing and that no objects filled with liquids, such as vases, shall be placed on the apparatus.
- The mains plug is used as the disconnect device, the disconnect device shall remain readily operable.
- In order to disconnect the apparatus from the mains completely, the mains plug should be disconnected from the mains socket outlet completely.
SURGE PROTECTORS:
It is recommended to use a surge protector for AC connection. Lightning and power surges ARE NOT covered under warranty for this product.
SAFETY INSTRUCTIONS
PLEASE READ BEFORE OPERATING THIS EQUIPMENT.
Before using the unit, be sure to read all operating instructions carefully. Please note that these are general precautions and may not pertain to your unit.
- Read these instructions.
- Keep these instructions.
- Heed all warnings.
- Follow all instructions.
- Do not use this product near water and moisture, for example: near a bathtub, washbowl, kitchen sink or laundry tub; in a wet basement; or near a swimming pool. No objects such as vases should be placed on the unit.
- Unplug this product from the wall outlet before cleaning. Do not use liquid cleaners or aerosol cleaners. It may damage the screen. Use a dry cloth for cleaning only.
- Slots and openings in the cabinet and in the back or bottom are provided for ventilation, to ensure reliable operation of the product and to protect it from overheating. These openings must not be blocked or covered. The openings should never be blocked by placing the product on a bed, sofa, rug or other similar surface. This product should never be placed near or over a radiator or heat source. This product should not be placed in a built-in installation such as a bookcase or rack unless proper ventilation is provided or the manufacturer's instructions have been adhered to.
- Minimum distances 10cm around the apparatus for sufficient ventilations.
- Do not install near any heat sources such as radiators, heat registers, stoves, or other apparatus (including amplifiers) that produce heat.
- Do not defeat the safety purpose of the polarized or grounding type plug. A polarized plug has two blades with one wider than the other. A grounding type plug has two blades and a third grounding prong. The wide blade or the third prong is provided for your safety. If the provided plug does not fit into your outlet, consult an electrician for replacement of the obsolete outlet.
- Protect the power cord from being walked on or pinched particularly at plugs, convenience receptacles, and the point where they exit from the apparatus.
- Only use attachments/accessories specified by the manufacturer.
- Unplug this apparatus during lightning storms or when unused for long periods of time.
- Refer all servicing to qualified service personnel. Servicing is required when the apparatus has been damaged in any way, such as power-supply cord or plug is damaged, liquid has been spilled or objects have fallen into the apparatus; and/or the apparatus has been exposed to rain or moisture and does not operate normally, or has been dropped.
-
This product should be operated only from the type of power source indicated on the marking label. If you are not sure of the type of power supply to your home, consult your appliance dealer or local power company. For products intended to operate from battery power, or other sources, refer to the operating instructions.
-
Do not overload wall outlets and extension cords as this can result in a risk of fire or electric shock. Use only power source as indicated.
- Never push objects of any kind into this product through openings as they may touch dangerous voltage points or short out parts that could result in fire or electric shock. Never spill or spray any type of liquid on the product.
- Do not attempt to service this product yourself as opening or removing covers may expose you to dangerous voltage or other hazards. Refer all servicing to qualified service personnel.
- Upon completion of any service or repairs to this product, ask the service technician to perform safety checks to determine that the product is in proper operating condition.
- Do not use the product near inflammable or explosive sources.
- Keep the device out of direct sunlight and away from other sources of extreme heat or cold.
- Use the apparatus in moderate climates. (Work temperature 0^ +40^ )
- The socket-outlet shall be installed near the equipment and must be easily accessible.
- The mains plug should be easily accessed during intended use.
- To completely disconnect the power input, the mains plug shall be disconnected from the mains, as the disconnecting part is the mains plug.
- The apparatus shall not be exposed to dripping or splashing and no objects filled with liquids, such as vases, shall be placed near them.
- Mains plug is used as disconnect device and it should remain readily accessible during intended use. In order to disconnect the apparatus from the mains completely, the mains plug should be disconnected from the main socket outlet completely.
- At full power, listening to a music player for prolonged periods can damage the user's hearing.
UNPACKING THE DEVICE
When unpacking, ensure that the following elements are included:
1 x Bluetooth® Karaoke System
1 x Microphone
1 x Instruction manual
1 x AC cable
WARNING: All packaging materials, such as tape, plastic sheets, wire ties and tags are not part of this product and should be discarded.
POWER SOURCE
The Bluetooth® Karaoke System operates on AC100-240V~ 60/50Hz.
- Make sure the speaker is off.
- Insert one end of the AC power cable (included) into the AC socket (28) at the back of the device and plug the other end into any convenient AC~100-240V, 50/60Hz power outlet. Once connected to power, the charging indicator (3) will light up in red to indicate the device is charging.
- After it is fully charged, the charging indicator lights up in green. You can disconnect the cable.
Note:
- The red charging indicator starts blinking when the device is running out of battery. Please connect it to power via the AC power cable.
- After 15 minutes of inactivity the device automatically goes into sleep mode. To exit the mode, press FUNCTION button (11).
- The socket-outlet shall be installed near the equipment and shall be easily accessible. Please disconnect the mains plug from the AC outlet if the appliance is not going to be used for a long period of time.
WARNING: Malfunction or loss of memory may be caused by strong frequency interference or electrostatic discharge. Should any abnormal function occur, unplug the unit from the mains socket and plug it back in.
TURNING THE DEVICE ON AND OFF
Before turning the Bluetooth® Karaoke System on, make sure it is connected to power or fully charged.
- To turn on the device, press the power switch (10) to "ON" position.
- To turn off the device, press the power switch to "OFF" position.
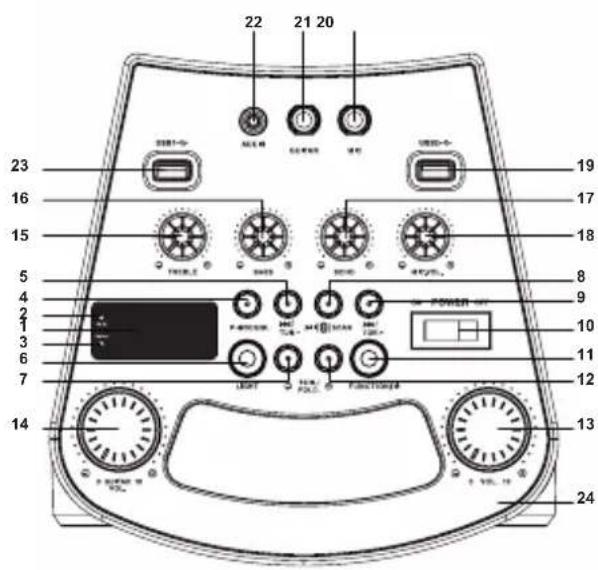
LOCATION OF CONTROLS
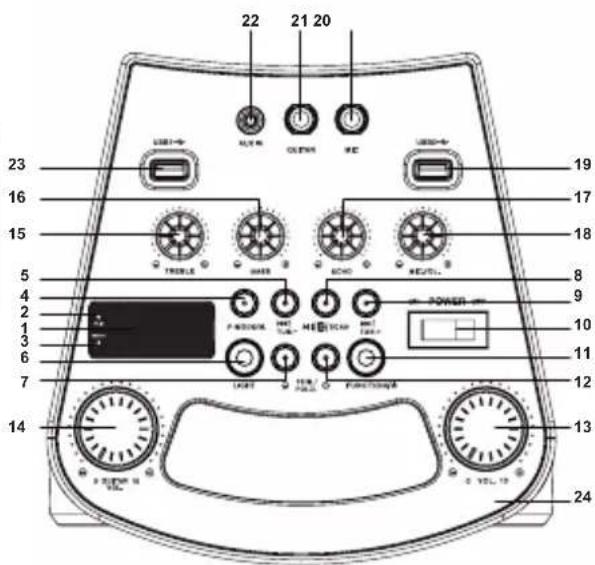
HSITON3
Top panel
- DISPLAY
- BLUETOOTH® INDICATOR (« PAIR »)
- CHARGING INDICATOR (« CHARGE »)
- P-MODE/MEM BUTTON
5./TUN.- BUTTON - LIGHT BUTTON
- FOLDER/10/M. - BUTTON
- PLAY/PAUSE/PAIR/SCAN BUTTON
- TUN.+ BUTTON
- POWER SWITCH
- FUNCTION/ BUTTON
- FOLDER/10/M. + BUTTON
- VOLUME KNOB
- GUITAR VOLUME KNOB
- TREBLE KNOB
- BASS KNOB
- MIC ECHO KNOB
- MIC VOLUME KNOB
- USB PORT 2
20.6.3MM MIC JACK
21.6.3MM GUITAR JACK - 3.5MM AUX IN JACK
- USB PORT 1
- HANDLE
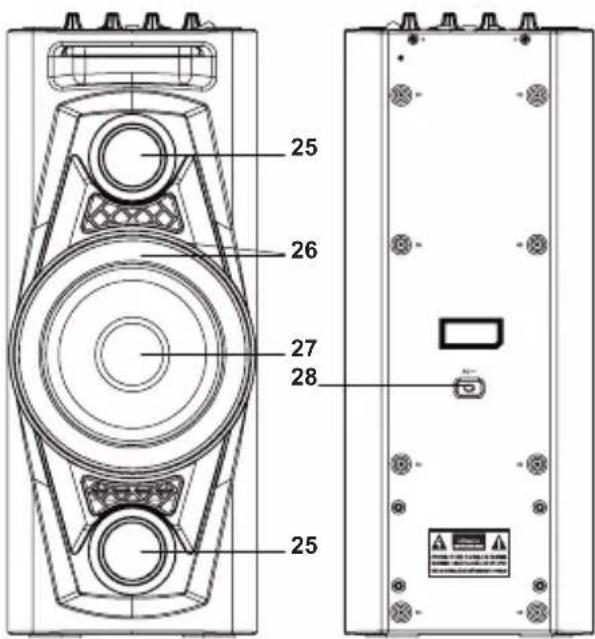
Front
- TWEETER
- FLASHING LIGHT
- SPEAKER
Back
- AC SOCKET
GENERAL FUNCTIONS
FUNCTIONS
The Bluetooth® Karaoke System features four functions: Radio, AUX IN, USB and Bluetooth®.
- Press FUNCTION button (11) successively to toggle between the four functions.
- Once selected, the function's name will appear on the display as follows: "AUX", "USB -1-, "USB -2", radio frequency or "bt" for Bluetooth®.
Note: The display also shows "no" when no USB is inserted.
AUX IN
- Press the FUNCTION button successively until "AUX" appears on the display.
- Connect your audio device to the speaker system via an AUX IN cable (not included).
- Rotate the volume knob (13) on the unit or use the buttons on your audio device to increase or decrease the music volume to your desired level.
- Control playback with your audio device.
- To stop the AUX IN function, press FUNCTION button.
Note: When receiving a call on your personal device, the music will stop and you will hear a signal tone from the speaker to inform you of an incoming call. Since the speaker does not feature a hands-free mode, please speak in your phone.

USB port 1 and 2
In USB mode, the Bluetooth® Karaoke System can read from the USB drive the following file types: MP3, WMA, WAV.
- Power on the unit and press the FUNCTION button successively until "USB -1- / "USB -2- appears on the display.
- Insert a USB Flash Drive (not included) into the USB port 1 (23) / port 2 (19), ensuring the plug is fully inserted in the correct way.
- The Bluetooth® speaker will automatically play music from the USB and "PLAY" will show on the display.
- Press button (8) to pause or resume the music. When pausing, the display shows "P" to indicate the music is pausing.
- Press shortly previous (5) or next button (9) to play the desired track. Or press and hold previous (5) or next (9) button to fast-rewind or fast-forward and release the button for playback.
- If the USB contains more than 10 tracks, press shortly FOLDER/10/M. + button or FOLDER/10/M. - button every time you wish to skip the next or previous 10 tracks. Then press previous or next button to select the desired track.
- If the USB contains more than one folder, press and hold FOLDER/10/M. + button or FOLDER/10/M. - button every time you wish to open a folder. Then press previous or next button to select the desired track.
- To exit the USB function, press FUNCTION button.
a) Repeat playback
On the USB function only, you can repeat one track or all tracks.
To repeat one track:
- During playback, press P-MODE/M. button (4) once, the display will show and the current track will be played over and over again.
- To cancel, press P-MODE/M. button successively until the icon disappears from the display.
HSITON
To repeat all tracks:
- During playback, press P-MODE/M. button twice, the display will show and all tracks from the USB will be played over and over again.
- To cancel, press P-MODE/M. button successively until the icon disappears from the display.
To repeat all tracks from one folder (only USB containing more than one folder):
- During playback, press P-MODE/M. button successively until the display shows "C FOLDER". The current folder will be played over and over again.
- To cancel, press P-MODE/M. button successively until " FOLDER" disappears from the display.
b) Random playback
- During playback, press the P-MODE/M. button successively until "RAND" shows on the display. Then the speaker will play randomly tracks from all folders starting from the next one playing.
- To cancel, press P-MODE/M. button successively until "RAND" disappears from the display.
RADIO OPERATION
You can also listen to the radio with the Bluetooth Karaoke System. To enter radio mode, press the FUNCTION button successively until the radio frequency appears on the display.
Store stations in the preset memory
a) Auto preset operation
- To scan the radio stations within the reception range and save them automatically in the preset memory, press and hold PLAY/PAUSE/PAIR/SCAN button.
- The unit will start scanning the FM tuner from 87.5 to 108.0.
- After scanning and saving the radio stations, the unit will automatically tune to the first radio station (P01).
b) Manual preset operation
Choose which stations to save in preset memory instead of scanning them automatically.
- Select the radio station you wish to save by using /TUN.+ (9) or /TUN.- button (5).
- Press P-MODE/M. button and "P01" will flash on the display to indicate the unit is saving it as preset station P01. To change the preset memory number, press FOLDER/10/M. + (12) or FOLDER/10/M. - (7) buttons.
- Press P-MODE/M. button to complete the preset operation.
- To save another station, repeat the 3 steps above.
Note: The unit can save up to 30 radio stations within the reception range.
Tuning
a) Manual tuning
- Press shortly /TUN.+ or /TUN.- button to choose the desired radio frequency.
- You can also press and hold /TUN.+ or /TUN.- button to search up a radio frequency.
b) Automatic tuning
- To tune the next preset station, press FOLDER/10/M. + button.
- To tune the previous preset station, press FOLDER/10/M. - button.
Previous/Next
In USB, AUX IN and Bluetooth® functions:
- Press shortly the button to get back to the previous track.
- Press shortly the button to listen to the next track.
Volume
Rotate the VOLUME knob to the right to increase (+) or to the left to decrease (-) the volume.
CAUTION: Too high volume can damage your hearing. For this reason, please turn the volume down.
Light
Press shortly the light button (7) to turn the light around the speaker on and off. When turned on, the light flashes in rhythm with the music or with the voice on the mic.
BLUETOOTH® SET UP
BLUETOOTH®
The Bluetooth® word mark and logos are registered trademarks owned by Bluetooth SIG, Inc. and any use of such marks by Lexibook® is under license. Other trademarks and trade names are those of their respective owners.
© 2016 Bluetooth SIG, Inc.
HSITON3
Your audio player must support the A2DP Bluetooth® profile to match this Bluetooth® Karaoke System. Please refer to your audio player's instruction manual for accurate information about the Bluetooth® profiles it supports, and how to set up Bluetooth® pairing.
- Turn the unit on, then press the FUNCTION button repeatedly until the screen displays "bt". The pair indicator will flash to indicate the unit is ready to be paired.
- Activate the Bluetooth® function on your personal device and make sure it is in discoverable mode.
- Confirm pairing or select the Bluetooth® name "K8100" to connect your player to the speaker. Input the password 0000 if required.
- If pairing is successful, you will hear a double signal tone, the Bluetooth® light will stop flashing and glow steadily. You can play an audio or a video file. Adjust the sound volume level using the keys on your personal device or the volume knob of the speaker.
- To disconnect the Bluetooth®, press and hold the PLAY/PAUSE/PAIR/SCAN button or disconnect the Bluetooth® function on your personal device.
Notes:
- If you exit the Bluetooth® function to choose another function on the unit and select it again later, the speaker will automatically reconnect with the device it has previously synchronized with.
- When turned on, the speaker automatically searches for a device that it has previously synchronized with.
- The Bluetooth® speaker only connects to one device at a time.
- Make sure the effective distance between the Bluetooth® device and the speaker is within 10m.
Notes: Some music players do not fully support Bluetooth® audio controls. Play/ pause, previous and next buttons on the Bluetooth® speaker may not respond.
The music player may also turn off.
To get the best control experience in the said player, use the on-screen track controls of your music player rather than those on the speaker.
KARAOKE AND INSTRUMENT SPEAKER SYSTEM
The Bluetooth® Karaoke System includes two 6.3mm jack inputs and both are compatible with microphone and instrument cable jack. Therefore you can connect as you wish two microphones, two instruments or one mic and one instrument to the speaker.
KARAOKE MODE
The Bluetooth® speaker includes a karaoke feature with microphone (included).
- Turn on the device and set up the function desired. The microphone works with all functions: Bluetooth®, AUX IN, radio and USB.
- Insert the microphone cable into the mic jack (20) and push the on/off button on the mic to « on » position to power it.
- Rotate the MIC VOL. knob (18) on the unit to increase (+) or decrease (-) the microphone volume.
Note: Do not bring the microphone too close to the speakers as it may cause audio feedback (squealing noise) through the speakers.
Microphone echo adjustment
Rotate the mic ECHO knob (17) on the unit to increase or decrease the microphone echo effect that best matches your style.
INSTRUMENT SPEAKER
The device also works as an instrument speaker. Follow the same steps as for the mic using the volume knob and jack specified for the guitar.
Treble/Bass adjustment
Rotate the TREBLE knob (15) / BASS knob (16) on unit to increase or decrease the treble/bass effect that best matches your music style.
TROUBLESHOOTING GUIDE
| SYMPTOM | SOLUTION |
| The Bluetooth® device and speaker are not pairing | Ensure the Bluetooth® speaker is charged and power switch is on. Ensure the Bluetooth® function on the Bluetooth® device is activated. |
| Pairing lost | Ensure that the Bluetooth® feature on the device has not been deactivated. It may be necessary to repeat the pairing steps again. Ensure the device is within 10 meters (32 feet) of the Bluetooth® Karaoke System. Ensure there are no obstacles. |
| No sound | Ensure the volume is not too low or on mute. Ensure the song is playing. Ensure the Bluetooth® device is correctly paired. Ensure it is on the desired function. |
SPECIFICATIONS
General
Power supply AC 100-240V 50/60Hz
Battery type Built-in rechargeable battery,
4000mAh/12V, Lead-acid
Unit output power 18W (RMS)
Bluetooth® effective distance 10 meters
AUX in jack 3.5mm audio jack
Microphone in jack 6.3mm microphone in jack
Guitar in jack 6.3 mm guitar jack
Bluetooth® profile Bluetooth 3.0
Operating temperature 0^ to +40^
Dimensions 202 x 201 x 490mm
Weight 4.9 kg
CONFORMITY DECLARATION
We, Lexibook® S.A.
Declare under our sole responsibility that the following product:

Kind of product: Bluetooth® Karaoke System
Type designation: K8100
Is in compliance with the following standards:
EN 55032:2012 + AC:2013
EN 55020:2007+A11:2011
EN 61000-3-2:2014
EN 61000-3-3:2013
EN301489-1V1.9.2
EN 301 489-17 V2.2.1
EN 300 328 V1.9.1
EN 62479:2010
EN 60065:2014
We hereby declare that the above mentioned product is in compliance with the R&TTE Directive (1999/5/EC) of the European Commission.

Yiu Wai Man
Product Development Manager
01/08/2016 (Hong Kong)
C €1797
MAINTENANCE
To prevent fire or shock hazard, disconnect your unit from the power source when cleaning. The finish on your unit may be cleaned with a dust cloth and cared for as other furniture. Use a soft, clean cloth moistened with plain, lukewarm water to clean the exterior of the unit. Use caution when cleaning and wiping the plastic parts. Mild soap and a damp cloth may be used on the front panel.
WARRANTY
This product is covered by our 2-year warranty.
For any claim under the warranty or after sale service, please contact your distributor and present a valid proof of purchase. Our warranty covers any manufacturing material and workmanship defect, with the exception of any deterioration arising from the non-observation of the instruction manual or from any careless action implemented on this item (such as dismantling, exposition to heat and humidity, etc.). It is recommended to keep the packaging for any further reference.
In a bid to keep improving our services, we could implement modification on the colours and the details of the product shown on the packaging.
NOTE: Please keep this instruction manual, it contains important information.

Reference: K8100
Designed and developed in Europe - Made in China
LEXIBOOK®
United Kingdom & Ireland
For after-sales service, please contact our teams: 0808 1003015
www.lexibook.com
Environmental Protection
Unwanted electrical appliances can be recycled and should not be discarded along with regular household waste! Please actively support the conservation of resources and help protect the environment by returning this appliance to a collection centre (if available).

This product is not a toy.
© 2016 Bluetooth SIG, Inc.
© 2016 Bluetooth SIG, Inc.
IM code: K8100_IM1316
YOUR OPINION MATTERS / VOTRE AVIS COMPTE
First name/Prenom
Address/Adresse:
Zip code/Code Postal :
Phone/Telephone:Email: