iGS630S - Counter iGPSport - Free user manual and instructions
Find the device manual for free iGS630S iGPSport in PDF.
| Product type | GPS bike computer |
| Brand | iGPSport |
| Model | iGS630S |
| Dimensions (approx.) | 80 x 50 x 20 mm |
| Weight | Approximately 70 g |
| Screen | Non-touch color screen |
| Power supply | Built-in rechargeable lithium battery, charging via USB port (DC 5 V) |
| Battery life | Up to 20 hours in normal use |
| Navigation system | GPS, GLONASS, Galileo, BeiDou (multi-GNSS) |
| Sensors | Barometer, accelerometer |
| Connectivity | Bluetooth, ANT+ |
| Main functions | Route and point navigation, activity recording, real-time metrics (speed, cadence, HR, power), structured training, segments, live tracking, smart notifications |
| Maintenance and cleaning | Clean with a soft, dry cloth. Do not use solvents. Keep the USB port and contacts clean. |
| Safety | Limited waterproofing (splash protection). Use only the original cable. Do not expose to extreme temperatures. |
| Spare parts and repairability | Battery not user-replaceable. Mounting bracket (base and rings) available from the manufacturer. Firmware updates via iGPSPORT APP. |
| General information | Country of origin: China. Manufacturer warranty: 1 year (depending on retailer). Manual available in multiple languages. |
Frequently Asked Questions - iGS630S iGPSport
User questions about iGS630S iGPSport
0 question about this device. Answer the ones you know or ask your own.
Ask a new question about this device
Download the instructions for your Counter in PDF format for free! Find your manual iGS630S - iGPSport and take your electronic device back in hand. On this page are published all the documents necessary for the use of your device. iGS630S by iGPSport.
USER MANUAL iGS630S iGPSport
PRODUCT INTRODUCTION 15
INITIAL SETUPS 15
CHARGING 17
BUTTON FEATURES 17
ICON DESCRIPTIONS 18
PAIRING YOUR SMARTPHONE 18
FIRMAWARE UPDATE 20
INSTALLATION OF STANDARD BIKE MOUNT 20
INSTALLING THE FRONT EXTENSION BRACKET 21
GOING FOR A RIDE 21
PRE-RIDING 21
WHILE-RIDING 22
POST-RIDING 24
CYCLING MODE 26
ENABLING MODES 26
PAGE SETTING 26
AUTO FUNCTIONS 27
ALERTS SETTING 27
DELETE MODES 28
ADD MODES 28
NAVIGATION 28
FOLLOWING A COURSE 28
FOLLOW A SAVED ACTIVITY 29
NAVIGATE BY LOCATION POINT 29
NAVIGATION OPTIONS 29
WORKOUTS 30
FOLLOWING A WORKOUT COURSE 30
WARNING 31
PAUSE/STOP A WORKOUT COURSE 31
TRAINER TRAINING 31
STAGE 32
RELEASESTAGE 33
STAGE SETTING 33
SAGE USE 33
HISTORY 34
ALL ACTIVITIES 34
HISTORICAL DATA 34
STATUS PAGE 35
SENSORS 35
LAMP MODE 35
WEATHER 35
SMART NOTIFICATIONS 36
SETTINGSS 36
SENSORS 36
PAIRPHONE 38
THEME. 38
POWER MANAGEMENT 39
SYSTEM SETTING 40
iGPSPORT APP 43
USER PROFILE 43
TRAINING DATA 43
CYCLING COMPUTER SETTINGS 43
ACTIVITY SHARING 44
COMMON WHEEL SIZE SETTING 44
CYCLING COMPUTER SETTINGS 46
Espanol 48
PRODUCT INTRODUCTION
INITIAL SETUPS
Hold and press 4 seconds to open the device.
After the first opening, press to select the options, and then press confirm. Use / to change the value and press confirm. If you want return and change your setting, please press go back to the page you need to change.
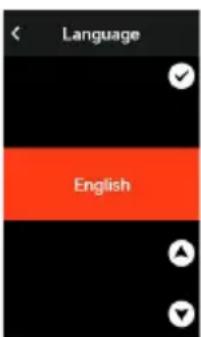
- Select a language: press to select your language; press save and view the next setting.
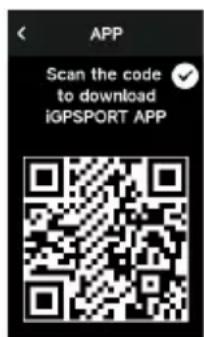
- Smartphone pairing notification: use your smartphone to download the iGPSPORT APP and pair your smartphone with the device in this APP.
Press to view the next setting, to be previous.
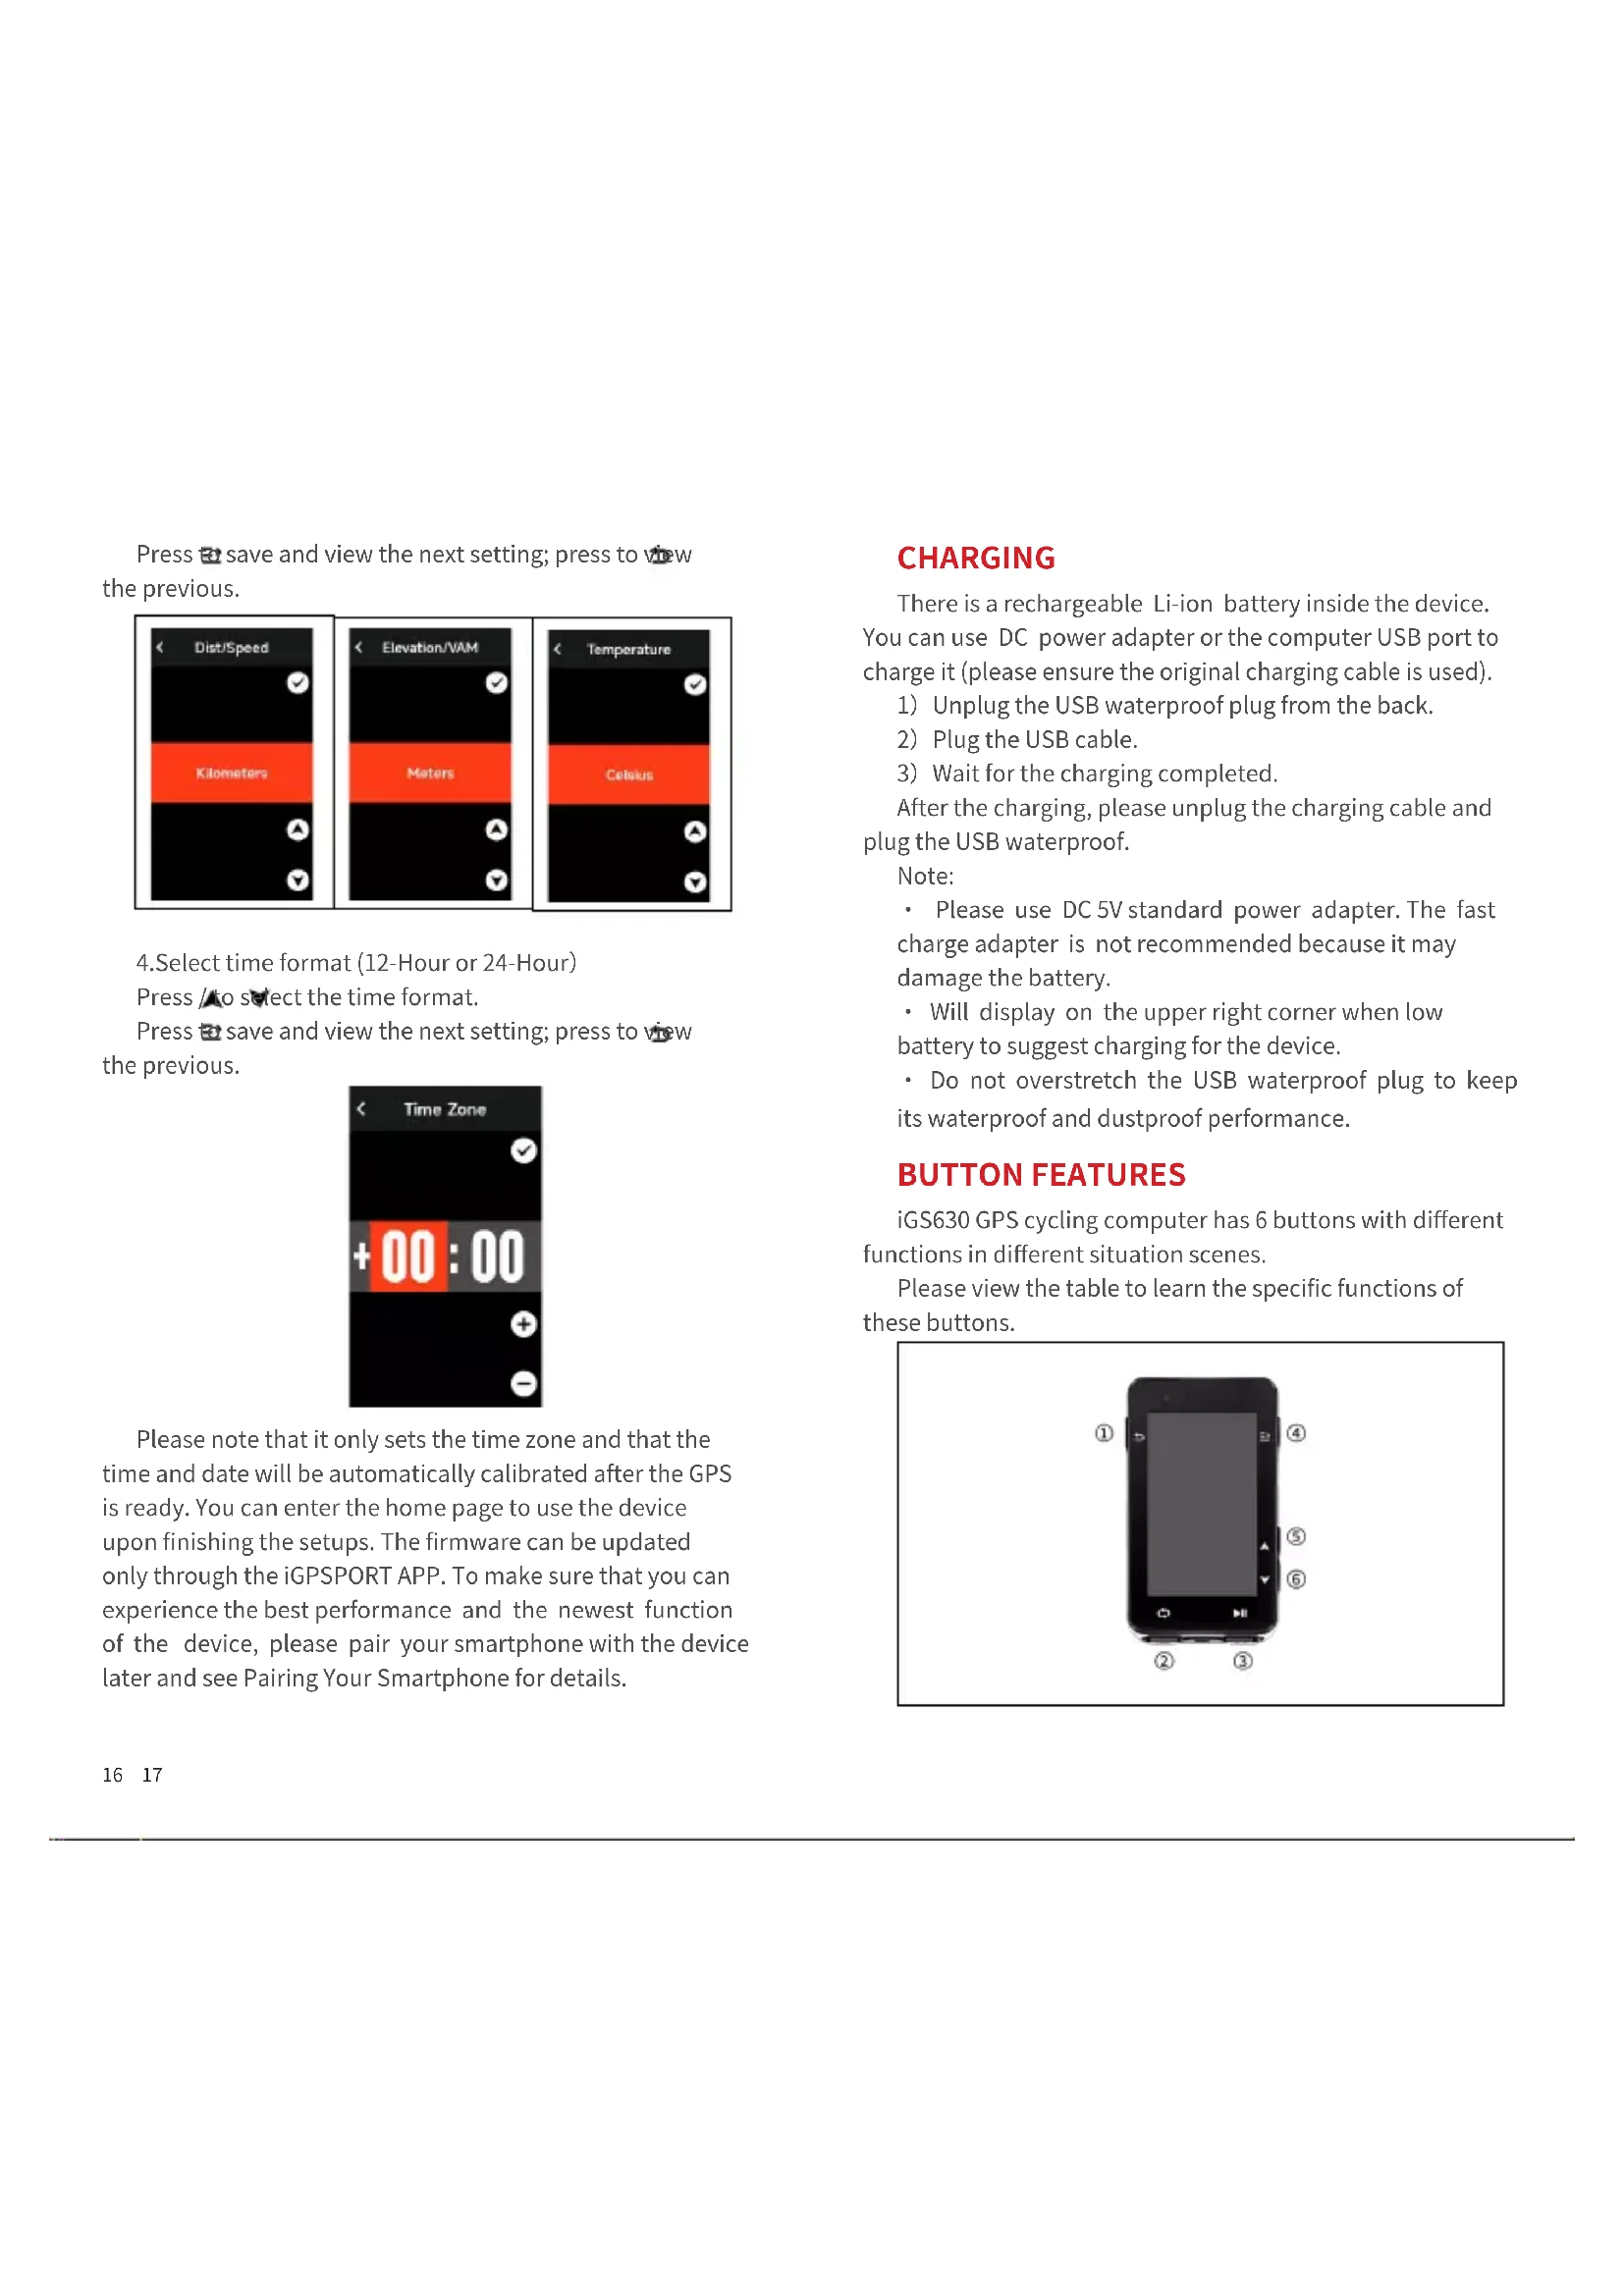
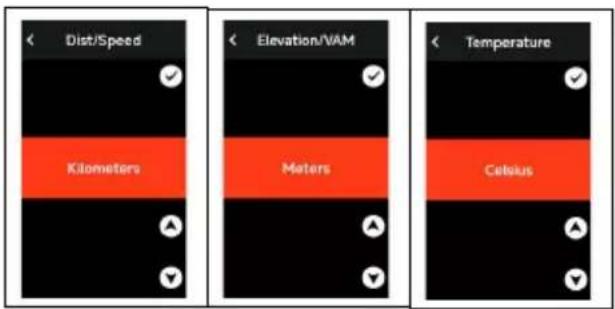
- Select metric/imperial: press to select units for speed/distance, elevation or temperature.
Press save and view the next setting; press to view the previous.
- Select time format (12-Hour or 24-Hour)
Press to select the time format.
Press save and view the next setting; press to view the previous.
Please note that it only sets the time zone and that the time and date will be automatically calibrated after the GPS is ready. You can enter the home page to use the device upon finishing the setups. The firmware can be updated only through the iGPSPORT APP. To make sure that you can experience the best performance and the newest function of the device, please pair your smartphone with the device later and see Pairing Your Smartphone for details.
CHARGING
There is a rechargeable Li-ion battery inside the device. You can use DC power adapter or the computer USB port to charge it (please ensure the original charging cable is used).
1) Unplug the USB waterproof plug from the back.
2) Plug the USB cable.
3) Wait for the charging completed.
After the charging, please unplug the charging cable and plug the USB waterproof.
Note:
- Please use DC 5V standard power adapter. The fast charge adapter is not recommended because it may damage the battery.
- Will display on the upper right corner when low battery to suggest charging for the device.
- Do not overstretch the USB waterproof plug to keep its waterproof and dustproof performance.
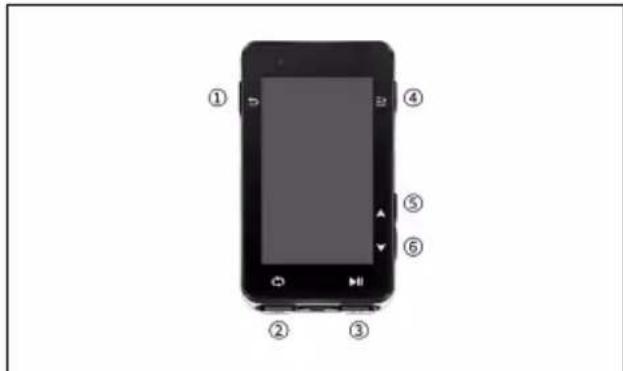
BUTTON FEATURES
iGS630 GPS cycling computer has 6 buttons with different functions in different situation scenes.
Please view the table to learn the specific functions of these buttons.
| Button Function | |
| ① | Power Button-short press for Power On/long press for Power Off; Shortcut key for Status page; Back key |
| ② | Lap |
| ③ | Shortcut key for Riding page; Activity Start/Pause |
| ④ | Confirm key; Shortcut key for Menu page |
| ⑤ | Upward |
| ⑥ | Downward |
ICON DESCRIPTIONS
| Weak Signal | Medium Signal | Strong Signal | No Signal Battery | |
| II | X | |||
| Start Recording | Recording | Stop Recording | Bluetooth Disconnected | Bluetooth Connected |
| 11 | ||||
| Upload Data | Speed Sensor | Cadence Sensor | Speed and Cadence Sensor | Heart Rate Sensor |
| Power Meter | Trainer Radar | Electronic shifter | Di2 | |
| N | Q3 | |||
| E-bike lamp | ||||
PAIRING YOUR SMARTPHONE
Pairing smartphone helps you use the bike computer more conveniently. You can have richer experiences of its functions on the iGPSPORT APP, including Activity Auto Sync, Cycling Computer Configuration, Alerts, Sensors Management,
Tracking, Firmware Update and so on.
Please note, you must follow the prompts to pair your smartphone in iGPSPORT APP, not in Bluetooth setting of your smartphone. Please make sure that your smartphone is connected to the network and the Bluetooth is turned on.
Download the iGPSPORT APP from AppStore or Google Play.
Android User: Make sure to enable location permission for iGPSPORT APP in phone's APP settings.
First Pairing
1) Open the iGPSPORT APP in your smartphone and login with your iGPSPORT account.
2) 1. Place the cycling computer nearby your smartphone, enter My Status on the home page in the APP or Device Management in the device. Click Add Device, select cycling computers and then your smartphone will automatically search for iGS630S. Select it and click Connect, and the pairing will start.
3) When Bluetooth pairing Request prompts on your device, click Pair to accept the request.
4) After the successful pairing, the cycling computer will be displayed in the device list.
5) After the successful pairing, the prompt of device setting on your smartphone will show up in the iGPSPORT APP. Finish your settings and click Save and Sync, and then the settings will be synced to the device.
If the pairing succeeds, the device and the smartphone will automatically be connected via Bluetooth; if fails, you can try to restart the smartphone Bluetooth, the iGPSPORT APP or the cycling computer for pairing again.
Remove Pairing
If you want pair your cycling computer with another smartphone, please remove the current pairing first:
1) Go to Setting > Pair Phone to view the paired device list.
2) Select the device you want to delete, click Unpair and press to confirm.
3) When deletion completed, the Bluetooth Disconnected icon will display on the device.
Note:
Do not Pair and Unpair frequently.
FIRMWARE UPDATE
To keep the device's best performance, please update its firmware timely when a new version is available. Firmware update can improve the user experience, including new functions, the improvement of existing functions or error repair. No data will be lost due to the firmware update.
Note:
- Before the update, please make sure that the activity data hasynced to iGPSPORT account to avoid data loss. At the same time, ensure that the computer is fully charged, and the bluetooth and data network are stable.
- Go to the iGPSPORT APP > Device > Firmware Update. You can check if there is a new version available and guidance on how to update.
- The time needed depends on the strength of Bluetooth signal. It takes up to 20 minutes, please wait patiently.
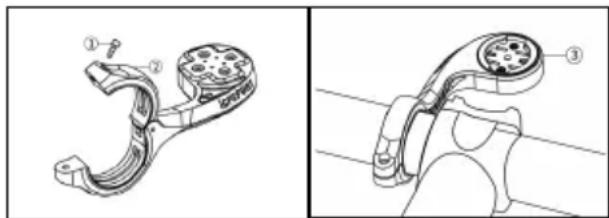
INSTALLATION OF STANDARD BIKE MOUNT
Use the included rubber bands to attach the standard bike mount to the bike stem.
1) Place the rubber disk on the back of the standard bike mount.
2) Select a suitable position on the bike stem to place the rubber disk and the standard bike mount.
3) Use two rubber bands to bypass the bike stem respectively, hook the buckle of the bike mount and fix it on the bike stem.
4) Align the tabs on the back of the device with the
standard bike mount notches.
5) Place the cycling computer on the base and rotate it 90 degrees.
INSTALLING THE FRONT EXTENSION BRACKET
1) Choose an appropriate mounting position on the handlebar to avoid compromising riding safety.
2)Use a hex wrench to remove the screw ① from the handlebar connector ②
3) Wrap the handlebar with the rubber buffer and tighten the screws (regularly check the tightness of the screws to ensure safe use).
4) Align the base of the code counter with the mounting slot (3) of the extension bracket and turn 90^ clockwise until the device locks.
Note:
- You can also use the out-front bike mount (iGPSPORT M80) to install cycling computer.
- It is recommended that you use the official standard bike mount or out-front bike mount of iGPSPORT to avoid damaging the buckle of cycling computer.
GOING FOR A RIDE
PRE-RIDING
To ensure the accurate riding data, you need to wait for the device to detect the GPS signal before riding.
If the GPS signal is needed, please go outside and keep
away from tall buildings and trees. Keep the device still and the screen up, and avoid touching it when searching for GPS signal.
If the sensor has been connected to the device before, it will automatically connect to the device once waken up, and the device will also automatically search for the sensor. During your riding, the device will automatically measure your heart rate, cadence and power and other data by using your sensors.
When the satellites for locating is four (minimum), the GPS icon shows, and you can start riding at this time. For more accurate data, please wait until shows GPS icon becomes when enough satellites are found to ensure good GPS Gaccuracy.
After all signals are detected, press enter the cycling data page.
Press start recording an activity on riding data page.
Press to start a new lap record, and the lap data will display for 10 seconds.
Press to exit the popup of the lap data.
During the riding data timing, press stop the timer.
Press to view the menu, select "Save" and press again to save the recording.
After the successful save, the Riding Data Summary will display.
Press to select and view the riding data summary.
Press do close the lap data popup.
WHILE-RIDING
Scan Data View
During the training, you can use a to switch riding view. Please note, the displayable riding data view and information depend on the selected cycling mode and your modification to the selected mode.
You can set up specific pages for different cycling modes on the device and in the iGPSPORT APP. You can create custom data fields for each activity mode and select the data you want to see during the riding.
For more information, please see the activity content in Cycling Mode.
Status Page View
During the riding, you can press to view the Status page. The information will display on Status page, including sensors, weather and smart notifications.
Shortcut Menu
During the riding, you can press to open the menu and you can access the functions such as page template, data fields and elevation calibration from it.
Data Field Setting
Jump to template and fields selection setting of the current page. See Cycling Mode > Page Setting, for details.
Cycling Mode Settings
Jump to current cycling mode page to quickly set up for it. See Cycling Mode for details.
Elevation Calibration
Jump to Elevation Setting to set up the current elevation.
About Elevation: the built-in barometer covers the calculation of elevation, ascent and descent. The barometer can measure the elevation by converting the measured air pressure into elevation reading. Ascent and descent are displayed in meters/feet.
In the first several minutes of the riding, the air pressure will be calibrated automatically via GPS. When riding starts, the elevation calibration is only based on the barometer, but the air pressure may not be accurate in some conditions. Elevation will be corrected after calibration, so any inaccurate reading before riding will be corrected automatically later. After the riding finished and the data is
synced, the corrected data can be viewed in the APP.
For most accurate elevation reading, it is recommended to manually calibrate the elevation with reliable references (for example, peaks or topographic map) or at sea level.
Note:
- Mud or dirt on the device may cause inaccurate elevation readings. Be sure to keep the device clean to ensure that the elevation measurement function of the barometer can work normally.
Lap
Pressing can manually lap. You can enable the Auto Lap function in Device Setting of the iGPSPORT APP and set lap by distance, position or time. If by distance, you should set the distance for each lap. After riding this distance, it will be automatically counted as one lap. If by position, the starting point of recording is taken as the mark point, and it will be automatically counted as one lap when you reach it again. If by time, it records the time according to the specified time period. It will be automatically counted as one lap when it reach that period again.
Pause/Stop
- Press pause recording.
- Press to continue.
- Press stop recording. Select Save on the popup to stop the activity. After saving the activity, you can immediately get the activity details on the device.
POST-RIDING
Activity Summary
After finishing the activity, you can immediately get the activity details on the device. More detailed data and schematic analysis can be obtained in the iGPSPORT APP or its official website.
The information in activity summary depends on the data collected during the activity.
On the home page, press to select History and press to view the recent activity list and its summary. You can view the historical activity summary saved on the device. Press to select the activity you want to view and press to open its summary.
View Cycling Data in the iGPSPORT APP
If your smartphone is within the Bluetooth range when the riding finished, the device will automatically be connected to and sync with the iGPSPORT APP (the auto sync function needs to be enabled in the APP). In the APP, you can quickly analyze every detail in the activity record using the iGPSPORT website to learn your performance better and track progress towards your monthly training target, and you can share your personal best with others.
For more details, please see the iGPSPORT APP.
CYCLING MODE
Cycling mode refers to the cycling ways you can select on the device. There are four default cycling modes on the device. You can create and set new modes according to your needs.
You can make some specific settings for each cycling mode. For example, you can set custom data page template for each cycling mode and select the data you want to view (heart rate only or speed and distance only) and the options that meet your training needs and requirements best.
The device can save 8 kinds of cycling modes at most.
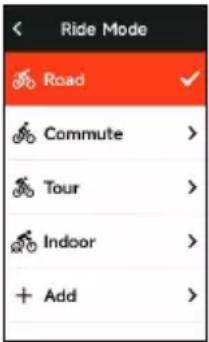
Select Cycling Mode on the home page, and press view the options.
Select a mode and press view its options.
ENABLING MODES
Select Enable and press enable this mode.
PAGE SETTING
Select"Page Selection" and press to enter the page list. There are five system's built-in data pages, maps, altimeters and some specific pages.
- Select "Show Screen" and press show/hide it.
Press to exit.
- Select "Data Fields Setting" and press to view page templates. Press to switch and get a live preview.
Press to cancel and exit.
Switch to the needed page and press save and set data fields. Press exit and save the template.
When setting data fields, press to select one to modify. Press to view its details. Press / to select a data field, press save, and press to exit
- Reordering, it supports reordering the page in Page Setting Select "Up" and press and then this page will move up one place.
Select "Down" and press and then this page will move down one place.
- It supports auto return to home page. Select "Home Page" in the page setting of the selected page, and press set it as the home page. When cycling, if the auto return is enabled, it will automatically return to home page after viewing other pages.
AUTO FUNCTIONS
Select "Auto Functions" and press View its options.
Select an auto function and press to open and set the threshold values.
Press to select the value and press to save and exit.
ALERTS SETTING
Select "Alerts" and press View its options.
Select an alert and press to view and set the value.
Press to select the value and press to save and exit.
DELETE MODES
Select "Delete" and press delete it.
Notice: Only applicable to Add Riding Mode.
ADD MODES
Select "Add New" and press to create a new mode.
Select an existing mode as the template, and customize and change the template into a new mode.
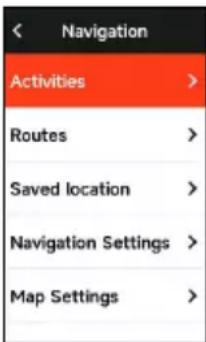
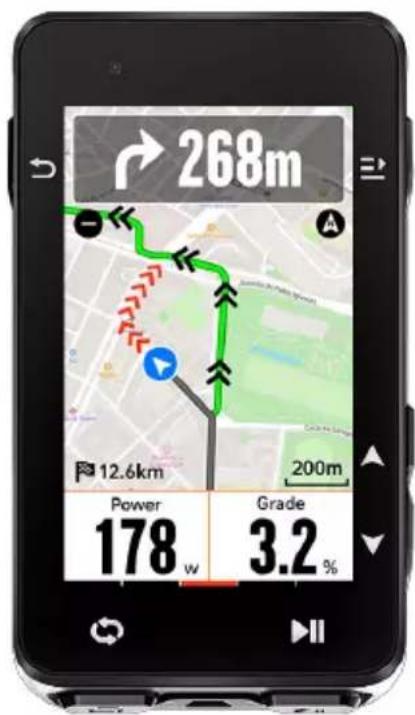
NAVIGATION
Once the navigation function of iGS630 is enabled, the device will always guide you and you just need to follow the instructions on the screen.
You can plan your route in the iGPSPORT APP and send it to the device. The files in GPX format can be directly imported into the iGPSPORT APP as the navigation route. Press to select "Navigation" on the home page, and press to view its options.
FOLLOWING A COURSE
The courses sent from the iGPSPORT APP can be viewed in navigation routes.
Select "Navigation Routes" and press View its options.
Press to select a course, press to view its options and press again to start the navigation.
After selecting a course, the device will display the map page, including the course overview and elevation profiles.
FOLLOW A SAVED ACTIVITY
Select "Activities" and press to view its options. To press to select an activity, and press to start the navigation.
Select "Saved positions", press the key to display the saved positions. Tap / to select a location, tap to view location details on the map, then tap to start offline navigation planning with location as end point and current location as point departure.
NAVIGATION OPTIONS
During the cycling, you can perform other operations, for example:
- Zoom in or out the map: press on the map page can zoom in or out the map.
- Back to the starting point: press to view the menu options, press to select "Back to the
Starting Point" and press to navigate along the route you came to to the starting point of the recording. The returning route function is very useful when you want to choose a safe and familiar route to return to the starting point.
Stop the Route: or select "Stop the Route" and press to stop the route to navigation.
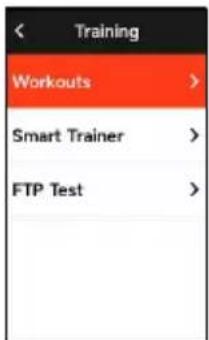
WORKOUTS
Press to select "Workouts", and press to view its options.
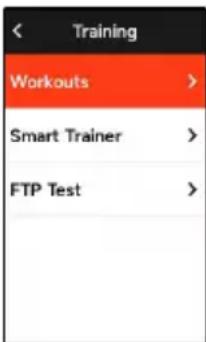
You can create a workout course based on heart rate, power, time, distance or calories in the iGPSPORT APP or import courses from the Training Peaks APP (need to be associated with Training Peak account), and send these workouts to the devic.
FOLLOWING A WORKOUT COURSE
Download a workout course from the iGPSPORT APP.
Press to select a workout course, press to view its options and press to view its options and press the button to view the preview details of each step of the training course, and finally press the button to start the training course.
After you follow a workout course, the Workout page will be displayed on the last page of cycling data.
Press start a workout course and the activity timer. Press on the Workout page to stop the current workout step and enter the next one.
Press view the menu, select "Stop Workout" and press stop it. The workout page will be hidden 3 seconds later.
After the activity is saved or discarded, the workout will also stop.
WARNING
If you are training beyond the heart rate or power zone you set, the device will notify you through with a warning.
PAUSE/STOP A WORKOUT COURSE
- Press to pause your workout course.
- Press again to continue.
- Press view the menu, select "Stop Workout
Course" and press stop it. The workout page will be hidden 3 seconds later.
After the activity is saved or discarded, the workout will also stop. After saving the workout, you can immediately get the workout summary on the device.
TRAINER TRAINING
Setting Resistance
Select "Trainer Mode" and press View its options.
If the smart Trainer is not connected, you can press to view the sensor options. Wake up the smart Trainer and connect to the device.
Select Level and press view its options.
Press the main menu.
Press start or stop the activity timer.
Press view the menu, and select "Save" to save the activity.
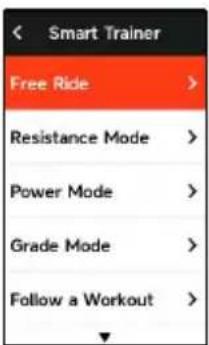
Setting Target Power
Select "Target Power" and press view the page of power setting.
The resistance will be adjusted according to your speed to maintain a constant power.
Press to set the target power.
Press start or stop the activity timer.
Press E view the menu, and select "Save" to save the activity.
According to a Course
Select "Course", and press View the saved activities.
Press to select an activity, and press to view the riding page.
TheTrainer will in crease or decrease the resistance according to elevation of the courseor activity.
Press start or stop the activity timer.
Press to view the menu, and select "Save" to save the activity.
STAGE
The stage function added by iGS630S provides a way for cyclists and sports enthusiasts to challenge themselves.
Through split timing, users can train more targetedly, improve their performance on specific road sections or areas, and compete with themselves or Compare the historical performance of others to achieve the goal of continuous improvement.
RELEASE STAGE
The race segment needs to be sent to the stop watch from the iGPSPORT APP.
After the computer is connected to the iGPSPORT APP, select "Segment" on the "My" page to select a segment for distribution.
STAGE SETTING
In the stage setting, you can turn on/off the detection function of the stage, select the challenge goal of the stage, and synchronize the latest information of the stage with the APP.
SAGE USE
After the segment is set to enable/disable the segment detection, the segment page will be opened after passing the segment route in the riding record activity, and the stopwatch will display the information of the segment completion after the segment is completed.
HISTORY
History refers to the cycling activities you save on the device. You can view the information of these activities, including time, distance, calories, average speed, laps and sensors.
Note:
the older history will be covered if the storage space is insufficient.
Press on the home page to select "History" and press to view it.

ALL ACTIVITIES
Go to History > All Activities and press view its options.
Press to select an activity. Press to view its options and press again to view the details.
Press once again to view laps and charts, or to delete the activity.
Press to exit.
HISTORICAL DATA
Go to History > Historical and press View the
odometer, total time and total ascent and maximum speed of all activities.
STATUS PAGE
Press view its options.GPS, battery and the connection status between sensors and the smartphone will be displayed on the Status Page.
SENSORS
Select Sensors and press view its options.
Wake up sensors nearby the device.
Press to view the options of adding sensors. The device will display all the sensors searched.
Press select a sensor and press to connect and save the sensor.
LAMP MODE
You can view the lighting modes of the connected lamps on your device and press the button to quickly change the lighting mode.
WEATHER
On the device, you can view the weather information synced by the iGPSPORT APP. Press on Status Page to select "Weather". Press to view the details and update the information according to the prompts.
After the weather information is updated, temperature, chance of rain, wind velocity and wind direction will be displayed.
Press to exit the page of weather details, and press again to exit the Status Page.
To enable this function, the iGPSPORT APP needs to be installed on your smartphone to connect to the device, and the location services (iOS) or location setting (Android) needs to be turned on.
SMART NOTIFICATIONS
You can view the calls and messages notifications on the device from the device, and you can set up options of smart notifications through the iGPSPORT APP.
The notifications of calls and messages and from Apps you received on the device are synchronized in real time with those on your smartphone.
When receiving a notification, the device will notify you with a popup at the bottom of the screen.
When a call comes in, the device will display the caller.
The smartphone notification is applicable to iOS and Android. To enable this function, the iGPSPORT APP needs to be installed on your smartphone to connect to the device. For more details, please see Pairing Your Smartphone.
Please note, if the smartphone notification is enabled, the battery consumption of the device and smartphone will be faster because Bluetooth is continuously turned on.
SETTINGS
Press the home page to view its options.
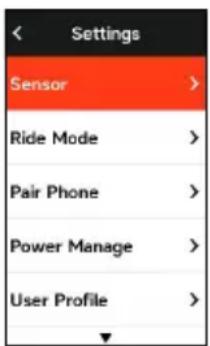
SENSORS
iGS630 can pair with sensors supporting ANT+ and Bluetooth Protocol, including heart rate monitors, cadence sensors, speed sensors, power meters, smart Trainers and
shifting. The specific third-party sensors that are compatible with the device subject to the actual connection status.
Sensors Pairing
Be sure that the sensor (heart rate monitor, cadence sensor, speed sensor or third-party power meter) has been installed correctly before the pairing. For more information about the installation, please see its User Manual. It is recommended that the ID of each sender should be checked to find the right one in the list.
1) Go to Setting > Sensor > Add a Sensor, and press Confirm on the device. Search for all sensors, possible search for different types of sensors.
2) The device searches for sensors.
- Cadence sensor: rotate the crank arms to wake up the sensor. A flashing red light indicates that the sensor is enabled.
- Speed sensor: rotate the wheel to wake up the sensor. A flashing red light indicates that the sensor is enabled.
Third-party power meter: rotate the crank arms to wake up the sender.
3) When the sensor is found, the model number and ID will be displayed. Select the sensor to connect and press to start pairing.
4) After the successful pairing, the sensor will be in the sensor list.
Note:
Please make sure that the sensor is waken up before pairing. The sensor will automatically connect to the device if it has been successfully paired with it.
Sensors Setting
The sensor needs to be set to ensure its correct use and accurate measurement of the sensor. The setting method is as follows: select a connected sensor, press to open the menu and select the data to set.
-
Wheel Size: if you want to pair with a speed sensor, you need set the wheel size. Select the speed sensor, press Confirm and select wheel diameter to set the wheel size. The setting method can refers to the Appendix Common Wheel Diameter Parameters.
-
Crank Length: set crank length in millimeters.
- Power Meter Calibration: first, rotate the crank arms to wake up the sensor; second, select "Power Calibration" in the menu; third, calibrate the power meter following the instructions on the screen.
Sensors Removing
Select a saved sensor, press view its options. Select Forget to remove this sensor.
PAIRPHONE
Connect the device to a Bluetooth. Once connected, you can use the Bluetooth connection features, including uploading activities to iGPSPORT APP, smart notifications, security and tracking, and more.
For a paired device, you can select "Unpair" here, press to unbind it from the mobile phone, and the device will restart after the unbind is successful.
THEME
The device supports multiple theme colors. You can select a theme according to your need.
Select "Theme" and press theme selection.
Select "Desktop Style" and press to select a one you like.
Select "Theme Color" and press to select a one you like.
Select "Dark Mode" and press View its options.
Select a mode and press save and exit.
Select "Component Settings", and press the button to view the display status of desktop components. Press the button to turn on/off the component display status.
POWER MANAGEMENT
Battery Save Mode can prolong the usage time of the battery, but lower and accuracy of the activity data.
If the Battery Save Mode is enabled, the device will change the recording frequency of GPS locations and data from sensors to extend the usage time. These settings can improve the usage rate of battery and obtain more time when in long tour or low battery.
GPS in Battery Save Mode will record locations and data from sensors with a lower frequency. Note: when the activity timer is working, the history recording is in Battery Save Mode.
Battery Save Mode
Select "Power Manage" and press View its options.
- Go to Settings > Power Manage > Battery Save Mode > On.
- Select wake up the screen when warning during the activity.
Note:You should close the Battery Save Mode and charge the device to get a better experience.
Auto Sleep
- Go to Setting > Battery Save > Auto Sleep. Press enable/disable this function.
Auto Power Off
- Go to Settings > Battery Save Setting > Auto Power Off, and press enable/disable this function.
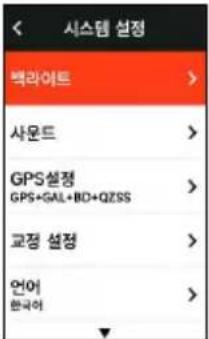
SYSTEM SETTING
Select "System Setting" and press to view its options.
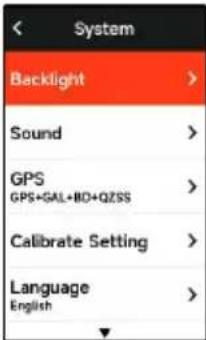
Language
The device supports multiple languages. You can select a language according to your need.
Select "Language" and press to view its options.
Press to select a language and press to save and exit.
Backlight
Select "Backlight" and press view its options.
Select Backlight>Brightness>Auto and press turn on/off.
If auto backlight is turned on, the device will automatically adjust the backlight and colors according to light brightness.
Select "Mode" and press dark mode.
Select a mode and press save and exit.
Select "Backlight Time" and press to view its options.
Select a time and press save and exit.
Select "Brightness" and press View its options.
Select a brightness and press save and exit.
GPS Mode
The bike computer is integrated with GPS, which provides
speed, distance and altitude for outdoor cycling activity. In addition to GPS, it is possible to change the satellite navigation system used by the computer.
- Select Settings> System Settings> GPS Settings and pres button to enter GPS mode selection menu. You can choose Precision, Balanced, Power Saving, Smart Switching, Custom and other modes, the default mode is Smart Switching.
- Select a GPS mode and press the button to activate the mode.
Sounds
Select "Key Tones" and press Open/close it.
Time
Select "Time" and press View its options.
Select "Time Format" and press View its options.
Press to select a time format (24-Hour/12-Hour) and press to save and exit.
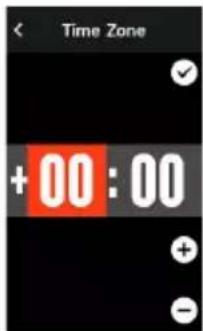
Select "Time Zone" and press View its options.
Press to select the former part of the time zone, and press to save and exit.
Press to select the latter part of the time zone and press to save and exit.
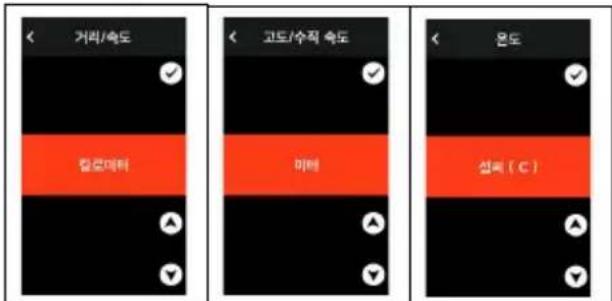
Units
You can customize units for distance/speed, elevation, temperature, time format and date format.
Select "Distance" and press to view its options.
Press to select a unit for distance and press to save and exit.
Select "Elevation/VAM" and press to view its options.
Press to select a unit for elevation and press to save and exit.
Select "Temperature" and press view its options.
Press to select a unit for temperature and press to save and exit.
Reset
Select "Reset" and press to view its options.
Selecting "Reset" will restore to the default values and activity profiles, but history will not be deleted.
Selecting "Deleting All" will restore to the default values and activity profiles, and history will be deleted.
Note:
Deleting all will restore to the default values, unpair the Bluetooth, clear all data and odometer. Therefore it is suggested that you should turn on the auto sync in the iGPSPORT APP (Device > Auto Sync) to save your personal data.
Device Setting
If you have problems when using the device, you can try to restart it. Restarting will not delete any settings or personal data on it.
Long press to turn off the device, and press again will restart it.
ABOUT THE DEVICE
Select About and press view its options.
You can view device information, such as serial number, software version, and copyright notice.
CYCLING DATA EXPORT
Turn off the computer and connect the computer's USB port to the computer's USB port using a USB data cable. Open hard disk> iGPSPORT folder> Activities folder. Copy and export the Fit file in the Activities folder.
iGPSPORT APP
In the iGPSPORT APP, you can manage the device, view real-time visual interpretation of activity data, plan training and navigation routes, and communicate with other riders.
USER PROFILE
It is very important to set your physique precisely, especially your weight, height, date of birth, and gender, because these factors affect the accuracy of measurement values, such as heart rate limits and calorie consumption.
You can set weight, height, date of birth, gender, monthly training targets, maximum heart rate, resting heart rate, FTP and other information in the User Profile.
If you know the current maximum heart rate value, please set it. When you set this value for the first time, the maximum heart rate value (220-age) predicted by age will be displayed as the default setting.
TRAINING DATA
In the iGPSPORT APP, you can easily access past and planned cycling activity data, establish new training targets, get a quick overview of cycling activities, analyze detailed summary data, chart records, and various detailed data of your performance in real time. You can view your cycling activity records and statistical analysis of data during the activity, and also make statistics of your activity data in different time periods.
CYCLING COMPUTER SETTINGS
It is convenient for you to set various functions on the device through the iGPSPORT APP, including adding, editing and enabling the data page view, and setting auto options and alerts. For more information, please see Activity Content in the iGPSPORT APP.
ACTIVITY SHARING
With the image sharing function of the iGPSPORT, you can share images and training data on the most commonly used social media such as Facebook and Instagram. You can share an existing photo, or you can take a new photo and customize it with your training data. If you have a GPS record during the training, you can also share a snapshot of the training route.
COMMON WHEEL SIZE SETTING
Setting wheel size is a prerequisite for correctly displaying of cycling information. There are two ways to determine the wheel size of a bicycle:
Way 1:
Manually measure the wheels to get the most accurate results.
Mark the air faucet as the point where the wheel touches the ground. Draw a line on the ground to mark that point. The bicycle moves forward a full circle on a flat surface. The tires should be perpendicular to the ground. Draw another line on the ground at the air faucet to mark a complete rotation of the wheel. Measure the distance between the two lines.
Subtract 4mm to calculate the weight on the bicycle to get the circumference of the wheel.
Way 2
Look at the diameter (in inches or ETRTO) printed on the wheel. Match it to the wheel size in millimeters in the right column of the chart.
You can check on the Internet and calculate the size that is not included in this list.
Common Wheel Diameter Parameters
| Wheel Size Length (mm) Wheel Size Length (mm) |
| 12×1.75 935 26×1.25 1953 |
| 14×1.5 1020 26×1-1/8 1970 |
| 14×1.75 1055 26×1-3/8 2068 |
| 16×1.5 1185 26×1-1/2 2100 |
| 16×1.75 1195 26×1.40 2005 |
| 18×1.5 1340 26×1.50 2010 |
| 18×1.75 1350 26×1.75 2023 |
| 20×1.75 1515 26×1.95 2050 |
| 20×1-3/8 1615 26×2.00 2055 |
| 22×1-3/8 1770 26×2.10 2068 |
| 20×1-1/2 1785 26×2.125 2070 |
| 24×1 1753 26×2 35 2083 |
| 24×3/4Tubular 1785 26×3.00 2170 |
| 24×1-1/8 1795 26×1 2145 |
| 24×1-1/4 1905 27×1-1/8 2155 |
| 24×1.75 1890 26×1-1/4 2161 |
| 24×2.00 1925 26×1-3/8 2169 |
| 24×2.125 1965 29×2.1 2288 |
| 26×7/8 1920 29×2.2 2298 |
| 26×1(59) 1913 29×2.3 2326 |
| 26×1(65) 1952 650×35A 2090 |
| 650×38A 2125 700×28C 2136 |
| 650×38B 2105 700×30C 2170 |
| 700×18C 2070 700×32C 2155 |
| 700×19C 2080 700CTubular 2130 |
| 700×20C 2086 700×35C 2168 |
| 700×23C 2096 700×38C 2180 |
| Wheel Size Length (mm) | Wheel Size Length (mm) |
| 700×25C 2105 700×40C 2200 |
CYCLING COMPUTER SETTINGS
| Classification | ata Content |
| Speed | Speed, Avg Speed, Max Speed, Lap Speed, Pre Lap Spd, Lap Max Spd; |
| Cadence | Cadence, Avg Cad, Max Cad, Lap Cad, Pre Lap Cad, Lap Max Cad; |
| Heart Rate | Heart Rate, Avg HR, Max HR, Lap HR, Pre Lap HR, Lap Max HR, HR Zone HR%, Avg HR%, Max HR%, Lap HR%, Pre Lap HR%; |
| Power | Power, Avg Pwr, Max Pwr, Lap Pwr, Pre Lap Pwr, Lap Max Pwr, Pwr Zone, Pwr3s, Pwr10s, Pwr30s, Pwr %FTP, Pwr IF, Pwr NP, Pwr TSS, Watt/Kg, Kilojoules, Pwr Balance, TQ.Effect., Ped.Smooth., 3s Balance, 10s Balance, 30s Balance, Lap Balance, Avg Balance; |
| Distance | Distance, Ascent Dist, Descent Dist, Lap Dist, Pre Lap Dist, Odometer, Dist.to Go. |
| Elevation | Elevation, Grade, VAM, VAM 30s, Total Ascent, Total Descent, Max Elevation, Min Elevation, VAM+ Avg, VAM- Avg, VAM+ Max, VAM- Max, Avg Grade+, Avg Grade-, Max Grade+, Max Grade-, Lap Elev+, Lap VAM+, Lap Grade+. |
| Timer Elapsed Time | Time, Timer, Laps, Lap Time; |
| Graph | Speed, Speed Curve, Cadence, Cadence Curve, Heart Rate, Heart Rate Zone, Heart Rate Curve, Power, Power Zone, Power Curve; |
| Classification | Data Content |
| Shifting | Gears, Front Gear, Rear Gear, Gear Battery, Front Battery, Rear Battery. |
| More | Time of Day, Sunrise, Sunset, Temperature, Accuracy, Heading, Calories; |
CONTACT US
www.igpsport.com
Wuhan Qiwu Technology Co., Ltd.
3/F Creative Workshop, No.04 District D Creative World, No.16 West Yezhihu Road, Hongshan District, Wuhan, Hubei, China.
027-87835568
service@igpsport.com
Disclaimer
This user manual is for user's reference only. If there is any difference between the device and the manual, please subject to the device. We will not notify otherwise.
www.igpsport.com
Wuhan Qiwu Technology Co., Ltd.
3/F Creative Workshop, No.04 District D Creative World, No.16 West Yezhihu Road, Hongshan District, Wuhan, Hubei, China.
027-87835568
service@igpsport.com
Endereço: 3/F Creative Workshop, No.04 District D Creative World, No.16 West Yezhihu Road, Hongshan District, Wuhan, Hubei, China.
Contacto: 027-87835568
E-mail: service@igpsport.com
Declaração
I'application iGPSPORT.
www.igpsport.com
Wuhan Qiwu Technology Co., Ltd.
3/F Creative Workshop, No.04 District D Creative World, No.16 West Yezhihu Road, Hongshan District, Wuhan, Hubei, China.
027-87835568
service@igpsport.com
免责:
3.단원선목:▲繡繫繫,繫繫,繫繫繫繫繫繫繫繫繫繫繫繫繫繫繫繫繫繫繫繫繫繫繫繫繫繫繫繫繫繫繫繫繫繫繫繫繫繫繫繫繫繫繫繫繫繫繫繫繫繫繧繫繫繫繫繫繫繫繫繫繫繫繫繫繫繫繫繫繫繫繫繫繫繫繫繫繫繫繫繫繫繫繫繫繫繫繫繫繫繫繫繫繫繫繫繫繫繫繫繫繊
整定将自增和多的整定将为,此则整定或
- 51
S
龍龍龍龍龍龍龍龍龍龍龍龍龍龍龍龍龍龍龍龍龍龍龍龍龍龍龍龍龍龍龍龍龍龍龍龍龍
自通卫
- 《》>·>
S
"司士泰”
用
此请可为国的,
"诶" 谓,
This device complies with part 15 of the FCC Rules. Operation is subject to the condition that this device does not cause harmful interference (1) this device may not cause harmful interference, and (2) this device must accept any interference received, including interference that may cause undesired operation.
Any changes or modifications not expressly approved by the party responsible for
Compliance could void the user's authority to operate the equipment.
NOTE: This equipment has been tested and found to comply with the limits for a Class B digital device, pursuant to Part 15 of the FCC Rules. These limits are designed to provide reasonable protection against harmful interference in a residential installation. This equipment generates, uses and can radiate radio frequency energy and, if not installed and used in accordance with the instructions, may cause harmful interference to radio communications. However, there is no guarantee that interference will not occur in a particular installation. If this equipment does cause harmful interference to radio or television reception, which can be determined by turning the equipment off and on, the user is encouraged to try to correct the interference by one or more of the following measures:
Reorient or relocate the receiving antenna.
- Increase the separation between the equipment and receiver.
- Connect the equipment into an outlet on a circuit different from that to which the receiver is connected.
- Consult the dealer or an experienced radio/TV technician for help.
To maintain compliance with FCC's RF Exposure guidelines, This equipment should be installed and operated with minimum distance between 20cm the radiator your body:
Use only the supplied antenna.
FCC ID:2AU4M-IGS630
SPECIFICATIONS:
Operating Temperature: -10^ - 50^
IGPSPORT
USER MANUAL
iGS630
WUHAN QIWU TECHNOLOGY CO.,LTD.