HD 615 M Portable - Pressure washer Kärcher - Free user manual and instructions
Find the device manual for free HD 615 M Portable Kärcher in PDF.
| Technical specifications | Max pressure: 150 bars, Flow rate: 600 l/h, Power: 2.8 kW |
|---|---|
| Power supply type | Electric |
| Dimensions | Dimensions: 400 x 370 x 930 mm |
| Weight | Weight: 30 kg |
| Usage | Ideal for cleaning medium to large surfaces such as terraces, vehicles, and garden tools. |
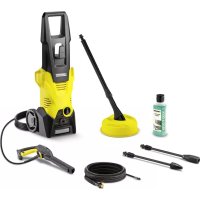
| Included accessories | Foam cannon, Cleaning lance, Rotary nozzle |
| Maintenance | Regularly check filters and hoses, clean the nozzle after each use. |
| Safety | Use gloves and protective glasses, do not direct the jet towards people or animals. |
| General information | Warranty: 2 years, After-sales service available, Spare parts accessible. |
Frequently Asked Questions - HD 615 M Portable Kärcher
Download the instructions for your Pressure washer in PDF format for free! Find your manual HD 615 M Portable - Kärcher and take your electronic device back in hand. On this page are published all the documents necessary for the use of your device. HD 615 M Portable by Kärcher.
USER MANUAL HD 615 M Portable Kärcher
- dB(A) 90 95 HD 6/15 M Portable HD 7/17 M Portable gemessen garantiert HD 6/15 M 87 90 HD 7/17 M 92 95 Chief Executive Officer Head of ApprobationEnglish 9 Contents General notes Read these original operating instruc- tions and the enclosed safety instruc- tions before using the device for the first time. Proceed accordingly. Keep both books for future reference or for future own- ers. Intended use Use this high-pressure cleaner only for the following types of work: Use the high-pressure jet for cleaning machines, vehi- cles, buildings, tools and similar objects. We recommend using a rotary nozzle as a special ac- cessory for stubborn soiling. The HD
- Plus is supplied with a rotary nozzle. ATTENTION Dirty water leads to premature wear or deposits in the device. Clean the device using only clean water, or recycled wa- ter that does not exceed the following limits: pH value: 6.5 .5 Electrical conductivity: Conductivity of fresh water + 1200 µS/cm, maximum conductivity 2000 µS/cm Settleable particles (sample volume 1 l, settling time 30 minutes): < 0.5 mg/l Filterable particles: < 50 mg/l, no abrasive sub- stances Hydrocarbons: < 20 mg/l Chloride: < 300 mg/l Sulphate: < 240 mg/l Calcium: < 200 mg/l Total hardness: < 28 °dH, < 50° TH, < 500 ppm (mg CaCO p. 9
- /l) Iron: < 0.5 mg/l Manganese: < 0.05 mg/l Copper: < 2 mg/l Active chloride: < 0.3 mg/l Free of unpleasant odours Environmental protection The packing materials can be recycled. Please dispose of packaging in accordance with the en- vironmental regulations. Electrical and electronic appliances contain valu- able, recyclable materials and often components such as batteries, rechargeable batteries or oil, which - if handled or disposed of incorrectly - can pose a potential threat to human health and the environ- ment. However, these components are required for the correct operation of the appliance. Appliances marked by this symbol are not allowed to be disposed of togeth- er with the household rubbish. Notes on the content materials (REACH) Current information on content materials can be found at: www.kaercher.com/REACH Safety instructions It is essential that you read the safety instructions 5.951-949.0 before initial startup. Observe the national regulations for liquid jet clean- ers. Observe the national accident prevention regula- tions. Liquid jet cleaners must be tested regularly. The test result must be recorded in writing. Do not modify the device or accessories. Symbols on the device The device may not be connected to the pub- lic drinking water network. The high-pressure jet must not be directed at persons, animals, live electrical equipment or at the device itself. Protect the device from frost. Safety devices Safety devices protect the user and may not be disabled or functionally circumvented. The overflow valve, pressure switch an safety valve are set and sealed by the manufacturer. Adjustments are performed only by customer service. Overflow valve with pressure switch When the water quantity is reduced via the pressure/ quantity control on the trigger gun, the overflow valve opens and part of the water flows back to the suction side of the pump. When the trigger on the high-pressure gun is release, the pressure switch switches off the high-pressure pump and the high-pressure jet stops. The pump switches on again when the trigger is pulled. Safety valve The safety valve opens when the permissible operating pressure is exceeded and the water flows back to the suction side of the pump. Control elements See graphics page 1 Mains connection cable with mains plug 2 Type plate 3 Pipe frame 4 Power switch 5 Protector General notes p. 9
- Intended use p. 9
- Environmental protection p. 9
- Safety instructions p. 9
- Control elements p. 9
- Colour coding p. 10
- Unpacking p. 10
- Installing accessories p. 10
- Initial startup p. 10
- Operation p. 10
- Interrupting operation p. 11
- Finishing operation p. 11
- Frost protection p. 11
- Transport p. 11
- Storage p. 11
- Care and service p. 11
- Troubleshooting guide p. 12
- Accessories and spare parts p. 12
- Warranty p. 12
- Technical data p. 12
- EC Declaration of conformity English 6 Nozzle 7 EASY!Lock spray lance 8 EASY!Force high-pressure gun 9 Safety latch 10 Trigger 11 Unlocking lever 12 EASY!Lock high-pressure hose 13 Cover 14 High-pressure connection 15 Water connection 16 Union nut 17 Hose spout 18 sieve Colour coding Control elements for the cleaning process are yel- low. Control elements for maintenance and servicing are light grey. Unpacking p. 1310
1. Check the contents of the package when unpacking.
2. Notify the dealer immediately in the case of shipping
damage. Installing accessories Note The EASY!Lock system connects components quickly and safely via a single turn of the quick-release thread.
1. Plug the high-pressure nozzle onto the spray lance.
3. Connect the spray lance to the high-pressure gun
and hand-tighten (EASY!Lock). Connect the high-pressure hose
1. Connect the high-pressure hose to the high-pres-
sure gun and high-pressure connection of the de- vice and tighten hand-tight (EASY!Lock). Initial startup Electrical connection DANGER Risk of injury from electric shock Use a plug to connect the device to the mains grid. Per- manent connection to the mains grid is prohibited. The plug is used for disconnection from the mains. See the type plate or technical data for the connecti
1. Unwind the mains cable and place on the ground.
2. Plug the mains plug into the socket.
Water connection Connection to a water line 몇 WARNING Health risk from return flow of contaminated water into the drinking water network. Observe the regulations of your water supply company. According to applicable regulations, the device must never be used with the drinking water network without a system separator. Use a system separator from KÄRCHER or a system separator as per EN 12729 Type BA. Water that has flowed through a system sep- arator is classified as undrinkable. Always connect the system separator to the water supply and never directly to the water connection on the device.
1. Check the feed pressure, input temperature and in-
put amount of the water supply. See the "Technical data" section for the requirements.
2. Connect the system separator and water connection
of the device with a hose (minimum length 7.5 m, minimum diameter 1”). The supply hose is not included in the scope of de- livery.
3. Open the water inlet.
Suck water from the container
1. Screw the suction hose (order number 4.440-207.0)
and filter (order number 4.730-012.0) onto the water connection.
1. Unscrew the nozzle from the spray lance.
2. Allow the device to run until the escaping water is
free of air bubbles.
3. In the case of venting problems, allow the device to
run for 10 seconds and then switch it off. Repeat the procedure several times.
4. Switch off the device.
5. Screw the nozzle back in place.
Operation DANGER Risk of injury from the high-pressure water jet Never fasten the trigger and safety lever in the actuated position. Do not use the high-pressure gun when the safety lever is damaged. Push the safety latch of the high-pressure gun forwards every time before starting work with the device. Opening/closing the high-pressure gun
1. Opening the high-pressure gun: Actuate the safety
2. Closing the high-pressure gun: Release the safety
lever and trigger. High-pressure operation Note The device is equipped with a pressure switch. The mo- tor only starts up when the high-pressure gun is open.
1. Set the power switch to "I".
2. Unlock the high-pressure gun by pushing the safety
latch of the high-pressure gun to the rear.
3. Open the high-pressure gun.
Operation with detergent Note A cup foam lance (optional)is needed for operating with detergent. 몇 WARNING Health risk through incorrect handling of deter- gents Observe the safety instructions on the detergent. ATTENTION Unsuitable detergents can damage the device and the object to be cleaned. Use only detergents approved by KÄRCHER. Observe the dosing recommendations and notes pro- vided with the detergent.English 11 Use detergents sparingly to help conserve the environ- ment. KÄRCHER detergents ensure fault-free operation. Ask us for a consultation, request our catalogue or our de- tergent information sheets. Figure B 1 Foam nozzle 2 Container 3 Gate Detergent mixing: 3=high, 2=medium, 1=low 4 Suction hose 5 EASY!Force high-pressure gun
1. Unscrew the container.
2. Plug the desired gate into the suction hose.
3. Fill the detergent into the container.
4. Screw the container onto the foam nozzle.
5. Remove the spray lance from the high-pressure gun.
6. Connect the foam nozzle to the high-pressure gun
7. Start up the high-pressure cleaner.
Recommended cleaning method
1. Spray the detergent sparingly on the dry surface and
let it work for a while (do not let it dry).
2. Rinse off the loosened dirt with the high-pressure
jet. Rinsing out the foam lance The foam lance must be flushed after use to prevent the formation of detergent deposits.
1. Unscrew the container.
2. Pour the remaining detergent back into the original
3. Fill the container with clear water.
4. Screw the container onto the foam nozzle.
5. Operate the foam nozzle for approx. 1 minute to
Interrupting operation
1. Close the high-pressure gun, the device will switch
2. Lock the high-pressure gun by pushing the safety
latch of the high-pressure gun to the front. Note The water pressure in the high-pressure hose is re- duced by approx. 70% when the device is switched off. This reduces the actuating force of the high-pressure gun and extends the service life of the device. Continuing operation
1. Unlock the high-pressure gun by pushing the safety
2. Open the high-pressure gun, the device will switch
on again. Finishing operation
1. Close off the water inlet.
2. Open the high-pressure gun.
3. Set the power switch to "I" and allow the device to
run for 5 to 10 seconds.
4. Close the high-pressure gun.
5. Turn the power switch to "0/OFF".
6. Pull the mains plug out of the socket only when your
8. Open the high-pressure gun until the device is com-
pletely depressurised.
9. Lock the high-pressure gun by pushing the safety
latch of the high-pressure gun to the front. Frost protection ATTENTION Frost destroys the device if it is not completely drained of water. Store the device in a frost-free location. If frost-free storage is not possible:
2. Pump commonly available anti-freeze through the
3. Allow the device for run for a maximum of 1 minute
until the pump and lines are empty. Note Use commonly available, Glycol-based vehicle anti- freeze. Observe the handling instructions of the anti- freeze manufacturer. Transport 몇 CAUTION Risk of injury, risk of damage Be aware of the weight of the device during transport. ATTENTION Risk of damage Protect the trigger of the high-pressure gun from dam- age.
1. When transporting in vehicles, secure the device
against slipping and tipping over according to the applicable guidelines. Storage 몇 CAUTION Risk of injury, risk of damage. Be aware of the weight of the device during storage.
1. Store the device indoors only.
Care and service DANGER Risk of injury due to inadvertently starting up de- vice and also due to electric shock. Switch off the device immediately and unplug the mains plug before performing work. Safety inspection/maintenance contract You can agree on regular safety inspections or close a maintenance contract with your dealer. Please seek ad- vice on this. Each time before use
1. Check the power cable for damage and have a dam-
aged cable replaced immediately by the authorised Customer Service or a qualified electrician.
2. Check the high-pressure hose for damage and re-
place a damaged high-pressure hose immediately.
3. Check the device for leaks. 3 drops of water per min-
ute are permissible. Contact Customer Service in the case of more serious leaks. Weekly
1. Clean the sieve in the water connection.
Clean the sieve in the water connection
1. Unscrew the union nut.
2. Pull out the hose union with sieve.12 English
3. Externally clean and rinse the sieve.
Note: Align the hex-head of the hose union for con- nection to the device.
4. Fit the hose union with sieve.
5. Tighten the union nut.
Every 500 operating hours, at least annually
1. Have the device maintained by Customer Service.
Changing oil Note See the "Technical data" section for the oil volume and type
1. Unscrew the 4 screws.
2. Remove the cover.
3. Pivot the oil drain hose downwards over an oil catch
4. Pull the plug out of the oil drain hose.
6. Remove the foam from the oil tank.
7. Wait until the oil has drained completely.
8. Insert the plug into the oil drain hose.
9. Pivot the oil drain hose upwards and latch in place.
10. Fill with the measured correct quantity of oil.
11. Insert the foam into the oil tank.
12. Fit the cap and press firmly in place.
Figure E Troubleshooting guide DANGER Risk of injury due to inadvertently starting up de- vice and also due to electric shock. Switch off the device immediately and unplug the mains plug before performing work. Have electrical components checked and repaired by the authorised Customer Service. In case of any malfunctions not mentioned in this chapter, contact the authorised Customer Service when in doubt or when you have been explicitly advised to do so. Device does not start Check the power cable for damage. Check the mains voltage. If the device overheats: a Set the power switch to "0". b Allow the device to cool for at least 15 minutes. c Set the power switch to "1". Contact Customer Service in the case of electrical faults. Device does not reach required pressure Check the size of the nozzle and compare with the required size specified in the "Technical data" sec- tion. Vent the device, see section "Venting the device". Clean the sieve in the water connection. Check the water supply volume and compare with the required volume specified in the "Technical data" section. Clean the nozzle. Contact Customer Service if necessary. Pump leaking Up to 3 drops of water per minute are permissible. In case of more serious leaks, have the device checked by Customer Service. Pump knocking Check the water supply line for leaks. Vent the device, see section "Venting the device". Contact Customer Service if necessary. Detergent dosing volume too low Refill the foam nozzle cup. Plug a larger blender onto the suction hose. Check the suction hose and foam nozzle for deter- gent deposits. Remove deposits using lukewarm water. Accessories and spare parts Only use original accessories and original spare parts. They ensure that the appliance will run fault-free and safely. Information on accessories and spare parts can be found at www.kaercher.com. Warranty The warranty conditions issued by our relevant sales company apply in all countries. We shall remedy possi- ble malfunctions on your appliance within the warranty period free of cost, provided that a material or manufac- turing defect is the cause. In a warranty case, please contact your dealer (with the purchase receipt) or the next authorised customer service site. (See overleaf for the address) Technical data HD 6/15 M Portable HD 7/17 M Portable Electrical connection Voltage V 230 400 Phase ~ 1 3 Frequency Hz 50 50 Connection output kW 3,1 4,2 Degree of protection IPX5 IPX5 Power protection (slow-blowing) A 16 16 Extension cable, 30 m mm
2,5 2,5 Water connection Feed pressure (max.) MPa 1 1 Input temperature (max.) °C 60 60 Input amount (min.) l/min 13 15 Suction height (max.) m 0,5 0,5Français 13 Subject to technical modifications. EC Declaration of conformity We hereby declare that the machine described below complies with the relevant basic safety and health re- quirements in the EU Directives, both in its basic design and construction as well as in the version placed in cir- culation by us. This declaration is invalidated by any changes made to the machine that are not approved by us. Product: High-pressure cleaner Type: 1.150-xxx Currently applicable EU Directives 2000/14/EC 2006/42/EC (+2009/127/EC) 2011/65/EU 2014/30/EU Harmonised standards used EN 60335–1 EN 60335–2–79 EN 50581 EN 55014-1: 2017 EN 55014-2: 2015 EN 62233: 2008 EN 61000–3–2: 2014 HD 6/15 EN 61000–3-3: 2013 Applied conformity evaluation method 2000/14/EG: Appendix V Sound power level dB(A) The undersigned act on behalf and under the power of attorney of the company management. Documentation supervisor: S. Reiser Alfred Kärcher GmbH & Co. KG Alfred-Kärcher-Str. 28 - 40 71364 Winnenden (Germany) Tel.: +49 7195 14-0 Fax: +49 7195 14-2212 Winnenden, 2019/06/01 Contenu Device performance data Nozzle size of standard nozzle 033 040 Operating pressure MPa 15 17 Operating pressure (max.) MPa 22,5 25,5 Water flow rate l/min 9,3 11,6 High-pressure gun recoil force N 28,6 35,5 Dimensions and weights Typical operating weight kg 30 32 Length mm 590 590 Width mm 320 320 Height mm 430 430 Oil volume l 0,25 0,20 Oil type Type 15W40 15W40 Determined values in acc. with EN 60335-2-79 Hand-arm vibration value m/s
Vee sisseimemine mahutist