
Gatsby - Grill plate Klarstein - Free user manual and instructions
Find the device manual for free Gatsby Klarstein in PDF.
| Product type | Electric grill plate |
| Brand | Klarstein |
| Model | Gatsby |
| Power supply | 220-240 V ~ 50-60 Hz |
| Rated power | 2562-3050 W |
| Temperature settings | 3 (LO, MEO, HI) |
| Plate coating | Non-stick |
| Safety switch | Yes (prevents heating if plate not installed) |
| Overheat protection | Yes |
| Windshield and splash guard | Included |
| Grease collection tray | Included |
| Side shelf | Included |
| Swivel castors | Yes |
| Insulated handle | Yes |
| Indoor use | Yes (as tabletop grill) |
| Outdoor use | Yes (covered, in dry weather) |
| Preheat time | Approximately 5-6 minutes |
| Cleaning | Damp cloth, do not immerse |
| Thermostat type | Temperature control switch with probe |
| Removable power cord | Yes |
| Reparability | Contact customer service for repair |
Frequently Asked Questions - Gatsby Klarstein
User questions about Gatsby Klarstein
0 question about this device. Answer the ones you know or ask your own.
Ask a new question about this device
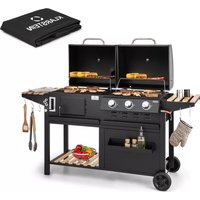
Download the instructions for your Grill plate in PDF format for free! Find your manual Gatsby - Klarstein and take your electronic device back in hand. On this page are published all the documents necessary for the use of your device. Gatsby by Klarstein.
USER MANUAL Gatsby Klarstein
Congratulations on purchasing this equipment. Please read this manual carefully and take care of the following hints on installation and use to avoid technical damages. Any failure caused by ignoring the items and cautions mentioned in the operation and installation instructions are not covered by our warranty and any liability. Scan the QR code to get access to the latest user manual and more product information.

CONTENTS
Contents 21
Safety Instructions 22
Product Description 25
Installation Instructions 27
Use 32
Cleaning and Care 34
Disposal Considerations 35
Manufacturer & Importer (UK) 35
TECHNICAL DATA
| Item number 10047043 | |
| Power supply 220-240 V ~ 50-60 Hz | |
| Rated power 2562-3050 W | |
SAFETY INSTRUCTIONS
Please read the following instructions and keep them handy for future reference. These instructions are for persons in the household.
- This appliance can be used by children aged eight and over, as well as by persons with reduced physical, sensory or mental abilities, or with a lack of experience and/or knowledge, provided they are supervised or have been instructed in the safe use of the appliance and understand the potential dangers.
Children must not play with the appliance.
Children under 8 years of age are not allowed to perform cleaning and user maintenance. - Keep the appliance and the power cord out of the reach of children under 8 years of age.
- Only connect the appliance to an AC power supply with a voltage that corresponds to that specified on the rating plate.
- This appliance must not be operated using an external timer or remote control system.
- Never immerse the appliance or the power cord in water or other liquids.
- This appliance is intended for household use only or similar areas, such as kitchenettes in businesses, offices, agricultural enterprises and places of work, as well as for use by guests in hotels, motels, private guest houses and holiday homes.
Electrical safety:
- Do not clean the appliance or power cord in a dishwasher.
- The electric grill must never come into contact with water or other liquids. However, if this happens, ensure that all parts are completely dry before using the appliance again.
- Never use the appliance in the vicinity of containers filled with water (e.g. bathtubs or swimming pools).
- Never expose the appliance to rain, snow or other wet environments.
- Never touch the appliance or power cord with wet hands.
- For safety reasons, never place the appliance on hot surfaces, metal trays or wet surfaces.
- Do not place the appliance or power cord near open flames during operation. Always use the electric grill on a level, uncluttered surface.
- If using the appliance as a tabletop grill, ensure the power cord does not hang over the edge of the countertop or table as this could cause accidents, e.g. if small children pull on the cord.
-
Never run the power cord underneath the appliance or allow it to come into contact with hot parts of the appliance, as this could cause damage.19. If you use an extension cord, ensure that it is intact and suitable for the power draw of the appliance; otherwise, there is a possibility of overheating.
-
If you use a cable reel as an extension cord, the power cord must be completely unwound to prevent the possibility of overheating.
The electrical outlet's rated current should not exceed 10 A. - The appliance must only be operated via a residual current device (RCD/FI) with a tripping characteristic of no more than 30mA . If in doubt, consult an electrician.
- Check the appliance, power cable and plug for wear and damage. If you discover any damage to the connection cable or other parts, please send the appliance, or in the case of an electrical defect, the thermostat plug, grill plate and grill housing only, to our customer service department for inspection and repair. Unauthorized repairs can result in serious hazards for the user and will invalidate the warranty.
Instructions for set-up and safe use of the appliance
- Only use the electric grill indoors or in a covered outdoor area, such as a balcony.
- Only use the grill outdoors when the weather is dry. Never use the appliance outdoors in damp weather. Never leave the appliance outdoors after use.
- For safety reasons, this appliance is intended for indoor use as a table grill only. It may only be used as a free-standing grill in a protected outdoor area. Never place the electric grill directly next to a wall or near flammable materials, such as curtains, while in use. Maintain a distance of at least 30cm from other objects.
- To prevent overheating, never cover the grill with solid or flexible materials such as aluminium foil or bowls. This would impair the safety of the appliance and cause severe damage.
- Do not touch the grill or the grill plate while they are still hot – there is a risk of burns!
- The grill plate must be properly placed in the grill housing before it can be used. The appliance is equipped with a safety switch that prevents the grill plate from heating up when it is outside the grill housing.
- Never use the appliance if the grease drip pan is not in place.
- Do not use the appliance with accessories from other manufacturers or brands. Such use could damage the appliance.
- Always unplug the mains plug from the electrical outlet after use and before cleaning. Never leave the appliance unattended when the mains plug is plugged in.
- Always allow the appliance to cool completely before moving, cleaning, etc. - Danger of burn injuries!
- Clean the appliance after every use.
- To unplug the power cable, always pull the plug and never the cable itself. Route the power cable safely to prevent it from being pulled on or tripped over.
- To prevent electrical hazards, only use the included thermostat plug. Route the power cable safely so that it cannot be pulled on or tripped over.
-
Always unplug the appliance from the power socket after use, before cleaning and in case of malfunction.
-
Never leave the appliance connected to the power socket while it is unsupervised.
- If a malfunction occurs, do not continue to use the appliance; instead, contact the customer service department.
- The grill is intended for cooking food only.
- Never use the grill as a heater.
- Do not use the appliance in tents, garages, etc.
- To prevent the grill from falling, never place it on the edge of a worktop when using it as a table grill.
WARNING

WARNING
Risk of electric shock
Never open the appliance housing under any circumstances. There is a danger of electric shock.
CAUTION
Risk of burns
Never open the appliance housing under any circumstances. There is danger of electric shock.

WARNING
Fire hazard
Never use the appliance unless the grease drip pan is in place.

WARNING
Fire hazard
Do not use charcoal or any other combustible fuel with this appliance.
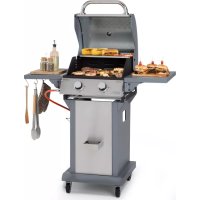
PRODUCT DESCRIPTION

1 Wind and splash guard
2 Temperature control knob
3 Temperature controller
4 Socket for power cable
5 Grill plate
6 Socket bracket
7 Side tray
8 Grill base
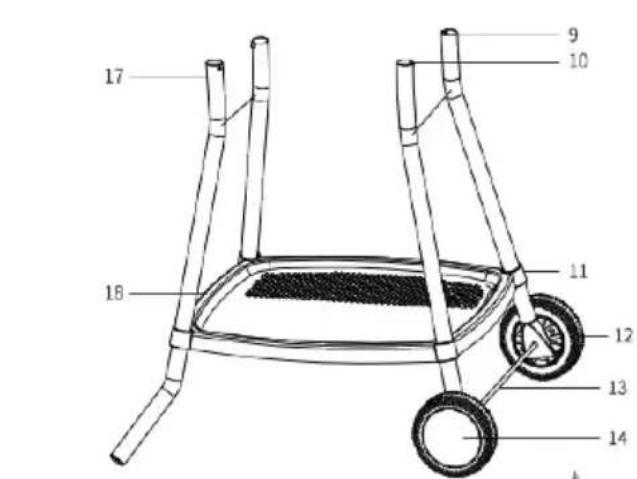
9 Support tube assembly (Support tube I/Support tube J)
10 Button
11 Food tray holder
12 Wheel
13 Axle
14 Wheel cover
15 Wind and splash guard handle
16 Hinge seat
17 Support tube assembly
18 Food tray
19 Ard pin
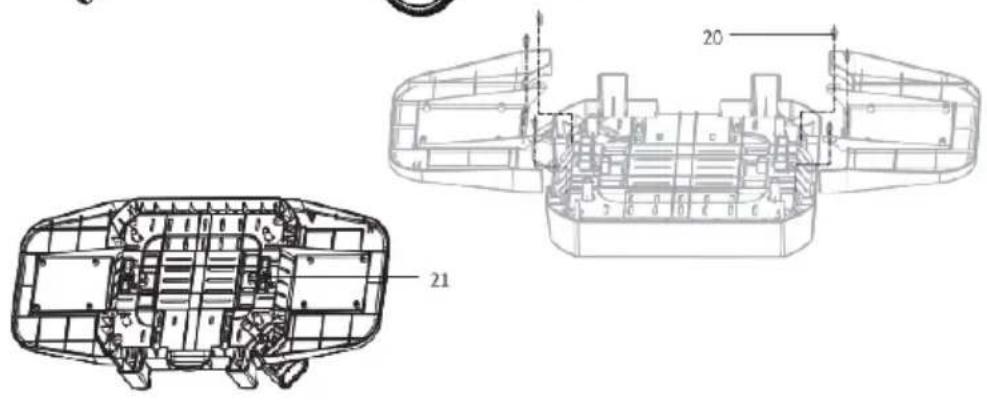
20 Screw
21 Knob
22 Screw
23 Oil collecting box
24 Shim
25 Screw
26 Screw
27 Hinge lining
28 Wind and splash guard hinge
29 Nut
30 Grill housing
Hardware parts
| 6 | 15 | 20 | 22 | 24 |
| Control box bracket x 1 | Handle x 1 | ST4*12 x 8 ST3*10 x 2 | φ20X φ5.2 x 2 | |
| 25 | 26 | 27 | 28 | 29 |
| ST4*14 x 2 | 4 set of screw & cap nuts (M4 x 8 + M4 x 4) | Lining x 2 Wind and | splash guard hinge x2 | Wheel buckle x 2 |
INSTALLATION INSTRUCTIONS
1
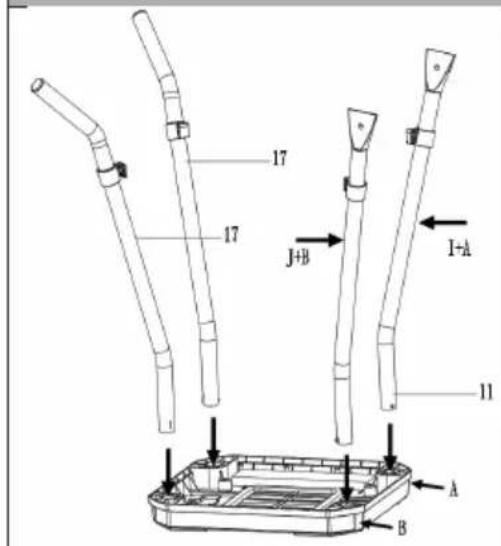
Insert the bracket tube assembly (9), the bracket tube I (with an "A" sticker on the tube body) and the bracket tube J (with a "B" sticker on the tube body). Align the corresponding hole positions of the grill base (8) as shown in the diagram. Press the button (10) in the support tube to align it with the hole position of the grill base, and then push it in.
Press down slightly and push it all the way in. Rotate left and right so that the button can automatically find the hole position. After assembly, you will hear a "click".
Assemble the two support tubes (17) with the grill base (8) using the same method.
Note: If the support tubes are not assembled properly, the wheel accessories cannot be assembled. To remove the bracket tube, simply use a tool, such as a screwdriver, to release the fastener. Then, rotate the tube in the opposite direction to its installation and it can be taken out.
2

The food trays (18) are buckled onto the four food tray holder (11) and pressed into place.
3
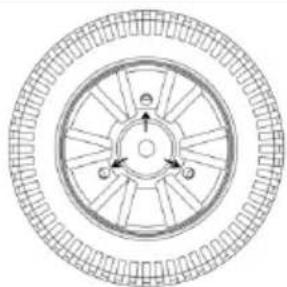
As shown in the diagram, the wheel cover is pre-assembled during packaging. Once you have taken it out of the package, you will see three clasps inside the wheel assembly. Press the clasps with your hand and push them outwards to remove the decorative wheel cover.
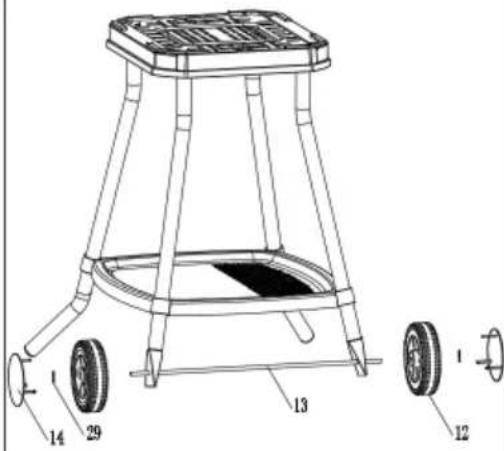
As shown in the figure, push the wheel axle (13) through the hole at the bottom of the bracket tube (9), aligning the two sides in sequence. Then, assemble one wheel (12) onto each axle, ensuring that the protruding side of the wheel faces inward. Push into place. Clamp the two clips (29) (2 pcs) with pliers, then insert them into the holes on the outer end of the wheel axle (2) and fix them in place. Finally, assemble the wheel covers (14) onto the left and right wheels, covering them tightly and fixing them in place.
4
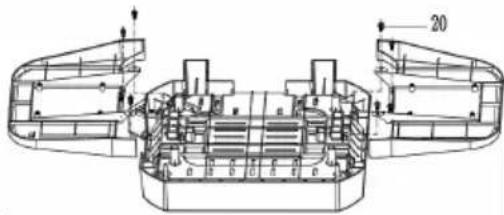
As shown in the diagram, place the side tray (7) on the corresponding screw columns of the grill housing (30), installing the small table board with hardware hooks on the left side of the grill housing. Align. the screw holes of the small table board with the screw columns of the grill housing and secure with 4 × 12 screws (20) (8 pcs).
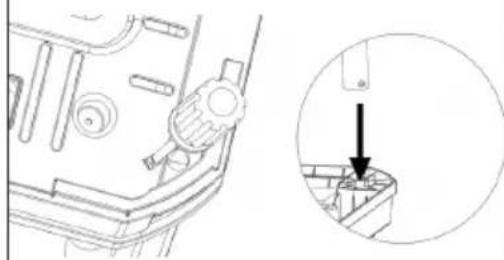
5
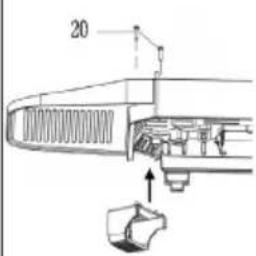

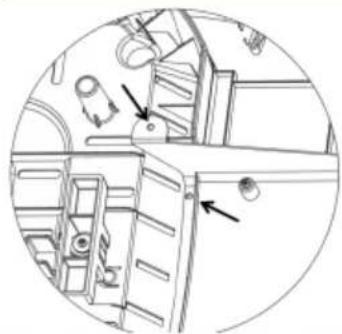
As shown in the figure, install the socket bracket (6) into the slot of the grill housing (30). Use a Phillips screwdriver to secure the two 3 × 10 screws (20) (2 pcs) at the bottom. Tighten the screws.
6
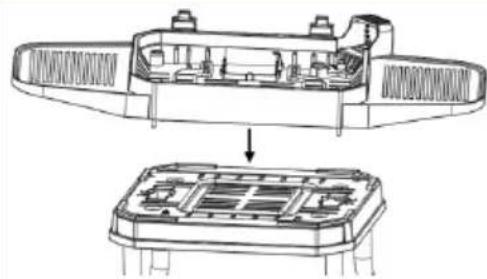
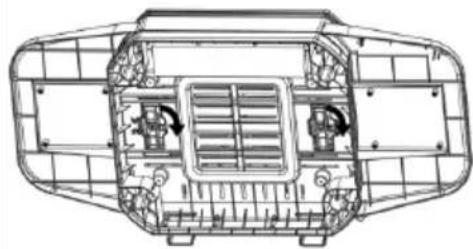
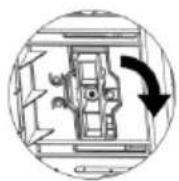
As shown in the illustration, align the grill housing assembly with the mounting position of the stove frame assembly, then place it on the grill base. Turn the knob clockwise from the bottom of the grill base to secure the grill housing to the base.
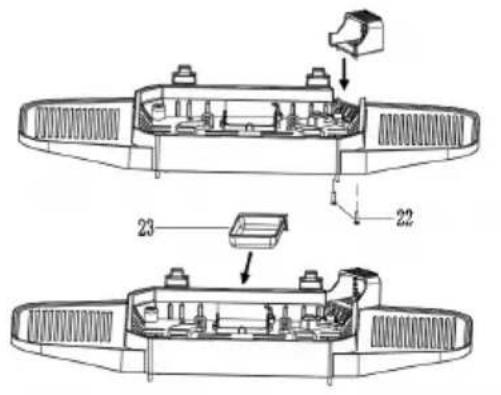
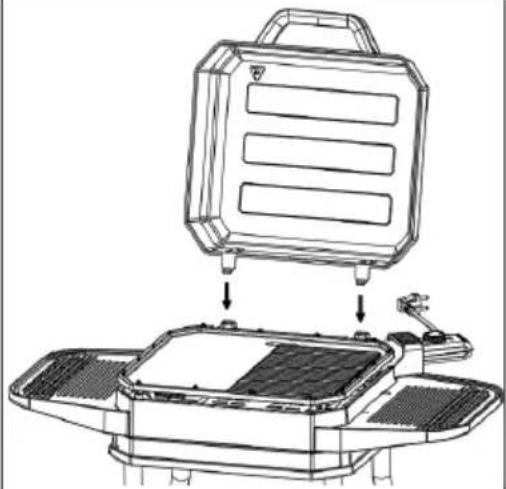
| 7 | |
| 33 | As shown in the illustration, insert the power cable socket (4) of the grill plate into the control box bracket of the grill housing. |
| 61 | Then, firmly place the grill plate (5) in the slot of the grill housing (30). If you wish to move the grill plate, ensure that it has cooled down and that the power is disconnected. |
| 8 | Attention: The grill plate (5) can only be used with the grill housing (30)! |
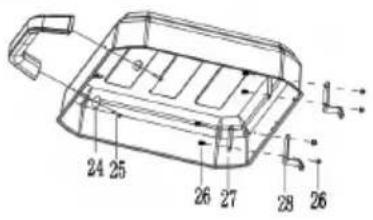
| 8 | |
| 24 25 | As shown in the figure, use a Philips screwdriver to remove the two screws (25) and washers (24) (2 pcs) from the handle. Then, thread two screws (25) (2 pcs) through the flat washer (24) and then through the screws on the wind and splash guard (1). Lock the hole with the wind and splash guard handle (15). Then, use four screws (26) to pass through the corresponding holes in the hinge lining (27) (2 pcs). |
| Pass them through the screw holes in the wind and splash guard (1) and the holes in the wind and splash guard hinge (28), then secure them with the cap nuts (26) (4 pcs). | |
| Note: The assembly sequence of some parts must be carried out according to the instructions, and they must not be installed in the wrong position. | |
9
As shown in the figure, the wind and splash guard hinge of the oil hood assembly is aligned with the hinge seat slot (16) on the hearth. With a slight back-and-forth swing, the two components automatically position themselves, placing the wind and splash guard on the grill plate (5).
10
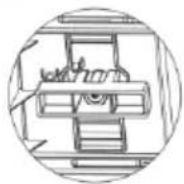
As shown in the figure, the temperature controller (3) inserts the temperature control probe into the power control box cover of the grill plate. When plugging in or unplugging the power cord, ensure that the grill housing (30) remains stable on the appliance.
Notes
- The electric BBQ grill comes with a grill plate (5), and the grill housing (30) can be assembled with it.
- The bracket assembly can be moved to the kitchen for indoor use.
- The grill plate (5) can only be used with the grill housing (30).
- The wind and splash guard (1) prevents wind and dust from affecting the product and can be covered once the product has stopped working.

WARNING Risk of personal injury
If using the electric grill as a table grill, it must only be used with the grill plate. Maintain a distance of at least 30 centimetres between the grill and the wall during operation. Do not unscrew the plastic feet under the grill plate. This reduces the gap between the grill plate and the furnace seat, which can lead to plastic components melting. This could result in serious injury and damage to the equipment.
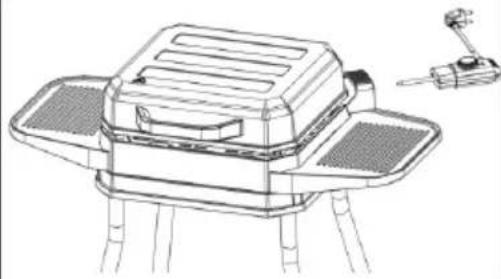
Indoor usage
As shown in the diagram, the device can be used indoors. Securely fix the grill plate (5) and the grill housing (30) together. Reinsert the thermostat and switch the device on. Make sure not to trip over the power cord.
Attention: It is not recommended to use the wind and splash guard (1) indoors.
Before using the device for the first time
Remove all packaging materials and clean the grill plate (5), the oil collection tray (23) and the wind and splash guard (1) with a damp cloth. It is very important that you thoroughly dry all the parts. This is particularly important for the temperature controllers (3). Do not immerse the power cord and regulator in water. Heat the grill plate to its maximum temperature for about 5-6 minutes. When using the appliance for the first time, any residue left during the manufacturing process may produce odour and smoke.
Cooking instructions
- Connect the electrical appliances to the main power supply.
- Set the temperature control knob (2) to the desired temperature level (usually requiring approximately 5-6 minutes of preheating time).
- Once the desired temperature is reached, the temperature indicator light will turn off.
- Place the food to be grilled on the grill plate (5).
Cooking time instruction
Here are the recommended cooking times. Different foods require different cooking times depending on their weight and size. Weather conditions can also affect cooking time.
-
The grill takes about 5-6 minutes to heat up. Turn the temperature control knob (2) to the maximum temperature setting; the temperature indicator light will illuminate and the heating element will begin to heat up.
-
Frozen food should be fully defrosted before grilling.
- The temperature controller has three settings: low (LO), middle (MEO) and high (HL). You can use the temperature control switch to adjust the temperature according to your cooking needs. Once the desired temperature is reached, the indicator light will turn off and you can place the food on the grill.
- To turn off the barbecue, turn the temperature control knob to the 'OFF' position and unplug the power cord.
- Burn hazard! When moving the barbecue tray when it is hot, always hold the insulated handle and the left and right side trays, and move slowly.
- The following table provides guidance on cooking times for various barbecue foods. Barbecue times can vary depending on personal preference and the thickness of the meat.
| Food to be grilled Temp erature grade setting | Cooking time (min) |
| Steak/beef High 10-15 | |
| Lamb High 10-15 | |
| Chicken drumsticks High 15-20 | |
| Chops High 20-25 | |
| Chicken wings High 15-20 | |
| Fillet of pork High 7-8 | |
| Whole fish High 8-12 | |
| Kebabs High 7-9 | |
| Various sausages High 8-10 |
Tips for grilling
- Your meat will taste better if you marinate it in the refrigerator overnight before cooking. You can make your own marinade using oil (to keep the meat moist), vinegar, fruit juice or wine (to tenderise the meat) and a mixture of seasonings to add flavour.
- Always use tongs to turn grilled food, as using a fork will dry it out and damage the non-stick coating. Take care not to damage the non-stick coating when using tongs.
- Only turn meat and fish once during grilling; you do not need to turn it more than once, as too much turning will dry the food out.
- Never overcook meat. Even pork is better if it is served pink and juicy.
- If food sticks to the grill plate, it is recommended that you wipe the tray with kitchen paper.
CLEANING AND CARE
- Disconnect all electrical appliances from the main power supply.
- Leave the grill to cool completely.
- Remove the thermostat (3) and power cord (4) from the socket.
- Clean the grill plate (5) and the oil collection tray (23) with a damp cloth and warm water. Do not use wire wool pads. Avoid using brushes or abrasives to prevent any damage to the grill plate coating.
- Wipe the bracket tube assembly of the electrical appliance with a damp cloth (9/17). Fat splatters can be removed with mild cleaning agents.
- If not in use for a long time, protect the appliance from dust and dirt by thoroughly drying it and then wrapping it in plastic bags.
- Store it in a cool, dry place.
Note: The grill plate has a non-stick coating. Do not scratch the coating during cooking or cleaning.
DISPOSAL CONSIDERATIONS
If there is a legal regulation for the disposal of electrical and electronic devices in your country, this symbol on the product or on the packaging indicates that this product must not be disposed of with household waste. Instead, it must be taken to a collection point for the recycling of electrical and electronic equipment. By disposing of it in accordance with the rules, you are protecting the environment and the health of your fellow human beings from negative consequences. For information about the recycling and disposal of this product, please contact your local authority or your household waste disposal service.
MANUFACTURER & IMPORTER (UK)
Chal-Tec GmbH, Mühlenstraße 25, 10243 Berlin, Germany.
Contact: info@electronic-star.de
Estimado cliente:
Chere cliente, cher client,
- CONTENTS
- SAFETY INSTRUCTIONS
- Electrical safety:
- Instructions for set-up and safe use of the appliance
- WARNING
- Risk of electric shock
- CAUTION
- Risk of burns
- Fire hazard
- PRODUCT DESCRIPTION
- INSTALLATION INSTRUCTIONS
- 1
- 2
- 3
- 4
- 5
- 6
- 9
- 10
- Notes
- WARNING Risk of personal injury
- Indoor usage
- Before using the device for the first time
- Cooking instructions
- Cooking time instruction
- Tips for grilling
- CLEANING AND CARE
- DISPOSAL CONSIDERATIONS
- MANUFACTURER & IMPORTER (UK)
- Estimado cliente:
Brand : Klarstein
Model : Gatsby
Category : Grill plate