
KE 86.5F.STD - Cooker Foster - Free user manual and instructions
Find the device manual for free KE 86.5F.STD Foster in PDF.
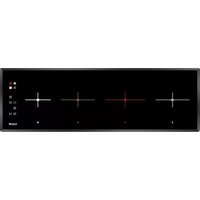
| Product type | Built-in induction hob |
| Brand | Foster |
| Model | KE 86.5F.STD |
| Number of cooking zones | 4 |
| Zone types | 2 rectangular zones 210x190 mm (2.1 kW), 1 round zone Ø200 mm (2.3 kW), 1 round zone Ø145 mm (1.4 kW) |
| Power supply | 220-240 V ~ 50/60 Hz (1 phase + N) or 380-415 V ~ 50/60 Hz (2 phases + N) |
| Maximum total power | 7.4 kW |
| Energy consumption (EU 66/2014) | 185.8 Wh/kg |
| Cooking functions | 10 power levels, Booster (P), Automatic rapid heating (R), Bridge function, Independent zone timer, Pause, Lock/Child safety, Automatic safety shutdown |
| Residual heat indicator | Display of 'H' on the zone screen |
| Power Management system | Automatic power distribution between zones |
| Safety | Pan detection, Overheat protection, Cooling fan, Zone safety shutdown |
| Cleaning | Ceramic glass surface: clean with specific products; scraper for encrusted dirt; avoid abrasive sponges |
| Installation | Built-in, worktop cutout, polyurethane foam seal supplied |
| Electrical connection | Cable H05V2V2-F, section according to model, mandatory grounding |
| Adjustable power limitation | Via the Service menu, levels 1 to 5 |
Frequently Asked Questions - KE 86.5F.STD Foster
User questions about KE 86.5F.STD Foster
0 question about this device. Answer the ones you know or ask your own.
Ask a new question about this device
Download the instructions for your Cooker in PDF format for free! Find your manual KE 86.5F.STD - Foster and take your electronic device back in hand. On this page are published all the documents necessary for the use of your device. KE 86.5F.STD by Foster.
USER MANUAL KE 86.5F.STD Foster
EN - Use and installation manual
natural_image
Isometric line drawing of a door with a gasket and handle, no text or symbols present| 7380645 | 7381645 | 7381245 | 7382645 | 7383645 | 7384645 | ||
| A 290 | 580 580 | 770 770 860 | |||||
| B | 510 510 | 510 510 | 510 510 | ||||
| C 270 | 560 560 | 750 750 840 | |||||
| D 480 | 480 | 480 | 480 | 480 | |||
| E 55 mm | 55 mm | 55 mm | 55 mm | 55 mm | 55 mm | ||
| F 6 mm | 6 mm | 6 mm | 6 mm | 6 mm | |||
| G ≥ 50 mm | ≥ 50 mm | ≥ 50 mm | ≥ 50 mm | ≥ 50 mm | ≥ 50 mm | ||
| H ≥ 600 mm | ≥ 600 mm | ≥ 600 mm | ≥ 600 mm | ≥ 600 mm | ≥ 600 mm | ≥ 600 mm | |
natural_image
Diagram showing a hand holding a tool interacting with a layered structure, labeled A (no text or symbols present)natural_image
Four identical line drawings of cooking pots with crossed handles, no text or symbols present

natural_image
Two identical black rectangular panels with white double-headed arrows, no text or symbols present.natural_image
Abstract curved lines on a dark background with faint diagonal streaks (no text or symbols)Fig.1

natural_image
Abstract pattern of concentric curved lines on a dark textured background (no text or symbols)Fig.2

natural_image
Abstract circular patterns with white streaks on black background, no text or symbols presentFig.3

natural_image
Abstract illustration of a white tool interacting with dark circular patterns (no text or symbols)Fig.4

natural_image
Close-up of two concentric circular white rings against a black background, no text or symbols visible.Fig.5
This appliance is intended for household use only.
Materials used for packaging are nature friendly and may be recycled, deposited or destroyed without any threats to the environment. In order to recognize these features, all packing materials are marked with relevant symbols.
Once your appliance has become obsolete and you do not intend to use it any longer, take adequate care not to litter the environment. Deposit your old appliance with the authorized depot dealing with used household appliances.
Instructions for use
Instructions for use describe the appliance and the way it is handled.
These instructions are intended for various types of appliances, so you can find some descriptions of functions that your particular appliance may not have.
These instructions are only valid for the country indicated on the appliance. If there is NO country on the appliance, technical instructions should be observed for adapting the appliance to comply with the requirements and regulations in your country.
Instructions for connection
The appliance must be connected in compliance with the instructions attached to it, as well as in compliance with relevant regulations and standards. The connection may only be performed by a qualified person.
Rating plate
The rating plate indicating the basic information is attached on the bottom of the appliance.
The Manufacturer strives for continuous improvements. For this reason, the text and illustrations in this book are subject to change without notice.
Keep these instructions in a safe place and ensure that new users are familiar with the contents. Pass them on to any future owner.
| Important warnings | 22 |
| Installation | 23 |
| Connection to the power supply | 25 |
| Power limitation setting | 27 |
| Technical information | 28 |
| Operation | 29 |
| Safety functions and error display | 36 |
| Cleaning and maintenance | 37 |
- The appliance and its accessible parts become hot during use. Care should be taken to avoid touching heating elements. Children less than 8 years of age shall be kept away unless continuously supervised.
- Prevent the children to hang around the appliance and warn them properly against the danger of burns.
- This appliance can be used by children aged from 8 years and above, and persons with reduced physical, sensory or mental capabilities or lack of experience and knowledge if they have been given supervision or instruction concerning use of the appliance in a safe way and understand the hazards involved.
- Children shall not play with the appliance.
- Cleaning and user maintenance shall not be made by children without supervision.

Unattended cooking with fat or oil can be dangerous and may result in fire. Be sure having the ation of such food (fries) under constant control. Never try to extinguish a fire with water, but switch appliance and then cover flame e.g. with a lid or a fire blanket.

Danger of fire: do not store items on the cooking surfaces.

If the surface is cracked, switch off the appliance to avoid the possibility of electric shock.
- Don't use high-pressure steam cleaner or hot steam to clean the appliance.
- Never place any metal objects upon the appliance surface, such as knives, forks, spoons, pot lids, and the like, as they may get very hot.
- The appliance can not be activated by external timers or remote controls systems.
- Do not use the appliance for room heating.
- If there is a wall power outlet located near the appliance and another appliance is plugged into it, make sure the power cord does not come into contact with the hot cooking zones.
- Do not store any temperature-sensitive objects, materials, or substances underneath the appliance, e.g. detergents, sprays, etc.
- In case of a failure of the appliance, immediately disconnect the appliance from the power mains and contact the service center.
• The appliance is manufactured in compliance with the relevant effective safety standards. - Don't connect the appliance to the power supply with an extension cable or multiple sockets, because they don't assure a sufficient safety (e.g. overheating risk of multiple sockets).
- Connect the appliance to a permanent connection.
- Installation of the appliance into a kitchen worktop and its connection to the power mains may only be performed by an adequately qualified technician.
- Do not place empty pans on the appliance.
- The cooking zones must not be used without pans on it.
- Appliance surface should not be used as a worktop. Sharp objects may cause scratches.
- Preparing food in thin aluminum of plastic containers on the cooking zones is not allowed. Do not place any plastic objects or aluminum foil on the appliance surface.
- After a prolonged use of cast iron plates, the area of the plate and the edge of the cooking zone may faded. Repair service is not covered by the warranty.
- If the appliance is built-in over an oven with a pyrolytic system, it should not be operated while the pyrolytic process is in progress because it can trigger its overheating protection.

The symbol on the product or on its packaging indicates that this product may not be treated as household waste. Instead it shall be handed over to the applicable collection point for the recycling of electrical and electronic equipment. By ensuring this product is disposed of correctly, you will help prevent potential negative consequences for the environment and human health, which could otherwise be caused by inappropriate waste handling of this product. For more detailed information about recycling of this product, please contact your local city office, your household waste disposal service or the shop where you purchased the product.
INSTALLATION
Important warnings
• Installation of the appliance into a kitchen worktop must be performed by an adequately qualified technician.
- Veneer or other finish of the piece of kitchen furniture into which the hob is to be built in should be treated with heat resistant glue (100°C); otherwise, the worktop finish may be discolored or deformed.
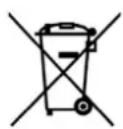
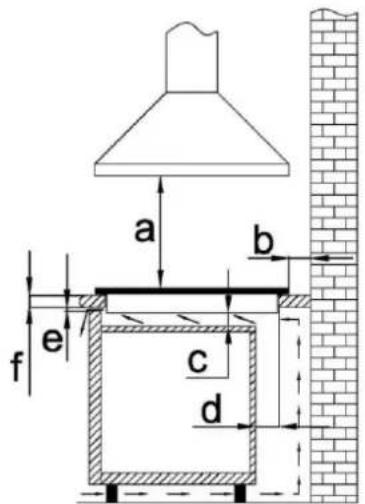
- Ideally the appliance should be installed with plenty of space on either side. There may be a wall at the rear and a tall unit or wall at one side. On the other side, however, no unit or divider should stand higher than the appliance.
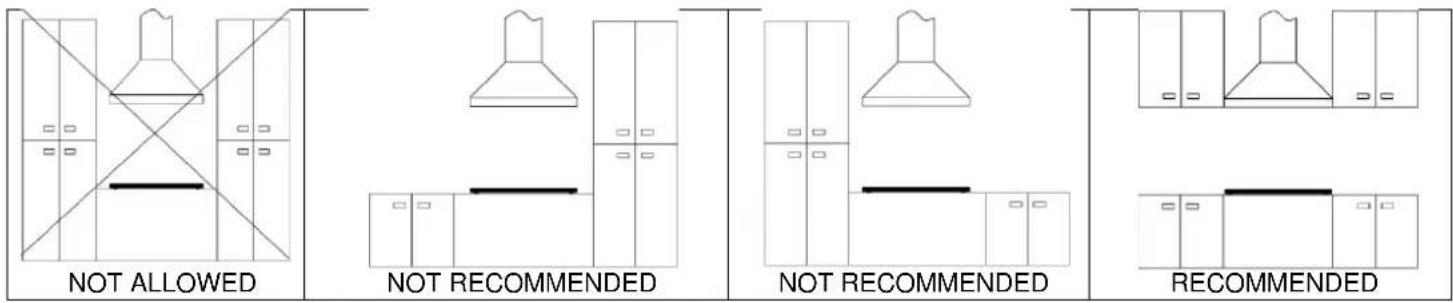
- The distance between the appliance edge and the adjacent tall kitchen furniture element should amount to no less than 250 mm.
- All sizes and distances to be taken for the proper functioning of the appliance are shown in figures below.
- The kitchen furniture element underneath the hob should not be fitted with a drawer. If the kitchen furniture element as a horizontal partition wall, it should be installed no less than min 20mm from the lower surface of the appliance. The space between the partition wall and the appliance must be empty; no objects should be placed into that gap.
- Hanging, or wall-mounted kitchen elements should be installed high enough not to interfere with the work process.
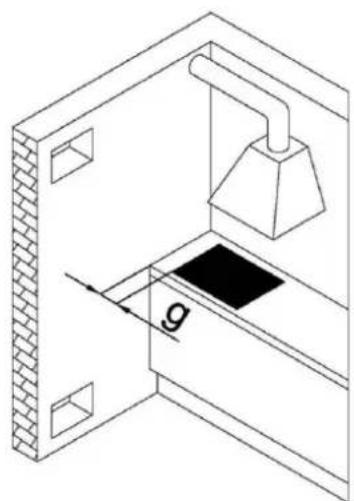
- A minimum safety distance must be maintained between the appliance and the cooker hood above it. See the cooker hood manufacturer's operating and installation instructions for details. If the manufacturer's instructions are not available or, if there are any flammable objects (e.g. utensil rails, wall units etc) above the appliance, a minimum safety distance of at least 800 mm must be maintained between them and the appliance below.
- Fit the wall units and cooker hood before fitting the appliance to avoid damaging it.
- The front part must have an opening of no less than 5 mm.
- The appliance must not be installed over a fridge, fridge-freezer, freezer, dishwasher, washing machine, washer-dryer or tumble dryer.
- Only ovens fitted with a cooling fan may be installed underneath this appliance.
- Before installing an oven, the rear wall of the kitchen furniture element should be removed in the area of the appliance cut-out. Furthermore, a gap of at least 5 mm should be left at the front side.

| a | ≥800 mm |
| b | ≥50 mm |
| c | ≥20 mm |
| d | ≥80 mm |
| e | ≥5 mm |
| f | ≥30 mm |
| g | ≥250 mm |

BUILT-IN SIZES
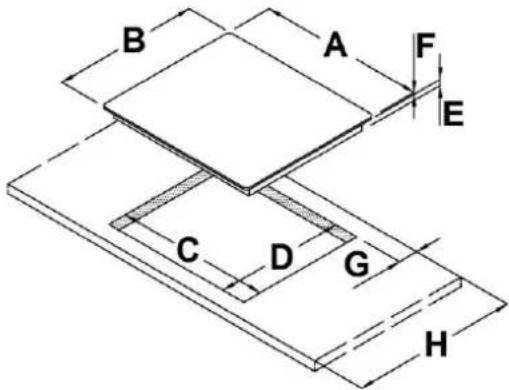
| 7380645 | 7381645 | 7381245 | 7382645 | 738364 | 5 7384645 | ||
| A 290 | 580 | 580 | 770 | 770 | 850 | ||
| B | 510 | 510 | 510 | 510 | 510 | ||
| C 270 | 560 | 560 | 750 | 750 | 840 | ||
| D 480 | 480 | 480 | 480 | 480 | 480 | ||
| E 55 mm | 55 mm | 55 mm | 55 mm | 55 mm | 55 mm | ||
| F 6 mm | 6 mm | 6 mm | 6 mm | 6 mm | |||
| G ≥ 50 mm | ≥ 50 mm | ≥ 50 mm | ≥ 50 mm | ≥ 50 mm | ≥ 50 mm | ≥ 50 mm | |
| H ≥ 600 mm | ≥ 600 mm | ≥ 600 mm | ≥ 600 mm | ≥ 600 mm | ≥ 600 mm | ≥ 600 mm | |
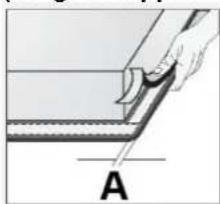
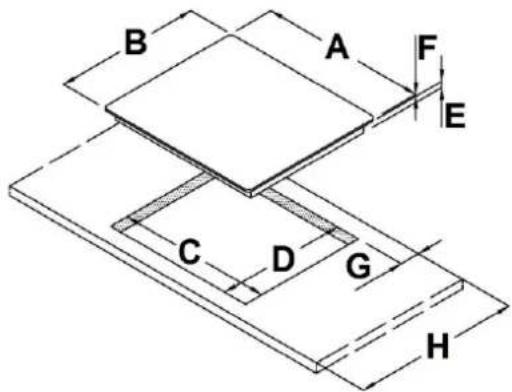
Installing the foam gasket (for glass appliances)
natural_image
Illustration of a hand holding a tool interacting with a layered material, labeled A (no text or symbols on the diagram itself)Before inserting the appliance into the opening in the kitchen worktop, the supplied foam gasket must be attached to the lower side of the glass.
Do not install the appliance without the foam gasket!
The gasket should be attached to the appliance in the following way:
- Remove the protective film from the gasket.
- Attach the gasket to the lower side approximately A = 2 - 3mm from the edge. The gasket must be attached along the entire length and should not overlap at the corners.
- When installing the gasket, make sure that the glass does not come into contact with any sharp objects.
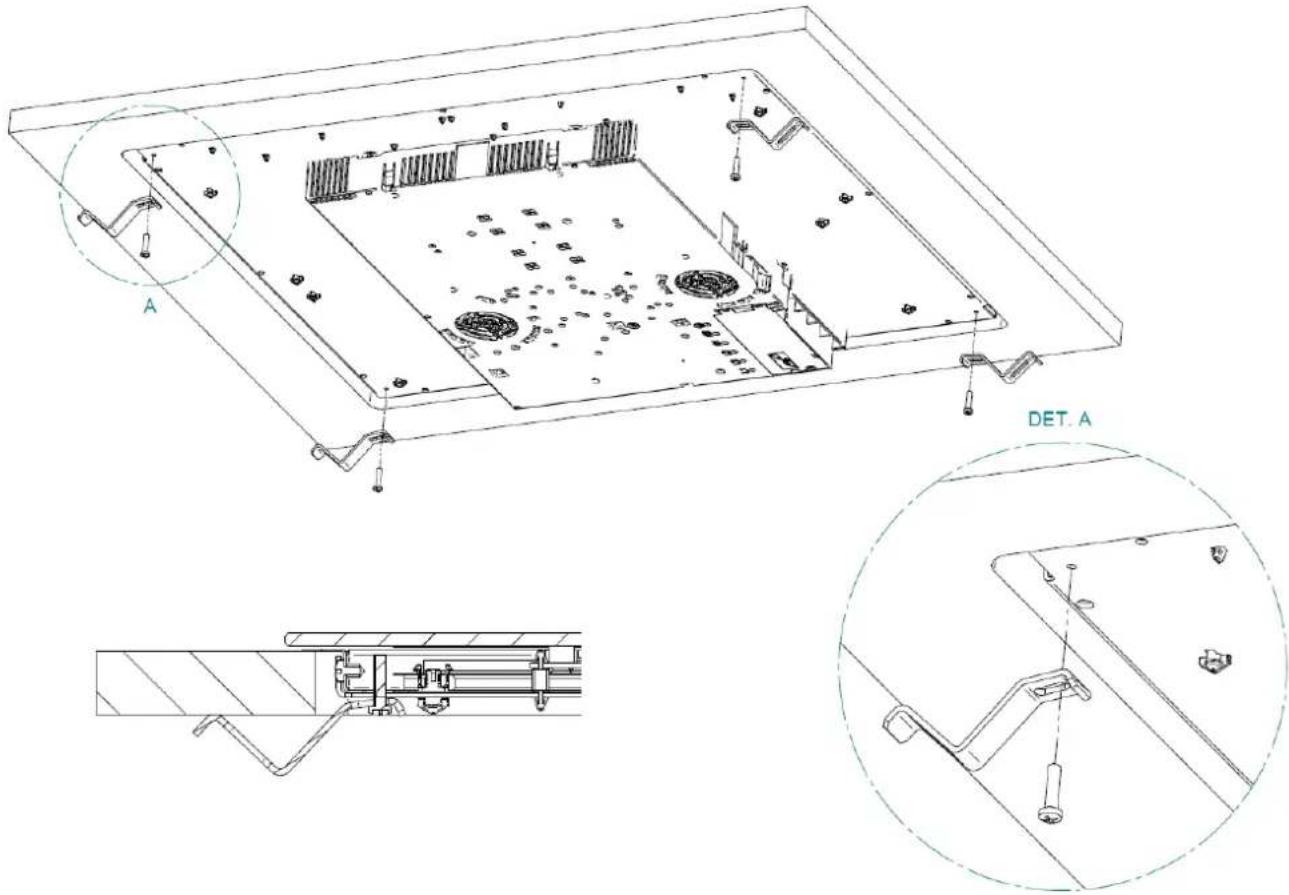
The fixing of the appliance to the worktop is achieved by using the brackets supplied in the accessory bag. After applying the gasket and positioning the top in the recess hole, position the brackets and secure them using the screws provided. Use the holes in the four corners of the hob.

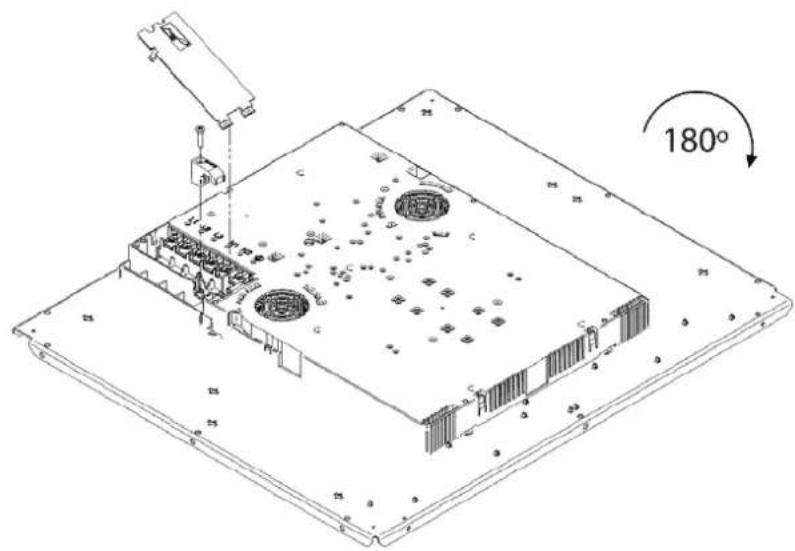
- The appliance may ONLY be connected by an authorized qualified technician.
• Electric system protection should comply with all relevant regulations.
- The connection clips can be accessed when the connection clip covers are opened / removed.
- Before connecting the appliance, make sure the voltage indicated on the rating plate is consistent with the voltage in your home network. Connection voltage should be checked by a qualified technician using a corresponding measuring device!
- The rating plate with basic information is attached on the lower side of the appliance.
- In order to make a fixed connection to the mains, insert an all-pole circuit breaker between the appliance and the mains. This device shall have a contact separation in all poles, providing full disconnection under overvoltage category III conditions.
- The current conducting and isolated parts must be protected from any possibility of direct contact.
- Before any intervention, disconnect the appliance from the power mains. Connect the appliance in compliance with the electric connections diagram supplied; make sure the relevant network voltage is observed!
- The ground wire should be connected to the clip indicated by the earth symbol.
- The mains cable should be fed through the fastening clip which protects it from being accidentally pulled out.
• After connecting the appliance, turn on all cooking zones / heaters for approximately three minutes to make sure they are operating correctly.
- Incorrect connection may destroy parts of the appliance, making the warranty void!
- Connection cable on the back of the appliance should be led in such way that it DOES NOT touch the appliance back wall, as this part will get very hot during operation.
- The appliance is generally configured to the maximum available power, shown in the technical data table. It's possible to set an operating mode with power limitation. This setting can be made at the time of installation or subsequently by a specialized technician. See chapter on power limitation setting.
Installation diagram


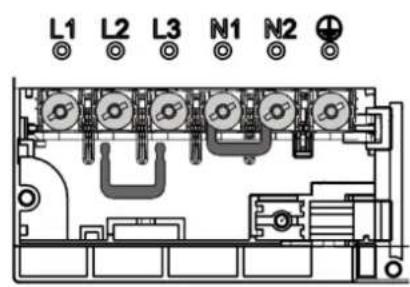
Use cables type: H05V2V2-F
| LIVE | L1 – L2 – L3 | BROWN – BLACK - GREY |
| EARTH |  | GREEN / YELLOW |
| NEUTRAL | N1 – N2 | BLUE |
| Model | Supply Voltage / Frequency | Number of phases | Power cable section | Connection |
| 7380645 | 220-240 V~ 50/60 Hz 1 phase + N 3 x 2,5 mm2 | 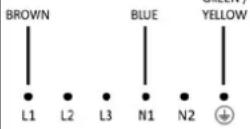 | ||
| 7381645 | 220-240 V~ 50/60 Hz 1 phase + N 3 x 4 mm2 | 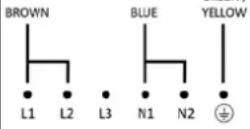 | ||
| 7381245 | ||||
| 7382645 | 380-415 V ~ 50/60 Hz 2 phases + N 4 x 2,5 mm2 | 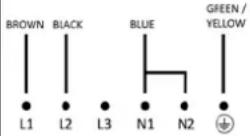 | ||
| 7383645 | 220-240 V~ 50/60 Hz 1 phase + N 5 x 2,5 mm2 | 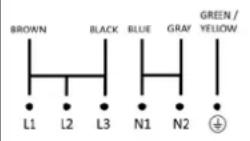 | ||
| 7384645 | 380-415 V ~ 50/60 Hz 3 phases + N 5 x 1,5 mm2 | 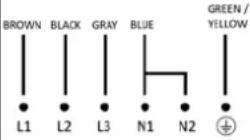 | ||
WARNING! THIS APPLIANCE MUST BE GROUNDED
The electrical safety of this appliance can only be guaranteed when continuity is complete between it and an effective earthing system, which complies with current local and national safety regulations.
You can access terminal block at the bottom of the appliance. Open terminal block with the use of a screwdriver with a slotted tip. Make electrical connection as shown in the table above, depending on the model purchased and the type of electrical connection.
Basic adaptation of environment sensors
After each connection to electrical network, basic adaptation is automatically performed which ensures the optimal function of the sensors. All displays light up for a few seconds. During sensor adaptation, there must be no objects. If not, the adaptation stops until you remove the objects. During this time you cannot use the cooking panel.
POWER LIMITATION SETTING
The appliance is generally configured to the maximum available power, shown in the technical data table.
However, an operating mode with power limitation can be set. In this way, the maximum power supplied by the hob is limited to a fixed value.

The power limitation setting must ONLY be performed by a specialized technician.
To set the power limitation, do the following:
- Connect the hob to the power supply.
- Within two minutes, access the Service Menu by simultaneously pressing the =0 and || keys until you hear an acoustic signal.
- Press two illuminated slider cursors until you hear a second beep. The "Timer" display shows [CF6].
- Press button. The "Timer" display shows [PHA].
- Use slider control (left end -, right end +) to select desired power level. Selected level is shown on display of a cooking zone. The correspondence between the power levels and limitation values are shown in table below.
- To confirm selection and exit the Service Menu, press =0 and || keys simultaneously. To exit the Service Menu without making changes, press. ⏻
WARNING! The power level selected must be according to the fuses installed.
Power level chart
| Model | 7380645 | 7381645 – 7381245 - 7382645 | 7383645 | 7384645 |
| 0 (Default) | 3700 W | 7400 W | 11100 W | 10400 W |
| 1 | 2800 W | 2800 W | 2800 W | 2800 W |
| 2 | 3500 W | 3500 W | 3500 W | 3500 W |
| 3 | - | 4500 W | 4500 W | 4500 W |
| 4 | - | 6000 W | 6000 W | 6000 W |
| 5 | - | - | 7400 W | 7400 W |
| Model | 7380645 | 7381645 - 7381245 - 7382645 | 7383645 | 7384645 |
| Layout |  |  | 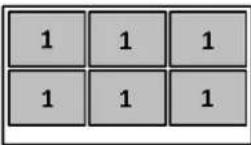 | 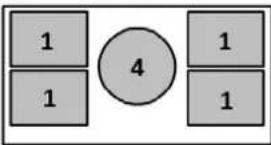 |
| Sipply voltage | 220-240 V ~ 1N | 220-240 V ~ 1N380-415 V ~ 2N | 220-240 V ~ 1N380-415 V ~ 3N | 220-240 V ~ 1N380-415 V ~ 3N |
| Supply frequency | 50 / 60 Hz | 50 / 60 Hz | 50 / 60 Hz | 50 / 60 Hz |
| Cooking zones | 1)210 x 190 mm - 2,1 kW(P = 3,0 kW) | 1) 210 x 190 mm - 2,1 kW(P = 3,0 kW)2) ∅ 200 mm - 2,3 kW(P = 3,0 kW)3) ∅ 145 mm - 1,4 kW(P = 1,85 kW) | 1) 210 x 190 mm - 2,1 kW(P = 3,0 kW) | 1)210 x 190 mm - 2,1 kW(P = 3,0 kW)4) ∅ 250 mm - 2,3 kW(P = 3,0 kW) |
| Total power | 3,7 kW | 7,4 kW | 11,1 kW | 10,4 kW |
Information accordingly with Regulation (EU) 66/2014
| Model | 7380645 | 7381645 - 7381245 - 7382645 | 7383645 | 7384645 | |||
| Type of hob | Induction hob | Induction hob | Induction hob | Induction hob | |||
| Number of cooking zones | 2 | 4 | 6 | 5 | |||
| Heating technology | Induction cooking zones | Induction cooking zones | Induction cooking zones | Induction cooking zones | |||
| Useful surface area of cooking zones | 2x 210 x 190 | 2x 210 x 190 | ∅ 200 | ∅ 145 | 6x 210 x 190 | 4x 210 x 190 | ∅ 250 |
| EC electric cookingEnergy consumption per cooking zones calculated per kg[Wh/kg] | 187 | 187 | 185,2 | 184 | 187 | 187 | 186 |
| EC electric hobEnergy consumption for the hob calculated per kg [Wh/kg] | 187 | 185,8 | 187 | 186,8 | |||
OPERATION
Cooking zones function principle
Appropriate cookware

The hob is fitted with high power induction hotplates. Heat is generated directly at the bottom of the dish, where it is most needed, without any losses through the glass surface. The glass surface is not heated directly, but only by return heat transmitted by the dish. This heat figures as H after the hotplate is turned off.
The induction hotplate generates heat from the induction coil, installed underneath the glass surface. The coil creates magnetic field at the bottom of the dish (which can be magnetized) which in turn originates whirling flows of current which then heat.
- Induction hotplate will function perfectly only if appropriate pot is used.
- The pot should be in the middle of the hotplate during cooking.
- The appropriate pot is the one which enables induction, for example steel, enamel or steel alloy. Pots made from steel alloy with copper or aluminium bottom, or glass pots are inappropriate.
- If you use the pressure pot, keep it under close surveillance until proper pressure is obtained. Hotplate should first operate on maximum power, then follow the manufacturer's instructions.
When buying cookware, check if it bears the label "allows induction".
| COOKING ZONES | ∅ MIN. PAN BOTTOM |
| 210x190 mm(SINGLE) | ∅ 110 mm |
| 210x190 mm(BRIDGE) | ∅ 230 mm |
| ∅ 145 | ∅ 90 mm |
| ∅ 200 | ∅ 110 mm |
| ∅ 250 | ∅ 130 mm |
Note:
When Bridge function is selected, you can use the created zone in different ways, with one or two pots.
If you use larger pots than the recommended maximum size, the heating time will be longer, because the heating will propagate from center to edges of the pot by conduction, in this case also the temperature will be very inhomogeneous.
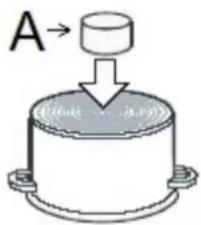
Magnet test
Use small magnet A to test if the dish bottom is magnetic. Only dishes where magnet sticks to the bottom are suitable.
Dish recognition
One of great advantages of the induction hotplate is dish recognition.
When the hotplate is on, the power indicator displays If you place the dish over that hotplate within the following 10 minutes, the hotplate recognizes the dish and turns on to the pre-set power value.
At the moment you remove the dish from the hotplate, power is suspended. If you place smaller dish upon the hotplate and it is recognized, the hotplate will only use the amount of energy required to heat the dish according to its size.
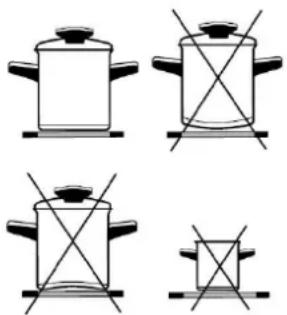
Hotplate may be damaged if:
• empty hop are heated up.
- you don't use the appropriate pots.
- you use clay dishes which leave scratches on the glass surface.
- you don't wipe the pot bottom.
The use of bad quality cookware or any adapter for non-magnetic cookware invalidates product warranty. In this case, the manufacturer cannot be held responsible for any damage caused to the appliance and / or objects closed to the same.
Power regulation
Heating power of the hotplates may be set at ten different levels.
| Power setting | Purpose |
| 0 | Off, using remaing heat |
| 1-2 | Maintaining warm food, slow simmer of smaller quantities |
| 3 | Slow simmer (continuation of cooking after a powerful start-up) |
| 4-5 | Slow cooking (continuation of larger quantities, roasting larger chunks) |
| 6 | Roasting, Browning |
| 7-8 | Roasting |
| 9 | Start of cooking, roasting |
| A | Automatic heat up |
| P | Especially powerful setting for extremely large quantities of food |
The chart indicates illustrative use of each power setting.
Energy saving tips
- When buying pots, be careful in selecting size: pot diameter usually refers to the top edge of the pot, which is often larger than the bottom;
- Steam-pressure pots, which use pressure in tightly sealed interior, are especially economic, and save both time and energy. Shorter cooking time leaves more vitamins in food;
• Always leave enough water in steam-pressure pots, otherwise it may result in overheating which may damage both the pot and the appliance;
• Always cover pots with lids of appropriate size; - Use such pot size to accommodate the quantity of food to be prepared.
Hob Control
- After turning the ceramic glass hob on all displays come on for a moment. The hob is ready for operation.
-
The hob is fitted with electronic sensors which are switched on if you touch the relevant circle for at least one second.
• Each sensor activation is followed by a sound signal. -
Avoid placing any objects on sensor surface (possible error signalization ↗).
• Always keep the sensor surface clean.

- ON/OFF hob
- Key-lock
- Pause and recall
- (-) Timer
- (+) Timer
- Timer
- Slide control
- Warming
Slide Control
| 0 | 0 |
| 5 | Medium power |
| P | Full power |
Turn the hob on

- Press Ⓤ for at least one second.
- The hob is now active, and all cooking zone displays indicate
. Now you need to select the next setting within 10 seconds, otherwise the hob switches off.
Turn cooking zones on
After turning the hob, within the next 10 seconds start one of the cooking zones. Set the power level 1-9 by touching the slider control.
- At the first touch, the level is set according to the part of the slider that you touch. Upon the slider control, the LEDs light up, according to the level set.
- By sliding along the slider, the power level setting is changed. By sliding to the right, the level increasing, while sliding to the left decreases the level.
- When you move your finger away from the slider control, the cooking field starts to operate at the level set.
Turn cooking zones off
If a specific point of the slider control is pressed for at least 3 seconds, the automatic cooking is activated (see Automatic fast heating).
• Selected hotplate must be activated.
- By touching the slider sensor at the start, bring the power setting to 0. Short beep confirms the OFF position.
• The hob is switched off by pressing ⏻
- The sound signal beeps and all indicators go off, except for those hotplates which are still hot and display the warning sign H as an indication of the remaining heat.
Turn the hob off
Key-lock
By activating the key lock protection, you can stop the operation of the appliance and the use of hotplates.
Activation
• The cooktop must be turned on.
- Press = 0 for approximately 1 second, the corresponding LED turns on above the key, the block is active.
- Safety lock prevents the activation of all sensors, except for ⏻ and =0.
- If the hob is switched off when the lock function is activated, it remains in memory until a new switch on of the hob.
- When set timers end their time, alarms can be switched off pressing or without need for unlocking the control.
Deactivation
The cooktop must be turned on
Press =0 for 1 second; after that, the unlocking is confirmed by a beep.
Child-Lock
This function can only be activated/deactivated after turning on the hob with ⏻ and with all cooking zone at zero level.
Activation
- Press =0 and || simultaneously for 3 seconds.
• Function is active and all displays show L - Hob control remains locked and switches automatically off after 10 sec.
The Child-Lock deactivates all keys except ⏻. Once activated electronic stays locked even if the control is switched off and on again.
Deactivation
- Within 10 sec. press =0 and || simultaneously for 3 seconds.
Pause
The execution of the function is possible only if at least one cooking zone is on. In pause mode, the cooking process is suspended and the hob does not deliver power.
Activation
- Press || for at least 1 second, the corresponding LED turns on above the key and all displays show ||
While the Pause function is active
- Any Timer (also Alarm Timer) set before the pause will be stopped during the pause and continue when pause mode is quitted.
• Cooking zones are turned off. - A selected booster or heat up time automatic function is terminated.
- Residual heat calculation and maximum operation time limitations will not be interrupted and keep on working in the background.
Functional LED's such as Timer, multi-zone, keep on glowing according to their status.
The pause mode can only be active for maximum 10 min.
Throughout the pause time, ⏻ can be used to switch the control off. In this case the pause mode is also deactivated.
Deactivation
- Press ||, the LEDs light up above the cursor of one of cooking zones.
- Within 10 seconds press and scroll from the left to the right on the slider cursor of the illuminated area. The LED above the pause key turns off and the condition before the pause mode is restored.
Recall
If the control was accidentally switched off through the main (I) all settings can be restored using the recall function.
After switching the control off from the main switch the user has 6s to switch the control on again and then he has another 6s to press || in order to recall the settings.
The recall function can only be used if at least one cooking zone was active (cooking level >0) independent from key lock.
Remaining heat indicator
Appliances also features remaining heat indicator H. Hotplates are not heated directly, but through return heat radiating from the dish. As long as H is on after the hotplate was switched off, the remaining heat may be used for warming up food or for melting.
Even when H disappears, the hotplate may still be hot.

Be careful of burns!
Fast cooking
Extra powerful setting may be additionally switched on for fast cooking. This extra power is used for heating large quantities of food.
After switching on, the extra power is activated for 10 minutes then automatically switches back on to the maximum normal level 9.
During the time extra power is activated, the power of other hotplates is limited. This is indicated on the power display by intermittently flashing the selected cooking level and limited power for a few seconds.
Activation
- Select the desired cooking zones and move the slider control to the extreme rights to activate the extra power P.
• The extra power is active.
• The display shows P
Premature deactivation
Press and scroll on the slider control of the desired zone, until you get to 0 if you want to turn off the zone, or until the wanted cooking level.
Heat up time automatic
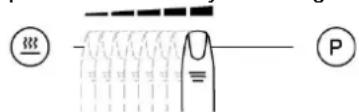
POWER MANAGEMENT SYSTEM
The Power Management system distributes power between the available cooking zones arranged in pairs (such as figures on the side), providing maximum power at a cooking zone and automatically reducing the power available to the other one. The display of the second cooking zone alternates, for a few seconds, the power of cooking chosen and the limited power.

In certain circumstances, the Extra powerful setting function may turn off automatically to protect the electronic components inside the hob.
This function preheats the burner on maximum power in order to bring it rapidly up to the required temperature. After a given time interval, the power level returns spontaneously to the established setting.
It may be switched on in any of the hotplates for all power settings except for setting "9" where power is set at maximum all the time.
Activation
• Automatic cooking mode is activated on any idle hotplate.
- Choose the required continuous cooking level and hold it for 3 seconds.
- The activated heat up time automatic will be displayed through alternating between R and the selected continuous cooking level on the display. As soon as the parboiling time is over, the preselected continuous cooking level is valid again.
- Once the time in the chart below expires, the function is switched off and disappears. You can also switch the automatic cooking mode off anytime by modifying power level.
| Power setting | 1 | 2 | 3 | 4 | 5 | 6 | 7 | 8 |
| Max. power cooking time (minutes) | 40 | 72 | 120 | 176 | 256 | 432 | 120 | 192 |
Bridge
With the bridge function two separate cooking zones with the same diameter and equal
power. The bridge function is available for cooking zones showing symbols UN Two cooking zones can be turned on at the same time and controlled with only one operation
Activation
- Whether the two zones are working at a different level, whether they are at level 0, simultaneously press anywhere on the slider controls of the zones.
- Now the two areas work together, the LEDs to the right of the corresponding displays turn on. The level is shown on the display of the control zone, in the meanwhile the controlled zone's display turns off.
-
When this function is active, you can set the timer, the LED lights on near both displays of the zones.
-
If in 10 uninterrupted minutes no cookware is detected on one of the two elements, the bridge function is automatically deactivated.
- The end of the Function can be done by repeating the simultaneous selection of both cooking elements (the same as activation).
- If the function is deactivated while in operation, than both cooking elements go to level 0 and can then be set again.
Deactivation
Warming
The warming function is used to keep cooked food warm. Hence this function can also be used as melting or simmer function.
Activation
- Press 1 of a cooking zone activates the "warming" 3 ;
• If 12 is pressed a second time “warming” function ends
Safety switch off
Maximum continuous operation of a particular hotplate is limited, and the duration is displayed in the above chart. When the hotplate is switched off by the safety mechanism, the indicator displays symbols O, or H in case there is any remaining heat left.
| Power setting | Minutes lapse prior safety switch off |
| Warming | 120 |
| 1 | 522 |
| 2 | 402 |
| 3 | 318 |
| 4 | 258 |
| 5 | 210 |
| 6 | 168 |
| 7 | 138 |
| 8 | 114 |
| 9 | 90 |
| P | 10 |
Example:
Set the hotplate to power level 5 and leave it operate for some time. If you do not change the above setting, the safety mechanism will switch the hotplate off after 210 minutes.
Protection from overheating
Induction hotplate is also fitted with safety device against overheating which protects electronic parts from damages. This device operates on several levels. When temperature of the hotplate excessively rises, it switches on two-stage fan. If this is not enough, extra powerful heating is deactivated, and finally the safety device either reduces the heating power of certain hotplates or turns them off completely. When the hotplate cools off, the full power of hotplate is again available.
Timer
Use a timer facilitates cooking by setting the time of hotplate operation. For each zone it's possible to set an independent timer
Activation
- The cooktop must be turned on and the zone where you want to set the timer must be working.
- Simultaneously press and , the timer's display shows 0.00 and , of the first active cooking zone from the left, lights on
- Simultaneously press and as many times as necessary, to select the zone where you want to set the timer. lights on only for active zooking zones.
- Within 10 seconds since pressing and set the timer value by pressing or
• The value of the timer can be displayed: - in minutes and seconds up to 9min59sec;
- in hours and minutes up to 9h59min, in this case the word "min" is shown under the timer's display.
Operation time can be set for each hotplate separately.
Changing pre-set cooking time
Cooking time can be changed anytime during the operation.
- Simultaneously press .
- Simultaneously press (-) and (+) as many times as necessary, to select the zone where you want to set the timer. Light on only for the active cooking zones.
- Within 10 seconds press and to modify the time.
Checking remaining cooking time
- Last set timer is always displayed ( has a lighting stronger than the others);
• Simultaneously press ⊖ and ⊕; - Simultaneously press ⏻ and ╗ as many times as necessary, to select the zone of which you want to see the remaining time. The zone is identified by the lighting on ⚠
- The timer's display will display the remaining time of the selected cooking zone.
Deactivation
When pre-set time elapses, a beep signals the end, and the hotplate is switched off. Switch off the alarm by pressing the sensor ⊖ or ⊕ or it switches off automatically after 2 minutes.
If you want to deactivate the timer prior the end of pre-set time:
- Simultaneously press and ; +
- Simultaneously press and as many times as necessary, to select the zone where you want to set the timer. The zone is identified by the lighting on of
- Press ⊖ to the value 0.
- is turned off and the timer is deactivated.
Alarm
Timer can be used as alarm also if it is already employed in timer control of one of the hotplates.
Timer setting
With the hob off:
- Press ⏻ to activate the cooking hob;
- Simultaneously press and to activate the alarm. The timer's display shows 0.00. If some cooking zone is active, 3 of the first active cooking zone from the left, lights on;
- Simultaneously press and as many times as necessary to select the alarm. The respective is located between or ;
• The timer value is set by pressing ⊖ or ⊕; - It's possible setting the time in minutes and seconds or, in hours and minutes also for the alarm.
Switching the alarm off
When the pre-set time expires a beep is heard which you can either turn off by pressing or , or leave it to turn off automatically after 2 minutes.
If you want to switch the timer off prior expiry of pre-set time:
- Simultaneously press and ; +
- Simultaneously press and as many times as necessary to select the alarm, light on;
-
Press ⊖ until the value □. The alarm is deactivated.
-
During the warranty period, only a service center authorized by the manufacturer may carry out any repairs.
- Before making any repairs, make sure the appliance is disconnected from the power mains either by removing the fuse or by disconnecting the power plug from the wall outlet.
- Unauthorized tampering with and repairs of the kitchen range (cooking hob) can result in electric shock or short circuit; hence, do not attempt to perform any repairs by yourselves. Leave such tasks to an expert or an authorized service unit.
- In case of minor faults or problems with the appliance operation, check the following instructions to see whether you can eliminate the causes by yourselves.
- Elimination of any errors or warranty claims that resulted from improper connection or use of the appliance is not covered by our warranty. In such cases, the costs of repair are borne by the user.
| ERROR CODE | ERROR DESCRIPTION | REMEDY |
| Permanent use of sensors; Control unit cuts off after 10 sec. Water or cooking utensils on the glass above the control unit.. | Cleaning of the operational surface. If the problem persists, Contact authorized center for technical assistance, specifying the error code | |
| L | NO error!Child.lock activated | Deactivate child-lock |
| Inappropriated pan | Use appropriate pan. If the problem remainsContact authorized center for technical assistance- specify the error code. | |
| E8 | Incorrect cooling fan operation | Air exhaust blocked, for example by paper.Or fan defectiveContact authorized center for technical assistance,specifying the error code. |
| E3 | Inappropriated pan | Use appropriate pan. If the problem remainsContact authorized center for technical assistance |
| E2 | Excessive overheating of hob | Do not heat empty pans.Use appropriate pots for induction.Let the hob cool down.If the problem persists, contact the authorized technical assistance center, specifying the error code. |
| Er21Er22Er20Er36Er31Er47Er40EAEHU400E4E5E6E7E9 | Contact authorized center for technical assistance, specifying the error code. | |
CLEANING AND MAINTENANCE
natural_image
Abstract curved lines on a black background with faint white marks (no text or symbols)Fig.1

natural_image
Abstract pattern of concentric curved lines on a dark textured background (no text or symbols)Fig.2

natural_image
Abstract pattern of concentric white circles on a black background, no text or symbols presentFig.3

natural_image
Abstract illustration of a white tool interacting with dark circular patterns (no text or symbols)Fig.4

natural_image
Close-up of two curved, elongated white bands against a black background (no text or symbols visible)Fig.5
Ceramic glass hob should be cleaned only when completely cooled down, preferably after each use, otherwise even the slightest stains remaining after cooking may burn into the hob surface with each following use.
For regular maintenance of ceramic-glass hob use special cleansing agents for glass ceramic.
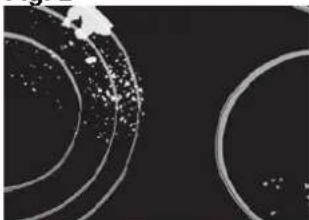
Before each use, wipe the dust and other particles from the hob, they may scratch the surface (Fig. 1).
Use of steel wool, abrasive cleaning sponges, and abrasive detergents can scratch the surface of the hob. The surface may also be damaged by the use of aggressive sprays and inappropriate liquid chemicals (Fig.1 and 2).

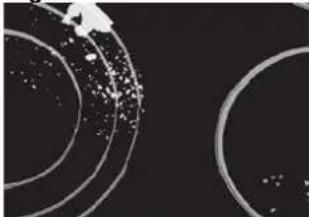
Pattern marks can be erased by the use of aggressive cleansing agents or rough maged cookware bottoms (Fig. 2). Minor stains are removed with moist soft cloth; at the surface should be wiped dry (Fig. 3).
Water stains are removed with gentle vinegar solution, but you must not wipe the frame with it (certain models only), since it may lose its glow. Never use any aggressive sprays or limestone removers (Fig. 3).
Major stains are removed with special ceramic-glass cleansers.
Follow strictly the manufacturer's instructions.
Be careful to remove any remains of cleansing agent from the hob surface, otherwise they will be heated during the next use and can damage the hob (Fig. 3).
Stubborn and burnt stains are removed with special ceramic-glass scraper. Be careful, however, not to touch the hotplate surface with the scraper handle (Fig. 4).
Handle the scraper with utmost care to avoid injuries!
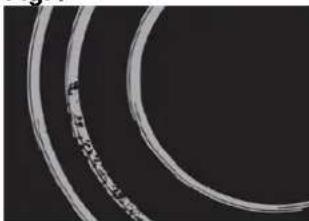
Sugar and sugar containing food may permanently damage the ceramic-glass hob surface (Fig. 5), so the remains of sugar and sugar containing food must be scraped off from the hob surface immediately, when the hotplates are still hot (Fig. 4).
Discoloring of ceramic-glass hob has no effect whatsoever on its operation and stability. In most cases, it appears as the consequence of burnt in food remains, or as a result of dragging pots and pans (especially aluminium or copper bottom cookware) across the surface, and such discoloring is rather hard to remove.

All described faults are mostly esthetical and do not affect directly the operation of compliance. Remedy of such faults is not covered by warranty.
natural_image
Isometric line drawing of a room interior with a lamp, brick wall, and a blackboard (no text or symbols)| 7380645 | 7381645 | 7381245 | 7382645 | 7383645 | 7384645 | ||
| A 290 | 580 580 | 770 770 860 | |||||
| B | 510 510 | 510 510 5 | 10 510 | ||||
| C 270 | 560 560 | 750 750 840 | |||||
| D 480 | 480 | 480 | 480 | 480 | |||
| E 55 mm | 55 mm | 55 mm | 55 mm | 55 mm | 55 mm | ||
| F 6 mm | 6 mm | 6 mm | 6 mm | 6 mm | |||
| G ≥ 50 mm | ≥ 50 mm | ≥ 50 mm | ≥ 50 mm | ≥ 50 mm | ≥ 50 mm | ||
| H ≥ 600 mm | ≥ 600 mm | ≥ 600 mm | ≥ 600 mm | ≥ 600 mm | ≥ 600 mm | ≥ 600 mm | |
natural_image
Illustration of a hand holding a tool interacting with a textured surface, labeled 'A' (no text or symbols on the diagram itself)natural_image
Four line drawings of cooking pots with crossed handles and no text or symbols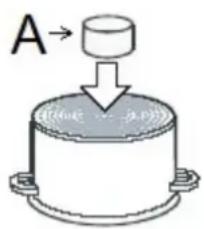

natural_image
Two black rectangular panels with white double-headed arrows, no text or symbols presentENERGIEVERWALTUNGSSYSTEM
natural_image
Abstract curved lines on a dark background with faint diagonal strokes (no text or symbols)| a | ≥800mm |
| b | ≥50mm |
| c | ≥20mm |
| d | ≥80mm |
| e | ≥5mm |
| f | ≥30mm |
| g | ≥250mm |
natural_image
Isometric line drawing of a room interior with a lamp, brick wall, and a labeled component 'g' (no text or symbols beyond the label)MEDIDAS DEL HUECO PARA EMPOTRAR
| 7380645 | 7381645 | 7381245 | 7382645 | 7383645 | 7384645 | ||
| A 290 | 580 580 | 770 770 860 | |||||
| B | 510 510 | 510 510 | 510 510 | ||||
| C 270 | 560 560 | 750 750 840 | |||||
| D 480 | 480 | 480 | 480 | 480 | |||
| E 55 mm | 55 mm | 55 mm | 55 mm | 55 mm | 55 mm | ||
| F 6 mm | 6 mm | 6 mm | 6 mm | 6 mm | |||
| G ≥ 50 mm | ≥ 50 mm | ≥ 50 mm | ≥ 50 mm | ≥ 50 mm | ≥ 50 mm | ||
| H ≥ 600 mm | ≥ 600 mm | ≥ 600 mm | ≥ 600 mm | ≥ 600 mm | ≥ 600 mm | ≥ 600 mm | |
natural_image
Illustration of a hand holding a tool interacting with a textured surface, labeled 'A' (no text or symbols on the diagram itself)natural_image
Four identical line drawings of a cooking pot with handles and crossed handles, no text or symbols present.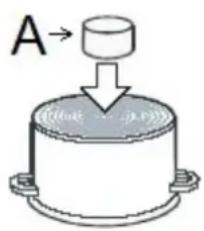

natural_image
Two black rectangular panels with white double-headed arrows pointing up and down (no text or symbols)natural_image
Abstract curved lines on a dark background with faint diagonal streaks (no text or symbols)Fig. 1

natural_image
Abstract pattern of concentric curved lines on a dark textured background (no text or symbols)Fig. 2
natural_image
Abstract circular patterns with scattered white dots on a black background, no text or symbols present.Fig. 3

natural_image
Abstract illustration of a white tool interacting with dark circular patterns (no text or symbols)Fig. 4

natural_image
Close-up of two curved, elongated white bands against a black background (no text or symbols visible)Fig. 5
natural_image
Isometric line drawing of a door with a gasket and handle, no text or symbols presentDIMENSIONS DU RENFONCEMENT

| 7380645 | 7381645 | 7381245 | 7382645 | 7383645 | 7384645 | ||
| A 290 | 580 580 | 770 770 860 | |||||
| B | 510 510 | 510 510 5 | 10 510 | ||||
| C 270 | 560 560 | 750 750 840 | |||||
| D 480 | 480 | 480 | 480 | 480 | |||
| E 55 mm | 55 mm | 55 mm | 55 mm | 55 mm | 55 mm | ||
| F 6 mm | 6 mm | 6 mm | 6 mm | 6 mm | |||
| G ≥ 50 mm | ≥ 50 mm | ≥ 50 mm | ≥ 50 mm | ≥ 50 mm | ≥ 50 mm | ||
| H ≥ 600 mm | ≥ 600 mm | ≥ 600 mm | ≥ 600 mm | ≥ 600 mm | ≥ 600 mm | ≥ 600 mm | |
natural_image
Illustration of a hand holding a tool interacting with a textured surface, labeled 'A' (no text or symbols on the diagram itself)natural_image
Four line drawings of cooking pots with crossed handles and a square base, no text or symbols present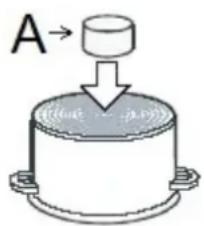

natural_image
Two black rectangular panels with white double-headed arrows pointing upward (no text or symbols)natural_image
Abstract curved lines on a dark background with faint diagonal streaks (no text or symbols)Fig.1

natural_image
Abstract pattern of concentric curved lines on a dark textured background (no text or symbols)Fig.2
natural_image
Abstract circular patterns with scattered white dots on a black background (no text or symbols)Fig.3

natural_image
Abstract illustration of a white tool with a handle and circular patterns on dark background (no text or symbols)Fig.4
natural_image
Close-up of two concentric circular film strips with visible texture and markings (no text or symbols)Fig.5
Via M.S. Ottone 18-20 42041 Brescello (RE) – Italy
www.fosterspa.com
LIB30837
rev. 02 (11-2020)


- Instructions for use
- Instructions for connection
- Rating plate
- INSTALLATION
- Important warnings
- BUILT-IN SIZES
- Do not install the appliance without the foam gasket!
- The gasket should be attached to the appliance in the following way:
- Installation diagram
- Use cables type: H05V2V2-F
- WARNING! THIS APPLIANCE MUST BE GROUNDED
- Basic adaptation of environment sensors
- POWER LIMITATION SETTING
- The power limitation setting must ONLY be performed by a specialized technician.
- OPERATION
- Cooking zones function principle
- Appropriate cookware
- Note:
- Magnet test
- Dish recognition
- Hotplate may be damaged if:
- Power regulation
- Energy saving tips
- Hob Control
- Slide Control
- Turn the hob on
- Turn cooking zones on
- Turn cooking zones off
- Turn the hob off
- Key-lock
- Activation
- Deactivation
- Child-Lock
- Pause
- While the Pause function is active
- Recall
- Remaining heat indicator
- Fast cooking
- Premature deactivation
- Heat up time automatic
- POWER MANAGEMENT SYSTEM
- Bridge
- Warming
- Safety switch off
- Example:
- Protection from overheating
- Timer
- Operation time can be set for each hotplate separately.
- Changing pre-set cooking time
- Checking remaining cooking time
- If you want to deactivate the timer prior the end of pre-set time:
- Alarm
- Timer setting
- Switching the alarm off
- CLEANING AND MAINTENANCE
- ENERGIEVERWALTUNGSSYSTEM
- MEDIDAS DEL HUECO PARA EMPOTRAR
- DIMENSIONS DU RENFONCEMENT
Brand : Foster
Model : KE 86.5F.STD
Category : Cooker