HST471 - Hi-Fi System SONY - Free user manual and instructions
Find the device manual for free HST471 SONY in PDF.
| Technical specifications | SONY HST471 Hi-Fi System |
|---|---|
| Output power | 100 W per channel |
| Player type | CD, MP3, FM/AM |
| Connectivity | Bluetooth, USB, AUX |
| Dimensions | 30 x 25 x 20 cm |
| Weight | 5 kg |
| Usage | Ideal for listening to music at home, parties, events. |
| Maintenance | Regularly clean connections and surfaces, check cables. |
| Repair | Consult a professional for internal repairs, spare parts available. |
| Safety | Avoid exposure to moisture, do not overload electrical outlets. |
| General information | Check audio format compatibility before purchase. |
Frequently Asked Questions - HST471 SONY
User questions about HST471 SONY
0 question about this device. Answer the ones you know or ask your own.
Ask a new question about this device
Download the instructions for your Hi-Fi System in PDF format for free! Find your manual HST471 - SONY and take your electronic device back in hand. On this page are published all the documents necessary for the use of your device. HST471 by SONY.
USER MANUAL HST471 SONY
Cassette Deck Receiver
Operating Instructions ____ EN
Mode d'emploi F
To avoid electrical shock, do not open the cabinet. Refer servicing to qualified personnel only.
Do not install the appliance in a confined space, such as a bookcase or built-in cabinet.
Do not, under any circumstances, place the CD player or any other component on top of the cassette deck receiver HST-471.
- For CD player CDP-C661/CDP-CX571 - The mains lead plug of CDP-C661/CDP-CX571 is a 2-pin type designed to be connected only to HST-471. Do not connect this plug to any other system or mains supply.
IMPORTANT: Never connect two mains leads into a single mains plug.
This system is equipped with Dolby Noise Reduction and Dolby Pro Logic Surround* decoder.
* Manufactured under license from Dolby Laboratories Licensing Corporation. DOLBY, the double-D symbol ☐ and "PRO LOGIC" are trademarks of Dolby Laboratories Licensing Corporation.

If the power switch is kept depressed, you can turn on and off the components by only pressing the SYSTEM POWER switch on the remote.
Table of Contents
Getting Started
Step 1: Hooking up the system...... 4
Step 2: Setting up the speakers ..... 8
Connecting optional AV components 12
Connecting optional outdoor antennas .... 13
The Radio
Presetting radio stations 14
Listening to the radio.... 16
The Tape Deck
Playing a tape.... 17
Recording on a tape 18
Recording from the radio 19
Recording from a tape 20
Inserting a blank space during recording 21
Sound Adjustment
Adjusting the sound 22
Selecting the preset sound fields..... 22
Selecting the surround mode...... 23
Emphasizing the bass sound ...... 24
Additional Information
Precautions 25
Troubleshooting 27
Specifications 29
Index.... 31
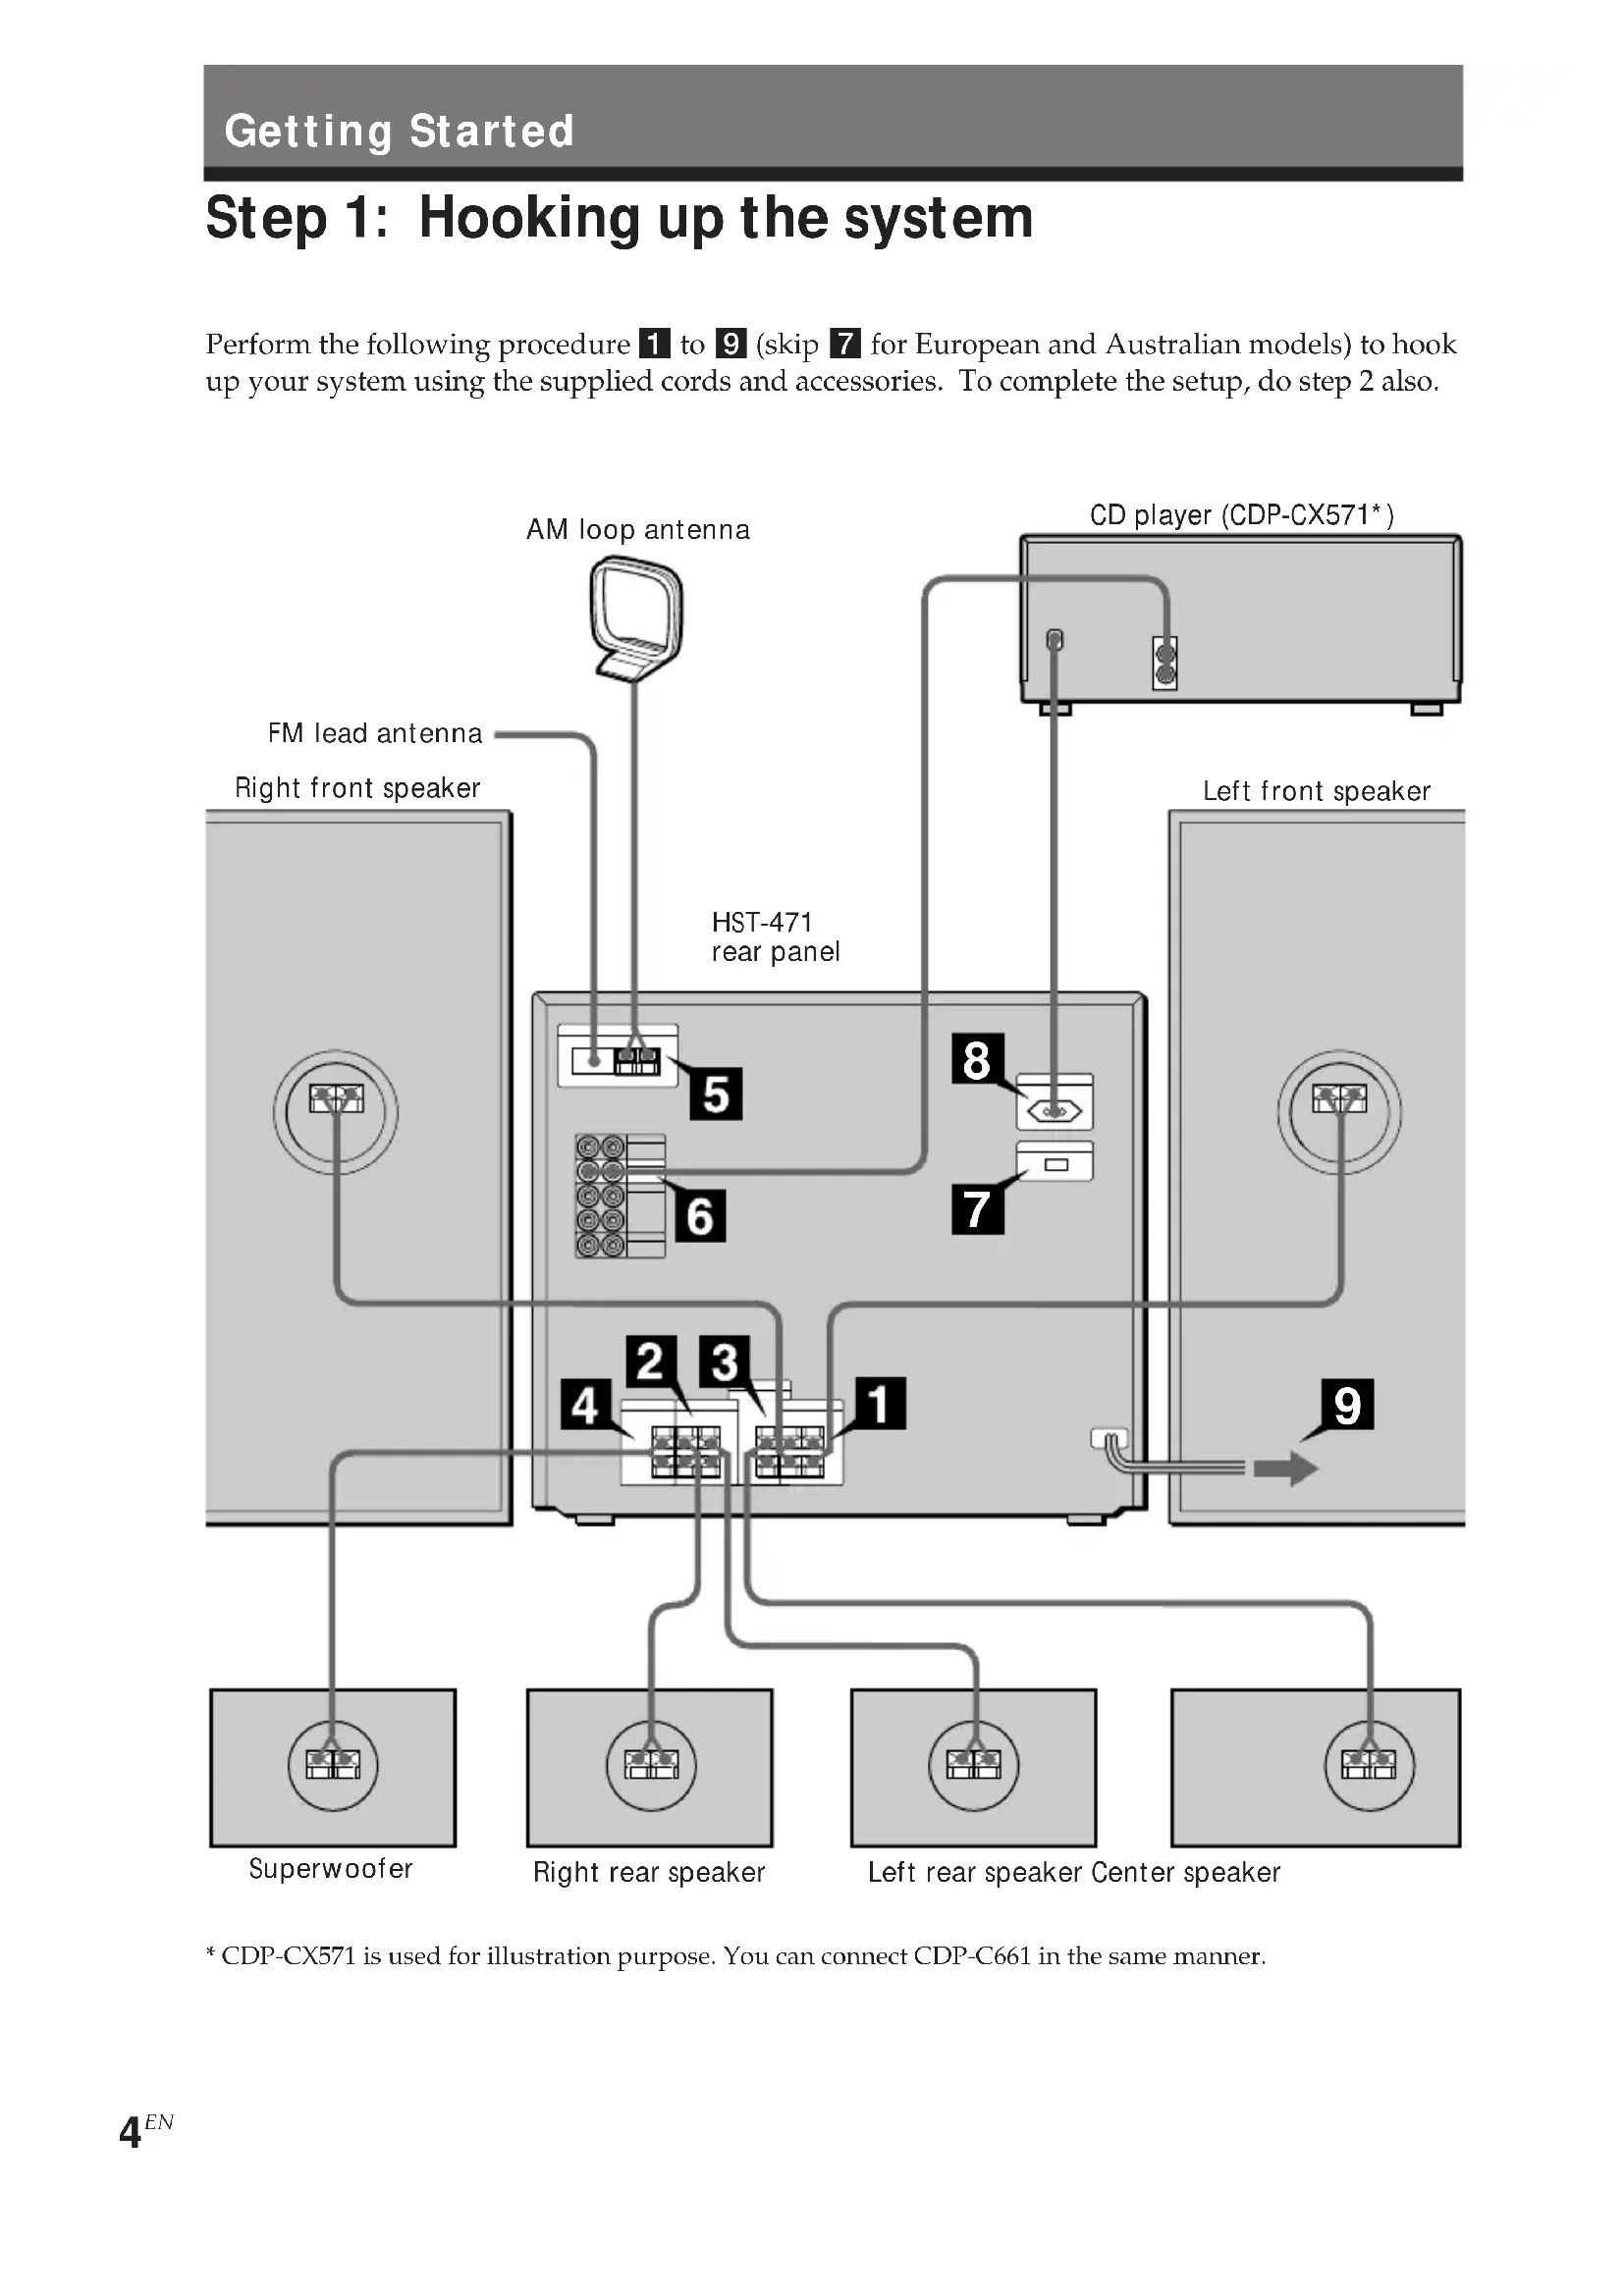
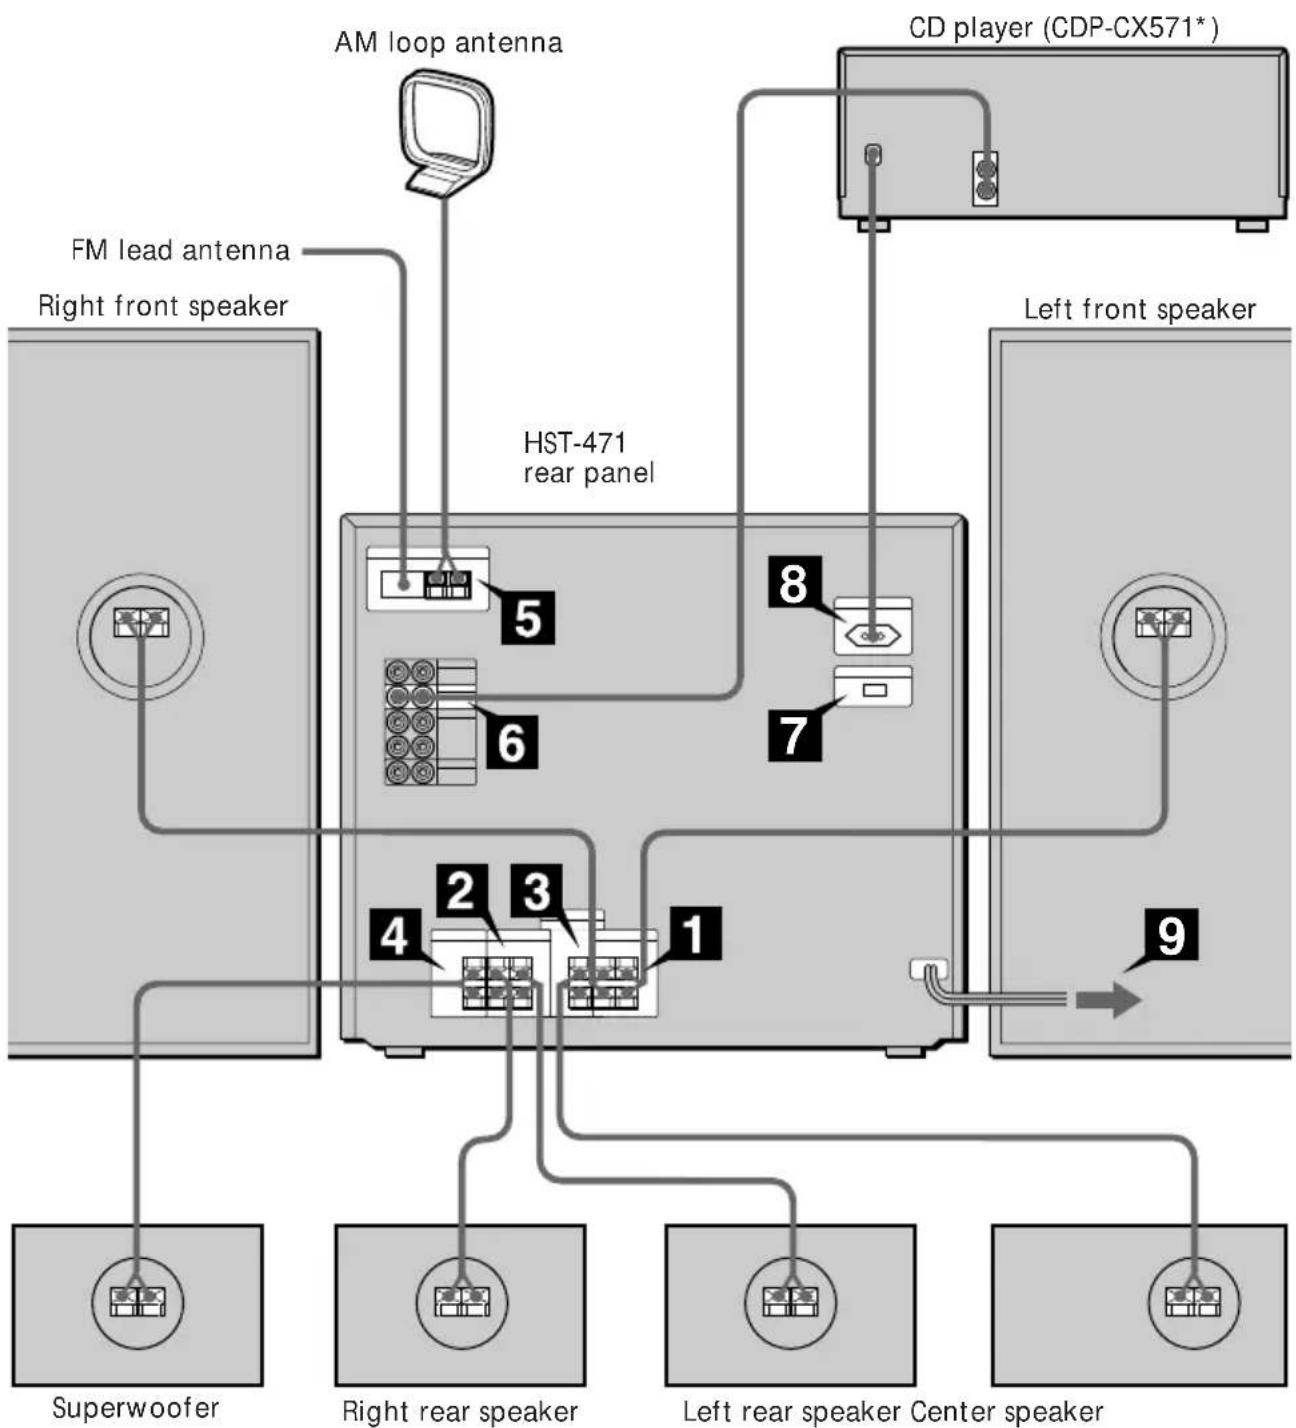
Step 1: Hooking up the system
Perform the following procedure 1 to 9 (skip 7 for European and Australian models) to hook up your system using the supplied cords and accessories. To complete the setup, do step 2 also.
flowchart
graph TD
    A["AM loop antenna"] --> B["HST-471 rear panel"]
    C["CD player (CDP-CX571*)"] --> B
    D["FM lead antenna"] --> B
    E["Right front speaker"] --> B
    F["Left front speaker"] --> B
    G["Superwoofer"] --> B
    H["Right rear speaker"] --> B
    I["Left rear speaker Center speaker"] --> B
    B --> J["1"]
    B --> K["2"]
    B --> L["3"]
    B --> M["4"]
    B --> N["5"]
    B --> O["6"]
    B --> P["7"]
    B --> Q["8"]
    B --> R["9"]
* CDP-CX571 is used for illustration purpose. You can connect CDP-C661 in the same manner.
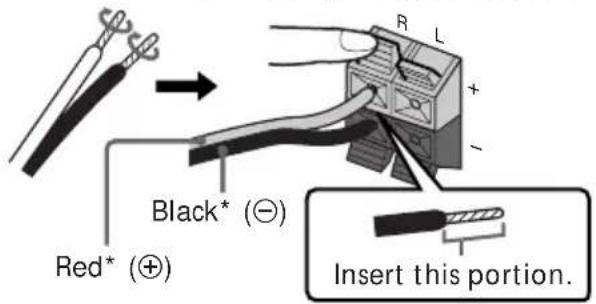
1 Connect the front speakers.
Connect the speaker cords to the FRONT SPEAKER terminals of the same color. Keep the speaker cords away from the antennas to prevent noise.
Pull the lever toward you after connecting the speaker cords.
text_image
Red* (⊕) Black* (⊖) Insert this portion.* The color of your speaker cords might be different. See the manual provided with your speaker system for details.
2 Connect the rear speakers.
Connect the speaker cords to the REAR SPEAKER terminals of the same color.
3 Connect the center speaker.
Connect the speaker cords to the CENTER SPEAKER terminals of the same color.
4 Connect the superwoofer.
Connect the speaker cords to the SUPER WOOFER terminals of the same color.
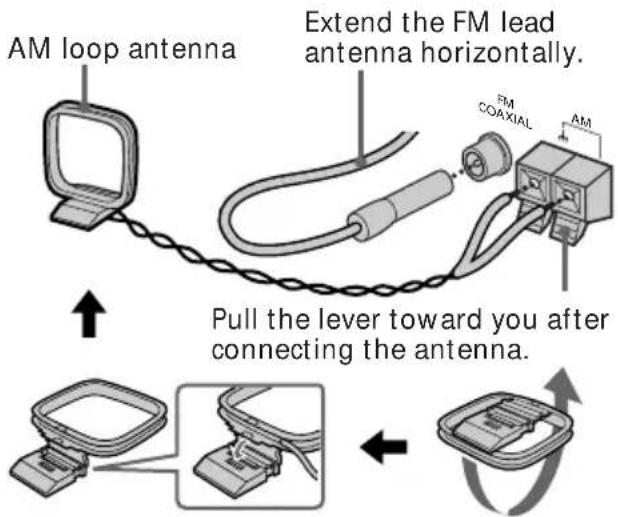
5 Connect the FM/AM antennas.
Set up the AM loop antenna, then connect it.
For European model
text_image
AM loop antenna Extend the FM lead antenna horizontally. Pull the lever toward you after connecting the antenna.For other models
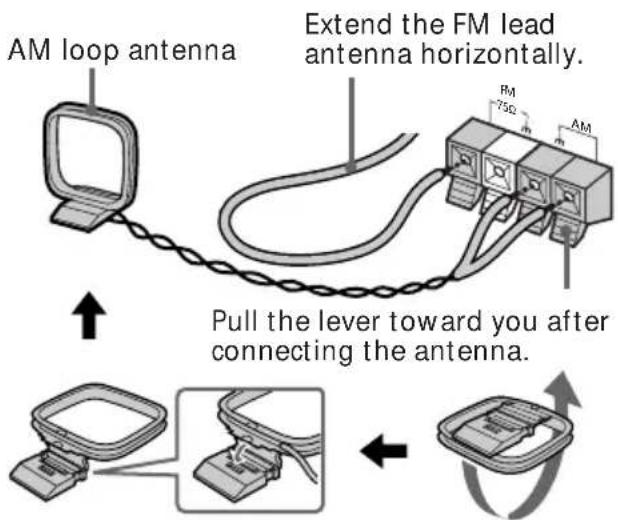
text_image
AM loop antenna Extend the FM lead antenna horizontally. Pull the lever toward you after connecting the antenna.Step 1: Hooking up the system (continued)
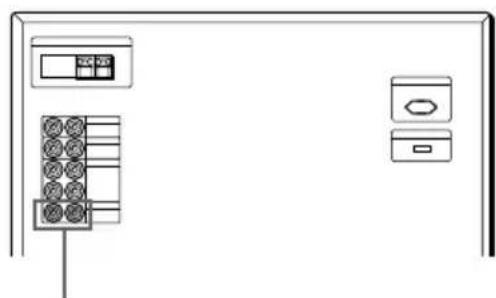
6 Connect the CD player.
Use the audio cord, matching the color of the plugs and the jacks.

natural_image
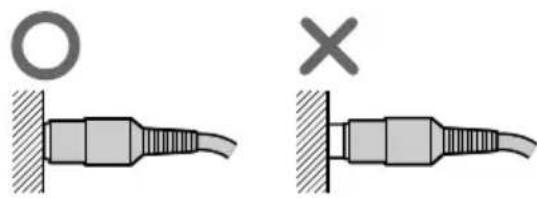
Diagram of two connected audio/video cables with a separate connector (no text or symbols)Insert the plugs firmly, pushing them in all the way.
natural_image
Two mechanical components with no visible text or symbols: one with a circular end and cross, the other with a plus sign (no text or symbols on the parts themselves)7 Set VOLTAGE SELECTOR to the position of your local power line voltage (except for European and Australian models).

text_image
220-240V 110-120V8 Connect the AC power cord from the CD player to the AC OUTLET on the system.
By connecting the AC power cord from the CD player to the AC OUTLET, you can turn on/off the CD player automatically when you turn on/off the system.
natural_image
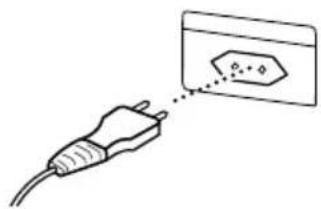
Simple line drawing of a plug with a magnified view showing an electrical component (no text or symbols)9 Connect the power cord from the system to a wall outlet.
Inserting two R6 (size AA) batteries into the remote

natural_image
Diagram showing a device transitioning from a battery pack to a handheld device via cable (no text or symbols present)Tip
With normal use, the batteries should last for about six months. When the remote no longer operates the system, replace both batteries with new ones.
Note
If you do not use the remote for a long period of time, remove the batteries to avoid possible damage from battery leakage.
Before you begin
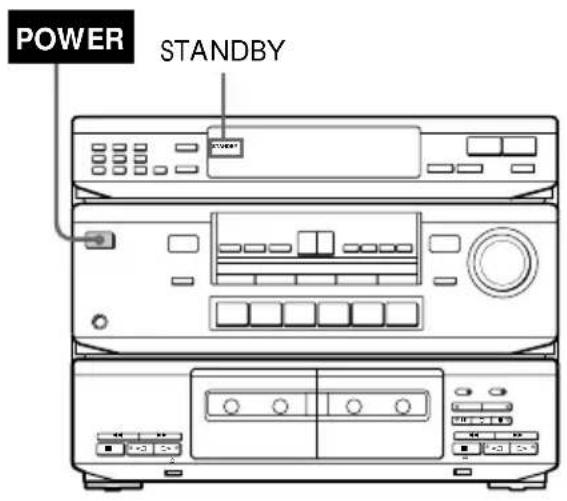
Press the POWER switch on the system to turn it on.
When the STANDBY lamp on the system is lit in red, you can turn on the system by pressing SYSTEM POWER on the remote.
Turning the power off by the remote sets the system to STANDBY mode (the STANDBY lamp is lit).
If you are not going to use the system for a long time, be sure to turn it off by pressing the POWER switch on the system.
text_image
POWER STANDBY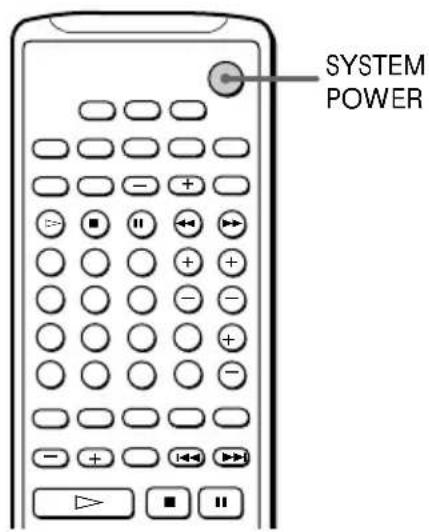
text_image
SYSTEM POWERUsing the remote
You can operate Sony TVs and VCRs and CD players CDP-C661/CDP-CX571 using the supplied remote. Operations using the HST-471 remote are described under the various sections in this manual.
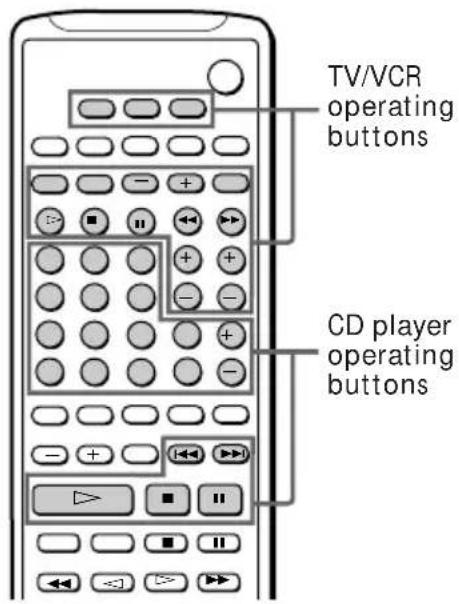
text_image
TV/VCR operating buttons CD player operating buttonsTo operate a Sony TV or VCR
| To | Press |
| Turn on/off a Sony TV | TV POWER |
| Turn on/off a Sony VCR | VTR POWER |
| Switch input signal between TV and VCR | TV/VIDEO |
| Switch output signal from the antenna terminal between TV and VCR | ANT TV/VTR |
| Select the type of VCR to operate | VTR 2 (8 mm)VTR 3 (VHS) |
| Select the preset channels on the VCR | VCR CH +/- |
| Select the preset channels on the TV | TV CH +/- |
| Adjust the volume of the TV | TV VOL +/- |
| Fast-forward or rewind the VCR | ▶▶ or ◀◀ |
| Pause the VCR | ■ |
| Stop the VCR | ■ |
| Play the VCR | ▷ |
Step 1: Hooking up the system (continued)
To operate the CD players CDP-C661/CDP-CX571
To Press
| Select disc numbers DISC SKIP +/-*1 |
| Select disc numbers directly DISC, disc (for CDP-CX571 only) number, then ENTER*2 |
| Select track numbers 1 to 10 |
| Select track numbers over 10 >10*3(for CDP-C661 only) |
| Select track numbers directly TRACK, track (for CDP-CX571 only) number, then ENTER*4 |
| Select a track ▶▶▶ or ◀◀◀ |
| Pause play ■■ |
| Stop play ■ |
| Start play ▷ |
* You cannot use the DISC SKIP - button for CDP-C661.
* Example: To select 24th disc: DISC → 2 → 4 → ENTER
* Example: To select 24th track in the disc: >10 → 2 → 4
*4 Example: To select 24th track in the disc: TRACK → 2 → 4 → ENTER
Step 2: Setting up the speakers
By connecting the speakers, you can enjoy Dolby Pro Logic Surround sound. Dolby Pro Logic Surround is a decoding system standardized in TV programs and movies. Dolby Pro Logic Surround improves sound imaging by using four separate channels. These channels manipulate the sound and enhance the action as it happens on the screen.
Selecting the Dolby Pro Logic Surround mode
To take advantage of Dolby Pro Logic Surround, you should connect at least one pair of rear speakers and/or one center speaker, plus a TV and a VCR. Also, to enjoy a full effect, you need to select the appropriate Dolby Pro Logic mode (NORMAL, WIDE, 3CH or PHANTOM modes) according to your speaker system.
NORMAL mode
Select NORMAL mode if you have front and rear speakers and a small center speaker such as those provided with this system. Since a small speaker cannot produce enough bass, the bass sound of the center channel is output from the front speakers.
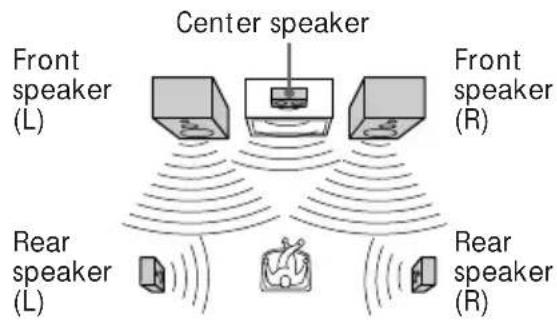
text_image
Center speaker Front speaker (L) Front speaker (R) Rear speaker (L) Rear speaker (R)WIDE mode
Select WIDE mode if you have front and rear speakers and a large center speaker. With this mode, you can take full advantage of Dolby Surround sound.
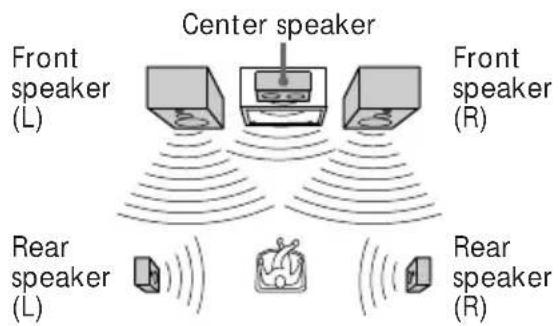
text_image
Center speaker Front speaker (L) Front speaker (R) Rear speaker (L) Rear speaker (R)3CH mode
Select 3CH (3 channel logic) mode if you have front and center speakers but no rear speakers. The sound of the rear channel is output from the front speakers to let you experience some of the surround sound without using rear speakers.
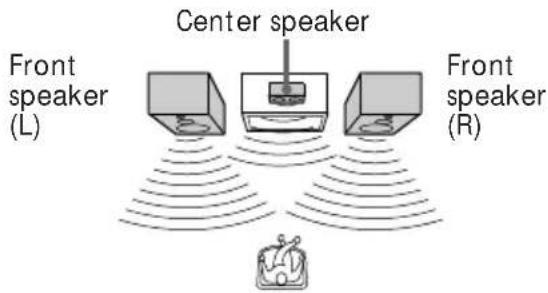
text_image
Front speaker (L) Center speaker Front speaker (R)PHANTOM mode
Select PHANTOM mode if you have front and rear speakers but no center speaker. The sound of the center channel is output from the front speakers.
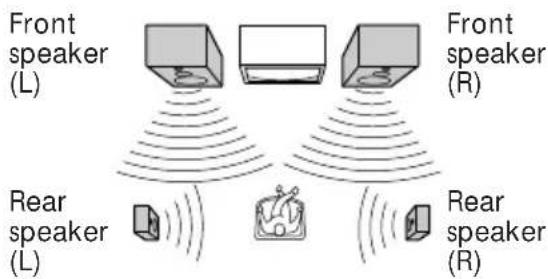
text_image
Front speaker (L) Front speaker (R) Rear speaker (L) Rear speaker (R)Positioning the speakers
Before you connect them, determine the best location for your speakers.
1 Place the front speakers at the angle of 45 degrees from your listening position.
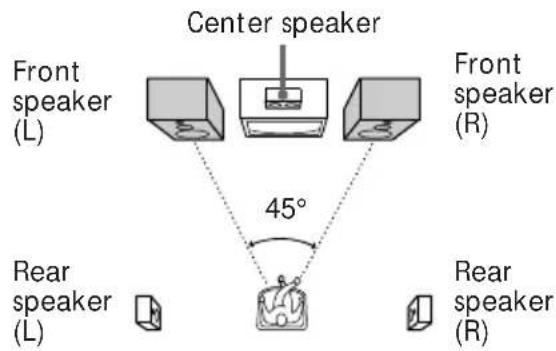
flowchart
graph TD
    A["Front speaker (L)"] --> B["Center speaker"]
    C["Rear speaker (L)"] --> D["Center speaker"]
    E["Front speaker (R)"] --> F["Center speaker"]
    G["Rear speaker (R)"] --> H["Center speaker"]
    B --> I["45°"]
    F --> I
    H --> I
2 Place the center speaker so it is placed at about the same height as the front speakers (A). Align the center speaker with the front speakers or place it a little backward from the front speakers' position (B).

natural_image
Diagram of a multi-tiered TV setup with speakers and a monitor, labeled 'A' (no text or symbols on components)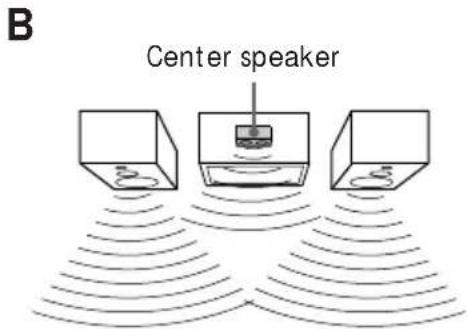
text_image
B Center speakerStep 2: Setting up the speakers (continued)
3 Place the rear speakers facing each other at about 60 to 90 cm above your listening position.
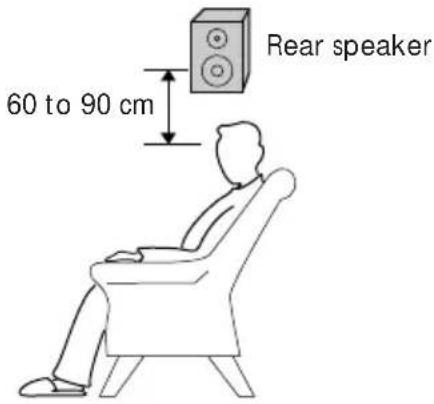
text_image
60 to 90 cm Rear speakerAdjusting the speaker volume
To enjoy Dolby Pro Logic Surround sound, select the appropriate Dolby Pro Logic mode, then adjust the volume of each speaker using the test tone that the system provides.

text_image
2 1 -/+ 4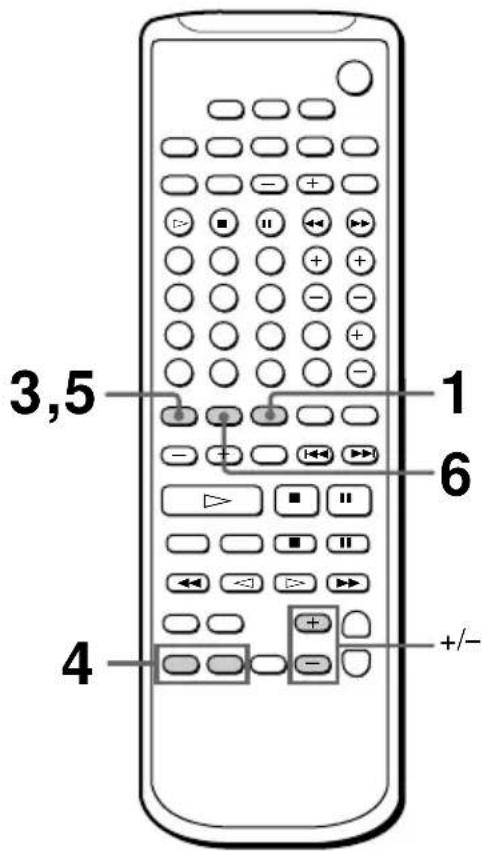
text_image
3,5 1 6 4 +/-1 Press DOLBY (or SURROUND MODE on the remote repeatedly to select DOLBY).
2 Press CENTER MODE repeatedly until the Dolby Pro Logic mode you want appears in the display. Select the Dolby Pro Logic mode according to your speaker setup (see page 8). Each time you press the button, the indication changes as follows:
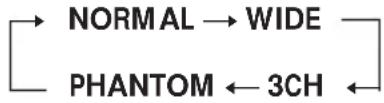
flowchart
graph LR
    A["NORMAL"] --> B["WIDE"]
    C["PHANTOM"] <--_D["3CH"]
    D --> C
3 Press SURROUND T.TONE on the remote.
You will hear the test tone from each speaker in the following order. Adjust the volume of the test tone.
• NORMAL, WIDE: Front (left) → Center → Front (right) → Rear
- 3CH: Front (left) → Center → Front (right)
• PHANTOM: Front → Rear
4 Adjust the volume level so that the test tone from each speaker is at the same level from your listening position.
To adjust the level of center speaker, press CENTER (or LEVEL CONTROL CENTER on the remote), then + or -. To adjust the level of rear speakers, press REAR (or LEVEL CONTROL REAR on the remote), then + or -.
5 Press SURROUND T.TONE on the remote when you are done adjusting. The test tone is turned off.
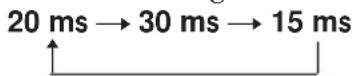
6 Press SURROUND DELAY on the remote repeatedly to adjust the delay time.
For more effective surround sound, delay the output from the rear speakers. If you have placed the rear speakers in a large room or apart from your listening position, set the delay time shorter. Each time you press the button, the indication changes as follows:
Notes
- You cannot set the delay time if you select the 3CH mode.
- The test tone feature works only for Dolby Pro Logic Surround mode.
Tip
If you turn MASTER VOLUME on the unit, all the speaker volumes change.
Connecting optional AV components
To enhance your system, you can connect optional components. Refer to the instructions of each component.
Connecting a TV game/LD player
Make sure to match the color of the plugs and the jacks.
natural_image
Front view of a front panel with buttons and a grid of circular components (no text or symbols visible)To the audio output of a TV game/LD player
To listen to the sound of a TV game/LD player
Press VIDEO 2.
Connecting a VCR
Make sure to match the color of the plugs and the jacks.
natural_image
Pure electrical circuit lines without any symbolsTo the audio input of a VCR
To the audio output of a VCR
To listen to the sound of a VCR
Press VIDEO 1.
Connecting a turntable
Make sure to match the color of the plugs and the jacks.
natural_image
Pure electrical circuit lines without any symbolsTo the analog (line) output of a turntable
ground terminal
To listen to the sound of a turntable
Press PHONO.
Tip
To reduce the noise, connect the earth lead provided with your turntable to the 1m ground terminal of the unit.
Connecting optional outdoor antennas
Connect the outdoor antenna to improve the reception.
FM antenna
Connect the optional FM outdoor antenna. You can also use the TV antenna instead.
For European model
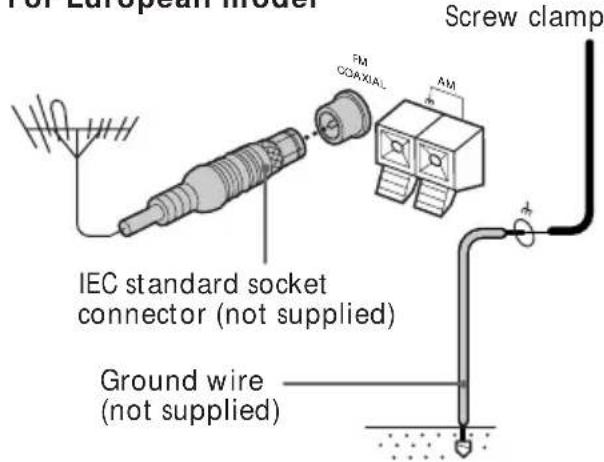
text_image
For European model Screw clamp FM CGAXIAL AM IEC standard socket connector (not supplied) Ground wire (not supplied)For other models
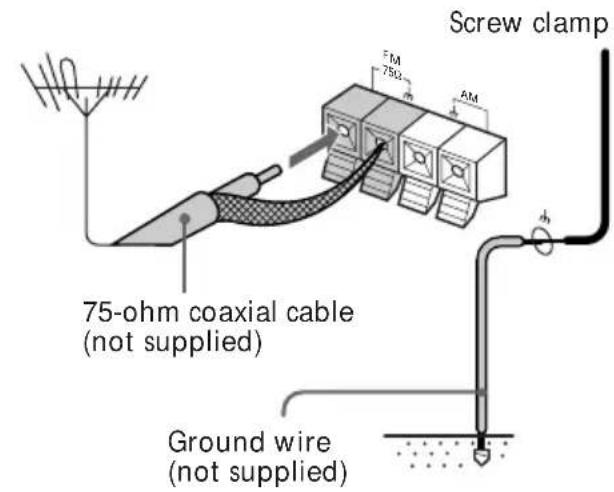
text_image
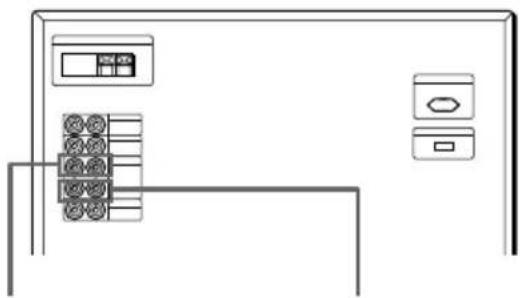
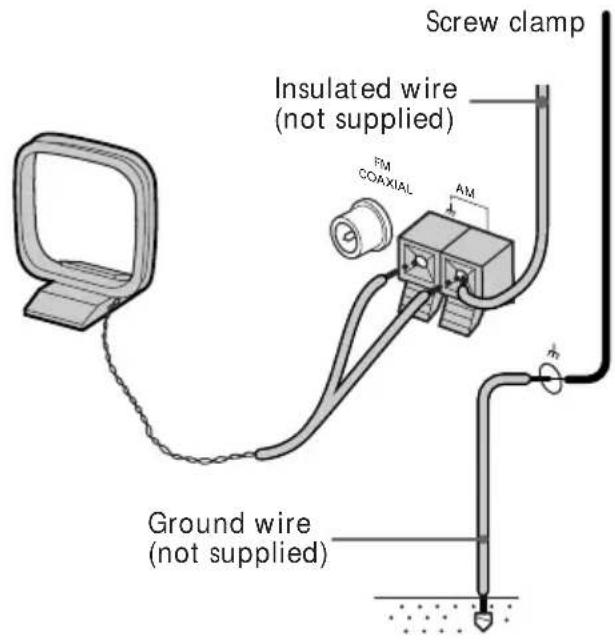
Screw clamp 75-ohm coaxial cable (not supplied) Ground wire (not supplied)AM antenna
Connect a 6- to 15- meter insulated wire to the AM antenna terminal. Leave the supplied AM loop antenna connected.
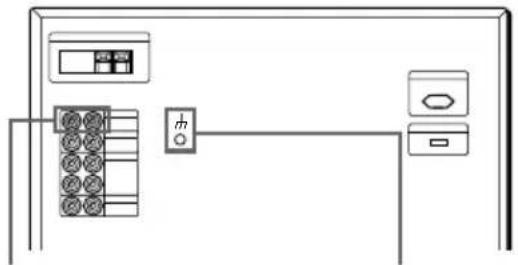
For European model
text_image
Screw clamp Insulated wire (not supplied) FM COAXIAL AM Ground wire (not supplied)For other models
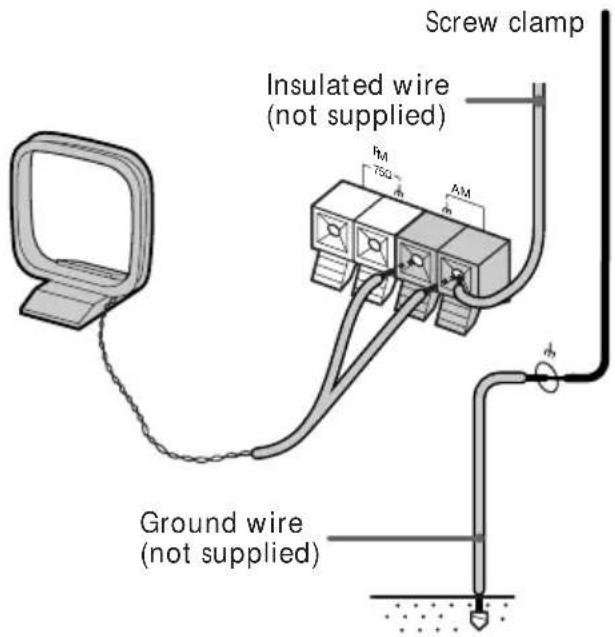
text_image
Screw clamp Insulated wire (not supplied) Ground wire (not supplied)Important
If you connect an outdoor antenna, ground from m terminal with the screw clamp against lightning. To prevent a gas explosion, do not connect the ground wire to a gas pipe.
The Radio
Presetting radio stations
You can preset up to 30 stations, 20 for FM and 10 for AM.
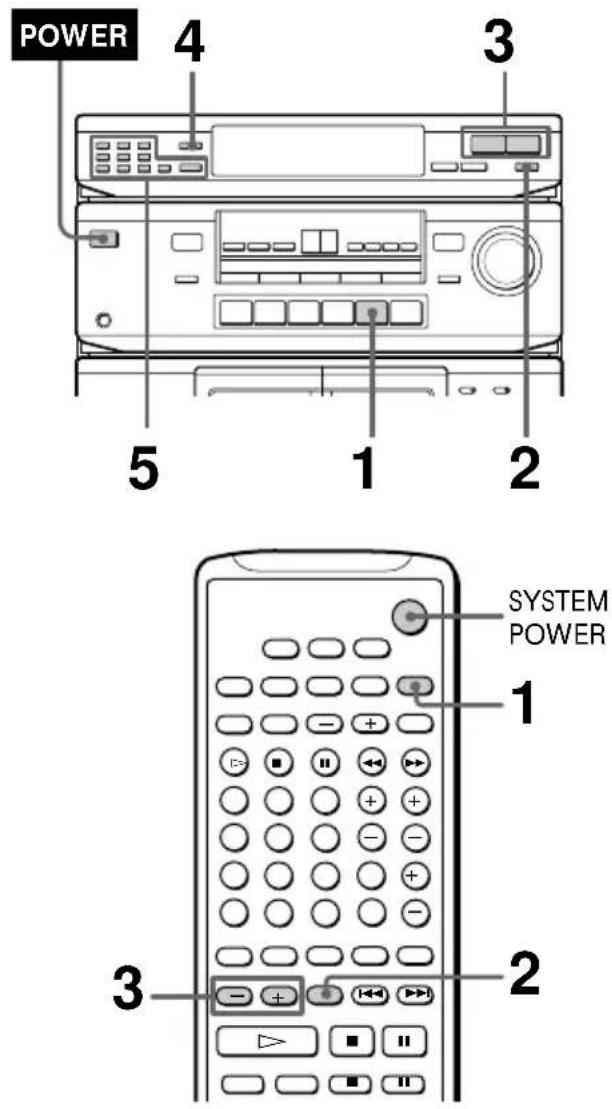
1 Turn on the system and press TUNER.
2 Press BAND repeatedly to select FM or AM.
3 Press TUNING + or - (or TUNER + or - on the remote).
Press + for a higher frequency.
Press – for a lower frequency.
To tune in a station automatically (Automatic Tuning)
Hold down TUNING + or - for about one second and release it when the frequency changes.
When the system tunes in a station, it stops automatically and "TUNED" appears in the display.
Tip
To stop automatic tuning before a station is tuned in, press TUNING + or -.
To tune in a station with a weak signal (Manual Tuning)
Press TUNING + or – repeatedly to select the frequency you want.
"TUNED" appears when a station is tuned in.
4 Press MEMORY.
"MEMORY" appears and the last preset number flashes in the display.
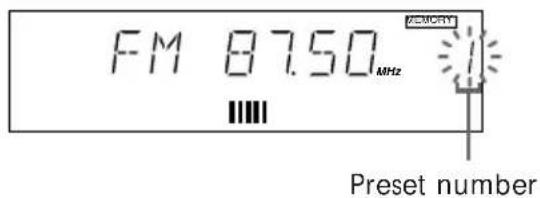
text_image
FM 87.50MHz Preset number5 Use the number buttons (1-9, 0/10 and >10) to select a preset number.
| To select Press | |
| 5 | 5 |
| 10 0/10 | |
| 15 | >10→1→5 |
| 20 >10→2→0/10 | |
The system stores the station at the preset number you specified.
6 Repeat steps 2 to 5 to store other stations.
To change the preset number
Start over from step 2.
To change the AM tuning interval (except for European model)
The AM tuning interval is factory-preset to 9 kHz. To change the AM tuning interval, press BAND repeatedly to select AM, then turn off the power. While holding down MEMORY, turn the power back on. When you change the interval, all the preset stations will be erased. To reset the interval, repeat the same procedure.
Tips
- If "MEMORY" disappears before you select the preset number, press MEMORY again.
- The preset stations are retained for a few days even if you pull off the power cord or if a power interruption occurs.
Scanning the preset memory
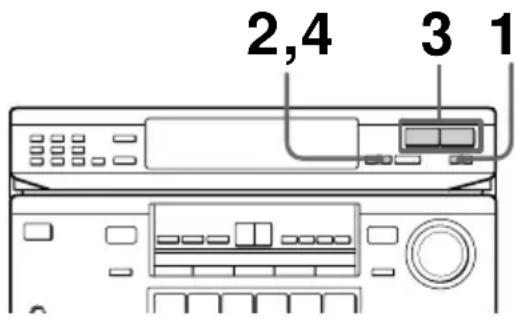
text_image
2,4 3 11 Press BAND repeatedly to select FM or AM.
2 Press MEMORY SCAN.
A preset number flashes in the display.
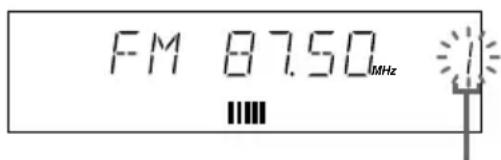
text_image
FM 87.50MHzPreset number
3 Press TUNING + or - (or TUNER + or - on the remote).
Press + to scan higher preset numbers.
Press - to scan lower preset numbers.
You will hear each preset station for about four seconds.
4 Press MEMORY SCAN again as soon as the station you desire is tuned in.
This stops the memory scan.
Tip
While scanning preset stations, a certain station with a weak signal may be skipped. Tune in the station manually.
Listening to the radio
— Preset Tuning
Preset radio stations in the tuner's memory first (see page 14).
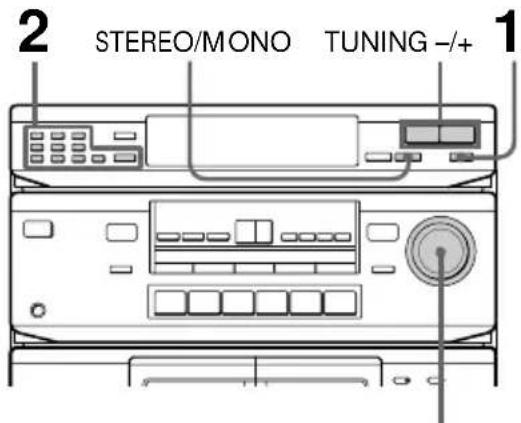
text_image
2 STEREO/MONO TUNING -/+ 1MASTER VOLUME
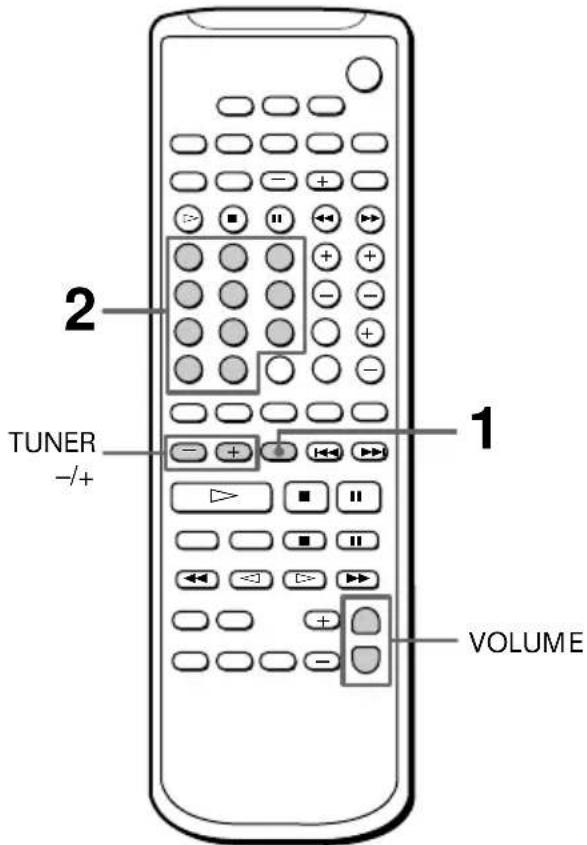
text_image
2 TUNER -/+ 1 VOLUME1 Press BAND repeatedly to select FM or AM.
2 Use the number buttons (1-9, 0/10 and >10) to select a preset number.
| To select Press | |
| 5 | 5 |
| 10 0/10 | |
| 15 | >10→1→5 |
| 20 >10→2→0/10 | |
When using the remote
Press TUNER + for higher preset numbers. Press TUNER – for lower preset numbers.
3 Repeat steps 1 and 2 to listen to other preset stations.
To adjust the volume
Turn MASTER VOLUME (or press VOLUME on the remote).
To listen to non-preset radio stations
After step 1, hold down TUNING + or - (or TUNER + or - on the remote) for about one second and release it when the frequency indication changes. Scanning stops when the system tunes in a station (Automatic Tuning).
After step 1, press TUNING + or - (or TUNER + or - on the remote) repeatedly to select the frequency you want. "TUNED" appears when a station is tuned in (Manual Tuning).
Tips
- When an FM stereo program is noisy, press STEREO/MONO so that "MONO" appears in the display. There will be no stereo effect, but the reception will improve. Press the button again to restore the stereo effect.
• To improve broadcast reception, reorient the supplied antennas.
The Tape Deck
Playing a tape
You can use any type of tape, TYPE-I (normal), TYPE-II (CrO_2) or TYPE-IV (metal), since the deck automatically detects the tape type.
When you use the remote, press DECK A or B to switch the function of the buttons to either deck A or B.
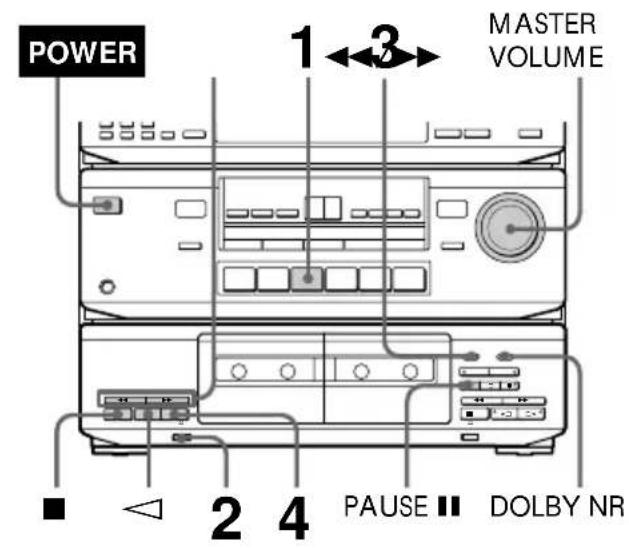
text_image
POWER 1 2 3 MASTER VOLUME ■ 2 4 PAUSE || DOLBY NR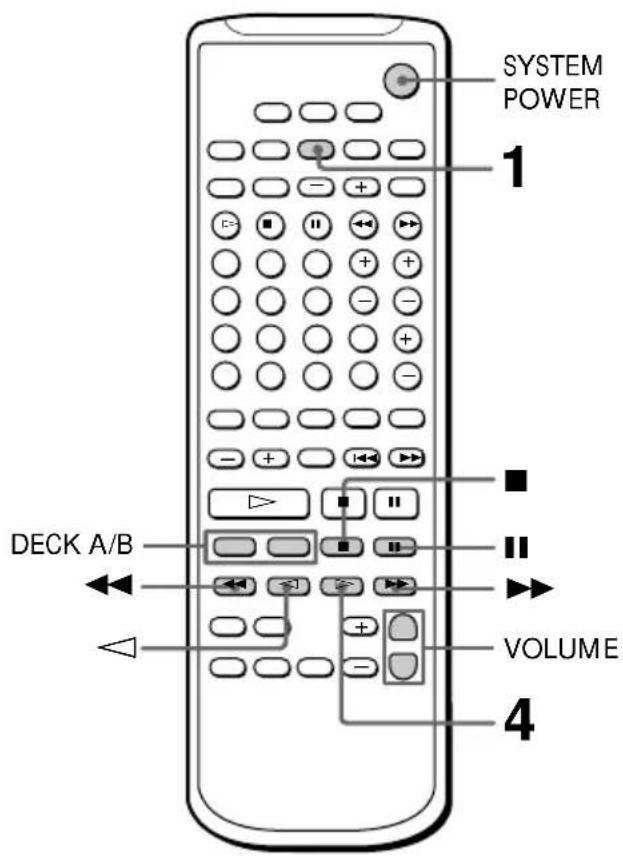
text_image
SYSTEM POWER 1 DECK A/B VOLUME 41 Turn on the system and press TAPE.
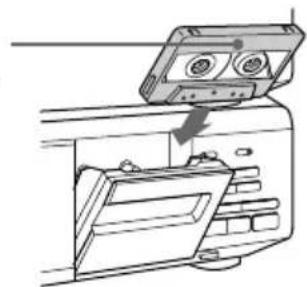
2 Press and insert a recorded tape.
With the side you want to play facing you
natural_image
Diagram of a device with a cable inserted into a housing, showing internal components and a downward arrow indicating motion (no text or symbols present)3 Set DIRECTION to select the side(s) to play.
Set to to play one side. Set to to play both sides continuously*. To play both decks in succession*, set to RELAY.
4 Press ▷.
Press to play the reverse side. Playback starts.
* The deck automatically stops after playing back five times.
| To Do this | |
| Stop play | Press ■. |
| Pause (deck B only) | Press PAUSE ▪ (or ▪ on the remote). Press again to resume play. |
| Fast-forward | Press ▶▶ (for front side) or ◀◀ (for reverse side) when the deck is stopped. |
| Rewind | Press ◀◀ (for front side) or ▶▶ (for reverse side) when the deck is stopped. |
| Take out the tape | Press ≅ when the deck is stopped. |
| Adjust the volume | Turn MASTER VOLUME (or press VOLUME on the remote). |
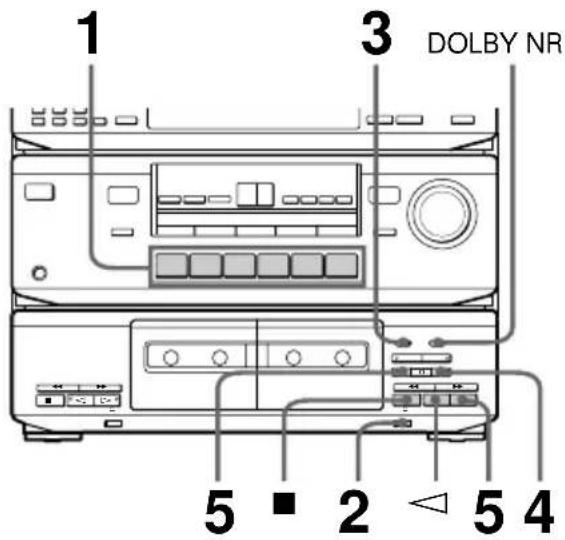
Playing a tape (continued)
Tip
To play a tape recorded with the Dolby NR system, set DOLBY NR to B.
The Dolby NR (noise reduction) system eliminates tape hiss noise by boosting low-level signals in the high-frequency range during recording, then lowering them during playback.
Recording on a tape
You can record from CD, or just the songs you want to record from the middle of the tape.
See "Recording from a tape" (page 20) to make a copy of the tape.
You can use TYPE-I (normal) or TYPE-II (CrO2) tapes. The recording level is automatically adjusted.
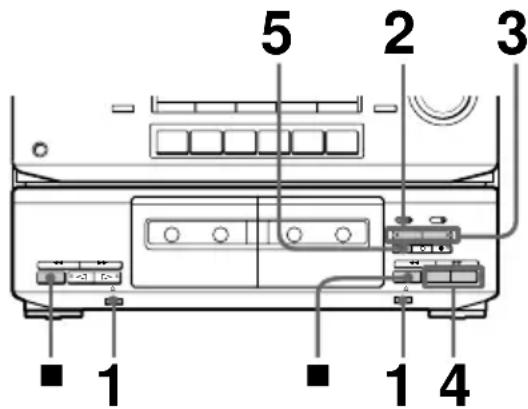
text_image
1 3 DOLBY NR 5 ■ 2 △ 5 41 Press one of the function buttons to select the sound source to be recorded.
2 Press ≅ and insert a blank tape into deck B.
With the side you want to record on facing you
natural_image
Diagram of a cassette tape being inserted into a device (no text or symbols visible)3 Set DIRECTION to select the side(s) to be recorded on.
Set to to record on one side. Set to to record on both sides*.
4 Press REC ●.
The ▷ indicator lights up for recording on the side facing you. If it doesn't, press ▷ once.
The tape deck automatically adjusts the recording level.
5 Press PAUSE || or ▷.
Press twice to start recording from the reverse side.
Recording starts.
6 Start playing the sound source.
* Recording stops when the tape reaches the end of reverse side.
To Press
Stop recording ■.
Pause PAUSE III. Press again to resume recording.
Take out the ≅ when the deck is stopped. tape
Tips
• To record with the Dolby NR system, set DOLBY NR to B before you start recording.
• To protect recordings against accidental erasure, break out the record-protect tab (see page 26).
Note
If you press buttons on deck A while deck B is recording, the recorded sound will be interrupted.
Recording from the radio
You can record a radio program on a tape by calling up the preset station.
You can use TYPE-I (normal) or TYPE-II (CrO2) tapes. The recording level is automatically adjusted.

text_image
3 4 2 DOLBY NR 6 ■ 1 △ 6 51 Press and insert a blank tape into deck B.
2 Press BAND repeatedly to select FM or AM.
3 Use the number buttons (1-9, 0/10 and >10) to select a preset number.
| To select Press | |
| 5 | 5 |
| 10 0/10 | |
| 15 | >10 → 1 → 5 |
| 20 >10 → 2 → 0/10 | |
When using the remote
Press TUNER + for higher preset numbers. Press TUNER – for lower preset numbers.
Recording from the radio (continued)
4 Set DIRECTION.
Set to to record on one side. Set to to record on both sides*.
5 Press REC ●.
The tape deck stands by for recording.
6 Press PAUSE || or ▷.
Press twice to start recording from the reverse side. Recording starts.
* Recording stops when the tape reaches the end of reverse side.
To stop recording
Press ■.
Tips
- To record non-preset stations, tune in the station you want using Manual Tuning or Automatic Tuning feature (see page 14).
- If noise is heard while recording an AM radio program, move the AM antenna to reduce the noise.
- To record with the Dolby NR system, set DOLBY NR to B before you start recording.
Recording from a tape
— Dubbing
You can copy a tape in deck A to a tape in deck B at normal or high speed.
You can use TYPE-I (normal) or TYPE-II (CrO2) tapes. The recording level is automatically adjusted.
text_image
1 2 3 4 51 Press ≅ and insert a recorded tape into deck A and a blank tape into deck B.
2 Set DIRECTION to select the side(s) to be recorded on.
Set to to record on one side. Set to ^ or RELAY ^* to record on both sides.
* Recording on the reverse side in deck B starts independently of playback in deck A.
** Recording on the reverse side in deck B starts simultaneously with playback of the reverse side in deck A.
3 Select the dubbing speed.
Press NORMAL for normal-speed dubbing.
Press HIGH for high-speed dubbing.
The selected button's indicator lights up and the tape deck stands by for dubbing.
4 Select the side from which to start dubbing. Press ▷ to record from the front side. Press ◀ to record from the reverse side.
5 Press PAUSE II to start dubbing.
To stop normal-speed dubbing
Press ■ on deck B.
To stop high-speed dubbing
Press ■ on both decks.
Tips
- During high-speed dubbing, only ■ is operative.
- If the original tape was recorded with Dolby NR B, dubbing is automatically performed with Dolby NR B. If, however, you want to monitor the sound during normal-speed dubbing, set DOLBY NR to B.
Note
If a TV set is placed near the system, noise may occur during high-speed dubbing. In that case, turn the TV set off or move it away from the system.
Dubbing only specific portions
You can skip unwanted portions during normal-speed dubbing.
1 Press ■ on deck A at the portion you want to skip.
Deck B changes to recording pause.
2 Locate the point you want to resume recording on deck A, then stop the tape.
3 Press PAUSE Ⅱ to resume dubbing.
Inserting a blank space during recording
— Record Muting
You can insert a blank space of 4 seconds between each track or erase unwanted portions on a tape.

text_image
3 2 31 Start recording.
2 Press REC MUTE ⊙ at the point you want to insert a blank space. "REC" flashes in the display and a blank space is recorded on the tape. After 4 seconds, ■ lights up and the tape deck changes to recording pause.
3 Press PAUSE II or ▷ to resume recording. While dubbing at normal speed, press PAUSE II to resume recording.
Tip
To insert a blank space longer than 4 seconds, hold down REC MUTE ☐ as long as you want. After 4 seconds, "REC" flashes faster.
When you release REC MUTE ☐, ▪ indicator lights up and the tape deck changes to recording pause.
Press PAUSE || or ▷ to resume recording.
Adjusting the sound Selecting the preset sound fields
You can adjust the bass and treble sound.
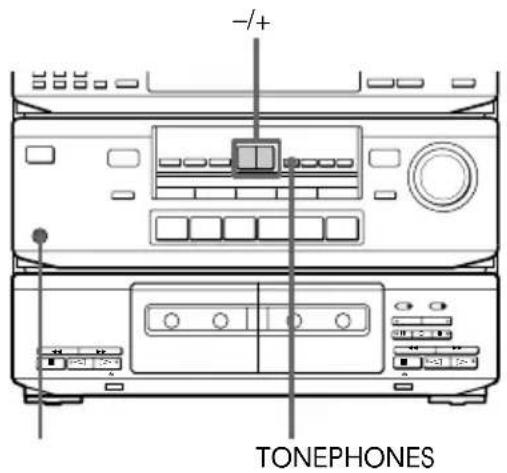
text_image
-/+ TONEPHONESPress TONE*, then + or - to adjust the tone quality.
* Each time you press TONE, the adjusting mode changes between bass and treble.
To listen through the headphones Connect the headphones to PHONES.
You can take advantage of sound fields simply by selecting one of the five pre-programmed effects according to the program you want to play.
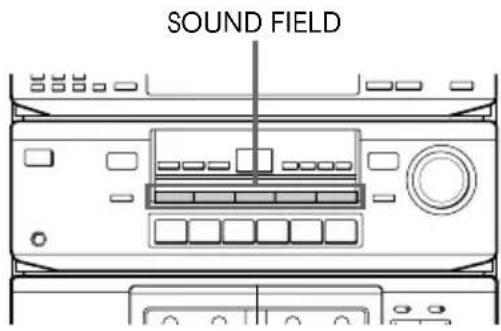
text_image
SOUND FIELDPress one of the SOUND FIELD buttons so that the sound field you want appears in the display.
Select the appropriate sound field as follows:
| Press | To reproduce |
| 1 ROCK | Powerful, clear sounds, emphasizing low and high audio. |
| 2 POPS | Light, bright sounds, emphasizing high and middle range audio. |
| 3 CLASSIC | Broad, open sounds with plenty of reverberation using a surround effect. |
| 4 MOVIE | A theater-like environment using a surround effect. |
| 5 GAME | Maximum audio impact from video game software using a surround effect. |
To turn off the sound fields
Press SOUND FIELD you have selected. "OFF" appears, and the sound field's effect is defeated.
To select with the remote
Press SOUND FIELD repeatedly until the sound field you want appears. Each time you press the button, the display changes as follows:

flowchart
graph LR
    A["ROCK"] --> B["POPS"]
    B --> C["CLASSIC"]
    D["OFF"] <--_E["GAME"]
    E <--_F["MOVIE"]
Tip
If you want to listen to CLASSIC, MOVIE or GAME without a surround effect, press one of the SURROUND MODE buttons to turn off the respective indicator.
Selecting the surround mode
You can take advantage of surround sound simply by selecting one of the three pre-programmed surround modes according to the type of program you want to play.
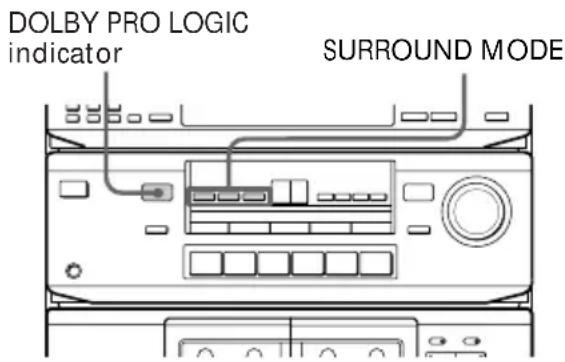
text_image
DOLBY PRO LOGIC indicator SURROUND MODEPress one of the SURROUND MODE buttons (DOLBY, HALL or SIMULATED) to turn on the surround sound.
Selected mode's indicator lights up in the display.
The DOLBY PRO LOGIC indicator lights up when you select the DOLBY mode.
Select the appropriate surround mode as follows:
Press To
| DOLBY decode programs processed with Dolby Pro Logic Surround and create the atmosphere of a movie theater. |
| HALL get the atmosphere of a large hall. |
| SIMULATED reproduce a simulated stereo effect to monaural sound. |
Selecting the surround mode (continued)
To turn off surround sound
Press SURROUND MODE (DOLBY, HALL or SIMULATED) you have selected.
Selecting with the remote
The remote also lets you select the surround mode.

Press SURROUND MODE repeatedly until the surround mode you want appears.
Each time you press the button, the display changes as follows:
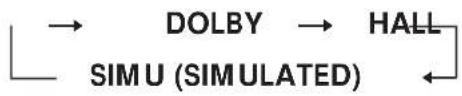
flowchart
graph LR
    A["DOLBY"] --> B["HALL"]
    B --> C["SIMU (SIMULATED)"]
    C --> A
To turn off surround sound
You can find Dolby Surround-encoded software by looking at the packaging.
However, some videos and laser discs may use Dolby Surround sound even if it's not indicated on the package.
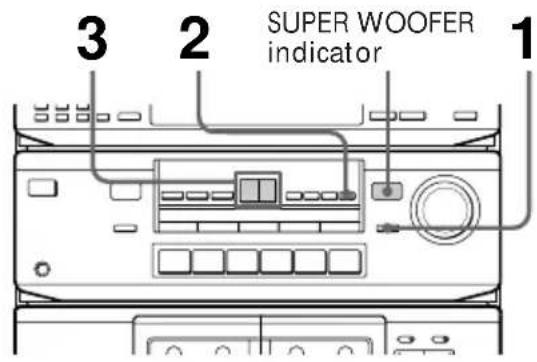
Emphasizing the bass sound
You can use the superwoofer to reinforce the bass sound of your front speakers and obtain a greater sense of atmosphere. Use the remote to adjust the superwoofer from your listening position.
text_image
SUPER WOOFER indicator 1 2 3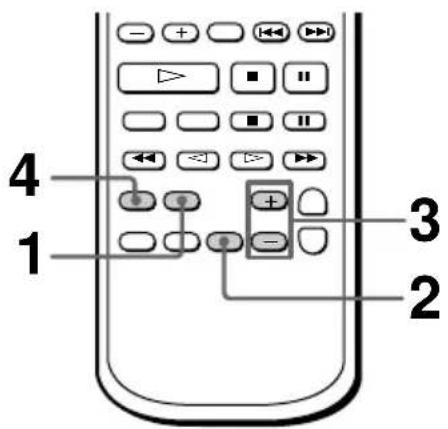
text_image
4 1 3 21 Press WOOFER ON/OFF (or SUPER WOOFER ON/OFF on the remote) to turn on the woofer. The SUPER WOOFER indicator lights up.
2 Press WOOFER (or LEVEL CONTROL WOOFER on the remote) to select the woofer adjustment mode.
The woofer level is indicated on the level meter in the display.
Additional Information
Precautions
3 Press + or - to adjust the woofer level.
4 Press SUPER WOOFER PHASE on the remote to select the polarity that provides the best bass reproduction.
Notes
- You can only adjust the woofer level when the woofer is on (when the SUPER WOOFER indicator is lit).
- You cannot use the superwoofer when you select PHONO ("SELECT OTHER FUNCTION" appears).
On operating voltage
Before operating the system, check that the operating voltage of your system is identical with the voltage of your local power supply.
On safety
- The unit is not disconnected from the AC power source (mains) as long as it is connected to the wall outlet, even if the unit itself has been turned off.
- Unplug the system from the wall outlet (mains) if it is not to be used for an extended period of time. To disconnect the cord (mains lead), pull it out by the plug. Never pull the cord itself.
- Should any solid object or liquid fall into the component, unplug the stereo system and have the component checked by qualified personnel before operating it any further.
- The AC power cord must be changed only at the qualified service shop.
On placement
- Place the stereo system in a location with adequate ventilation to prevent heat build-up in the stereo system.
- Do not place the system in an inclined position.
- Do not place the system in locations where it is;
- Extremely hot or cold
- Dusty or dirty
- Very humid
- Vibrating
– Subject to direct sunlight.
Precautions (continued)
Before placing a cassette in the tape deck
Take up any slack in the tape. Otherwise the tape may get entangled in the parts of the tape deck and become damaged.
When using a tape longer than 90 minutes
The tape is very elastic. Do not change the tape operations such as play, stop, and fast-winding etc. frequently. The tape may get entangled in the tape deck.
To save a tape permanently
To prevent a tape from being accidentally recorded over, break off the cassette tab from side A or B as illustrated. If you later want to reuse the tape for recording, cover the broken tab with adhesive tape.
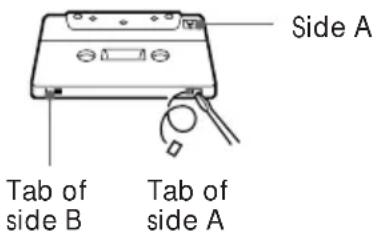
text_image
Side A Tab of side B Tab of side A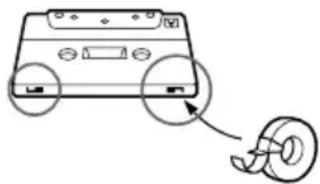
natural_image
Diagram of a CD-ROM drive with a spool and circular arrows indicating motion (no text or symbols)When you are using a TYPE-II (CrO2) or TYPE-IV (metal) cassette, be careful not to cover the detector slots which allow the tape deck to automatically detect the type of tape.
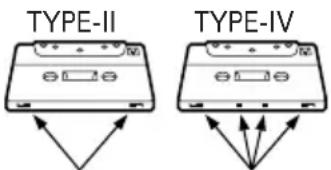
text_image
TYPE-II TYPE-IVDetector slots (Do not cover with adhesive tape.)
Cleaning the tape heads
Clean the tape heads after every 10 hours of use. When the tape heads become dirty;
– the sound is distorted
– there is a decrease in sound level
– the sound drops out
– the tape does not erase completely
– the tape does not record.
Make sure to clean the heads before you start an important recording or after playing an old tape. Use a separately sold dry-type or wet-type cleaning cassette. For details, refer to the instructions of the cleaning cassette.
Demagnetizing the tape heads
Demagnetize the tape heads and the metal parts that have contact with the tape after every 20 to 30 hours of use with a separately sold demagnetizing cassette. For details, refer to the instructions of the demagnetizing cassette.
Cleaning the cabinet
Use a soft cloth slightly moistened with mild detergent solution.
Never use strong solvents, such as thinner or benzine, since they may damage the finish.
If you have any questions or problems concerning your stereo system, please consult your nearest Sony dealer.
Troubleshooting
If you run into any problem using this stereo system, use the following check list.
First, check that the power cord is connected firmly and the speakers are connected properly and firmly.
Should any problem persist, consult your nearest Sony dealer.
General
There is no sound.
- Turn MASTER VOLUME clockwise.
• The headphones are connected. - Connect the antennas.
- Make sure the speaker connection is secure.
There is severe hum or noise.
- A TV or VCR is placed too close to the stereo system. Move the system away from the TV or VCR.
The remote does not function.
- There is an obstacle between the remote and the system.
- The remote is not pointing in the direction of the system's sensor .
- The batteries have run down. Replace the batteries.
Speakers
Sound comes from one channel or unbalanced left and right volume.
- Check the speaker connection and speaker placement.
There is no sound from the speakers except the center speaker.
- The source being played back is monaural. Turn off the Pro Logic mode.
There is no sound from the center speaker.
- The Pro Logic mode is set to PHANTOM mode. Select another mode.
- Adjust the CENTER level appropriately (see page 11).
There is no sound from the rear speakers.
- The Pro Logic mode is set to 3CH logic mode. Select another mode.
- Adjust the REAR level appropriately (see page 11).
- The software being played back has limited sound effects. Check the volume with the test tone.
Tape Deck
The tape operating buttons do not work.
- Wait until the II indication stops flashing. (Operation is not possible for the first three seconds after the power is turned on.)
- Insert the tape properly and close the cassette holder completely.
The tape does not record.
- No tape in the cassette holder.
- The tab has been removed from the tape (see "To save a tape permanently" on page 26).
• The tape has reeled to the end.
The tape does not record nor play or there is a decrease in sound level.
- The heads are dirty. Clean them (see "Cleaning the tape heads" on page 26).
- The record/playback heads are magnetized. Demagnetize them (see "Demagnetizing the tape heads" on page 26).
Troubleshooting (continued)
The tape does not erase completely.
- The record/playback heads are magnetized. Demagnetize them (see "Demagnetizing the tape heads" on page 26).
There is excessive wow or flutter, or the sound drops out.
- The capstans or pinch rollers are dirty. Clean them (see "Cleaning the tape heads" on page 26).
Noise increases or the high frequencies are erased.
- The record/playback heads are magnetized. Demagnetize them (see "Demagnetizing the tape heads" on page 26).
The sound is unbalanced.
- Make sure the Dolby NR setting matches the setting used when the tape was recorded.
- Move the system away from the TV or VCR.
The tape stops before the tape has been fully rewound.
- There is slack in the tape. Take up the tape slack.
- The cassette shell is bent. Use another cassette.
There is excessively loud tape transport noise during fast-forwarding or rewinding.
- This noise is caused by the cassette and is not a mechanical problem.
does not work.
- There was a power failure or the power cord was disconnected during tape operation. Reconnect the power.
There is a short break in sound output during playback.
- You pressed ▶▶, ◀◀ or ■ on one deck while the other deck was playing. Or you pressed PAUSE ■, ▷ or ◀ on deck B while deck A was playing.
Tuner
You cannot tune in a frequency.
- Adjust the antennas.
- Connect the FM outdoor antenna.
- Preset the stations again if you've moved.
Severe hum or noise ("TUNED" or "STEREO" flashes in the display).
- Adjust the antenna.
- The signal strength is too weak. Connect the outdoor antenna.
- Tune to a correct frequency.
- Move the system away from the TV or VCR.
A stereo FM program cannot be received in stereo.
- Press STEREO/MONO so that "STEREO" appears.
If other troubles not described above occur, reset the system as follows:
1 Unplug the power cord.
2 Hold down DOLBY, then plug the power cord again into the wall outlet.
The system is reset to the factory settings. All the settings you made such as the preset stations are cleared. You should set them again.
Specifications
Tuner section
FM stereo, FM/AM superheterodyne tuner
FM tuner section
Tuning range 87.5 - 108.0 MHz
Antenna FM lead antenna
Antenna terminals 75 ohm unbalanced
Intermediate frequency 10.7 MHz
AM tuner section
Tuning range
European model: 522 - 1,611 kHz
Other models: 531 - 1,602 kHz
(with the interval set at
9 kHz)
530 - 1,710 kHz
(with the interval set at
10 kHz)
Antenna AM loop antenna,
outdoor antenna
terminals
Intermediate frequency 450 kHz
Amplifier section
European and Australian models:
(FRONT)
DIN power output 80 + 80 watts
(at rear/center/woofer
off at 1 kHz, 8 ohms)
Continuous RMS power output
100 + 100 watts
(at rear/center/woofer
off at 1 kHz, 10% THD,
8 ohms)
70 watts/ch
(at SURROUND ON at
1 kHz, 10% THD, 8 ohms)
Music power output 150 + 150 watts
(at rear/center/woofer
off, 8 ohms)
(REAR) 70 watts
(at front/center/woofer
off at 1 kHz, 8 ohms)
(CENTER) 70 watts
(at front/rear/woofer off
at 1 kHz, 8 ohms)
(WOOFER) 30 watts
(at front/rear/center off
at 40 Hz, 4 ohms)
Other models:
Peak music power output
1,500 watts (total)
(FRONT)
Continuous RMS power output
90 + 90 watts
(at rear/center/woofer
off at 1 kHz, 5% THD,
8 ohms)
70 watts/ch
(at SURROUND ON at
1 kHz, 10% THD, 8 ohms)
(REAR) 70 watts
(at front/center/woofer
off at 1 kHz, 8 ohms)
(CENTER) 70 watts
(at front/rear/woofer off
at 1 kHz, 6 ohms)
(WOOFER) 30 watts
(at front/rear/center off
at 40 Hz, 4 ohms)
Specifications (continued)
Inputs
PHONO (phono jacks): sensitivity 2.5 mV, impedance 50 kilohms
CD (phono jacks): sensitivity 400 mV, impedance 50 kilohms
VIDEO1, 2 (phono jacks): sensitivity 250 mV, impedance 50 kilohms
Outputs
VIDEO1 (phono jacks): voltage 250 mV, impedance 1 kilohm
PHONES (stereo phone jack): accepts low and high impedance headphones
Tape deck section
Track method 4-track, 2-channel stereo
Wow & flutter ±0.15% W.Peak (IEC) 0.1% W.RMS (NAB) ±0.2% W.Peak (DIN)
Frequency response
With DOLBY NR set to OFF TYPE-I tape: 60 – 13,000 Hz, ±3 dB TYPE-II tape: 60 – 14,000 Hz, ±3 dB
Speaker
For the speaker system, refer to the speaker's manual.
General
Power requirements
European model: 220 – 230 V AC, 50/60 Hz
Australian model: 240 V AC, 50/60 Hz
Other models: 110 – 120 V AC or 220 – 240 V AC, 50/60 Hz (adjustable with the voltage selector)
Power consumption 240 watts Dimensions (w/h/d) Approx. 430 · 330 · 355 mm
Mass Approx. 10.5 kg Supplied accessories: Remote RM-U575 (1) Sony SUM-3 (NS) batteries (2) AM loop antenna (1) FM lead antenna (1)
Design and specifications are subject to change without notice.
Index
A
Adjusting
the sound 22
the volume 10, 16
Automatic tuning 14
B
Batteries 6
C
Cleaning 26
Connecting. See Hooking up
D
Dolby Noise Reduction 2, 18
Dolby Pro Logic Surround 2, 8
Dubbing 20
E, F, G
Emphasizing the bass sound 24
H
Hooking up
optional components 12
the antennas 5, 13
the CD player 6
the power 7
the superwoofer 5
the system 4
I, J, K, L
Index 31
Inserting blank space 21
M, N, O
Manual tuning 14
Memory scan 15
P, Q
Playing a tape 17
Precautions 25
Preset memory 15
Preset sound fields 22
Preset tuning 16
Presetting radio stations 14
Protecting recordings 26
R
Radio stations
presetting 14
tuning in 14, 16
Recording
from a tape 20
from the radio 19
on a tape 18
Record muting 21
Remote 6,7
S
Sound adjustment 22
Speakers
positioning 9
setting up 8
Specifications 29
Superwoofer 24
Surround mode 23
T, U, V, W, X, Y, Z
Turning on the system 7
Troubleshooting 27
AVERTISSEMENT
natural_image
Diagram of two connected audio/video cables with a separate connector (no text or symbols)natural_image
Two mechanical components with symbols: a circular head and a cross, both without any text or labels.natural_image
Simple line drawing of a plug with a magnified inset showing internal components (no text or symbols)natural_image
Diagram showing a device transitioning from a battery to a handheld device (no text or symbols present)Conseil
natural_image
Diagram of a multi-tiered TV setup with speakers and a monitor, labeled 'A' (no text or symbols on components)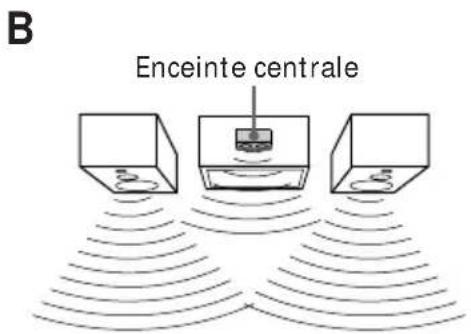
text_image
B Enceinte centraletext_image
2 1 -/+ 4
text_image
3,5 1 6 4 +/-natural_image
Front view of a front panel with buttons and a grid of circular components (no text or symbols visible)natural_image
Pure electrical circuit lines without any symbolsnatural_image
Pure electrical circuit lines without any symbolstext_image
FM 87.50MHztext_image
2 STEREO/MONO TUNING -/+ 1 MASTER VOLUME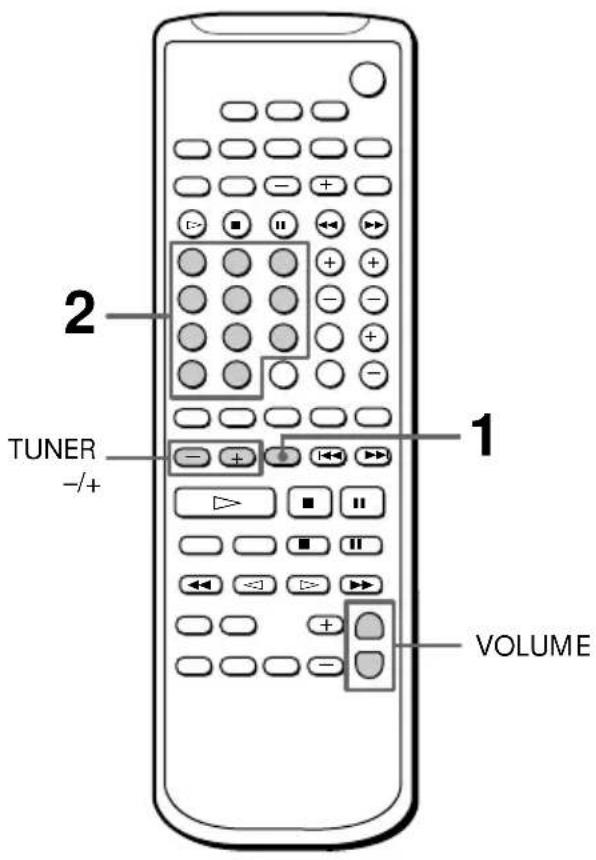
text_image
2 TUNER -/+ 1 VOLUMEnatural_image
Diagram of a device with a camera module and a directional arrow indicating motion (no text or symbols)La lecture commence.
natural_image
Diagram of a car interior showing a vehicle with a cassette tape and a directional arrow indicating motion (no text or symbols present)flowchart
graph LR
    A["DOLBY"] --> B["HALL"]
    B --> C["SIMU (SIMULATED)"]
    C --> A
Accentuation des graves
Section platine-cassette
Raccordements. Voir Installation
natural_image
Diagram of two connected audio/video connectors with a separate panel showing two cylindrical components (no text or symbols present)natural_image
Two mechanical components with cross symbols, one showing a circular head and the other a cross symbol (no text or labels)natural_image
Simple line drawing of a plug with a dotted arrow pointing to a hexagonal symbol (no text or labels)natural_image
Diagram showing a device transitioning from a battery pack to a handheld device (no text or symbols present)Observación
natural_image
Diagram of a multi-tiered TV setup with speakers and a monitor, labeled 'A' (no text or symbols on components)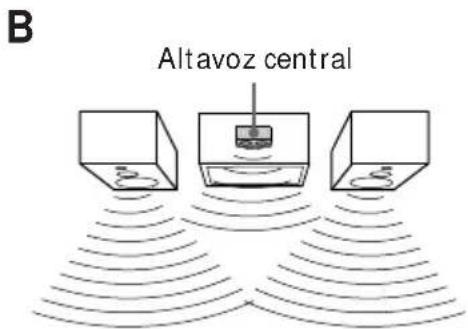
text_image
B Altavoz centraltext_image
2 1 -/+ 4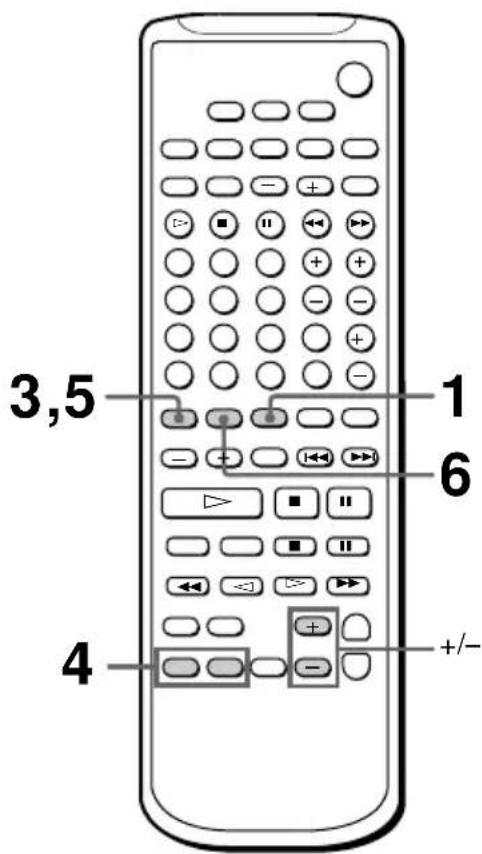
text_image
3,5 1 6 4 +/-natural_image
Front view of a front panel with buttons and a grid of circular components (no text or symbols)natural_image
Pure electrical circuit lines without any symbolsnatural_image
Pure electrical circuit lines without any symbolstext_image
FM 87.50MHz MEMORYtext_image
FM 87.50MHztext_image
2 STEREO/MONO TUNING -/+ 1 MASTER VOLUME
text_image
2 TUNER -/+ 1 VOLUMEnatural_image
Diagram of a device with a camera module and a cable inserted into a housing (no text or symbols visible)natural_image
Diagram of a device with a tape measure and a control panel, showing no text or symbols3 Fije DIRECTION para seleccionar la(s) cara(s) a grabar.
flowchart
graph LR
    A["DOLBY"] --> B["HALL"]
    B --> C["SIMU (SIMULATED)"]
    C --> A