
PCMR300 - Cassette player SONY - Free user manual and instructions
Find the device manual for free PCMR300 SONY in PDF.
| Product Type | Digital Audio Tape (DAT) Deck |
| Brand | Sony |
| Model | PCM-R300 |
| Dimensions (W × H × D) | Approx. 432 × 122 × 325 mm |
| Weight | Approx. 5.0 kg |
| Power Supply | 120 V AC (USA/Canada) or 230 V AC (Europe/UK), 50/60 Hz, 30 W |
| Sampling Frequencies | 48 kHz, 44.1 kHz, 32 kHz |
| Long Play Mode | Yes (32 kHz, double recording time) |
| SBM (Super Bit Mapping) Function | Yes (for analog recording in standard mode) |
| Subcodes | Start ID, Skip ID, End ID codes; program numbers |
| Head | Rotary Head |
| Error Correction | Double Reed-Solomon Code |
| Signal-to-Noise Ratio | 90 dB or more (20 kHz LPF, A filter on) |
| Total Harmonic Distortion | Standard: ≤ 0.05%; Long Play: ≤ 0.3% (1 kHz, reference level) |
| Frequency Response | Standard: 20 – 20,000 Hz (±0.5 dB); Long Play: 20 – 14,500 Hz (±0.5 dB) |
| Wow and Flutter | Below measurable limit (±0.001%) |
| Inputs | Analog (line – phono jack); Digital coaxial (phono jack 75 Ω) and optical |
| Outputs | Analog line (phono jack) and headphones (6.35 mm stereo); Digital coaxial and optical |
| Supplied Accessories | Remote control RM-D757, AA batteries (2), rack adapters, power cord, instruction manual |
| Cleaning | Head and tape path with Sony DT-10CL cleaning cassette (not supplied) |
| Safety | Do not expose to moisture; unplug when not in use; refer all servicing to qualified personnel |
| Repairability | Spare parts available through Sony dealer; maintenance by qualified technician only |
Frequently Asked Questions - PCMR300 SONY
User questions about PCMR300 SONY
0 question about this device. Answer the ones you know or ask your own.
Ask a new question about this device
Download the instructions for your Cassette player in PDF format for free! Find your manual PCMR300 - SONY and take your electronic device back in hand. On this page are published all the documents necessary for the use of your device. PCMR300 by SONY.
USER MANUAL PCMR300 SONY
Digital Audio Recorder
To avoid electrical shock, do not open the cabinet. Refer servicing to qualified personnel only.
For the customers in the United States


This symbol is intended to alert the user to the presence of uninsulated "dangerous voltage" within the product's enclosure that may be of sufficient magnitude to constitute a risk of electric shock to persons.

This symbol is intended to alert the user to the presence of important operating and maintenance (servicing) instructions in the literature accompanying the appliance.
Owner's Record
The model and serial numbers are located on the rear of the unit. Record the serial number in the space provided below. Refer to them whenever you call upon your Sony dealer regarding this product.
Model No. PCM-R300
Serial No.
INFORMATION
This equipment has been tested and found to comply with the limits for a Class B digital device, pursuant to Part 15 of the FCC Rules.
These limits are designed to provide reasonable protection against harmful interference in a residential installation. This equipment generates, uses, and can radiate radio frequency energy and, if not installed and used in accordance with the instructions, may cause harmful interference to radio communications. However, there is no guarantee that interference will not occur in a particular installation. If this equipment does cause harmful interference to radio or television reception, which can be determined by turning the equipment off and on, the user is encouraged to try to correct the interference by one or more of the following measures:
Reorient or relocate the receiving antenna.
Increase the separation between the equipment and receiver.
- Connect the equipment into an outlet on a circuit different from that to which the receiver is connected.
Consult the dealer or an experienced radio/TV technician for help.
CAUTION
You are cautioned that any changes or modifications not expressly approved in this manual could void your authority to operate this equipment.
For the customers in Canada
CAUTION
TO PREVENT ELECTRIC SHOCK, DO NOT USE THIS POLARIZED AC PLUG WITH AN EXTENSION CORD, RECEPTACLE OR OTHER OUTLET UNLESS THE BLADES CAN BE FULLY INSERTED TO PREVENT BLADE EXPOSURE.
Thank you for purchasing the Sony Digital Audio Recorder. Before operating the unit, please read this manual thoroughly and retain it for future reference.
The PCM-R300 has the following features:
- SBM (Super Bit Mapping) function
- Three sampling frequencies (48 kHz, 44.1 kHz, 32 kHz)
- Recording and playback in long-play mode
- Sub codes
Start IDs, skip IDs, an end ID, and program numbers written to the tape allow you to locate tracks quickly
- Easy menu operations using the SELECT and DATA buttons that allows you to make various settings
- Error rate counter
- See-through cassette compartment lid
A see-through cassette compartment lid that allows you to view tape operations during playback and recording - Rack mount adaptor
About This Manual
The instructions in this manual are for PCM-R300.
Conventions
Instructions in this manual describe the controls on the deck.
The following icons are used in this manual:

Indicates useful information or tips that make a task easier.

Indicates a task that requires use of the remote.
TABLE OF CONTENTS
Getting Started
Unpacking 4
Rack Mounting 4
Hooking Up the System 5
Digital Interface 5
Playing a Tape 7
Recording on a Tape 8
Recording Operations
Things You Should Know Before Recording 10
Locating the End of the Recorded Portion (End Search) 10
Setting the Recording Mode 11
Using the SBM (Super Bit Mapping) Function 11
Inserting a Sound-Muted Section While Recording (Record Muting) 12
Playback Operations
About the Display 12
Locating a Track (AMS/Direct Access) 13
Playing Tracks Repeatedly (Repeat Play) 14
Playing Tracks Skipping Specific Portions During Playback (Skip Play) 14
Writing Sub Codes
About Sub Codes 15
Writing Sub Codes During Recording 15
Writing Sub Codes During Playback 16
Adjusting the Position of an Existing Start ID 17
Erasing Sub Codes 18
Renumbering the Program Numbers Automatically (Renumbering) 18
Menu Operations
Menu Operations 19
Additional Information
Precautions 21
Cleaning 21
Display Messages 22
Troubleshooting 22
Specifications 23
Index 25
Unpacking
Check that you have received the following supplied items:
- AC power cord (1)
- Remote commander (remote) RM-D757 (1)
Size-AA (R6) batteries (2) - Rack mount adaptors (2)
- Screws (M5·12) (4)
- Decorative washers (4)
- Decorative panel (1)
- Tapping screws (3 - 8) (2)
- Operating instructions (1)
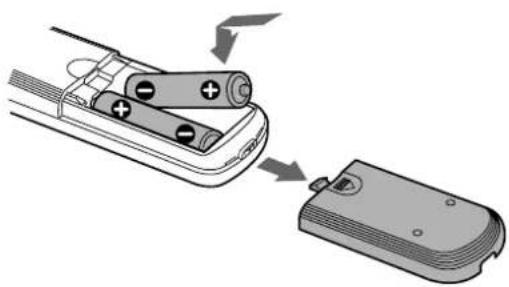
Inserting batteries into the remote
Insert two size-AA (R6) batteries, matching the + and - on the batteries with the markings inside the battery compartment.

When to replace the batteries
With normal use, batteries should last for about 6 months. When the remote no longer operates the deck, replace both batteries.
Notes
- Do not leave the remote near an extremely hot or humid place.
- Do not drop any foreign matter into the remote casing, particularly when replacing the batteries.
- Do not expose the remote sensor to direct sunlight or illumination as doing so may cause malfunction.
- When not using the remote for an extended period of time, remove the batteries to avoid possible damage from battery leakage and corrosion.
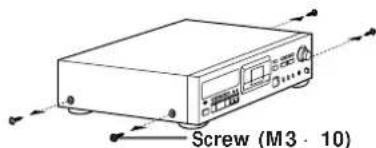
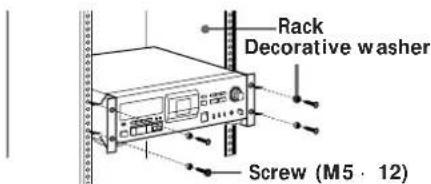
Rack Mounting
You can use the supplied rack mount adaptor to install your deck in a 19-inch 3U-size rack. Be sure to turn the deck off before you install it.
1 Remove the screws (M3·10) from the sides of the deck.
2 Position the rack mount adaptors onto the sides of the deck as shown below and secure them with the screws removed in step 1.
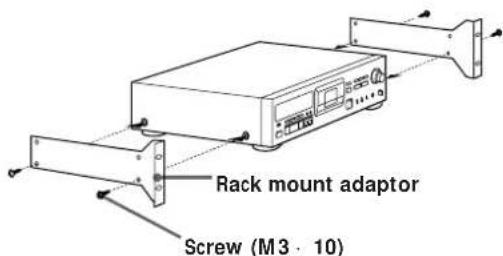
3 If necessary, attach the decorative panel with the tapping screws (3·8). The decorative panel covers the space that forms below the deck.
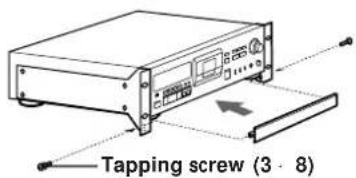
4 Insert the deck into the rack and secure it with the supplied decorative washers and screws (M5· 12).
Hooking Up the System
This section describes how to hook up your deck to an amplifier, CD player, MD deck, or other audio components. Be sure to turn off the power to each component before making the connections.
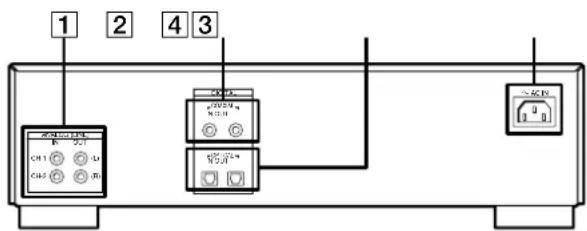
1 ANALOG (LINE) IN/OUT jacks
2 DIGITAL COAXIAL IN/OUT jacks
3 DIGITAL OPTICAL IN/OUT jacks
ACINsocket
Analog connections
Use phono-plug audio connecting cables (not supplied).
Digital connections
For connections through the DIGITAL COAXIAL IN/OUT jacks
Use coaxial digital connecting cables (not supplied).
For connections through the DIGITAL OPTICAL IN/OUT jacks
Use optical digital connecting cables (not supplied).
Connecting the AC power cord
Connect the AC power cord (supplied) to the AC IN socket on the rear panel and connect the plug on the other end to a wall outlet.
Digital Interface
Digital input and output jacks
- The following table shows signal formats that correspond to the input and output jacks on the deck.
- The DIGITAL COAXIAL IN jack accepts not only the consumer version of the IEC-958 international digital audio interface standard, but also the broadcasting studio version of the IEC-958 standard used by such DAT decks as the PCM-2300, PCM-2700 or PCM-2700A.
Type Input signal format Output signal format
| DIGITAL COAXIAL/OPTICAL | IEC-958 for consumer use | IEC-958 for consumer use |
| DIGITAL COAXIAL | IEC-958 for broadcasting studio use |
Copy information during recording
- Copy information that is recorded on tape during recording varies according to the input jack used and the signal format, as shown in the table below.
- In the case of the IEC-958 for broadcasting studio use, the digital signal carries no copy information.
- As for the IEC-958 for consumer use, three types of copy information exists: copying possible, first-generation copy permitted, and copying prohibited (Serial Copy Management System).
| Input jack Signal format | Copy information carried by digital signal | Recording capability on this deck | Copy information recorded on tape | |
| DIGITAL COAXIAL | IEC-958 for broadcasting studio use | None Possible Determined by menu setting (page 19) | ||
| DIGITAL COAXTAL/OPTICAL | Permitted Possible Permitted (ID 6:00) | |||
| IEC-958 for consumer use | First-generation only | Possible Prohibited (ID 6:10) | ||
| Prohibited Possible Prohibited (ID 6:10) | ||||
| ANALOG (LINE) | — Possible Determined by menu setting (page 19) | |||
Automatic writing of start IDs during recording
- When the AUTO indicator lights up in the display during recording, the automatic writing of start IDs takes place according to the input jack used and the signal format, as shown in the table below.
- You can select the trigger for the automatic writing of start IDs such as an audio input signal level, a DAT start ID code, or a Q-code from a CD track by menu settings (see pages 19 and 20).
O: automatic writing possible
: automatic writing prohibited
| Input jack | Signal format (Category code) | Automatic writing according to | ||
| audio input level(a) | DAT start ID(b) | Q-code from a CD track | ||
| DIGITAL COAXIAL | IEC-958 for broadcasting studio use | ○ | ○c) | . |
| DIGITAL COAXIAL/OPTICAL | IEC-958 for consumer use | (DAT)○ | ○ | d) |
| (CD)○·○ | ||||
| (Other)○· | . | |||
| ANALOG (LINE) | ○· | . | ||
a) If the input level remains under the level set in the "L-SY TH" menu longer than the time set in the "L-SY BK" menu (see page 19), the deck writes a start ID when the input level rises above that level.
b)DAT skip IDs are automatically written in the same way.
c) Only when connected to the PCM-2300, PCM-2700, or PCM-2700A.
d) Some CD players do not output track information (Q-code) in the digital signal.
Digital signal lock range
- The lock range of a digital signal (signal reception range) is about ± 0.1% for a sampling frequency of 48 kHz, 44.1 kHz, or 32 kHz. Variable pitch signals are not receivable.
- When the digital input sampling frequency information does not match the actual sampling frequency, it is possible to record that signal if you change the REC MODE switch on the front panel to the actual sampling frequency of the signal.

You can check the signal format input from the DIGITAL COAXIAL or OPTICAL IN jack
See "Menu Operations" ("DIF") on page 20.
Where do I go next?
Now you're ready to use your deck.
For basic operations, go to pages 7 to 9; for advanced operations, go to the sections starting from page 10.
Playing a Tape
See page 5 for hookup information.
1 Turn on the amplifier and set the source selector to the position for DAT.
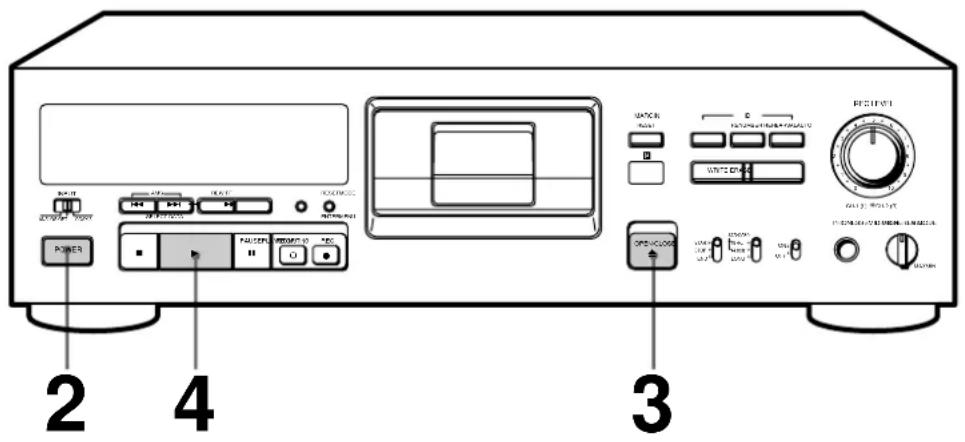
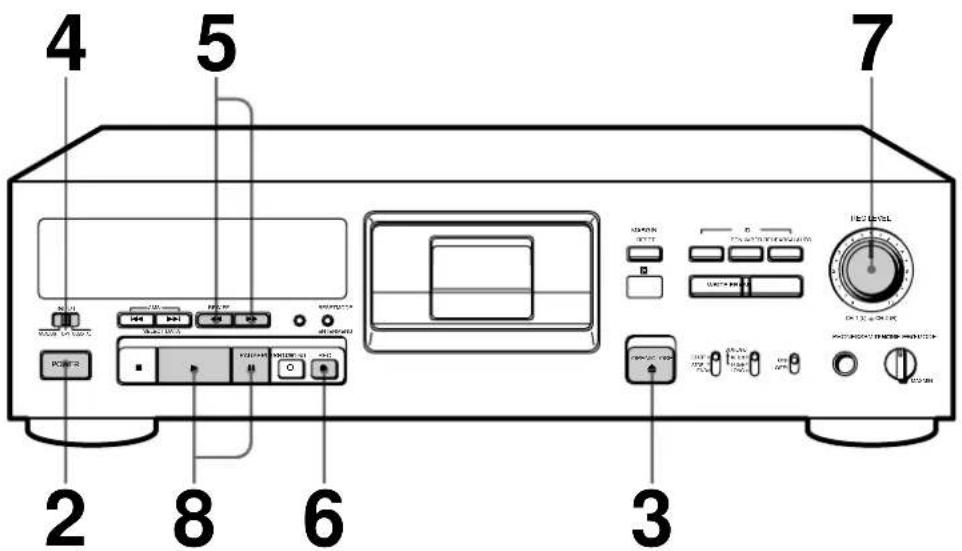
2 Press POWER.
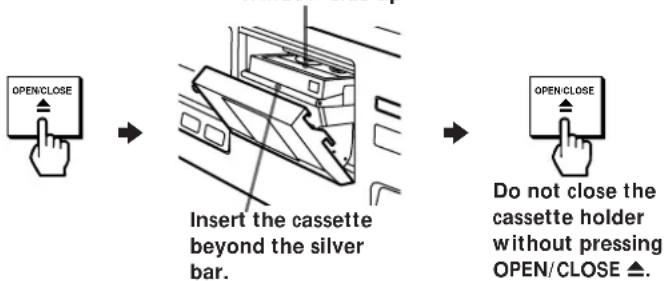
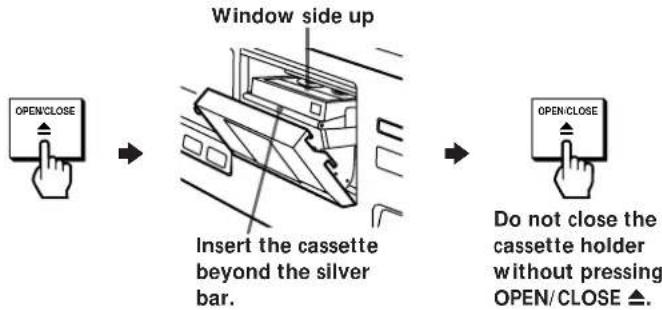
3 Press OPEN/CLOSE and insert a cassette. Window side up

To use headphones
Connect them to the PHONES jack. Use PHONE LEVEL to adjust the volume.
4 Press PLAY.
The deck starts playing. Adjust the volume on the amplifier.
| To | Press |
| Stop playing | STOP■ |
| Pause playing | PAUSE■. Press the button again or press PLAY▶to resume play. |
| Go to the next track or the preceding track | ▶(AMS) or ↓(AMS) |
| Fast-forward or rewind | ▶(FF) or ←(REW) when the deck is stopped |
| Fast-forward or rewind while monitoring the sound | ▶(FF) or ←(REW) during playback. Release the button to resume normal playback. |
| Take out the cassette | OPEN/CLOSE▲ after stopping playing |
Basic Operations
Recording on a Tape
See page 5 for hookup information.

You can monitor the input signal (Source Monitor function)
1 Do steps 1 and 2 on this page.
2 Skip steps 3 and 5, and do steps 4 and 6. When you press the REC button, "NO TAPE" and "SOURCE" appear in the display and you can monitor the program source connected to the selected input connector.
1 Turn on the amplifier and play the program source you want to record.
2 Press POWER.
3 Press OPEN/CLOSE and insert a cassette.
4 Set INPUT to the corresponding input connector.
| To record through | Set INPUT to |
| ANALOG (LINE) IN | ANALOG |
| DIGITAL OPTICAL IN | OPT |
| DIGITAL COAXTAL IN | COAXTAL |

If "UNLOCK" appears in the display
The program source is not connected to the deck properly or is not turned on. Make sure that the program source is properly connected or turned on.

To adjust the recording level more accurately
While monitoring the sound, turn REC LEVEL CH-1 (L)/2 (R) so that the recording level on the peak level meters is at maximum level without entering the OVER range.
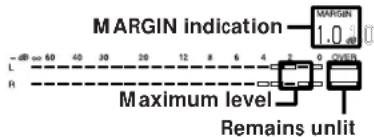
The segments of the peak level meters corresponding to the maximum signal strength remain lit longer than normal. The MARGIN indication shows the margin between maximum signal strength and 0dB , changing each time a stronger signal is input.
If the level exceeds 0 dB
The segments under the OVER indicator light up, and "0.0dB" flashes in the display. If these segments light steadily, sound distortion may occur. To avoid this, keep the recording level between -12 dB and 0 dB.
To reset the margin indication
Press MARGIN RESET. The margin indication changes to "--dB".
5 Locate the position where you want to start recording.
To record from the beginning of the tape
Press (REW) to rewind the tape to its beginning.
To record from the end of the recorded portion
1 Press (REW) to rewind the tape to its beginning.
2 Press (FF).
The deck locates the end of the recorded portion on the tape and stops automatically.
6 Press REC. The deck chair
The deck changes to recording pause. Recording does not start yet.
When recording the analog input signal, adjust the recording level with REC LEVEL CH-1 (L)/2 (R).
The recommended recording level is 3.
8 Press PAUSE I or PLAY. Recording starts.
9 Start playing the program source.
When the tape reaches the end, the deck rewrinds it automatically to its beginning and stops (Auto Rewind).
To Press
Stop recording STOP
Pause recording PAUSE III. Press the button again to resume recording.
Take out the cassette OPEN/CLOSE after stopping recording.
To prevent accidental erasure
Slide the record-protect tab to the left as shown in the illustration below.
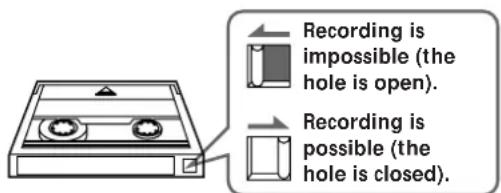
If you insert the cassette whose hole is open and press the REC button, "PROTECT" appears in the display and the recording cannot be done.
Things You Should Know Before Recording
The difference between a blank section and a sound-muted section
The deck distinguishes between two kinds of silent sections, which are respectively called a "blank section" or "sound-muted section".
Blank section
This is a section on which no signal has ever been recorded.
Blank section
This is a section on which a signal has been recorded but at a level that is not audible.
Sound-muted section
Make sure no blank sections are created while you are recording. The existence of blank sections within recorded material will make search operations using the I/ (AMS) buttons impossible or destroy the continuity of the absolute time codes.
Absolute time codes
Absolute time codes indicate the elapsed time from the beginning of the tape. These codes are automatically recorded. Note that once recorded, absolute time codes cannot be re-written.
For accurate recording of absolute time codes
- If the tape is blank, make sure to start recording from the beginning of the tape.
- Use Record Muting (see page 12) to insert spaces between tracks. Do not advance the tape with the PLAY or (FF) button.
- To start recording from the middle of a tape, use End Search (see this page) to locate the end of the recorded portion. This will prevent the creation of blank sections.
If the EMPHASIS indicator lights up in the display
The deck is recording a digital signal with emphasis (in the higher frequencies). The recording will also contain the same emphasis.
If the deck is left in recording pause for more than 10 minutes
Recording pause will be released automatically, the deck will stop for the sake of tape protection and "SOURCE" will appear in the display.
To resume recording, press the REC button. The deck will change to recording pause.
When using a new tape
Before you record on a new tape, we recommend that you fast forward the whole tape and then rewind to the beginning to make the tape reel smoothly.
Locating the End of the Recorded Portion (End Search)
When recording from the middle of a tape, use End Search to locate the end of the recorded portion. This will prevent the creation of a blank section on the tape.
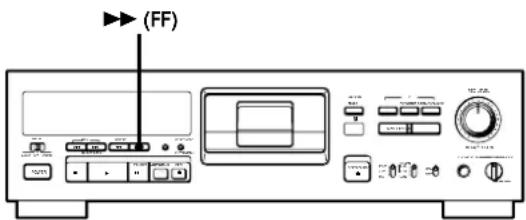
Press (FF) with the deck stopped.
The deck locates the end of the recorded portion (the beginning of the blank portion or the position of the end ID), then stops.
The deck stops at the beginning of any blank section that is 9 seconds or longer, or fast-forwards to the end of the tape if the tape is blank.
When you press the REC button while in a blank section
The deck rewinds the tape to the beginning of the blank section and changes to recording pause. "BLANK" and "WAIT" appear in the display while the deck is searching for the beginning of the blank section.
Note
End Search does not operate if you press the (FF) button while in a blank section.
Setting the Recording Mode
You can select either of two recording modes—standard or long—in the following cases.
- When recording an analog input signal with the INPUT switch set to ANALOG
- When recording a digital input signal with a sampling frequency of 32kHz with the INPUT switch set to OPT or COAXIAL.
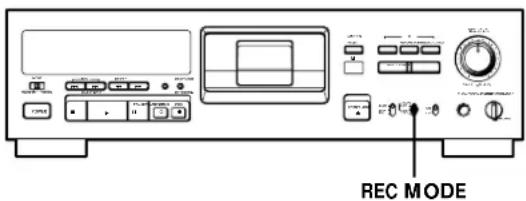
Set REC MODE to select the recording mode.
The following table shows the selectable recording modes and corresponding REC MODE position and sampling frequency for various input signals.
| Input signal | REC MODE position | Recording mode |
| Analog | STANDARD(48 kHz) | Standard play(48 kHz) |
| STANDARD(44.1kHz) | Standard play(44.1 kHz) | |
| LONG Long play (32 kHz) | ||
| Digital (32 kHz) | STANDARD(48 kHz) | Standard play(32 kHz) |
| STANDARD(44.1kHz) | ||
| LONG | Long play (32 kHz) | |
| Digital (44.1 kHz) STANDARD(48 kHz)STANDARD(44.1kHz)LONG | Standard play(44.1 kHz)(Standard play only) | |
| Digital (48 kHz) | STANDARD(48 kHz) | Standard play(48 kHz)(Standard play only) |
| STANDARD(44.1kHz) | ||
| LONG | ||
The recording time in long-play mode (the REC MODE switch set to LONG) is twice as long as standard-play mode.
The LONG indicator lights up in the display while playing or recording in long-play mode.

The counter in long-play mode
The displayed tape running time, absolute time and remaining time on the tape are for standard-play mode. Double the time to obtain the corresponding times for long-play mode.
Note
Do not change the INPUT or REC MODE setting while recording. This may cause an error in the "PGM TIME" (playing time of the track) display.
Using the SBM (Super Bit Mapping) Function
The SBM function uses the principles of human hearing and noise-shaping technology to reduce quantizing noise within the frequency band.
You can use the SBM function to record analog input signal only when the INPUT switch is set to ANALOG and the REC MODE switch to STANDARD (either 48 kHz or 44.1kHz).

Set SBM to ON.
The SBM indicator lights up in the display during recording using the SBM function.
To turn the SBM function off
Set SBM to OFF.
Note
The SBM function operates only during recording. The improved sound produced by the SBM function, however, can be enjoyed during playback, regardless of the SBM switch position or the DAT deck being used.
Inserting a Sound-Muted Section While Recording (Record Muting)
Use Record Muting to insert a space of about 0.5 to 9.5 seconds between tracks.
For details on setting the duration of the blank space, see "Menu Operations" ("REC MUTE") on page 19.
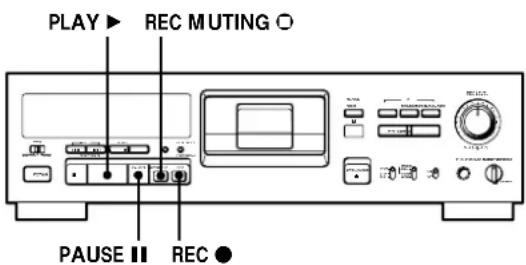
Press REC MUTING where you want to insert a space while the deck is recording or in recording pause.
The REC indicator in the display starts flashing and tape transport continues, but no signal is recorded.
After inserting a space, the REC and indicators in the display stay on and the deck changes to recording pause.
To insert a blank space (of a duration different from that preset by menu setting)
Hold down the REC MUTING 口 button as long as you want.
When you release the REC MUTING button, the REC and the indicators stay on and the deck changes to recording pause.
When the preset duration has passed, the REC indicator begins to flash faster and the MARGIN indication shows how long the REC MUTING button has been pressed.
To insert a blank space of a duration shorter than the preset value
Press REC while the REC indicator is flashing. The deck starts recording again.
To resume recording
Press PAUSE or PLAY
Note
If you do not create a sound-muted section at the beginning of a tape, you may not be able to move or erase a start ID (see page 15) that is recorded within 2 seconds from the beginning of the tape.
About the Display
You can use the display to show the tape running time, absolute time, playing time of the track, remaining time on the tape, error rate, and menu display.

Press MODE (or COUNTER MODE on the remote). Each time you press the button, the display changes as follows.
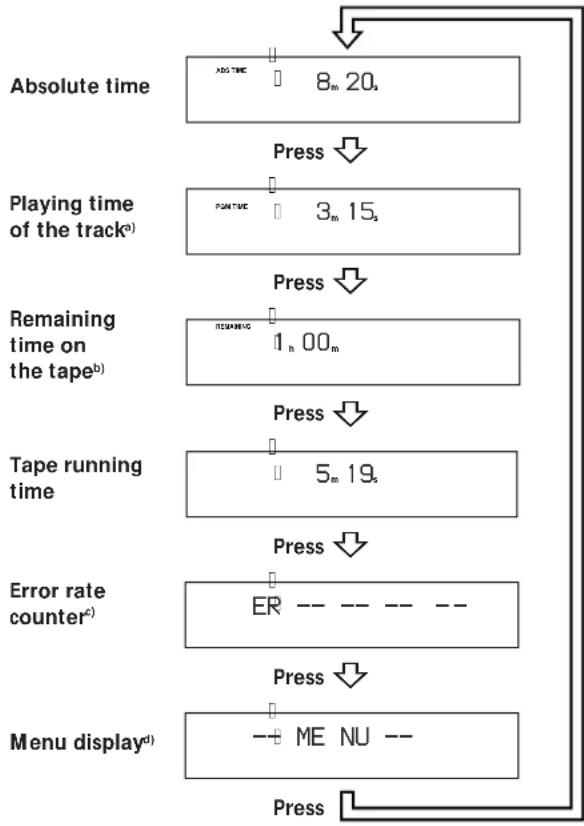
a) The playing time of the track will not be displayed when the "P-TMDISP" is set to "--" (see page 20).
b) In the case of a premasted tape, the remaining time is to the end of the recorded portion.
c) Numeric characters appear only during playback. During recording or pause, the counter shows "ER ----." For details on the error rate counter, see "Notes on the error rate counter" on page 13.
d) Menu display appears only when the deck is empty, stopped, or paused. For details on how to access various menu settings, see "Menu Operations" on page 19.
To reset the tape running time
Press RESET (or COUNTER RESET on the remote).
Notes
- When playing certain types of premastered tapes, "BB" may appear momentarily in the display at the beginning of the tape.
- The playing time of the track does not appear in the following cases:
- When you start playing from the middle of the track
- During rewinding
- In standard-play mode, the remaining time on the tape appears about 16 seconds after you start playing.
- The displayed remaining time may vary somewhat from the actual remaining time, depending on the tape.
Notes on the error rate counter
The counter shows the error rate of the audio signal being played back for both playback heads A and B. The four digits on the right and the left show the error rate detected on the playback heads A and B, respectively. When no error is detected, "0000" appears for the respective playback head. Since the recording of single audio channel takes both heads, the error detected for the playback head A or B does not necessarily correspond to the error on the L or R channel.
Notes
- The counter may temporarily show high rate in the following cases:
when you play a portion recorded with INPUT or REC mode setting has been changed during recording.
when you monitor the sound at high speed.
the transition from one recording to another or beginning or the end of the tape is being played - The display returns to the absolute time indication when you press:
the OPEN/CLOSE button
the ID RENUMBER, ID REHEARSAL, WRITE, or ERASE button.
If the ERR indicator flashes in the display or the error rate counter remains in positive value for 5 seconds or more
- The playback head is dirty. Clean the head with the DAT cleaning cassette (see page 21).
- The tape is defective or damaged.
If the EMPHASIS indicator lights up in the display
The deck is playing an audio signal recorded with emphasis (in the higher frequencies). The deck, however, plays the signal while automatically deemphasizing it (with attenuation proportional to the degree of emphasis).
If "THINTAPE" appears in the display
A cassette over 130 minutes long is inserted.
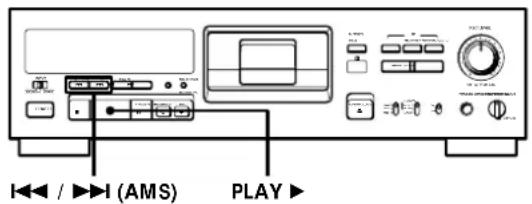
Locating a Track (AMS*/Direct Access)
You can locate the tracks in a number of ways, but only after you have recorded start IDs on the tape (see pages 15 to 17). To use Direct Access, program numbers must be recorded on the tape (see pages 15, 16 and 18).
| To locate | Do the following: |
| The beginning of the next or succeeding tracks (AMS) | Press▶(AMS) as many times as you want while playing. For example, to locate the second track ahead, press twice. |
| The beginning of the current track (AMS) | Press▶(AMS) once while playing. |
| The beginning of preceding tracks (AMS) | Press▶(AMS) as many times as you want while playing. For example, to locate the second track behind, press three times. |
| By specifying the program number of a track (Direct Access) | 1 Enter the program number of the track with the number buttons.2 Press▶(or PLAY▶on the main unit). |
- AMS = Automatic Music Sensor.

If you enter the wrong program number during Direct Access
If you haven't pressed the button, press the CLEAR button on the remote, then enter the correct number. If you have already pressed the button, pressing the CLEAR button will not erase the wrong program number. Stop the deck and reenter the program number.

If the deck detects a blank section of 9 seconds or more, end ID, or the end of the tape (Auto Rewind) The deck rewinds the tape automatically to its beginning and stops.

You can make the deck start playing automatically from the beginning of the tape after rewinding (Auto Play)
Press PLAY▶ while holding down (REW).
Playing Tracks Repeatedly (Repeat Play)
You can play a specific track or all the tracks on the tape repeatedly.
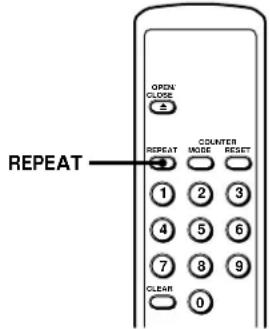
Playing all tracks repeatedly
Press REPEAT repeatedly while playing a track until the REPEAT indicator lights up in the display.
The deck will play all tracks 5 times, then stops.
If the deck detects either of the following during
Repeat Play, it will rewind the tape to its beginning
and start playing again.
A blank section of 9 seconds or more
The end of the tape or the end ID
To stop playing all tracks repeatedly
Press REPEAT repeatedly until the REPEAT indicator goes off.
Note
Repeat Play of all tracks is canceled when you take out the cassette.
Playing a track repeatedly
Press REPEAT repeatedly while playing the track you want to repeat until the REPEAT 1 indicator lights up in the display.
The deck plays the current track 5 times and then stops.
If the deck detects any of the following during Repeat Play, it will rewind the tape to the start ID of the current track and starts playing again from that position.
The next start ID
A blank section of 9 seconds or more
The end of the tape or end ID
A skip ID with Skip Play activated
To stop playing a track repeatedly
Press REPEAT repeatedly until the REPEAT 1 indicator goes off.
Note
Repeat Play of a single track is canceled when you take out the cassette.
Playing Tracks Skipping Specific Portions During Playback (Skip Play)
Please note that skip IDs (see page 15) must be written on the tape before you can use Skip Play.
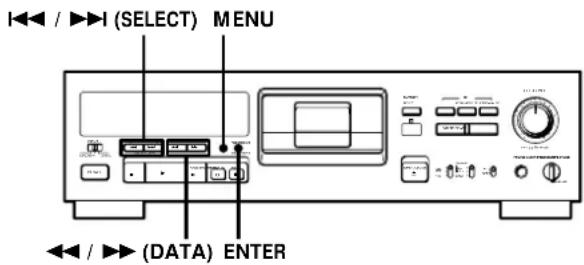
1 While the deck is stopped or paused, press MENU repeatedly until "--MENU--" appears in the display.
2 Press 一 一 /SELECT) repeatedly to select "SKIPPLAY."
3 Press / (DATA) to select "on." "on" indication flashes in the display.
4 Press ENTER. The SKIP PLAY indicator lights up in the display. When the deck detects a skip ID, it fast-forwards the tape to next start ID, then resumes playing.
To cancel Skip Play
Do steps 1 to 4 above to set "SKIPPLAY" to "-."
The SKIP PLAY indicator goes off.
About Sub Codes
In the DAT format, control codes, or sub codes, such as start IDs, skip IDs, and end ID can be recorded on the tape with the audio signal. Since sub codes are written on the tape separately from the audio signal, they have no effect on the audio signal.
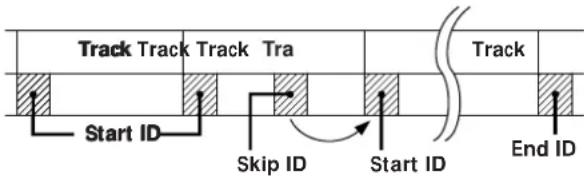
Start IDs
Start IDs indicate the start of a track, and therefore allow you to locate the position of a track precisely. The start IDs are 9 seconds in length (18 seconds in long-play mode) to enable easy detection during fast-forwarding or rewinding.
Program numbers
Program numbers serve as track numbers. Occupying the same position as start IDs, a program numbers allow you to locate specific tracks or play tracks in a specific order.
Skip IDs
Skip IDs indicate tracks or recorded portions that are to be skipped while playing. Skip IDs are 1 second in length (2 seconds in long-play mode).
End ID
An end ID indicates the end of a recording. An end ID is 9 seconds in length (18 seconds in long-play mode). When an end ID is detected during playback, playback stops and the deck rewinds the tape to its beginning. If an end ID is detected during fast-forwarding, the tape stops at that point and deck becomes ready for recording from that point.
Notes
- All tape operation buttons do not work during the writing or erasing of sub codes.
- Writing and erasing of sub codes and renumbering of program numbers are impossible if the record-protect hole on the DAT cassette is open (see page 9).
Writing Sub Codes During Recording
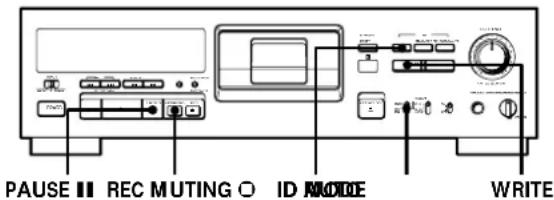
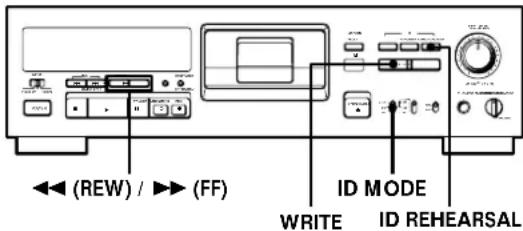
Writing start IDs manually during recording
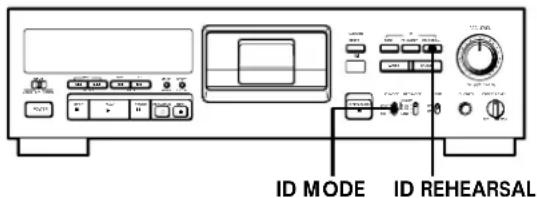
1 Set ID MODE to START.
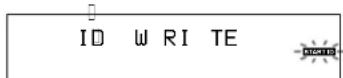
2 Press WRITE.
"ID WRITE" appears in the display for a few seconds and the start ID is written on the tape. The START ID indicator flashes in the display during this time.
Note
The interval between start IDs must be more than 18 seconds (36 seconds in long-play mode). If the interval is less than 18 seconds (or 36 seconds), the deck may fail to detect the second start ID while playing a tape.
Writing start IDs automatically during recording
1 Set ID MODE to START.
2 Press ID AUTO repeatedly until the AUTO indicator lights up in the display.
For details on the condition for the automatic writing of start IDs, see "Automatic writing of start IDs during recording" on page 6, and "Menu Operations" on pages 19 and 20.
Writing program numbers during recording
Program numbers occupy the same positions as the start IDs and are determined by depending on the following conditions:
When a program number is displayed
The next program number rises by one above when the next start ID is written.
(Continued)
When no program number is displayed ("--" appears instead)
Program numbers are not written even when start IDs are written. To write program numbers, rewind the tape to the nearest start ID to display the program number, and then locate the position where you want to start recording.

When you record from the beginning of the tape
The program number will start with 1. However, you can change the program number assigned to the first track by setting the "FIRST(PGM NO.)" menu (see page 20).
Specifying the program number to be assigned
1 Pause recording.
2 Press the number button(s) to input the program number you want to assign.
The number appears in the display.
To cancel the number, press the CLEAR button on the supplied remote.
3 Start recording.
A start ID and the assigned program number are written simultaneously.
Note
During automatic start ID writing the positioning of some start IDs may be inaccurately or inappropriately positioned away from the beginning of the track. If this happens, you can reposition or erase the start IDs later (see "Accurate positioning of sub codes" on this page and page 17, and "Erasing Sub Codes" on page 18).
Writing skip IDs manually during recording
1 Set ID MODE to SKIP.
2 Press WRITE.
The skip ID is written on the tape. The SKIP ID indicator flashes in the display during this time.
Writing an end ID during recording
1 When the recording of the program source comes to an end, press PAUSE or REC MUTING. Recording is paused.
2 Set ID MODE to END.
3 Press WRITE.
"ID WRITE" or "EE" appears in the display while the end ID is being written.
When writing has finished, the record pause mode is canceled and the deck rewrinds the tape to the beginning of the end ID.
Writing Sub Codes During Playback
You can write start IDs, skip IDs, or an end ID during playback.
1 Set ID MODE to the position for the type of ID you want to write.
2 Press WRITE.
"WRITE") appears in the display while the deck rewrites to the point where you pressed the button, and then "ID WRITE" appears in the display for a few seconds and the specified ID is written on the tape.
Accurate positioning of sub codes (Rehearsal function)
1 Set ID MODE to the position for the type of ID you want to write.
2 During playback, press ID REHEARSAL when you arrive at the proper position.
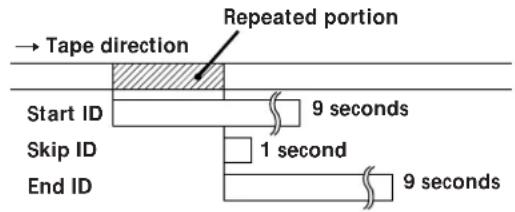
"REHRSL" appears, the corresponding ID indication flashes in the display and the Rehearsal function repeats a 3-second portion containing the selected position. The repeated portion plays back 8 times, with the remaining number of times appearing to the right of the "REHRSL." After 8 times, the deck stops.
In the case of a start ID, the 3-second repeated portion starts from the point where you pressed the ID REHEARSAL button.
In the case of a skip ID or an end ID, the 3-second repeated portion ends at the point where you pressed the ID REHEARSAL button.
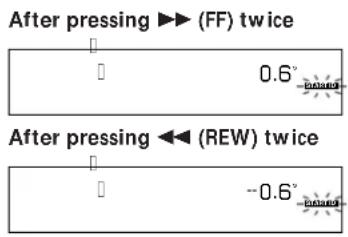
3 Press (REW) or (FF) to move the beginning of the repeated portion.
Each time you press the (REW) or (FF) button, the beginning of the repeated portion shifts backwards or forwards in 0.3-second increments, up to a maximum extent of about 2 seconds (4 seconds in long-play mode) in either direction.

When writing a start ID

When writing a skip ID or an end ID
The time in the display shows the shift in position from the time the ID REHEARSAL button was pressed.
Example: Positioning Start ID
4 Press WRITE to write the ID.
"WRITE") appears in the display while the deck rewrites to the point where you pressed the button, and then "ID WRITE" appears for a few seconds and the ID is written on the tape at the selected position.
- Start IDs are 9 seconds long starting from the beginning of the repeated portion.
- Skip IDs are 1 second long starting from the end of the repeated portion.
- An end ID is 9 seconds long starting from the end of the repeated portion.
Newly written IDs positioned by the Rehearsal function
Adjusting the Position of an Existing Start ID
You can adjust the position of previously recorded start IDs.
1 Set ID MODE to START.
2 During playback, press ID REHEARSAL when the existing start ID you want to reposition is displayed.
The deck rewinds to the beginning of start ID and Rehearsal repeats a 3-second portion.
3 Do steps 3 and 4 of "Accurate positioning of sub codes (Rehearsal function)" on this page.
You can move the start ID to a maximum extent of about 2 seconds (4 seconds in long-play mode) in either direction from its original position.
Notes
- Start IDs written within 10 seconds from the end of the tape may be difficult or impossible to move.
- Existing skip IDs or an end ID cannot be moved.
Erasing Sub Codes
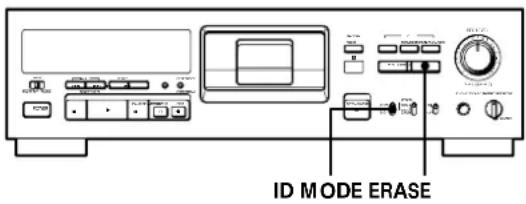
1 Set ID MODE to the position for the type of ID you want to erase.
2 To erase a start ID or skip ID
Press ERASE when the ID you want to erase appears in the display.
"ERASE") appears in the display as the deck rewrinds to the beginning of the ID, then "ID ERASE" appears as the deck erases the ID.
In the case of a skip ID, if the SKIP ID indicator has been turned off by the time you press ERASE, the deck will still erase the skip ID.
To erase an end ID
Press ERASE.
"ERASE") appears in the display while the deck fast-forwards to the beginning of the end ID, then "ID ERASE" appears while the deck erases the end ID.
- It takes 9 seconds to erase a start ID.
It takes 1 second to erase a skip ID. - It takes 9 seconds to erase an end ID.
- Program numbers are erased together with start IDs.

You can erase an ID even when it is not displayed
Just press the ERASE button. The tape is rewound, and the first ID detected is erased.

You can use the End Search function to locate the end ID
See page 10.
Note
A skip ID written at the same position of a start ID is erased when the start ID is erased.
Renumbering the Program Numbers Automatically (Renumbering)
Renumbering searches for each start ID from the beginning of the tape and assigns a new program number to each one starting with 1. Use Renumbering function in the following cases:
- When you've added a start ID while playing the tape
- When a program number is missing due to an erased start ID
- When you began recording from the middle of the tape and wrote a program number that already exists, or when one of the start IDs has no program number.

Press ID RENUMBER while the deck is stopped or playing.
The RENUMBER indicator flashes in the display and the tape is automatically rewound to its beginning. The deck then starts searching for each successive start ID writing a new program number for each one starting with 1. The RENUMBER indicator stops flashing and "ID WRITE" appears in the display for a few seconds as the deck begins rewriting the program numbers.
After renumbering is finished, the deck rewinds the tape automatically to its beginning, then stops.

You can specify the first program number to be assigned to the first track
For details, see "Menu Operations" ("FIRST(PGM NO.)") on page 20.
Note
Renumbering function may not function correctly when:
- A blank section exists on the tape.
- The interval between two start IDs is less than 18 seconds (36 seconds in long-play mode).
- A start ID exists within 10 seconds from the end of the tape.
Menu Operations
You can make various settings and examine internal conditions of the deck through menu operations. Settings made through menu are memorized even when the deck is turned off.
Note
You can do menu operations only when the deck is empty, stopped or paused.
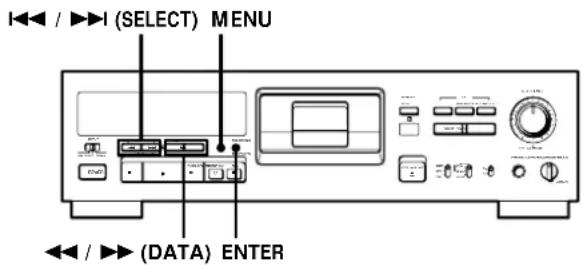
Making menu settings
1 Press MENU repeatedly until "--MENU--" appears in the display.
2 Press / (SELECT) repeatedly to select the menu.
3 Press / > (DATA) repeatedly to select the parameter. The selected parameter flashes.
4 Press ENTER. The selected setting lights up.
5 Press MENU again. The deck becomes ready for operation.
Menu descriptions
A brief explanation is given below for each menu, including their settings or setting range, factory setting, and reference pages.
SETID6
Selects the copy information to be written on the tape when recording the analog signal or the IEC-958 digital signal for broadcasting studio use input from the DIGITAL COAXIAL IN jack.
Settings: 00 (copying permitted), 10 (copying prohibited), 11 (one generation copy only)
Factory setting: 00
Reference page: 5
REC MUTE (REcord MUTing duration)
Sets the duration of the sound-muted section created between tracks by the Record Muting function.
Setting range: 0.5 to 9.5 seconds (in units of 0.5 second)
Factory setting: 4 seconds
Reference page: 12
L-SY TH (Level-SYnc THreshold)
Sets the reference input level for automatic writing of start IDs.
Setting range: -12 to -60 dB (in units of 1 dB)
Factory setting: -45 dB
Reference pages: 6, 15, 20
L-SY BK (Level-SYnc BlanK time)
Sets the length of time that the input signal must remain below the reference level before automatic writing of start IDs begin.
Setting range: 1 to 10 seconds (in units of 1 second)
Factory setting: 3 seconds
Reference pages: 6, 15, 20
IEC S-ID (IEC Start-ID)
Specifies if start IDs (or skip IDs) are automatically detected and written on the tape when recording from a DAT deck connected to the DIGITAL COAXIAL or OPTICAL IN jack.
Settings: on (start IDs (or skip IDs) are automatically detected and written), -- (writing of the start IDs (or skip IDs) is determined by the settings of the L-SY TH and L-SY BK menus)
Factory setting: on
Reference pages: 6, 15, 20
IEC CD-Q (IEC CD-Q code)
Specifies if start IDs are written automatically whenever a Q code defined by the user's bits on the CD is detected while recording from a CD player connected to the DIGITAL COAXIAL or OPTICAL IN jack.
Settings: on (a Q code is detected and written as a start ID automatically),
-- (writing of the start IDs is determined by the settings of the L-SY TH and L-SY BK menus)
Factory setting: on
Reference pages: 6, 15, 20
(Continued)
Menu Operations
SKIPPLAY (SKIP PLAY)
Selects if the deck detects skip IDs and fast-forwards the tape to the next start ID during playback.
Settings: on (the deck detects skip IDs), -- (the deck does not detect skip IDs)
Factory setting: --
Reference page: 14
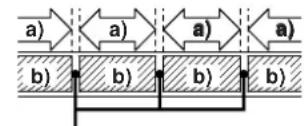
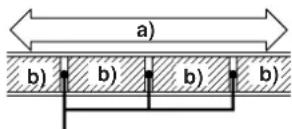
Automatic writing of start IDs and menu settings during digital recording
The automatic detection and writing of start IDs are carried out according to the jack to which the program source is connected, the signal format, and the category code of the signal, as shown in the table below.
A: Start IDs are detected and written automatically.
B: Q codes are detected and written as start IDs automatically.
C: The writing of start IDs is determined by the settings of the L-SY TH and L-SY BK menus.
Menu settings
| Jack | COAXIAL | COAXIAL/OPTICAL | ||
| Signal format | Broadcast studio use | Consumer use | ||
| Category | — | DAT | CD | Others |
| IEC S-ID on A* A | — C | |||
| IEC-S-ID-C-C | — C | |||
| IEC CD-Q on— B C | ||||
| IEC CD-Q-- C | — C | |||
- Only when connected to the PCM-2300, PCM-2700, or PCM-2700A
P-TMDISP (Program TiMe DISPLAY)
Specifies if the track playing time is displayed when the MODE button is pressed.
Settings: on (the track playing time is displayed), -- (the track playing time is not displayed)
Factory setting: on
Reference page: 12
FIRST(PGM NO.) (FIRST ProGram NO.)
Specifies the first program number to be assigned to the first track when recording from the beginning of the tape or using the Renumbering function.
Setting range: 1 to 99
Factory setting: 1
Reference pages: 16, 18
TAPEID6 (ID6 on TAPE)
Displays the copy information of the tape currently inserted.
Indications: 00 (copying permitted), 10 (copying prohibited), 11 (one generation copy only)
Reference page: 5
DIF (Digital Input signal Format)
Shows the format of the digital input signal from the connector selected by the INPUT switch. Use this menu while the deck is in recording pause or while you are monitoring the program source.
Displays: -- -- (the INPUT switch is set to
"ANALOG" or no digital signal is input),
NON AU (non-audio-format signal is input; not recordable on this deck),
PRO (signal for broadcast studio use is input),
DAT (signal is input from a DAT deck for consumer use),
CD (signal is input from a CD player for consumer use),
MD (signal is input from a MD deck for consumer use),
GEN (signal is input from a BS tuner etc.),
OTHER (signal is input from other components than described above)
Reference page: 6
HOUR (HOURs meter)
Displays the total drum operating time for periodic check-up.
Display range: 0 to 9999 hours (in units of 1 hour)
INIT SET (INITIAL SETting)
Resetssallthemenualsetingstofactory settings.
Settings: on (resets the menu settings),
- (does not reset the menu settings)
Factory setting: --
Precautions
On safety
- Do not disassemble the cabinet as this may result in an electric shock. Refer servicing to qualified personnel only.
- Should any solid object or liquid fall into the cabinet, unplug the AC power cord before operating the unit any further.
On power sources
- Before operating the unit, check that its operating voltage is identical with your local power supply. The operating voltage is indicated on the nameplate at the rear of the unit.
- If you are not going to use the unit for a long time, be sure to disconnect the AC power cord (mains lead) from the wall outlet. To disconnect the cord, grasp the plug itself; never pull the cord.
- AC power cord must be changed only at the qualified service shop.
On operation
If the unit is brought directly from a cold place to a warm place, or is placed in a very damp room, moisture may condense inside the unit, "CAUTION" may appear in the display, and the unit may not operate. If this happens, leave the unit turned on for about an hour until the moisture evaporates. Then turn the unit off, then on again.
On placement
- Place the unit in a location with adequate ventilation to prevent heat build-up.
- Do not place the unit: on a soft surface such as a rug that might block the ventilation holes on the bottom.
near heat sources.
in direct sunlight.
in an inclined position.
in a place subject to excessive dust or mechanical shock.
On the tapes
After using a tape, put it into its case and keep it where it will not be subject to sunlight, high temperature, moisture or dust.
- The DAT cassette shell is designed to keep out dust. Do not open the case to expose the tape.
- The hole at the back of the cassette is the detector slot. Do not cover this slot.
Regarding tapes of over 130 minutes
Do not use thin-tape cassettes (with a playing time of over 130 minutes) to record important material since such cassettes are subject to the following problems:
- Improper threading of the tape after repeated AMS, rewinding, fast-forwarding, or cueing operations.
Incorrect writing and erasing of start IDs.
Sound distortion.
"THINTAPE" appears in the display when you insert such cassettes.
If you have any questions or problems concerning your unit, please consult your nearest Sony dealer.
Cleaning
Cleaning the cabinet, panel and controls
Use a soft cloth slightly moistened with a mild detergent solution. Do not use any type of abrasive pad, scouring powder or solvent such as alcohol or benzine.
Cleaning the head and tape path
- Prolonged operation will cause contamination of the head. To obtain the best possible recording and playback sound, we recommend that you use the Sony DT-10CL cleaning cassette (not supplied) to clean the head after every ten hours or so of operation.
- Clean the head with the cleaning cassette when the deck has not been used for a long period of time. Contamination of the head may cause sound dropout during playback.
Using the cleaning cassette
1 Insert the cleaning cassette as you would a normal DAT cassette.
2 Press PLAY. After 10 seconds, press STOP Do not press the REC or (FF) button for cleaning.
3 Remove the cleaning cassette without rewinding it. You should rewind the cleaning cassette only when it has reached the end.
Notes on cleaning
- After 10 hours of operation, "CLEANING" appears in the display for about ten seconds when you turn on the deck. It is recommended that you clean the head and tape path periodically, using this message as a guide.
- Due to the shortness of the cleaning cassette, the counter will not show the actual running time and remaining time of the cassette.
Display Messages
The following table explains the various messages that appear in the display.
Message Meaning
| BLANK | The deck is searching for the beginning of the blank section on the tape. |
| CAUTION | A safety mechanism is operating because of condensation or other reasons. |
| CLEANING | Cleaning the head and tape path is recommended. After about 10 hours of deck use, this message appears for about 10 seconds whenever you turn on the deck. |
| (ERASE) | The deck is searching for the beginning of the sub code to be erased. |
| ID ERASE | A sub code is being erased. |
| ID WRITE | A sub code is being written. |
| -MENU-- | The menu operation is possible. |
| NO TAPE | A cassette is not inserted into the deck. |
| REHRSL | Rehearsal function is on. |
| SOURCE | The deck has been in recording pause for about 10 minutes, or you've pressed the REC button while no cassette is in the deck or the cassette is record-protected. |
| TAPE END | The tape has come to the end of the recorded portion. |
| TAPE TOP | The tape has reached its beginning. |
| THINTAPE | A cassette over 130 minutes long is inserted. |
| UNLOCK | No digital signal is being input to the jack that you selected with the INPUT switch. |
| WAIT | The deck is searching for the beginning of the blank section on the tape. |
| (WRITE) | The deck is rewinding the tape to the position where the sub code is written. |
Troubleshooting
If you've experienced any of the following difficulties while using the deck, use this section as a guide to remedy the problem. Should any problem persist, consult your nearest Sony dealer.
The cassette holder does not close.
- Check that the cassette is inserted correctly (see pages 7 and 8).
Insert the cassette beyond the silver bar (see pages 7 and 8).
The function buttons do not work.
The deck has just been turned on and will not operate for about 4 seconds. Wait 4 seconds (10 seconds when "CLEANING" appears) before attempting any operation.
The PAUSE button is activated. Press PAUSE to cancel pause.
The tape has reached its end. Press (REW) to rewind the tape.
No sound
Make the proper connections (see page 5).
The connected amplifier is not being operated properly. Operate the amplifier as required for the respective deck operation. (Refer to the operating instructions of the amplifier.)
The deck does not record.
The record-protect hole on the cassette is open. Slide the record-protect tab to close the hole (see page 9).
The INPUT switch is incorrectly set. Set INPUT to the correct position.
The REC LEVEL control is set at 0. Turn REC LEVEL clockwise to raise the recording level (only during analog recording).
The OPEN/CLOSE button does not work.
The OPEN/CLOSE button does not function during recording. Press STOP or PAUSE to stop recording first, then press OPEN/CLOSE.
"CAUTION" appears and the deck cannot be operated.
A safety mechanism is operating because of condensation. Remove the cassette and leave the deck turned on for about an hour. Then turn the deck off, then on again (see page 21).
Writing or erasing of sub codes is not possible.
The record-protect hole on the cassette is open. Slide the record-protect tab to close the hole (see page 9).
Start ID writing is not possible during recording.
The start ID cannot be written within 9 seconds (18 seconds in long-play mode) after the end of the previous start ID. Make sure at least 9 seconds (18 seconds in the long-play mode) has passed after the last start ID and before writing a new one.
The search function does not work.
The specified program number does not exist on the tape. Renumber the program numbers (see page 18).
The program numbers are out of order. Renumber the program numbers (see page 18).
The search function operates suddenly during playback.
Skip Play is on. Set the SKIPPLAY menu to "--" (see page 20).
Repeat Play is on.
Press REPEAT on the remote repeatedly to turn off the REPEAT or REPEAT 1 indicator in the display and cancel Repeat Play (see page 14).
The tape operation buttons do not function while writing or erasing a sub code.
All buttons do not work during the 9 seconds the start ID or end ID is being written or erased (18 seconds in long-play mode) or during the 1 second the skip ID is being written or erased (2 seconds in long-play mode). Wait until the writing or erasing the start, skip or end ID finishes before operation.
Absolute time codes writing is not possible.
Recording began within a blank section.
Rewind the tape to its beginning, or locate the end of the recorded portion with End Search before starting recording.
Tape transport is excessively loud during fast-forwarding or rewinding.
The noise is caused by the cassette and is not a mechanical problem.
The tape stops suddenly.
The cassette is defective or damaged.
Press OPEN/CLOSE and replace the cassette with a new one.
When pressing (REW)/FF) or I/AMs), the tape stops momentarily before starting to move.
This is normal and is not a mechanical problem.
The deck cannot be operated with the remote.
The battery is weak. Change both batteries.
The SBM indicator does not light up in the display even though SBM is set to ON.
The SBM indicator lights up only during the recording of analog input signals with a sampling frequency of 48 kHz or 44.1kHz not during the recording of a digital input signal, an analog input signal with a sampling frequency of 32kHz or during playback.
A particular operation cannot be done as you want.
Set the appropriate menu to its default setting (see pages 19 and 20).
Specifications
Recording section
Tape Digital audio tape
Recording head Rotary head
Recording time Standard: 120 minutes
Long-play: 240 minutes
DT-120
Tape speed Standard: 8.15mm / s
Long-play: 4.075mm / s
Drum rotation Standard: 2,000 rpm
Long-play: 1,000 rpm
Error correction Double-encoded Reed Solomon code
Tape section
Track pitch 13.6 m (20.4 m)
Sampling frequency 48kHz 44.1kHz 32kHz
Modulation system 8-10 modulation
Transfer rate 2.46 Mbit/sec
Number of channels 2 channels, stereo
D/A conversion Standard: 16-bit linear
(quantization) Long-play: 12-bit non-linear
General section
Power requirements
Where purchased Power requirements
U.S.A./Canada 120V AC, 60Hz
Europe/U.K 230 V AC, 50/60 Hz
Power consumption 30 W
Dimensions Approx 432 · 122 · 325 mm (w/h/d)
(17· 4^7 / 8· 12^7 / 8 inches)
(not including rack mount adaptor)
Weight Approx 5.0 kg (11 lb)
Remote commander RM-D757 (supplied)
Remote control system
Infrared control
Power requirements
3V DC, with two size-AA (R6) batteries
Dimensions
Approx 45. 210· 26mm(w / h / d)
(1^3 / 16 · 8^3 / 8 · 1^1 / 16 inches)
Weight
Approx 100g (3.5 oz) incl. batteries
(Continued)
Additional Information
Input jacks
Analog Input
| Jack Type Input | impedance | Rated input levela) | |
| ANALOG (LINE) | Phono-plug jack | 47 kilohms -12 dBs | |
Digital Input
| Jack Type Input | Rated input level impedance |
| COAXIAL Phono-plug jack | 75 ohms 0.5 Vp-p |
| OPTICAL Optical jack — — | |
Output jacks
Analog Output
| Jack Load Type | Output impedance | Rated output levela) | impedance | |
| ANALOG (LINE) | Phono-plug jack | 470 ohms -12 dBs 47 kilohms | ||
| PHONES Stereo phone- plug jack | 100 ohms 0.36 mW 32 ohms | |||
Digital Output
| Jack | Type RatedOutputimpedance output levelimpedance | ||
| COAXIAL | Phono- plug jack | 75 ohms 0.5 Vp-p | 75 ohms |
| OPTICAL | Optical jack | — Wavelength: 660 nm | — |
Audio characteristics
Frequency response
Standard: 20-20,000 Hz (±0.5 dB)
Long-play: 20-14,500 Hz (±0.5 dB)
Signal-to-noise ratio
90 dB or more (20 kHz LPF, A-Weight filter ON)
Total harmonic distortion b)
Standard: 0.05% or less
Long-play: 0.3% or less
(1 kHz, Reference levela) 20 kHz LPF
ON)
Wow and flutter
Below measurable limit (± 0.001%)
W.PEAK)
a) The reference level corresponds to -20dB on the peak level meters.
b) During analog input with the SBM function off
Supplied accessories See page 4.
Design and specifications are subject to change without notice.
Index
A
Absolute time 12
Absolute time codes 10
Adjusting the recording level 9
AMS (Automatic Music Sensor) 13
Auto Play 13
Auto Rewind 13
B
Batteries 4
Blank section 10
C
Cleaning
cabinet, panel and controls
21
head and tape path 21
D
Digital interface
Automatic writing of start
IDs 6
Copy information 5
Digital input and output
jacks 5
Digital signal lock range 6
Direct Access 13
Display messages 22
E, F, G
Emphasis 10, 13
End ID
Definition 15
Erasing 18
Writing during recording 16
End Search 10
Error rate counter 12, 13
H
Hooking up the system
AC power cord 5
Analog connections 5
Digital connections 5
I, J, K, L
Inserting batteries into the
remote 4
M, N, O
Menu
descriptions 19
display 12
Making settings 19
P, Q
Playing a tape 7
Playing time of the track 12
Program numbers
Definition 15
Renumbering 18
Specifying the program
number 16
Writing during recording 15
R
Rack mounting 4
Recording on a tape 8
Record Muting 12
Record-protect tab 9
Rehearsal function 16
Remaining time on the tape 12
Renumbering 18
Repeat Play
Playing a track repeatedly 14
Playing all tracks repeatedly
14
S
SBM function 11
Setting the recording mode 11
Skip ID
Definition 15
Erasing 18
Writing manually during
recording 16
Skip Play 14
Sound-muted section 10, 12
Source Monitor 8
Start ID
Adjusting the position of an
existing start ID 17
Definition 15
Erasing 18
Writing automatically during
recording 15
Writing manually during
recording 15
T
Tape running time 12
U, V
Unpacking 4
W,X,Y,Z
Writing sub codes during
playback 16
Names of controls
Buttons
CLEAR 13
COUNTER MODE 12
COUNTER RESET 12
ENTER 14, 19
ERASE 18
ID AUTO 15
ID REHEARSAL 16, 17
ID RENUMBER 18
MARGIN RESET 9
MENU 14,19
MODE 12
OPEN/CLOSE 7-9
PAUSE 7,9,12,15
PLAY 7,9,12,13
REC 9,12
REC MUTING 12, 15
REPEAT 14
RESET 12
STOP 7,9
WRITE 15,16
AMS7,13
DATA)14,19
(REW) / (FF) 7, 9, 10,
16
1/SELECT)14,19
Switches
ID MODE 15-18
INPUT 8
POWER 7,8
REC MODE 11
SBM 11
Controls
PHONE LEVEL 7
REC LEVEL CH-1 (L)/2 (R) 9
Jacks
ANALOG (LINE) IN/OUT 5
DIGITAL COAXIAL IN/OUT
5
DIGITAL OPTICAL IN/OUT 5
PHONES 7
Others
CAUTION 21, 22
ERR 13
PROTECT 9
UNLOCK 9,22
WAIT 10,22
AVERTISSEMENT
1 Prises ANALOG (LINE) IN/OUT
2 Prises DIGITAL COAXIAL IN/OUT
3 Prises DIGITAL OPTICAL IN/OUT
4 Plot AC IN
Raccordements analogiques
REC MUTE (REcord MUTing duration)
L-SY TH (Level-SYnc THreshold)
Pages de reference: 6, 15, 20
L-SY BK (Level-SYnc BlanK time)
Pages de reference: 6, 15, 20
IEC S-ID (IEC Start-ID)
IEC CD-Q (IEC CD-Q code)
Pages de reference: 6, 15, 20
FIRST(PGM NO.) (FIRST ProGram No.)
TAPEID6 (ID6 on TAPE)
INIT SET (INITIAL SETting)
CLEAR 13
COUNTER MODE 12
COUNTER RESET 12
ENTER 14, 19
ERASE 18
ID AUTO 15
ID REHEARSAL 16,17
ID RENUMBER 18
MARGIN RESET 9
MENU 14,19
MODE 12
OPEN/CLOSE 7-9
PAUSE 7,9,12,15
PLAY (D>7,9,12,13
REC 9,12
REC MUTING 12,15
REPEAT 14
RESET 12
STOP 7,9
WRITE 15,16
AMS7,13
DATA)14,19
(REW)/FF7,9,10
16
14,19
REC LEVEL CH-1 (L)/2 (R) 9
Prises
ANALOG (LINE) IN/OUT 5
DIGITAL COAXIAL IN/OUT
5
DIGITAL OPTICAL IN/OUT 5
PHONES 7
Divers
CAUTION 21, 22
ERR 13
PROTECT 9,22
UNLOCK 9,22
WAIT 10,22
Vorsicht
- AMS = Automatic Music Sensor

REC MUTE (REcord MUTing duration)
L-SY TH (Level-SYnc THreshold)
IEC CD-Q (IEC CD-Q code)
TAPEID6 (ID6 on TAPE)
INIT SET (INITIAL SETting)
Transferrate 2,46 MBit/s
Audio characteristics
Frequenzgang ^b)
Standardplay: 20-20.000 Hz (±0,5 dB)
Longplay: 20-14.500 Hz (±0,5 dB)
Digitale Anschlüsse 5
Netzkabel 5
Aufnahme 8
Aufnahmemodus 11
ANALOG (LINE) IN/OUT 5
DIGITAL COAXIAL IN/OUT
5
DIGITAL OPTICAL IN/OUT 5
PHONES 7
Regler
PHONE LEVEL 7
REC LEVEL CH-1 (L)/2 (R) 9
Sonstige
CAUTION 21, 22
ERR 13
PROTECT 9
UNLOCK 9,22
WAIT 10,22


- Digital Audio Recorder
- Owner's Record
- INFORMATION
- CAUTION
- For the customers in Canada
- About This Manual
- Conventions
- TABLE OF CONTENTS
- Getting Started
- Playing a Tape 7
- Recording on a Tape 8
- Recording Operations
- Playback Operations
- Writing Sub Codes
- Menu Operations
- Additional Information
- Unpacking
- Inserting batteries into the remote
- When to replace the batteries
- Notes
- Rack Mounting
- Hooking Up the System
- Analog connections
- Digital connections
- Connecting the AC power cord
- Digital Interface
- Digital input and output jacks
- Copy information during recording
- Automatic writing of start IDs during recording
- Digital signal lock range
- Where do I go next?
- Playing a Tape
- To use headphones
- Basic Operations
- Recording on a Tape
- You can monitor the input signal (Source Monitor function)
- Press POWER.
- If the level exceeds 0 dB
- To reset the margin indication
- Locate the position where you want to start recording.
- To record from the end of the recorded portion
- Press REC. The deck chair
- When recording the analog input signal, adjust the recording level with REC LEVEL CH-1 (L)/2 (R).
- Press PAUSE I or PLAY. Recording starts.
- Start playing the program source.
- To Press
- To prevent accidental erasure
- Things You Should Know Before Recording
- The difference between a blank section and a sound-muted section
- Blank section
- Absolute time codes
- For accurate recording of absolute time codes
- If the EMPHASIS indicator lights up in the display
- If the deck is left in recording pause for more than 10 minutes
- When using a new tape
- Locating the End of the Recorded Portion (End Search)
- When you press the REC button while in a blank section
- Note
- Setting the Recording Mode
- The counter in long-play mode
- Using the SBM (Super Bit Mapping) Function
- To turn the SBM function off
- Inserting a Sound-Muted Section While Recording (Record Muting)
- To insert a blank space (of a duration different from that preset by menu setting)
- To insert a blank space of a duration shorter than the preset value
- To resume recording
- About the Display
- To reset the tape running time
- Notes on the error rate counter
- If the ERR indicator flashes in the display or the error rate counter remains in positive value for 5 seconds or more
- If "THINTAPE" appears in the display
- Locating a Track (AMS*/Direct Access)
- If you enter the wrong program number during Direct Access
- You can make the deck start playing automatically from the beginning of the tape after rewinding (Auto Play)
- Playing Tracks Repeatedly (Repeat Play)
- Playing all tracks repeatedly
- To stop playing all tracks repeatedly
- Playing a track repeatedly
- To stop playing a track repeatedly
- Playing Tracks Skipping Specific Portions During Playback (Skip Play)
- To cancel Skip Play
- About Sub Codes
- Start IDs
- Program numbers
- Skip IDs
- End ID
- Writing Sub Codes During Recording
- Writing start IDs manually during recording
- Writing start IDs automatically during recording
- Writing program numbers during recording
- When a program number is displayed
- When no program number is displayed ("--" appears instead)
- When you record from the beginning of the tape
- Specifying the program number to be assigned
- Writing skip IDs manually during recording
- Writing an end ID during recording
- Writing Sub Codes During Playback
- Accurate positioning of sub codes (Rehearsal function)
- Adjusting the Position of an Existing Start ID
- Erasing Sub Codes
- To erase a start ID or skip ID
- To erase an end ID
- You can erase an ID even when it is not displayed
- You can use the End Search function to locate the end ID
- Renumbering the Program Numbers Automatically (Renumbering)
- You can specify the first program number to be assigned to the first track
- Making menu settings
- Menu descriptions
- SETID6
- REC MUTE (REcord MUTing duration)
- L-SY TH (Level-SYnc THreshold)
- L-SY BK (Level-SYnc BlanK time)
- IEC S-ID (IEC Start-ID)
- IEC CD-Q (IEC CD-Q code)
- SKIPPLAY (SKIP PLAY)
- Automatic writing of start IDs and menu settings during digital recording
- P-TMDISP (Program TiMe DISPLAY)
- FIRST(PGM NO.) (FIRST ProGram NO.)
- TAPEID6 (ID6 on TAPE)
- DIF (Digital Input signal Format)
- HOUR (HOURs meter)
- INIT SET (INITIAL SETting)
- Precautions
- On safety
- On power sources
- On operation
- On placement
- On the tapes
- Regarding tapes of over 130 minutes
- Cleaning
- Cleaning the cabinet, panel and controls
- Cleaning the head and tape path
- Using the cleaning cassette
- Notes on cleaning
- Display Messages
- Troubleshooting
- The cassette holder does not close.
- The function buttons do not work.
- No sound
- The deck does not record.
- The OPEN/CLOSE button does not work.
- "CAUTION" appears and the deck cannot be operated.
- Writing or erasing of sub codes is not possible.
- Start ID writing is not possible during recording.
- The search function does not work.
- The search function operates suddenly during playback.
- The tape operation buttons do not function while writing or erasing a sub code.
- Absolute time codes writing is not possible.
- Tape transport is excessively loud during fast-forwarding or rewinding.
- The tape stops suddenly.
- When pressing (REW)/FF) or I/AMs), the tape stops momentarily before starting to move.
- The deck cannot be operated with the remote.
- The SBM indicator does not light up in the display even though SBM is set to ON.
- A particular operation cannot be done as you want.
- Specifications
- Recording section
- Tape section
- General section
- Where purchased Power requirements
- Remote commander RM-D757 (supplied)
- Input jacks
- Digital Input
- Output jacks
- Digital Output
- Audio characteristics
- Total harmonic distortion b)
- Supplied accessories See page 4.
- Index
- A
- B
- C
- D
- E, F, G
- H
- I, J, K, L
- M, N, O
- P, Q
- R
- S
- T
- U, V
- W,X,Y,Z
- Names of controls
- Buttons
- Switches
- Controls
- Jacks
- Others
- AVERTISSEMENT
- Raccordements analogiques
- Prises
- Divers
- Vorsicht
- Regler
- Sonstige
Brand : SONY
Model : PCMR300
Category : Cassette player