
DTC690 - Cassette player SONY - Free user manual and instructions
Find the device manual for free DTC690 SONY in PDF.

| Product type | DAT cassette deck (Digital Audio Tape) |
| Brand | Sony |
| Model | DTC-690 |
| Dimensions (W × H × D) | 430 × 110 × 350 mm |
| Weight | Approx. 5 kg |
| Power supply | 220-230 V AC, 50/60 Hz (European version) or 110-120 / 220-240 V switchable |
| Sampling frequencies | 48 kHz, 44.1 kHz, 32 kHz |
| Frequency response (standard) | 2-22,000 Hz (±0.5 dB) |
| Frequency response (long play) | 2-14,500 Hz (±0.5 dB) |
| Signal-to-noise ratio | More than 90 dB |
| Dynamic range | More than 90 dB |
| Total harmonic distortion (standard) | Less than 0.005% (1 kHz) |
| Total harmonic distortion (long play) | Less than 0.08% (1 kHz) |
| Tape speed (standard) | 8.15 mm/s |
| Tape speed (long play) | 4.075 mm/s |
| Drum rotation (standard) | 2,000 rpm |
| Drum rotation (long play) | 1,000 rpm |
| Max recording time (DT-120 cassette) | 2 h (standard), 4 h (long play) |
| Inputs | Line (RCA), digital coaxial (RCA), digital optical |
| Outputs | Line (RCA), headphones (stereo jack), digital optical |
| Recordable subcodes | Start ID, program number, skip ID, end ID |
| Advanced playback functions | AMS, music scan, repeat, RMS, skip play, timer |
| Maintenance | Regular head cleaning with DT-10CL cassette |
| Supplied remote control | RM-D690A (infrared, AA batteries) |
Frequently Asked Questions - DTC690 SONY
User questions about DTC690 SONY
0 question about this device. Answer the ones you know or ask your own.
Ask a new question about this device
Download the instructions for your Cassette player in PDF format for free! Find your manual DTC690 - SONY and take your electronic device back in hand. On this page are published all the documents necessary for the use of your device. DTC690 by SONY.
USER MANUAL DTC690 SONY
Digital Audio Tape Deck
Operating Instructions
Mode d'emploi
To avoid electrical shock, do not open the cabinet. Refer servicing to qualified personnel only.
NOTICE FOR THE CUSTOMERS IN THE UNITED KINGDOM
If the plug supplied with this appliance is not suitable for the socket outlet in your home, it should be cut off and appropriate plug fitted.
IMPORTANT
The wire in this mains lead are coloured in accordance with the following codes:
Blue: Neutral
Brown:Live
As the colours of the wires in the mains lead of this apparatus may not correspond to the coloured markings identifying the terminals in your plug, proceed as follows:
The wire which is coloured blue must be connected to the terminal which is marked with the letter N or coloured black.
The wire which is coloured brown must be connected to the terminal which is marked with the letter L or coloured red.
Do not connect either wire to the earth terminal in the plug which is marked by the letter E or by the safety earth symbol 12 or coloured green or green-and-yellow.
Should the fuse in the plug supplied with this appliance need to be replaced, a 5 AMP FUSE approved by ASTA or BSI to BS 1362, i.e. carries the mark or the mark must be used.
WARNING
To prevent shock hazard, do not insert the plug cut off from the mains lead into a socket outlet. This plug cannot be used and should be discarded.
If the plug supplied with this appliance has detachable fuse cover, be sure to attach the fuse cover after you change the fuse. Never use the plug without the fuse cover.
If you should lose the fuse cover, please contact your nearest Sony service station.
Avertissement
Before using the DAT deck
Warning 2
Digital audio tape 6
Precautions 8
Features 10
Location and function of controls 12
Front panel/remote commander 12
Remote commander operation 20
Installling batteries 20
Display window 22
Rear panel jacks 30
Connections 32
Connecting cords 32
Connection examples 34
Cassette loading 38
Recording
Before recording. 40
Blank section and sound muted portion 40
Absolute time codes 42
Recording 44
Recording level adjustment (for analog input signals only). 48
Long play mode 50
Creating a sound muted portion (Record muting) 52
End search. 54
Writing sub codes
Sub codes 56
Start ID 62
Writing automatically during recording 62
Writing manually during recording 64
Writing manually during playback (Rehearsal function) 68
Adjusting the position 68
Erasing 68
Program numbers 70
Writing automatically during recording 70
Renumbering 74
Erasing 76
Skip ID 78
Writing during recording 78
Writing during recording. 78
Writing during playback (Rehearsal function) 78
Erasing 80
End ID 82
Writing during recording. 82
Writing during playback (Rehearsal function) 84
Erasing 86
| Playback | 88 |
| Display window | 90 |
| Various playback operations | 92 |
| Repeat play | 92 |
| Automatic music sensor operation | 94 |
| Music scan | 96 |
| Designating the desired selection | 98 |
| Skip play | 100 |
| Auto play: restarting playback after rewinding | 100 |
| Random music sensor (RMS) operation | 102 |
| Timer activated operation | 104 |
| Timer activated recording | 104 |
| Timer activated playback | 106 |
Additional Information
| Maintenance | 108 |
| Cleaning the cabinet | 108 |
| Cleaning the head | 108 |
| Guide to the serial copy management system | 110 |
| Troubleshooting guide | 118 |
| Specifications | 130 |
Lecture
DAT (Digital Audio Tape) is a new recording system which digitalizes the audio signal and records it on a DAT cassette tape.
DAT records the audio signal by converting the analog sound into a digital signal. This converting system is called the PCM (Pulse Code Modulation), and its accurate processing of the audio signal allows recording/playback with lower wow and flutter, wider dynamic range, lower distortion rate, and superb signal-to-noise ratio. In addition, various control codes call sub codes can be written on the DAT cassette separately from the audio signal. They are written for a variety of convenient playback/tape editing operations, and except for the absolute time, can be rewritten after audio signal recording has been completed.
- Before operating the unit, be sure that the operating voltage of your unit is identical with that of your local power supply.
The unit is not disconnected from the AC power source (mains) as long as it is connected to the wall outlet, even if the unit itself has been turned off. - Should any solid object or liquid fall into the cabinet, unplug the unit and have it checked by qualified personnel before operating it any further.
- Unplug the unit from the wall outlet if it is not to be used for an extended period of time. To disconnect the cord, pull it out by grasping the plug. Never pull the cord itself.
- AC power cord must be changed only at the qualified service shop.
Operation
Before making program source connections, be sure to unplug the unit.
Installation
Do not install the unit in a location near heat sources such as radiators or air ducts, or in a place subject to direct sunlight, excessive dust, mechanical vibration or shock.
Moisture Condensation
If the unit is brought directly from a cold to a warm location, moisture may condense inside the unit. In this condition, the tape may adhere to the head drum and be damaged, or the unit may not operate correctly. Always remove the cassette when the unit will not be used.
If moisture is present...
- Function controls will not operate.
All operations will stop.
When the CAUTION indicator lights and the unit will not operate
Leave the unit turned on for about an hour.
NOTE
When closing the cassette compartment, do not push the cassette lid forcibly by hand, but perform with the OPEN/CLOSE button.
If you have any question or problem concerning your unit, please consult your nearest Sony dealer.
Précautions
Sécurité
Serial copy management system
This unit utilizes the serial copy management system that permits digital-to-digital recording for one generation. You can record CD sound or other digital formats through a digital-to-digital connection. (See page 110.)
Three sampling frequencies
Recording/playback can be done with three sampling frequencies (48 kHz, 44.1 kHz and 32 kHz).
48 kHz: For analog and digital input signals in a standard mode.
44.1 kHz: For compact disc and pre-recorded DAT tape.
32 kHz: For analog input signals in a long-play mode.
Long play mode
This unit can operate in a long-play mode. Analog input signals can be recorded or playback for up to four consecutive hours when the DT-120 DAT cassette tape is used. The sampling frequency will be 32kHz in the long-play mode.
Visible cassette loading
You can view the tape operation through the lid of the cassette compartment. Due to a revolutionary new transport mechanism, cassette loading time has been significantly reduced.
Excellent sound quality
1-bit A/D converter
For the A/D converter section which converts analog input signals to digital signals, the unit employs a 1-bit A/D converter which theoretically generates no zero-cross distortion for a clear, elegant sound quality.
Pulse D/A converter
Superior playback performance is achieved with a D/A converter.
Rich variety of subcode information
This unit can record subcode information such as Start IDs, program numbers, Skip IDs, and absolute time data, enabling you to quickly locate tunes and display the playback time in the same manner as when playing compact discs.
Post edit recording of sub codes
You can record or rewrite the following sub codes after the audio signal recording has been completed.
Start ID: Signifies the beginning of a selection.
Program number: Gives a number to the selection.
Skip ID: Signifies the beginning of a portion to be skipped.
End ID: Signifies the end position of recording/playback.
Since sub codes are written on the tape separately from audio signals, the audio signals are not affected.
\section*{Caracteristiques}
Location and Function of Controls
Refer to the pages indicated in parenthesis for details.
Front Panel/Remote Commander
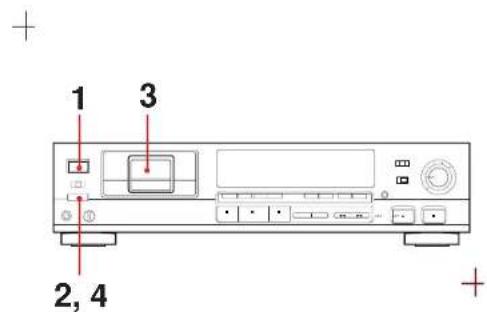
1 POWER button
Turns the power on and off.
2TIMER switch
Normally set to the OFF position. When recording or playing back at the desired time using a commercially available audio timer, set to the REC position or the PLAY position respectively. (104)
3Cassette compartment
Insert a cassette with the window side up and the safety tab facing you. (38)
STARTIDbuttons
AUTO: Press to turn on and off the AUTO indicator. When the AUTO indicator is lit, the start ID will automatically be written during recording. When the AUTO indicator is not lit, press the START ID WR button at the point where you want to write a start ID. (62)
WRITE: Press to write the start ID at the desired point during recording or playback. (64)
ERASE: Press to erase a start ID. When a start ID and a program number are written on the tape, both codes are simultaneously erased by pressing this button. (68)
RENUMBER: Press to renumber all programs on the tape. When only the start IDs are written, pressing this button will insert the proper program numbers beginning with "1". The tape will rewind and start from the beginning to accomplish this function. (74)
5Display window
SKIPIDbuttons
WRITE: Press at the beginning of the portion you may wish to skip later. A skip ID will be written from the point where you pressed this button. (78)
ERASE: Press to erase the nearest skip ID which is before the current position. (80)
Location and Function of Controls
7ENDIDbuttons
WRITE: Press to write the ID signifying the end of playback or recording. (82)
ERASE: Press to erase the end ID. (86)
Remote sensor
Receives the signal from the remote commander.
[9]COUNTER MODE button
Selects the display mode among the absolute time, remaining time to the end of whole tape and linear counter (tape running time). Each time you press the button, the display changes sequentially. (90)
RESET button (only with the remote commander)
Resetsthe linear counter to "0M 00S", (90)
INPUT selector
Set according to the signal to be recorded.(44)
ANALOG: For recording from the equipment connected to the LINE IN jacks.
OPT: For recording from the equipment connected to the DIGITAL IN (OPTICAL) jack.
COAXIAL: For recording from the equipment connected to the DIGITAL IN (COAXIAL) jack.
11REC MODE selector
Normally set to the STANDARD position. When this selector is set to the LONG position, you can record analog input signals or digital signals with 32kHz in the long-play mode. (44, 50)
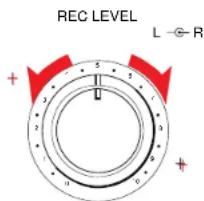
12REC LEVEL (recording level) controls Adjust the recording levels and balar for the analog input signals.
The outer knob controls the L (left) channel level and the inner knob the R (right) channel level. The knobs can be adjusted together. To adjust each channel independently, turn the knob while holding the other knob.
When recording digital signals, it is not necessary to adjust the recording levels. (44, 48)
Location and Function of Controls
13Tape operating buttons
- (stop): Press to stop recording or playback.
- (play): Press to start palsyback or recording.
IPAUSE (pause): Press to stop for a moment during recording or playback. To restart recording or playback, press this button again or press the button.
If the unit is left in the pause mode for about 10 minutes, it will automatically be released and the deck will enter the stop mode. To restart recording or playback from the stop mode, press the REC or button respectively.
(AMS): Press to locate the beginning of the selection during playback or in the stop mode.
(rewind:review, fast-forward)
(cue): In the stop mode, press to rewind/ fast-forward the tape. During playback, press to rewind or fast-forward the tape while listening to the sound.
OREC MUTE (record muting): Inserts a sound-muted portion (space).
REC (recording): Press to enter the record-pause mode. After pressing this button, press the pause or button.
PHONES jack and LEVEL control Insert the headphones plug to this jack and turn the control to adjust the headphones volume level. (88)
15OPEN/CLOSE button
Press to open or close the cassette compartment. (38)
This button does not function during recording or in the record muting mode.
16Numeric buttons (0-9) and CLEAR button
Designate the desired program number to be played back before starting
playback. Designate the desired number in the record-pause mode, the program number is written consecutively from the designated number. (72)
Press the CLEAR button to cancel the program number which has been mistakenly entered.
Location and Function of Controls
DISPLAY MODE button Changes the display mode. (22)
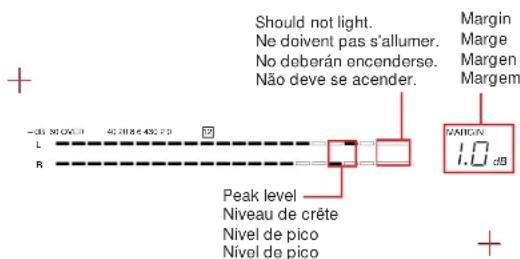
MARGIN RESET button Press to reset the margin of peak level. appears at the MARGIN display. (48)
REPEAT 1/ALL button Press to play a desired portion repeatedly. Each time you press the button, the indication changes as follows: REPEAT 1 REPEAT ALL off (92)
20 MUSIC SCAN button Press to listen to the beginning of each selection successively. (96)
21SKIP PLAY button Press to activate the skip ID code function. The portion of the tape previously marked will be skipped. (100)
22RMS play buttons ENTER: To program the selections in a desired order, press this button after pressing the numeric buttons. (102) CHECK: Press to check the programmed contents. (102)
Insert two size AA (R6) batteries with correct polarity, and close the lid.
Location and Function of Controls
Remote Commander Operation
Each button on the remote commander functions in the same way as those having the same name on the front panel. However, the following operations cannot be performed using the remote commander. Use the front panel controls instead.
Turing the power on and off
- Selecting digital(optical/coaxial)/analog input source
Adjusting the recording level and balance
- Adjusting the headphones level
- Setting the timer recording/playback
- Selecting the record mode (standard or long)
- Writing and erasing a start ID, skip ID and end ID.
The following operations can be performed only with the remote commander.
Repeat play
- Skip play
RMS* play
*RMS: Random Music Sensor
- Designating and canceling a program number.
- Resetting the linear counter to '0 M 00S'
- Resetting the margin of peak level.
- Changing the display mode.
Installing Batteries
Notes on remote control
- Do not expose the remote sensor on the deck to strong light such as direct sunlight, lighting apparatus, etc.
- Do not place any obstructions between the remote commander and the remote sensor, or else operations will not be performed correctly.
- The controllable range is limited. Point the remote commander directly at the remote sensor on the deck.
- When remote control operation distance becomes shorter, the batteries are weak. Replace both batteries with new ones.
To avoid battery leakage
When the commander will not be used for a long period of time, remove the batteries to avoid damage caused by battery leakage and corrosion.
Battery life
About half a year of normal operation can be expected when using the Sony SUM-3 (NS) batteries.
Location and Function of Controls
C


Display Window C
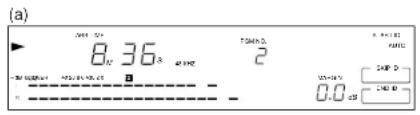
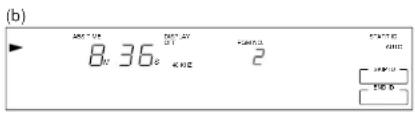
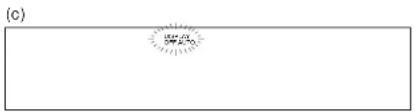
To turn off the display window When the power is turned on, the dis window also is turned on. During rec or playback, all display or some part the display can be turned off as follo
This operation can be performed only with the remote commander. Each time you press the DISPLAY MODE button, the display changes as follows:
Normal indicators (a)
Peak level meters and margin indicators go off. (b) (The DISPLAY OFF indicator lights.)
All the indicators go off during recording or playback'. (c) (The DISPLAY OFF AUTO indicator lights momentarily just before the indicators go off.)
- When pressing the DISPLAY MODE button except during recording or playback, the DISPLAY OFF AUTO indicator lights. In this case, all the indicators go off immediately after recording or playback starts.
To change the brightness of the display window
While pressing the COUNTER MODE button, press one of the numeric buttons 1, 2 and 3 on the remote commander. The greater number pressed, the darker the display window becomes.
Location and Function of Controls
Fig. D
1Tape operation indicators
[REC]:Lights during recording or in the record-pause mode. Flashes in the record muting mode.
- Lights during recording or playback. It also lights in the record-pause, the play-pause mode or in the record muting mode.
11: Lights in the record-pause mode or in the play-pause mode.
2LONG play mode indicator
Lights when recording or playback is being performed in the long play mode.
Time indicator
Indicates the tape running time, absolute time or remaining time. Each time you press the COUNTER MODE button, the display is changed.
When only the time display appears:
Shows the tape running time.
When the REMAINING (remaining time) indicator appears: Shows the remaining time of the tape.
When the ABS TIME (absolute time)
indicator appears: Shows the elapsed
time from the beginning of the tape.
4DISPLAY OFF/AUTO indicators
The DISPLAY OFF indicator lights when peak level meters and margin indicators are turned off. The DISPLAY OFF AUTO indicator lights momentarily before all the indicators are turned off.
5CAUTION indicator
Lights when moisture condensation occurs. If this happens, the deck stops functioning automatically. (8)
|6|INPUT selector indicators
The DIGITAL IN OPTICAL or DIGITAL IN COAXIAL indicator lights according to the position of the INPUT selector. No indicator lights when the INPUT selector is set to the ANALOG position.
STEP/PGM NO. indicator
Shows the program number of the selection being played. When
programming the desired selection with the RMS operation (102), the display shows the step number of the programmed selection.
Function of Controls
8MUSIC SCAN indicator
Lights after you press the MUSIC SCAN button to listen to the beginning of each selection successively.
RMS (Random Music Sensor)/AMS
(Automatic Music Sensor) indicators Show the number of selections to be skipped ahead or behind in the AMS operation. When designating a selection directly by the numeric button and the
- button, the display shows the program number of the target selection while the selection is being searched for. When programming the desired selections in the RMS operation (102), the display shows the program number of the selection to be programmed.
10REPEAT indicators
REPEAT 1: Lights when a desired
selection is played back repeatedly.
REPEAT ALL: Lights when all the selections are played back repeatedly.
[1]SKIPindicator
When this indicator is lit during playback, the portion marked by the skip ID is skipped and playback continues from the next start ID.
12START ID mode indicators
AUTO: Lights when the AUTO button is pressed to write the start ID automatically.
WRITE: Lights when writing the start ID manually.
ERASE: Lights when erasing the start ID.
AUTO RENUMBER: Lights when renumbering program numbers automatically.
SHIFT RENUMBER: Lights when shifting the start ID and program number position.
Location and Function of Controls
[13]Sampling frequency indicator
48 kHz: Lights when recording or playing back analog input signals (standard mode).
44.1 kHz: Lights when recording or playing back a CD or a pre-recorded DAT cassette tape.
32 kHz: Lights when recording or playing back analog input signals (long-play mode).
[14]STARTIDindicator
Flashes when writing (for 9 or 18 seconds) or erasing a start ID code, and lights when the start ID is detected during playback.
SKIP ID indicator
Lights when writing (for 1 or 2 seconds) or erasing a skip ID code or when the skip ID is detected during playback.
SKIPIDmodeindicator
WRITE: Lights when writing the skip ID.
ERASE: Lights when erasing the skip ID.
ENDIDmodeindicator
WRITE: Lights when writing the end ID.
ERASE: Lights when erasing the end ID.
17MARGINindicator
Shows how much margin there is between the peak level of input audio signal and 0 dB.
REHEARSAL indicator
Lights while the rehearsal function is activated (66).
19Peak level meters
Indicate the signal levels during playback and recording. There are separate meters for each left and right channel. These meters have a peak hold function which indicates the peak level momentarity.
Location and Function of Controls
Rear Panel Jacks
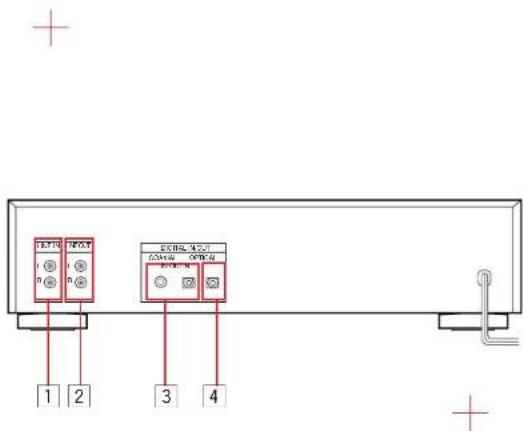
E
TLINE IN (line input) jacks (phono jack) Connect to the recording outputs of an amplifier. Signals supplied by the amplifier can be recorded using the sampling frequency of 48kHz in the standard play mode or 32kHz in the long play mode.
LINE OUT (line output) jacks (phono jack) Connect to the DAT or tape inputs of an amplifier. The playback signal of this deck will be output.
3COAXIAL/OPTICAL DIGITAL IN (digital input) jacks (coaxial phono jack/optical jack) Connect to the digital outputs of an amplifier having a built-in D/A converter or other digital source, such as a CD player for digital-to-digital recording.
4 OPTICAL DIGITAL OUT (digital output) jack (optical jack) Connect to the digital inputs of an amplifier having a built-in D/A converter or another DAT deck, for playback of a DAT cassette or digital-to-digital recording.
Notes on connection
- Use the connecting cords specified in the illustrations.
- Turn off the power for all equipments before making connections.
- Be sure to insert the plugs firmly into the jacks. Loose connections may cause hum and noise. When unplugging, grasp the plug and not the cord.
Note on sound signals
When connecting an optical cable to the DIGITAL IN/DIGITAL OUT jacks, sound signals (L/R) are transmitted together through the cable.
There are following three types of connecting jacks at the rear of the deck. Each type of jack requires a different type of connecting cord.
For LINE IN/OUT (analog input/output) jacks
Use the supplied or an optional audio signal connecting cord such as RK-C710HS, RK-C715HS, RK-C910ES, RK-C915ES etc.
Note
Red plugs and jacks are for the right channel (R) and white ones for the left channel (L).
For COAXIAL IN (digital input) jacks
B
Use an optional coaxial connecting cord such as VMC-1ES, VMC-10ES etc.
For OPTICAL IN/OUT (optical transmission digital input/output) jacks [C]
Use an optional optical cable such as POC-15,POC-10HS etc.
How to connect the optical cable [D] Remove the cap and plug it in firmly.
Notes on the optical cable
Do not bend the cord. When the cord is not used, curl it with a diameter of more than 15cm (57 inches).
- Do not use it under high temperatures.
- When the optical cable is not connected, cover the OPTICAL IN/OUT jackets with the supplied caps.
Connexions
Conexiones
Ligacoes
Cordons de raccordement
: Digital signal (coaxial cable or optical cable)
Cordons de connexion du signal numérique (cordon)
coaxial ou cable optique)
: Senal digital (cable coaxial o cable optico)
Cabos de ligação para sinais digitais (coaxial ou optico)
:Signal flow
If your amplifier is not equipped with digital signal jacks
a) CD player
b)DAT deck
c) Amplifier
d)to a wall outlet
A) When recording via digital-to-digital connection, connect a DAT deck (th digital input) to DIGITAL OUT OPTIC of the DTC-690.
B)When recording via digital-to-digital connection, connect the sound source equipment (the digital output) to DIGITAL IN (COAXIAL or OPTICAL) of the DTC-690.
When connecting a microphone
Connecting a stereo microphone amplifier (the analog output) to LINE IN of the DTC-690.
Note
If "PROH" appears on the display,
recording via digital-to-digital connection
cannot be performed.
In this case, connect the sound source
equipment using LINE IN and OUT jacks.
Connexions
Conexiones
Ligaoes
If your amplifier is equipped with digital signal Jacks
a) CD player
bDAT deck
c) Amprilier d) to a wall outlet
Note
If "PROH" appears on the display,
recording via digital-to-digital connection cannot be performed.
In this case, connect the sound source equipment using LINE IN and OUT jacks.
Connexions
Conexiones
Ligacoes
fonle sonora com as tomasas LINE IN e OUT.


Cassette Loading
1 Turn on the power.
2 Press OPEN/CLOSE. The OPEN indicator appears on the display.
3 Insert the cassette. A)Insert the cassette beyond the silver line. B)Tab facing fowards you. C)Window side up.
4 Press △OPEN/CLOSE. The CLOSE indicator appears on the display.
To remove the cassette Press OPEN/CLOSE.
On a digital audio tape
Only the digital audio tape made
especially for DAT deck is required. Unlike a conventional analog audio cassette tape, a digital audio tape can be used only one side.. Digital audio tape is designed to avoid a dust.Do not open the inside of the tape The hole at the back of a tape is a detector slot.Donot cover the slot.
Notes
- When you turn on the power, the II indicator flashes for a moment in the display window. During this period, no buttons other than the OPEN/CLOSE and buttons are operative. Wait until flashing stops and the II indicator goes off.
- When inserting the cassette, do not push the cassette compartment closed. Be sure to use the OPEN/CLOSE button.
On the sampling frequency
When a cassette is inserted and a source program is played back, the sampling frequency (48 kHz, 44.1 kHz or 32 kHz) of the source program appears in the display window.
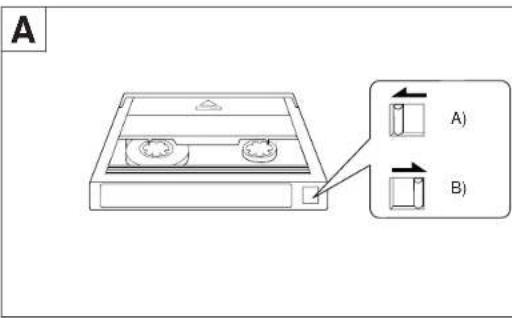
To prevent accidental erasure A
When a recording is made, any previously recorded signal will be erased automatically. To prevent accidental erasure, set the safety tab to the position shown in the illustration. With the hole open, rewriting sub codes cannot be performed.
A)Recording is impossible (with the hole open).
B)Recording is possible (with the hole covered).
Insertion de la cassette
Carga del cassette
Blank Section and Sound Muted Portion
With conventional analog audio tapes, the tape portion on which no recording ever has been made and the portion on which a recording has been made but the sound is muted are treated the same, since no sound can be heard from these portions. However, with DAT cassette, you should know that the two kinds of "no sound" portions must definitely be distinguished one from the other.
A
B
Blank section A
Means the portion on which no recording ever has been applied.
A)Blank section
:Recording
Selection
Sound muted portion B
Means the portion on which a recording has been applied but that no audible sound is recorded.
A)Sound muted section
R:Recording
S:Selection
Important
When recording, be certain that no blank section is left on the tape. If blank sections remain on the tape, search operations using the AMS buttons, for example, may take quite a long time or the absolute time is not written correctly.
Difference between the blank section and sound-muted portion
When you record, a track format is constructed on the recorded area, even if the sound is muted during recording. On the blank section, since no recording is applied, there is no track format.
The absolute time indicates the position of the tape, giving the time elapsed from the beginning.
A)ABS time
B)the position being playing back C)selection
The absolute time codes correctly written on the tape can be used in various convenient ways during playback.
Recording absolute time codes
When you record, the absolute time codes are also written automatically from the beginning of the tape.
Once the absolute time codes are recorded, it cannot be re-written. With the absolute time, you can check the elapsed time from the beginning of the tape.
Note, however, that the absolute time codes are not written if you start recording from the middle of blank section. No blank sections should be left on the tape when recording.
Tips for recording:
To insert silence between selections, use the record muting function (page 52). Do not advance the tape with the or button.
- To start recording from the middle of the tape, use the end search function (page 54) to locate the beginning of the blank section. This will avoid leaving a blank section.
If a blank section is left on the tape
If you start recording from the middle of a blank section, the absolute time codes are not recorded, since the DAT deck can no longer count the absolute time from the beginning of the tape.
1 Make sure that the TIMER switch is set to the OFF position, and turn on the power.
2 Insert a cassette and press the OPEN/CLOSE button to load the cassette (Page 38).
3Locate the position at which you want to start recording. To start recording from the beginning of the tape,press the button.(Press the button again,the "TOP indicator will appear at the beginning of the tape.) To start from the middle of the tape, locate the point immediately before the blank section with the end search function (Page 54).
4 Set the INPUT selector to ANALOG, OPT or COAXIAL depending upon your sound source.
5 Press the REC button. [REC], and ii indicators light on the display, and the deck enters the record-pause mode. The sampling frequency to be applied for recording appears. If the digital copy prohibit signal is written on the codes of the sound source, the PROH Indicator appears on the display and signifies that you cannot record that source with the digital-to-digital connection. In this case, use the analog-to-analog connection.
6 When recording the analog input signal, adjust the recording level and balance with the REC LEVEL controls respectively (Page 48). No recording level adjustment is required when recording the digital input signal.
7 Set the REC MODE selector. When recording in the long play mode or standard mode, set the REC MODE selector to the LONG or STANDARD position respectively (Page 50).
8 When writing start ID automatically during recording, make sure that the AUTO indicator is lit. If not, press the START ID AUTO button (Page 62).
9 When designating the program number, press the desired numeric button (Page 72). When recording from the beginning of the tape, the program number will be assigned automatically from 1. The program number is also written at the same position as the start ID.
10 Press the iPAUSE or (play) button. The indicator goes off. and recording starts.
Enregistrement
Grabacion Gravacao
Note on the recording from the beginning of the tape
When you start recording from the beginning of the tape, create a 4 second-muted portion by using record muting function (Page 52). Otherwise, when locating the first selection with the or 1 button, the first portion of the first selection may not be played back.
To stop recording
Press the button.
To stop recording for a moment Press the iPAUSE button.
When you press the OREC MUTE button, the deck will enter the record-pause mode automatically.
To release pause and restart recording
Press the PAUSE or button. Note on the OPEN/CLOSE button
The OPEN/CLOSE button does not function during recording or in the record muting mode. So, when removing the cassette tape, press the button to stop recording and then press the OPEN/CLOSE button.
If recording cannot be made
Check the following:
- The safely tab of the cassette is not set to the record-possible position. (Page 38.)
No cassette is loaded. - The INPUT selector is set to the incorrect position.
- Tape is fully rewound to the end.
- The output level of the playback equipment is too low.
- The digital copy prohibit signal is written in the codes of the sound source you want to record. (The PROH indicator appears on the display.)
The REC LEVEL controls are set to the 0 position. (Only when recording the analog input signal.)
Note on the INPUT selector and the
REC MODE selector
Do not change the position of these selectors after recording starts.
If the cassette is ejected after it has been loaded
Chock to see if the cassette is inserted correctly. (Page 38.)
When the tape is recorded to the end
The tape is rewound to the beginning and stops automatically. (Auto rewind function) The auto rewind function is not applied when the TIMER switch is set to the REC position.
Accuracy of the electronic linear time counter
The linear time counter provided with this unit is not a clock. The time indicated by the counter may differ slightly from the actual recording/ playback time.
Enregistrement
Grabación
Gravacao
LaUNCHING OF THE RESEARCH LaUNCHING OF THE RESEARCH LaUNCHING OF THE RESEARCH LaUNCHING OF THE RESEARCH LaUNCHING OF THE RESEARCH LaUNCHING OF THE RESEARCH LaUNCHING OF THE RESEARCH LaUNCHING OF THE RESEARCH LaUNCHING OF THE RESEARCH LaUNCHING OF THE RESEARCH LaUNCHING OF THE RESEARCH LaUNCHING OF THE RESEARCH LaUNCHING OF THE RESEARCH LaUNCHING of the RESEARCH LaUNCHING of the RESEARCH LaUNCHING of the RESEARCH LaUNCHING of the RESEARCH LaUNCHING of the RESEARCH LaUNCHING of the RESEARCH LaUNCHING of the RESEARCH LaUNCHING of the RESEARCH LaUNCHING of the RESEARCH LaUNCHING of the RESEARCH LaUNCHING of the RESEARCH LaUNCHING of the RESEARCH LaUNCHING of the RESEARCH LAUNCHING of the RESEARCH LAUNCHING of the RESEARCH LAUNCHING of the RESEARCH
If the unit is left in the record-pause mode for more than 10 minutes during digital recording
The record-pause mode will be released automatically, and the unit will enter the stop mode. (The -DA indicator appears on the display.) In this case, press the REC to set the unit to record-pause mode.
If the cable is disconnected or the program source is intermitted, the digital input signal will be interrupted during digital recording
The OPTICAL and II or COAXIAL and indicators flash and the unit will enter record-pause mode. (For about 10 minutes) If the digital signal is input again in this period, the unit will enter recording mode automatically.
A
Recording level adjustment (for analog input signals only) A
The peak level meters have a peak hold function which indicates the peak level of the analog input signal momentarily. The MARGIN indicator shows how much margin there is between the peak level of the input audio signal and 0 dB. Whenever a signal having a higher level than the displayed one is input, the new level replaces the lower one on the MARGIN indicator. Turn the REC LEVEL controls so that the "OVER" segments do not light, even at the highest level.
To reset the margin
Press the MARGIN RESET button. The margin will become "..."
If the level exceeds 0 dB
The "OVER" segments light in red, and "0.0 dB" flashes.
If "OVER" lights steadily, lower the recording level so that the peak level meter lights between -12dB (12) and 0dB to avoid sound distortion.
If you keep adjusting the recording level with the unit in the record-pause mode
If the unit is left in the record-pause mode for more than 10 minutes, the record-pause mode will be released automatically, and the unit will enter the stop mode.
The levels of the input audio signals appear even in the stop mode, and you can continue to adjust the recording level. (The "AD-DA" indicator appears on the display.)
In the above case, press the REC button again to set the unit to record-pause mode.
Enregistrement
Grabación
Gravacao
According to the input signal, recording/ playback in the long-play mode can be performed as follows.
| Input signal | Recording mode (position of the REC MODE selector) | |
| STANDARD | LONG | |
| Analog input signal | standard play (48 kHz) | long play (32 kHz) |
| Digital input signal 32 kHz* | standard play (32 kHz) | long play (32 kHz) |
| Digital input signal 44.1 kHz, 48 kHz^ | standard play (the same as input signal) | standard play (the same as input signal) |
( ): sampling frequency
The digital input signal on 44.1 kHz or 48 kHz cannot be recorded/played back in the long play mode, even if the REC MODE selector is set to the LONG position. Digitally recorded analog input signal with a sampling frequency of 32 kHz or 48 kHz can be recorded via digital-to digital connection.
The longest recording period at each mode
| Mode Cassette | The longest recording period | |
| standard | long | |
| DT-120 | 2h | 4h |
| DT-90 | 1h 30m | 3h |
| DT-60 | 1h | 2h |
(h: hour, m: minute)
The timer counter in the long-play mode
Tape running time, absolute time and total remaining of the tape appears, based on those in the standard mode. To obtain the actual time, double each value.
Creating a Sound Muted Portion (Record Muting)
1 During recording or record-pause mode, press the OREC MUTE button where a sound muted portion is required.
The [REC] indicator flashes and the record muting is activated. After about 4 seconds, the [REC] indicator shows a steady light, and the indicator lights. The deck enters the record-pause mode.
2 To resume recording, press the IPAUSE or (play) button. Recording resumes.
Using sound muted portion
If you intend to dub the DAT cassette onto an analog cassette tape, we recommend that you insert sound muted portions between selections on the DAT cassette. This will ensure that the AMS function of the analog cassette deck works correctly for the recorded tape.
Note
With DAT deck, the AMS function is realized by using the start ID code. (Page 56.)
Caution
To place a space on a DAT cassette, you must not advance the tape with the or button. If a space is created this way, no absolute time code will be recorded on the succeeding area, and you cannot check the elapsed time of the tape.
To create a sound muted portion of more than 4 seconds
Keep the OREC MUTE button pressed for as long as you want to make a recorded portion with no signals. After about 4 seconds, the [REC] indicator flashes rapidly. When you release the OREC MUTE button, the deck enters the record-pause mode.
The interval between selections is indicated at the MARGIN display.
To create a sound muted portion of less than 4 seconds
Press the oREC MUTE button, and then the iPAUSE button while the REC indicator is flashing.
To start recording in the record muting mode
Press the REC button while theREC indicator is flashing.
Enregistrement
Grabación
Gravacao
If the previous recording was applied to the middle of the tape, you must locate exactly the last point of the recorded area, and start the new recording from this point. This will prevent leaving a blank section on the tape.
If you want space between the last recording and the new recording, use the OREC MUTE button to mute the sound.
Press▶
The last point of the previous recording (the beginning of the blank section or the beginning of the end ID) is located, and the tape stops. When the end ID is detected, the 'EE' indicator lights at the PGM. NO display.
When new recording is made from the position where the end ID is written, the end ID is erased automatically.
Note
If the point where you pressed the button is blank, the end search operation will not function.
When the end ID is written before a blank section
The end search operation stops at the beginning of this end ID as described in Fig 1C.
A)Selection
B)Blank
C)The position at which the end ID stops. D)End ID
Note on the duration of a blank section
The blank section must last for more than 9 seconds for the end search operation to function correctly.
With the new cassette tape which no recording is made, the tape will advance to the end.
Enregistrement
Grabación
Gravacao
Recherche de fin
In addition to the ordinary audio signals, various control codes called sub codes can be recorded on the DAT cassette tapes to ease recording and reproducing operation.
A)The sub codes are recorded.
B) Audio signals are recorded.
A desired selection can be called up or time information can be displayed using the sub codes, for example.
The sub codes such as start ID, program number, skip ID, end ID and absolute time are available on this unit.
- Sub codes are written on the tape separately from the audio signals, so the audio signals are not affected.
- Sub codes, except the absolute time, can be rewritten after the audio signal recording has been completed. The recorded audio signals are not affected by the rewritten sub codes.
- When you record the tape with sub codes written onto a new tape via digital-to-digital connection, the sub codes to be written on the new tape are following:
| Start IDs | The same as the codes written on the original tape. |
| Skip IDs | The same as the codes written on the original tape. |
| Program Numbers | New ones will be written according to the DAT deck you use. |
| Absolute time | New ones will be written. |
| End ID | The one written on the original tape will not be written. |
When you use analog-to-analog connection, no sub codes on the original tape will be written onto a new tape. New codes will be written according to the DAT deck you use.
Les sous-codes
This signal indicates the start of a music selection. You can locate the position of the start ID precisely. This signal should be written at the beginning of the selection.
A)Selection B)Start ID
Program number [c]
This signal gives a number to selection. You can record it where the start ID is written. By designating this number, you can choose the desired selection directly or program selections in a desired order. ASelection
B)Program number
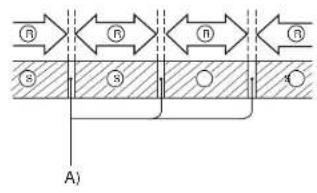
Skip ID [D]
This signal can be marked on the selection wherever you wish. When the SKIP indicator is lit during playback, the deck will skip at high speed from where the skip ID is marked to the next start ID, and then playback will start again. Record this skip ID at the beginning of portion you want to skip.
A)Selection
BjSkip ID
C)Skip to the next start ID.
D)Start ID
![SONY DTC690 - Skip ID [D] - 1](/content/2026/03/510314/images/9ee08c7829a5fa55a3c355bb56d73b13da496b39e4fda11c5499349a99101228.jpg)
C
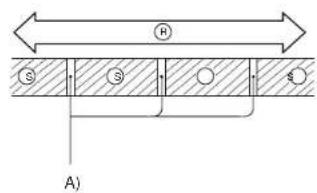
End ID [E]
This signal indicates the end position of a recording.
+
When you do not want to listen to the very end of a tape, record the end ID at the beginning of the portion you do not want to play. When the end ID is detected during playback, playback stops and the tape is rewound to the beginning automatically.
A)Selection
B)When the end ID is detected, during playback, the tape is automatically rewound to the beginning.
C)End ID
Les sous-codes
Subcódigos
Sub-códigos
Code de départ
When recording new material on a recorded tape, you can write an end ID at the end of the re-recorded portion. This will help you easily find the position to start recording the next time when you want to record other material onto the same tape.
A)Selection
BiBlank
C)Recorded tape
D) When recording new material onto the same tape.
E)End ID
F) Portion where you have not made a second recording (This first recording has not be erased.)
3)
When an end ID which has been written is detected during locating selections or rehearsal playback of start ID or skip ID, the unit stops at the beginning of the end ID.
A)Selection
BiEnd ID
C)The position at which the tape stops.
Absolute time
The absolute time indicates the position of the tape, giving the time elapsed from the beginning. The absolute time is recorded automatically at the same time the audio signal is recorded. It cannot be re-recorded. The absolute time allows you to confirm the elapsed time from the beginning of the tape.
When using the sub codes
| Things that can be done | Required sub code(s) |
| Locating a selection (AMS function) | Start ID |
| Listening to the first portion of selections sequentially (Music Scan) | Start ID |
| Choosing a selection directly | Start ID/Program number |
| Programming desired selections in a desired order (RMS play) | Start ID/Program number |
| Skipping the portion not desired | Skip ID/Start ID |
| Looking for the position at which the recording or playback ends | End ID |
Les sous-codes
The start ID indicates the beginning of each selection.
You can start playback from the start ID position. (Page 58.)
There are three ways to write start ID:
- Writing automatically during recording
- Writing manually at the desired position during recording
- Writing manually at the desired position during playback
Note
While the start ID is being written, all buttons except the button are not operative.
Writing Automatically during Recording
1 Make sure that the AUTO indicator is lit. If it is not, press the START AUTO button.
When turning on the power and inserting a cassette with its safety tab at the record-possible position, the AUTO indicator lights automatically. In time recording, this indicator will be the same as the one before the power is turned off. Start IDs will be recorded automatically when the AUTO indicator lights.
2 To start recording, press the REC button, then press the IPAUSE or (play) button.
When the non-signal level lasts for more than 3 seconds and a selection then starts, the start ID is written automatically for 9 seconds (18 seconds in the long-play mode). The program number is also written simultaneously. (Page 70.) While a start ID is being written, the STARTID indicator flashes on the display.
Code ID de depart
Why 9 seconds or 18 seconds are necessary for writing a start ID ?
A start ID requires 9 or 18 seconds to allow to be detected when rewinding.fast
forwarding a tape. (The speed is 200 times as fast as that of normal tape operation.)
After the start ID is located, the tape returns to the beginning of the start ID if necessary, and playback starts from the beginning of the selection.
If the signal level stays very low for more than 3 seconds
If there is a portion of very low volume level during a selection, a start ID may be written even in the middle of the selection. An unwanted start ID can be erased later. (See page 68).
When the portion between selections is not clear
The start ID position may not coincide exactly to the beginning of the selection. To shift the start ID position, see 'Shifting Start IDs' and Program Numbers Position' on page 76.
Illustration of writing a start ID A
a)Selection b)Start ID
b) start ID
c) Particular level
d)More than 3 seconds
When recording from a CD player
If the auto space function is available with your CD player, activate this function to ensure that the start IDs are written correctly.
Writing Manually during Recording
1 Make sure that the AUTO Indicator is off.
If it is not, press the START ID AUTO button to turn it off.
2 To start recording, press the REC button, then press the IIPAUSE or (play) button.
3 At the desled position, press the START ID WRITE button.
The WRITE indicator lights.
The start ID is written for 9 seconds
(18 seconds in the long-play mode)
from the point where you pressed the
STARTIDWRITEbutton.Whilea start
ID is being written, the START ID
indicator flashes.
Code ID de départ
Writing Manually during
Playback (Rehearsal Function)
During playback, start ID can be written at the desired position more accurately than during recording.
Make sure that the safety tab of the cassette is closed.
1 Press the button to start
playback. At the desired position, press the START ID WRITE button.
The REHEARSAL indicator lights and the WRITE and START ID indicators flash, and the position for 3 seconds from the point where you pressed the START ID WRITE button is played back repeatedly (rehearsal function).
The beginning of the repeated portion will be the beginning of the start ID.
2 Press the or button to adjust the "repeat start" point.
The "repeat start" point is shifted backward with the button or forward with the button by about 0.3 of a second.
The indicator at the MARGIN display shows how much the "repeat start" point is shifted from the point where you pressed the START ID WRITE button.
3 After setting the beginning of the start ID at the desired point, pr the START ID WRITE button ag
The WRITE indicator lights steadily and the start ID is written. The program number is not written in this time.
a) When you pressed twice.
Note on the point where a start ID is written [A]
During the rehearsal function, a start ID is written at the beginning of the repeated portion as illustrated.
a) Point where you pressed START ID WRITE
b)Repeated portion (for 3 seconds) c)Selection
d)Each time you press
e) Each time you press▶
f) 0.3 sec.
Normally, the repeated portion is played back 5 times.
When the or button is pressed while the repeated portion is played back, the repeated portion is played back up to 8 times max, and then the tape stops.
Code ID de depart
Adjusting the Position
The position of a start ID written during recording or by using the rehearsal function can be finely adjusted.
You can shift the start ID position about 2 seconds (about 4 seconds in the long-play mode) backward or forward. To shift it for more than 2 seconds, first erase the start ID (see below) and rewrite it manually.
1 During playback, press the START ID WRITE button where the start ID to be shifted is written.
2 Perform steps 2 and 3 described, "Writing Manually during Playback."
Erasing
While the start ID you want to erase appears on the display during playback or in the stop mode, press the START ID ERASE button.
Make sure that the safety tab of the cassette is closed.
That start ID is erased. The ERASE indicator flashes while the start ID is detected. While the start ID is being erased, the ERASE indicator lights and the START ID indicator flashes.
If you press the START ID ERASE button during the stop mode or while the START ID Indicator is not on the display
The start ID just before the current position is erased.
When a start ID is erased
If a program number is also written with the start ID, the program number will be erased as well at the same time and the succeeding program number remain unchanged. In this case, re-arrange the program number with the renumbering function. (Page 74.)
Code ID de départ
Program numbers are the codes indicating the selection order. (Page 58.)
There are two ways to write program numbers:
- Writing automatically during recording
- Renumbering automatically during playback or in the stop mode (Renumbering function)
Writing Automatically during Recording
When you proceed so that start IDs are written automatically during recording, the program numbers are also written.
Writing program numbers from the beginning of the tape
1 Make sure that the AUTO indicator is lit. If it is not lit, press the START ID AUTO button. When turning on the power and inserting a cassette with its safety tab at the record-possible position, the AUTO indicator lights. In timer recording, the AUTO indicator will be the same as the one before the power is turned off.
2 To start recording, press the REC button, then press the PAUSE or (play) button. The program numbers will be written in numerical order from "1" at the same position as the start IDs. The START ID indicator flashes while the start ID is written for about 9 seconds (18 seconds in the long-play mode).
Numeros de programme
Writing program numbers from the middle of the tape
1 To locate the last point of the previous recording, using the end search function. (Page 54) It is important to proceed with the end search function in order not to leave a blank section on the tape.
2 Make sure that the AUTO indicator is lit. If it is not lit, press the START ID AUTO button. When turning on the power and inserting a cassette with its safety tab at the record-possible position, the AUTO indicator lights. In timer recording, the AUTO indicator will be the same as the one before the power is turned off.
3 Press the REC button to set the deck in the record-pause mode.
4 Designate the next program number (the number that follows the program number of the last selection) with the numeric button on the remote commander. If you are not aware of the program number, press the button to check the last program number (After checking the program number, locate the last point of the previous recording, using the end search function.) If the program number of the last selection appears at the PGM NO. display you need not to designate the next number.
a) Next program number
If the next program number is not designated
The start IDs will be written, but the program numbers will not.
You can write the program numbers using the renumbering function described on the next page.
5 Press the PAUSE or (play) button.
The program numbers are written consecutively, beginning from the designated number at the same position as the start ID.
Numeros de programme
Numeros de programa
Número das musica
If you record from the beginning to the middle of a tape on which another recording has ever been applied, the same program number may be written twice on that tape.
If you omit designating the next program number when recording from the middle of the tape, the succeeding program numbers are not written. In such cases, with the renumbering function, you can renumber the program numbers from the beginning of the tape at a high speed.
Renumbering Program Numbers Automatically
1 Make sure that the AUTO indicator is lit, and that the safety tab of the cassette is at the record-possible position. If the AUTO indicator is not lit, press the START ID AUTO button.
2 Press the RENUMBER button during playback or in the stop mode. The tape will automatically be rewound to the beginning, and the program numbers are re-arranged from "1" in numerical order at each start ID position. While the program numbers are rewritten, the [START ID] indicator flashes and while the tape is fast-forwarded to the next start ID, the AUTO RENUMBER indicator flashes. When program numbers are written correctly, the tape is fast-forwarded to the next start ID.
When renumbering is terminated The tape is automatically rewound to the beginning, and the deck enters stop mode.
Note
The renumbering function may not work correctly in the following cases:
- A blank section is left on the tape.
- The beginning of the new tape is advanced with the or button.
Numeros de programme
Numeros de programa
Número das musica
Renumérotation
Renumerator automática de losThey are the most popular of programs.
Shifting Start IDs' and Program Numbers Position
The start ID position may not coincide exactly to the beginning of the selection, especially when the portion between selections is not clear. On such a tape, the very beginning of the selection cannot be located using the AMS function. If this happens, you can shift the start ID and program number position, however, you cannot shift the position of the program number 1.
1 Make sure that the AUTO Indicator is off, and that the safety tab of the cassette is at the record-possible position.
If the AUTO indicator is lit, press the START ID AUTO button to turn off the indicator.
2 Press the RENUMBER button during playback or in the stop mode.
The start ID and program number position of the 2nd selection and the succeeding selections, will be shifted toward the head of the tape by about 0.3 of a second.
When program numbers are written incorrectly, the renumber function operates.
Erasing
Make sure that the safety tab of the cassette is closed.
During playback, press the START ID ERASE button while the program number to be erased appears on the display.
That program number is erased. The start ID at the same position will also be erased. The ERASE indicator flashes while the program number is being searched for, and the START ID indicator flashes while the program number is being erased.
When the program number is erased
Playback continues. The succeeding program numbers remain unchanged. To re-arrange the program numbers, renumber them as described on page 74.
Numeros de programme
Numeros de programa
Número das musica
The skip ID indicates the beginning of the portion to be skipped.
When the skip ID is detected during playback, the tape skips to the next start ID position, and the normal playback resumes. (SKIP play) (Page 58.)
You can write the skip ID during recording or write more accurately during playback.
Writing during Recording
Press the SKIP ID WRITE button at the beginning of the portion you want to skip later.
The [SKIP ID] and WRITE indicators light momentarily.
The skip ID is written for about 1 second (2 seconds in the long-play mode) from where you pressed the button.
Writing during Playback (Rehearsal Function)
During playback, skip ID can be written at the desired position more accurately than during recording. Make sure that the safety tab of the cassette is closed.
1 During playback, press the SKIP ID WRITE button at the desired position.
The REHEARSAL indicator lights and the WRITE indicator flashes, and the portion for 3 seconds to the point where you pressed the SKIP ID WRITE button, is played back repeatedly (rehearsal function). The end of the repeated portion will be the beginning of the skip ID.
2 Press the or button to adjust the "repeat end" point. The "repeat end" point shifted backward with the button or forward with the button by 0.3 of a second.
The indicator at the MARGIN shows how much the "repeat end" point is shifted from the point where you pressed SKIP ID WRITE. a) When you pressed twice.
3 After setting the beginning of the skip ID at the desired point, press the SKIP ID WRITE button again. The [SKIPID] indicator lights, and the skip ID is written.
Code ID de saut
Note on the point where a skip ID is written A
During the rehearsal function, a skip ID will be written at the end of the repeated portion as illustrated.
a) Repeated portion
b)Point where you pressed SKIP ID WRITE.
c)Selection
d3 seconds e) Skip ID (1second)
f) Each time you press
g)0.3 sec.
h)Each time you press
Normally, the repeated portion is played back 5 times.
When the or button is pressed while the repeated portion is played back, the repeated portion is played back up to 8 times, and then the tape stops.
Erasing
Make sure that the safety tab of the cassette is closed.
During playback or in the stop mode, press the SKIP ID ERASE button immediately after the skip ID to be erased (immediately after the SKIP ID Indicator appears).
The tape is rewound to the nearest skip ID position and the skip ID is erased. The ERASE indicator lights while the skip ID is being searched for and goes off when the skip ID is erased.
Precaution
When the skip ID and the start ID are overwritten, the skip ID will also be erased if the start ID is erased.
| ID to be erased | Operation |
| Start ID, skip ID | Press the START ID ERASE button. |
| Skip ID | Press the SKIP ID ERASE button. |
Code ID de saut
The end ID indicates the last position of the recording or playback. While recording on the same tape has been done several times, you can locate the point where the previous recording terminates quickly by using the end ID.
When the end ID is detected during playback, the playback stops and the tape is rewound to the beginning automatically.
Writing during Recording
1 Press the IPAUSE or OREC MUTE button to stop recording.
When pressing the PAUSE button: The deck enters the record-pause mode.
When pressing the OREC MUTE button: The deck enters the recordpause mode after a sound muted portion is created for 4 seconds.
2 Press the END ID WRITE button. The END ID WRITE indicator lights.
3 Press the PAUSE or (play) button to release the record-pause mode.
The 'EE' indicator appears on the display.
The end ID is written for about 9 seconds (18 seconds in the long-play mode). Tape returns to the beginning of the end ID after the end ID is written.
After you write an end ID
The portion after the end ID position cannot be played back. (The "EE" indicator appears at the PGM NO. display.) Erase the end ID (page 86) where you want to play back the portion after the end ID position.
Code ID de fin
Writing during Playback (Rehearsal Function)
- During playback, no end ID can be written on a blank section.
To write the end ID just before a blank section with the end search function, perform "Writing during Recording" described above. - Make sure that the safety tab of the cassette is closed.
1 During playback, press END ID. WRITE at the desired position
The REHEARSAL indicator lights and the WRITE indicator flashes, and the portion for 3 seconds to the point where you pressed the END ID WRITE button, is played back repeatedly (rehearsal function). The end of the repeated portion will be the beginning of the end ID.
2 Press the or button to adjust the "repeat end" point. The "repeat end point is shifted backward with the button or forward with the button by 0, a second.
The indicator at the MARGIN display shows how much the "repeat end" point is shifted from the point where you pressed the END ID WRITE button. a) When you pressed twice
3 After setting the beginning of the end ID at the desired point, press the END ID WRITE button again. The "EE" and WRITE indicators light, and an end ID is written.
Code ID de fin
Note on the point where an end ID is written A
During rehearsal function, an end ID is written at the end of the repeated portion as illustrated.
a) Repeated portion
b)Point where you pressed END ID WRITE
c) Selection
d)3 seconds
e) End ID (9 seconds)
f) Each time you press
q)0.3 sec.
h)Each time you press
Normally, the repeated portion is played back 5 times.
When the or button is pressed while the repeated portion is played back, the repeated portion is played back up to 8 times, and then tape stops.
Note
When recording is finished in the middle of a tape, be sure to write the end ID at the end of the last selection.
Erasing
Make sure that the safety tab of the cassette is closed.
1 Search for the beginning of the end ID with the▶ button. (Page 54.)
When the end ID is detected, the 'EE' indicator lights.
2 Press the END ID ERASE button.
The END ID ERASE indicator lights while the end ID is being searched for and then goes off when the end ID is erased.
Note
When recording from the point where the end ID is written, the end ID is erased automatically.
Code ID de fin
1 Make sure that the TIMER switch is set to the OFF position, and then turn on the power.
2 Insert the cassette and press the OPEN/CLOSE button to load the cassette.
3 Press the (play) button.
Playback begins.
If an end ID is written on the tape or a blank section of more than 9 seconds is detected, playback stops automatically at the end ID position, and the tape will be rewound to the beginning.
To stop playback
Press the button.
To stop playback for a moment
Press the PAUSE button.
To release pause and restart
playback
Press the PAUSE or play button.
To remove the cassette
Press the OPEN/CLOSE button.
To rewind or fast-forward the tape
Stop the tape and press the or
button.
To advance the tape (cue) with hearing the tape sound*
Press the button during playback.
To rewind the tape (review) with hearing the tape sound*
Press the button during playback.
Sound is heard while the button is pressed. Release the button at the desired point. Playback resumes.
The speed of the tape increases about 4 seconds after the cue or review starts.
On the volume adjustment
Compared with the analog audio cassette tape, a digital audio tape contains less tape hiss noise. So be sure to turn down the volume before playback.
Adjusting the headphones volume
Use the LEVEL control.
When the tape is played back to its end
The tape will be rewound to the beginning and stop automatically.
If tape noise exists, or sound quality has deteriorated
The head may be contaminated. Clean the head, using a cleaning cassette (See page 108).
Lecture
Each time you press COUNTER MODE, the counter changes as follows.
a) Absolute time
b)Remaining time to the end of the whole tape (not to the end of the recorded portion)*
c) Linear counter (tape running time)
- When playing back a pre-recorded tape (software), remaining time to the end of the recorded portion appears.
Notes
At the beginning of the tape, " 贝 may appear and immediately go off at the PGM NO. indicator position depending on some types of pre-recorded tapes. (no" stands for "beginning).
To reset the counter to 0M 00S, press
COUNTER RESET on the remote commander.
Remaining time does not appear in the following cases
- Immediately after the deck is set in the playback mode.
The remaining time will appear about 16 seconds (in the standard-play mode) later. - When playback is started from a blank section (page 40), the remaining time may not appear. Press the button.
Accuracy of the Indicator for the remaining time
This unit indicates the remaining time by referring the thickness of the tape. So the remaining time may differ from the actual remaining time according to the type of tape.
Lecture
Reproducción
Leitura
VariousPlayback Operations
Repeat Play
These functions can be performed only with the remote commander.
Playing a Selection Repeatedly
Press the REPEAT 1/ALL button on the remote commander while the desired selection is played back.
The REPEAT 1 indicator appears. After the selection is played back, the tape is rewound to the beginning of that selection automatically, and the playback is repeated.
To stop playing a selection repeatedly and return to the normal playback
Press the REPEAT 1/ALL button twice. The REPEAT indicator goes off.
Note on the end of the repeated portion during the REPEAT 1 play
The tape is rebound to the beginning of the selection to be repeated when one of the following is detected.
- Start ID of the next selection
A blank section of more than 9 seconds
End of the tape or end ID
- Skip ID with SKIP play activated
Playing all selections repeatedly
During playback, press the REPEAT 1/ALL button until the REPEAT ALL indicator appears on the display.
After the tape is played back to the end, it is reword to the beginning and the playback of all selections is repeated. In the RMS play (page 102), all the selections programmed are played back repeatedly.
To stop playing all selections repeatedly and return to the normal playback
Press the REPEAT 1/ALL button once. The REPEAT indicator goes off.
Note on the end of the repeated portion during the REPEAT ALL play
The tape is rewound to the beginning of the tape when one of the following is detected.
End of the tape or end ID
A blank section of more than 9 seconds
Number of times to be repeated
The selection to be repeated will be played back 5 times, and then the tape will stop.
Lecture repeteedune plaque
VariousPlayback Operations
A
Automatic Music Sensor Operation
When you press the 一 一 or 一 一 button during playback or in the stop mode, playback will start from the beginning of the desired selection.
When it is pressed in the pause mode, the deck enters the pause mode at the beginning of the designated selection. Press the PAUSE or play button to resume playback.
For this operation, the start ID codes must be written on the tape.
For how to write the start ID, see page 62.

B
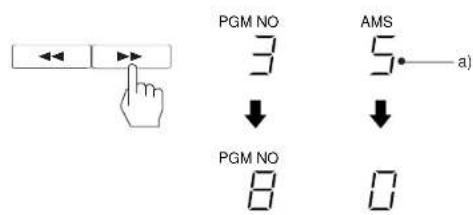
To locate the selection ahead
Press the button. Each pressing advances the tape to the next selection in sequence.
Example A
To designate five selections ahead, press the button five times.
a) The number of time you pressed▶is displayed
When the designated selection is located, playback resumes.
To locate the previous selection
Press the button. Each pressing moves the tape to the previous selection in sequence.
Example B
To designate three selection back
(excluding the selection being played), press the 一 一 button four times.
a) The number of time you pressed is displayed
When the designated selection is located, playback resumes. The display returns to the counter display.
When designating the selection being played back by pressing once, -0^ appears.
You can designate a selection by pressing the numeric buttons, instead of pressing the or button several times. In this case, press the or button after pressing the numeric buttons.
VariousPlayback Operations
Music Scan
With the this function, you can listen to the first part of each selection. You can designate the scan time up to 15 seconds in steps of a second. The scan time is 8 seconds if the scan time is not desigated. (The designated time remains memorized even if you turn off the unit.) For this operation, the start ID codes must be written on the tape. For how to write the start ID codes, see page 62. This operation can be performed only with the remote commander.
1 In the stop mode, press the MUSIC SCAN button.
The MUSIC SCAN indicator flashes and the designated scan time is indicated at the MARGIN display. To designate the scan time, press the or button while the scan time is indicated at the MARGIN display.
2 Press the (play) button.
The tape is rewound to the beginning, the first part of each selection (start ID position) is played back for the time you designated sequentially. The and START ID indicators light during playback.
When you press the 口 button instead of the (play) button The nearest start ID before/after the current position is detected and, after playing back the first part of that selection for the time you designated, the next start ID in the reverse/ forward direction is located. This operation continues until the end of the tape.
- When the MUSIC SCAN is pressed during playback, the tape is rewound to the beginning and the music scan starts automatically.
VariousPlayback Operations
To listen to the beginning of a selection for more than the designated time
Press the (play) button while the selection you want to listen to is played back.
While pressing the button, the countdown at the MARGIN display slows, and the playback of that selection continues.
To listen to an entire selection
Press the MUSIC SCAN button while the selection you want to listen to is played back.
The music scan function is released, and the playback of that selection continues.
Designating the Desired Selection
By designating the desired program number, you can listen to the desired selections directly.
For this operation, the selections must be numbered by the program numbers.
For how to write the program number, see page 70.
This operation can be performed only with the remote commander.
1 Designate the desired program number with the numeric button(s).
a)Current program number
b)Designated program number
▶ (play) button.
The designated selection is searched for at high speed and playback starts from the beginning of that selection. a) Displayed number is advanced to the designated number one by one b) Goes off.
When you press the numeric button(s) during play-pause mode, the deck enters the pause mode at the beginning of the designated selection. Press the iPAUSE or button to resume playback.
If an incorrect number is designated Before pressing the button, press the CLEAR button.
The displayed program number will be cleared. Then designate the correct program number.
Once the button is pressed, it is impossible to cancel the designated selection.
VariousPlayback Operations
Skip Play
With this function, you can skip the undesired selection which the skip ID is written and listen to the only desired one. For this operation, the skip ID code(s) must be written on the tape.
The SKIP indicator lights.
During playback, the tape skips to the next start ID position automatically when a skip ID is detected, and the playback resumes.
To release the SKIP play mode
Press the SKIP PLAY button to turn off the SKIP indicator.
Auto Play: Restarting Playback after Rewinding
While pressing the button, press the button.
The tape is re wound to the beginning, and playback starts automatically.
Notes
If the above operation is done immediately after the cassette is inserted, the auto play operation does not function. In this case, press the button a few seconds after the button is pressed.
- The setting of the skip play and repeat play remains even if the power is turned on/off.
VariousPlayback Operations
Random Music Sensor (RMS) Operation
The RMS function allows you to program the desired selections in the desired order. For the operation, program numbers must be written on the tape. This operation can be performed only with the remote commander.
1 Designate the desired selection by pressing the numeric button(s) in the stop mode.
The selection numbers can be specified from 1 to 99. a) Lights
2 Press the ENTER button.
a) Indicates the playing order. b)The RMS indicator lights after programming the first selecti
3 Repeat step 1 and 2.
A maximum of 60 selections can be programmed.
4 Press the (play) button.
The programmed selections are played back in the designated order.
To stop RMS play
Press the button.
To check the programmed selections
Press the CHECK button on the remote commander. Each time you press the CHECK button, the programmed selections appear in the designated order.
To add a selection to the program
Once the RMS play starts, you cannot add a selection. To add a selection, first stop the RMS play, and program new selection(s) by following the procedure described above.
To delete the selection you programmed last
Press the CLEAR button.
However, when checking the programmed selection, the CLEAR button cannot be used.
To cancel the entire program
In the stop mode: Press the button once.
In the RMS play mode: Press the button twice.
The program is also erased when the power is turned off.
Timer Activated Operation
Use a commercially available audio timer to activate recording or playback at a desired time.
Read the operating instructions for the timer and the amplifier.
Timer Activated Recording
1 Turn on the timer.
2 Turn on the DAT deck, and prepare for recording. (Follow steps of "recording" on page 44.)
3 Set the timer to the desired time. Power to the amplifier and to the DAT deck is turned off. Leave the power switches of the equipment turned on.
4 Set TIMER to REC.
At the preset time, the power is supplied and recording starts after about 4 seconds.
The AUTO indicator will be the same as the one before the power of the DAT deck is turned off.
When the AUTO indicator lights, start IDs will be written during recording.
When timer activated recording is finished
Be sure to set the TIMER switch to the OFF position.
Precautions
- If the TIMER switch is left at the REC position, recording will start when the power is turned on the next time, and the tape contents will be erased.
- In timer recording (the TIMER switch is set to the REC position), the auto rewind function will not be activated even if the tape is fully taken up. The tape stops without being rewound so that recording will not be performed over the previously recorded material.
- Be sure to activate timer recording with the cassette inserted properly in the cassette compartment. With the cassette compartment lid opened, timer recording will not function.
Timer Activated Operation
Timer Activated Playback
1 Turn on the timer.
2 Turn on the DAT deck, and insert the cassette.
3 Set the timer to the desired time.
Power to the amplifier and to the DAT deck is turned off. Leave the power switches of the equipment turned on.
4 Set the TIMER switch to the PLAY position.
At the preset time, the power is supplied and playback starts after about 4 seconds.
When timer activated playback is finished
Normally set the TIMER switch to the OFF position.
If you want to start playback at the preset time every day automatically, leave the TIMER switch to the PLAY position.
4
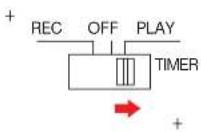
Cleaning the Cabinet
Clean the cabinet, panels and controls with a soft cloth slightly moistened with a mild detergent solution. Do not use any type of abrasive and, scouring powder or solvent such as alcohol or benzine.
Cleaning the Head
Prolonged operation will cause contamination of the head.
To make the best possible recording and playback, we recommend cleaning the head periodically, using the DT-10CL cleaning cassette (not supplied).
How to use the cleaning cassette
1 Insert the cleaning cassette as you insert a normal DAT cassette.
2 Press▶ Press ■ after about 10 seconds.
3 Remove the cleaning cassette without rewinding it.
4 Proceed with recording and playback with a normal DAT cassette and check the sound quality.
Notes on the cleaning cassette
- The cleaning cassette cannot be used for recording and playback.
- Do not clean the head with the cleaning cassette more than five times over a short period. Cleaning the head continuously for a too long period of time may cause wear to the head.
Do not rewind the cleaning cassette each time you use it. When the cleaning cassette tape is taken up completely, rewind it to the beginning and re-use it. The cleaning cassette can be used two hundred times, with 10 seconds of cleaning each time.
Entretien
Mantenimiento
Manutenção
Guide to the Serial Copy Management System
This digital audio tape deck adopts the Serial Copy Management System. This system enables one generation of digital recording of prerecorded software via digital input/output. A summary of this system is as follows:
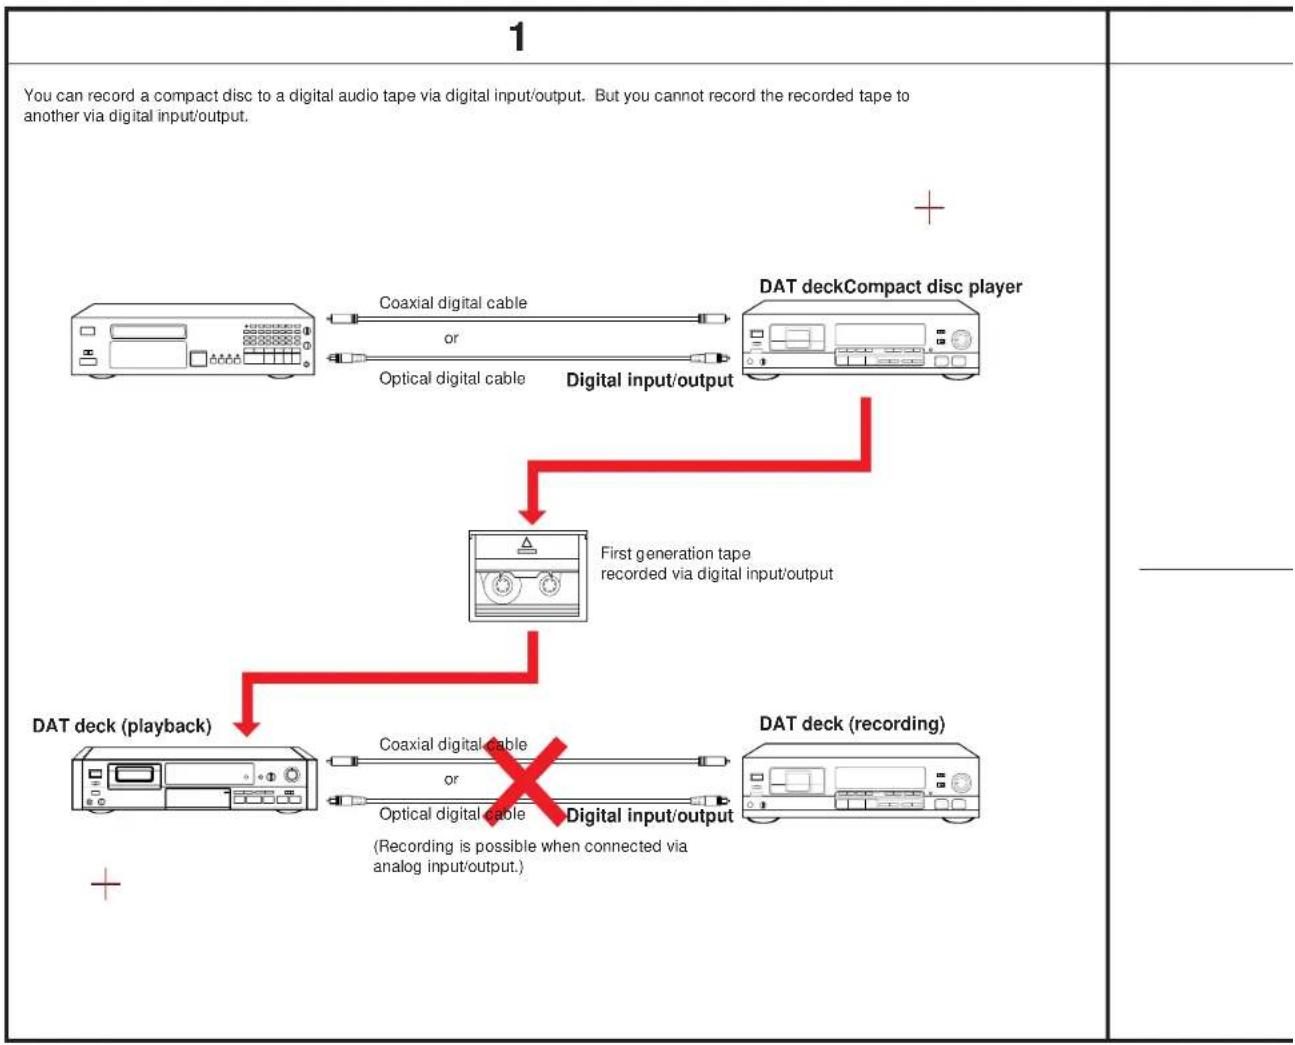
2
You can record a digital audio tape recorded via analog input/output to another via digital input/output. But, you cannot make a second generation tape via digital input/output.
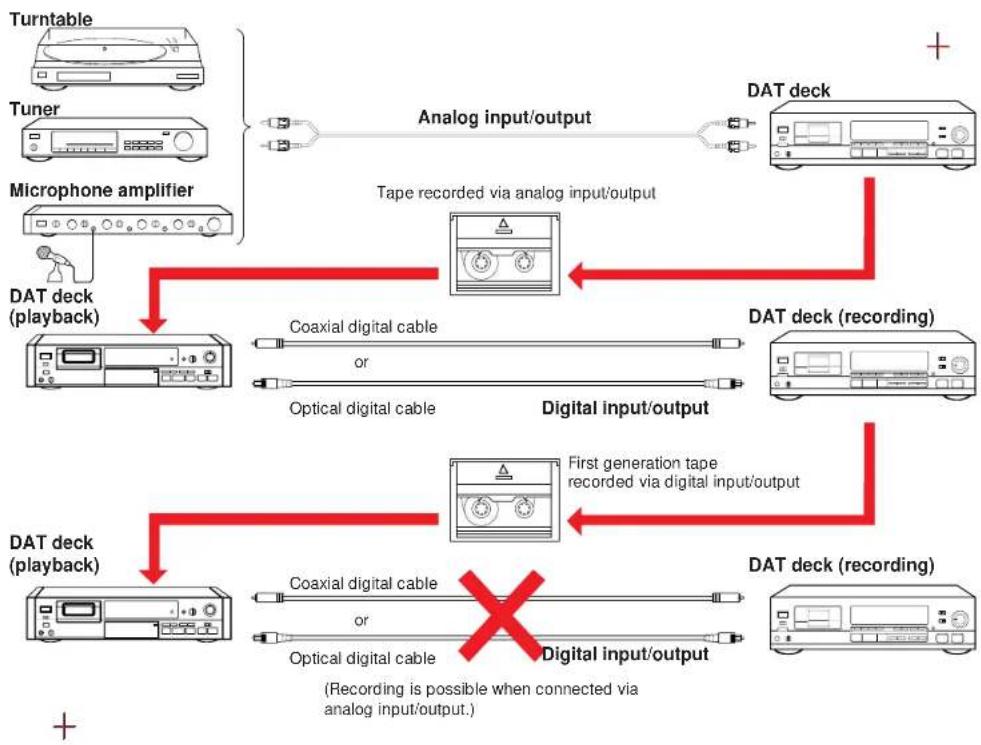
Remarks
There are no restrictions for generation when DAT decks are connected via analog input/output each other. These rules do not apply when you use a DAT deck which does not adopt the Serial Copy Management System.
| Basic Operation | ||
| Symptom | Cause | Remedy |
| The tape is ejected after being loaded. | The cassette is inserted incorrectly. | Insert the cassette correctly. (page 38) |
| The tape does not move. | For 4 seconds after the power is turned on, the buttons do not function. | Wait until the blinking of the indicator goes off and then try again. |
| The PAUSE button is activated. (The indicator lights.) | Press the PAUSE button to release pause. | |
| The tape is wound completely. | Press the or I button to rewind. | |
| The sound is not heard. | Incorrect connections. | Connect properly. (pages 32 to 36) |
| Incorrect operation of the connected amplifier. | Operate the amplifier as required by the deck operation. (Refer to the operating instructions of the amplifier.) | |
| Recording cannot be made. | The safety tab of the cassette is open. | Close the tab of the cassette. (page 38) |
| Incorrect position of the INPUT selector. | Set the INPUT selector correctly. When recording sound from the equipment connected to the COAXIAL IN or OPTICAL IN jack, set the INPUT selector to the COAXIAL or OPT position respectively. When recording sound from the equipment connected to the LINE IN jacks, set to the ANALOG position. | |
| The digital copy prohibit signal exists in the source signal input to the digital input jack. | Connect the source equipment to the LINE IN jacks. | |
| The ▲OPEN/CLOSE does not function. | The ▲OPEN/CLOSE does not function during recording. | Press to stop recording and then press ▲OPEN/CLOSE. |
| The sound is not heard from the recorded tape. | When recording analog input signals, the recording level is turned down completely. (When recording the analog input signal) | Adjust the recording level by using the REC LEVEL control. (page 48) |
| The CAUTION indicator lights, and no button does function. | Moisture condenses inside the unit. | Leave the unit turned on for about an hour. (page 8) |
| Defective or damaged cassette is inserted. | Remove the cassette. | |
| The cassette is removed forcibly from the cassette compartment. | Turn off the unit and then turn on again. | |
Sub Code Operation
| Symptom | Cause | Remedy |
| Sub codes cannot be written. | Insert a cassette tape with its safety tab at the record-impossible position. | Insert a cassette tape with its safety tab at the record-possible position. (Page 38) |
| Start ID cannot be written during recording. | A new start ID cannot be written within 9 seconds (18 seconds in the long-play mode) from the end of another start ID. | Leave at least 9 seconds (18 seconds in the long-play mode) from the end of another start ID. |
| Search function does not operate during playback. | The start ID is not written correctly. | Erase it (page 68), and then write it again. |
| The portion between the end of a start ID and the beginning of the following start ID is less than 9 seconds (18 seconds in the long-play mode) long. | When writing the start IDs manually, write so that the intervals between them are more than 9 seconds (18 seconds in the long-play mode.) | |
| The selected program number does not exist on the tape. | Use the RENUMBER button to re-arrange the program numbers. (page 74) | |
| The program numbers are out of order. | ||
| Search function operates suddenly during playback. | The skip play function is operating. (The SKIP indicator lights in the display window.) | Turn off the indicator by pressing SKIP PLAY. |
| The repeat play function is operating. | Turn off the indicator by pressing REPEAT 1/ALL. | |
| Search function stops. | There is a blank section between selections. (The sampling frequency indicator blinks on the display.) | Use the end search function (page 54) when recording so that no blank is created. |
| The tape operation buttons do not operate while writing the start ID. | While writing the start ID (9 seconds or 18 seconds), none of the buttons except the button are operative. | Operate after the start ID is written. |
| The absolute time codes cannot be written. | Recording was started from the blank section. | Rewind the tape to the beginning, or locate the very last point of the previous recording by using the end search function (page 54), and start recording from the point. |
| End ID cannot be written during playback. | The portion where you want to write the end ID is blank. | Set the deck in the record-pause mode by pressing ●REC, then write the end ID. |
| Renumbering function does not operate. | The portion between the end of a start ID and the beginning of the following start ID is less than 9 seconds (18 seconds in the long-play mode) long. | When writing the start IDs manually, write so that the intervals between them are more than 9 seconds (18 seconds in the long-play mode). |
| Start ID cannot be erased. | ||
| Skip ID cannot be erased. | Two skip IDs are written continuously. | When writing the skip IDs, write so that the intervals between them are more than 1 second (2 seconds in the long-play mode). |
| End ID cannot be erased. | The end ID is written at the beginning of the tape. | Start recording from the beginning of the tape. |
| The end ID is written immediately after a start ID. | First erase the start ID. |
Troubleshooting Guide
Others
| Symptom | Cause | Remedy |
| Tape transport noise seems excessively loud in rewind or fastforward mode. | This situation depends upon the cassette being used and is not a problem. | - |
| The tape stops running suddenly. | A defective or damaged cassette has been inserted. | Press the ▲OPEN/CLOSE button to change the tape. |
| Unbalanced left and right volume. | Incorrect adjustment of the recording balance. | Adjust the recording balance correctly by using the REC LEVEL control. (page 48) |
| Increase of noise or deterioration of sound quality. | Contamination of the head. | Clean the head, using the cleaning tape. |
| After pressing ←/→ or ←/→, the tape stops for a moment, and then starts running. | This is not a problem. | - |
Dépannage
Recording head Rotary head
Recording time Standard: 120 minutes.
Long-play mode: 240 minutes
(with DT-120)
Tape speed Standard: 8.15 mm/s,
Long play mode: 4.075 mm/s
Drum rotation Standard: 2,000 rpm
Long-play mode: 1,000 rpm
Error correction Double Read Solomon code
Tape
Track pitch 13.6 m (20.4 μm)
Sampling frequency 48 kHz, 44.1 kHz, 32 kHz
Modulation system 8-10 Modulation
Transfer rate 2.46 Mbit/sec.
Number of channel 2 channels, stereo
D/A conversion (Quantization)
Standard: 16-bit linear
Long-play mode: 12-bit non-linear
Frequency response Standard: 2-22,000 Hz (±0.5 dB)
Long-play mode: 2-14,500 Hz
(±0.5dB)
Signal to noise ratio Standard: more than 90 dB
Long-play mode: more than 90 dB
Dynamic range Standard: more than 90 dB
Long-play mode: more than 90 dB
Total harmonic distortion Standard: less than 0.005% (1 kHz)
Long-play mode: less than 0.08%
(1kHz)
Wow and flutter Below measurable limit
(±0.001% W. PEAK)
Input
| Jack type | Impedance | Rated Input level | |
| LINE IN | phono jack | 47 kohms | -4 dBs |
| DIGITAL IN | phono jack | 75 ohms | 0.5 Vp-p, ±20% |
| DIGITAL IN | optical jack | — | — |
Output
DIGITAL OUT (optical jack): wavelength 660 nm
General
Power requirements Model for Continental Europe:
220/230 V AC, 50/60 Hz
Model for other countries:
110-120 V or 220-240 V AC
adjustable, 50/60 Hz
Power consumption 31 W
Dimensions
Approx. 430 × 110 × 350 mm( w/h/d)
(1619x4³/0x137/inches)
Weight
Approx. 5 kg (11 lb)
Remote commander (supplied)
Remote control system
Infrared control
Power requirements 3V DC, with two size AA (R6)
batteries
Dimensions
Approx. 40 x 20 x 175 mm (w/h/d)
(1/15 x 13/16 x 7 inches)
Weight
Approx. 100 g (4 oz) incl. batteries.
Supplied accessories
Remote commander RM-D690A (1)
Sony batteries SUM-3(NS) (2)
Audio connecting cords (2 phono plugs - 2 phono plugs, stereo for
line inputs and outputs) (2)
Design and specifications are subject to change without notice.
Note
This appliance conforms with EEC Directive 87/308/EEC regarding
interference suppression.
Accessories not supplied
Optical cable
Connecting card
POC-15,POC-10HS etc.
RK-C710HS,etc.
(2 phono plugs - 2 phono plugs:
connectors plated with gold, high
fidelity LC-OFC line cord)
VMC-1ES,etc.(phono plug-phono
plug): for digital connection
DT-10CL
Output
Specifications
Conversion N/A (Quantification)
Standard: Lineaire 16 bits
Normal: 16 bits, linear
Modo de leitura prolongada:
12 bits.nao linear


- Digital Audio Tape Deck
- NOTICE FOR THE CUSTOMERS IN THE UNITED KINGDOM
- IMPORTANT
- WARNING
- Avertissement
- Before using the DAT deck
- Recording
- Writing sub codes
- Additional Information
- Lecture
- Operation
- Installation
- Moisture Condensation
- If moisture is present...
- When the CAUTION indicator lights and the unit will not operate
- NOTE
- Précautions
- Sécurité
- Serial copy management system
- Three sampling frequencies
- Long play mode
- Visible cassette loading
- Excellent sound quality
- 1-bit A/D converter
- Pulse D/A converter
- Rich variety of subcode information
- Post edit recording of sub codes
- \section*{Caracteristiques}
- Location and Function of Controls
- Front Panel/Remote Commander
- Remote Commander Operation
- Installing Batteries
- Notes on remote control
- To avoid battery leakage
- Battery life
- Display Window C
- To change the brightness of the display window
- Fig. D
- Function of Controls
- Rear Panel Jacks
- Notes on connection
- Note on sound signals
- For LINE IN/OUT (analog input/output) jacks
- For COAXIAL IN (digital input) jacks
- For OPTICAL IN/OUT (optical transmission digital input/output) jacks [C]
- How to connect the optical cable [D] Remove the cap and plug it in firmly.
- Notes on the optical cable
- Connexions
- Conexiones
- Ligacoes
- Cordons de raccordement
- If your amplifier is not equipped with digital signal jacks
- When connecting a microphone
- Ligaoes
- If your amplifier is equipped with digital signal Jacks
- Cassette Loading
- On a digital audio tape
- Notes
- On the sampling frequency
- Insertion de la cassette
- Carga del cassette
- Blank Section and Sound Muted Portion
- Blank section A
- Sound muted portion B
- Difference between the blank section and sound-muted portion
- Recording absolute time codes
- Tips for recording:
- If a blank section is left on the tape
- Enregistrement
- Grabacion Gravacao
- Note on the recording from the beginning of the tape
- To stop recording
- To release pause and restart recording
- If recording cannot be made
- Note on the INPUT selector and the
- If the cassette is ejected after it has been loaded
- When the tape is recorded to the end
- Accuracy of the electronic linear time counter
- Grabación
- Gravacao
- Recording level adjustment (for analog input signals only) A
- The timer counter in the long-play mode
- Creating a Sound Muted Portion (Record Muting)
- Using sound muted portion
- Caution
- To create a sound muted portion of more than 4 seconds
- Press▶
- When the end ID is written before a blank section
- Note on the duration of a blank section
- Recherche de fin
- Les sous-codes
- Program number [c]
- Skip ID [D]
- End ID [E]
- Subcódigos
- Sub-códigos
- Code de départ
- Absolute time
- Writing Automatically during Recording
- Code ID de depart
- Why 9 seconds or 18 seconds are necessary for writing a start ID ?
- If the signal level stays very low for more than 3 seconds
- When the portion between selections is not clear
- Illustration of writing a start ID A
- When recording from a CD player
- Writing Manually during Recording
- Code ID de départ
- Adjusting the Position
- Erasing
- When a start ID is erased
- Writing program numbers from the beginning of the tape
- Numeros de programme
- Numeros de programa
- Número das musica
- Renumbering Program Numbers Automatically
- Renumérotation
- Renumerator automática de losThey are the most popular of programs.
- Shifting Start IDs' and Program Numbers Position
- Make sure that the AUTO Indicator is off, and that the safety tab of the cassette is at the record-possible position.
- Press the RENUMBER button during playback or in the stop mode.
- During playback, press the START ID ERASE button while the program number to be erased appears on the display.
- When the program number is erased
- Writing during Recording
- Writing during Playback (Rehearsal Function)
- Code ID de saut
- Note on the point where a skip ID is written A
- During playback or in the stop mode, press the SKIP ID ERASE button immediately after the skip ID to be erased (immediately after the SKIP ID Indicator appears).
- Precaution
- After you write an end ID
- Code ID de fin
- Note on the point where an end ID is written A
- Remaining time does not appear in the following cases
- Accuracy of the Indicator for the remaining time
- Reproducción
- Leitura
- VariousPlayback Operations
- Lecture repeteedune plaque
- Automatic Music Sensor Operation
- To locate the selection ahead
- To locate the previous selection
- Music Scan
- In the stop mode, press the MUSIC SCAN button.
- Press the (play) button.
- To listen to the beginning of a selection for more than the designated time
- To listen to an entire selection
- Designating the Desired Selection
- Designate the desired program number with the numeric button(s).
- If an incorrect number is designated Before pressing the button, press the CLEAR button.
- Skip Play
- To release the SKIP play mode
- Auto Play: Restarting Playback after Rewinding
- Random Music Sensor (RMS) Operation
- Timer Activated Operation
- Timer Activated Recording
- When timer activated recording is finished
- Precautions
- Timer Activated Playback
- Cleaning the Cabinet
- Cleaning the Head
- How to use the cleaning cassette
- Notes on the cleaning cassette
- Entretien
- Mantenimiento
- Manutenção
- Guide to the Serial Copy Management System
- 2
- Remarks
- Troubleshooting Guide
- Dépannage
- Tape
- General
- Remote commander (supplied)
- Supplied accessories
- Accessories not supplied
- Specifications
Brand : SONY
Model : DTC690
Category : Cassette player