VG3 - Speaker SoundCast - Free user manual and instructions
Find the device manual for free VG3 SoundCast in PDF.

| Product type | Wireless portable speaker |
| Brand | SoundCast |
| Model | VG3 |
| Power source | 12 V rechargeable lithium-ion battery |
| Charging | Micro USB, charging time 4-5 hours with recommended 1.5 A charger |
| Battery life | Varies with volume level |
| Wireless connection | Bluetooth with NFC (CCP) and simple pairing |
| Wired connection | 3.5 mm auxiliary input |
| TWS technology | Qualcomm TrueWireless Stereo (pairing two VG3) |
| Hands-free function | Yes, via play/pause button |
| Keypad | Backlit capacitive keys with ambient light sensor |
| Child lock | Yes, activate by holding mute button for 5 s |
| Auto lock | Yes, after 3 min without interaction (unlock by sliding) |
| Auto power off | After 15 min without audio (battery saving) |
| Weather resistance | Weather resistant, not waterproof |
| Outdoor use | Recommended on battery only |
| Recommended charger | Standard USB charger 1 A or more (1.5 A for fast charge) |
| Box contents | 3.5 mm audio cable, battery pack, quick start guide |
| Warranty | 1 year (extendable to 2 years by registering at goSoundcast.com) |
| Cleaning | With a dry cloth only |
Frequently Asked Questions - VG3 SoundCast
User questions about VG3 SoundCast
0 question about this device. Answer the ones you know or ask your own.
Ask a new question about this device
Download the instructions for your Speaker in PDF format for free! Find your manual VG3 - SoundCast and take your electronic device back in hand. On this page are published all the documents necessary for the use of your device. VG3 by SoundCast.
USER MANUAL VG3 SoundCast
5047TM Tilburg, the Netherlands
VG3 USER MANUAL
ENGLISH......4
ESPAÑOL......9
FRANCAIS......14
PORTUGUÊS......19
DEUTSCHE......24
NEDERLANDS.....29
中文.... 34
ENGLISH | How to use VG3
Congratulations and thank you for your purchase of the Soundcast VG3. Please read the operation instructions carefully before use.
Quick Start Guide
Box Includes:
3.5mm
analog
audio
cable
Battery Pack
[1] Micro USB charging cable
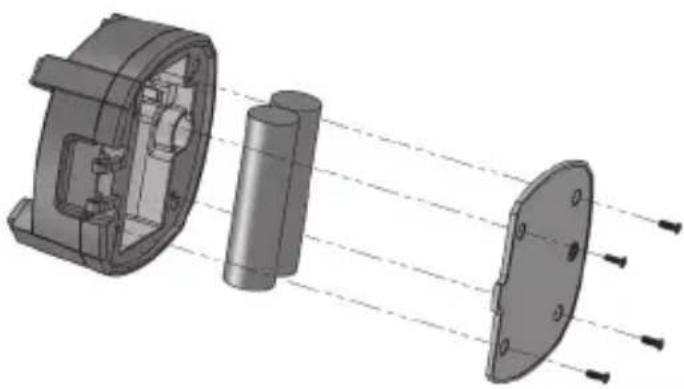
Installing Battery
- Using a Phillips #1 screwdriver, unscrew and remove battery cover located on bottom of VG3
- Connect the battery to the VG3 connector which will only fit in the proper direction
- Route the battery wires
- Re-install battery cover
natural_image
3D mechanical assembly diagram showing internal components and light path (no text or symbols)Charging Battery
Before initial use, charge battery for at least 5 hours to full capacity. To ensure battery longevity and maximum performance of the system, the battery should always be charged prior to mobile operation.
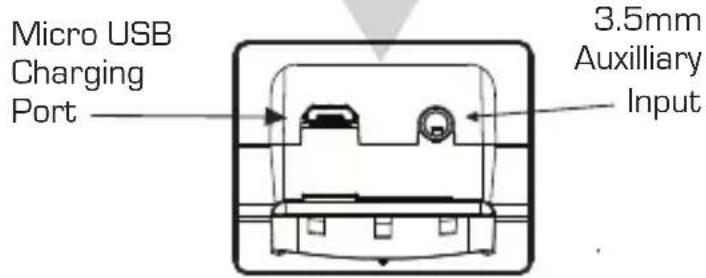
- Connect the included Micro USB charging cable to the VG3 Micro USB port located behind the port protection cover of the VG3
- Connect the other end of the USB cable to user-provided standard (1 Amp) or greater USB charger. It is NOT recommended to charge VG3 using computer or laptop USB ports due to potential compatibility or limited available charging current.
- Included VG3 charging cable is rated for maximum charging current and will provide fastest charge time possible (4-5 hours) when used with a (1.5Amp) or greater charger. Charging time may be increased when using generic USB cables
- Playtime varies from depending upon volume level.
Orange Power/ Charging Indicator LED
Status Power LED
| Power ON | Solid Orange |
| Power OFF | Off |
| Battery Low | Slow Blinking Red |
| Charging | Solid Red |
| Fully Charged | Off (if power off) |
| Fully Charged | Solid Orange (if power on) |
| Error- Cannot Charge | Fast Blinking Red |
Ports, Connections and Inputs
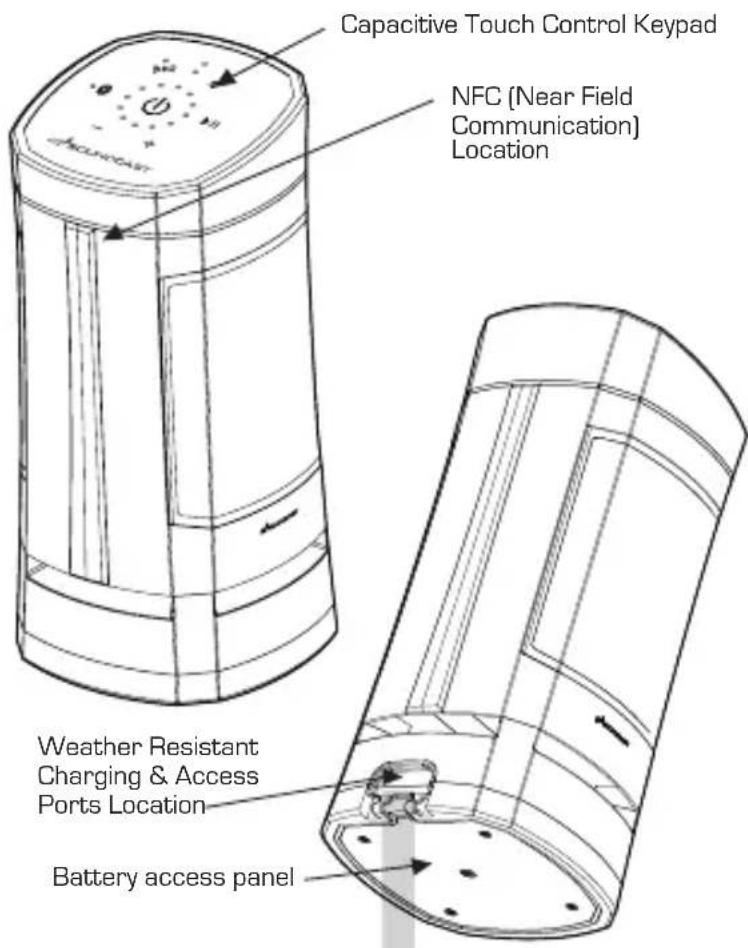
Charging & Access Ports
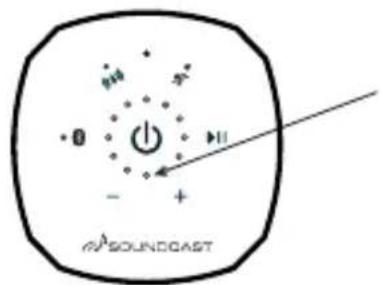
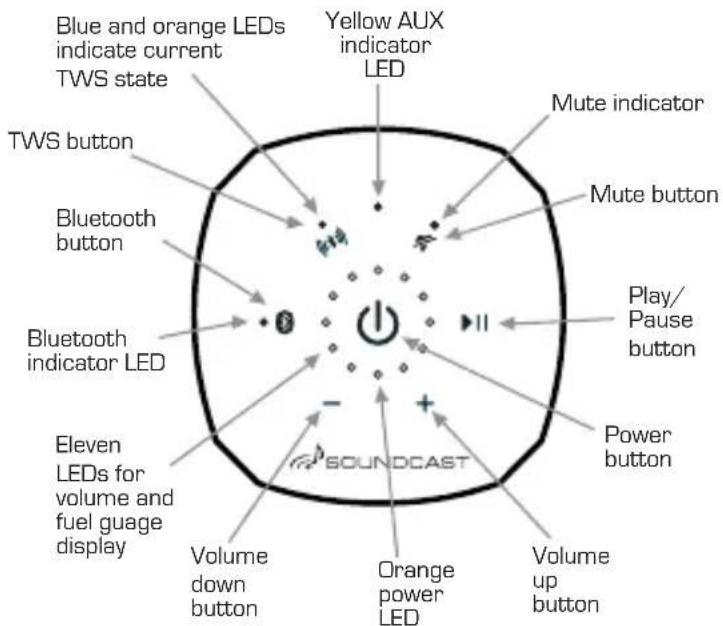
Capacitive Touch Keypad
The VG3 features an advanced capacitive touch keypad and backlighting technology. User functions are accessed by a single press or press and hold over the appropriate button area of the keypad surface as indicated.
Powering On/Off: The VG3 is turned on and off using the large button located in the center of the keypad
Turn On: Press and hold the power button for [2] seconds until the backlights illuminate and then release within [2] seconds, a confirmation beep will confirm unit is turned on
Turn Off: Press and hold the power button for [2] seconds then release within [2] seconds, a confirmation beep will confirm unit is turning off
Control Panel Keypad
Connecting and Pairing
The VG3 power must be turned on before trying to pair (as well as aux input disconnected)
Bluetooth pairing with NFC
- Enable Bluetooth and NFC functions on your mobile device
- Hold phone near the NFC logo (logo) on VG3 unit until mobile device connects and Bluetooth LED blinks slowly
- Press OK/Connect on your mobile device to complete pairing
- Play audio
Standard Bluetooth Pairing
- Enable Bluetooth on your mobile device
- Pair a new device: press the VG3 Bluetooth button (Bluetooth LED will blink slowly)
- From Bluetooth menu on mobile device settings, select "VG3 by Soundcast_xxxxxx"
- Once paired, the Bluetooth LED becomes solid blue
▶ Press & Hold Bluetooth button for (2) seconds and beep is heard to re-enter pairing mode to pair a new or additional device.
To clear all devices from memory, press and hold the Bluetooth button for (10) seconds until the Bluetooth LED double blinks and third confirmation beep is heard.
Aux Input Mode
Plug external audio source into 3.5mm jack to automatically switch to Aux Input mode as indicated by Aux LED turns yellow. Remove 3.5mm plug to switch back to Bluetooth operation.
Qualcomm TrueWireless™ Stereo (TWS) Pairing
With TWS, two VG3 units may be paired for synchronous Bluetooth playback. Power off, volume and TWS mode will by synchronized and may be controlled from either unit.
- Both speakers must be powered on in Bluetooth mode (no Aux input connected)
-
At least one of the speakers must be paired to audio source (as described above) Press and hold the TWS ( ) for (2) seconds until a confirmation beep is heard. The TWS LED will start to blink slowly. Repeat with the second VG3 unit
-
When paired, the TWS LED on both units will show both blue and orange (purple)
▶ When in TWS mode and you turn off one unit, the other unit will turn off automatically - Reconnecting: The TWS-paired units will re-connect to each other automatically after turning both units on. A short press of the TWS button on either unit allows cycling through the TWS modes (stereo, left/right, off) as indicated below;
• LED blue and orange: left/right from each speaker - LED orange only: left from primary speaker, right from secondary speaker
- LED off: TWS off
To clear all devices from TWS memory and return to single device operation, press and hold the TWS button for (10) seconds until third beep is heard and the TWS LED double blinks, then turn the unit off. When unit is turned on again, the TWS LED will not be on, indicating that TWS is disabled.
▶ If you experience any difficulty with either standard Bluetooth pairing or TWS operation, the VG3 Bluetooth system can be reset by clearing pairing memory of both Bluetooth and TWS by using the [10] second press and hold function (third beep) of each button and then power cycling the unit.
▶ No music or intermittent dropouts? VG3 primary and secondary units may be too far away from each other.
Handsfree Speakerphone Operation
- If your phone receives a call while paired with the VG3 press the play/pause button to answer the call. VG3 will become a hands-free speaker phone
- When call is complete, press the Play/Pause button to end the call. VG3 will automatically return to your previous music source
▶ If Keypad Auto-Lock or Child Lock is active when call is received, the keypad will automatically unlock for duration of call and re-engage after call completes.
Qualcomm TrueWireless™ is a product of Qualcomm Technologies International, Ltd.
Other Controls and Features
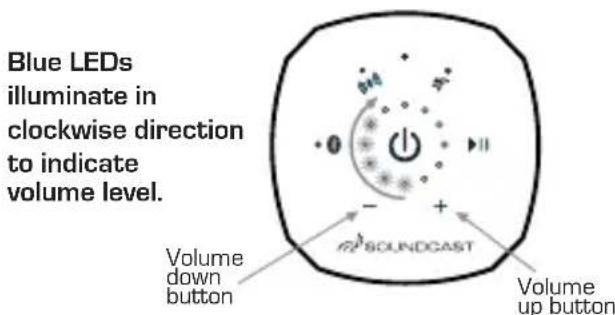
Volume Control:
The VG3 volume can be adjusted when playing music or during speakerphone operation by pressing or press and holding the + [up] or - [down] volume adjustment buttons on the keypad. The current volume level will be displayed with blue LED's on the volume bar graph.
▶ Mobile devices that support the AVRCP protocol can adjust the volume from the mobile devices volume slider control.
Fuel Gauge:
Press the Power button for [1] second and beep is heard to display the current battery level bar graph using a combination of RED=Low, YELLOW=OK, GREEN=Full LEDs. The bar graph will move counter-clockwise as the battery discharges.
The fuel-gauge and amber low battery LED indicators will NOT be accurate until at least two full charging/ discharging cycles have been completed.
Volume Level Indication
Battery Status Indication

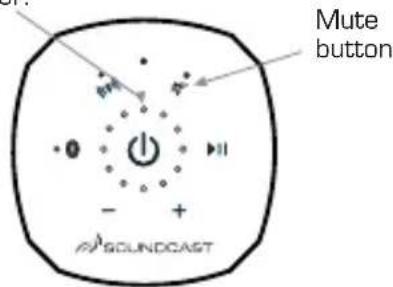
Keyboard Lock
The VG3 has two different keypad lockout mechanisms to prevent un-intended or accidental operation. Both are disabled by default. When enabled, all keypad functions except for power on/off will be ignored.
Child Lock:
To Enable or Disable, press and hold the mute button for (5) seconds and release. The top most BLUE LED will flash indicating the keypad is locked and child lock is active. Power cycling the unit will disable the keypad child lock.
Auto Lock:
To Enable or Disable Auto-Lock, press and hold the mute button for [10] seconds and release. The volume
Keypad Lock Indicator:
Flashing Blue: Child Lock Active
Flashing Green: Auto Lock Active
bar graph will blink twice when enabled and once when disabled. When enabled, the keypad will "Auto-Lock" after (3) minutes of no keypad interaction. The top GREEN LED will blink indicating the keypad is locked The Auto-Lock will remain enabled or disabled when power cycling the unit.
Temporarily unlock the keypad for use while Auto-Lock is active by conducting an "Unlock Swipe". This can be done by sliding your finger quickly between the power button and any other function button, being sure to release your finger while it is still over the "other function" button. The volume bar graph will blink indicating that the keypad is unlocked. Keypad will auto-lock again after [3] minutes of no interaction.
Temporary Unlock Swipe Action
Slide finger from power button to any function button, and release.

Auto Shutdown - VG3 will automatically power down after 15 minutes of no audio to preserve battery.
Troubleshooting
| Problem | Solution |
| VG3 does not turn on | Be sure unit is fully chargedBe sure keypad is clear of any dirt, dust or moistureDisconnect / Re-connect battery |
| Difficulty with Bluetooth or TWS pairing process | Power cycle VG3 unit(s) and retryClear both Bluetooth and TWS pairing history by holding the Bluetooth button for 10 seconds (third beep), repeat by pressing the TWS buttons for a full 10 seconds (third beep) and try your pairing again.Disable/Enable Bluetooth function on your music source device (phone or computer) and retry |
| Keypad has un-intended operation due to moisture | Wipe down keypad to remove any excess moisture or dirtUtilize Child Lock or Auto Lock features described above |
| Keypad backlights are changing brightness or turn off | The VG3 utilizes an ambient light sensor to adjust the LED backlights and status LED indicators based on the ambient light. This is normal operation |
| Keypad is not responding to button presses | Power cycle the unit and be certain that Child Lock and Auto-Lock functions are Disabled |
| Unit is misbehaving or not responsive | Perform factory reset by Disconnecting & Reconnecting batteryClear both Bluetooth and TWS memory (refer to instructions above)Power cycle unit |
natural_image
3D mechanical assembly diagram showing internal components and light path (no text or symbols)Carga de la Batería
[1]
Câble de charge-
ment micro-USB
natural_image
3D mechanical assembly diagram showing internal components and light path (no text or symbols)natural_image
3D mechanical assembly diagram showing internal components and light rays (no text or symbols)natural_image
3D mechanical assembly diagram showing internal components and light path (no text or symbols)Aufladen des Akkus
Orange Power-/Ladeanzeige-LED
Status Power LED
Lade- & Zugangsanschlüsse
natural_image
Technical diagram of a mechanical component with no visible text or symbols3,5 mm Hilfseingang
Kapazitives Touch-Bedienungs- Tastenfeld
Qualcomm TrueWireless™ Stereo (TWS)-Kopplung
natural_image
3D mechanical assembly diagram showing internal components and light path (no text or symbols)Accu
Indicatie accustatus
![Geel [accu OK] Groen [accu opgeladen] Rood [accu laag] Oranje stroom-LED](/content/2026/03/440040/images/a14c14b1f666287715e89216cc3b62625ec2e1097b6c46be463df6356caaf5c0.jpg)
Toetsenbordvergrendeling
natural_image
3D mechanical assembly diagram showing internal components and light path (no text or symbols)充电电池
natural_image
Hand cursor icon pointing at a button with arrows indicating movement (no text or symbols)The VGX uses a 12 volt Lithium-Ion rechargeable battery for DC operation. Please review the following safety instructions before use. Failure to read and follow the instructions below may result in fire, personal injury, and damage to property if charged or used improperly. Please note that the battery must be fully charged prior to its initial use.
Please observe the following precautions when using or handling the battery:
- Do not dispose in fire or expose to high temperature.
- Do not under any circumstances insert the battery with the positive and negative poles reversed.
- Do not directly connect the battery to power outlets or 12 volt automotive ports.
- Do not connect the positive terminal with the negative terminal with metals such as wire, etc. Also, do not store or carry the battery with metal necklaces, etc.
- Do not disassemble or modify the battery. The battery contains safety and protective devices which, if damaged, may cause the battery to generate heat, explode or ignite.
- Do not directly solder the battery.
- The battery contains a chemical liquid. If this liquid comes in contact with the eyes, this may lead to loss of sight. Without rubbing the eyes, immediately ush them with clean water for at least 15 minutes and then consult a doctor.
- Do not use the battery if it shows signs of any leakage, a change of color or shape, or any other changes in appearance, an unusual smell, or feels hot.
- Do not wet the battery or place it in water or sea water. This may lead to the battery generating heat or rusting.
- Do not remove or damage the coating tube. This makes it easy for
the battery to short-circuit and may cause leakage or heat generation.
- At all times, store the battery out of reach of small children.
- If the battery is rusted, generating heat, or shows any other abnormal signs at the time of purchase, take it to the point of purchase without using it.
- When not using the battery, or not using the unit for a prolonged period, remove the battery from the unit and store it in a dry place between the temperatures of -20 degrees C (-4 degrees F) and +35 degrees C (95 degrees F). This prevents leakage, rust, and decreased battery performance and service life.
- Do not place the battery in direct sunlight, in hot cars, in front of stoves or other hot places. This may lead to leakage or explosion, and may deteriorate the performance and life expectancy.
- Only the battery provided with the device, or a compatible replacement battery purchased from Soundcast, LLC should be used in this device. Do not use this battery in any other device.
- When charging the battery, use only the built-in charger provided in this device. Do not attempt to charge the battery by any other means, or using any other device. Failure to do so may cause the battery to become hot, rupture, or ignite and cause serious injury.
- The temperature range over which the battery can be charged is 0^(+32^) to +45^(+113^) . The built-in charger in this device will not charge the battery outside of this range. Charging the battery at temperatures outside of this range may cause the battery to become hot or to break, and may also harm the performance of the battery or reduce its life expectancy.
- The temperature range over which the battery can be used is -20^ (-4^) to +50^ (+122^) . Use of the battery outside of this temperature range may damage the performance of the battery or may reduce its life expectancy.
FOR CUSTOMERS IN THE U.S.A. AND CANADA
RECYCLING LITHIUM-ION BATTERIES: Lithium-Ion batteries are recyclable. You can help preserve our environment by returning your used rechargeable batteries to the collection and recycling location nearest you. For more information regarding recycling of rechargeable batteries, call
toll free: 1-800-822-8837, or visit www.call2recycle.org
Caution: Do not handle damaged or leaking Lithium-Ion batteries.
ESPAÑOL
LI-ION ACCU VEILIGHEIDSINSTRUCTIES
DISPOSAL OF OLD ELECTRICAL & ELECTRONIC EQUIPMENT (Applicable in the European Union and other European countries with separate collection systems) This symbol on the product or on its packaging indicates that this product shall not be treated as household waste. Instead it shall be handed over to the applicable collection
point for the recycling of electrical and electronic equipment. By ensuring this product is disposed of correctly, you will help prevent potential negative consequences for the environment and human health, which could otherwise be caused by inappropriate waste handling of this product. The recycling of materials will help to conserve natural resources. For more detailed information about recycling of this product, please contact your local Civic Office, your household waste disposal service or the shop where you purchased the product.

This symbol on the battery or on the packaging indicates that the battery provided with this product shall not be treated as household waste. By ensuring these batteries are disposed of correctly, you will help prevent potentially negative consequences for the environment and human health which could otherwise be caused by inappropriate waste handling of the battery. The recycling of the materials will help to conserve natural resources. In case of products that for safety, performance or data integrity reasons require a permanent connection with an incorporated battery, this battery should be replaced by qualified service staff only. To ensure that the battery will be treated properly, hand over the product at end-of-life to the applicable collection point for the recycling of electrical and electronic equipment. For all other batteries, please view the section on how to remove the battery from the product safely. Hand the battery over to the applicable collection point for the recycling of waste batteries. For more detailed information about recycling of this product or battery, please contact your local Civic Office, your household waste disposal service or the shop where you purchased the product.
SAFETY INFORMATION
CAUTION: PLEASE READ THE INSTRUCTIONS GIVEN IN THIS MANUAL AND THOSE MARKED ON THE UNIT. KEEP THESE INSTRUCTIONS FOR FUTURE REFERENCE. PLEASE HEED ALL WARNINGS AND FOLLOW ALL INSTRUCTIONS.
This unit has been designed and manufactured to assure personal safety. Improper use can result in electric shock or fire hazard. The
safeguards incorporated in this unit will protect you if you observe the following procedures for installation, use, and servicing. This unit does not contain any parts that can be repaired by the user.
AC/DC ADAPTER POWER SUPPLY
Use only the AC adapter that was supplied by Soundcast Systems. Do not use a substitute AC adapter. Using an incorrect AC adapter may cause damage to the unit and will void its warranty.
IMPORTANT SAFETY INSTRUCTIONS
- Read the instructions.
- Heed all warnings.
- Follow all instructions.
- Do not use this unit in water. The unit is weather resistant, not water proof. It is recommended to have the unit outdoors only while in use. It should be stored indoors when not in use.
- When using the unit outdoors it is recommended to operate on battery power only. The AC adapter is designed for indoor applications only.
-
Clean only with a dry cloth.
-
Do not block any ventilation openings. Install in accordance with the manufacturers instructions.
- Do not install near any heat sources such as radiators, heat registers, stoves, or other devices (including amplifiers) that produce heat.
- Do not defeat the safety purpose of the polarized plug. A polarized plug has two blades with one wider than the other. The wide blade is provided for your safety. If the provided plug does not fit your outlet, consult an electrician for replacement of the obsolete outlet. - This applies to 110 volt markets only.
- Protect the power cord from being walked on or pinched particularly at the plugs, convenience receptacles, and the point where it exits the unit.
- Only use attachments/accessories specified by the manufacturer
- Refer all servicing to qualified service personal. Servicing is required when the unit has been damaged in any way, such as the power supply cord or plug is damaged, liquid has been spilled or objects have fallen into the unit, the power supply has been exposed to rain or moisture, does not operate, or has been dropped.
SAFETY PRECAUTIONS
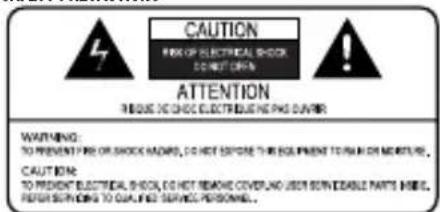
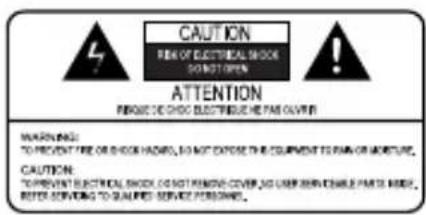
The lightning flash with arrowhead symbol, within an equilateral triangle, alerts the user to the presence of un-insulated "dangerous voltage" within the product's enclosure that may be of
sufficient magnitude to constitute a risk of electric shock.

The exclamation point within an equilateral triangle alerts the user to the presence of important operating and maintenance (servicing) instructions in the literature accompanying the appliance.
WARNING: TO REDUCE THE RISK OF FIRE OR ELECTRIC SHOCK, DO NOT EXPOSE THIS APPLIANCE TO RAIN OR MOISTURE. VOLTAGES ARE PRESENT INSIDE THE ENCLOSURE. DO NOT OPEN THE ENCLOSURE. REFER SERVICING TO QUALIFIED PERSONNEL ONLY.
CAUTION: TO PREVENT ELECTRIC SHOCK, MATCH THE WIDE BLADE OF THE PLUG TO THE WIDE SLOT, AND FULLY INSERT. - 110 volt markets only.
ESPAÑOL

VEILIGHEIDSWAARSCHUWINGEN

WARRANTY
ENGLISH
Double your warranty! Register your product at www.goSoundcast.com/
Soundcast, LLC warrants to the end user (“Customer”) that the hardware product will be free from defects in workmanship and materials, under normal use and service, for the following length of time from the date of purchase from Soundcast or an authorized retailer: One (1) Year.
Soundcast's sole obligation under this express warranty shall be, at its option and expense, to repair the defective product or part, deliver to Customer an equivalent product or part to replace the defective item. All products that are replaced will become the property of Soundcast. Replacement products may be new or refurbished. Soundcast warrants any replaced or repaired product or part for a period of ninety (90) days from shipment, or the remainder of the initial warranty period, whichever is longer. In no case shall Soundcast be responsible for damage to any connected audio equipment, resulting from misuse, abuse, neglect, improper installation or testing, unspecified application, modification or alteration of or tampering with Soundcast products.
For warranty service please contact:
Soundcast
San Diego, California
US only 1-800-722-1293 or 1-619-591-0126
customersupport@gosoundcast.com
*to a maximum warranty period of 2-years
GARANTÍA ESPAÑOL
ÁDuplique su garant'a!\* Registre su producto en www.goSoundcast.com/
San Diego, California
customersupport@gosoundcast.com
San Diego, California
customersupport@gosoundcast.com
San Diego, California
customersupport@gosoundcast.com
San Diego, California
Apenas nos EUA 1-800-722-1293 or 1-619-591-0126
customersupport@gosoundcast.com
San Diego, California
US only 1-800-722-1293 o 1-619-591-0126
customersupport@gosoundcast.com
customersupport@gosoundcast.com
*保修期最长可达2年。
SOUNDCAST