
IWSC 51051 CECO EU.M - Washing machine INDESIT - Free user manual and instructions
Find the device manual for free IWSC 51051 CECO EU.M INDESIT in PDF.
| Product type | Washing machine |
| Brand | Indesit |
| Model | IWSC 51051 CECO EU.M |
| Dimensions (W x H x D) | 59.5 cm x 85 cm x 42.4 cm |
| Washing capacity | 5 kg |
| Energy efficiency class | A+ |
| Maximum spin speed | 1000 rpm |
| Minimum water pressure | 0.05 MPa (0.5 bar) |
| Maximum water pressure | 1 MPa (10 bar) |
| Annual water consumption | 7546 L |
| Noise level (washing) | 60 dB(A) |
| Noise level (spinning) | 80 dB(A) |
| Number of programs | 14 + partial programs |
| Special functions | Eco Time, Energy Saver, Extra Rinse, Delayed Start |
| Load balancing system | Yes |
| Loading type | Front |
| Power supply | 220-240 V ~ 50 Hz |
| Maximum drain hose length | 150 cm (with extension) |
| Recommended maintenance | Cleaning the detergent drawer, the pump, the door seal |
Frequently Asked Questions - IWSC 51051 CECO EU.M INDESIT
User questions about IWSC 51051 CECO EU.M INDESIT
0 question about this device. Answer the ones you know or ask your own.
Ask a new question about this device
Download the instructions for your Washing machine in PDF format for free! Find your manual IWSC 51051 CECO EU.M - INDESIT and take your electronic device back in hand. On this page are published all the documents necessary for the use of your device. IWSC 51051 CECO EU.M by INDESIT.
USER MANUAL IWSC 51051 CECO EU.M INDESIT
Unpacking and levelling
Connecting the electricity and water supplies
The first wash cycle
Technical data
Care and maintenance, 4
Cutting off the water or electricity supply
Cleaning the washing machine
Cleaning the detergent dispenser drawer
Caring for the door and drum of your appliance
Cleaning the pump
Checking the water inlet hose
Precautions and tips, 5
General safety
Disposal
Description of the washing machine and starting a wash cycle, 6-7
Control panel
Indicator lights
Starting a wash cycle
Wash cycles, 8
Table of wash cycles
Personalisation, 9
Setting the temperature
Setting the spin speed
Functions
Detergents and laundry, 10
Detergent dispenser drawer
Preparing the laundry
Garments requiring special care
Load balancing system
Troubleshooting, 11
Service, 12
INDESIT
! This instruction manual should be kept in a safe place for future reference. If the washing machine is sold, transferred or moved, make sure that the instruction manual remains with the machine so that the new owner is able to familiarise himself/herself with its operation and features.
! Read these instructions carefully: they contain vital information relating to the safe installation and operation of the appliance.
Unpacking and levelling
Unpacking
- Remove the washing machine from its packaging.
- Make sure that the washing machine has not been damaged during the transportation process. If it has been damaged, contact the retailer and do not proceed any further with the installation process.
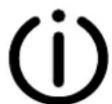
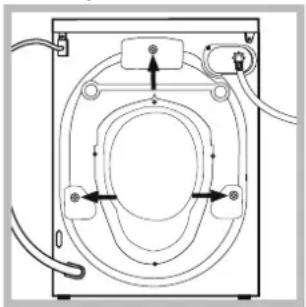
-
Remove the 3 protective screws and the rubber bush with the respective spacer, situated on the rear of the appliance (see also the installation leaflet).
-
Close off the holes using the plastic plugs provided.
- Keep all the parts in a safe place: you will need them again if the washing machine needs to be moved to another location.
! Packaging materials should not be used as toys for children.
Levelling
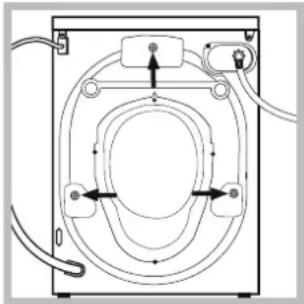
- Install the washing machine on a flat sturdy floor, without resting it up against walls, furniture cabinets or anything else.
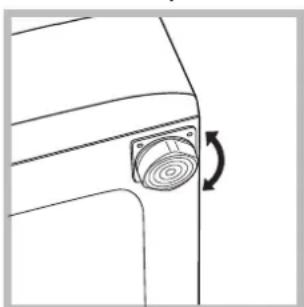
- If the floor is not perfectly level, compensate for any unevenness by tightening or loosening the adjustable front feet (see figure); the angle of inclination, measured in relation to the worktop, must not exceed 2^ .
Levelling the machine correctly will provide it with stability, help to avoid vibrations and excessive noise and prevent it from shifting while it is operating. If it is placed on carpet or a rug, adjust the feet in such a way as to allow a sufficient ventilation space underneath the washing machine.
Connecting the electricity and water supplies
Connecting the water inlet hose
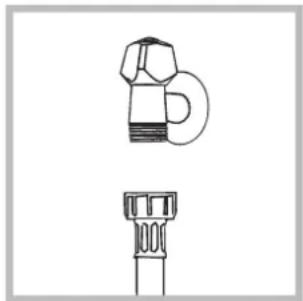
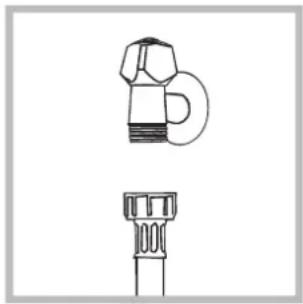
- Connect the supply pipe by screwing it to a cold water tab using a 3 / 4 gas threaded connection (see figure).
Before performing the connection, allow the water to run freely until it is perfectly clear.
-
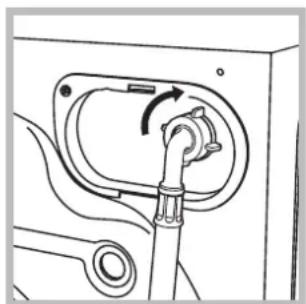
Connect the inlet hose to the washing machine by screwing it onto the corresponding water inlet of the appliance, which is situated on the top right-hand side of the rear part of the appliance (see figure).
-
Make sure that the hose is not folded over or bent.
! The water pressure at the tap must fall within the values indicated in the Technical details table (see next page).
If the inlet hose is not long enough, contact a specialised shop or an authorised technician.
! Never use second-hand hoses.
! Use the ones supplied with the machine.
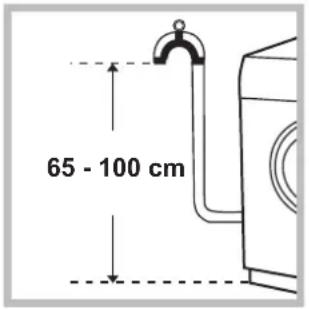
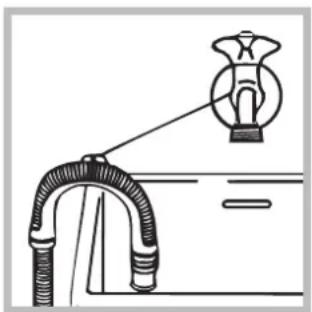
Connecting the drain hose
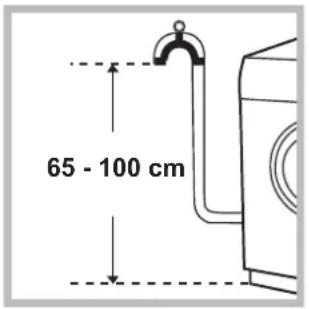
Connect the drain hose, without bending it, to a drainage duct or a wall drain located at a height between 65 and 100cm from the floor;
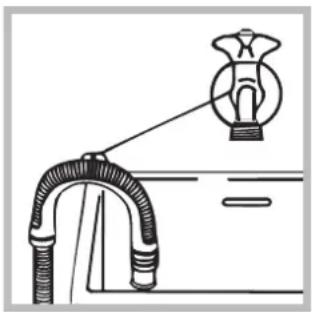
alternatively, rest it on the side of a washbasin or bathtub, fastening the duct supplied to the tap (see figure). The free end of the hose should not be underwater.
! We advise against the use of hose extensions; if it is absolutely necessary, the extension must have the same diameter as the original hose and must not exceed 150~cm in length.
Electrical connections
Before plugging the appliance into the electricity socket, make sure that:
- the socket is earthed and complies with all applicable laws;
- the socket is able to withstand the maximum power load of the appliance as indicated in the Technical data table (see opposite);
- the power supply voltage falls within the values indicated in the Technical data table (see opposite);
- the socket is compatible with the plug of the washing machine. If this is not the case, replace the socket or the plug.
! The washing machine must not be installed outdoors, even in covered areas. It is extremely dangerous to leave the appliance exposed to rain, storms and other weather conditions.
! When the washing machine has been installed, the electricity socket must be within easy reach.
! Do not use extension cords or multiple sockets
! The cable should not be bent or compressed.
! The power supply cable must only be replaced by authorised technicians.
Warning! The company shall not be held responsible in the event that these regulations are not respected.
The first wash cycle
Once the appliance has been installed, and before you use it for the first time, run a wash cycle with detergent and no laundry, using the wash cycle 5.
| Technical data | |
| Model | IWSC 51051 |
| Dimensions | width 59,5 cm height 85 cm depth 42,4 cm |
| Capacity | from 1 to 5 kg |
| Electrical connections | please refer to the technical data plate fixed to the machine |
| Water connection | maximum pressure 1 MPa (10 bar) minimum pressure 0.05 MPa (0.5 bar) drum capacity 40 litres |
| Spin speed | up to 1000 rotations per minute |
| Test wash cycles in accordance with Regulations 1061/2010 and 1015/2010 | Programme 5: Eco Cotton 60°. Programme 5: Eco Cotton 40°. |
| CE | This appliance conforms to the following EC Directives: - 2004/108/CE (Electromagnetic Compatibility) - 2012/19/EU (WEEE) - 2006/95/EC Low Voltage |
Care and maintenance
Cutting off the water and electricity supplies
- Turn off the water tap after every wash cycle. This will limit wear on the hydraulic system inside the washing machine and help to prevent leaks.
- Unplug the washing machine when cleaning it and during all maintenance work.
Cleaning the washing machine
The outer parts and rubber components of the appliance can be cleaned using a soft cloth soaked in lukewarm soapy water. Do not use solvents or abrasives.
Cleaning the detergent dispenser drawer
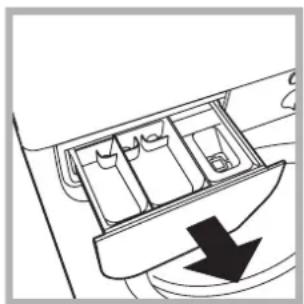
Remove the dispenser by raising it and pulling it out (see figure). Wash it under running water; this operation should be repeated frequently.
Caring for the door and drum of your appliance
- Always leave the porthole door ajar in order to prevent unpleasant odours from forming.
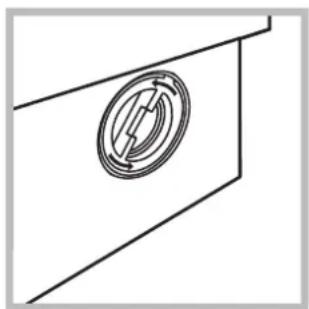
Cleaning the pump
The washing machine is fitted with a self-cleaning pump which does not require any maintenance. Sometimes, small items (such as coins or buttons) may fall into the pre-chamber which protects the pump, situated in its bottom part.
! Make sure the wash cycle has finished and unplug the appliance.
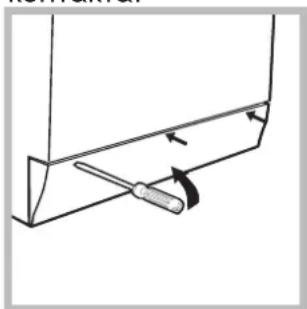
To access the pre-chamber:
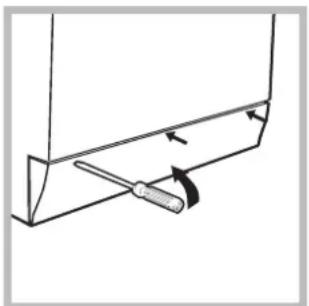
- using a screwdriver, remove the cover panel on the lower front part of the washing machine (see figure);

-
unscrew the lid by rotating it anticlockwise (see figure): a little water may trickle out. This is perfectly normal;
-
clean the inside thoroughly;
- screw the lid back on;
- reposition the panel, making sure the hooks are securely in place before you push it onto the appliance.
Checking the water inlet hose
Check the inlet hose at least once a year. If there are any cracks, it should be replaced immediately: during the wash cycles, water pressure is very strong and a cracked hose could easily split open.
! Never use second-hand hoses.
! This washing machine was designed and constructed in accordance with international safety regulations. The following information is provided for safety reasons and must therefore be read carefully.
General safety
- This appliance was designed for domestic use only.
- This appliance can be used by children aged from 8 years and above and persons with reduced physical, sensory or mental capabilities or lack of experience and knowledge if they have been given supervision or instruction concerning use of the appliance in a safe way and understand the hazards involved. Children shall not play with the appliance. Cleaning and user maintenance shall not be made by children without supervision.
- Do not touch the machine when barefoot or with wet or damp hands or feet.
- Do not pull on the power supply cable when unplugging the appliance from the electricity socket. Hold the plug and pull.
- Do not open the detergent dispenser drawer while the machine is in operation.
- Do not touch the drained water as it may reach extremely high temperatures.
- Never force the porthole door. This could damage the safety lock mechanism designed to prevent accidental opening.
- If the appliance breaks down, do not under any circumstances access the internal mechanisms in an attempt to repair it yourself.
- Always keep children well away from the appliance while it is operating.
- The door can become quite hot during the wash cycle.
- If the appliance has to be moved, work in a group of two or three people and handle it with the utmost care. Never try to do this alone, because the appliance is very heavy.
Before loading laundry into the washing machine, make sure the drum is empty.
Disposal
- Disposing of the packaging materials: observe local regulations so that the packaging may be re-used.
- The European Directive 2012/19/EU WEEE on Waste Electrical and Electronic Equipment, requires that old household electrical appliances must not be disposed of in the normal unsorted municipal waste stream. Old appliances must be collected separately in order to optimise the recovery and recycling of the materials they contain and reduce the impact on human health and the environment. The crossed out "wheeled bin" symbol on the product reminds you of your obligation, that when you dispose of the appliance it must be separately collected.
Consumers should contact their local authority or retailer for information concerning the correct disposal of their old appliance.
Description of the washing machine and starting a wash cycle
GB
Control panel
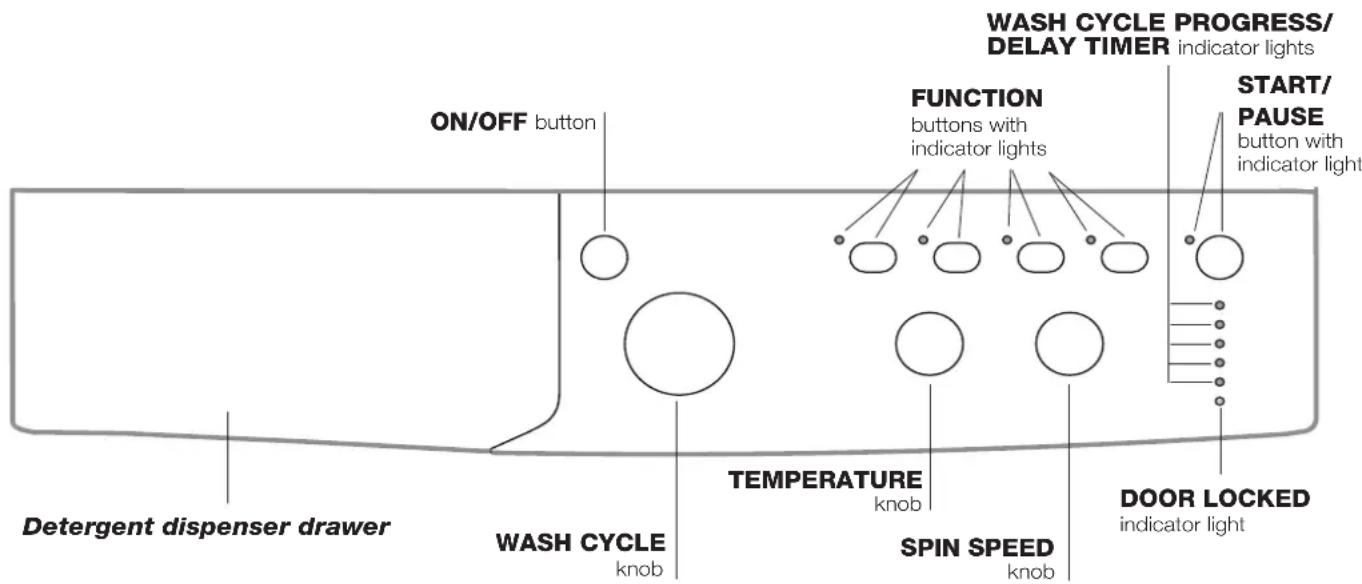
Detergent dispenser drawer: used to dispense detergents and washing additives (see "Detergents and laundry").
ON/OFF button: switches the washing machine on and off.
WASH CYCLE knob: programmes the wash cycles. During the wash cycle, the knob does not move.
FUNCTION buttons with indicator light: used to select the available functions. The indicator light corresponding to the selected function will remain lit.
TEMPERATURE knob: sets the temperature or the cold wash cycle (see "Personalisation").
SPIN SPEED knob: sets the spin speed or exclude the spin cycle completely (see "Personalisation").
WASH CYCLE PROGRESS/DELAY TIMERindicator lights: used to monitor the progress of the wash cycle.
The illuminated indicator light shows which phase is in progress.
If the Delay Timer function has been set, the time remaining until the wash cycle starts will be indicated (see next page).
DOOR LOCKED indicator light: indicates whether the door may be opened or not (see next page).
START/PAUSE button with indicator light: starts or temporarily interrupts the wash cycles.
N.B. To pause the wash cycle in progress, press this button; the corresponding indicator light will flash orange, while the indicator light for the current wash cycle phase will remain lit in a fixed manner. If the DOOR LOCKED indicator light is switched off, the door may be opened (wait approximately 3 minutes).
To start the wash cycle from the point at which it was interrupted, press this button again.
Standby mode
This washing machine, in compliance with new energy saving regulations, is fitted with an automatic standby system which is enabled after about 30 minutes if no activity is detected.
Press the ON-OFF button briefly and wait for the machine to start up again.
Indicator lights
The indicator lights provide important information.
This is what they can tell you:
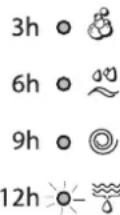
Delayed start
If the DELAY TIMER function has been activated (see "Personalisation"), after the wash cycle has been started the indicator light corresponding to the selected delay period will begin to flash:
3h 0
6h 0
9h o
12h-0-
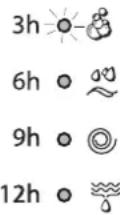
As time passes, the remaining delay will be displayed and the corresponding indicator light will flash:
3h 6-8
6h 0
9h 0
12h 0
The set programme will start once the selected time delay has expired.
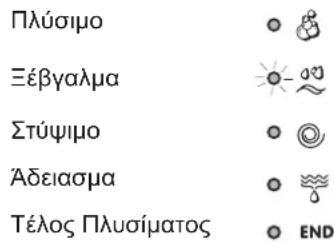
Wash cycle phase indicator lights
Once the desired wash cycle has been selected and has begun, the indicator lights switch on one by one to indicate which phase of the cycle is currently in progress.
Wash

Rinse

Spin

Drain

End of wash cycle
O END
Function buttons and corresponding indicator lights
When a function is selected, the corresponding indicator light will illuminate.
If the selected function is not compatible with the programmed wash cycle, the corresponding indicator light will flash and the function will not be activated.
If the selected function is not compatible with another function which has been selected previously, the indicator light corresponding to the first function selected will flash and only the second function will be activated; the indicator light corresponding to the enabled option will remain lit.
Door locked indicator light
When the indicator light is on, the porthole door is locked to prevent it from being opened; make sure the indicator light is off before opening the door (wait approximately 3 minutes). To open the door during a running wash cycle, press the START/PAUSE button; the door may be opened once the DOOR LOCKED indicator light turns off.
Starting a wash cycle
- Switch the washing machine on by pressing the ON/OFF button. All indicator lights will switch on for a few seconds, then they will switch off and the START/PAUSE indicator light will pulse.
- Load the laundry and close the door.
- Set the WASH CYCLE knob to the desired programme.
- Set the washing temperature (see "Personalisation").
- Set the spin speed (see "Personalisation").
- Measure out the detergent and washing additives (see "Detergents and laundry").
- Select the desired functions.
- Start the wash cycle by pressing the START/PAUSE button and the corresponding indicator light will remain lit in a fixed manner, in green.
To cancel the set wash cycle, pause the machine by pressing the START/PAUSE button and select a new cycle. - At the end of the wash cycle the END indicator light will switch on. The door can be opened once the DOOR LOCKED indicator light turns off (wait approximately 3 minutes). Take out your laundry and leave the appliance door ajar to make sure the drum dries completely. Switch the washing machine off by pressing the ON/OFF button.
GB
Table of wash cycles
| Wash cycles | Description of the wash cycle | Max.temp.(°C) | Max.speed(rpm) | Detergents | Max/load (kg) | Residual dampness % | Energy consumption kWh | Total water fit | Cycle duration | ||
| Pre-wash | Wash | Fabric softener | |||||||||
| Daily | |||||||||||
| 1 | Cotton with prewash: extremely soiled whites. | 90° 1000 | ● | ● | 5 | --- | 150' | ||||
| 2 | Mix Colored: lightly soiled whites and delicate colours. | 40° 1000 - | ● | ● | 5 | --- | 85' | ||||
| 3 | Synthetics: heavily soiled resistant colours. | 60° 1000 - | ● | ● | 3 | 44.0 | 70 46 145' | ||||
| 4 | Synthetics (3): lightly soiled resistant colours. | 40° 1000 - | ● | ● | 3 | --- | 130' | ||||
| 5 | Eco Cotton 60° (1): heavily soiled whites and resistant colours. | 60° 1000 - | ● | ● | 5 | 62.0 | 89 47 5 220' | ||||
| 5 | Eco Cotton 40° (2): lightly soiled whites and delicate colours. | 40° 1000 - | ● | ● | 5 | 62.0 | 95 66 2 15' | ||||
| 20° Zone | |||||||||||
| 6 | Cotton Standard 20°: lightly soiled whites and delicate colours. | 20° 1000 - | ● | ● | 5 | --- | 170' | ||||
| 7 | Mix Light | 20° 1000 - | ● | ● | 5 | --- | 120' | ||||
| 8 | 20' Refresh | 20° | 800 - | ● | ● | 1,5 | --- | 20' | |||
| Special | |||||||||||
| 9 | Silk/Curtains: for garments in silk and viscose, lingerie. | 30° | 0 | - | ● | ● | 1 | --- | 55' | ||
| 10 | Wool: for wool, cashmere, etc. | 40° 800 - | ● | ● | 1 | --- | 65' | ||||
| 11 | Jeans | 40° | 800 - | ● | ● | 2,5 | --- | 70' | |||
| Sport | |||||||||||
| 12 | Sport Intensive | 30° | 600 - | ● | ● | 2,5 | --- | 85' | |||
| 13 | Sport Light | 30° | 600 - | ● | ● | 2,5 | --- | 60' | |||
| 14 | Sport Shoes | 30° | 600 - | ● | ● | Max. 2 Pairs | --- | 55' | |||
| Partial wash cycles | |||||||||||
| Rinse | - | 1000 - | - | ● | 5 | --- | 36' | ||||
| Spin + Drain | - | 1000 | - | - | - | 5 | --- | 10' | |||
| Drain only * | - | ∅ | - | - | - | 5 | --- | 3' | |||
^ If you select programme and exclude the spin cycle, the machine will drain only.
The length of cycle shown on the display or in this booklet is an estimation only and is calculated assuming standard working conditions. The actual duration can vary according to factors such as water temperature and pressure, the amount of detergent used, the amount and type of load inserted, load balancing and any wash options selected.
1) Test wash cycle in compliance with regulations 1061/2010: set wash cycle 5 with a temperature of 60^ .
This cycle is designed for cotton loads with a normal soil level and is the most efficient in terms of both electricity and water consumption; it should be used for garments which can be washed at 60^ . The actual washing temperature may differ from the indicated value.
2) Test wash cycle in compliance with regulations 1061/2010: set wash cycle 5 with a temperature of 40^ .
This cycle is designed for cotton loads with a normal soil level and is the most efficient in terms of both electricity and water consumption; it should be used for garments which can be washed at 40^ . The actual washing temperature may differ from the indicated value.
For all Test Institutes:
2) Long wash cycle for cottons: set wash cycle 5 with a temperature of 40^ .
3) Synthetic program along: set wash cycle 4 with a temperature of 40^ .
Sport Intensive (wash cycle 12) is for washing heavily soiled sports clothing fabrics (tracksuits, shorts, etc.); for best results, we recommend not exceeding the maximum load indicated in the "Table of wash cycles".
Sport Light (wash cycle 13) is for washing lightly soiled sports clothing fabrics (tracksuits, shorts, etc.); for best results, we recommend not exceeding the maximum load indicated in the "Table of wash cycles". We recommend using a liquid detergent and dosage suitable for a half-load.
Sport Shoes (wash cycle14) is for washing sports shoes; for best results, do not wash more than 2 pairs simultaneously.
The 20^ wash cycles (20° Zone) offer effective washing performance at low temperatures, reducing electricity usage and expenditure while benefitting the environment. The 20° wash cycles meet all requirements:
Cotton Standard 20^ (programme 6) ideal for lightly soiled cotton loads. The effective performance levels achieved at cold temperatures, which are comparable to washing at 40^ , are guaranteed by a mechanical action which operates at varying speed, with repeated and frequent peaks.
Mix Light (programme 7) ideal for mixed loads (cotton and synthetics) with a normal soil level. The effective performance levels achieved at cold temperatures are guaranteed by a mechanical action which operates at varying speed, across set average intervals.
20' Refresh (programme 8) ideal for refreshing and washing lightly soiled garments in a few minutes. It lasts just 20 minutes and therefore saves both time and energy. It can be used to wash different types of fabrics together (except for wool and silk), with a maximum load of 1.5kg .
Setting the temperature
Tum the TEMPERATURE knob to set the wash temperature (see Table of wash cycles).
The temperature may be lowered, or even set to a cold wash
The washing machine will automatically prevent you from selecting a temperature which is higher than the maximum value set for each wash cycle.
Setting the spin speed
Turn the SPIN SPEED knob to set the spin speed for the selected wash cycle.
The maximum spin speeds available for each wash cycle are as follows:
Wash cycles Maximum spin speed
Cottons 1000 rpm
Synthetics 1000 rpm
Wool 800 rpm
Silk drain only
The spin speed may be lowered, or the spin cycle can be excluded altogether by selecting the symbol
The washing machine will automatically prevent you from selecting a spin speed which is higher than the maximum speed set for each wash cycle.
Functions
The various wash functions available with this washing machine will help to achieve the desired results, every time.
To activate the functions:
- Press the button corresponding to the desired function;
- the function is enabled when the corresponding indicator light is illuminated.
Note:
- If the selected function is not compatible with the programmed wash cycle, the corresponding indicator light will flash and the function will not be activated.
- If the selected function is not compatible with another function which has been selected previously, the indicator light corresponding to the first function selected will flash and only the second function will be activated; the indicator light corresponding to the enabled option will remain lit.
EcoTime
Selecting this option enables you to suitably adjust drum rotation, temperature and water to a reduced load of lightly soiled cotton and synthetic fabrics (refer to the "Table of wash cycles"). "Eccmatales you to wash in less time thereby saving water and electricity. We suggest using a liquid detergent suitably measured out to the load quantity.
Energy Saver
The Energy Save function saves energy by not heating the water used to wash your laundry - an advantage both to the environment and to your energy bill. Instead, intensified wash action and water optimisation ensure great wash results in the same average time of a standard cycle.
For the best washing results we recommend the usage of a liquid detergent.
Extra Rinse
By selecting this option, the efficiency of the rinse is increased and optimal detergent removal is guaranteed. It is particularly useful for sensitive skin.
Delay timer
This timer delays the start time of the wash cycle by up to 12 hours.
Press the button repeatedly until the indicator light corresponding to the desired delay time switches on. The fifth time the button is pressed, the function will be disabled.
N.B. Once the START/PAUSE button has been pressed, the delay time can only be modified by decreasing it until launching the set programme.
Detergents and laundry
Detergent dispenser drawer
Good washing results also depend on the correct dose of detergent: adding too much detergent will not necessarily result in a more efficient wash, and may in fact cause build up on the inside of your appliance and contribute to environmental pollution.
Do not use hand washing detergents because these create too much foam.
Use powder detergent for white cotton garments, for prewashing, and for washing at temperatures over 60^ .
! Follow the instructions given on the detergent packaging.
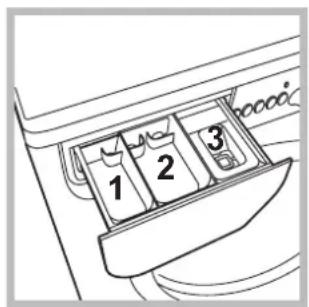
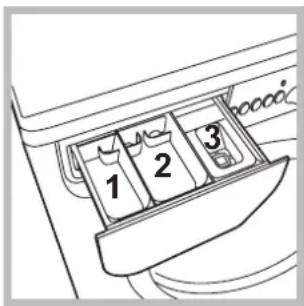
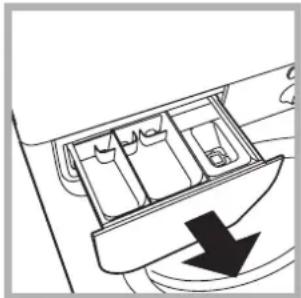
Open the detergent dispenser drawer and pour in the detergent or washing additive, as follows.
Compartment 1: Pre-wash detergent (powder) compartment 2: Detergent for the wash cycle (powder or liquid)
Liquid detergent should only be poured in immediately prior to the start of the wash cycle.
compartment 3:Additives (fabric softeners, etc.)
The fabric softener should not overflow the grid.
Preparing the laundry
- Divide the laundry according to:
- the type of fabric/the symbol on the label
- the colours: separate coloured garments from whites.
- Empty all garment pockets and check the buttons.
- Do not exceed the values listed in the "Table of wash cycles", which refer to the weight of the laundry when dry.
How much does your laundry weigh?
1 sheet 400-500 g
1 pillow case 150-200 g
1 tablecloth 400-500 g
1 bathrobe 900-1200 g
1 towel 150-250 g
Garments requiring special care
Silk: use special wash cycle 9 to wash all silk garments. We recommend the use of special detergent which has been designed to wash delicate clothes.
Curtains: fold curtains and place them in a pillow case or mesh bag. Use wash cycle 9.
Wool: all wool garments can be washed using programme 10, even those carrying the "hand-wash only" label. For best results, use special detergents and do not exceed 1 kg of laundry.
Jeans: Turn garments inside-out before washing and use a liquid detergent. Use programme 11.
Load balancing system
Before every spin cycle, to avoid excessive vibrations and to distribute the load in a uniform manner, the drum rotates continuously at a speed which is slightly greater than the washing rotation speed. If, after several attempts, the load is not balanced correctly, the machine spins at a reduced spin speed. If the load is excessively unbalanced, the washing machine performs the distribution process instead of spinning. To encourage improved load distribution and balance, we recommend small and large garments are mixed in the load.
Your washing machine could fail to work. Before contacting the Technical Assistance Centre (see "Assistance"), make sure that the problem cannot be solved easily using the following list.
Problem:
Possible causes / Solutions:
The washing machine does not switch on.
The wash cycle does not start.
- The appliance is not plugged into the socket fully, or is not making contact.
- There is no power in the house.
- The washing machine door is not closed properly.
- The ON/OFF button has not been pressed.
- The START/PAUSE button has not been pressed.
The water tap has not been opened. - A delayed start has been set (see "Personalisation").
The washing machine does not take in water (the indicator light for the first wash cycle stage flashes rapidly).
- The water inlet hose is not connected to the tap.
The hose is bent.
The water tap has not been opened. - There is no water supply in the house.
The pressure is too low. - The START/PAUSE button has not been pressed.
The washing machine continuously takes in and drains water.
The drain hose is not fitted at a height between 65 and 100cm from the floor (see "Installation").
- The free end of the hose is under water (see "Installation").
- The wall drainage system is not fitted with a breather pipe.
The washing machine does not drain or spin.
If the problem persists even after these checks, turn off the water tap, switch the appliance off and contact the Assistance Service. If the dwelling is on one of the upper floors of a building, there may be problems relating to water drainage, causing the washing machine to fill with water and drain continuously. Special anti-draining valves are available in shops and help to avoid this inconvenience.
The washing machine vibrates a lot during the spin cycle.
- The wash cycle does not include draining: some wash cycles require the drain phase to be started manually.
- The drain hose is bent (see "Installation").
- The drainage duct is clogged.
The washing machine leaks.
- The drum was not unlocked correctly during installation (see "Installation").
- The washing machine is not level (see "Installation").
- The washing machine is trapped between cabinets and walls (see "Installation").
The "Functions" indicator lights and the "start/pause" indicator light flash, while one of the "phase in progress" indicator lights and the "door locked" indicator light will remain lit in a fixed manner.
- The water inlet hose is not screwed on properly (see "Installation").
- The detergent dispenser drawer is blocked (for cleaning instructions, see "Care and maintenance").
-
The drain hose is not fixed properly (see "Installation").
-
Switch off the machine and unplug it, wait for approximately 1 minute and then switch it back on again.
If the problem persists, contact the Technical Assistance Service.
There is too much foam.
- The detergent is not suitable for machine washing (it should display the text "for washing machines" or "hand and machine wash", or the like).
- Too much detergent was used.
Before calling for Assistance:
- Check whether you can solve the problem alone (see "Troubleshooting");
- Restart the programme to check whether the problem has been solved;
- If this is not the case, contact an authorised Technical Assistance Centre using the telephone number provided on the guarantee certificate.
Always request the assistance of authorised technicians.
Have the following information to hand:
the type of problem;
the appliance model (Mod.);
the serial number (S/N).
This information can be found on the data plate applied to the rear of the washing machine, and can also be found on the front of the appliance by opening the door.
| COMMISSION DELEGATED REGULATION (EU) No 1061/2010 | |
| Brand | INDESIT |
| Model | IWSC 51051 CECO EU.M |
| Rated capacity in kg of cotton | 5 |
| Energy efficiency class on a scale from A+++ (low consumption) to G (high consumption) | A+ |
| Energy consumption per year in kWh1) | 166 |
| Energy consumption of the standard 60 °C cotton programme at full load in kWh2) | 0.898 |
| Energy consumption of the standard 60 °C cotton programme at partial load in kWh2) | 0.627 |
| Energy consumption of the standard 40 °C cotton programme at partial load in kWh2) | 0.53 |
| Power consumption of the off-mode in W | 0.5 |
| Power consumption of the left-on mode in W | 8 |
| Water consumption per year in litres3) | 7546 |
| Spin-drying efficacy class on a scale from G (minimum efficacy) to A (maximum efficacy) | C |
| Maximum spin speed attained4) | 1000 |
| Remaining moisture content5) | 62.0% |
| Programme time of the "standard 60 °C cotton" at full load in minutes | 220 |
| Programme time of the "standard 60 °C cotton" at partial load in minutes | 165 |
| Programme time of the "standard 40°C cotton" at partial load in minutes | 160 |
| Duration of the left-on mode in minutes | 30 |
| Noise in dB(A) re 1 pW washing6) | 60 |
| Noise in dB(A) re 1 pW spinning6) | 80 |
| Built-in model | |
1) The "standard 60^ cotton" at full and partial load and the "standard 40^ cotton" at partial load are the standard washing programmes to which the information in the label and the fiche relates. Standard 60^ cotton and standard 40^ cotton are suitable to clean normally soiled cotton laundry and are the most efficient programmes in terms of combined energy and water consumption. Partial load is half the rated load.
2) Based on 220 standard washing cycles for cotton programmes at 60^ and 40^ at full and partial load, and the consumption of the low-power modes. Actual energy consumption will depend on how the appliance is used.
3) Based on 220 standard washing cycles for cotton programmes at 60^ and 40^ at full and partial load. Actual water consumption will depend on how the appliance is used.
4) For the standard 60^ at full and partial load or the 40^ at partial whichever is lower.
5) Attained for 60^ cotton at full and partial load or the 40^ at partial whichever is higher.
6) Based on washing and spinning phases for the standard 60^ cotton programme at full load.

EAAVikα
περιεχόμενα
EykataoTaon,14-15
Antouakeuaia kaiopiovtow
YpaaikeKai nAekptikEe ouvdeoeis
PpWToC KukLo TlauaiauToS
Texivka oToixeia
GR
IWSC 51051
Suvtnpnon kai povtida, 16
AIOKLeiooC vepou kai nEeKtpiKoU pEuatoC
Kaθaipioμoτouπauvtnpiou
Kaθaioμος Tou ouptapiou aToppuavTKov
Kaouotepnuev n Ekkivnon
Av evpyoiohneioupyia Kaouotepnuev n Ekkivon' (BLeE "Egatoikoeic), aou EKKIVnOeTo TpOypa, o apxiei va avaoobnvei To Evokitko pfwaki to oxetiko eTnv EIIayevn Kauotepnon:
Me to tepaou Tou xpovou aattekoviciTai n UTOAIEIIOeVn KaOuTePNO, Me To OXETIKo EvEIKTKO qwTaki va avaooBnvei.
Apoou oloknpwOe i npoetileyevn xpvokaoutepnon 0a apxioe to eIIeYEv o poypa.
EvEIKTKa wfTaki qoans e EeAIGN
Kata tov eTtoumuTo kukLo TluuofmuTo, ta evEeiktikα φwakia θa avayouv Tpooδeutiká yia va δeigouv TnV katotaon TpoωθηoNs:
Kouptia aeitoupyiac kai oxetikakvdeiktikka wotakia EIIeoyvtac mia aeitoupyia to oxetikokvdeiktikok wotaki 0a i e i.
Av n ETIIeeyevn AEioupyia dev eivai oumbatn me to TEeV TPoypama to oxetikó Evdeiktikó φwtaKi θa avaboβhvei KAI n AEioupyia dev th evepyotoinhe. Av n ETIIeeyevn AEioupyia dev eivai oumbatn me μa aaln TIOEVEyn Tponyouevwoc, to axetikó φwtaKi TNS TPOTNC ETIIeeyevns AEioupyiac θa avaboβhvei KAI θevepyotointhe i mvo n deutepn, to Evdeiktikó φwtaKi TNS evepyotointheiaç AEioupyiac θa φwtiotei.
EvdeiktoKoWtakiOaQaIIOeVnsTnptas
To avamévo evdiKTIO φwTAKI δiXVE oTI n Tópta eivai μλokapiouevyia va atoPexuXθe i to avoiyua. Ia va avoiEte TnV TóPTA PPTEI To evdiKTIO φwTAKI va eivai OβnoTo (TepieveTe 3 λetTt Apeitou). Ia va avoiEte Tnv Tópta evw εivai OE EξEALη Evac KukLoC TIEOte TO kouπI START/PAUSE. Av to evdiKTIO φwTAKI NOPTA AΦAIAI MENH eivai OβnoTo mTOpTe va avoiEte Tnv Tópta.
Ekkivnoe voc TpoypaMaTOC
Kaouotepnuev Ekkivnon
KaouoTepei Tnv Ekkivnon Tou nXavnmuatoc expi 12 wpc.
Piote TnoaEs opecs To nnKtpo xepi va avayei To EvEiktikto oxetikoe Tnv eTtiouunnt Kaouotepnon. Tnv
Tepnn oopa Toun Oa TiieoTe To koumi n aeioupyia Oa aTevepyotoine.
SHMEIOsH:Aouu TnTnei To nAnKtpo START/PAUSE, mTopeite va aAaTe Tnv tiN kaTuotepnoC moV oEvovtac Tnv MEXPI Tnv EKKIVNOI TO TEeVTOC PoypapmuOc.
AπoppuTTavTiKa kai μΠouγδa
Onkn aToppuavTKwV
To kaIa oIOTeAeOa Tou IauoIaTOc EApTataI EtIONC kAI aIO Tn OwOtN BOOLOyia Tou aToppuavTKOU: UTEPbAAovtac dev NLeVouE aTOTEAeOaTIKOTepa KAI ouVTAEoUe OTn dNMIoupyia KPOoTaC OTA eWTEpiKa Mepn Tou Iauvtnpou Ka OTn MOLvON Tou TEPIBaaovTOc.
Mn xpnoiopoioie aToppuavtikya ia Tluoi oTo Xepi, ioti npayouv Tla appo.
! Na xpnaiouoie aToppuavtikαe kovn yia pouxa leuka baapekaiyia npntauon kai yia tluajata oepokpaoia eyaute np tw 60°C.
!AkoouhnoTe TIC UTOBDEIEEIG TIOU avaypapovtai OTN Ouakeuaia Tou aToppuTTAVIKOU.
Byalte tn thkn aToppuavtkw kai EIayete to aToppuavtko nTo TpOoTheo wEgnc.
Modalitatea de stand by
Aceasta masina de spalat rufe, conform noilor norme legate de economia de curent electric, este dotata cu un sistemas de oprire automat (stand-by) care intra in functiune dupa cateva minute de neutilizare. Apasati scurt tasta ON-OFF si asteptati repunerea in functiune a masinii.
CBeTJIHHH INHdNKaTOPN
BkIIOUbaHe Ha nporpaMa
Pporpamn, 56
Ta6nua c nporpa mnte
PepcoHaJIu3IpaHnA,57
3aabaHa TEmpeaTypata
3aabaheHa zentpoyraTa
ΦyHKUuN
PepnH npenapatn npex 3a npaHe, 58
YeKeMeJxKe 3a nepiHnHTe npenapatn
IoproTbHe Ha npaHTo
CneunuHno npaHe
Cnctema 3a n3MepBaHe Ha TObapa
PpO6JIeMn IMepKn 3a OTcTpaHЯBaHeto m, 59
CepBn3Ho 06cJyKBaHe, 60
INDESIT
! BaxHo e Da cBxpaHbAte nHCTpyKcHnTe, 3a Da MoXeTe Da npaBnTe DOnbHnHTeJHn CnpaBKn no BcKaO BpeMe. B cnUay Ke nepaHaTa MaunHa ce npoJaDe, npeOTcTbn nn PpeMeCTn, Tp6Ba Da ce nOrpnKnte INCTpyKcHnTe BuHaN da Ja npuDpyKabAT, 3a Da ce npedocTabn INHOpMaun Ha HOBn Co6CTBeHk 3a paBoTaTaN cbOTBeTHnTe npedyPexKeHn.
!PpOeTeTe BHNMaTeJHNO IHCTpyKcUInTe: 3aUOTO CbIbpxKaT BaxHa INΦOpMaζnA 3a MOHTaKa, N3N0NJ3BaHETO N6e3OnaCHOCTTa.
Pa3onakOBaHe n HnBeJInpaHe
Pa3onaKOBaHe
- Pa3onakobaiTe nepaJHaTa MaunHa.
- Повере Дади поралнда Мшина He e NOBpeDEHa npi TpaHcIopTnpaHeTo. Ako e NOBpeDEHa, Heя CBbp3BaITe, a ce obbpHeTe KbM npOdaBaYa.
3.CBaIeTe 3-Te BnHTa
3a npedna3BaHene
np TpaHcNopt
N rymuKaTa CbC
cbOTBETHata
BTyIka, NOCTaBEHn
OT 3aHaTAtCPaHa
(6ux Noka3aHomo Ha
fuaypama).
- 3aTbOpTe OTbOpHTe c npEIOCTaBeHITe NNactMaCOBn KaNaUKN.
- Cbxpahete BCnquKu qactn: 3a da ce MOHTnpaT OTHOBO npn Heo6xOJNMOCT nepaHata MaunHa Da 6bnde TpaHCnoptupaHa.
! OnakOBbUHnT MaTePnAHe e DeTcKa nrgpaUka.
HnBvIpaHe
- MoNTpaIte nepaHata MaunHa Ha paBeH n TBbpI IOd, 6e3 da a onnpate B cTeHN, Me6eNn dp.
2.Ako noBt He e nDeaHNO XOpn3oHTaJIeH, KOMneHcnpaIte HepaBHOCTnte, KaTO OTBnTe UIN 3aBnTe PpeHNITE Kpaeta (ux fuaypama); bIbNbT HaHaKIOHa, INMpeH Bbpx pa6OThata
NOBbpxHOCT, He Tp6Ba Da HaBnUba 2°.
ToHOTO HNBeJIIPAHe NO3BOJRA MaUNHaTa Da 6bDe cTaNHa N Da Ce N36rBaT Bn6paUNTe, WymbT IN PpeMeCTBaHETo I No BpeMe Ha paBota. Korato HactNkata e MOKET UIN KINIM, peryJInpaiTe Taka KpaueTata, Ye NOD nepaHATA MaUNHa da OCTaHe DOCTaBHyO MRCTO 3a BEHTNuAciu.
XnDpaBnUHn n eJKeTpnueCKn Bp3KN
Cbbp3BaHe Ha Mapkya KbM BOOnpOBoHHaTa MpeXa
- CbpxkTe
3axpaHbAunMapkyu, KaTO rO 3aBnTe KbM
KpaHa 3a cTydeHaTa
BOda C HApaiHnk C
ra3oBa pe36a 3/4 (BuX
fuaypama).
IpeNi Da ro
CBpxkTe, n3ToueTe
BOdata, DOKATO ce
n36nCTpn.

-
CbpxeTe
Mapkya 3a
CTydeHaTa B0da KbM
NepaHata MaunHa,
KaTO rO 3aBnTe
KbM CneuHaHHra
Uyep, pa3noJoxeH
OT 3aHaTc TpaHa,
rope B4xCHO (BuX
fusypama). -
Bhimaba Te Mapkya da He ce nperebba n npitncka.
!HaIraHHeTo NO BODOnpOBoHnHaTa MpeKa Tpy6Ba Da 6bJe B rpaHnCnTe, yKa3aHn B Ta6nCnAta,TexHnueckn DaHHN" (6x. cneDeaUama cmpaHuca).
!AkoDbJnxHaTaHa3axpaHbuaMapkyu He e DoCTaTbUHa,ce OobpHeTeKbM CneunaN3npaH MaRa3nH NJI KbMOTOpn3npaH TexHK.
!Hikora He n3noJ3BaITe Beue ynoTpe6BaH Mapky.
!I3noJI3BaIte Te3n,KoETo ca doCTaBeHc C nepaJIHaTa MaUNHa.
Cbbp3BaHe Ha Mapkyu 3a MpbchTa Boda
CbpxKeTe Mapkya
3a Mpbchata
B0da,6e3 da ro
npeTbBaTe,KbM
KaHaJIIN3aUIOHHaTa
Tp6a Nn
KbM Tp6aTa
3a OTBeXdAHe
B CTeHaTa,
pa3NoJoxEHN Ha
BInCOUnHa MeJy 65
n 100 cm ot noja, nIIN ro noInpete Ha pb6a Ha MNBkata IIN BaHaTa,
CbBp3BaIKn
DOCTaBeHnra
BOJaU KbM KpaHa (EK. fuaypama).
CBo6oHNrT Kpa
Ha Mapkya 3a
MpbcHaTa BOJa
He Tpr6Ba Da
6bJe NOTOEN BBB
BOdAta.
! He ce npenopbUba n3noJ3BaHeTo Ha yIbJxnteJIHn MapKyu. Ako e Heo6xOIMo, yIbJxnteJIr Tpr6Ba Da IMa CbIuIa DnAmEtbp KaTO opRHaJIHnI a Da He HaNDbNtBaa 150 cm.
Cbbp3BaHe KbmeJeKeTpnueckaTa Mpeka
Ipei Da CbpxKeTe eicena B KOHTaKTa, npOBepe TaJn:
KoHTaKTbTe 3a3EmeH CbTnACHO DeIcTBaUNTe CTaHApTN;
KOHTaKTbT MoKe Da NoeMe MaKcImMaJIHaTa MOUHOCt Ha HATOBapBaHe Ha MaUNHaTa, yKa3aHa B Ta6JIuCaTa C TexHueCKnTe daHHN (Bux cneDeaama cmpaHuca);
3axpaHbAaOTo HAnpeXeHne e B rpaHnUnte Ha yKa3aHOTo B Ta6JnUcaTc TexHnuecknTe daHHn (Bux cneobauama cmpaHuua);
- KOHTaKTbT OTROBapHa Ha ZIeNcEHa Ha nepaHnHaTa MaunHa. B npOTuBEN cnyaH 3aMeHeTe ZIeNcEHa NIN KOHTaT.
! NepaHata MaunHa He ce MOHTupa Ha OTKpnto, DOpn NOD HAcBec, 3aUOTO e MHORO ONaCHO Da Ce OCTaBN Ha BInraHHeTo Ha atmocphipeHnte ycNoBn.
! 3a MOHTnpaHaTa nepaHa MaunHa eNEKTPnuecknT KOHTaKT TpRbBa Da 6bDe NeCHO DoCTbNeH.
! He n3noJ3BaIte yIbJIxHtIe nn pa3KnOHHTeJI.
!Ka6eBbT He Tp8Ba Da 6bJe O8bHaT nnn cnIeCKaH.
!3axpaHbauT Ka6e Tp6Ba da ce
noDmeHa cMo OT OToPn3npaHn TexHnCn.
BHMaHHe! NmuMaTa OTXBpbJRA BcKaKBa
OTROBOPHOCT B CnyaHTe, B KOnTO Te3N
HOpMn He Ce Cna3BaT.
Pbpo npaHe
Cnei nHCTaIIpaHe n npeDn ynoTppeBa BKNIOUcTe eINH cIKbN Ha n3PiPapHe C nepuIeH npenapat, Ho 6e3 dpexn, 3aDaBaKn npoRpMa 5.
| TexhneyeCKn ДaHHN | |
| Mодeн IWSC 51051 | |
| Размери | ширINA 59,5сm ВисочINA 85сm ДьлбочINA 42,4сm |
| Вмecтимост ot 1 до 5 кг. | |
| Елькtripиеско Зхранвае | Виж tabелкова с харakтористikerite, поставения на машинау |
| Зхранвае с вoda | мakсимално наляганe 1 MPa (10 bar) мнимално наляганe 0,05 MPa (0,5 bar) обem на kasana 40 лintpa |
| Сkopост на центroфугata | do 1000 оборotinga/Minhyta |
| Пэррами За поверka сыласно Perулиpane № 1061/2010 и № 1015/2010 на Комисята | пэррама 5; Еco пamyк рprn 60°C. пэррама 5; Еco пamyк рprn 40°C. |
| CE | пэрална тmaшина сьответCTва на сладни: ЕврONEСКИ ДИPEKTINВ: -2004/108/CE (3a eilektropomarHTha сьвмостимост) -2006/95/CE (3a Н stock напожени) -2012/19/EU (WEEE) |
CnnpaHe Ha BOdaTa N 3KJIIOUvBaHe Ha eJekTpO3aXpaHBAHeTo
3aTbapnTe KpaHa 3a B0da CneI BcKo n3nnpaHe. NToToH NaunH ce OrpaHnUaBa n3HOcbAHeTO Ha XnDpaBnUHata IHCTaJaunHa NaepaJHATA MaUNHa N Ce OrpaHnUaBA OnaCHOCTTa OT TeOBe.
-ИЗКЛЮЧВай Te сeпс�еЯ OT eNEKТрчecкOTO 3axpaHBAHe, KOrATO NOUcTBaTe nepaHHaTа MaшинA И NO ВpeMe Ha pa6OTn NO NOДдрьжКаТ.
Почистване на有很大а Т Maшина
BbHsHaTa Yact N rYmehnte Yactn Moat Da Ce NouchTBAc C Kbpna C XnaJa Ka Boda n canyH. He n3NoJ3BaIte pa3TBOpHTeN nn a6pa3NBn npenapaTn.
IOnuNCTBaHe Ha YeKMeJxKeTo 3a nepuHnTe npenapatn
I3BaTe
YeKMeJxETo C
NoBnraHe N
N3TeTnAne HaBbN
(6ux fuaypama).
N3MnTe rnoi
Teaasa Boda. Toba
NouchTaHe Tp86Ba
da ce n3BbPwBa
YeCTo.
PndpbkkaHaJIOKaHa6apa6aHa
OCTaBnTe JIOKa BnHaRn OTKpExHaT 3a N36raBaHe 6pa3yBaHeto Ha He npiaTHMnpu3Mn.
NouchBaHe Ha nomnata
IepaHata Maunha e OKOMnKeKTOBaHa cbc camOnOuNCTBaUa ce NOMna, KOrTO HMa hyXda OT noDpBxka. Bb3MoXHo e o6aYe MaJKN ppeMEn (MOHEn, KONHeTa) da nonaHaT BvB fInTbpa, KOHTo ppeJa3Ba NOMnata n Ce HAMnpa B DonHaTa uacT. !YBepete ce, ye zukblT Ha npaHe e 3aBbPwn, n n3KJIIOyTe UeNCeNa ot KOHTaKTa.
3a doctbn do
ФиNTbpa:
- cBaIeTe nHaHeJa B npEHaTa YaCT Ha nepaHata MaUNHa C NOMOuTa Ha OTBepTKa (8X. quya);
-
OTBnTe KaNaKkTa, KaTo Ra 3aBbptnte B Nocoka, ObaTHa Ha YacOBHKnOBaTa CTpeNka (BuX quaypa): HopMaJIHo e Da n3Teue MaJko BOda;
-
NOUHCTeTe BHNMaTeJHO OTBbTpe;
- 3abnnte OTHOBO kanaqkaTata;
- 3aTbOpTe OTHOBo NaHeJa, KaTo, npei Da Iro N36yTate KbM nepaJIHraTa, ce yBepNTe, Ye CTe NOCTabNII INI npaBnIHo 3akpeINBaUHTe KyKn B CneuHaHIne BOdaUn.
IpoBepka Ha Mapkya 3a cTydeHaTa BOda
IpoBepaBte Mapkya 3a CtydeHaTa Boda IOnHe BeHbK rOiNsho. Da ce 3aMeHN, aKO e HanyKaH n HauepeH, 3aIoTO nO Bpeme Ha n3nnpaHe rOJAMOTo HJaRaHe MoKe da npEdn3Bnka BHe3aAnHO cnYkBaHe.
!Hnkora He n3noJ3BaITe Beue ynoTpe6BaH Mapkyu.
!IepaHaTaMaHnHae npoeKtnpaHa n npoN3BeDeHa B CbOTBeTCTBnE C MekdyHapOdHnTe HOpMn 3a 6e3oNaChocT.IpeDynpexkdeHnraT Tyk ca npoDnKTyBaHn IIO npuHHn 3a 6e3oNaChocT n Tp8Ba da ce yeTaT BHIMaTeJHo.
O6u npedeoxpaHnteHn Mepku
To3n ypeI e npedHa3HaueH n3KIOuHTeINHO 3a domaunha ynoTpe6a.
To3n ypeJ moKe da 6bJe n3noJ3BaH OT Deua Hnd 8 roDInH n IINa C OrpaHnueHn fN3nueckn, CETNBn IINy UMCTBeHN cNoC06HOCTn, INn C HeIOCTaTbyeH ONIT nI03HaHnA, AKO Te Ca Ha6JIIODaBaHn IIN NHCtpyKTIpaHn OTHOCHO N3NOJ3BaHeTO Ha ypeJa OT IINCe, OTROBOPHO 3a TExHaTa 6e3OnacHOCT n pa3bnpat OnacHOCTne, CBbp3AHn C yIOTpe6bata Ha ypeJa. Deqata He Tp86Ba Da cN irpaT C ypeJa. IODPbXkKaTa n NOuNCtBAHeTO He Tp86Ba Da ce n3BbPWBat OT Deca 6e3 HAD3Op.
- IepaJIHaTa MaunHa Tp6Ba Da ce n3noJ3Ba cAmO OT Bb3paCTHn Xopa CbrIaCHO HnCTpyKuInTe, npedocTaBeHn B Ta3n KnHexKa.
HeDOKOCBaIteMaunHaTa,KoratoCTe6OcnnC MOKpnnnBnaKnnpbue nnKpaka.
-ИЗкнювайоТОКонтakta,kaTo xBauaTe 3a UeNceJa a He KaTo DbPnaTe KaBeJa.
He OTBapaIte YeKMeJKeTo C nepuJIHnTe npenapaTn, Dokato nepaHaTa MaunHa pa6OtN.
HeDOKocBaIteMapkya3aMpchataBoa,3aIoTO MoKe DaIOCTnHReBUCOKTeMmpepatyn.
Hnkora He OTbapnTe Ioka Cbc Cnna, 3aUTo MoKe Da ce NOBpeMexAHn3Ma 3a 6e3OnaCHOCT, KOITo npedna3Ba OT cnyauHo OTbapnHe.
BcnyaHa nobpeaNo HkaKbB NOoD He DoCTnraTe DO BbTpueHNTE MexaHn3Mn B ONNTu 3a peMOHT.
BnHaru KOHTpOJIpaIe DeIaTa Da He Ce Do6NkaBaT do pa6oTeUaTa MaUNHa.
- No Bpeme Ha n3nnpaHeTo JIOKbT ce HarpBa.
-Пиреметванода сивьршва ВИHMATEЛНО OT
Дама Или Ттума Души. НкORA OTcamЧOBЕK,
ЗашOTOпоралнота машина TeKEN MHORO.
- Ppei Da 3apeiTe MaunHaTa, npOBepTe daHn 6apa6aHbT e npa3eH.
PeunknapaHe
- YHnIooKabAHe Ha onaKOBbUHM MaTePnaJI: cna3BaIte MeCTHnTE HOpMn - NO To3N Haun HOnaKOBbUHNrMaTePnaJI MoKe Da ce peuKnIpa.
- Ebponenckata dnpekTbva 2012/19/EU WEEE 3a OTnabuNTe OT eNeKtpuecko n eNeKtpoHNO obOpyDbaHe npedBnKda DomaknHcknte eNeKtpoypeDi Ha He ce n3xBpIaT 3aeHNO c ObuayauHnTe TBbpN rpaDCN OTnabuN. N3BaDeHnTe OT ynoTppe6a ypeDN Tp86Ba da 6bDat cbbpahnOTdEInHO c zel Da sbde yBeJIuHc
JeBt Ha noDnHexaUnTe Ha noBTOpHa ynoTpe6a n peuKlnpaHe MaTePnaI,OT KOITo Ca HAnpaBeHn,KakTo I Da 6bDaT N36eHATN eBEHTyAINH BPeDN 3a 3dpabeto N OKONHaTa CpeDA.CmBOJbT "3auepkhato KOWe" e NOCTaBeH Bbpxy BCNUKN pOdykTN,3a Da HAnOMHra 3a 3aBbJNKeTIHOTo pa3dEJIHO cb6UnPAhe. 3a DonbLNHTeHNa INΦOpMaUZr OTHOCHO npABUNHO T3BaXdaHE OT yNOtpe6bHa Na DOMAKHNCKNTe eNEKTPOpyPeDN, INTEpecyBaunTe ce MORaT da CE 06bpHAT KbM cnyx6bata 3a cb6UnPAhe Ha OTnAbuN INN KbM dNCTpn6byTopnte.
CBeTInHeH INdkaTop 6noknpaH JIOK
CBeTeUHT CBeToHnDnKAtOp nKa3Ba, ye IIOKbT e 6NOKnpaH, 3a Da CE Bb3PpeYrTCTBa OTBapReHTo My; 3a Da OTBopNTe IIOKA n3yakaTe CBeToHnDnKAtOp a Da yrache; (u3yakaTe OKoNo 3 MInHyTu).3a OTbApRe H a NIOKa no Bpeme Ha npaHe ce HataNcKa 6yToH START/PAUSE; MoKe da OTBopNTe NIOKa, aKO CBeToHnDnKAtOpbT BLOKnPAH NIOK e yrachAn.
BkIIOUbaHe Ha nporpama
Bb3MOxHn npuHH / Mepkn 3a OTCpaHraBaHeTo m:
IepaHaMaHHa He ce BKnIOvBa.
- Ue nceIbT He e BkIIOueH KbM eNEKtpuYeCKn KOHTaKT uIN He e Do6pe BkIOUeH, 3a da npabN KOHTaKT.
- HЯмATE TOK BKBbU.
UKbIbT Ha n3nnpaHe He 3anOyBa.
JIIOKbT He e 3aTBOpEn Do6pe.
- ByToHbT ON/OFF He e 6nHaTHcHaT.
- ByToHbT START/PAUSE He e 6n HATnCHaT.
- KpaHbT 3a BODa He e OTBopeH.
3aanaeHO e 3ababAHe, KOeTo ce e HacnoKnIO Bbpxy BpeMeTO 3a NyckaHe (ex. "TepcoHaunu3upaHua").
IepaHaTa MaunHa He ce nBnHc BOda (6bp30 Mra CBeTINHHNHT INDkaTop 3a PpBaTa f3a Ha npaHe).
MapkybT 3a CtydeHaTa B0Da He e Cbbp3aH KbM KpaHa.
MapkyuT e nperebHaT.
KpaHbT 3a BOda He e OTbOpEn.
- HЯма BOДа NO BOДОпpoBOДиHaТа Мpeжа.
HaIraHTo e HDoCTaTbUHO.
-БуToHbT START/PAUSE He e 6nJ HaTnCHaT.
IepaHraTa HenpeKbCaTo ce nBJHn H3TOyBa.
MapkybT 3a mPbchata Boda He e MOHTupaH Mekdy 65 n 100 cm ot 3emrTa (6x. "MoHmupaHe").
KpaTHa Mapkya 3a Mpbchata B0da e nToTHe BB B0da (6K. "MoHmupaHe").
KaHaJIIN3aUHnHHaTApb6aBCTeHaTa HrMa OTdyuHnK.
Ako cne Te3n npoBepKn npo6nembT He ce peu, 3aTbopeTe KpaHa 3a B0daTa, n3KnHcTe nepaHaTa MaunHa nNo3BbHeTe B cepBu3a. Ako KnniueTo BN Ce HAMnpa Ha NocJeHNite eTaXn Ha crpaDaTa, HAnraHeTo HA CTydeHaTA B0a MoKe Da e HNCO, nopadN KoETo nepaHaTa MaunHa HEnpeKbCHato CE nblHn N n3TOBa. 3a N36raBaHe Ha TOBa HeyDo6CTBO BV TbproBCKaTa MpeKa Ce npedNaarat NoDxOJaUN Bb3BpaTHn KlaanHn.
IepaHata He ce n3ToyBa nn He ceHTpoDpyrnpa.
- PpOpaMaTHe IpeBnKJa N3ToUbaHe: C HAcON PpOpaMn Tp6Ba Da ce N3BbPbUba pBuHO.
MapkybT 3a mpbchata B0da e npntchat (eK. "MoHmupahe").
KaHaHn3aUHOHHata Tpb6a e 3anyWeHa.
IepaHaTbB6pnpa MHOrO no BpeMe Ha ceHTpoDpyrupahe.
-ПиMuTaxka 6apabaht He e 6nI OT6IOKpAn npaBnIHo (eK. "MoHmupaHe").
- Пекалната малини He e HnBeHnPapa (6K. "MoHmPapae").
- Пералната машина e пuitина тамекду мбели и стега (ж. "МоHMupaHe").
IepaHaTa mMa Teu.
MapkybT 3a CtyeHaTa BOa He e DObpe CBbp3An (EK. "MoHmupaHe").
- YeKeMeJKeTe 3a nepuHnHe npenapaTne 3anyeHo (3a nouHCTBaHeTo My 6K. "IodpBxKa u noHcMaBeHe").
MapkybT 3a mPbCHata B0a He e fukcapn do6pe (K. MoHmupe).
CBETINHHNTE INHINKATopn Ha "ONCINTE" IN CBETINHHNRT INHINKATopn Ha "START/
N3KIOUeTe MaunHata N 13BaTe Te cenca OTOKtA, 13aKaTe OKOIO 1 MInHyTa I R BKNIOte OTHOBO.
PAUSE" Mrrat n eINH OT CBeTNIHHNTE HnDnKaTopu Ha "TeKyua cpa3a OT npOrpamata" Ha "6nOKnpaH JIOK CBETT NOCTOHNHO.
Ako Heu3npaBHOCTTa He MoKe Da Ce OTCpaHn, NOTppe Ye cIyIte Ha CepBu3a.
06pa3yBa ce TBbpde MHoro nHa.
- PepnHnT npenapat He e 3a ABTomTuHa nepaHa (TpraBa da Ima HaIIMC "3a ABTomTuHa nepaHa", "3a npaHe Ha pbKa n 3a ABtomTuHa nepaHa" nIIN noIO6eH HaIIMc).
-Дозиранetoe6nIIO TBbpeTROJIMO.
CepBn3Ho 06cIpyXBaHe
Ppei Da ce CbBpxkTe C TexHueckn cepBu3:
- PpOBepeTe daJIIMoKete da peuHte camu np6nema (ek. "PpObeMeMu U Mepku 3a omcmpaHaeaHemo um);
Bknqute OTHO nporpaMaT, 3a da npoBePte daHn3npaBHOCTTa e OTcPaHeHa;
B npotnbeH cnuyaH ce o6bphTe KbM OTOpu3npaHn TExHueckn cepBn3 Ha TepeoHHn Homep, yka3aH ha rapaHNoHHata KapTa.
!Hnkora He non3BaIte ycJyInte Ha HeOTOp3IpaHn TexHnI.
Cbo6eTe:
Tnna Ha npo6nema;
- MoDéJa Ha MaùnHaTa (Mod.);
- cepniHnH oHmeP (S/N).
T3n INHOpMaunCe HAMnpa Ha 7pa6pHHaTa Ta6eIka, pa3noJIOKeHa Ha 3aHaTa CtpaHa Ha nepaHata MaHHa B npedHata Yact, cJe KaTO ce OTBOPN JIOKbT.
| ДELLEГИРАН PEGЛAMENT (EC) № 1061/2010 HA KOMICNЯТA | |
| Mapka | INDESIT |
| Mодел | IWSC 51051 CECO EU.M |
| КалачтET Ha namyho npahe B кг | 5 |
| Енegrпен Клас OT A+++ (ниска консумаши)do G (виска консумаши) | A+ |
| Гошина консумаши Ha eнegrпя (kWh)1) | 166 |
| Консумаши Ha eнegrпя по.stандарта nporpama namyk 60°C pri npьлно заразеде в kWh 2) | 0.898 |
| Консумаши Ha eнegrпя по.stандарта nporpama namyk 60°C pri рочтуно заразеде в kWh 2) | 0.627 |
| Консумаши Ha eнegrпя по.stандарtega nporpama namyk 40°C pri рочтуно заразеде в kWh 2) | 0.53 |
| Консумаши Ha мошноct (W) pri npеким b rotobnoct | 0.5 |
| Консумаши Ha мошноct (W) pri npеким ha pajoba | 8 |
| Гошина консумаши Ha boda B liptn 3) | 7546 |
| Клас Ha ИзCUшаве ot G (нисka eфektivnoct)do A (виска eфektivnoct) | C |
| Мakсинално obopotни Naцentproфугата 4) | 1000 |
| Сыдржанne Ha octatbчн Baizhnoct 5) | 62.0% |
| Проблжтолноct в м尼HTи Ha сандарта nporpama namyk 60°C pri nbлно заразеде | 220 |
| Проблжтолноct в м尼HTи Ha сандарtega nporpama namyk 60°C pri рочтуно заразеде | 165 |
| Проблжтолноct в м尼HTи Ha сандарtega nporpama namyk 40°C pri рочтуно заразеде | 160 |
| Проблжтолноct в м尼HTи pri рочтун Беким BAZAKBAhe | 30 |
| Сыдржанne Ha octatbчн Baizhnoct 6) | 60 |
| НИБО на чу mв dB(A) re 1 pW pri Nazentprofугирaine 6) | 80 |
| Модел за вррахданe | |
1HnHpmaHrTaHa eepnnHrTa CnKep HnncHcHrHa npOyKaTe cOthac 3a cTaNapThn nporpama nnpAky60C npNtBnHO HactNHO aapeKdane H cTaNapThn nporpama namyn 40C np 40C ca npdoXn da npahe Ha npomAHO nApYnHn TaKanHn Ca HaeEeKTHBN NO OTHoUHe HOKCyMaHrTa HA eepnHa Boda. HcTNNTO 3apeKdane E noonbHATAO MAKCMHnHn KANaHTET Ha pnahe.
2) Ba3npaHO Ha 220 cTaNaprTH NkBbHa npane Ha namyu TbkHn npn 60°C n 40°C npn nbno uactnho zapeKdahe n npn KOHCmaui HA HNCbK peKHM MaMOoHCT. PeanHATA KOHCMAUHA eHeprn 3abnc ot TOBA KAC ce h3non3Ba ypeDa.
3) Ba3npaHO Ha 220 cTAndapTHn qKbna Ha npaHe Ha namyuHn TbKaHn npn 60°C n40°C npn nbHo uactuHNO sapekdahe. PeaHaTa KOHCyMaHr Ha BODa sABNCn OT TOBA KAK Ce H3non3Ba ypeDa.
41)No-HNCKATA CTOHIOCT MEKdy CTAndpTnH nporpaMn 60°C npn nbHNO H aCtTuHO sapeXdane INN 40°C npn aCtTuHO sapeXdane.
5) IIO-BnCOKaTCTOINHOCT nonyeHa npnporpamn namyK 60°C npn pbHNO HnHtueHn 40°C npn acTHNo 3apeJdahe.
6) BasupaHO ha faaHTe Ha npane H eHTpoFynpaH e 3a CTnAptHa nporpama namyK 60°C npn Pbno 3apekdahe.

Deutsch
INHALTSVERZEICHNIS
Installation 62-63
Coton 1000 tours/minute
Causes / Solutions possibles:
- Care and maintenance, 4
- Precautions and tips, 5
- Description of the washing machine and starting a wash cycle, 6-7
- Wash cycles, 8
- Personalisation, 9
- Detergents and laundry, 10
- Troubleshooting, 11
- Unpacking and levelling
- Unpacking
- Levelling
- Connecting the electricity and water supplies
- Connecting the water inlet hose
- Connecting the drain hose
- Electrical connections
- The first wash cycle
- Care and maintenance
- Cutting off the water and electricity supplies
- Cleaning the washing machine
- Cleaning the detergent dispenser drawer
- Caring for the door and drum of your appliance
- Cleaning the pump
- Checking the water inlet hose
- General safety
- Disposal
- Description of the washing machine and starting a wash cycle
- Control panel
- Standby mode
- Indicator lights
- Delayed start
- Wash cycle phase indicator lights
- Function buttons and corresponding indicator lights
- Door locked indicator light
- Starting a wash cycle
- Setting the temperature
- Setting the spin speed
- Wash cycles Maximum spin speed
- Functions
- Note:
- EcoTime
- Energy Saver
- Extra Rinse
- Delay timer
- Detergents and laundry
- Detergent dispenser drawer
- Compartment 1: Pre-wash detergent (powder) compartment 2: Detergent for the wash cycle (powder or liquid)
- compartment 3:Additives (fabric softeners, etc.)
- Preparing the laundry
- How much does your laundry weigh?
- Garments requiring special care
- Load balancing system
- Problem:
- Possible causes / Solutions:
- Before calling for Assistance:
- Have the following information to hand:
- περιεχόμενα
- EykataoTaon,14-15
- Suvtnpnon kai povtida, 16
- Kaouotepnuev n Ekkivnon
- EvEIKTKa wfTaki qoans e EeAIGN
- EvdeiktoKoWtakiOaQaIIOeVnsTnptas
- Ekkivnoe voc TpoypaMaTOC
- Kaouotepnuev Ekkivnon
- AπoppuTTavTiKa kai μΠouγδa
- Onkn aToppuavTKwV
- Modalitatea de stand by
- Pporpamn, 56
- PepcoHaJIu3IpaHnA,57
- PepnH npenapatn npex 3a npaHe, 58
- PpO6JIeMn IMepKn 3a OTcTpaHЯBaHeto m, 59
- Pa3onakOBaHe n HnBeJInpaHe
- Pa3onaKOBaHe
- HnBvIpaHe
- XnDpaBnUHn n eJKeTpnueCKn Bp3KN
- Cbbp3BaHe Ha Mapkya KbM BOOnpOBoHHaTa MpeXa
- Cbbp3BaHe Ha Mapkyu 3a MpbchTa Boda
- Cbbp3BaHe KbmeJeKeTpnueckaTa Mpeka
- Pbpo npaHe
- CnnpaHe Ha BOdaTa N 3KJIIOUvBaHe Ha eJekTpO3aXpaHBAHeTo
- Почистване на有很大а Т Maшина
- IOnuNCTBaHe Ha YeKMeJxKeTo 3a nepuHnTe npenapatn
- PndpbkkaHaJIOKaHa6apa6aHa
- NouchBaHe Ha nomnata
- IpoBepka Ha Mapkya 3a cTydeHaTa BOda
- O6u npedeoxpaHnteHn Mepku
- PeunknapaHe
- CBeTInHeH INdkaTop 6noknpaH JIOK
- BkIIOUbaHe Ha nporpama
- Bb3MOxHn npuHH / Mepkn 3a OTCpaHraBaHeTo m:
- CepBn3Ho 06cIpyXBaHe
- Ppei Da ce CbBpxkTe C TexHueckn cepBu3:
- Cbo6eTe:
- INHALTSVERZEICHNIS
- Installation 62-63
- Causes / Solutions possibles:
Brand : INDESIT
Model : IWSC 51051 CECO EU.M
Category : Washing machine