
Yeti 400 - Power bank GOAL ZERO - Free user manual and instructions
Find the device manual for free Yeti 400 GOAL ZERO in PDF.
| Product Type | Portable solar generator / backup battery |
| Brand | Goal Zero |
| Model | Yeti 400 |
| Dimensions | 26 x 20.3 x 20.3 cm (10.25 x 8 x 8 inches) |
| Weight | 13.2 kg (29 lbs) |
| Battery Type | Sealed lead acid AGM |
| Battery Capacity | 396 Wh (12 V, 33 Ah) |
| Life Cycles | Hundreds of cycles |
| Shelf Life | Keep plugged in or charge every 3 months |
| Charge Input | 8 mm port (blue ring) for solar panel up to 120 W, wall charger 72 W, car charger 30 W |
| Charge Time (wall outlet) | About 5 hours |
| Charge Time (solar) | 8 to 80 hours depending on panel |
| USB Outputs | 2 USB ports 5 V, up to 2.1 A (10.5 W max) each, regulated |
| 12 V Car Output | 12 V cigarette lighter port, 10 A max (120 W) |
| 12 V 6 mm Output | 6 mm 12 V port, 10 A max (120 W) |
| AC Inverter | 220 V, 50 Hz, pure sine wave, 300 W continuous |
| Series Port | Anderson PowerPole (side) to connect multiple Yeti 400s |
| Display | LCD: battery level, power in/out (W, A, V, Wh, Ah) |
| Safety | Overvoltage, undervoltage (audible alarm), overheat, short circuit protection |
| Operating Temperature | 0 to 40 °C (32 to 104 °F) |
| Warranty | 1 year (12 months) for the product, 180 days for the battery |
| Repairability | User-replaceable battery (spare part available); internal fuse not replaceable (contact support) |
| Maintenance | Keep plugged in permanently or recharge every 3 months; store in a dry, cool place |
Frequently Asked Questions - Yeti 400 GOAL ZERO
User questions about Yeti 400 GOAL ZERO
0 question about this device. Answer the ones you know or ask your own.
Ask a new question about this device
Download the instructions for your Power bank in PDF format for free! Find your manual Yeti 400 - GOAL ZERO and take your electronic device back in hand. On this page are published all the documents necessary for the use of your device. Yeti 400 by GOAL ZERO.
USER MANUAL Yeti 400 GOAL ZERO
Before reading through the rest of the manual, plug your YETI into the wall. You should store your YETI plugged in, so the battery is always healthy and full.
Table of Contents
Goal Zero products are designed to keep you powered while you're doing what you love. Whether you're climbing in the Himalaya, living in your van while you travel the world, or camping in your backyard we will keep you powered.
Welcome to the solar life.
Getting Started 2
i. Get to Know Your YETI
ii. Unpacking Your YETI
iii. What it Powers
Charging your YETI 4
i. Charging from Solar
ii. Charging from the Wall
iii. Charging from the Car
Using your YETI 6
i. What can I Power?
ii. How to Use
iii. Best-Use Strategy
iv. Cold Weather Usage
v. LCD Display
vi. Pure-Sine Wave Inverter
vii. Storage and Downtime Maintenance
viii. Chaining your YETI
Technical Specifications 9
Frequently Asked Questions 10
Troubleshooting 13
Education 14
i. Batteries 101
ii. Solar 101
Warranty and Contact Info 16
Français 18
Deutsch 36
Espanol 54
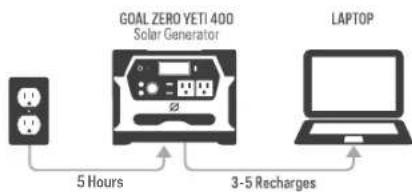
Congrats on your new Goal Zero YETI 400 Portable Power Station, a plug-and-play generator for emergencies, camping, or wherever you need power. With 400 watt-hours of power/energy, you can keep laptops, appliances, lights and more going for hours longer.
Make sure you go online and register your product to activate your warranty. You'll also be able to sign up to receive notifications and alerts regarding the YETI. www.GoalZero.com/warranty
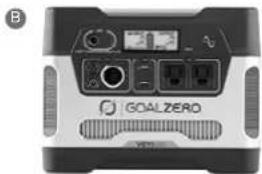
Get To Know Your Gear
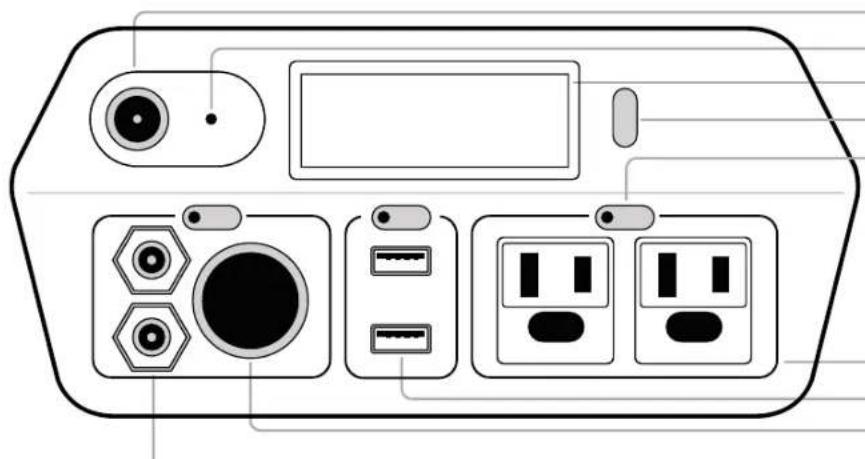
INPUT
Charging Port
Charging Indicator Light
Display
Display Button
Individual Port Power Buttons
OUTPUT
AC Outlets (pure-sine wave)
Two USB Outputs
12V Car Port
12V 6mm Port
SIDE
Anderson Powerpole
Chaining Port
Unpacking your YETI
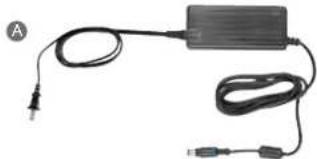
AC Wall Charger (2 pieces)
B Goal Zero Yeti 400 Portable Power Station
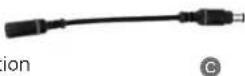
Legacy-Nomad Adapter (4.7 to 8mm)
What it Powers

LAL
100+Hours

Smartphone
30+ Recharges

LAPTOP
5 Recharges

TV
3 Hours
Charging Your YETI
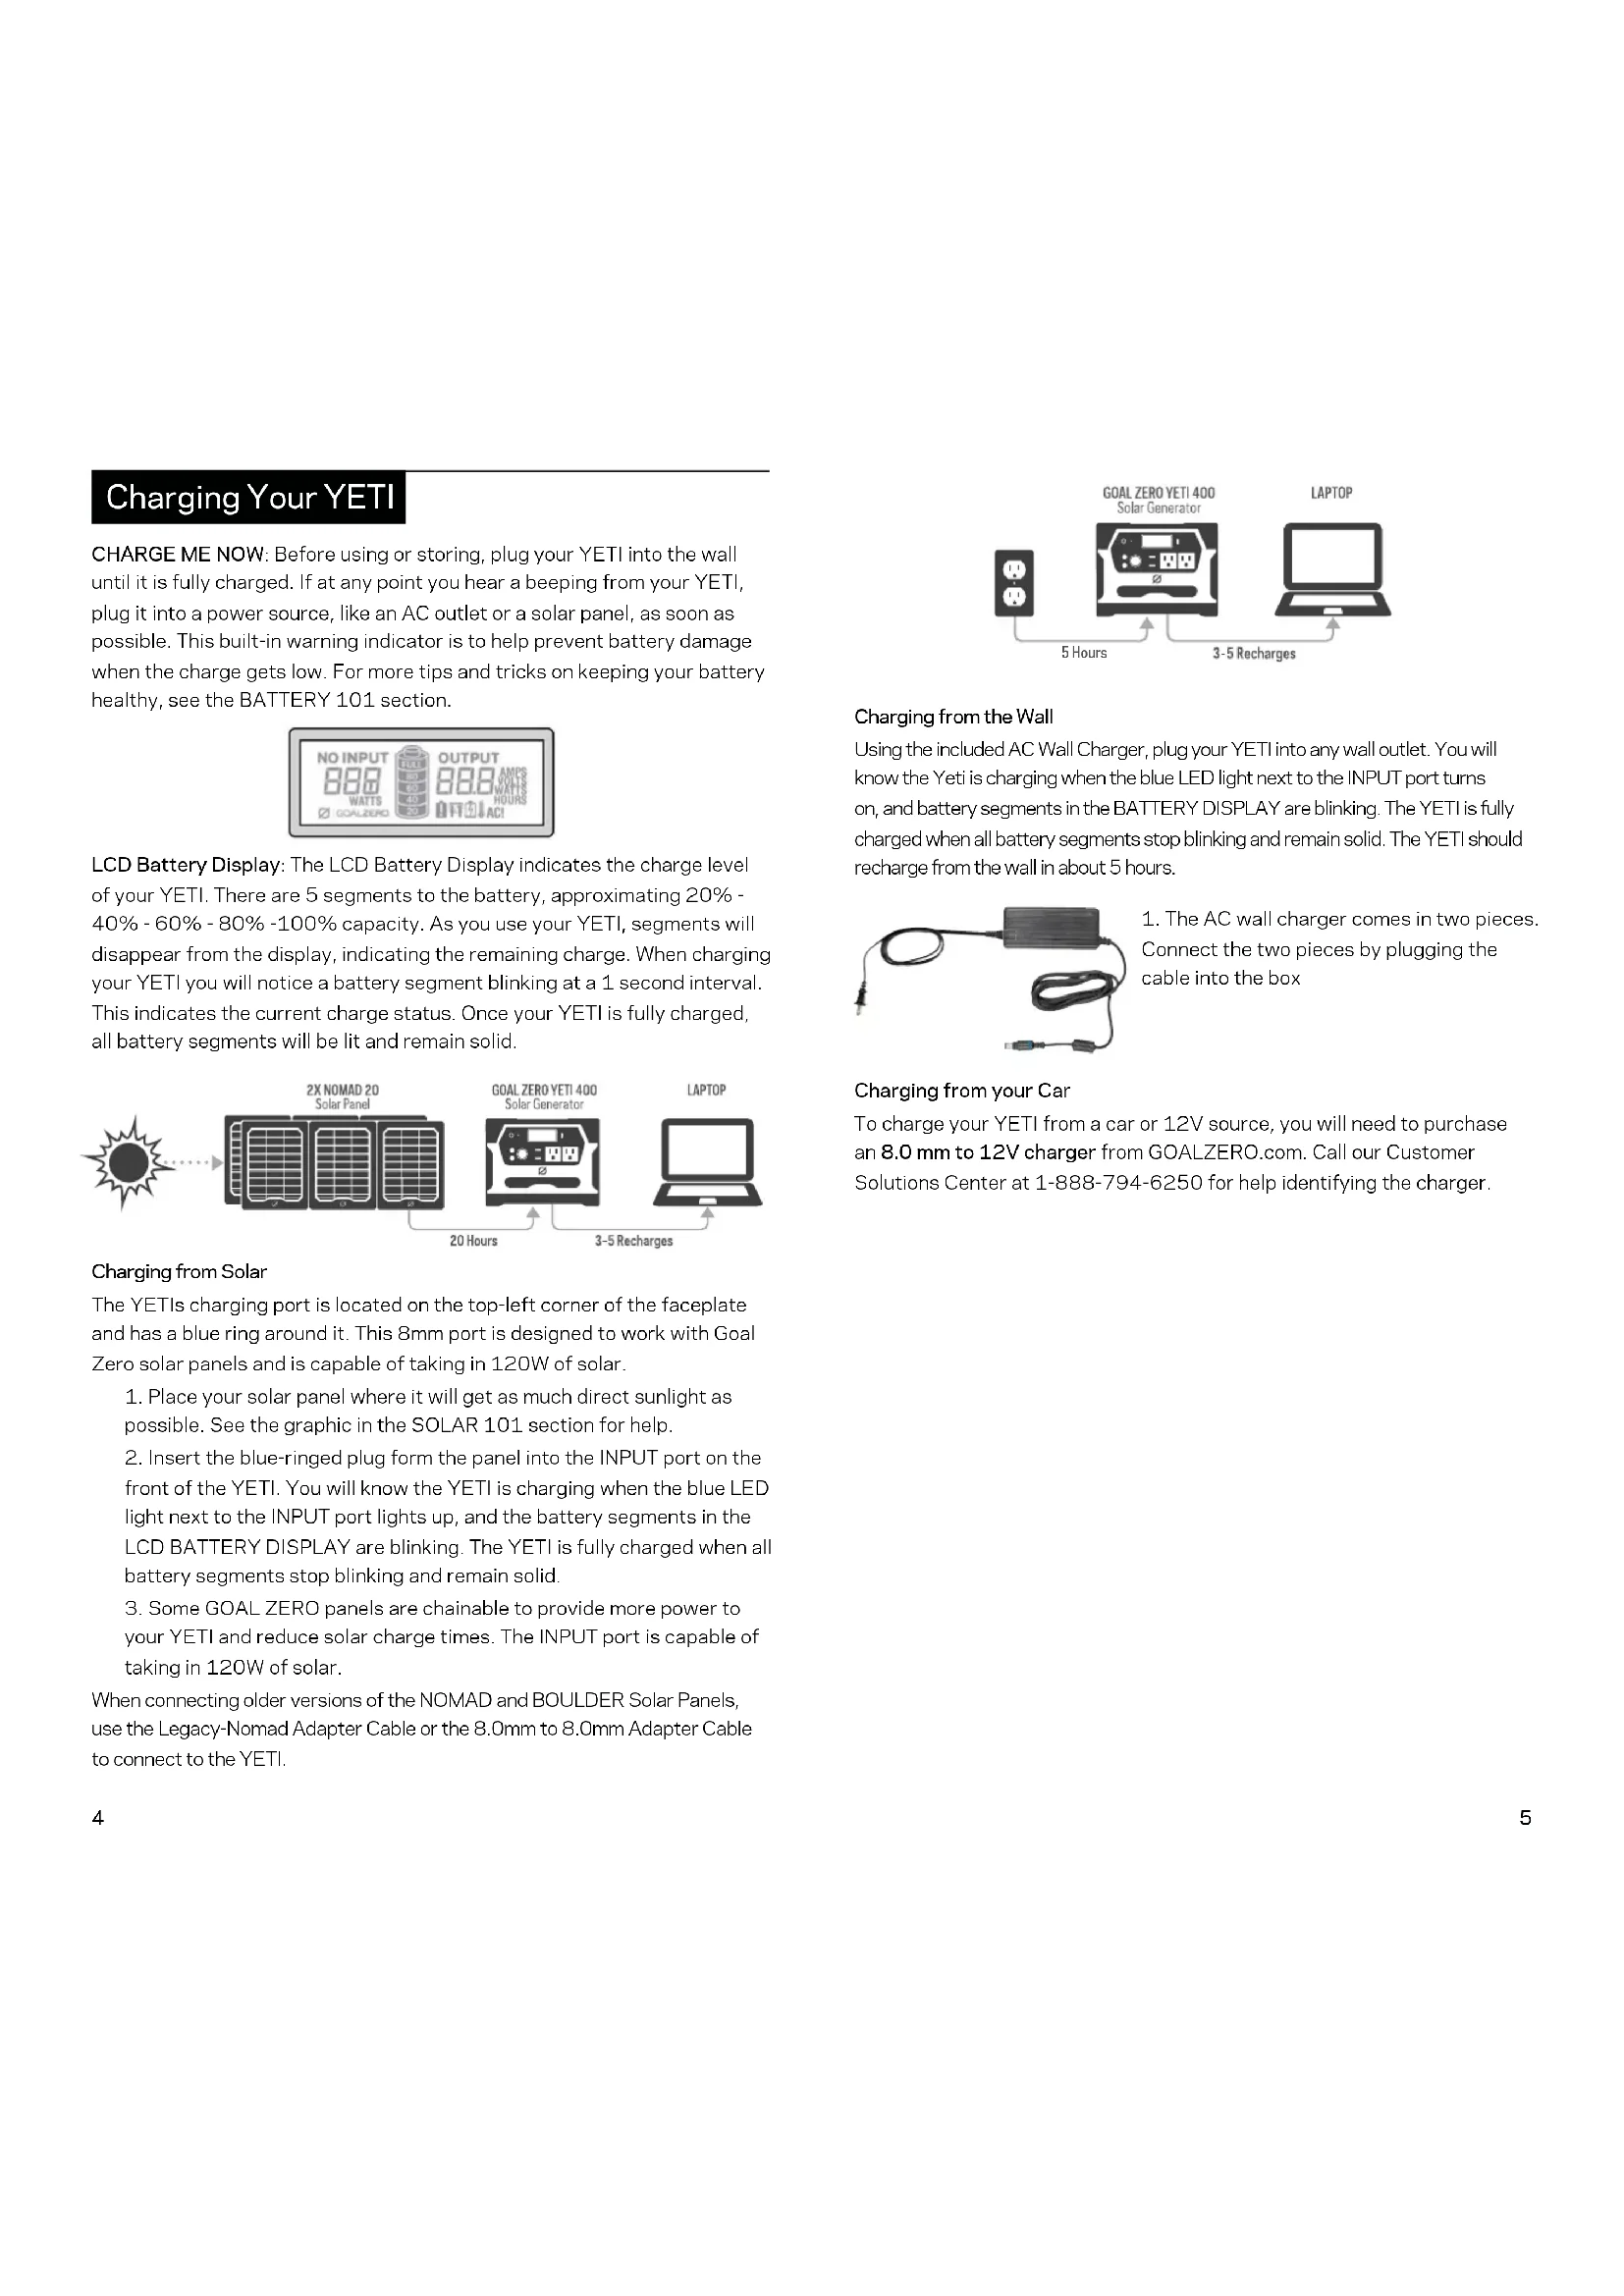
CHARGE ME NOW: Before using or storing, plug your YETI into the wall until it is fully charged. If at any point you hear a beeping from your YETI, plug it into a power source, like an AC outlet or a solar panel, as soon as possible. This built-in warning indicator is to help prevent battery damage when the charge gets low. For more tips and tricks on keeping your battery healthy, see the BATTERY 101 section.
LCD Battery Display: The LCD Battery Display indicates the charge level of your YETI. There are 5 segments to the battery, approximating 20% - 40% - 60% - 80% - 100% capacity. As you use your YETI, segments will disappear from the display, indicating the remaining charge. When charging your YETI you will notice a battery segment blinking at a 1 second interval. This indicates the current charge status. Once your YETI is fully charged, all battery segments will be lit and remain solid.
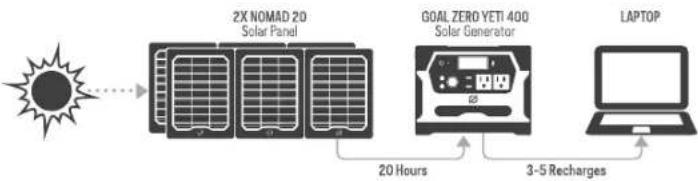
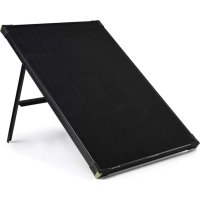
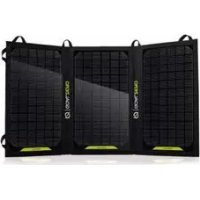
Charging from Solar
The YETIs charging port is located on the top-left corner of the faceplate and has a blue ring around it. This 8mm port is designed to work with Goal Zero solar panels and is capable of taking in 120W of solar.
- Place your solar panel where it will get as much direct sunlight as possible. See the graphic in the SOLAR 101 section for help.
- Insert the blue-ringed plug form the panel into the INPUT port on the front of the YETI. You will know the YETI is charging when the blue LED light next to the INPUT port lights up, and the battery segments in the LCD BATTERY DISPLAY are blinking. The YETI is fully charged when all battery segments stop blinking and remain solid.
- Some GOAL ZERO panels are chainable to provide more power to your YETI and reduce solar charge times. The INPUT port is capable of taking in 120W of solar.
When connecting older versions of the NOMAD and BOULDER Solar Panels, use the Legacy-Nomad Adapter Cable or the 8.0mm to 8.0mm Adapter Cable to connect to the YETI.
Charging from the Wall
Using the included AC Wall Charger, plug your YETI into any wall outlet. You will know the Yeti is charging when the blue LED light next to the INPUT port turns on, and battery segments in the BATTERY DISPLAY are blinking. The YETI is fully charged when all battery segments stop blinking and remain solid. The YETI should recharge from the wall in about 5 hours.
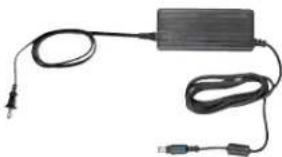
- The AC wall charger comes in two pieces. Connect the two pieces by plugging the cable into the box
Charging from your Car
To charge your YETI from a car or 12V source, you will need to purchase an 8.0 mm to 12V charger from GOALZERO.com. Call our Customer Solutions Center at 1-888-794-6250 for help identifying the charger.
Using your YETI
What to power from your YETI:
USB: Smartphones, MP3 Players, Digital Cameras, E-readers, Tablets, etc.
12V: Goal Zero Lights, Car adapters, etc.
AC:Laptops, CPAP, Display Monitors, Appliances, TVs, etc.
How to use your YETI:
-
Press the power button located above each port you will be using.
-
You'll know the port is turned on when the green LED light on the button is
illuminated.
**When the AC port is not in use, turn it off to conserve power.
3. Plug in your gear for power anywhere life takes you.
4. If possible, keep your YETI plugged into a power source when not in use.
Best-Use Strategy:
When recharging gear with your YETI, take note of the LCD Battery Display. If you plug in devices that have a high power requirement, the charge level of your YETI can drop quickly and you may not get exactly 400Wh of power. On the flipside, if you're recharging devices that draw power more slowly (a tablet), you will get closer to 400Wh from your YETI. If you're experiencing shorter runtimes, you may want to check the device's power requirements, see TROUBLESHOOTING for help
Cold Weather Usage:
Cold temperatures (below freezing) can impact the YETI's battery capacity. If you'll be living off-grid in sub-zero conditions, we recommend keeping your YETI in an insulated cooler, and connected to a power source (solar panels). The natural heat generated by the YETI contained in an insulated cooler will keep battery capacity at its highest.
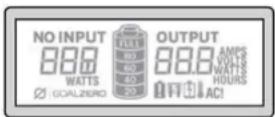
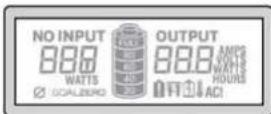
LCD Display:
Your YETI is equipped with an advanced LCD display that shows insightful information about your power consumption.
- The INPUT section on the left side of the display indicates the amount of watts going into your YETI from your charging source, like the wall, 12V charger, or solar panel.
a. When charging from a solar panel, notice the change in the number of watts going into your YETI when you angle the panel toward the sun.
b. If the power flow is below a measurable point, the display will
show LOW. If charging from the sun, reposition your solar panels into more direct sunlight.
- The BATTERY outline in the middle of the display indicates the current charge level of your YETI. You can read more about the charging your YETI on page 4.
- The OUTPUT section on the right side of the display indicates the amount of power your devices are pulling from the YETI. This information can be displayed in AMPS, VOLTS, WATTS, AMP HOURS (Ah), and WATT HOURS (Wh).
a. Press and hold the DISPLAY button until the display begins flashing. Release the button and press again to scroll through different display options
b. AMPS, VOLTS, and WATTS are all indicators of runtime, meaning they will give you a good estimate of how long you'll be able to use the devices plugged in before the YETI needs to be charged.
c. Wh and Ah reflect the power usage over the lifetime of the YETI. To reset these numbers, press and hold the DISPLAY button for 10 seconds. The OUTPUT display will begin flashing, and then stop flashing - release the button to reset the totals.
*To efficiently monitor your power usage, reset Wh and Ah after you fully charge your YETI.
4. Yeti 400Warnings:
Battery Fail: Replace internal battery
Blown Fuse: Contact Goal Zero Solutions Center
Low Battery: Plug into power source immediately
Temperature Warning; Too Hot: Unplug YETI and allow it to cool down
AC! Inverter Fail: Device is pulling too much power. Unplug device and turn AC inverter off and on. Contact Goal Zero Solutions Center
Pure-Sine Wave Inverter
Your YETI has a built-in pure-sine wave inverter, which means it provides the cleanest power for your devices. For more information about pure-sine wave power, see page 11.
Storage and Downtime Maintenance:
Having your YETI connected to a power source, like a solar panel or wall outlet, between adventures or while in storage keeps its battery healthy and topped off. This prolongs battery life and will ensure your YETI is charged and ready to go all day, every day.
If you can't keep your YETI plugged into a power source during storage, fully-charge your YETI every 3 months and store it in a cool, dry place.
Failure to maintain your YETI by following these steps can result in battery damage which will void the product warranty.
Chaining your Yeti:
You can chain your YETI to other YETI 400s to extend runtimes. To chain to other YETI 400s:
- Purchase the Anderson Chaining Cable from www.GOALZERO.com
- Insert the cable connectors into the Anderson PowerPole ports on the side of each Yeti 400.
- Make sure both YETIs are completely charged BEFORE chaining.
When additional batteries are chained to the YETI, you will experience increased charge times - this is a result of having to charge up the chained batteries in addition to the YETI.
The YETI 400 is NOT chainable with the YETI 1250 - the internal batteries are not the same size. You can chain the YETI 400 to the discontinued EXTREME 350 Power Pack.
Technical Specifications
Charge Times
Wall Charger (72W) 5 Hrs
Car Charger (30W) 13 Hrs
Goal Zero Nomad 20 40 80 Hrs
2x Goal Zero Nomad 20's 20-40 Hrs
Goal Zero Boulder 30 26-52 Hrs
Battery
Cell Type AGM Lead Acid
Pack Capacity 396Wh (12V, 33Ah)
Lifecycles Hundreds of cycles
Shelf-life Keep plugged in or charge every 3 months
Fuses None
Management System Charging and low-battery protection built-in
Ports
USB Port (output) 5V, up to 2.1A (10.5W max), regulated
6mm Port
12V,up to 10A(120W max)
(output, 6mm, green, hexagon)
12V Car Port (output) 12V, up to 10A (120W max)
110V AC Unit Inverter
(output, 60Hz, pure-sine wave)
110V,2.6A (300W continuous, 600W surge max)
220V AC Unit Inverter
220V, 1.4A (300W continuous, 600W surge max)
(output, 50Hz, pure-sine wave)
UNIVERSAL OR AUSTRALIA ITYPE 11 AC PLUGS
Power Pole Chaining Port 12V, up to 33A (400W max)
Charging Port
14-29V,up to 10A(120W max)
(input, 8mm, blue, circle)
General
Chainable
Yes
Weight
29 lbs (13.2 kg)
Dimensions
10.25 x 8 x 8 in (26 x 20.3 x 20.3 cm)
Operating Usage Temp.
32-104F(0-40C)
Certs
Warranty 12 Months
Frequently Asked Questions
What type of battery is in my YETI?
Your YETI uses a 12V, 33Ah sealed lead-acid battery (AGM), and similar to what is found in your car. Here are some basic facts about AGM batteries:
- AGM batteries should be kept full at all times.
This means you should leave your YETI plugged into a power sources at all times, especially during storage.
- AGM batteries last longer if you do not drain them completely.
This stems from the "battery memory myth" in old rechargeable batteries. You can read more about this in the Battery 101.
How do I know if my YETI is charged?
To check the charge level of your YETI, refer to the LCD Battery Display. When lit up, you'll see a battery outline with 5 segments, indicating the current charge level. You can turn on the Battery Display by pushing the DISPLAY button. It is OK to use your YETI even when it's not fully charged.
My YETI is beeping... what does that mean?
Plug your YETI into a power source, like a solar panel or outlet, as soon as possible. This chirping is to alert you that your YETI's battery is low and needs to be charged.
Is the battery inside my YETI replaceable?
Your YETI depends on an advanced lead-acid battery to power your gear, and like all other batteries, one day it will make the journey to the battery graveyard. Lucky for you, the YETI's battery is replaceable. Follow these steps for replacing your YETI's battery:
- Remove the four top bolts
- Remove the lid
- Remove the battery terminal bolts
- Lift the old battery out of the body of the YETI
**This battery is HEAVY. Use caution and proper technique when lifting.
- Insert replacement battery and reassemble in reverse order of steps above.
Once you have replaced your battery, you will need to find a local battery recycling center to dispose of it properly.
For more help replacing your YETI's battery, contact our Customer Solutions Center at 1-888-794-6250 or at support@goalzero.com
What do the different display options mean?
Your YETI's LCD display is an advanced feature designed to help you better understand power and monitor your consumption. The INPUT side reflects the amount of power your YETI is receiving while it's charging. The OUTPUT side indicates the amount of power the devices you have plugged in are
pulling out of the YETI - in the form of AMPS, VOLTS, WATTS, AMP HOURS and WATT HOURS.
You can use the numbers displayed in WATTS to estimate runtimes. For example, if you have a light plugged in that is pulling 100W, you can estimate the YETI 400 will run the light for about 4 hours (YETI Wh/Device W = runtime in hours; 400/100 = 4 hours).
WATT HOURS (Wh) and AMP HOURS (Ah) represent the amount of power being pulled per hour. This number continues to accumulate with each use of your YETI and can be manually reset whenever desired.
Can I power devices from the Anderson PowerPole ports on the side of the YETI?
No. There is no under-voltage protection built into the Anderson PowerPole ports on the side of the YETI 400, meaning if you try to power devices from these ports you could damage the battery. These ports are meant for chaining other YETI 400s or EXTREME 350s for longer runtimes.
What does a pure-sine wave inverter mean?
When it comes to power, you might have heard the letters DC and AC thrown around. DC stands for Direct Current, and is the only type of power that can be stored in a battery. AC stands for Alternating Current, which is the type of power your devices use when they're plugged into the wall. An inverter is required to change DC output to AC output and requires a small amount of power for the change. You can see this by turning on the AC port and looking at the OUTPUT on the LCD display.
A pure-sine wave inverter, like the one found in your YETI 400, produces an output that is exactly the same as supplied by an AC wall plug in your house. Although integrating a pure-sine wave inverter takes more components, it produces power output that makes it compatible with almost all AC electric devices you use in your house.
So in the end, the pure-sine wave inverter allows your YETI to safely power almost everything under 400 watts in your house that you would normally plug into the wall.
How do I know if my device will work with the YETI?
First, you'll need to determine the amount of power your device requires. This may require some research on your end, a good online search or examining the user guide for your device should suffice. To be compatible with the YETI 400, you should use devices that require less than 300W. Second, you will need to check the capacity for the individual output ports. For example, the AC port is monitored by an inverter that allows for 300W of continuous power. This means if your device is a pulling more than 300W for an extended period of time, the YETI's inverter will shut off. Once you know your device is compatible, you'll want to determine how long you'll be able to power your gear from the YETI.
How long will the YETI run my device?
Here's a quick and dirty lesson in power:
All GOAL ZERO rechargers have a number in their name, ex. GUIDE 10 Plus Recharger, GOAL ZERO YETI 400 Portable Power Station. These numbers refer to the Watt Hours (Wh), or the amount of energy that can be stored in each battery, and can help estimate how long your gear will run from each recharger. For example, a 400Wh battery should run a 100W light for 4 hours (400 / 100 = 4) . If your gear falls within the 400Wh capacity of the YETI, you'll want to check the restrictions on each of the output ports.
Here are some common devices and their watt-hour requirements:
| Device Power from Yeti 400 |
| Light-a-Life 12V Lantern (3Wh) 130 Hrs |
| Smartphone (5-7Wh) 30+ Recharges |
| Tablet (25-42Wh) 10+ Recharges |
| DVD Player (20-25W) 14-17 Hrs |
| Laptop (50W) 2-17 Hrs |
| Radio/Stereo (40W) 7 Hrs |
| Desktop Computer (100W) 3-3.5 Hrs |
| Printer (90W) 1.5 Hrs |
32LCD TV (98-156W) 2-3.5 Hrs
When you're deciding on what to power from your new GOAL ZERO recharger, do some research into your device's wattage consumption. For more quick tips and learning tools, check out www.GOALZERO.com/learn.html
Troubleshooting
If your devices are not recharging from your YETI, follow these steps:
- Ensure the Output Port has been turned on. The green LED light on the power button should be lit up.
- Check the Battery Display. If it is at 20% or below, recharge your YETI.
- Verify your device is suitable for use with the YETI:
a. All of the YETI output ports have their own max power capacity.
Check the YETI's Tech Specs to ensure your device is compatible.
b. Some devices with rechargeable batteries, like laptops and tablets, may pull more watts when in use. In these cases, power down your device and recharge it.
Reset the battery following these steps:
*Unplug all charging cables, including device charging cables, from the YETI before attempting to reset the battery.
a. Remove the four bolts holding the YETI top in place.
b. Lift top off and set aside.
c. Remove the two battery terminal bolts.
d. Disconnect the wires on the battery terminals. Wait 10 seconds.
e. Reconnect battery wires and reassemble YETI.
f. Fully recharge your battery.
If you are still experiencing trouble with your YETI, please call our Customer Solutions Center at 1-888-794-6250 or by email at support@goalzero.com
Education
BATTERIES 101: GOAL ZERO utilizes the latest and greatest in battery technology to accompany you on all life's adventures. From the versatile and lightweight Lithium Ion, to the robust and powerful Lead Acid, we've compiled some helpful tips to keep your GOAL ZERO batteries working their best.
i. Batteries need exercise
The best thing for any battery is to use it. Don't leave a charged battery sitting around, unloved and unused for long periods of time.
ii. The "Battery Memory" myth
Thanks to old Nickel-Cadmium (NiCd) batteries, there's a myth running around that you should completely drain your batteries before plugging them in for a recharge, called "deep cycling". Although true with NiCd batteries, the typical batteries you'll find in most of your gear today, including the advanced lithium and lead-acid batteries used in your GOAL ZERO products, require no such draining. In fact, you should avoid deep cycling your batteries - it does more harm than good in most cases.
iii. The "Stadium Effect"
The stadium effect occurs when recharging your batteries. You'll notice your battery quickly filling up in the beginning, then slowing down noticeably when trying to charge up the last several percentages. Think of how quickly a stadium fills up when the doors first open - there are hundreds of open seats so it's easy to find the one you want. Eventually there are only a few open seats here and there and people have to maneuver around to find the spot they want and filling those seats takes longer. The same theory applies to recharging batteries. It's easy for energy to flow in and take up empty space in the beginning, and as time goes on and there is less space available, it takes longer for the energy to fill in the holes.
iv. Read the manual.
Yeah, it might be a long read, but the manual is the best place to find the dos and don'ts for the battery in your specific device. Reading your manual will ensure you're taking steps to keep your batteries happy and healthy.
SOLAR 101: GOAL ZERO makes it easy to recharge your gear from the sun - we didn't invent solar power, we perfected it. Some things to keep in mind when recharging your gear with solar power:
i. Solar panels don't store power from the sun, they collect it.
We teach you to COLLECT - STORE - USE, which is the best way to utilize solar power to recharge your gear. COLLECT the sun's energy with a solar panel. STORE the power in a recharger. USE the recharger to power your gear, day or night. If you're really a diehard, you can plug your gear directly into the junction box located on the back of our NOMAD Solar Panels to recharge from the sun.
ii. Not all solar charge times are created equal
Most solar panel manufacturers calculate their recharge times with the following equation: Device Watt Hours/Solar Panel Watts = Solar Recharge Times. So theoretically, a 13 watt solar panel would recharge a 50 watt-hour recharger in 3.84 hours (50/13 = 3.84) - and this is the number you could find in marketing material for a solar panel. However, in order to standardize results across all manufacturers, these tests are completed in laboratory settings.. The truth is, on a good, sunny day, you'll receive about 50-75% of your solar panel's rated wattage, and this is how the engineers at GOAL ZERO calculate the solar recharge times you see on our packaging.
iii. Solar works, even in overcast conditions.
Solar panels utilize IR, UV, and visible rays from the sun that can penetrate through clouds. Although the efficiency of the solar panel will decrease in cloudy conditions, you'll still be collecting valuable power from the sun.
iv. Keep away from shade and windows.
Although you should seek out the shade on sunny days, your solar panels will collect more power when fully exposed to the sunlight. Windows also have a habit of decreasing efficiency. So keep those panels outside and in the bright sunlight.
v. Proper alignment works wonders.
Keeping your solar panel angled toward the sun can dramatically increase solar efficiency. Set it up and let Mother Nature do the rest.
Warranty & Contact
LIMITED WARRANTY
GOAL ZERO LLC warrants to the original consumer purchaser that this GOAL ZERO product will be free from defects in workmanship and material under normal consumer use during the applicable warranty period identified in Paragraph 2, below, subject to the exclusions set forth in Paragraph 5, below. This warranty statement sets forth GOAL ZERO's total and exclusive warranty obligation. We will not assume, nor authorize any person to assume for us, any other liability in connection with the sales of our products.
WARRANTY PERIOD
The warranty period for GOAL ZERO battery cells (whether purchased on a stand-alone basis or as part of another product) is 180 days. The warranty period for all other GOAL ZERO products and components is one (1) year. In each case, the warranty period is measured starting on the date of purchase by the original consumer purchaser. The sales receipt from the first consumer purchase, or other reasonable documentary proof, is required in order to establish the start date of the warranty period. If you completed the online GOAL ZERO Product Registration Form within 30 days after purchasing your product, that registration can also establish the start date of the warranty period (but warranty coverage is not conditioned upon such registration).
REMEDY
GOAL ZERO will repair or replace (at GOAL ZERO's option and expensal any GOAL ZERO product that fails to operate during the applicable warranty period due to a defect in workmanship or material.
LIMITED TO ORIGINAL CONSUMER BUYER
The warranty on GOAL ZERO's products is limited to the original consumer purchaser and is not transferable to any subsequent owner.
EXCLUSIONS
GOAL ZERO's warranty does not apply to (i) any product that is misused, abused, modified, damaged by accident, or used for anything other than normal consumer use as authorized in GOAL ZERO's then-current product literature, or (ii) any product purchased through an online auction house. GOAL ZERO's warranty does not apply to any battery cell or product containing a battery cell unless the battery cell is fully charged by you within seven (7) days after you purchase the product and at least once every 6 months thereafter.
HOW TO RECEIVE SERVICE
To obtain warranty service, you must contact our customer service team via telephone at (888) 794-6250, or via email at support@goalzero.com. If our customer service team determines that further assistance is required, they will give you a Return Material Authorization ("RMA") number and will provide you with prepaid return shipping label that you can use to mail back your non-functioning items). You must properly package the product, clearly marking the RMA number on the package and including proof of your purchase date with the product. We will process your return and send your repaired or replacement product to you at our expense for product being shipped to locations in North America. For product purchased or being shipped outside of North America, please contact the local distributor from whom you purchased the product or email support@goalzero.com to obtain further distributor information.
IMPLIED WARRANTYIS
THE LIMITED WARRANTY STATED HEREIN IS IN LIEU OF ALL OTHER EXPRESS WARRANTYES. IN NO EVENT SHALL ANY IMPLIED WARRANTYES, INCLUDING BUT NOT LIMITED TO ANY WARRANTYES OF MERCHANTABILITY, FITNESS FOR A PARTICULAR PURPOSE OR NONINFRINGEMENT, EXTEND BEYOND THE APPLICABLE WARRANTY PERIOD IDENTIFIED IN PARAGRAPH 2, ABOVE. Some states do not allow limitations on how long an implied warranty lasts, so the above limitation may not apply to you. This warranty gives you specific legal rights, and you may also have other rights which vary from state to state.
EXCLUSIVE REMEDY; LIMITATION OF LIABILITY
The foregoing provisions state GOAL ZERO's entire liability, and your exclusive remedy, for any breach of warranty, express or implied. IN NO EVENT WILL GOAL ZERO BE LIABLE FOR ANY CONSEQUENTIAL OR INCIDENTAL DAMAGES ASRISING FROM ANY USE OR MALFUNCTION OF ANY GOAL ZERO PRODUCT, OR FROM ANY BREACH OF WARRANTY, INCLUDING DAMAGE TO OTHER DEVICES. IN NO EVENT WILL GOAL ZERO'S LIABILITY FOR ANY CLAIM. WHETHER IN CONTRACT, WARRANTY, TORT (INCLUDING NEGLIGENCE AND STRICT LIABILITY) OR UNDER ANY OTHER THEORY OF LIABILITY, EXCEED THE AMOUNT PAID BY YOU FOR THE GOAL ZERO PRODUCT. Some states do not allow the exclusion or limitation of incidental or consequential damages, so the above limitation or exclusion may not apply to you.
Designed in the U.S.A.
Made in China
1-888-794-6250
GOALZERO.COM
16 17
We make the powerless, powerful.
goalzero.com/sharethesun
Français

CHARGEZ-MOI MAINTENANT
Specifications techniques 27
www.GoalZero.com/warranty
Specifications Techniques
Temps de Charge:
PRISES CA UNIVERSELLES OU
AUSTRALIENNES
Onduleur CA 110 V
sortie, 60 Hz, onde sinusoidale) (300W en continu, sur-puissance 600W max)
Smartphone (5-7 Wh) 30+ recharges
Tablette (25-42 Wh) 10+ recharges
www.GoalZero.com/warranty
Designed in the U.S.A.
Made in China
Goal Zero Yeti is a trademark of Goal Zero.
This equipment has been tested and found to comply with the limits for a Class B digital device, pursuant to part 15 of the FCC Rules. These limits are designed to provide reasonable protection against harmful interference in a residential installation. This equipment generates, uses and can radiate radio frequency energy and, if not installed and used in accordance with the instructions, may cause harmful interference to radio communications. However, there is no guarantee that interference will not occur in a particular installation. If this equipment does cause harmful interference to radio or television reception, which can be determined by turning the equipment off and on, the user is encouraged to try to correct the interference by one or more of the following measures:
—Reorient or relocate the receiving antenna.
—Increase the separation between the equipment and receiver.
- Connect the equipment into an outlet on a circuit different from that to which the receiver is connected.
—Consult the dealer or an experienced radio/TV technician for help.
This device complies with part 15 of the FCC Rules. Operation is subject to the following two conditions: (1) This device may not cause harmful interference, and (2) this device must accept any interference received, including interference that may cause undesired operation.

- Table of Contents
- Get To Know Your Gear
- INPUT
- OUTPUT
- SIDE
- Unpacking your YETI
- What it Powers
- Charging Your YETI
- Charging from Solar
- Charging from the Wall
- Charging from your Car
- Using your YETI
- What to power from your YETI:
- How to use your YETI:
- Best-Use Strategy:
- Cold Weather Usage:
- LCD Display:
- Yeti 400Warnings:
- Pure-Sine Wave Inverter
- Storage and Downtime Maintenance:
- Chaining your Yeti:
- Technical Specifications
- Charge Times
- Battery
- Ports
- 110V AC Unit Inverter
- 220V AC Unit Inverter
- General
- Frequently Asked Questions
- What type of battery is in my YETI?
- How do I know if my YETI is charged?
- My YETI is beeping... what does that mean?
- Is the battery inside my YETI replaceable?
- What do the different display options mean?
- Can I power devices from the Anderson PowerPole ports on the side of the YETI?
- What does a pure-sine wave inverter mean?
- How do I know if my device will work with the YETI?
- How long will the YETI run my device?
- Troubleshooting
- Reset the battery following these steps:
- Education
- i. Batteries need exercise
- ii. The "Battery Memory" myth
- iii. The "Stadium Effect"
- iv. Read the manual.
- i. Solar panels don't store power from the sun, they collect it.
- ii. Not all solar charge times are created equal
- iii. Solar works, even in overcast conditions.
- iv. Keep away from shade and windows.
- v. Proper alignment works wonders.
- Warranty & Contact
- LIMITED WARRANTY
- WARRANTY PERIOD
- REMEDY
- LIMITED TO ORIGINAL CONSUMER BUYER
- EXCLUSIONS
- HOW TO RECEIVE SERVICE
- IMPLIED WARRANTYIS
- EXCLUSIVE REMEDY; LIMITATION OF LIABILITY
- GOALZERO.COM
- Français
- CHARGEZ-MOI MAINTENANT
- Specifications techniques 27
- Specifications Techniques
- Temps de Charge:
- Goal Zero Yeti is a trademark of Goal Zero.
Brand : GOAL ZERO
Model : Yeti 400
Category : Power bank