
Fire - DJ Equipment AKAI - Free user manual and instructions
Find the device manual for free Fire AKAI in PDF.
| Brand | AKAI |
| Model | Fire |
| Category | DJ Equipment |
| Product Type | MIDI Controller for FL Studio |
| Power | Via USB port (bus-powered) |
| Connectivity | 1 USB port, 1 Kensington lock |
| Screen | Yes, to display menus and options |
| Pads | 16 backlit velocity-sensitive pads |
| Buttons | Volume, Pan, Filter/Low EQ, Resonance/High EQ, Select, Pattern, Browser, Grid, Mute/Solo, Step Sequence, Note, Drum, Perform, Shift, Alt, Pattern Song, Play, Stop, Record |
| Operating Modes | Channel Rack, Mixer, User 1, User 2 |
| Main Functions | Step sequencer control, note recording, drum mode, performance, preview, metronome, countdown |
| Compatible Software | FL Studio (system requirements) |
| Manual Languages | French, English, German, Spanish, Italian and others (translation available) |
| Number of Manual Pages | 20 pages |
| Dimensions | Approximately 320 x 200 x 50 mm (estimated) |
| Weight | Approximately 1.2 kg (estimated) |
| Care and Cleaning | Clean with a soft, dry cloth. Do not use liquid or abrasive products. |
| Safety | Use the Kensington lock to secure the device. Avoid exposure to moisture and extreme temperatures. |
Frequently Asked Questions - Fire AKAI
User questions about Fire AKAI
0 question about this device. Answer the ones you know or ask your own.
Ask a new question about this device
Download the instructions for your DJ Equipment in PDF format for free! Find your manual Fire - AKAI and take your electronic device back in hand. On this page are published all the documents necessary for the use of your device. Fire by AKAI.
USER MANUAL Fire AKAI
User Guide (English)
Introduction
Thank you for purchasing the Fire. At Akai Professional, we know how serious music is to you. That's why we design our equipment with only one thing in mind—to make your performance the best it can be.
Box Contents
Fire
USB Cable
Software Download Card
User Guide
Safety & Warranty Manual
Support
For the latest information about this product (documentation, technical specifications, system requirements, compatibility information, etc.) and product registration, visit akaipro.com.
For additional product support, visit akaipro.com/support.
Setup
Fire should be automatically detected and enabled in FL Studio. If it is not, follow the steps below.
Setting up Fire with FL Studio:
Note: MIDI does not transmit audio; it sends MIDI note and control data (knob movements, sound/program changes).
- Use the included USB cable to connect Fire's USB port to an available USB port on your computer (powered on).
- On your computer, open FL Studio.
- In FL Studio, make sure "Enable MIDI remote control" is selected in the Options menu, or MIDI input will be disabled.
- Open the MIDI settings by selecting Options > MIDI settings from the main menu.
- Select the MIDI Input section to display a list of controller devices that have been detected.
- Select Fire (or USB Audio Device (generic controller)) and then click the enable switch.
- Test that MIDI data is being transmitted by pressing a button or turning a knob on Fire. The MIDI activity light in the Main Panel of FL Studio will blink each time controller data is received.
Features
Top Panel
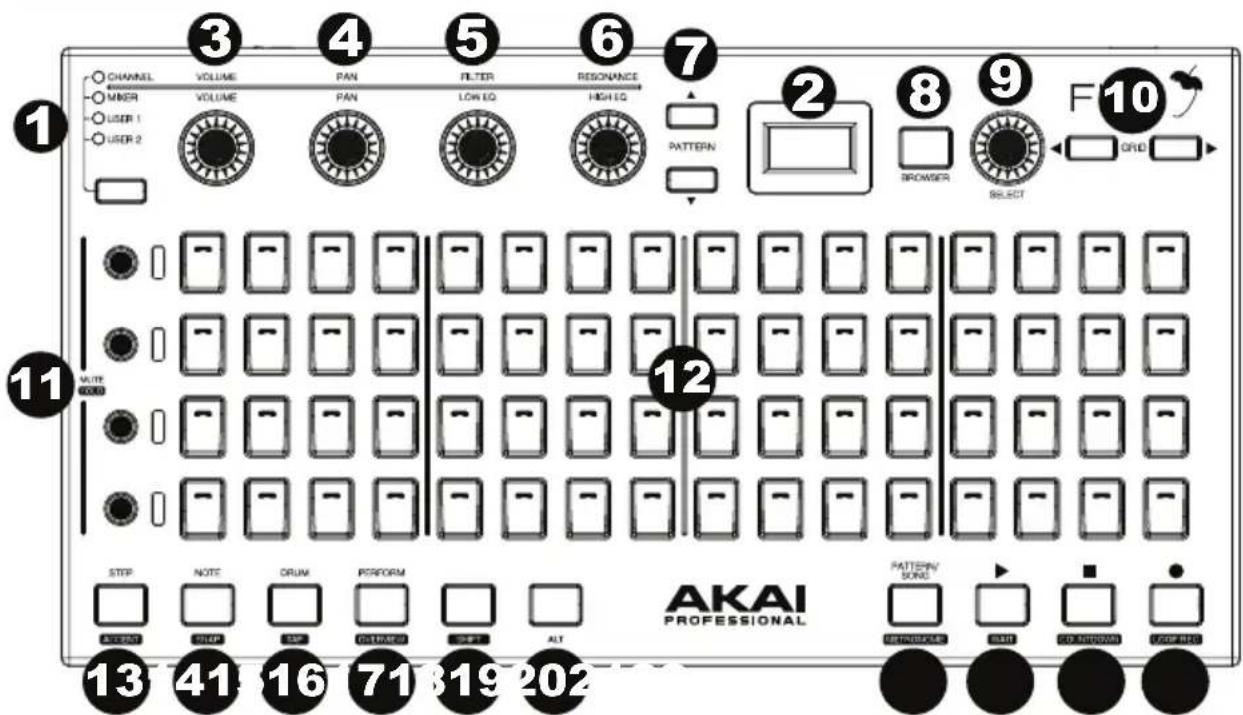
- Modes - Channel Rack, Mixer, User 1, User 2: Press this button to cycle through the modes for selecting the Channel Rack (which holds the Instruments and Effect plugins for a Playlist Track), Mixer (allows you to select Tracks, play Racks and adjust levels), and two customizable User slots.
- Display: Shows the menus and options that are selected from the controller.
- Volume: Adjusts the volume for the selected channel/track.
- Pan: Adjusts the L/R balance for the channel/track.
- Filter/Low EQ: The Filter removes frequencies from the sound. The low EQ function adjusts the bass frequencies of the sound.
- Resonance/High EQ: The resonance boosts a frequency band near the cutoff level to create a "sharpening" sound. The high EQ function adjusts the treble frequencies of the sound.
- Pattern Buttons: Press this to select a pattern in your Playlist. Patterns can contain note or automation data.
- Browser: Press this to select projects, samples, presets, or plugins.
- Select: Rotate this knob to scroll to channel/track. Hold this knob to activate the selected channel/track.
- Grid: Press this button to go to the grid mode.
- Mute/Solo: Press these buttons to mute or solo a channel.
- Button Pads: Press this buttons to trigger instruments in the step sequencer for the selected channel.
-
Step Sequence/Accent: Press this button to activate the step sequencer. Hold Shift and press this button to select the accent function and adjust MIDI note velocity.
-
Note/Snap: Press this button to go into the note recording mode. Hold Shift and press this button to select how clips will move and quantize to the grid.
- Drum/Tap: Press this button to go to Drum mode. Hold Shift and press this button to go to Tap mode.
- Perform/Overview: Press this button to go to Perform mode. Hold Shift and press this button to go to Overview mode.
- Shift: Hold this button along with other buttons that have knockout text to activate the secondary functions. For example, hold Shift and press the Stop button to turn on countdown.
- Alt: Press this button to access additional functions from certain buttons. For instance, press and hold Alt and press a Mute button to select that channel.
- Pattern Song/Metronome: Press this button to select a pattern or song. Hold Shift and press this button to select the metronome function.
- Play/Wait: Press this button to play a clip. Press this button and Shift to have playback or recording begin only when note data is received.
- Stop/Countdown: Press this button to stop playback or recording. Hold Shift and press this button to have a count-in happen before recording starts.
- Record/Loop Record: Press this button to start recording. Hold Shift and press this button to have multiple continuous recordings.

Rear Panel
- USB Port: Connect the controller to a USB port on your computer to power the unit and send MIDI data to FL Studio.
- Kensington® Lock: Use this port to attach a security cable to the unit.
Technical Specifications
| Power | Via USB |
| Dimensions (width x depth x height) | 12.44" x 6.55" x 1.69" / 316 x 166 x 43 mm |
| Weight | 1.68 lbs. / 760g |
Specifications are subject to change without notice.
Trademarks & Licenses
Akai Professional is a trademark of inMusic Brands, Inc., registered in the U.S. and other countries. Akai Professional and MPC are trademarks of inMusic Brands, Inc., registered in the U.S. and other countries. FL Studio is a registered trademark of Image-Line. Kensington and the K & Lock logo are registered trademarks of ACCO Brands. macOS is a trademark of Apple Inc., registered in the U.S. and other countries. Windows is a registered trademark of Microsoft Corporation in the United States and other countries. All other product names, company names, trademarks, or trade names are those of their respective owners.
AKAI
PROFESSIONAL
akaipro.com