
MPX8 - DJ Equipment AKAI - Free user manual and instructions
Find the device manual for free MPX8 AKAI in PDF.


| Product Type | Sampling Pad Controller |
| Number of Pads | 8 backlit velocity-sensitive pads |
| Connectivity | USB (power and MIDI), headphone output (3.5mm jack), line output (RCA) |
| Power Supply | Via USB (5V, 500mA minimum) |
| Dimensions (W × D × H) | Approx. 240 × 160 × 45 mm |
| Weight | Approx. 0.5 kg |
| Internal Memory | Plays audio files from SD card (not included) |
| Supported Audio Formats | WAV, MP3, AIFF |
| Main Functions | Sample triggering, volume control, pitch adjustment, playback modes (One Shot, Gate, Loop) |
| Care and Cleaning | Wipe with a soft, dry cloth. Do not use chemicals. |
| Safety | Do not expose to moisture or heat sources. Disconnect during storms. |
| Spare Parts and Repairability | No user-serviceable parts. Contact authorized service. |
| General Information | Compatible with music production software via MIDI USB. |
Frequently Asked Questions - MPX8 AKAI
User questions about MPX8 AKAI
0 question about this device. Answer the ones you know or ask your own.
Ask a new question about this device
Download the instructions for your DJ Equipment in PDF format for free! Find your manual MPX8 - AKAI and take your electronic device back in hand. On this page are published all the documents necessary for the use of your device. MPX8 by AKAI.
USER MANUAL MPX8 AKAI
MPX8
User Guide
English (2-7)
Guía del usuario
Español (8 - 13)
Guide d'utilisation
Français (14 – 19)
Guida per l'uso
Italiano (20 – 25)
Benutzerhandbuch
Deutsch (26 – 31)
Appendix
English (32 - 35)
User Guide (English)
Introduction
Load virtually any sample via standard SD card* and assign it to any of the MPX8's eight backlit velocity- and pressure-sensitive pads. It's that simple. Use it in the studio. Use it live on stage or on air. MPX8 packs proven Akai Pro technology into a compact, durable design that's built to perform.
* SD card sold separately.
Box Contents
- MPX8 - USB Power Adapter
• MPX8 Sample Kit Editor (download) • 1/8"-to-MIDI Adapters (2)
- Loop Library (download) - User Guide
- USB Cable - Safety & Warranty Manual
Support
For complete system requirements, compatibility information, and product registration, visit the Akai website: www.akaipro.com.
For additional product support, visit www.akaipro.com/support.
Quick Start / Connection Diagram

flowchart
graph TD
    A["Speaker 1"] -->|Monitors ↑| B["MPX8 PROFESSIONAL"]
    C["Speaker 2"] -->|Monitors ↓| B
    D["Speaker 3"] -->|Monitors ↓| B
    E["Headphones ↑"] --> F["MPX8 PROFESSIONAL"]
    G["MPX8 PROFESSIONAL"] --> H["MPX8 PROFESSIONAL"]
    I["MPX8 PROFESSIONAL"] --> J["MPX8 PROFESSIONAL"]
    K["MPX8 PROFESSIONAL"] --> L["MPX8 PROFESSIONAL"]
    M["MPX8 PROFESSIONAL"] --> N["MPX8 PROFESSIONAL"]
    O["MPX8 PROFESSIONAL"] --> P["MPX8 PROFESSIONAL"]
    Q["MPX8 PROFESSIONAL"] --> R["MPX8 PROFESSIONAL"]
    S["MPX8 PROFESSIONAL"] --> T["MPX8 PROFESSIONAL"]
    U["MPX8 PROFESSIONAL"] --> V["MPX8 PROFESSIONAL"]
    W["MPX8 PROFESSIONAL"] --> X["MPX8 PROFESSIONAL"]
    Y["MPX8 PROFESSIONAL"] --> Z["MPX8 PROFESSIONAL"]
    AA["MPX8 PROFESSIONAL"] --> AB["MPX8 PROFESSIONAL"]
    AC["MPX8 PROFESSIONAL"] --> AD["MPX8 PROFESSIONAL"]
    AE["MPX8 PROFESSIONAL"] --> AF["MPX8 PROFESSIONAL"]
    AG["MPX8 PROFESSIONAL"] --> AH["MPX8 PROFESSIONAL"]
    AI["MPX8 PROFESSIONAL"] --> AJ["MPX8 PROFESSIONAL"]
    AK["MPX8 PROFESSIONAL"] --> AL["MPX8 PROFESSIONAL"]
    AM["MPX8 PROFESSIONAL"] --> AN["MPX8 PROFESSIONAL"]
    AO["MPX8 PROFESSIONAL"] --> AP["MPX8 PROFESSIONAL"]
    AQ["MPX8 PROFESSIONAL"] --> AR["MPX8 PROFESSIONAL"]
    AS["MPX8 PROFESSIONAL"] --> AT["MPX8 PROFESSIONAL"]
    AU["MPX8 PROFESSIONAL"] --> AV["MPX8 PROFESSIONAL"]
    AW["MPX8 PROFESSIONAL"] --> AX["MPX8 PROFESSIONAL"]
    AY["Headphones ↑"] --> AZ["Headphones ↑"]
    BA["USB cable to USB power adapter"] --> BB["USB cable to USB power adapter"]
    BF["USB cable to computer"] --> BG["USB cable to computer"]
† Sold separately.
Features

-
USB Port: Use the included USB cable to connect this USB port to (A) your computer or (B) the included USB power adapter, and then connect the power adapter to a power outlet.
-
Power Switch: Turns MPX8 on and off. Remember to use the included USB cable to connect MPX8 to a power source first.
-
SD Card Slot: Insert a standard SD card containing samples into this slot. Use the MPX8 Editor (downloadable for free from www.akaipro.com/mpx8) to load samples onto an SD card. If you choose to load samples to an SD card without using the MPX8 Editor, please see the Using Your Own Samples section of this manual to make sure they are formatted properly.
-
Main Out: Use audio cables with standard 1/4" (6.35 mm) TS connectors to connect these outputs to a speaker or amplifier system. For mono sound, connect a cable only to the left (L) output. Adjust the volume of these outputs with the Volume +/- buttons.
-
Headphone Out: Connect stereo headphones with a standard 1/8" (3.5 mm) plug to this output. Adjust the volume of this output with the Volume +/- buttons.
-
Display: Shows MPX8's current parameters and other operations. See the Display Overview section of this manual for more information.
-
Data Dial: Decreases or increases the value of the currently selected parameter.
-
Select +/-: Moves up or down through the available parameters shown in the Display.
-
Volume +/-: Adjusts the volume level sent to the Main Out and Headphone Out. Press both buttons at the same time to stop all samples that are currently playing.
-
Pads: Use these pads to trigger the samples on an inserted SD card (sold separately). The pads are velocity-sensitive and pressure-sensitive, which makes them very responsive and intuitive to play.
The pads light up different colors to indicate their current states:
• Off (no color): The pad has no sample assigned to it.
• Orange: The pad has a sample assigned to it.
• Green: The pad's assigned sample is currently playing.
• Red: The pad is currently being edited (whether or not a sample is assigned to it).
Note: The pads' pressure sensitivity does not affect sample playback. "Pressure information" is only sent out the MIDI Out as polyphonic aftertouch messages when MPX8 is used as a MIDI controller.
- MIDI In: Use the included 1/8"-to-MIDI cable to connect this output to the MIDI Out of an external MIDI device. This is useful if you want to use an external MIDI device to trigger samples assigned to MPX8's pads (set each pad's MID parameter to the desired MIDI Note number). MPX8 recognizes MIDI Note On messages over Channel 10 only.
- MIDI Out: Use the included 1/8"-to-MIDI cable to connect this output to the MIDI In of an external MIDI device. MPX8 can then send MIDI Note On and polyphonic aftertouch messages to that device (set each pad's MID parameter to the desired MIDI Note number).
- Kensington ^® Lock Slot: This connector is compatible with standard laptop-style Kensington security cables for theft protection.
Operation
Display Overview
This is an overview of MPX8's Display:
- Kit: The number of the preset, either a Internal Kit (with an "i" prefix) or a User Kit (with an "e" prefix).
- Sample Location: Displays the sample location, either MPX8's internal sample library or an inserted SD card (sold separately).
- Message: Displays information about MPX8's current state. This will show an command.
- Sample Name: Displays the name of the selected sample from MPX8's internal sample library or an inserted SD card (sold separately).
- Parameters: Displays the tuning, reverb, trigger type, level, panning, and MIDI note number.
Selecting Kits
A "Kit" includes each pad's sample location, name and/or number, tuning, reverb level, trigger type, volume level, panning, and MIDI note number.
To select a Kit:
- Use the Select +/- buttons to move the cursor to the Kit field (KIT).
- Use the Data Dial to scroll through the kit numbers. (Internal Kits have an "i" prefix, and User Kits have an "e" prefix.)
- When the desired Kit number is shown, wait a few seconds—the Kit will load automatically.

Editing Kits
You can edit the parameters of each Kit, including the samples assigned to the pads and the tuning, trigger type, panning, etc. for each pad.
To assign a sample to a pad:
- Select a Kit (as described in the previous Selecting Kits section).
- Press the pad you want to assign a sample to. It will light up red, and the name of the sample currently assigned to it (if any) will appear in the display.
- Select the Location field (LOC) by using the Select +/- buttons.
- Use the Data Dial to select where your desired sample is located: MPX8's internal memory (INT) or an inserted SD card (CARD). If you are using your own samples on an SD card, please see the important Using Your Own Samples section below.
- Select the sample name field by using the Select +/ - buttons.
- Use the Data Dial to select the desired sample. When the desired sample name is shown, wait a few seconds—the sample will load automatically.
IMPORTANT! Your Kit (including its pad assignments, parameters, etc.) will not be saved automatically! To save it, please see the Saving Kits section of this manual.
Using Your Own Samples
You can use MPX8 to trigger your own samples instead of the ones in MPX8's internal sample library.
To do this, load the sample files onto an SD card (not included) using one of the following:
• A standard SD card reader.
- The MPX8 Editor, downloadable for free at www.akaipro.com/mpx8. Instructions for using the editor are included with the download.
Please note the following:
- The samples files must be 16-bit, mono WAVs. They can have a sample rate of 48, 44.1, 32, 22.05, or 11.205 KHz.
- The sample files must be located in the root (main) directory of the card and not in any subdirectories.
- You can use an SD card or SDHC card with a capacity up to 32 GB.
- We recommend formatting your SD card to a FAT32 file system (if it is not already) and naming your sample files according to this format. This means:
○ Do not use any of these characters: "*/\:<> ? | - Do not use spaces.
○ Limit your file name to 8 characters, if possible. - Up to 512 files can be stored in the root directory of the card.
- You can assign up to 30 MB's worth of samples onto MPX8's pads at a time (the sample library on your SD card can be larger, of course). Also, please note that a sample's size will be rounded up when loaded (e.g., a 2.1 MB sample on the SD card will be treated as a 3 MB sample when it is assigned to a pad).
To adjust the parameters of a pad:
- Use the Select +/- buttons to highlight the desired parameter name.
- Use the Data Dial to adjust the parameter value.
The adjustable parameters are described below:
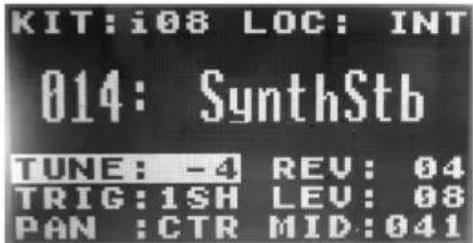
Tuning TUNE
The pitch adjustment of sample assigned to the pad, in semitones. The lowest possible tuning is -4, and the highest is 4. At 0, the pad will play the sample back at its normal pitch.
Reverb REV
The amount of reverb applied to the sample assigned to the pad. The lowest amount is 0 (no reverb), and the highest is 10 (maximum reverb).
Trigger TRIG
How the sample plays back when triggered by the pad. When set to One-Shot (1SH), pressing the pad will play the entire sample.
When set to Hold (HLD), pressing and holding the pad will play the sample until you release the pad. If you are still holding the pad when it reaches the end of the sample, it will loop back to the beginning, looping it continuously until you release the pad.
When set to Loop (LP), pressing the pad will play the sample, looping it continuously until you press the pad again.
Level LEV
The volume level of the sample assigned to the pad. The quietest value is 0 (silent), and the loudest is 10.
Panning PAN
The left-right balance of the sample assigned to the pad. The left-most value is L4, the right-most value is R4, and the center is CTR.
MIDI Note Number MID
The MIDI note message sent out when you press the pad. The available values are 000 - 127. This value does not affect the sample assigned to the pad; it changes the MIDI note message sent out MPX8's MIDI Out port and the MIDI note message MPX8 recognizes sent into its MIDI In port.
Saving Kits
If you change the currently selected Kit (in the KIT field), you will lose any changes you have made unless you save it first.
To save the currently selected Kit:
- Press Select + and Volume + simultaneously. The Display will ask if you want to save the current Kit.
- Press the Volume + button (Yes) to save the kit or the Volume - button (No) to cancel.
Please note: Saving a kit will overwrite all the pad assignments, parameters, etc. since the last time you saved it.
To copy and save the current Kit's settings to a new User Kit:
- Make sure an SD card is inserted into the SD Card Slot.
- Press Select – and Volume – simultaneously. The Display will ask if you want to save the Kit to a new Kit.
- Press the Volume + button (Yes) to save the kit or the Volume - button (No) to cancel. MPX8 will save the Kit to the next available User Kit number (e.g., if you have 12 User Kits already saved on the SD card, the next User Kit will be e13).
Messages
MPX8's display may show these messages to indicate its current state:
Processing The sample is currently loading into MPX8's memory. Please wait!
Reading SD Card MPX8 is reading your SD card. Please wait!
Save Complete The Kit has been saved successfully.
Stop All Sounds This message is shown after you press both Volume +/- buttons simultaneously, stopping all samples currently playing back.
MPX8's display may show these error messages if MPX8 cannot execute a command. Use the information below to troubleshoot the problem:
Card Error Your SD card is not FAT16-/FAT32-formatted, or your SD card is not functioning properly. Reformat your SD card to a FAT16 or FAT32 file system.
Card Locked Your SD card is write-protected. Remove write protection before continuing.
Int Mem Error MPX8's internal memory is damaged and needs to be serviced. Contact Akai Professional's technical support.
Invalid Format MPX8 does not support the sample's file format. Please make sure the file is a 16-bit, mono WAVs at a sample rate of 48, 44.1, 32, 22.05, or 11.205 KHz.
Kit File Full MPX8 cannot save another User Kit because there are already 99 User Kits saved on your SD card. Delete enough files so there are fewer than 99 User Kits on your SD card.
No Kit File The KITS directory on your SD card is empty (this is where MPX8 saves User Kits; at least one Kit file must be in this directory for MPX8 to operate normally). Delete this directory from your SD card and insert it into MPX8 again. MPX will automatically create a new KITS folder and resume normal operation.
No SD Card The SD card slot is empty. Insert a card in the SD card slot.
No Sounds Found Your SD card's root directory contains no WAV files. Make sure the samples are on your SD card's root directory.
Not Enough Space There is not enough space on your SD card. Delete some files from it.
Sound File Error The sample assigned to the pad is of an invalid format or is too large. Please make sure the file is a 16-bit, mono WAVs at a sample rate of 48, 44.1, 32, 22.05, or 11.205 KHz, and make sure only 30 MB's worth of samples are assigned to MPX8's pads at a time.
Sound Too Large Either the sample is larger than 30 MB or adding the sample would exceed the 30 MB limit of MPX8's memory. Please make sure only 30 MB's worth of samples are assigned to MPX8's pads at a time.
Also, please note that a sample's size will be rounded up when loaded (e.g., a 2.1 MB sample on the SD card will be treated as a 3 MB sample when it is assigned to a pad).
Restoring Default Settings
To restore MPX8's default settings, which will reset all Internal Kits to their defaults, press and hold both Volume +/- buttons while switching MPX8's power on.
Assistance technique
Technical Specifications
| Pads | 8 pads (velocity-sensitive and pressure-sensitive) |
| Kits | 8 Internal Kits99 User Kits possible (on optional SD card, sold separately) |
| Internal Sounds | 21 |
| Supported File Format | 16-bit mono WAV with a sample rate of 48, 44.1, 32, 22.05, or 11.205 KHz |
| Supported SD Cards | SD or SDHC up to 32 GB capacity (FAT16 or FAT32 file format) |
| Connections | 1/4" (6.35 mm) TS x 2 (Main Out)1/8" (3.5 mm) TRS (Headphone Out)1/8" (3.5 mm) TRS x 2 (MIDI In/Out)1 USB-MIDI port1 SD card slot1 Kensington lock slot |
| Power | 5 V, 1 A (via USB) |
| Dimensions (W x D x H) | 11.6" x 4" x 1.3"295 mm x 102 mm x 33 mm |
| Weight | 1 lb.0.45 kg |
AKAI
professional
akaipro.com
7-51-0392-A


- MPX8
- User Guide (English)
- Introduction
- Box Contents
- Support
- Features
- Operation
- Display Overview
- Selecting Kits
- To select a Kit:
- Editing Kits
- To assign a sample to a pad:
- Using Your Own Samples
- Please note the following:
- To adjust the parameters of a pad:
- Tuning TUNE
- Reverb REV
- Trigger TRIG
- Level LEV
- Panning PAN
- MIDI Note Number MID
- Saving Kits
- To save the currently selected Kit:
- To copy and save the current Kit's settings to a new User Kit:
- Messages
- Restoring Default Settings
- Assistance technique
Brand : AKAI
Model : MPX8
Category : DJ Equipment