GourmetPRO FP9300 - Food Processor AEG - Free user manual and instructions
Find the device manual for free GourmetPRO FP9300 AEG in PDF.
| Brand | AEG |
| Model | GourmetPRO FP9300 |
| Product type | Food processor / kitchen robot |
| Large bowl capacity | 4.2 liters |
| Maximum liquid capacity | 2.6 liters |
| Maximum solid food capacity (grating) | 3.4 liters |
| Power supply | Mains electricity (voltage and frequency according to rating plate) |
| Power | Not specified (estimated 1200 W) |
| Speeds | Start and Boost |
| Included accessories | Large bowl, small bowl, large multifunction blade, small blade, kneading hook, emulsifying disc, french fry disc, reversible grating disc, adjustable slicing disc, drive shaft, large pusher, small pusher, lids |
| Main functions | Chopping, kneading, slicing, grating, emulsifying, whisking, making french fries |
| Safety | Safety lid lock, protection against sharp blades, automatic stop if unlocked |
| Cleaning | Removable parts dishwasher safe or washable in hot water; wipe motor unit with a damp cloth (do not immerse) |
| Storage | Retractable power cord in base |
| Maximum operating time (heavy load) | 90 seconds, then 10 minutes cooling |
| Weight | Not specified (estimated 5 kg) |
Frequently Asked Questions - GourmetPRO FP9300 AEG
User questions about GourmetPRO FP9300 AEG
0 question about this device. Answer the ones you know or ask your own.
Ask a new question about this device
Download the instructions for your Food Processor in PDF format for free! Find your manual GourmetPRO FP9300 - AEG and take your electronic device back in hand. On this page are published all the documents necessary for the use of your device. GourmetPRO FP9300 by AEG.
USER MANUAL GourmetPRO FP9300 AEG
natural_image
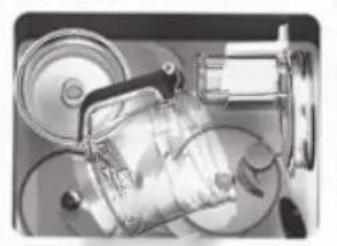
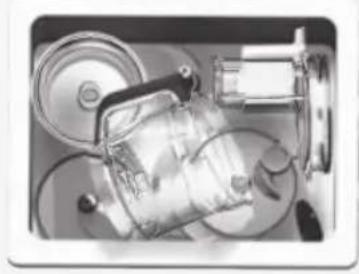
Close-up of a modern kitchen feedstock with AEG branding and control buttons (no visible text or symbols on the device itself)GourmetPRO Series™ FP9300
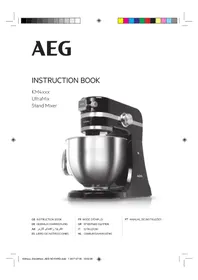
GB Instruction book....19–25
Before using the appliance for the first time, please read the safety advice on page 20 carefully.

text_image
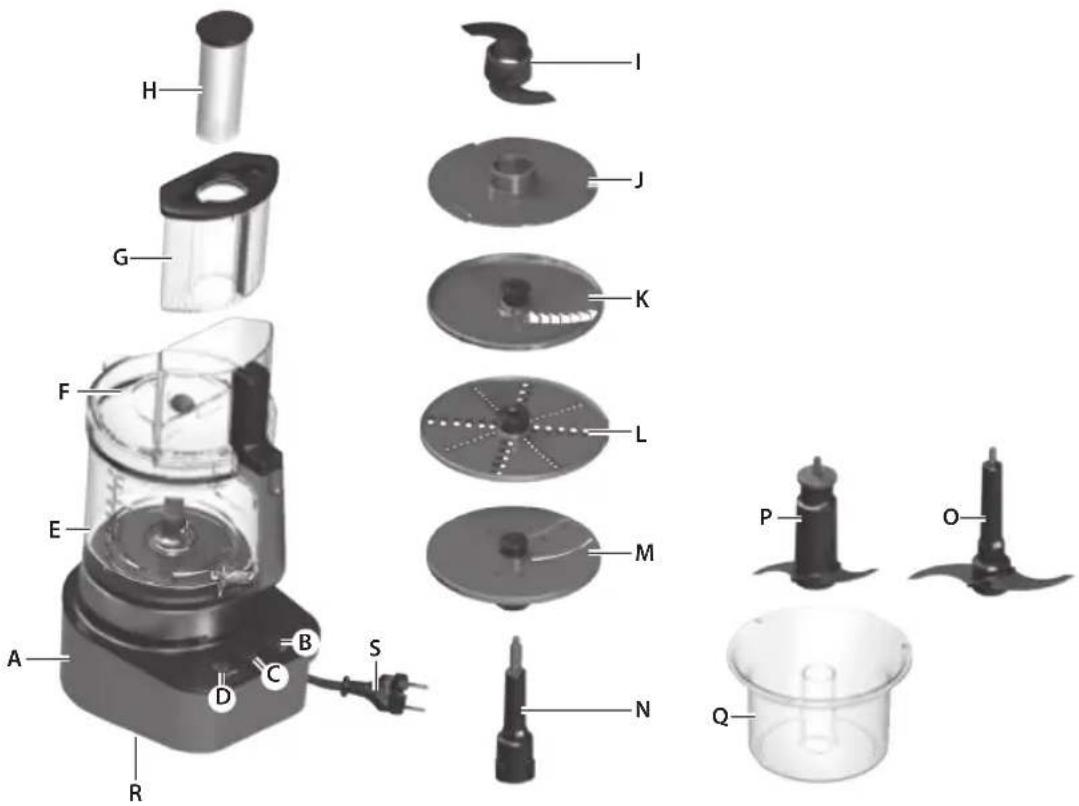
Exploded view diagram of a kitchen appliance with labeled parts from fan to lidD
Teile
A. Motorblock
B. Taste „Power“
C. Taste „Boost“
natural_image
Mechanical assembly diagram showing a motor, gears, and housing components (no text or labels)
natural_image
Illustration of a glass pitcher with a handle and arrow indicating rotation (no text or symbols)
natural_image
Close-up of a laboratory glassware device with a curved arrow indicating rotation (no visible text or symbols)natural_image
Diagram showing a mechanical device with downward arrows indicating process (no text or symbols)- Es gibt zwei verschiedene Schieber für den Deckel, einen großen (für größere Gemüsesorten) und einen kleinen (z.B. für Karotten oder Gurken). Stecken Sie den kleinen Schieber in den großen Schieber und den großen Schieber in die Einfüllöffnung am Deckel. Hinweis: Das Gerät startet nicht, wenn der große Schieber nicht korrekt an der Einfüllöffnung befestigt wurde.
- Υπάρχουν δύο διαφορετικοί τύποι εξαρτημάτων ώθησης για το καπάκι: ένα μεγάλο (για μεγάλα λαχανικά) και ένα μικρό (για μικρά λαχανικά, όπως καρότα ή αγγούρια). Τοποθετήστε το μικρό εξάρτημα ώθησης μέσα στο μεγάλο, και το μεγάλο εξάρτημα μέσα στο στόμιο τροφοδοσίας που βρίσκεται στο καπάκι του μπολ. Σημείωση! Η συσκευή δεν θα ξεκινήσει, αν το μεγάλο εξάρτημα ώθησης δεν τοποθετηθεί σωστά στο σωλήνα τροφοδοσίας.
- Er zijn twee verschillende soorten duwers voor het deksel, een grote (voor grotere groente) en een kleine (voor bijvoorbeeld wortelen of komkommers). Plaats de kleine duwer in de grotere duwer en plaats vervolgens de grote duwer in de vulopening op het deksel. Opmerking! Het apparaat start niet als de grote duwer niet correct in de vulbuis is geplaatst.
- Il existe deux différents types de poussoirs pour le couvercle : un grand (pour les gros légumes) et un petit (pour les carottes ou les concombres, par exemple). Placez le petit poussoir dans le grand, puis le grand poussoir dans la cheminée de remplissage sur le couvercle du bol. Remarque : L'appareil ne démarre pas si le grand poussoir n'est pas correctement placé dans la cheminée.

text_image
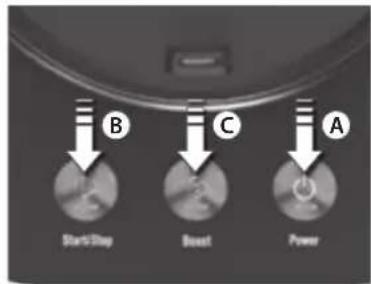
B C A Start/Stop Boost Power- Schließen Sie das Netzkabel an den Strom an. Drücken Sie die Taste „Power“ (A). Drücken Sie die Taste „Start/Stop“ (B) einmal, um mit der Verarbeitung zu beginnen. Halten Sie die Taste „Boost“ (C) gedrückt, um die Impuls-Funktion zu aktivieren. Die Impuls-Funktion bleibt solange aktiviert, wie die Taste „Boost“ gedrückt wird. Bei schweren Arbeiten (Brotteig) darf das Gerät nicht länger als 90 Sekunden ununterbrochen laufen.
- Βάλτε το φις του καλωδίου στην πρίζα. Πατήστε το κουμπί Power (A). Πατήστε το κουμπί Start/Stop (B) μία φορά για να ξεκινήσει η επεξεργασία. Πατήστε παρατεταμένα το κουμπί Boost (C) για να ενεργοποιήσετε τη στιγμιαία λειτουργία Boost. Η στιγμιαία λειτουργία Boost παραμένει ενεργή, για όσο διάστημα είναι πατημένο το κουμπί Boost. Για μεγάλες ποσότητες, π.χ. όταν φτιάχνετε ζύμη για ψωμί, η συσκευή δεν πρέπει να λειτουργεί περισσότερο από 90 δευτερόλεπτα χωρίς διακοπή.
- Steek de stekker in het stopcontact. Druk op de Aan/Uit-toets (A). Druk één keer op de Start/Stop-toets (B) om te beginnen met verwerken. Houd de Boost-toets (C) ingedrukt om de Boost-functie te activeren. De Boost-functie blijft geactiveerd zolang de Boost-knop is ingedrukt. Voor zware bewerkingen (bijvoorbeeld deeg) mag het apparaat maar 90 seconden achter elkaar worden gebruikt.
- Branchez le cordon d'alimentation au secteur. Appuyez sur la touche de mise sous tension (A). Pour démarrer, appuyez une fois sur la touche marche/arrêt (B). Appuyez sur la touche Boost (C) et maintenez-la enfoncée pour activer la fonction Boost. La fonction Boost reste activée tant que la touche Boost est maintenue enfoncée. L'appareil ne doit pas fonctionner pendant plus de 90 secondes sans interruption si vous travaillez des mélanges épais (pâte à pain).

natural_image
Close-up of a mechanical device with an upward arrow and a power button labeled 'Power' (no text or symbols on the device itself)- Sobald der kleine Schieber entfernt wurde, können während der Verarbeitung weitere Zutaten durch die Einfüllöffnung hinzugefügt werden. Wenn Sie den großen Schieber verwenden, wird das Gerät automatisch ausgeschaltet, sobald der große Schieber von der Einfüllöffnung entfernt wird. Dies ist eine Sicherheitsvorrichtung. Das Gerät wird automatisch wieder eingeschaltet, sobald der Schieber in die Einfüllöffnung gesteckt wurde. Schalten Sie das Gerät ab, indem Sie die Taste „Power“ drücken. Vorsicht! Stecken Sie niemals Ihre Finger oder andere Gegenstände in die Öffnung/den Einfülltrichter.
- Μπορείτε να προσθέτετε επιπλέον υλικά κατά τη διάρκεια της επεξεργασίας, μέσω του σωλήνα τροφοδοσίας, και αφού πρώτα αφαιρέσετε το μικρό εξάρτημα ώθησης. Ότα χρησιμποιείτε το μεγάλο εξάρτημα ώθησης, η συσκευή σταματά να λειτουργεί αυτόματα, αν αφαιρέσετε το μεγάλο εξάρτημα από το σωλήνα τροφοδοσίας. Αυτό συμβαίνει για λόγους ασφάλειας. Η συσκευή θα ξεκινήσει ξανά αυτόματα, μόλις τοποθετήσετε το εξάρτημα ώθησης στο σωλήνα τροφοδοσίας. Πατήσε το κουμπί Power για να απενεργοποιήσετε το συσκευή. Προσοχή! Μη βάζετε τα δάχτυλά σας ή μαγειρικά σκεύη στο στόμιο/σωλήνα τροφοδοσίας.
- Volgende ingrediënten kunnen via de vulbuis worden toegevoegd tijdens de bewerking, zodra de kleine duwer is verwijderd. Wanneer u de grote duwer gebruikt, zal het apparaat automatisch stoppen als de grote stamper uit de vulbuis wordt getild. Dit is een veiligheidsvoorziening. Het product wordt automatisch gestart zodra de duwer in de vulbuis wordt geplaatst. Schakel het apparaat uit door te drukken op de Aan/Uit-toets. Let op! Steek nooit uw vingers of hulpstukken in de opening/trechter.
- Vous pouvez ajouter des ingrédients supplémentaires en cours d'utilisation, via la goulotte, une fois le petit poussoir retiré. Lorsque vous utilisez le grand poussoir, l'appareil s'arrête automatiquement si celui-ci est retiré de la cheminée. Il s'agit d'une sécurité. L'appareil redémarre automatiquement une fois que le grand poussoir est inséré dans la cheminée. Éteignez l'appareil en appuyant sur la touche de mise sous tension. Attention ! Ne placez jamais vos doigts ni d'autres ustensiles dans la cheminée/la goulotte.
natural_image
Close-up of a mechanical device with a downward arrow indicating compression or disassembly (no text or symbols visible)D
text_image
Diagram illustrating a mechanical assembly with labeled parts and directional arrows indicating motion or force.natural_image
Diagram of a mechanical device with arrows indicating motion or assembly (no text or symbols)- Entfernen Sie nach der Lebensmittelverarbeitung das Zubehör und die Spindel von der Rührschüssel, bevor Sie die zubereiteten Speisen entfernen.
- Μόλις ολοκληρωθεί η επεξεργασία, αφαιρέστε το εξάρτημα και τον άξονα από το μπολ, προτού αφαιρέσετε την τροφή που επεξεργαστήκατε.
- Zodra de bewerking is voltooid, verwijdert u het hulpstuk en spil van de mengkom vóór u het eten uit het apparaat neemt.
- Lorsque vous avez terminé de hacher les aliments, retirez l'accessoire et la tige de rotation du bol avant de retirer les aliments hachés.

natural_image
3D rendered object resembling a mechanical or electronic component with a grid-patterned top and power outlet (no text or symbols visible)- Schalten Sie das Gerät aus, ziehen Sie den Stecker aus der Steckdose und warten Sie, bis die Einsätze zum Stillstand gekommen sind. Wischen Sie den Motorblock mit einem feuchten Tuch ab.
Wärung! Tauchen Sie niemals das Gehäuse, den Netzstecker oder das Netzkabel in Wasser oder andere Flüssigkeiten. - Απενεργοποιήστε τη συσκευή,
αφαιρέστε το φις από την πρίζα τοίχου
και περιμένετε μέχρι να σταματήσουν
να περιστρέφονται πλήρως τα
εργαλεία. Σκουπίστε τη βάση του
μοτέρ με ένα υγρό πανί.
Προσιδοποίηση! Μην βυθίζετε το περίβλημα, το φις ή το καλώδιο σε νερό ή σε οποιοδήποτε άλλο υγρό. - Schakel het apparaat uit, neem de stekker uit het stopcontact en wacht totdat de accessoire is gestopt met draaien. Veeg de motorbasis schoon met een vochtige doek.
Waalschuwing! Dompel de behuizing, de stekker of het netsnoer nooit onder in water of enige andere vloeistof. - Éteignez l'appareil, débranchez la fiche de la prise électrique et attendez que les outils soient complètement arrêtés. Essuyez la base moteur à l'aide d'un chiffon humide.
Avertissement ! Ne plongez jamais le bloc moteur, la prise ou le cordon dans l'eau ou dans un autre liquide.
natural_image
Close-up of mechanical components including a cylindrical device and a motor, with no visible text or symbols.- Reinigen Sie alle Teile mit Ausnahme des Motorblocks mit warmem Seifenwasser. Trocknen Sie jedes Teil vor der Verwendung sorgfältig ab.
Alle Teile mit Ausnahme des Motorblocks und der Scheibe zum Schlagen sind spülmaschinenfest. Stellen Sie die Teile nur in den oberen Spülmaschinenkorb. - Πλύνετε όλα τα τμήματα, εκτός από τη βάση του μοτέρ, με ζεστή σαπουνάδα. Αφήστε όλα τα τμήματα να στεγνώσουν καλά, πριν από τη χρήση.
Ολα τα τμήματα, εκτός από τη βάση μοτέρ και το δίσκο ανάδευσης, μπορούν να πλυθούν σε πλυντήριο πιάτων. Αν χρησιμοποιείτε πλυντήριο πιάτων, τοποθετήστε τα τμήματα στο επάνω ράφι του πλυντηρίου. - Reinig alle onderdelen behalve de motorbasis in warm water met zeepsop. Droog alle onderdelen grondig af voordat u deze gebruikt.
Alge onderdelen, behalve de motorbasis en de klopschijf, zijn vaatwasmachinebestendig. Als u een afwasautomaat gebruikt, mag u de onderdelen alleen in het bovenste rek van de afwasautomaat plaatsen. - Lavez tous les éléments à l'eau chaude savonneuse, à l'exception de la base moteur. Séchez soigneusement chaque élément avant utilisation.
Tous les éléments, à l'exception de la base moteur et du disque à émulsionner, sont lavables au lave-vaisselle. Si vous utilisez un lave-vaisselle, placez les éléments uniquement dans le bac du haut de votre lave-vaisselle.
text_image
Exploded view diagram of a kitchen appliance with labeled parts from fan to lid
GB
Components
A. Motor Base
B. Power button
C. Boost button
D. Start/Stop button
E. Large processing bowl
F. Bowl Lid
G. Big Pusher
H. Small Pusher
I. Dough Blade
J. Whisk disc
K. French fries disc
L. Reversible Shredding Disc
M. Adjustable Slicing Disc
N. Spindle for the dough blade and discs
O. Large multi knife/chopping blade
P. Small multi knife/chopping blade
Q. Small processing bowl
R. Power Cord Storage
S. Power Cord
GB
READ INSTRUCTION BEFORE USING.
Read the following instruction carefully before using the appliance for the first time.
- This appliance shall not be used by children. Keep the appliance and its cord out of reach of children. Appliances can be used by persons with reduced physical, sensory or mental capabilities or lack of experience and knowledge if they have been given supervision or instruction concerning use of the appliance in a safe way and if they understand the hazards involved. Children shall not play with the appliance.
- Cleaning and user main tenance shall not be made by children without supervision.
- The appliance may only be connected to a power supply whose voltage and frequency comply with the specifications on the rating plate!
- Never use or pick up the appliance if – the supply cord is damaged, – the housing is damaged.
- If the appliance or the supply cord is damaged, it must be replaced by the manufacturer, its service agent or similarly qualified person, in order to avoid hazard.
• Always place the appliance on a flat, level surface.
- Always disconnect the appliance from the supply if it is left unattended and before assembling, disassembling or cleaning.
- Never touch the blades or inserts with your hand or any tools while the appliance is plugged in.
• The blades and inserts are very sharp! Danger of injury!
- Do not immerse the appliance in water or any other liquid.
- Do not let the appliance run for more than 90 seconds at a time using heavy loads. After running for 90 seconds with heavy loads, the appliance should be left to cool for at least 10 minutes.
- Do not exceed the maximum filling volume as indicated on the appliances.
- Do not use this applianc e to stir paint. Danger, could result in an explosion!
- Do not let the power cord touch hot surfaces or hang over edge of table or counter.
- Never use accessories or parts made by other manufactures not recommended or sold; may cause a risk of injury to persons.
- Keep hands and ut ensils out of the appliance during operation to reduce the risk of severe injury to persons or damage to the appliance.
- Never feed food by hand. Always use the food pusher.
- Never operate the appliance if the cover is not properly locked in place.
- Care shall be taken when handling the sharp cutting blades, emptying the bowland during cleaning.
- Be careful if hot liquid is poured into the appliance as it can be ejected out of the appliance due to a sudden steaming.
- Switch off the appliance and disconnect from supply before changing accessories or approaching parts that move in use.
- Be careful if hot liquid is poured into the appliance as it can be ejected out of the appliance due to a sudden steaming.
- This appliance is intended for domestic use only. The manufacturer cannot accept any liability for possible damage caused by improper or incorrect use.
- DO NOT OPEN UNTIL BLADES STOP. SHARP BLADES - NEVER USE SLICER UNLESS COMPLETELY ASSEMBLED.
Getting started
natural_image
Mechanical assembly diagram showing motor, gears, and housing components (no text or labels)GB
- Before using the food processor for the first time, wash all parts in warm soupy water, except for the Motor Base. Dry each part thoroughly before use.
Caution! Ensure that the power cord is unplugged.

Warning! Never immerse the
housing, plug, or cord in water or any other fluid.

natural_image
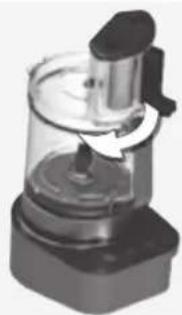
3D rendering of a glass pitcher with a handle and arrow indicating rotation (no text or symbols)- Place the Motor Base on a dry, level surface. Place the Processing Bowl onto the Motor Base (the bowl will only fit correctly on the base when the handle is positioned to the right). Rotate the handle clockwise to lock.
natural_image
Close-up of a laboratory glassware device with a mechanical lever and base (no visible text or symbols)- Position the Lid onto the Processing Bowl. The symbol ▼ on the Lid should be aligned with the 🔒 on the handle. Rotate clockwise to lock 🔒.
Note: If the Processing Bowl and Bowl Lid are not correctly assembled, the appliance will not function.

natural_image
Diagram of a mechanical component with downward arrows indicating force or movement (no text or symbols)- There are two different types of pushers for the lid, a large (for larger vegetables) and a small (for example for carrots or cucumbers).
Place the small pusher into the larger pusher, and finally the larger pusher into the filling hole on the bowl lid.
Note! The appliance will not start if the large pusher is not correctly placed into the feeding tube.
text_image
B C A Start/Stop Boost Power- Plug in the Power Cord to the mains. Press the Power button (A). Press the Start/Stop button (B) once, to start processing. Press and hold the Boost button (C) to activate the Boost function. The Boost function remains on as long as the Boost button is pressed down. For heavy work, (bread dough) the appliance should not be switched on more than 90 seconds without stopping.

natural_image
Close-up of a mechanical device with an upward arrow and a power button icon (no text or symbols)- Further ingredients can be added while processing, by pouring through the feed tube, once the Small Pusher has been removed. When using the large pusher, the appliance will stop automatically if the large pusher is lifted out from the feeding tube. This is a safety feature. The product will start automatically again once the pusher is inserted into the feeding tube.
Turn off the appliance by pressing the Power button.
Caution! Never put fingers or other utensils in the opening/feed chute.
Assembling the attachments
GB

natural_image
Close-up of a mechanical device with a downward arrow indicating compression or disassembly (no text or symbols visible)- Assembling the Large multi knife / chopping blade: Fit the Large processing Bowl as previously described. Fit the Large multi knife, by pressing it firmly into place on the Drive Shaft. Caution! The blades are very sharp!

text_image
Diagram illustrating a mechanical assembly process with labeled components and directional arrows indicating motion or movement.- Assembling the discs or Dough Blade: Fit the Spindle, by pressing it firmly into place on the Drive Shaft. Select the desired disc. Fit the disc by pressing it firmly into place on the Spindle. Note: The Dough blade and Whisk disc are assembled firmly with spindle before pressing it into place on the drive shaft. All attachments must be firmly attached/correctly fitted to the Spindle.

- Assembling the Small processing bowl and Small multi knife / chopping blade: Place the small bowl within the large bowl. If the small bowl is misplaced, it is not possible to close the lid. Fit the Small multi knife by pressing it firmly into place.
Cleaning and Care

text_image
Diagram showing a droplet in a glass jar with upward arrows indicating process or movement, possibly illustrating a physical or chemical process.- When processing is complete, remove the attachment and Spindle from the Processing Bowl before removing the processed food.

natural_image
3D rendering of a cylindrical device with a grid-patterned top and connected to an electrical outlet (no text or symbols visible)- Switch the appliance off, remove the plug from the wall socket and wait until the tools have stopped completely. Wipe the Motor Base with a damp cloth.
Warning! Never immerse the housing, plug, or cord in water or any other fluid.

natural_image
Mechanical assembly diagram showing a motor, pulley, and wheels (no text or labels)- Wash all parts, except for the Motor Base, in warm soupy water. Dry each part thoroughly before use.
All parts, except for the Motor Base and Whisk disc, are dishwasher safe. If using the dishwasher, place parts only on the top rack of your dishwasher.
Blending quantities and Processing Times
GB
| Maximum Processing time with heavy load | 90 s | Whisking/Whipping quantities and Processing Times | |||
| Ingredients Quantity Time Speed | |||||
| Cream 200-600 g 40~60 sec Start | |||||
| Egg-white 120-360 g ≥ 120 sec Start | |||||
| Processing bowl filling levels | ||
| Bowl full capacity:4,2 liters (~18 cups) | For schredding:max 3,4 liters | Liquids:max 2,6 liters |
| Note: Do not fill bowl above marked liquid levels or 3,75 liters (15 cups) Dry level (shredding). | ||
| Multi Knife quantities and Processing Times | ||||||||
| Ingredients Quantity | Quality Time Quality Time Quality Time Speed | |||||||
| Nut (Almond) | 100-200 g | Coarse | \ | Medium | 5 s | Fine | 10 s Boost | |
| 200-300 g | s | s | 10 s Boost | |||||
| 300-400 g | s | s | 10 s Boost | |||||
| Meat (Beef) | 200-400 g | \ | \ | 10 s | Boost | |||
| Bread crumbs | 100-200 g | s | 10 s Boost | |||||
| 200-400 g | s | 10 s Boost | ||||||
| Vegetable (onion) | 100-200 g | s | 10 s Boost | |||||
| 200-300 g | s | s | 10 s Boost | |||||
| 300-400 g | s | s | 10 s Boost | |||||
| Ice cubes | 100-200 g | 3 s for 5 times | 3 s for 10 times | Boost | ||||
| 200-300 g | 3 s for 5 times | 3 s for 10 times | Boost | |||||
| 300-400 g | 3 s for 5 times | 3 s for 10 times | Boost | |||||
| Kneading dough with dough blade | ||||
| Recipe | Ingredients/Quantity | Method | Time | Speed |
| Bread dough | 350 g flour:5 g salt;10 g margarine;10 g sugar;200 g water :Quick yeast | Place all the ingredients into the bowl and knead until satisfactory. | 70-90 s | Start |
| Pizza dough | 400 ml of warm water;100 ml of oil;850g of wheat flour;1 egg (about 60g);30 g of cold yeast or 10g of dry yeast;3 teaspoons of salt (about 15g);1 teaspoon of sugar (about 5g). | Place all the ingredients into the bowl and knead until satisfactory. | ~ 90 s | Start |
| Wheat dough | 800 g flour1 egg8 g sugar550 g water | Place all the ingredients into the bowl and knead. | (25 S + 2 min off) X 2 | Start |
| Food disk | |||
| Food | Food tube | Speed | |
| Slicing | Carrot | Small / Big | Start |
| Mushroom | Big | Start | |
| Ginger | Big | Start | |
| Shredding | Carrot | Small / Big | Start |
| Cheese | Small / Big | Start | |
| French Fries | Potato | Big | Start |
Troubleshooting
GB
| Troubleshooting | ||
| Problem Possible cause Solution | ||
| Slices are slanted or uneven. | The food is light, it jumps during slicing. | Load food in the filler hole. Place big / small pusher onto food and apply pressure. Then start. |
| Some food remained on the disc after processing. | It is normal for small pieces to remain after processing. | Always clear any blocked food from chipper disc by yourself. |
| The motor slows down during operation. | Amount of dough may exceed maximum capacity. | Remove half and process in two batches. |
| Dough may be too wet, it sticks onto the side of the bowl. | Add more flour, 1 tablespoon at a time until the motor speeds up. Process until dough cleans the side of the bowl. | |
| The motor slows to start with S-blade. | Amount of meat may exceed maximum capacity. | Remove the meat and process in two batches. |
| Too much fat in the meat. Note that for best result | trim the meat of fat before processing. | |
| The motor does not work. There is a safety interlock switch to prevent the motor from starting if it is not properly assembled. | Make sure the processing bowl, lid are securely locked into position. Make sure that the large pusher is correctly placed into the large feeding tube. | |
| The appliance is not connected to the mains. Make sure to plug in the appliance before operation. | ||
| The food processor shuts off during operation. | The lid may have become unlocked. Check to make sure it is securely in position. | |
| The food processor vibrates/ moves during operation. | The rubber feet are wet. Make sure the rubber feet at the bottom of the unit are clean and dry. | |
| It is normal for heavy loads (e.g heavy dough, cheese). | Remove half and process in two batches. | |


Disposal
Recycle the materials with the symbol

Put the packaging in applicable con- s to recycle it.
Help protect the environment and human health and to recycle waste of electrical and electronic appliances.
Do not dispose appliances marked with

the symbol ■ with the household waste. Return the product to your local recycling facility or contact your municipal office.
D
GR
NL
F
GB


natural_image
Color palette bar with grayscale shades and a central crosshair symbol (no text or labels)This page is left blank intentionally


natural_image
Color palette bar with grayscale shades and a central crosshair symbol (no text or labels)This page is left blank intentionally


www.aeg-home.com


Printed on recycled paper


With Electrolux, the choice of professionals.
AEG