USER MANUAL Dinamica Plus ECAM370.95.T DELONGHI
st www on oé or sto s rv
nt rs n r you
o uo ot m mo u uo
W \~ Wt z aW
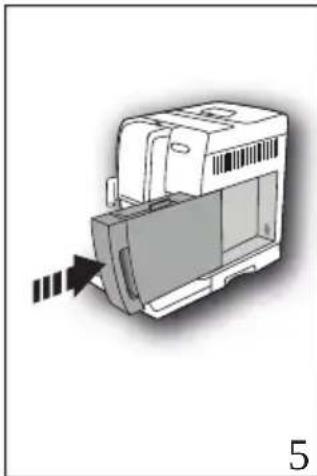
natural_image
Exterior view of a modern coffee machine with control panel and glass cup (no visible text or symbols)
MACHINE À CAFÉ
y o ’ é p o l oons rv z tt not
s t z www l on l oé pour y vor un s t
s ntr s rép r ton pro s z vous l
om mo É u u É o u
W \~ Wt aW
CAFETERA
p s y u r st s nstru on s
u os é nt st nstru t vo nt s
us r su p r to
st www on oé pr v r st
ntros s rv os r nos ust u
om mo u uom o uom f
W \~ Wt aW

text_image
A
A1
A2
1 MAX
A3
A5
A6
A7
B C
A4
A22
A8
A9
A10
A19
A21
A20
A11
A12
A13
A14
A15
A16
A17
A18

text_image
B
C
B8
B7
B6
B4
B4
B5
PROFILE 1
B1B9
ESPRESSO
COFFEE
CAPPUCCINO
LATTE MACCHIATO
B2
B3
B4
B4
B5
C1
C6
C2
my
C5
C3
C4
CONNECT
text_image
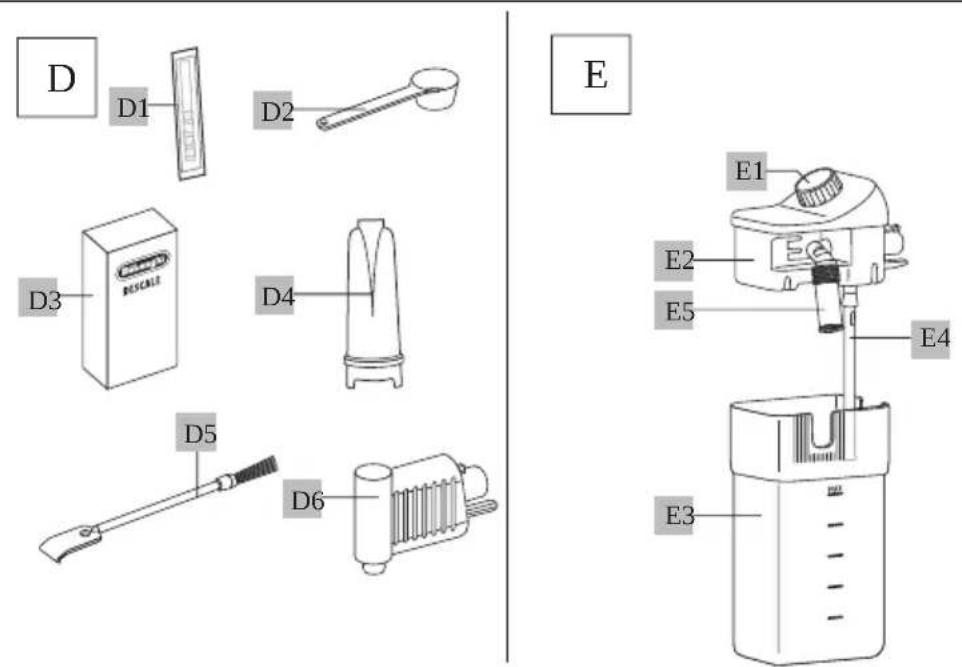
D
D1
D2
E
E1
E2
E5
E4
D3
D4
BISCALE
D5
D6
E3
t™·Óv·ÓÈ
z« À™ÊÓr • ÓJÈr wvx Úr Éu ÈJYYYYYYYYYYYYYYYYYYYYYYYYYYYYYYYYYYYYYYYYYYYYYYYYYYYYYYYYYYYYYYYYYYYYYYYYYYYYYYYYYYYYYYYYYYYYYYYYYYYYYYYYYYYYYYYYYYYYYYYYYYYYYYYYYYYYYYYYYYYYYYYYYYYYYYYYYYYYYYYYYYYYYYYYYYYYYYYYYYYYYYYYYYYYYYYYYYYYYYYYYYYYYYYYYYYYYYYYYYYYYYYYYYYYYYYYYYYYYYYYYYYYYYYYYYYYYYYYYYYYYYYYYYYYYYYYYYYYYYYYYYYYYYYYYYYYYYYYYYYYYYYYYYYYYYYYYYYYYYYYYYYYYYYYYYYYYYYYYYYYYYYYYYYYYYYYYYYYYYYYYYYYYYYYYYYYYYYYYYYYYYYYYYYYYYYYYYYYYYYYYY
“m”q6 t q"q6uz" ' o u\~z"
Èy™ÊÓIt™ÊuJz• ÉÓÊÚtÓz™• ÈJYYYYYYYYYYYYYYYYYYYYYYYYYYYYYf
bYJz·ÓÊ™uÚtÓz™·JYYYYYYYYYYYYYYYYYYYYYYYYYYYYYYYYYg
natural_image
Illustration of a hand inserting a plug into an electrical outlet (no text or symbols)
natural_image
Diagram of a computer monitor with an open button and scroll, showing no text or symbols
natural_image
Diagram of a device with a magnified inset showing a cable being inserted (no text or symbols present)
natural_image
Diagram of a mechanical component with a magnified inset showing a faucet handle (no text or symbols present)
| ZU6EI ruxx6 mz w6 u t l6I r' q"t 6 m q' I f6 | | |
| OmXc PGOF | UGZPSGIF | G | G | Gy m...G | á | GO | | G | G | G | | PG | á | G |
| G | | GOF | UG | SG | Gfí | | G | | Gá | G | | á | GOF | UGaPg |
natural_image
3D diagram of a mechanical component with an arrow indicating direction (no text or symbols)
natural_image
Line drawing of a mechanical device with a clamped component and an arrow indicating motion (no text or symbols)
| UGG1 uz "q' G m q' G" ~• Ifc o G G G G i ú GOp b Pcá Gá G G G á G -- G0md PSOF UGbPg Gí G G á G á G G á á ú G GZUZdC -VGXWWE Gú GOF U6c Pg |
natural_image
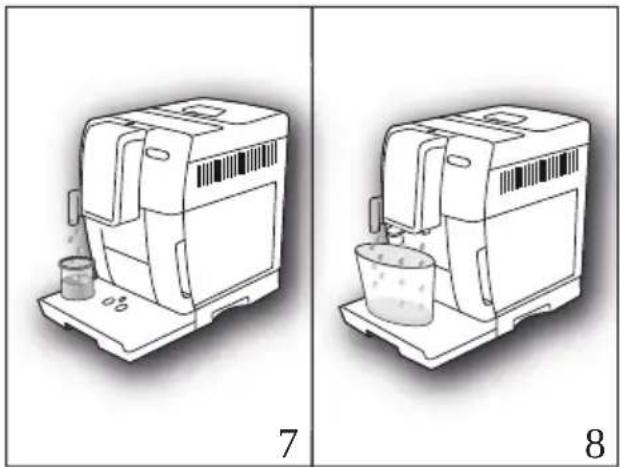
Two line drawings of a portable water heater device, labeled 7 and 8, showing internal components and liquid flow (no text or symbols on the devices themselves)
| aUGG1 | m | q' G | ou' o• | u G | qy | I G | I ' q""G ~wG ~G " m' I fE i | | | |
| Ok √ | G | G | F | UG | G | á | G | á | G | G | G |
| | G | G | í | ú | GOF | UGdPS | | G | G | E | G | ú | á | (U | |
| G | E | G | | á | Gá | G | G | (G | G | | Gú | U | | | |
Please note:
| •G6 | GF | Gá | G(úGú | G | G | á | SC(úG | G | G | G | TaG |
| ííú | á | G | | GaG | G | Gá | Gíá | G | ú | U |
| •G6 | Gáí | G | Gí | | | G | G(úG | á | SG | G | T |
| | Gá | á | G | G | G | | GF | GOp | PG | á |
| | á | GI | XcUG | | G | GF | IUG | | | |
eYJIOÚE z• xJÓy vJ« rtyz• vJ™
Please note:
text_image
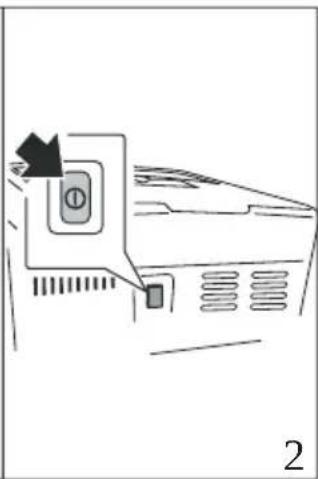
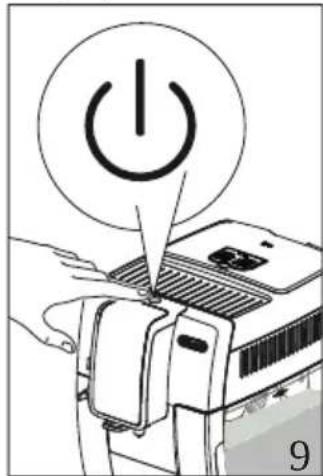
Diagram showing a hand pressing a power button on a device, with the number 9 labeled below.
| When heating is complete,essag G | G | fgl' uz "uz s G |
| zpq' | m | lGl | xqm" | qG | mu | lUgm | G | G | á | G |
| á | G | G | G | Gá | | Gá | úá | G (Gá ú | á |
| G | á | Gá | G | (G | Gú | G | G | G | á | G |
| íí | U | | | | | | | | GO | í |
fYJJÓÚÊ• z• xJÓy vJ« rtyz• vJ™ww
text_image
Diagram showing two steps of a coffee maker processing, labeled 10 and 11, with arrows indicating process direction.
text_image
Diagram of a car air conditioner unit with labeled components and directional arrow, showing airflow direction and component placement.
text_image
7531
GRINER ADJUSTMENT
13
Please note:
aUGGm G a a G a G G V E G i u G (G (uí S6 G G a G a G G (
Importantpoo
m (Gú G G á G G G U
j YJ« n• xJ« z" Is r ÈvuÊvtzÀvÈ
Please note:
text_image
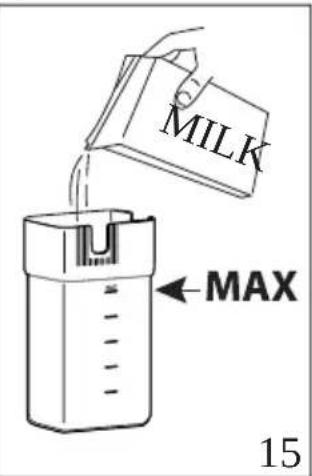
MILK
MAX
14
15
YUGrà G G à G à GOqZPE á G G úD á G ú á (G G à SG
G ) á G Gy m...G G G G á GOF UG
XaPUQq G G G G á G G G á G í G G
ú GZUZdGC -GVXWWG G G á g
Please note:
natural_image
Technical illustration of a mechanical device with a shaft and housing, shown from two different angles (no text or symbols)
natural_image
Illustration of a coffee maker using a glass with a downward arrow, no text or symbols present
dUGr G Ga ú á G G G G ú á U
j YcJr fljustin- Jthff) mountJofJfroth
XUGGra G G a G a GOqPG G Ga G G a G U YUGG" G G ua G fs
•Gom • 00UZ \~
-66xm q6y moot um \~
•Ggt \~ Gy uxw6
•Gom •ooz\~R
•G6om • 00UZ \~5y U...
•G6omrrqxm q
•G6rxm 6 tu q
• 66q" ' q""\~6y moot um \~
Please note: general indications when preparing all milk based beverages
natural_image
Illustration of a chemical spray machine pouring liquid into a container (no text or symbols visible)
natural_image
Line drawing of a hand holding a document with a barcode on the page (no text or symbols)
Please note:
| XUGGy | G ú G G G G ú G p b P Gá G G (G G G G G G G G G G G G G G G G G G G G G G G G G G G G G G G G G G G G G G G G G G G G G G G G G G G G G G G G G G G G G G G G G G G G G G G G G G G G G G G G G G G G G G G G G G G G G G G G G G G G G |
| YUGG | G G G á Gú G G í ú G O G G GÍ á G G G |
| á G í Pg |
| ZUGG | G l t ~ G m q' lg G í á Gá G í í G G |
| G á í (SG G á G Gí G G á GF G úT (G Gí í á Gí g |
| UGG | G á G á G G SC G á (G í G ú T á (U6 Gá úí G G G á (G ú (SGí G |
StopX.
Please notep
| •Gōu 61 q | (G"á I G | Gá Gá Só( úc ( G | G Gá G G |
| G | G G Gá Gá Gá U |
| •G6 í | á G G G | G G G ú á CO | Gá G |
| IXYUGoú | á á G G | G JI G | G IXZUG y |
| ( ú G Gú Gí F I PU |
bcYJt ÍEÓ™« zÈz• xJóy vJs vávÊr xvÈJJ
| G | | GO | | G | úá | PG | G | ú | á (G | G | G | | G | G |
| G ú | | á | U | | | | | | | | | | | |
| XUGgy | G | ú | G | Gú | Sí | F | G | G | á | G( | úG | G | G | ú |
| G | | | Gá | G | á | UG | úG | G | | GIy | IG | | G |
| G | G | Gí | F | g | | | | | | | | | |
natural_image
Illustration of a sewing machine with arrows indicating process flow (no text or symbols)
natural_image
Diagram showing a computer monitor with an arrow pointing to a screen, no text or symbols present
natural_image
Technical line drawing of a mechanical device with no visible text or symbols
beYgJlt lff) nin- Jthfflw) tffrlt) nk
natural_image
Diagram of a mechanical device with directional arrows indicating motion or force (no text or symbols)
beYba/t lff) nin- Jthff|milkJ ont) inffr
| G | í G | G | | G | D | á | SG | G | G | à | G | à | G | (G | G |
| ( | G | G | á | G | | U | | | | | | | | | |
| XUGG' | | G | G | à | GOqYPg | | | | | | | | | | |
| YUGG' | | G | G | á | G | í | ú | GOqaPG | Gá | | G | ú | GOq | PGOF | UGZXPg |
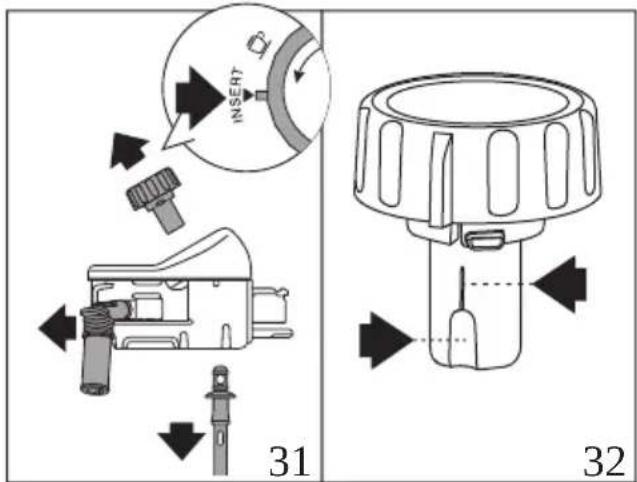
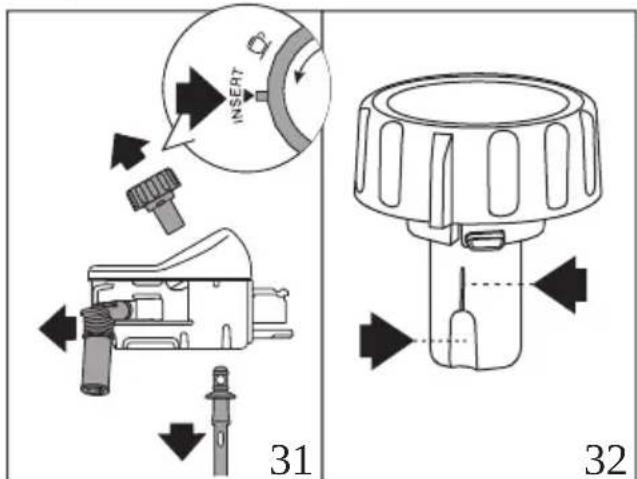
text_image
INSERT
31
32
| ZUGG | ú | G | G | G | ú | G | á | G | OqXPG | á | á | G | G | G | |
| Iuz | "q' | IGf | á | á | GOF | UGZXPC | Gí | ú | Gá | G | EGuí | g | | |
| UGG | | G | G | G | í | | G | ú | ( G | á | G | G | G | G | |
| á | G | | á | Túí | Gá | úá | Uor | III | omponffntsJ) | rffflishw) | shW | |
| ffrls) | fffVl( | ut | mustU( | ffpl) | ffflinlthffltopl( ) | skffluoflthffl | |
| flishw) | shffrVly | G | ú | G | G | G | á | G | ú | G |
| | G | G | | G | ú | G | G | á | GOF | UG ZYPUCu G | ( SG | |
| | í | G | G | | G | á | G | G | í | á | g | | | |
| aUGG' | á | Gá | á | G | G | | G | ú | | G | á | G | G | á | G |
| | GOF | UGZZPg | | | | | | | | | | | | |

natural_image
Line drawing of a faucet with a water drop symbol above it, no text or labels present
| ZUGG1' qy ~" q6 m q' Grux q' I GOF UGZ PFG ) G G G G |
| OmXc PSG G G G G F G Op PG Oa G i PG |
| G i (G G G UG Next >)Sg |
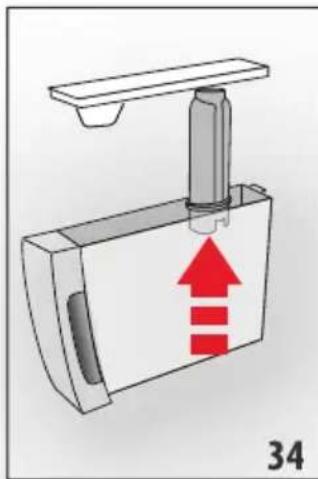
natural_image
Diagram of a mechanical device with a red upward arrow indicating motion or force, labeled '34' (no text or symbols on the diagram itself)
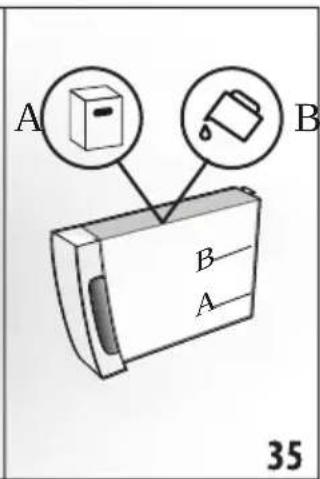
text_image
A
B
B
A
35
| UGCI pq"omxq' G Oxq" qxG mPI G I mz pG m q' G Oxq" qxG nPI G OF UG ZaPgG |
| ú G G Cá G G Guí G G G gmG G |
| á á G G CO ú G G GZUZdC -GVXWW GÍ PSG G |
| G CO G á Pcúí G G gnG Gí ú G G G G |
| UG G Next > g |
| aUGCI qy Gp' u G 'm I GOF UGYYPfG |
| bUGC' SG í (G G í G G áf G (G OmXaPc G |
| ú G á GOmXXPUG G Next > g |
| cUGCI ~"u u~z GY Go~z muz q' I GI ~wG ~6" m' I fG |
| G G í (G á G á G G á á ú G í á (G GbcUbG C6 |
| -VG YG á Gú G G G G í ú GOpbP6 G E G í ú G |
| OmePGOF UGdPg |
ImportantpooDangerofscaldingo
natural_image
Mechanical assembly diagram showing a component with a downward arrow and red annotation (no text or symbols)
| X UGGI' uz "q6mz p6r uxx6 m q' G mz wl 6I - G ~Gy m...6xq" qxI GOF UG Pfg |
| rá G G Guí G G Gy m...G G á G G g |
| XaUGGI uz "q' G m q' G mz wl GOF UGaPfg ú G G G Gá G |
| G á g |
| XbUGGI ~"u u~z GY Go~z muz q' I 6I ~w6 ~6" m' G' uz "uz s I fg G |
| G á Gú G G G G G ú á G í (G |
| ú G G G G í ú GOF UgdPG Gí S Ok √ |
| XcUGEst G Gá G á G G G G V G í ú G G |
| I' uz "uz s 6• z pq' m I 6I xqm" q6 mu I Gá G á í ( g |
| XdUG Iqy Gp'u G 'm I G OF UG YYPfg m G G G G G |
| á SG SG í (G G í G G aí G (G Om XaPg G |
| ú G á GOmXXPG Gí GG Next > |
| XeUGGI pq"omxqso~y xq ql f6í GGg Ok √ |
| YWUG I ruxxG mz w6 u t I 6I r' q" t 6 m q' I fg í (G G á G |
| ú G G G G á G SG G G G G G |
| F G á G G Guí G G Gy m...6 SG Gí ú G Gá G |
| G á U |
| G á G ( Gá G G í U |
Please note:
| bUGGq) | Next >g |
| G | G | G OmXc PG |
| U | | |
| cUGGIuy y q' "qér ux q' G ~IGI q... qxému' Gn• nnxq"IGOF UGZePfgu G |
| GF | Ga | G | G | G | G | Ga | Ga | G | í | (G G |
| ú G | G | | SG | íá | Ga G | Gí | á | Ga Gá | (G G T | |
| G | Gá G | ú | G | G | í | UG | G | Next >g |
natural_image
Diagram of a mechanical device with a tool inside, showing a blue liquid and a red arrow pointing to it (no text or symbols present)
text_image
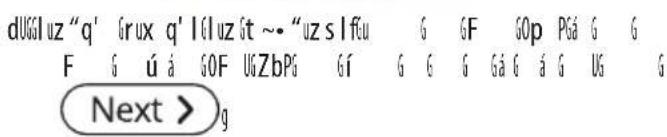
dUGG1uz "q' Grux q' Icluz St ~" uz slfcu G GF GOp P6a G G
F G ú á GOF U6ZbPG Gí G G Gá G á G U6 G
Next > g
text_image
eUGEI uz "q' G m q' G mz wl f'o G G G á G G á G OmXc PSG
GÍ ú G G G Gá G G á GOF UGaPg
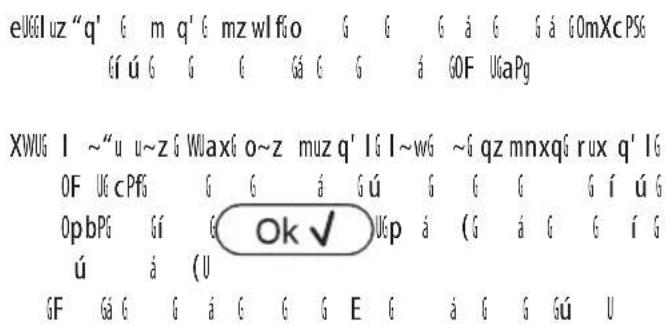
XWUG I ~"u u~z G Wlaxó o~z muz q' lG l~wó ~g qz mnxqí rux q' lG
OF UG cPfS G G á G ú G G G G í ú G
OpbPg Gí G Ok √ Ucp á (G á G G í G
ú á (U
GF Gá G G á € G E G á G G Gu U
bhYcJJÊffpl) in-JthffHltffr
XcUXGuê ôÈççÊô èêG ıFçô ıııııııııııııııııııııııııııııııııııııııııııııııııııııııııııııııııııııııııııııııııııııııııııııııııııı
text_image
Diagram showing a plug being inserted into a socket, with arrows indicating the process and labeled parts 1 and 2.
text_image
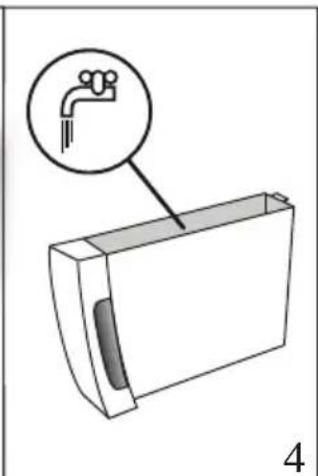
Diagram showing a device with a water drop and a close-up of its internal structure, labeled with parts 4 and 5.
ZUGG1' qy xu' 6 xq6' É"q" \~u' l6 lp'qm· (r' mÎot ql6 fi) ò È 6 ç 6 é ûè 6àG È GOMxCpGOF UGZPSG é ç 6 ' È ğÔ ÊîÛ GOF UG PG à î 'àççÈç ê gy m 60 é éé 6 ç 6 é ûè PCgG 6 è éT 6ç 6 é ûè GOF UkaPC

natural_image
Two technical diagrams showing a device with internal components and directional arrows, labeled 5 and 6 (no text or symbols on the devices themselves)
UGGI uz "É' q' Gxm6n• "qG ÀSqm• I6f0eêô ôç ĝî ̃çÈc ̃àG È G
ÎÜÈ ̃G0pbP5 èôg êé é G ̃ç G Íç ̃G0mdP5OF U6bPG óG èT
õ èêê G êG è ̃è ̃êG el êôG OF U6cPG H ê ĉÎÈ ÊÎ óég
é êé Éç G EXWWGé çig

natural_image
Two technical line drawings of a portable industrial machine, one with a beaker and the other with a bucket (no text or symbols)
aUGEl ou' o• u«óp'qm• ó" upql ól ' q""q' ó\~wó \~• ' ó\~y y qz oq' I Cf6
È ( G G Ok √) ó è ó lèêF é CG fó ç'È ÊT
çó ô ó ó ç'È ó É ó çÈG ő OF Ug dPÓ ’éó êòG
È õéé Éô î é êòU
y È êô êÊõóSG çÈ ó ÉÏÜ é ó àG ÍÊõéS ós êô ó è óêô ó ç é ó
êè é Èç é êòU
NotaBene:
•G6ÀçÈG é è G ó ç Êò èêG ıçÈgé ÉIÜ è Só çõÈ õõÖÈ ı TaëlÈ T
ÎÎ èè GÊuÊeõé 'è ô ê ı è é çöÉõ€ Êõ ÒÈ ÒeõU
•G6 è ı è ô ê ı ı òè ÉêÎ ı è ô é Èç ı ıçÈgé ÉIÜ è Só
êè Gîèê ççèê ı 'è ôÈçç ıç ıç Fçõ ıÈ è î ı Op P6 ê6
ûÈêõçç ı è ÍÈô èê ı GÏÜÈ ô ıXcÜr çõ GÈ è î ıUG
eYJr "D" « r x vJuvJ" (r ÀÀr Évz"
NotaBene:
mùÈêôô NÊçç é gûÉ È çé ûué F ıî ıçn êô ô ó èêé Éçú OmYYPG è ôg êðeêl éóOF UGYPUG ÀsīTÜEî Čèçç é È sçç’È È çó D İT ô ČÈ òèé Êõ î é êôg êôì (İç ıç éÎÜÉ D ıç ôg ıç êcÈ ù •ßG è ČÊçç é gcïÈ È ç§È ě ( ıç ġçÉGòè ÍÜ ıüDmc € OF UG ePfC çhél Êê€ ÊE ÍÜ ıç ıç É Ď Clot m• rrqí qzó\~• '‘IÜ I”q• uxxq°G m«uqz «q’IÜ
text_image
Diagram showing a hand pressing a power button on a device, with the number 9 labeled below.
text_image
Diagram showing two steps of a coffee maker's processing: adding a coffee into a tray and adding a coffee cup, with labeled parts 10 and 11.
text_image
Diagram of a device with labeled parts and an upward arrow, showing a tool interacting with the lid.
UGC çEÎ G ê GoÈ G è Gç G Î Gu Gî ÈôéGOmePU
aUGG"éç Îô èêê Gç ĀĖÕég è ÚÈ ôég
• q" , q" \~
- X\~Z S
-60\~rrqq6
text_image
MILK
MAX
14
15
YUG' é ç 6ç 6 èòà6çÈ ò 60qZPGÈü Íg ê 6î Èêô óég 6çÈ óG E T
Èêô SÉé È 6 Èê 6 é È 6ç çê û È gym çê î óG 6ç ç èǎo
OF UcXaPUG" 6 È ç 6î ĝÎÜÊî ĝî Èêé é éG 6ç ĝÎôôéé
6 é ûè îè eê gàXWWGé çG 6çÈ ôg
NotaBene:
natural_image
Technical illustration of a mechanical device with a shaft and housing, shown from two different angles (16° and 17°), no text or symbols present.
UGG' é ôô 6ç Îè û Îç 6 6 èôàìçÈ ôG êG çÈÎ 6g
natural_image
Line drawing of a coffee maker using a glass cup with a straw, no text or symbols present
text_image
CLEAN
19
20
natural_image
Line drawing of a hand using a computer with a barcode on the page (no text or symbols)
NotaBene:
•G6 è G é È G s GõÈ G s è èê ēaú Ê G gçÈ ðSÉ
ê òõè( Gç s èôgáóçÈ ðõÈ è GçÈG ê è s é É òò èêUgg
G6 è G Ê G Ê )G é Ê Éo èe g ûÊéo SG çè i ’èêú T
Èç Gç Gé Ê G è G çÈG òèêÎo èê€ oxqmz SG Ê ( S G
Esc U
•G6” Gç gê òöè(È cên) óG Ê g D Îo éSGçkél Êê€ÈE ìÜ Gç G (é T
èç G ̄ )G è G Ê ç Gî k çsÕÈ ós élé GÈ gê òöè(È G
6 èôgáóçÈ ôU
•G6x G çÈ óG óé§ Êê G ç G èøs aú çÈ óG ós eô g îeê uégÈ G
éÔ é ÈÔ U
•G6pÈê gî õÈ ê €ÏÈ SG è G D Îo gç Gê òöè(È SG çóÕÈ óGÊoT
ô ê gçÊÎÜÈ D G gÇÉvé ÊÎÜ ê U
baYJtr Ér wvlÀJtrwÉ
XU6G çEÎ G ê GTÈ EÔ G è Gç G ÎCù G GTÊôÉGomePcfçè G G
ÎÜè )G gcÈsÎT ÈÔ Ga£ o ç Sàô ê ðIeé o g gcÈsÎ T Èêô ôéÎT G
È© ò é SGÎN õcÀT cf
•G6ç G Î Gu G Ā ÊÕé60meP6g
natural_image
Diagram of a sewing machine with arrows indicating process flow (no text or symbols)
YU66" G ðê ðõè( G è ê é êõç Sõ è Gaéé È ÎGmXXP6 êG
êEêõ6 è eS G ò Goè 6ç G é ĉi G û êõs G éT
è GÈ Cõeê cfîç G êÎ È Cõe ê G0paP6 ðG ëõÉG N é G è G
È È ôé Gàû ðõ ðè é Eô èêU
ZUGoèēō ǒc gǐěīlè ǒc gǐèē ě Ēò èēg OmXWPGO ǒīè c g
è PG ðsī g ǒc g ðg c é Sīcěgū U
Attention
natural_image
Diagram showing a magnified view of a device with a black arrow pointing to a component, labeled '23' (no readable text or symbols)
mùÈêôôî GÎ ÊBèôô gê é È G G çÈô È G ’È G è GOÈ G OmXYPSe çû óôêêî È G Gû gc’é è òòè G óô gc gê òòè( SÈ E T ô é êôçnì È G óé é è g óô è èé é È gcÈbé ÉÎU ê Sıç G çÈê€ MÈ Ge gcÈs-êê ĒÈ òè UG
natural_image
Technical line drawing of a mechanical device with no visible text or symbols
beYgJ• ffttoy) - fffluIrésffrvoirlàJff) u
XUG z oõe( G é çè é êôs O êu èêg ê G ðe G È gée PG òg àG
ÎÛÊî G é çÊl é êôG 6Fçô 6È è l̄ GOP PGO G éû PCç G
é ûe gà€ È 60mXcPCâççÈ G N ê©Ü Dèê©Ü é G óS N ê€ G
6ê oõe(Èêôc è )ffû êl G è é éê©ÉüÈêôG S é ç G òé
éê é 5ç G é ùè Cg
YUGG' ò Gç GF çô GO G é êoPG ðGç G êl GaççH È GlçÈ Gg
ZUGG é ôô Gç G Fçô GO G éû PSG é ç Gç G é ûè EÊû Té G
çñ È ÔO ÉīTÛ G óG é ôô Gç G é ûè 6g
natural_image
Diagram of a device with arrows indicating motion or movement, no readable text or symbols present
natural_image
Line drawing of a faucet with a water drop symbol above it, no text or labels present
natural_image
Diagram of a mechanical device with a red upward arrow indicating motion or force, labeled '34' (no text or symbols on the diagram itself)
text_image
A
B
B
A
35
UG“pÉ«m' «' mz «ó Oz u" qm- ó mPG q«ó qm- ó Oz u" qm- ó nP”G OF UG ZaPG g6
" G Èê gç G é ûè ĠàG È gç G éòÈ o Èêòà i MÈ gê û È g
mòOÎ è èê ÈêòàG êS é ÈçÈ G GXWWé pG é ééG G
ç GIÔôéG êô e G é ûè ČgìÈàè o G èeÎG GÇN È GO êçç o PG
à î Mà€Èõõ è gç Gê û È gn6gé éê é Gç G é ûè ĠàG È UG
m ( 6 0 Next >)Cg
aUGG“”upq' GÉs \~• ««\~u' ”COF UGYYPGfS
bU6gèç û Se û ı óğ éê é ı çlé è óòè ı0mXaPi óç çó è şàé é Ê Tı ıTÊÕ€50mXXPUım ( ı Next >)Çg
cU65"y q««' q6• z 6' Éou uqz «6Y65 ' q""q' 6\~w6 \~• '6pÉy m' ' q' "6f
çÊÎ 6 êG éÎ êõû Ê (£ÊõG ê ÊÎ Ê Î ôégé ê é Êç 6 GYôç ò 6 è GçÊG Ga& Ê SÎÜÈ 60pbPG óg è 6ç 6 Îcû 6 6ÎÊDÉS
OmePGOF UKdPg
AttentionRisquedebrûlures
p 6çn Ê 6ÏÜE 6Ï èêô éÈêôG 6ÉÎ 6 è óG 6çÈ6 6àG Ê 6
ÏÜE 6 óG 6 Íìû 6 6Ï ÉDéV6Éû ò ó 6oè 6sî èêôÉÎ òöÉû Í6î òò 6
èç ò èêU
dUGm ( G G G G è oèêV é G ç' èo è Ïò èeG
GçÈG èç ò èêS éoÉ õ Eêô UxMéI ÈtÈE ìÜ «“pÉ«m’ «’ ms qóqz G
o\~• ' “Sú” q· uxxq°€ m«uqz «q’ ”îfix G è Éé é G 6 éoÉ õ É G
Îèé é êl G óçç G éoÉ õ Éoßîe ç SÈ G ès GçÈG Gaà É ì
ÎÜÈ SGÍ G SGÍU G SGÈOéG ós D Iô GÈ oèé Éo T
î é éoGòè õ G è G é G 6 eçÈ gàG éò ûÈçç G è GéçT
é è Gç G é S SGÍÈçÎÈ G gcî éoé G gçÈgé ÉÎÜ è Eg
m è G êù èêYaéé ê õ Sıç’È È çú êo èé óçç € éoÉ õ È U
eUGG“’ uz oq’ G q«G’ qy xu’ 6p’qm• 6v• “S• km• Gzu” qm• Gy m ”GOF US
Pfçç’È È çú óéé É eò èÊeô€ eòG è G eG èl G 6 eT
çÈ gàGqH È ĂO ÉîÎÜ U6” Gç G él êoG õ ç é è G î çç G
çÈ6 èç ò èêG éoÉ õ Éeõ G óg )ò É G ç G é üe G ’ È Sü ç G
û Sıçç G êl Gaïçç’ È cîè Éêö Sıçç G é ç Sa î ’È géû È G
y m ÒÈû ÎG çs’ È āO ÈÎÎÜ G óşch è é G Èè gçÈgé ÉÎÜ è Eg
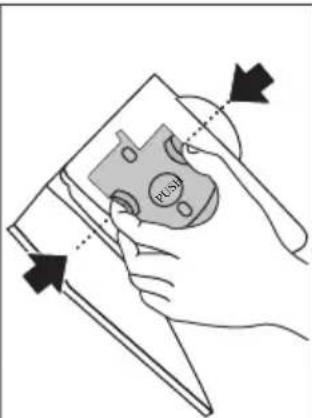
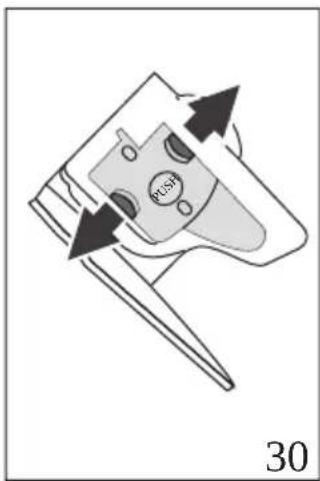
XWUGG'y q«' qí• z f' Éou uqz «gYçs\~w6 \~• ' [xmxz oq' [xqis' uz Çms q''£fû m è gç'Èüè gû ésû çÈî ̃ç ̃c ̃eî êõô ðç éś è ̃eî êT ̃çÈû èç ô èêû éôÈ ô Èêô ̃è ̃ç ̃i Gû ̃G ĉÎÈÕéû óçÈû ̃àû È ŝÎÜÈ GOF UódPS ðÈÈ ( ̃ ̃ Ok√) Cgçg
natural_image
Mechanical component diagram showing a lever and directional arrow (no text or symbols)
X U66«' uz oq' 6 q«€' qy xu' 6 p' qm• 6 v• "S• Km• G z u" qm• G y m "G OF U6 PÓff' é c 6ç 6 é ûè Sá i MÈ ğê û È gy m ŠÊû ÍÇ (çq) È 6 Ô ÊîÎ Þ 6
XaU66"uz"É'q'6xq6'É"q''\~u'6À6qm•”6OF UsaPSf8'éêé 6ç6é T
ûè 6à6È 6g
XbU66“y q«‘ qí• z 6’ Éou uqz «Gy6\~w6 \~• ’ óxmz oq’ óxq6’ uz Çms q”ófE m è óç’Êüè ðü éSG çEl çç él êöé ô ç éé è éel éT çgÈ6 èç ô èê€ éöÉ ô Èõö 6 è ççÈ6 çàG È GÎÜÈ GOF U€ dPÉ óG OK √
XcU66x'ÈÛÜE Gèô (£)Éi GàÈÛÜE VuÈ 6ôçléÎ ÈèG
ÈÈ ÍÜ 6" uz Çms qíqz 6o\~• ' "Sé" q· uxxq°6 m«uqz «q' ”5g
XdU66“”upq' 6És \~• ««\~u' ”6OF UGYYP6fam 6ô é 6 G Îeê 6 êçÈ 6
êç û Sû û 6 ôé éée 6 çlè é oòè 6 OmXaPc óç ç õ è 6 àà
é É î6 €î ÉÔé50mXXP6fû 680 Next >
XeU66“pÉ«m' «'ms q6«q'y uz É”(f5È ( 6 Ok √
YWUG "qy xu' g xq6' É" q" \~u' g p nqm· e r' mIot q'fε û gç g éT
Î êôg òç és è g él é fçN È G g êçÈ Sà) òÈ G óg
é ç fç G é ùè G 'È GÓ ÉÎÛ Gà Î HÈ ěe û È ym g Óç G
éê é g Èê fçÉgé ÉÎÛ é U
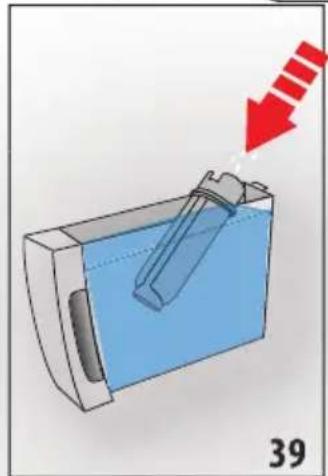
natural_image
Diagram of a mechanical component with a red arrow indicating downward motion, labeled '39' at bottom (no text or symbols on the diagram itself)
dùg“uz “É’ q’ 6xqí rux«’ qí pmz “6”\~z 6x\~s qy qz «“6f5uz “É’ q’ 6xq6
rux«' q6?p =6pmz "6"\~z6x\~sqé êôGOF U6ZbP6 ô6ç 6 à6
Ôèê U€m ( G ⒽCg Next > )
eUGG1uz"É'q'6xqG'É"q''\~u'6Aqm·16ff'ôéçféûè(EûÎ)
ç Glè û Îç G0mXbPSG G éê é Gç G é ûè G Èê GçÈé ÉT
ÎÛ ê GOF UGaP5g
XWUGG“y q««' q6• z G' Éou uqz «OWSax6\~w6 \~• ' gmo«u" q' 6xq6r ux«' q”
OF UgcPgfGE oô gc él êoç è gcÈG càs É GIÜE GOpbPG
ôGÈ ( G 0 Ok √ 0ffçÈG ô ô èêîèé é êl 0
ôô N êô èé ôôÊ ôèé Éô î é êôU
x ßFçô 6 ôôé È êô êÈêõõÉÎô ûéé 6 óó çó 6 óó è 9 6 ßîèêô ê 6 àá
ôç GçÈgé ÊÎÛ ê U
bhYcJJEffmpl) ffmffntJfluJHltrff
' é çËÏ 6ç 6 Fçô 6 Op PG çè i 6 çMéÏ ÈêG ÍÜ 6 "qy xmoq' 6
xqfrux' qA6qm-S' q''q' 6\~w6 \~-'6pÉy m' ' q' 6''ff 6ç'èêè T
ÜEöG èlé GoèöGöGÈGé cEléêöSGÈ( G G
Ok √
p U68rá n G I N N ñGÓÓ G Úú óGé ÑÓ óP
natural_image
Illustration of a plug being inserted into an electrical outlet (no text or symbols)
natural_image
Line drawing of a computer monitor with an open button and a black arrow pointing to the screen (no text or symbols)
natural_image
Diagram of a device with an arrow pointing to a component, no text or symbols present
natural_image
Diagram of a mechanical component with a magnified inset showing a faucet handle (no text or symbols present)
ZUGC" úÓCÓ GNÓÍ óóá GNÓG Úú GmXc POFÚUZZPSG ÓÓG ó GÍÓG y Á GOáé í nÓó CÓ CÓ GNÓÍ óóá PG G Úú G nÓó GOFÚUG PÓÓgá T n Ñu- GNÓÍ úéóó GÓNÓÍ óóá GOFÚUGaPg
natural_image
Two technical diagrams showing a device with internal components and directional arrows, labeled 5 and 6 (no text or symbols on the devices themselves)
UGO" ÔñaF uÓcóáÓ góún aÑ nōNÓc Úú g aÓ Óóp bPÓó ágé ó aÑ CÓ g
gí úá GómdPÓF ÚÚbPÓc gí Ú gÑÓÍ gú gñÓ áí aÓ ÓÓF ÚUgC Pg
gú c í aÑ Néé í aé GÑÓXWWGé g
natural_image
Two technical line drawings of a mechanical device, labeled 7 and 8, showing internal components without any text or symbols.
aUGGú ú óÓGóGÍ (n G OKF né ñfúó ÓG Úú c ÑNÓ g óu n T
aÑ nís ÑO G í ñ G OF ÚUG dP5 (c ÑNóci úeós óÓG í Ú g ÑNÓG né G
ú é á á U
x G Ó Ón C ( GÓó áé aó Gí ñ gÓÑú á á- N G né é Ó ÓU
NotaBene:
•Gix Gí náé Óñ G Ó-G úÓcú a a ÓG G Ó Óñ SóóÑáG Ó Óo ná Gí nÓT
í n nÓ TaG ííú a ág Óó€ÑÓG I Ó ÓnÉf uÓ óénÓóú Ñ où
•Gj n GÍ Ó ÓnS é Ó nÓóci nÓó a Óó€ NÓG sé a úa GóÓG nÓT
é aÓ Ñ Gá ó nCÓ G F n g í Ñ N Ñ nÓp Pó óáÚuáÓ Ñ G óá o nú a Óó€ÑÓ G ííú GIXcÚrà n g í Ñ N Ñ niUG
text_image
Diagram showing a hand pressing a power button on a device, labeled with number 9
natural_image
Diagram of a device with an upward arrow and circular inset showing two small components (no text or symbols)

natural_image
Illustration of a coffee machine with a cup being inserted, showing a downward arrow (no text or symbols)
YUGo úOúú G - GÍ GÓ Góún aÑ nGÑÓG éSOmePg
ZUCEN ÓCÓ Góuǐn aÑ něNÓG éG ó G Ón ñ G gé áósí óáÍ ÓG í óG
- óCÓFÚUGXXPfGÑÓGÓó G né GÓGÍ áÓ Ócú ßnÓé GÉ Ó ŋg
UGC"ÓÓ á ÓCÓ G éGÑÓÓÓ Ñ f
• Eeq"i q""\~
• Eex\~zs
• Eco\~rrqq
• Ecp\~i j u\~R
• EGY Gq"i q""\~
natural_image
Diagram of a car air conditioner unit with airflow direction and component labels (no readable text or symbols)
U6 i Ú cu 6 - ENOÍ GNÓ óí úá ósNO sóuín aN nENÓg éSOmePU
aUGC"Ó Ó á OÓ Ó écNOóÓ Ñ f
• q" i q" " \~
•X\~ZS
•Comr É
bùlùx gí nǒi n aó Góé i aÓ- G(ú CÓ GÑaói (Gí nǒ Ó Gáé ÚO G
NÓG cí Óf aÑ GóO Ó á N G(cú cí nñ GÑÓgí n ÚnÓóaó c úÓóóÓG
é i Ó G cé ÓÑaÑ G úÓG cí nǒi n aó 6 - U
oú Ñ G Í G Gí nÓí n áó SGÓ G í n GÓó aÓ aó CÍ n GÓÓnÍu aT á- Ñ GNÓG úÓ U
natural_image
Mechanical component diagram showing a piston-like assembly with an upward arrow and base, labeled '14' (no text or symbols on the diagram itself)
text_image
MILK
MAX
15
YUGXÓ ÓÓÓ ğNÓ áí aÓ ÓÑÓG óÓ ÓOqZPE guá aÑ ÑtóúF aÓ T ÓÑÓG Ó ÓSe cóúí ÓnÓÓ G á ó ly Á Ukáé í nÓó óó óó Óó ÓÚXaPUG«Ó Ú óáóé í nÓcí nÓóÓ Ó úÓ Ñ gÍ nñ cáé í nÓó óó Ó ó Ón gÑÓ gÑÓí óóá é nnóói ÑNG GXWWéé gÑOG Ó ÓU
NotaBene:
• 65í n G I Ó Óñú ú GÓói úé Gé áóEÑÓ ó G(Gná Sú u á á ÓG Ó Ó
ÑÓó N G GÓÓe aÑÓó N G(S G Óé í Ón ún gÑÓG naÚ nÍF G
O nÓÑÓN nSÑÓga6°oPUS
• 66"áÓ Gé N G«<m mñ sq ÓñÚé á »GÓó áG á N S G Cí naé Ón S
Í OÍ aÑ Cí Ñní G nÑ nóú óGóÚU ú N óCÓ bó áñU
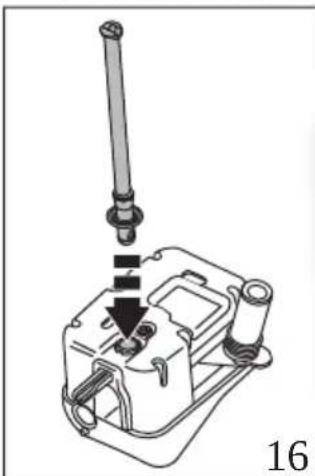
ZUGemoÓÚlúnÓóÓGÑÓG úÓGÓ g úÍ gÑÓG oí án áo gÑÓG GÓ ÓOq PÓÓó éG
Í aÓ G N SÓ GÓ Gó í n ÓGóá ú N ÓO GÓ G N GÑÓG GÍ T
ÑÓN gÑÓ gnÓ aí aÓ ÓGÑÓG GÓ ÓOFÚUGXbPU
natural_image
Technical line drawing of a mechanical assembly with a vertical rod inserted into a housing (no text or symbols)
natural_image
Illustration of a mechanical device with a sensor and directional arrow (no text or symbols)
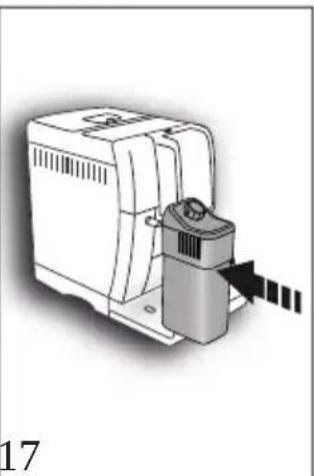
UGi Ú GNOc uO G G i NOn GN0 gnO aI aO OEN0G G O OU
aUG" aOó áci nOóO OSoú uOó Goún aN ngNOG Uú G aO OOp bPg
bUGq Ú OsOé iú N G G N G O gnO aI aO OsNOG G O OoPg
O G sI ua GomdP6OF UUGXc Pft Ge á ua GOe a Osú GoOñ G
uó a GOoág G ú ao GOôn S úo á GOó áe a Pg
cUGo ûOGú G - G GoúF aO Óe Ó OS Un NOÍ G óS T
úa oENO GOún aN nGN0C eGOmePG( Cl G O E ul GN0Gó aN gNOE
G O OSe N 8qaPgünOUú OG G Uá uNNO G úl GN0Gó aN G
N0GÓ Óú n G Ón n G G - G aN N goae i Óe Ó OG a G
Í GOF UUGXdPU
natural_image
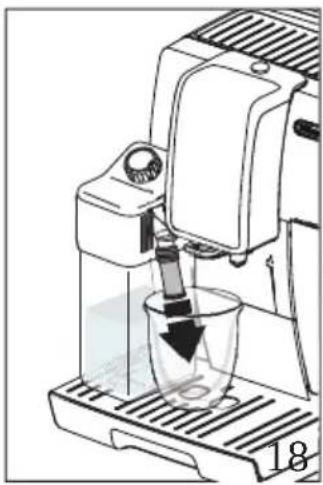
Illustration of a coffee maker using a glass mixer with a downward arrow indicating liquid level (no text or symbols)
dùuā“áU G ógá Ña óóG úÓsóÓsé úÓó ñ G G á ú áó Gí ñ G
Ñ G ú áó Óóí Ó íF U
text_image
CLEAN
19
20
UUGO úÓGÓ cé N ČNÓSINÓUú áó GÓ GU ČNÓG ósóO Ó á ÓÓ
NÓG óói úé U
aUGO" úÓGÓ GÍNÓ áí áÓ ÓCÑÓG GÓ ÓCÇ G áé í aÓGóAÓÉ í nÓG GÍ úá G
NÓG Úú G áÓ ÓGÖmdPG GU óói GOF ÚUGYXPU
natural_image
Line drawing of a person using a computer with a barcode (no text or symbols)
NotaBene:
baYjjr ÊÊr JuvItr wÉ
XUGG: Ú Gú G nǐ GÍ GÓ Góún aÑ nís NÓG éG Ome PfS GÓ ÓUáng S
nǐ G úOcNÓI Óú á á- nísNÓI Ós Ó ÓcÓ G úÓ G G aÑ ÑgNÓs
éS úÓó ÑnáSGÓó GÓf
| uosislsfflff ion) fl) lt | ntifl) fURmlS |
| YaW |
| uosislsfflff ion) fl) lt | ntifl) fURmlS |
| 4 | aWW |
| 6 | caW |
natural_image
Illustration of a CNC machine tool interacting with a device, showing motion arrows (no text or symbols)
| YUGG" | ÍÓG( G áé í áÓcé Ó á ú ó é Ó ÓÓ G ó GÑÓC óGí ó ó60mXXPG |
| í n úñ N G úá nís Ñ óG óSñÓóaÑú óG úÓcóÓGí úÓÑÓ G I ÓñG |
| ÑÓí óá Ñ GÓ GÓ G Ñ fÓ Gí á Ó 60paPGÓó áeÑ Ñ GÑÓGú G |
| Óóí á ú G ÑÓ ú Ñ Gí n ÉÓ G í Óñ áó U |
| ZUGGO | n ÓG GÍ ÑÓ G nÓ ÚÓ ÑÓ ÑÓ ó áó G OmXWPG OÑÓG nís |
| n P€ ( SsóágÓó áé Ó Sg íÓ U |
¡Atenciónpo
| m (Ó) n Ón6 cí NÓ tínÓ UÓU óóÓóá l áU ná g a nóóáÓé í nÓGÓ c ó tÑÓc ócí ó óoNÓG éc ú úÓc Óóó égé ú( G Ó 15“ áóÓó gí Ón áó g óóOánó á- cí uÓÑÓcóu ÓÑÓně uÓSg sí nóí n níc n óc |
| éókóú Óóá | é Ó ÓSÓÓ G | ó ÓÑÓG | óGÍ | ó óóóÓcí úÓÑÓG | Ó | nídé áóg |
| ÑÓG | cí nÓ áó | GÇ GÓÓGÍ | úÓN | G Í ó núáně | G | Ó Ón Ú |
natural_image
Illustration of a computer monitor with a magnified view showing a black arrow pointing to a screen (no text or symbols present)
| m | ÓóCÑÓ€ | úÓGÓó | Óća | Ná | Ñ | nídÓé | í aÓ | Óć | ó | é | ñcÓ | € | SÍ | ÑÓ | G | í | T | |
| ( | - | óG0mXYPGÓÓ€ | Ó | Óó | ná | G | á | nǚ | GÍ | ÑÓ | G(€ | aé | í a | ñ | SGÓ | G | ó | G |
| ñ | ná | GÓ | Úú | cí | uÓÑÓ | gñÓÍ | ó | nǐgí | nídÓ | GÍ | ñÑÓG | (€Ñ | ñ | nǚ | Gé | á | úàT |
| S | góúí | ÓñF | aÓGÑÓ€ | í | ( | € | G | c- | S | án | ú | ó | ÓUC¡ | ñ | GÓ) | ñ | Óñc |
| Í | ÑÓ | gñÓ | ÚÓÚ | óci | ñ | ÓÑ | gÑÓG | cóa | ÚúaÓ | Ócé | Óñ | f | | | | | |
| XUÓ€q) | ñ | aÚ | G | GÍ | ÑÓ | gñÓ | ÚÓÚ | óG | (€Ó | G | ó | €ÑÓG | ósi | ó | ó€ÑÓG | | |
| |
| éG0mXXPGOF ÚUCYYPg | |
| YÚG€ | Óé | úÓ | G | GÍ | ÑÓ | G | í | ( | - | ó€ | OmXYPSE | GñÓ | à | GÍ | ÑÓ | G | | |
| OmX | PSE | úÓÚ | G | ÍÓG | GÍ | ÑÓ | GñÓ | ÚÓÚ | ó€ | (€Ó | € | ó | €ÑÓG | ó€ | | | |
| í | ó | ó€ | G | ñ | Ñ | ó€ | ó€ | éí | Ó | ÓóU | | | | | | | |
| ZÚG€o | ñ | Ó€ | G | Í | ÑÓ | g | nÓ | ÚÓ | ÑÓ | ó | áó | € | ÑÓG | ñG | ñ | G | |
| OmXaPC( | SsóácÓó | áG | Ó | SG | iÓ | g | | | | | | | | | | | |
| UÚG€” | úÓ | G | G | | ñG | G | Í | ÑÓ | GñÓ | ÚÓÚ | ó€ | | € | €ñÓ | á | GÓ | G | |
| | | | | | | | | | | | | | | | | | |
| | | | | | | | | | | | | | | | | | |
natural_image
Technical line drawing of a mechanical device with no visible text or symbols
natural_image
Line drawing of a hand using a computer to insert a small electronic component (no text or symbols visible)
26
text_image
HUSH
27
UC: j ñÓóá Ó: á g ÑÓ n ó ó Ñ óÍ ÓÓ: ÑÓ: ÑÓóÓ Ú Ó: ÑÓ: ÑÓ(SG cé aóé s aÓé í SÓ) ñ aÚ GÓ Úúnúí óá úó ñÓF ÚUÉYc PU
aÚÓ“ úé Óñ g Ñúñ Óc aG é á ú ó ó í n ) áé Ñ é ó ÓÓ ó G Úúúí ó
á úó ñÓÓ G ó Úú G(€Ó úaÚúó ől GÓ GUña U
¡Atenciónpupoo
qz v• ms • qf" \~xmy qz «q6o\~z fms • m6
z \~6• "q6p q«q s qz «q" 6Gz \~6xm" q6qz 6xm" m" mvuxxm"
xaé í áÓG Ó 6 Únúí 6 á úó n6 óá 6 úó n6 ÑO ÓÚÓ ÓÓ ( 6 úÓs í Ñní 6 Óó ñ í Ó ñóÚ)
bÚÓ• á á- Ñ ÓÓ 6í á Ó ÓopaPS óé í áÓG óe ñÓóaÑú óg ÑÓG égí ñÓT
óÓ ÓÓS Ó GÓ 6 óaÓ GÑÓG 6 ú aÑ ÑN ÑNÓá úóá ÓóSG áoál ÓÓG
ÑÓoÑÓG 6í ñ Ó-úÓ GÑÓC 6ú aÑ ÑU
cÚÓcpÓói úeósÑÓG 6 áé í áÓ- S6 úÓ 6 € nSÓ ßÚnúí 6á úó ñCÓ 6
Ó Gó i ñ ÓOFÚUcYdPgG 6 á ú áó Gí ñÓóà Óóó ÍnÓÓ 6 éné aT
či • "t 6 ó 6 ínSÓ 6 á GÑÓGÓ Ú ÓU
NotaBene:
“áé ÓcñÓóú gÑa í á g nélÓ Ēúnuí gá úó nSGO Óó€ÑÓG n PG óÓ€ÑÓÍ ÓG Ó nél G gÑaé Ó óáo G mñÓ gí nÓóá Ñ E óGÑ óGÍ T óG é goÓgé úÓó n ĀÓ Ē GFÚUCYeu
dùópóói úéósNÓG Íón G N S G óÓUúnÓóOÉÑÓG úÓG óÉÑ óSÍ T
ÓógNÓG nÓóóó ÍnÓó Ú S á G úÓn COFÚUGZWPU
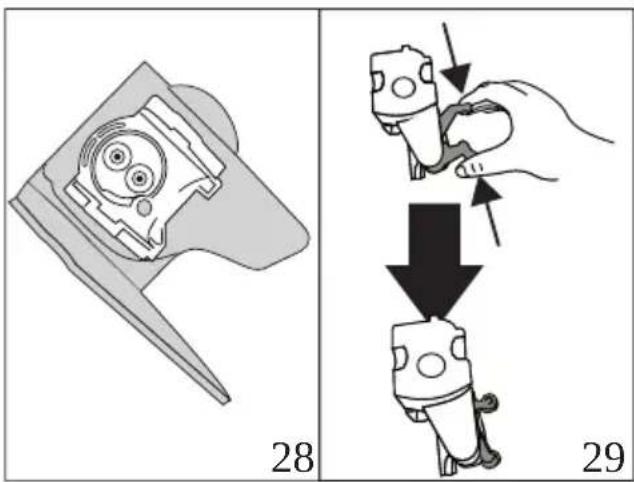
text_image
28
29
natural_image
Diagram of a device with arrows indicating motion or movement, labeled '30' at bottom (no readable text or symbols)
eUGGoaOnnÓG Gí n Ó-úÓ GNÓ GUñuí Gá uó nU
XWUGG Óá n Nú- GÓ GNÓI óóà GNÓ G Úú U
beYba"impiffz) JlffUrf ipiffntffJlffJl) Jlff hff
i ñ gé Ó ÔÑGÓ CÓF aÓ á GÓ GÍ aÑ ñ ó aé í aÓGÓ GnÓ áí aÓ ÓÑÓG GÓ ÓGQpG Ñ GN óGÑí óG G(G é GoÓgSÑOó naÍ OÉ G á ú aÓ f XUGG" uÓG G í ÝÓN GQYPg YUGGq) ñ aÚ GÓ G úÍ gÑÓGó aÑ gÑÓG GÓ ÓGQaPG(GÓ gÑÓG óí añ aÓ U Oq PGOF ÚUSZXPU
text_image
INSERT
31
32
ZUÓs anÓGÓ GÓ ãN G ñ ná GÓ gnÓUú Ñ núÑÓS GÓi úé 00qXPó ó g
Gí óá áó G«uz" q «»0FÚÜZXPó(óá úó ē aîn Ñ G ā g ñnáí g
Uóx Óé Ó à ú ó é Ó Ó Ñ Ñ ó ó é í Ó Ó ó ó Ē Úú T
aÓ Óc(ú Ï Ñ Ñ Ú Ó Ó Ñ Ñ Ñ « Ñ ó ó é í Ó Ó ó ó Ó Ó
á óí óÓÍ úÓÑÓ 6 nísgí óñ J olo ánflolos/ffnJl) J ffst) J supffrior líffl mismoV «ó Ú é óói ó á é ó Óí úaÑ N í NÓs úÓC ÑO ñ G ÑOŚ ß ñ ñ G(€ÑÓ 6 Ñú Góá ú Ñ sí ÓÓ tí ó COFÚUG ZYPS: 6 úÓÑÓ gnÓó óGÑÓ: Ó ÓfCÓ góuś ó čn ó úÓGÓ 6 Ñú 6 úí á ČNÓ: NaÓ Óóg aU&cq ú ÚuÓGÓ Gá Óñá niÑÓ 6 é áÓ ČNÓ gnÓUú Ñ nísOói úé 6 G Úú 6 ūnaÓ ÓOFÚUGZZPU

natural_image
Line drawing of a faucet with a water drop symbol above it, no text or labels present
natural_image
Mechanical component diagram showing a downward force application with red arrows, labeled '36' (no text or symbols on the diagram itself)
Xbùlì j \~z q 6 qouj uqz «qó Y 6 \~wó j m mó uz uoum ó qz v· ms· ql fó
"úÓ ó gí Óñó í GÓ ēnÓ áí áÓ Ógú áá- ň gí n ĝnÓ ÚÓnó
Gó ú áó GÑÓó áF Ń n ĝNÓÍ GÑÓ góún aÑ nió ÑÓG Úú G
áÓ ÓGOFÚGePgC(gí ú óÓG Ok √
XcU6q6 Uú 6 aO O6o OGNO couin an nCNOs Uú 6 aO OV i ne(SO 6
Náói (G aóu á- gl qz v·ms·qíqz fo· \~Ssq" i q qfi \~ gm" \~ lg
XdUGG«" moum 6nmz pqvm6 qo\~s qs \~«m"=60F ÜÜGYYPfüm 6F ä- nSÓ G óÓUú Ñ CÓ ú ÚúÓó úÓSS íÓC( G úÓ C gé O Óñá GÍ ÑÓ G nÓ ÚÓÚ óóOmXaPG( GÓ G ó ĒÑÓcí ó ógNÓ G éSOmXXPfcí ú óÓ Next > g
XeUgg«pq"omxouruomouÓz 6«q y uz mpm»fú ú óÓgg Ok √
YWUG ?xxqz m éqxé pqi Ó"u«\~6o\~z 6ms · mér q"om=fú íÓÉÓ EñÓT
aí áÓ Óúó Ñ sí n énÓ ÚónGÓ Úú GÑÓ GÓ ú ÚúÓSó úÓC
(É Ó ÓÓ GÑÓÍ óóá GÑÓG Úú G G Úú G ñóó G ó GÓ G á Ó G
y Á (G úÓ G gé Ó Ôn GÓ G gé á úá U
x G í Ón aó GÑÓGÑÓó aF aó G G Óné á Ñ U
NotaBene:
• G6“áGÓ G á GÑÓSÑÓó aF aó G CF á- G ñnÓ é Ó ÓGÍ nG
Ó Óe í SG GÑÓGóué á aó n GÑÓCÓ ÓnÚÍ GÓ é ñá PóGÓG T
óÓ GnÓí Ó añGÓ G á U
natural_image
3D diagram of a mechanical component with a red arrow indicating direction, no text or symbols present
dUGGI uz « \~p· ou € qxá rux« \~6 qzé “• 6”\~i \~ «ql fiú u ñ Ñú- GÓ S
F ñ óó p PÓ óó úó í ñ ÓOFÚUGZbPÓ( G í náÓ Ó ó ó GÓ G Ñ UG
i ú óÓ8 Next > g
eUGGI uz « \~p· ou 6pqqi O"u«\~gms · ml f6oaÖnnöGÖNÖü ÚÓ GÓ ÖNÓí óóá G
G G í NÓn ComXbPSEÑÓói úéóé üÓ G GÍ ÓncÓ GÑÓí óóá G
Ó G G Ó Ón COFÚUGaPg
XWU06«i \~z s m6qx6 qouj uqz «qGWSa6x56\~w6j m m6mo«u"m cQx6ruxC
« \~»cOFÚUGcPffí Ú GÓ GñÓ áí aÓ ÓGÍ CÓ Góún aÑ nōÑÓG Úú G
aÓ ÓGOpbPG (Gí ú óÓG Ok √ fúÓé í aÓ- Gó aÑ c(G
óÓsá Óññué í óG ú éá á éő OÚ
text_image
Register Now
www.delonghi.com/register
De'Longhi Appliances via Seitz, 47 31100 Treviso, Italy www.delonghi.com
5713246511_01_1120