
DPX7100DAB - Radio KENWOOD - Free user manual and instructions
Find the device manual for free DPX7100DAB KENWOOD in PDF.
| Product Type | Car radio with DAB+ reception, FM/AM, CD player, USB, Bluetooth |
| Brand | Kenwood |
| Model | DPX7100DAB |
| Installation dimensions (W × H × D) | 182 mm × 111 mm × 158 mm |
| Weight | 1.7 kg |
| Power supply | 14.4 V DC (10.5 V – 16 V allowable), max current 10 A |
| Maximum output power | 50 W × 4 (full power 22 W × 4, THD < 1%) |
| Speaker impedance | 4 Ω – 8 Ω |
| Radio bands | DAB (Band III: 174.928 – 239.200 MHz), FM (87.5 – 108 MHz), MW (531 – 1611 kHz), LW (153 – 279 kHz) |
| Bluetooth | Version 3.0, profiles HFP, A2DP, AVRCP, SPP, PBAP |
| Connectors | USB (1.5 A), AUX (3.5 mm mini-jack), microphone input, DAB antenna (SMB) |
| Audio formats played (USB) | MP3, WMA, AAC, WAV, FLAC |
| Audio formats played (CD) | CD audio, MP3, WMA, AAC |
| Equalizer | 13 bands (62.5 Hz – 16 kHz) with presets and manual adjustment |
| Audio functions | Subwoofer, Fader, Balance, Loudness, Bass Boost, Sound Reconstruction, Space Enhance, Drive EQ |
| Digital Time Alignment (DTA) | Distance and gain adjustment per speaker, presets by vehicle type |
| Display | LCD with customizable RGB backlight, automatic dimming |
| Bluetooth hands-free functions | Echo cancellation, phonebook, call history, voice recognition |
| Integrated services | Spotify (via USB or Bluetooth) |
| Compatibility | iPod/iPhone (USB or Bluetooth), Android (AOA 2.0 or Bluetooth) |
| Supplied accessories | DAB film antenna, microphone, wiring harness, mounting sleeve, extraction keys |
| Maintenance and cleaning | Wipe the front panel with a dry silicone or soft cloth; clean discs from center outward with a soft cloth |
| Safety | Adjustable auto-off (P-OFF WAIT), distraction warning, 10 A fuse |
| Repairability | Firmware update via USB, replaceable fuse |
| General information | Compliant with EU Directives 2014/53/EU and RoHS; manufacturer JVC KENWOOD Corp., Japan |
Frequently Asked Questions - DPX7100DAB KENWOOD
User questions about DPX7100DAB KENWOOD
0 question about this device. Answer the ones you know or ask your own.
Ask a new question about this device
Download the instructions for your Radio in PDF format for free! Find your manual DPX7100DAB - KENWOOD and take your electronic device back in hand. On this page are published all the documents necessary for the use of your device. DPX7100DAB by KENWOOD.
USER MANUAL DPX7100DAB KENWOOD
Digital Audio Broadcasting

Spotify®

Made for

iPod

iPhone

Bluetooth®

B5A-2113-00 (EN)© 2017


Information on Disposal of Old Electrical and Electronic Equipment and Batteries (applicable for countries that have adopted separate waste collection systems)
Products and batteries with the symbol (crossed-out wheeled bin) cannot be disposed as household waste. Old electrical and electronic equipment and batteries should be recycled at a facility capable of handling these items and their waste byproducts.
Contact your local authority for details in locating a recycle facility nearest to you. Proper recycling and waste disposal will help conserve resources whilst preventing detrimental effects on our health and the environment.
Notice: The sign "Pb" below the symbol for batteries indicates that this battery contains lead.
The marking of products using lasers
The label is attached to the chassis/case and says that the component uses laser beams that have been classified as Class 1. It means that the unit is utilizing laser beams that are of a weaker class. There is no danger of hazardous radiation outside the unit.
Declaration of Conformity with regard to the RE Directive 2014/53/EU Declaration of Conformity with regard to the RoHS Directive 2011/65/
Manufacturer:
JVC KENWOOD Corporation
3-12, Moriya-cho, Kanagawa-ku, Yokohama-shi, Kanagawa, 221-0022, JAPAN
EU Representative:
JVCKENWOOD Europe B.V.
Amsterdamseweg 37, 1422 AC UITHOORN, THE NETHERLANDS
Hereby, JVCKENWOOD declares that the radio equipment "DPX-7100DAB" is in compliance with Directive 2014/53/EU.
The full text of the EU declaration of conformity is available at the following internet address:
http://www.kenwood.com/cs/ce/eudoc/
Français
| 1 | Select the display language and cancel the demonstration |
| 2 | Set the clock and date |
| 3 | Set the initial settings |
DIGITAL RADIO 6
| ANALOG RADIO 9 | |
| CD/USB/iPod/ANDROID | 11 |
| AUX | 14 |
| Spotify | 14 |
| BLUETOOTH® | 16 |
AUDIO SETTINGS 23
| DISPLAY SETTINGS 26 | |
| TROUBLESHOOTING | 27 |
| REFERENCES | 30 |
| Maintenance |
| More information |
| SPECIFICATIONS | 32 |
| INSTALLATION/ CONNECTION | 34 |
BEFORE USE
IMPORTANT
- To ensure proper use, please read through this manual before using this product. It is especially important that you read and observe Warning and Caution in this manual.
- Please keep the manual in a safe and accessible place for future reference.
WARNING
- Do not operate any function that takes your attention away from safe driving.
Caution
Volume setting:
- Adjust the volume so that you can hear sounds outside the car to prevent accidents.
- Lower the volume before playing digital sources to avoid damaging the speakers by the sudden increase of the output level.
General:
- Avoid using the external device if it might hinder safe driving.
- Make sure all important data has been backed up. We shall bear no responsibility for any loss of recorded data.
- Never put or leave any metallic objects (such as coins or metal tools) inside the unit to prevent a short circuit.
- If a disc error occurs due to condensation on the laser lens, eject the disc and wait for the moisture to evaporate.
- Depending on the types of cars, the antenna will automatically extend when you turn on the unit with the antenna control wire connected (37). Turn off the unit or change the source to STANDBY when parking at a low ceiling area.
How to read this manual
- Operations are explained mainly using buttons on the faceplate.
- English indications are used for the purpose of explanation. You can select the display language from the [FUNCTION] menu. (-5)
• [XX] indicates the selected items. - (→XX) indicates references are available on the stated page.
BASICS
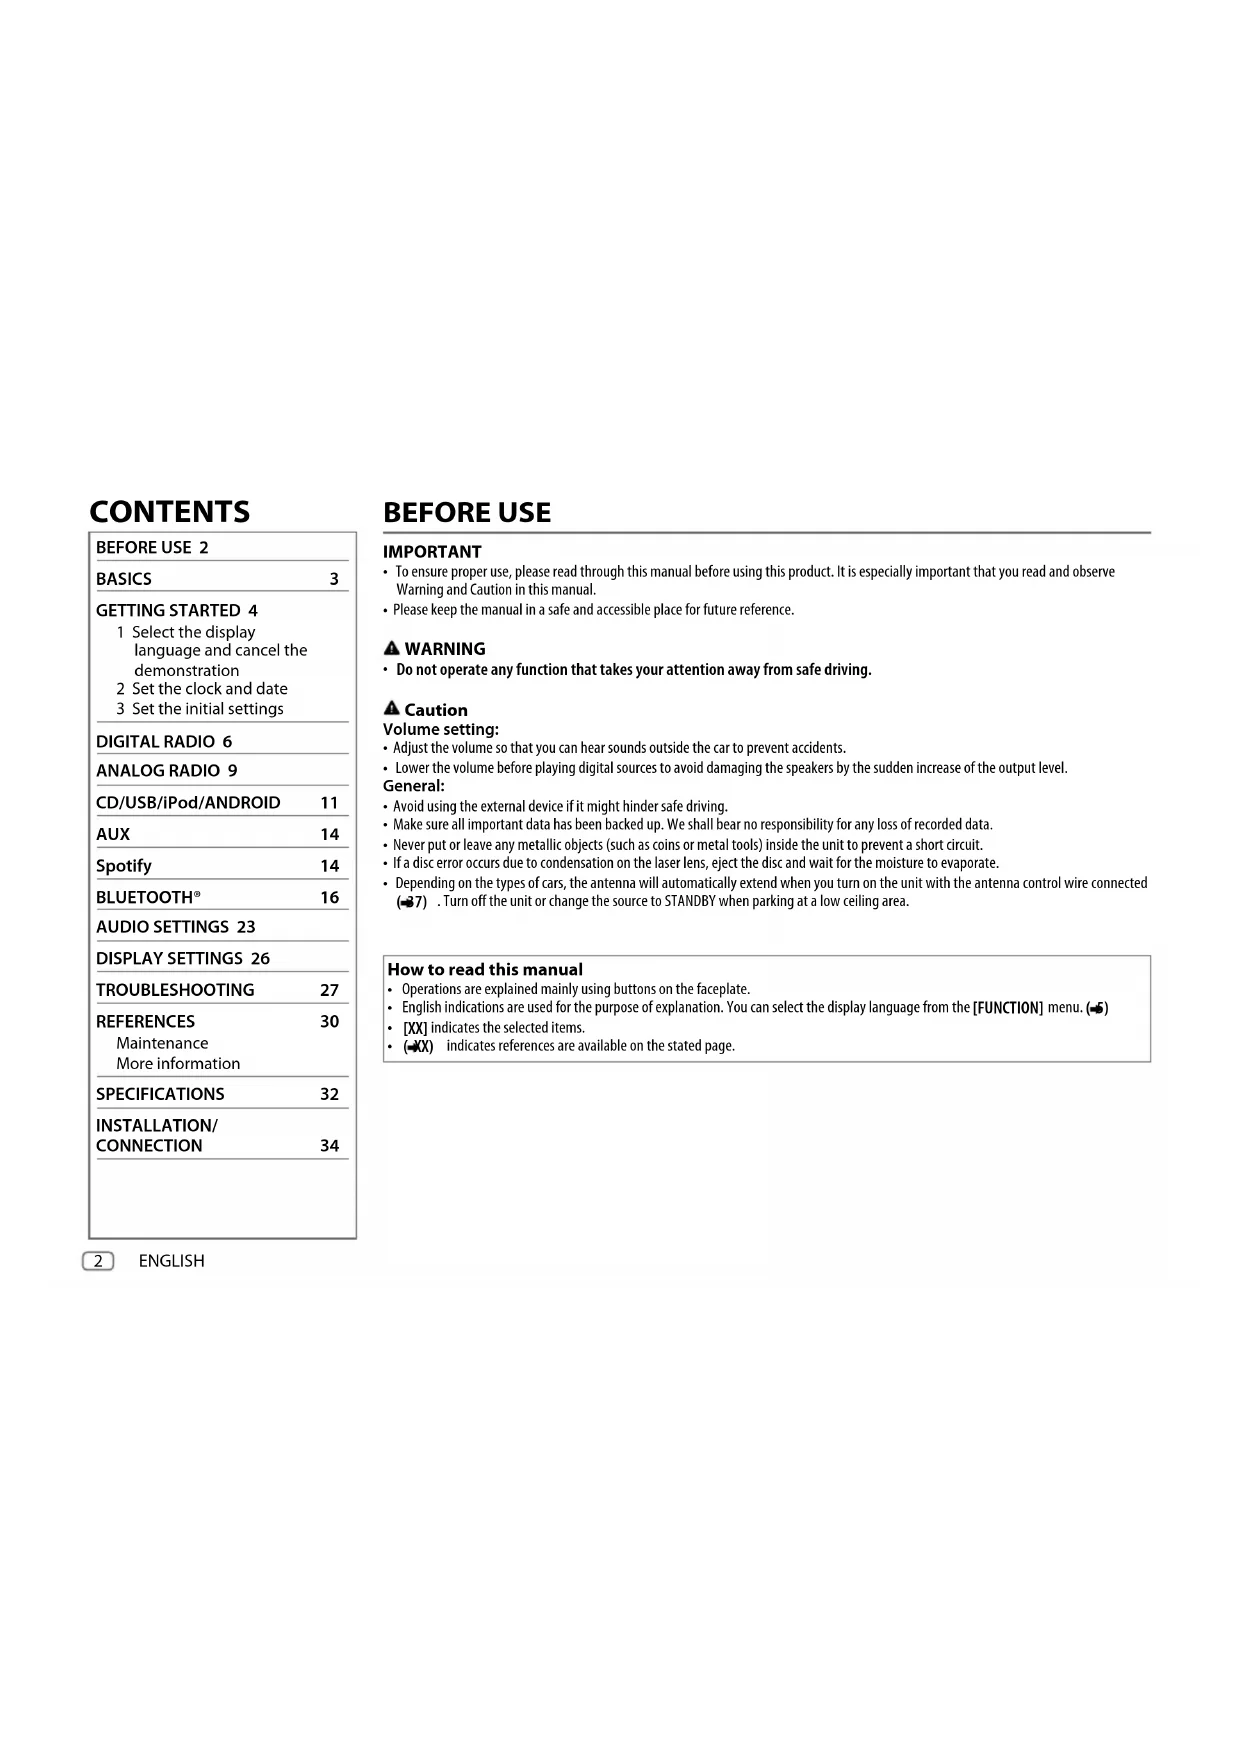
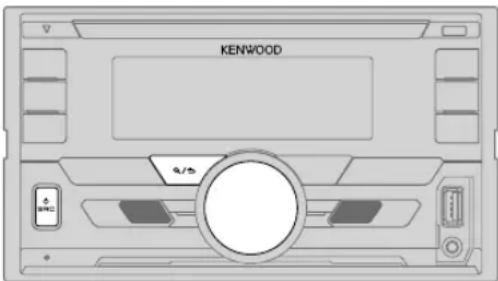
Faceplate
To On the faceplate
| Turn on the power | Press ⏻ SRC. • Press and hold to turn off the power. |
| Adjust the volume Turn the volume knob. | |
| Select a source | Press ⏻ SRC repeatedly. |
| Change the display information Press DISP repeatedly. | (→2) |
GETTING STARTED
1 Select the display language and cancel the demonstration
When you turn on the power for the first time (or [FACTORY RESET] is set to [YES], → 5), the display shows: "SEL LANGUAGE" → "PRESS" → "VOLUME KNOB"
1 Turn the volume knob to select [ENG] (English), [RUS] (Russian) or [SPA] (Spanish), then press the knob.
[ENG] is selected for the initial setup.
Then, the display shows: "CANCEL DEMO" → "PRESS" → "VOLUME KNOB".
2 Press the volume knob.
[YES] is selected for the initial setup.
3 Press the volume knob again.
"DEMO OFF" appears.
Then, the display shows the selected crossover type:
"2-WAY X' OVER" or "3-WAY X' OVER"
- To change the crossover type, see "Change the crossover type". (-6)
- To change the crossover type, see "Change the crossover type". (-6)
2 Set the clock and date
1 Press the volume knob to enter [FUNCTION].
2 Turn the volume knob to select [CLOCK], then press the knob.
To adjust the clock
3 Turn the volume knob to select [CLOCK ADJUST], then press the knob.
4 Turn the volume knob to make the settings, then press the knob.
Hour → Minute
5 Turn the volume knob to select [CLOCK FORMAT], then press the knob.
6 Turn the volume knob to select [12H] or [24H], then press the knob.
To set the date
7 Turn the volume knob to select [DATE FORMAT], then press the knob.
8 Turn the volume knob to select [DD/MM/YY] or [MM/DD/YY], then press the knob.
9 Turn the volume knob to select [DATE SET], then press the knob.
10 Turn the volume knob to make the settings, then press the knob.
Day → Month → Year or Month Day Year
11 Press and hold to exit.
To return to the previous setting item, press R/5
3 Set the initial settings
1 Press repeatedly to enter STANDBY.
2 Press the volume knob to enter [FUNCTION].
3 Turn the volume knob to select an item (5), then press the knob.
4 Repeat step 3 until the desired item is selected or activated.
5 Press and hold to exit.
To return to the previous setting item, press Q/5
4 ENGLISH
GETTING STARTED
| DISPLAY | |
| EASY MENU | When entering [FUNCTION]...ON LCD DISPLAY zone illumination changes to white color. ;OFF: LCD DISPLAY zone illumination remains as [COLOR SELECT] color.(←27)KEY zone illumination changes to light blue color when you enter[FUNCTION],irregardless of the [EASY MENU] setting.Refer to the illustration on page 26 for zone identification. |
| TUNER SETTING | |
| DABANT POWER | ON Supplies power to the DAB antenna. Selects when using the supplied antenna. ;OFF: Does not supply power. Selects when using passive antenna without booster. (←38) |
| PRESETTYPE | NORMAL:Memorizes one station for each preset button in each band (FM1/FM2/FM3/MW/LW/DB1/DB2/DB3). ;MIX:Memorizes one station (digital radio or analog radio) for each preset button, regardless of the selected band. |
| SYSTEM | |
| KEY BEEP | (Not applicable if 3-way crossover is selected.)ON Activates the keypress tone. ;OFF: Deactivates. |
| SOURCE SELECT | |
| SPOTIFYSRC | ON Enables SPOTIFY in source selection. ;OFF: Disables. (←4) |
| BUILT-INAUX | ON Enables AUX in source selection. ;OFF: Disables. (←4) |
| P - OFF WAIT | Applicable only when the demonstration mode is turned off.Sets the duration when the unit will automatically turn off (while in standby mode) to save the battery.20M: 20 minutes; 40M: 40 minutes; 60M: 60 minutes; — — : Cancels |
| CD READ 1 | _: Automatically distinguishes between audio file disc and music CD. ;2: Forces to play as a music CD. No sound can be heard if an audio file disc is played. |
| F/W UPDATE | |
| UPDATE SYSTEM/UPDATE DAB1/UPDATE DAB2 | |
| F/W UP xxxx/F/W UP xxxxx /F/W UP Vxxx | YES: Starts upgrading the firmware. ; NO: Cancels (upgrading is not activated).For details on how to update the firmware, visit. |
| FACTORYRESETYES | : Resets the settings to default (except the stored station). ;NO: Cancels |
| CLOCK | |
| CLOCK DISPLAY | ON: The clock time is shown on the display even when the unit is turned off. ;OFF: Cancels. |
| ENGLISH | Select the display language for [FUNCTION] menu and music information if applicable. |
| РУССКИЙ | |
| ESPANOL | By default, [ENGLISH] is selected. |
GETTING STARTED
Change the crossover type
1 Press repeatedly to enter STANDBY.
2 Press and hold number buttons 4 and 5 to enter crossover select. The current crossover type appears.
3 Turn the volume knob to select "2WAY" or "3WAY", then press the knob.
4 Turn the volume knob to select "YES" or "NO", then press the knob. The selected crossover type appears.
• To cancel, press and hold 9/5.
• To adjust the selected crossover settings, (24, 25).
Caution
Select a crossover type according to how the speakers are connected. (36, 37)
If you select a wrong type:
• The speakers may damage.
- The output sound level may be extremely high or low.
DIGITAL RADIO
About DAB (Digital Audio Broadcasting)
DAB is one of the digital radio broadcasting systems available today. It can deliver digital quality sound without any annoying interference or signal distortion. Furthermore, it can carry text, pictures and data. In contrast to FM broadcast, where each program is transmitted on its own frequency, DAB combines several programs (called "services") to form one "ensemble."
The "primary component" (main radio station) is sometimes accompanied by a "secondary component" which can contain extra programs or other information.
Preparation:
1 Connect the supplied DAB antenna to the DAB antenna jack. (37)
2 Press repeatedly to select DIGITAL AUDIO.
3 Press and hold Q/→ (LIST UPDATE) to start the Service List update.
"LIST UPDATE" appears and update starts. "UPDATED" appears when update completes.
Updates take up to 3 minutes. No interruption (such as traffic information) is possible during updates.
- To cancel the Service List update: Press and hold Ⓠ/♂ (LIST UPDATE) again.
DIGITAL RADIO
Search for an ensemble
1 Press repeatedly to select DIGITAL AUDIO.
2 Press repeatedly to select DB1/DB2/DB3.
3 Press and hold |◀◀ / ▶▶▶ to search for an ensemble.
4 Press |◀◀/▶▶| to select an ensemble, service or component to listen.
- To change the searching method for ◀◀◀ / ▶▶▶: Press ▼ SEEK repeatedly.
AUTO1 : Press ◀◀◀ / ▶▶◀: Select an ensemble, service or component. Press and hold ◀◀◀ / ▶▶▶◀: Automatically search for an ensemble.
AUTO2 : Press ◀◀◀ / ▶▶▶: Search for a preset station.
MANUAL : Press |◀◀/▶▶: Select an ensemble, service or component. Press and hold |◀◀/▶▶: Manually search for an ensemble.
- To store a service: Press and hold one of the number buttons (1 to 6).
- To select a stored service: Press one of the number buttons (1 to 6).
Select a service
1 Press to enter Service Search mode.
2 Turn the volume knob or press ▲ / ▼ to select a service, then press the knob.
To cancel the Service Search mode, press 9/5 again.
Select a service by name
1 Press to enter Service Search mode.
2 Turn the volume knob quickly to enter Alphabet Search mode.
3 Turn the volume knob or press |◀◀ / ▶▶▶ to select the character to be searched for.
Press ▲ / ▼ to go to the previous/next page.
4 Press the volume knob to start searching.
5 Turn the volume knob to select a service, then press the knob.
To cancel the Alphabet Search mode, press again.
Other settings
1 Press the volume knob to enter [FUNCTION].
2 Turn the volume knob to select an item ( 8), then press the knob.
3 Repeat step 2 until the desired item is selected/activated or follow the instructions stated on the selected item.
4 Press and hold to exit.
To return to the previous setting item, press R/5
DIGITAL RADIO
| TUNERSETTING | |
| AF SET | ON:While listening to DAB: Automatically switch to FM broadcasting the same program if the DAB signal becomes weak. It will switch back to DAB sound when the signal becomes strong again.While listening to FM: Automatically switch to DIGITAL AUDIO source broadcasting the same program (if available). ;OFF: Cancels. |
| TI ON | : Allows the unit to temporarily switch to Traffic Information if available ("TI" lights up). ;OFF: Cancels. |
| PTY SEARCH | 1 Turn the volume knob to select the available Program Type (→), then press the knob.2 Turn the volume knob to select the PTY language (ENGLISH/FRENCH/GERMAN), then press the knob.3 Press |←| / ►►I to start searching. |
| ASW SELECT TRAVEL ,WARNINGS, NEWS, WEATHER, EVENT, SPECIAL, RAD INFO, SPORTS, FINANCE : Turn the volume knob to make a selection, then press the knob."* " appears in front of the activated announcement type.Automatically switch from any source to Digital radio ensembles broadcasting an activated announcement type.Multiple announcement can be activated simultaneously.To deactivate, press the volume knob again (" * " goes off). | |
| LIST UPDATE AUTO : Automatically update the DAB Service List when the power is turned on. ;MANUAL: Updates the DAB Service List by pressing and holding Q / →(LIST UPDATE). | |
| PTY WATCH | 1 Turn the volume knob to select the available Program Type, then pressQ/S.The unit automatically switch from any source to Digital Radio ensembles broadcasting the selected type of program.Program Type:NEWS, AFFAIRS, INFO, SPORT, EDUCATE, DRAMA,CULTURE, SCIENCE, VARIED, POP M (music), ROCK M (music),EASY M (music), LIGHT M (music), CLASSICS, OTHER M (music),WEATHER, FINANCE CHILDREN, SOCIAL RELIGION, PHONE IN,TRAVEL, LEISURE, JAZZ COUNTRY, NATION M (music), OLDIES,FOLK M (music), DOCUMENTOFF: Cancels.2 Press the volume knob to enter PTY language selection.3 Turn the volume knob to select the PTY language (ENGLISH/ FRENCH/GERMAN), then press the knob. |
| RELATEDSERVON | : Enable Soft-Link function to switch to an alternative service which is different audio program from the current audio program.;OFF: Disable. |
| CLOCK | |
| TIME SYNC | ON: Synchronizes the unit’s time to the Digital Radio signal station time.;OFF: Cancels. |
DIGITAL RADIO
Available Program Type for[PTY SEARCH]
SPEECH: NEWS, AFFAIRS, INFO (information), SPORT, EDUCATE, DRAMA, CULTURE, SCIENCE, VARIED, WEATHER, FINANCE, CHILDREN, SOCIAL, RELIGION, PHONE IN. TRAVEL, LEISURE, DOCUMENT
MUSIC: POP M (music), ROCK M (music), EASY M (music), LIGHT M (music), CLASSICS, OTHER M (music), JAZZ, COUNTRY, NATION M (music), OLDIES, FOLK M (music)
The unit will search for the Program Type categorized under [SPEECH] or [MUSIC] if selected.
- If the volume is adjusted during reception of traffic information, announcement, alarm or news bulletin, the adjusted volume is memorized automatically. It will be applied the next time traffic information, announcement, alarm or news bulletin is turned on.
ANALOG RADIO
Search for a station
1 Press repeatedly to select RADIO.
2 Press rapidly to select FM1/FM2/FM3/MW/LW.
3 Press |◀◀/▶▶| to search for a station.
- To change the searching method for |◀◀/▶▶: Press ▼ SEEK repeatedly.
AUTO1 : Automatically search for a station.
AUTO2 : Search for a preset station.
MANUAL : Manually search for a station.
- To store a station: Press and hold one of the number buttons (1 to 6).
- To select a stored station: Press one of the number buttons (1 to 6).
Other settings
1 Press the volume knob to enter [FUNCTION].
2 Turn the volume knob to select an item (10), then press the knob.
3 Repeat step 2 until the desired item is selected/activated or follow the instructions stated on the selected item.
4 Press and hold to exit.
To return to the previous setting item, press Q/5
ANALOG RADIO
Default: XX
| TUNERSETTING | |
| LOCAL SEEK | ON: Searches only stations with good reception. ;OFF: Cancels.- Settings made are applicable only to the selected source/station. Once you change the source/station, you need to make the settings again. |
| AUTO MEMORY | YES: Automatically starts memorizing 6 stations with good reception. ;NO: Cancels.- Selectable only if [NORMAL] is selected for [PRESET TYPE]. (-€) |
| MONO SET | ON: Improves the FM reception, but the stereo effect may be lost. ;OFF: Cancels. |
| NEWS SET ON | : The unit will temporarily switch to News Programme if available. ;OFF: Cancels. |
| REGIONAL ON | _: Switches to another station only in the specific region using the "AF" control. ;OFF: Cancels. |
| AF SET ON | _: Automatically searches for another station broadcasting the same program in the same Radio Data System network with better reception when the current reception is poor. ;OFF: Cancels. |
| TI* | ON: Allows the unit to temporarily switch to Traffic Information if available ("TI" lights up). ;OFF: Cancels.* [TI] in MW/LW band is for enabling traffic interruption to DIGITAL AUDIO source only. |
| PTY SEARCH | 1 Turn the volume knob to select the available Program Type (see the following), then press the knob.2 Turn the volume knob to select the PTY language (ENGLISH/FRENCH/GERMAN), then press the knob.3 Press |◄◄/►►| to start searching. |
Available Program Type for [PTY SEARCH]
SPEECH : NEWS, AFFAIRS, INFO (information), SPORT, EDUCATE, DRAMA, CULTURE, SCIENCE, VARIED, WEATHER, FINANCE, CHILDREN, SOCIAL, RELIGION, PHONE IN, TRAVEL, LEISURE, DOCUMENT
MUSIC : POP M (music), ROCK M (music), EASY M (music), LIGHT M (music), CLASSICS, OTHER M (music), JAZZ, COUNTRY, NATION M (music), OLDIES, FOLK M (music)
The unit will search for the Program Type categorized under [SPEECH] or [MUSIC] if selected.
- [LOCAL SEEK]/[MONO SET]/[NEWS SET]/[REGIONAL]/[AF SET]/[PTY SEARCH] is selectable only when the band is FM1/FM2/FM3.
- If the volume is adjusted during reception of traffic information or news bulletin, the adjusted volume is memorized automatically. It will be applied the next time traffic information or news bulletin is turned on.
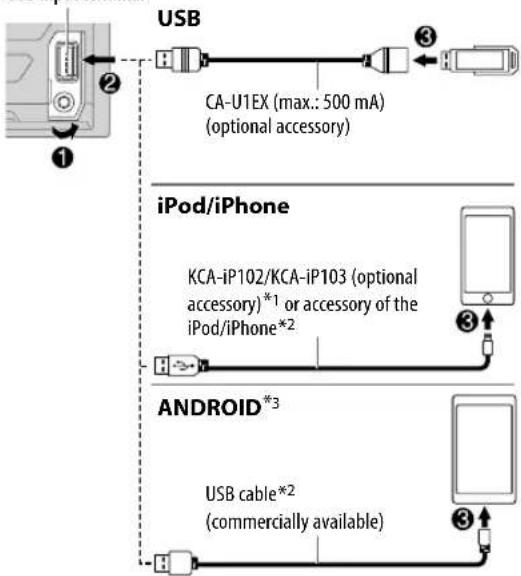
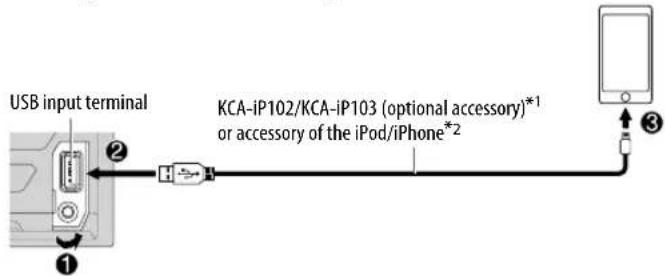
CD/USB/iPod/ANDROID
Start playback
The source changes automatically and playback starts.
CD
USB input terminal
flowchart
graph TD
    A["USB"] --> B["CA-U1EX (max.: 500 mA)<br>(optional accessory)"]
    B --> C["iPod/iPhone"]
    C --> D["KCA-iP102/KCA-iP103 (optional accessory)*1 or accessory of the iPod/iPhone*2"]
    D --> E["Android*3"]
    E --> F["USB cable*2<br>(commercially available)"]
To On the faceplate
| Playback/pause Press . | ▶II 6 |
| Reverse/Fast-forward*4 | Press and hold |◀◀ / ▶▶|. |
| Select a track/file | Press |◀◀ / ▶▶|. |
| Select a folder*5 | Press ▲ / ▼. |
*1 KCA-iP102:30-pin type, KCA-iP103:Lightning type
*2 Do not leave the cable inside the car when not using.
*3 When connecting an Android device, "Press [VIEW] to install KENWOOD MUSIC PLAY APP" is shown. Follow the instructions to install the application. You can also install the latest version of KENWOOD MUSIC PLAY application on your Android device before connecting. For more information, visit
*4 For ANDROID: Applicable only when [BROWSE MODE] is selected. (→2)
*5 For CD: Only for MP3/WMA/AAC files. This does not work for iPod/ANDROID.
CD/USB/iPod/ANDROID
| To On the faceplate | |
| Repeat play*6 | Press Repeatedly. TRACK REPEAT/ALL REPEAT : Audio FILE REPEAT/FOLDER REPEAT/ALL REPEAT : MP3/WMA/AAC/WAV/FLAC file FILE REPEAT/FOLDER REPEAT/REPEAT OFF : iPod or ANDROID |
| Random play*6 | Press Repeatedly. DISC RANDOM/RANDOM OFF : Audio CD FOLDER RANDOM/RANDOM OFF : MP3/WMA/AAC/WAV/FLAC file, iPod or ANDROID |
| Press and hold 3× to select ALL RANDOM.*7 | |
*6 For iPod/ANDROID: Applicable only when [MODE OFF]/[BROWSE MODE] is selected.
*7 For CD: Only for MP3/WMA/AAC files.
Select control mode
While in iPod USB source, press 5 repeatedly.
MODE ON : Control iPod using the iPod itself. However, you can still play/pause, file skip, fast-forward or reverse from this unit.
MODE OFF : Control iPod from this unit.
While in ANDROID source, press 5 repeatedly.
BROWSE MODE: Control Android device from this unit via KENWOOD MUSIC PLAY application installed in the Android device.
HAND MODE : Control Android device using the Android device itself via other media player applications installed in the Android device. However, you can still play/pause and file skip from this unit.
Select music drive
While in USB source, press 5 repeatedly.
StoredGngs in the following drive will be played back.
- Selected internal or external memory of a smartphone (Mass Storage Class).
- Selected drive of a multiple drives device.
Listen to Tuneln Radio/Tuneln Radio Pro
While listening to Tuneln Radio or Tuneln Radio Pro, connect the iPod/iPhone to the USB input terminal of the unit.
- The unit will output the sound from these applications.
Select a file from a folder/list
For iPod/ANDROID, applicable only when [MODE OFF]/[BROWSE MODE] is selected.
1 Press .Q/5
2 Turn the volume knob to select a folder/list, then press the knob.
3 Turn the volume knob to select a file, then press the knob.
Quick Search (applicable only for CD, USB and ANDROID source) If you have many files, you can search through them quickly.
Turn the volume knob quickly to browse through the list quickly.
Skip Search (applicable only for iPod USB and ANDROID source) Press |◀◀ / ▶▶ to search at a preset skip search ratio. (◀3, [SKIP SEARCH])
- Pressing and holding |◀◀ / ▶▶ searches at a 10% ratio.
CD/USB/iPod/ANDROID
Alphabet search (applicable only for iPod USB and ANDROID source)
You can search for a file according to the first character.
For iPod USB source
1 Turn the volume knob quickly to enter character search.
2 Turn the volume knob to select the character.
- Select " * " to search for a character other than A to Z, 0 to 9.
3 Press |◀◀/▶▶ to move to the entry position.
- You can enter up to 3 characters.
4 Press the volume knob to start searching.
For ANDROID source
1 Press ▲ / ▼ to enter character search.
2 Turn the volume knob to select the character.
^A^: Upper case letters (A to Z)
_A_: Lower case letters (a to z)
-0-: Numbers (0 to 9)
***: Character other than A to Z, 0 to 9
3 Press the volume knob to start searching.
- To return to the root folder/first file/top menu, press 5. (Not applicable for BT AUDIO source.)
• To return to the previous setting item, press 9/5
• To cancel, press and hold 9/5.
Settings to use KENWOOD Remote application
KENWOOD Remote application is designed to control the KENWOOD car receiver's operations from the iPhone/iPod (via USB input terminal).
Preparation:
Install the latest version of KENWOOD Remote application on your device before connecting. For more information, visit
You can make the settings in the same way as connection via Bluetooth.
(21, 22)
Other settings
1 Press the volume knob to enter [FUNCTION].
2 Turn the volume knob to select an item (see the following table), then press the knob.
3 Repeat step 2 until the desired item is selected or activated.
4 Press and hold to exit.
To return to the previous setting item, press 9/5
Default: XX
USB
MUSIC DRIVE DRIVE CHANGE : The next drive ([DRIVE 1] to [DRIVE 4]) is selected automatically and playback starts.
Repeat steps 1 to 3 to select the following drives.
SKIPSEARCH0.5%/1%/5%/10%: While listening to iPod USB or ANDROID source, selects the skip search ratio over the total files.
AUX
Preparation:
Select [ON] for [BUILT-IN AUX] for [SOURCE SELECT]. (→)
Start listening
1 Connect a portable audio player (commercially available).
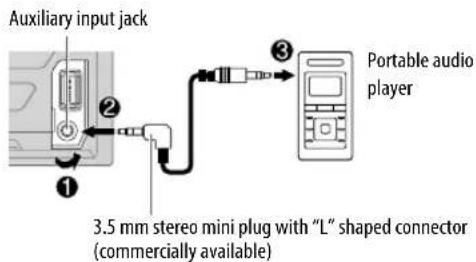
2 Press repeatedly to select AUX.
3 Turn on the portable audio player and start playback.
Set the AUX name
While listening to a portable audio player connected to the unit...
1 Press the volume knob to enter [FUNCTION].
2 Turn the volume knob to select [SYSTEM], then press the knob.
3 Turn the volume knob to select [AUX NAME SET], then press the knob.
4 Turn the volume knob to select an item, then press the knob.
AUX (default)/DVD/PORTABLE/GAME/VIDEO/TV
5 Press and hold to exit.
To return to the previous setting item, press 9/5.
Spotify
Preparation:
Install the latest version of the Spotify application on your device (iPhone/iPod touch), then create an account and log in to Spotify.
- Select [ON] for [SPOTIFY SRC] in [SOURCE SELECT]. (-5)
Start listening
1 Open the Spotify application on your device.
2 Connect your device to the USB input terminal.
3 Press repeatedly to select SPOTIFY.
Broadcast starts automatically.
*1 KCA-iP102:30-pin type, KCA-iP103:Lightning type
*2 Do not leave the cable inside the car when not using.
Spotify
| To On the faceplate | |
| Playback/pause Press . | ▶II 6 |
| Skip a track | Press ◀◀*3 / ▶▶. |
| Thumbs up or thumbs down*4 | Press ▲ / ▼. |
| Start radio Press and hold 5. | |
| Repeat play*5 | Press Repeatedly.REPEAT ALL/REPEAT ONE*3/REPEAT OFF |
| Random play*5 | Press Repeatedly.* 3SHUFFLE ON/SHUFFLE OFF |
*3 Available for premium account users only.
*4 This feature is available for tracks in Radio only. If thumbs down is selected, the current track is skipped.
*5 Available for tracks in Playlists only.
Save favorite song information
While listening to the Radio on Spotify...
Press and hold the volume knob.
"SAVED" appears and the information is stored to "Your Music" or "Your Library" on your Spotify account.
To unsave, repeat the same procedure.
"REMOVED" appears and the information is removed from "Your Music" or "Your Library" on your Spotify account.
Search for a song or station
1 Press Q/5
2 Turn the volume knob to select a list type, then press the knob. The list types displayed differ depending on the information sent from Spotify.
3 Turn the volume knob to select the desired song or station.
4 Press the volume knob to confirm.
You can browse through the list quickly by turning the volume knob quickly.
To cancel, press and hold Q/S.
BLUETOOTH®
BLUETOOTH — Connection
Supported Bluetooth profiles
- Hands-Free Profile (HFP)
- Advanced Audio Distribution Profile (A2DP)
– Audio/Video Remote Control Profile (AVRCP) - Serial Port Profile (SPP)
- Phonebook Access Profile (PBAP)
Supported Bluetooth codecs
- Sub Band Codec (SBC)
- Advanced Audio Coding (AAC)
Connect the microphone
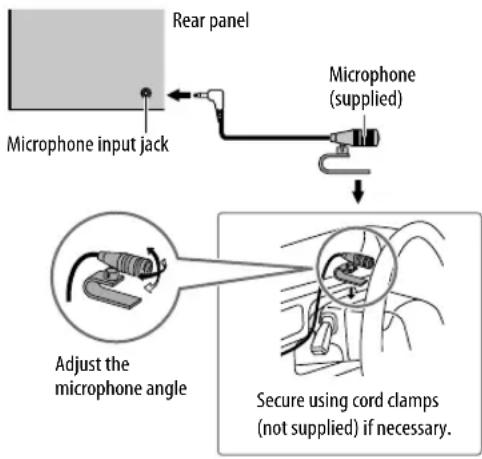
Pair and connect a Bluetooth device for the first time
1 Press to account on the unit.
2 Search and select this unit model name (DPX-7 *** ) on the Bluetooth device. "PAIRING" → "PASS XXXXXX" → Device name → PRESS "VOLUME KNOB" appears on the display.
- For some Bluetooth devices, you may need to enter the Personal Identification Number (PIN) code immediately after searching.
3 Press the volume knob to start pairing.
"PAIRING OK" appears when pairing is completed.
Once pairing is completed, Bluetooth connection is established automatically. "BT1" and/or "BT2" indicator on the faceplate lights up.
- This unit supports Secure Simple Pairing (SSP).
- Up to five devices can be registered (paired) in total.
- Once the pairing is completed, the Bluetooth device will remain registered in the unit even if you reset the unit. To delete the paired device, 20, [DEVICE DELETE].
- A maximum of two Bluetooth phones and one Bluetooth audio device can be connected at any time. However, while in BT AUDIO source, you can connect to five Bluetooth audio devices and switch between these five devices. (21)
- Some Bluetooth devices may not automatically connect to the unit after pairing. Connect the device to the unit manually.
- Refer to the instruction manual of the Bluetooth device for more information.
Auto Pairing
When you connect iPhone/iPod touch/Android device to the USB input terminal, pairing request (via Bluetooth) is automatically activated.
Press the volume knob to pair once you have confirmed the device name.
Automatic pairing request is activated only if:
- Bluetooth function of the connected device is turned on.
- [AUTO PAIRING] is set to [ON]. (20)
- KENWOOD MUSIC PLAY application is installed on the Android device (▶1) and [BROWSE MODE] is selected. (▶2)
BLUETOOTH®
BLUETOOTH — Mobile phone
Receive a call
When there is an incoming call:
• The KEY zone illuminates in green color and flashes.
- The unit answers the call automatically if [AUTO ANSWER] is set to a selected time. (→8)
During a call:
- The LCD DISPLAY zone illuminates according to the settings made for [DISPLAY] (27) and the KEY zone illuminates in green color.
- If you turn off the unit, the Bluetooth connection is disconnected.
The following operations may differ or not available depending on the connected phone.
To On the faceplate
First incoming call...
| Answer a call | Press TEL or the volume knob or one of the number buttons (1 to 6). |
| Reject a call | Press R/S. |
| End a call | Press R/S |
While talking on the first incoming call...
| Answer another incoming call and hold the current call | Press ⬆ TEL |
| Reject another incoming call | Press ⬆/♂. |
While having two active calls...
| End current call and activate held call | Press / . |
| Swap between the current call and held call | Press TEL |
| Adjust the phone volume [00] to [35] (Default: [15]) | Turn the volume knob during a call.· This adjustment will not affect the volume of the other sources. |
| Switch between hands-free and private talk modes | Press II 6 during a call.· Operations may vary according to the connected Bluetooth device. |
BLUETOOTH®
Improve the voice quality
While talking on the phone...
1 Press the volume knob to enter [FUNCTION].
2 Turn the volume knob to select an item (see the following table), then press the knob.
3 Repeat step 2 until the desired item is selected or activated.
4 Press and hold to exit.
To return to the previous setting item, press Q/5
Default: XX
| MIC GAIN LEVEL -10 | to LEVEL +10 (LEVEL -4): The sensitivity of the microphone increases as the number increased. |
| NR LEVEL LEVEL -5 | to LEVEL +5 (LEVEL 0): Adjust the noise reduction level until the least noise is being heard during a phone conversation. |
| ECHOCANCELLEVEL -5 | to LEVEL +5 (LEVEL 0): Adjust the echo cancellation delay time until the least echo is being heard during a phone conversation. |
Make the settings for receiving a call
1 Press to Enter Bluetooth mode.
2 Turn the volume knob to select an item (see the following table), then press the knob.
3 Repeat step 2 until the desired item is selected or activated.
4 Press and hold to exit.
To return to the previous setting item, press R/S
Default: XX
| SETTINGS | |
| AUTOANSWER | 1 to 30: The unit answers incoming call automatically in the selected time (in seconds). ;OFF: Cancels. |
| BATT/SIGNAL*AUTO | : Shows the strength of the battery and signal when the unit detects a Bluetooth device and the Bluetooth device is connected. ;OFF: Cancels. |
* Functionality depends on the type of the phone used.
Make a call
You can make a call from the call history, phonebook, or dialing the number. Call by voice is also possible if your mobile phone has the feature.
1 Press to differ Bluetooth mode.
"(First device name)" appears.
- If two Bluetooth phones are connected, press against to another phone. "(Second device name)" appears.
2 Turn the volume knob to select an item (see the following table), then press the knob.
3 Repeat step 2 until the desired item is selected/activated or follow the instructions stated on the selected item.
4 Press and hold to exp.
To return to the previous setting item, press 9/5
CALL HISTORY (Applicable only if the phone supports PBAP.)
1 Press the volume knob to select a name or a phone number.
- "INCOMING", "OUTGOING", or "MISSED" is shown on the lower part of the display to indicate the previous call status.
• PresDISP to change the display category (NUMBER or NAME).
- "NO DATA" appears if there is no recorded call history.
2 Press the volume knob to call.
BLUETOOTH®
| PHONE BOOK | (Applicable only if the phone supports PBAP.)1 Turn the volume knob quickly to enter alphabet search mode (if the phonebook contains many contacts).The first menu (ABCDEFGHIJK) appears.To go to the other menu (LMNOPQRSTUV orWXYZ1 *), press ▲/▼.To select the desired first letter, turn the volume knob or press |◄◄ / ►►|, then press the knob.Select “1” to search with numbers and select “ *” to search with symbols.2 Turn the volume knob to select a name, then press the knob.3 Turn the volume knob to select a phone number, then press the knob to call.The phonebook of the connected phone is automatically transferred to the unit when pairing.Contacts are categorized as: HOME, OFFICE, MOBILE, OTHER, GENERAL.This unit can display only non-accent letters. (Accent letters such as “Ú” is shown as “U”.) |
| NUMBER DIAL | 1 Turn the volume knob to select a number (0 to 9) or character (*, #, +).2 Press |◄◄ / ►►| to move the entry position.Repeat steps 1 and 2 until you finish entering the phone number.3 Press the volume knob to call. |
| VOICE | Speak the name of the contact you want to call or the voice command to control the phone functions. (◆Make a call using voice recognition) |
| BATT LOW/MID/FULL*: Shows the strength of the battery. | |
| NO SIGNAL LOW/MIDMAX*: Shows the strength of the current received signal. | |
* Functionality depends on the type of the phone used.
Make a call using voice recognition
1 Press and hold to activate the voice recognition of the connected phone.
2 Speak the name of the contact you want to call or the voice command to control the phone functions.
- Supported Voice Recognition features vary for each phone. Refer to the instruction manual of the connected phone for details.
- This unit also supports the intelligent personal assistant function of iPhone.
Settings in memory
Store a contact in memory
You can store up to 6 contacts into the number buttons (1 to 6).
1 Press to Enter Bluetooth mode.
2 Turn the volume knob to select [CALL HISTORY], [PHONE BOOK], or [NUMBER DIAL], then press the knob.
3 Turn the volume knob to select a contact or enter a phone number. If a contact is selected, press the volume knob to show the phone number.
4 Press and hold one of the number buttons (1 to 6). "STORED" appears when the contact is stored.
To erase a contact from the preset memory, select [NUMBER DIAL] in step 2 and store a blank number.
Make a call from memory
1 Press to Enter Bluetooth mode.
2 Press one of the number buttons (1 to 6).
3 Press the volume knob to call.
"NO MEMORY" appears if there is no contacts stored.
BLUETOOTH®
Other settings
1 Press the volume knob to enter [FUNCTION].
2 Turn the volume knob to select an item (see the following table), then press the knob.
3 Repeat step 2 until the desired item is selected/activated or follow the instructions stated on the selected item.
4 Press and hold to exit.
To return to the previous setting item, press R/5
Default: XX
BT MODE
| PHONE SELECT | Selects the phone or audio device to connect or disconnect. “*” appears in front of the device name when connected. |
| AUDIO SELECT | “▷” appears in front of the current playback audio device.You can only connect a maximum of two Bluetooth phones and one Bluetooth audio device at any time. |
| DEVICEDELETE | 1 Turn the volume knob to select a device to delete, then press the knob.2 Turn the volume knob to select [YES] or [NO], then press the knob. |
| PIN CODE EDIT (0000) | Changes the PIN code (up to 6 digits).1 Turn the volume knob to select a number.2 Press |◀◀/▶▶1 to move the entry position.Repeat ste1sand2 until you finish entering the PIN code.3 Press the volume knob to confirm. |
| RECONNECT ON | _: The unit automatically reconnect when the last connected Bluetooth device is within range. ;OFF: Cancels. |
| AUTOPAIRINGON | _: The unit automatically pair supported Bluetooth device (iPhone/iPod touch/Android device) when it is connected through USB input terminal. Depending on the operating system of the connected device, this function may not work. ;OFF: Cancels. |
| INITIALIZE YES | : Initializes all the Bluetooth settings (including stored pairing, phonebook, and etc.). ;NO Cancels. |
Bluetooth test mode
You can check the connectivity of the supported profile between the Bluetooth device and the unit.
- Make sure there is no Bluetooth device paired.
1 Press and hold . TEL
"PLEASE PAIR YOUR PHONE PIN 0000" appears.
2 Search and select this unit model name (DPX-7 *** ) on the Bluetooth device.
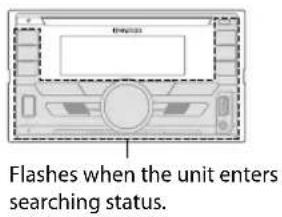
3 Operate the Bluetooth device to confirm pairing. "TESTING" flashes on the display.
The connectivity result (OK or NG) appears after the test.
PAIRING: Pairing status
HF CNT: Hands-Free Profile (HFP) compatibility
AUD CNT: Advanced Audio Distribution Profile (A2DP) compatibility
PB DL: Phonebook Access profile (PBAP) compatibility
To cancel test mode, press and hold ⏻ SRC to turn off the unit.
BLUETOOTH®
BLUETOOTH — Audio
While in BT AUDIO source, you can connect to five Bluetooth audio devices and switch between these five devices.
Audio player via Bluetooth
1 Press to select BT AUDIO.
2 Operate the Bluetooth audio player to start playback.
To On the faceplate
| Playback/pause Press . | ▶II 6 |
| Select group or folder | Press ▲/▼. |
| Reverse/Forward skip | Press ◀◀/▶▶. |
| Reverse/Fast-forward | Press and hold ◀◀/▶▶. |
| Repeat play Press | ○4 repeatedly.ALL REPEAT, FILE REPEAT , REPEAT OFF |
| Random play Press and hold to select 3× ALL RANDOM.• Press 3× to select RANDOM OFF. | |
| Select a file from a folder/list | Refer to “Select a file from a folder/list” on page 12. |
To On the faceplate
Switch between connected Bluetooth audio devices Press 5.*
* Pressing the "Play" key on the connected device itself also causes switching of sound output from the device.
Operations and display indications may differ according to their availability on the connected device.
Settings to use KENWOOD Remote application
KENWOOD Remote application is designed to control the KENWOOD car receiver's operations from the iPhone/iPod (via Bluetooth or via USB input terminal) or Android smartphone (via Bluetooth).
Preparation:
Install the latest version of KENWOOD Remote application on your device before connecting. For more information, visit
1 Press the volume knob to enter [FUNCTION].
2 Turn the volume knob to select an item (2), then press the knob.
3 Repeat step 2 until the desired item is selected or activated.
4 Press and hold to exit.
To return to the previous setting item, press Q/5
BLUETOOTH®
Default: XX
REMOTEAPP
| SELECT | Select the device (IOS or ANDROID) to use the application. |
| IOS YES | : Selects iPhone/iPod to use the application via Bluetooth or connected via USB input terminal. ;NO: Cancels.If IOS is selected, select iPod BT source (or iPod USB if your iPhone/iPod is connected via USB input terminal) to activate the application.The connectivity of the application will be interrupted or disconnected if: - You change from iPod BT source to any playback source connected via the USB input terminal.- You change from iPod USB source to iPod BT source. |
| ANDROID YES _: Selects Android smartphone to use the application via Bluetooth. ;NO: Cancels. | |
| ANDROID LIST*: Selects the Android smartphone to use from the list. | |
| STATUS | Shows the status of the selected device.IOS CONNECTED: You are able to use the application using the iPhone/iPod connected via Bluetooth or USB input terminal.IOS NOT CONNECTED: No IOS device is connected to use the application.ANDROID CONNECTED: You are able to use the application using the Android smartphone connected via Bluetooth.ANDROID NOT CONNECTED: No Android device is connected to use the application. |
* Displayed only when [ANDROID] of [SELECT] is set to [YES].

Listen to iPhone/iPod via Bluetooth
You can listen to the songs on the iPhone/iPod via Bluetooth on this unit.
Press repeatedly to select iPod BT.
- You can operate the iPod/iPhone in the same way as iPod/iPhone via USB input terminal. (41)
- If you plug in an iPhone/iPod to the USB input terminal while listening to iPod BT source, the source automatically change to iPod USB. Press
SRC to select iPod BT if the device is still connected via Bluetooth.
Internet radio via Bluetooth
You can listen to Spotify on the iPhone/iPod/Android device via Bluetooth on this unit.
- Make sure the USB input terminal is not connected to any device.

Listen to Spotify
Preparation:
Select [ON] for [SPOTIFY SRC] in [SOURCE SELECT]. (-5)
1 Open the Spotify application on your device.
2 Connect your device via Bluetooth connection. (16)
3 Press repeatedly to select SPOTIFY (for iPhone/iPod) or SPOTIFY BT (for Android device).
The source switches and broadcast starts automatically.
- You can operate Spotify in the same way as Spotify via USB input terminal. (4)
AUDIO SETTINGS
While listening to any source...
1 Press the volume knob to enter [FUNCTION].
2 Turn the volume knob to select an item (see the following table), then press the knob.
3 Repeat step 2 until the desired item is selected or activated.
4 Press and hold to exit.
To return to the previous setting item, press 9/5
Default: XX
| AUDIO CONTROL | |
| SUB-W LEVEL | LEVEL -50 to LEVEL +10 (LEVEL 0): Adjusts the subwoofer output level. |
| MANUAL EQ | The sound elements (frequency level, tone level, Q factor) are preset into each selection. |
| 62.5HZ LEVEL LEVEL -9 | to LEVEL +9 (LEVEL 0): Adjusts the level to memorize for each source. (Before making an adjustment, select the source you want to adjust.) |
| BASSEXTEND ON: Turns on the extended bass. ;OFF: Cancels. | |
| 100HZ/160HZ/250HZ/400HZ/630HZ/1KHZ/1.6KHZ/2.5KHZ/4KHZ/6.3KHZ/10KHZ/16KHZ | LEVEL -9 to LEVEL +9 (LEVEL 0): Adjusts the level to memorize for each source. (Before making an adjustment, select the source you want to adjust.) |
| Q FACTOR 1.35 | /1.50/2.00: Adjust the quality factor. |
| PRESET EQ NATURAL | / ROCK POPS/EASY/TOP40/JAZZ/ POWERFUL/USER Selects a preset equalizer suitable to the music genre. (Select [USER] to use the settings made in [MANUAL EQ].) |
| BASS BOOST LEVEL1 | /LEVEL2/LEVEL3 /LEVEL4/ LEVELS Selects your preferred bass boost level. ;OFF: Cancels. |
| LOUDNESS LEVEL1 | /LEVEL2: Selects your preferred low and high frequencies boost to produce a well-balanced sound at a low volume level. ;OFF: Cancels. |
| SUBWOOFERSETON | ____:Turns on the subwoofer output. ; OFF: Cancels. |
| FADER | (Not applicable if 3-way crossover is selected.)R15 to F15 (0): Adjusts the rear and front speaker output balance. |
| BALANCE L15 | to R15 (0): Adjusts the left and right speaker output balance. |
| VOLUME OFFSET LEVEL -15 to LEVEL +6 (LEVEL 0): Preset the initial volume level of each source. (Before adjustment, select the source you want to adjust.) | |
| SOUND EFFECT | |
| SOUND RECNSTR(Sound reconstruction) | (Not applicable for RADIO source, DIGITAL AUDIO source and AUX source.)ON: Creates realistic sound by compensating the high-frequency components and restoring the rise-time of the waveform that are lost in audio data compression. ; OFF: Cancels. |
| SPACE ENHANCE | (Not applicable for RADIO source and DIGITAL AUDIO source.)SMALLMEDIUM / LARGE: Virtually enhances the sound space. ;OFF: Cancels. |
| SND REALIZER LEVEL1 | /LEVEL2 /LEVEL3 : Virtually makes the sound more realistic. ;OFF: Cancels. |
| STAGE EQ LOW | /MIDDLE/HIGH: Virtually adjust the sound position heard from the speakers. ;OFF: Cancels. |
| DRIVE EQ ON | : Boosts the frequency to reduce the noise heard from outside the car or running noise of the tyres. ;OFF: Cancels. |
| SPEAKER SIZE | Depending on the crossover type you have selected (-6) , 2-way crossover or 3-way crossover setting items will be shown. (-24, 25)By default, 2-way crossover type is selected. |
| X'OVER | |
| DTA SETTINGS | For settings, → 25, 26, Digital Time Alignment settings |
| CAR SETTINGS | |
- [SUB-W LEVEL] is selectable only if [SUBWOOFER SET] is set to [ON].
AUDIO SETTINGS
Crossoversettings
Below are the available setting items for 2-way crossover and 3-way crossover.
SPEAKER SIZE
Selects according to the connected speaker size for optimum performance.
- The frequency and slope settings are automatically set for the crossover of the selected speaker.
- When 2-way crossover is selected, if [NONE] is selected for [TWEETER] of [FRONT], [REAR] and [SUBWOOFER] for [SPEAKER SIZE], the [X'OVER] setting of the speaker is not available.
- When 3-way crossover is selected, if [NONE] is selected for [WOOFER] of [SPEAKER SIZE], the [X'OVER] setting of [WOOFER] is not available.
X'OVER
- [FRQ]/[F - HPF FRQ] /[R - HPF FRQ] / [SW LPF FRQ] [HPF FRQ]/[LPF FRQ]: Adjusts the crossover frequency for the selected speakers (high pass filter or low pass filter). If [THROUGH] is selected, all signals are sent to the selected speakers.
- [F - HPF SLOPE]/[R - HPF SLOPE]/[SW LPF SLOPE]/[HPF SLOPE]/[LPF SLOPE]/[SLOPE]: Adjusts the crossover slope. Selectable only if a setting other than [THROUGH] is selected for the crossover frequency.
- [SW LPF PHASE]/[PHASE]: Selects the phase of the speaker output to be in line with the other speaker output.
- [GAIN LEFT][GAIN RIGHT]/[F - HPF GAIN]/[R - HPF GAIN]/[SW LPF GAIN]/[GAIN]: Adjusts the output volume of the selected speaker.
2-way crossover setting items
| SPEAKER SIZE | ||
| FRONT SIZE | 8CM/10CM/12CM/13CM/16CM/17CM/18CM/4×6/5×7/6×8/6×9/7×10 | |
| TWEETER | SMALL/MIDDLE/LARGE/NONE(not connected) | |
| REAR 8CM | /10CM/12CM/13CM/16CM/17CM/18CM/4×6/5×7/6×8/6×9/7×10 /NONE(not connected) | |
| SUBWOOFER* | 16CM/20CM/25CM/30CM/38CM OVER /NONE (not connected) | |
| X'OVER | ||
| TWEETER FRQ | 1KHZ/1.6KHZ/2.5KHZ4KHZ/5KHZ/6.3KHZ/8KHZ/10KHZ/12.5KHZ | |
| GAIN LEFT | -8to 0 | |
| GAIN RIGHT | -8to 0 | |
| FRONT HPF F - HPF FRQ | 30HZ/40HZ/50HZ/60HZ/70HZ/80HZ/90HZ/100HZ/120HZ/150HZ/180HZ/220HZ/250HZ/THROUGH | |
| F - HPF SLOPE | -6DB/-12DB/-18DB/-24DB | |
| F - HPF GAIN | -8to 0 | |
| REAR HPF R - HPF FRQ | (ReferFRONT HPF settings above.) | |
| R - HPF SLOPE | ||
| R - HPF GAIN | ||
| SUBWOOFER LPF* | SW LPF FRQ 30HZ | /40HZ/50HZ/60HZ/70HZ/80HZ/90HZ/100HZ/120HZ/150HZ/180HZ/220HZ/250HZ/THROUGH |
| SW LPF SLOPE | -6DB/-12DB/-18DB/-24DB | |
| SW LPF PHASE | REVERSE (180°)/NORMAL (0°) | |
| SW LPF GAIN -8 | to 0 | |
* Selectable only when [SUBWOOFER SET] is set to [ON] (-23)
AUDIO SETTINGS
B-way crossover setting items
| SPEAKER SIZE | |
| TWEETER | SMALL/MIDDLE/LARGE |
| MID RANGE | 8CM/10CM/12CM/13CM/16CM/17CM/18CM/4×6/5×7/6×8/6×9 |
| WOOFER* | 16CM/20CM/25CM/30CM/38CM OVER/NONE (not connected) |
| X'OVER | |
| TWEETER HPF FRQ | 1KHZ/1.6KHZ/2.5KHZ/4KHZ/5KHZ/6.3KHZ/8KHZ/10KHZ/12.5KHZ |
| SLOPE | -6DB/-12DB |
| PHASE | REVERSE (180°)/NORMAL (0°) |
| GAIN -8 | to 0 |
| MID RANGE HPF FRQ | 30HZ/40HZ /50HZ/60HZ/70HZ/80HZ/90HZ/100HZ/120HZ/150HZ/180HZ/220HZ/250HZ/THROUGH |
| HPF SLOPE | -6DB/-12DB |
| LPF FRQ | 1KHZ/1.6KHZ/2.5KHZ/4KHZ/5KHZ/6.3KHZ/8KHZ/10KHZ/12.5KHZ/THROUGH |
| LPF SLOPE | -6DB/-12DB |
| PHASE | REVERSE (180°)/NORMAL (0°) |
| GAIN -8 | to 0 |
| WOOFER* | LPF FRQ 30HZ 40HZ/50HZ/60HZ/70HZ/80HZ/90HZ/100HZ/120HZ/150HZ/180HZ/220HZ/250HZ/THROUGH |
| SLOPE | -6DB/-12DB |
| PHASE | REVERSE (180°)/NORMAL (0°) |
| GAIN -8 | to 0 |
* Selectable only when [SUBWOOFER SET] is set to [ON]. (-23)
Digital Time Alignment settings
Digital Time Alignment sets the delay time of the speaker output to create a more suitable environment for your vehicle.
- For more information, 26, Determining the value for [DISTANCE] and [GAIN] of [DTA SETTINGS].
| DTA SETTINGS | |
| POSITION | Selects your listening position (reference point).ALL: Not compensating; FRONT RIGHT: Front right seat;FRONT LEFT: Front left seat; FRONT ALL: Front seat[ FRONT ALL] is displayed only when [2-WAY X'OVER] is selected.(→6) |
| DISTANCE OCM | to 610CM: Fine adjust the distance to compensate.(Before making an adjustment, select the speaker you want to adjust.) |
| GAIN -8DB | to 0DB: Fine adjust the output volume of the selected speaker.(Before making an adjustment, select the speaker you want to adjust.) |
| DTA RESET YES | : Resets the settings ([DISTANCE] and [GAIN]) of the selected [POSITION] to default.; NO: Cancels. |
| CAR SETTINGS | Identify your car type and rear speaker location in order to make the adjustment for [DTA SETTINGS]. |
| CAR TYPE COMPACT | /FULL SIZE CAR/WAGON/MINIVAN/SUV/MINIVAN(LONG): Selects the type of vehicle.;OFF: Not compensating. |
| R - SP LOCATION | Selects the location of the rear speakers in your vehicle to calculate the furthest distance from the listening position selected (reference point).DOOR/REAR DECK: Selectable only when [CAR TYPE] is selected as [OFF] [COMPACT] [FULL SIZE CAR], [WAGON] or [SUV].2ND ROW/3RD ROW: Selectable only when [CAR TYPE]is selected as [MINIVAN] or [MINIVAN(LONG)]. |
AUDIO SETTINGS
- Before making an adjustment for [DISTANCE] and [GAIN] of [DTA SETTINGS], select the speaker you want to adjust:
When 2-way crossover is selected:
FRONT LEFT /FRONT RIGHT/ REAR LEFT/REAR RIGHT/SUBWOOFER
- You can only select [REAR LEFT], [REAR RIGHT] and [SUBWOOFER] if a setting other than [NONE] is selected for [REAR] and [SUBWOOFER] of [SPEAKER SIZE]. (-24)
When 3-way crossover is selected:
TWEETER LEFT/TWEETER RIGHT/MID LEFT/MID RIGHT/WOOFER
- You can only select [WOOFER] if a setting other than [NONE] is selected for [WOOFER] of [SPEAKER SIZE].(25)
• [R - SP LOCATION] of [CAR SETTINGS] is selectable only if:
- 2-way crossover is selected. (→)
- A setting other than [NONE] is selected for [REAR] of[SPEAKER SIZE]. (-24)
Determining the value for [DISTANCE] and [GAIN] of [DTA SETTINGS]
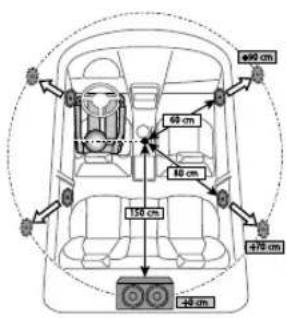
If you specify the distance from the center of the currently set listening position to every speaker, the delay time will be automatically computed and set.
1 Determine the center of the currently set listening position as the reference point.
2 Measure the distances from the reference point to the speakers.
3 Calculate the differences between the distance of the furthest speaker (rear speaker) and other speakers.
4 Set the DISTANCE] calculated in step 3 for individual speakers.
5 Adjust [GAIN] for individual speakers. Example: When [FRONT ALL] is selected as the listening position
DISPLAY SETTINGS
Zone identification for color and brightness settings
Set the dimmer
Press and hold DISP to turn on or off the dimmer.
- If you have set [DIMMER TIME] (-27), it will be canceled once you press and hold this button.
Other settings
1 Press the volume knob to enter[FUNCTION].
2 Turn the volume knob to select an item (27), then press the knob.
3 Repeat step 2 until the desired item is selected/activated or follow the instructions stated on the selected item.
4 Press and hold to exit.
To return to the previous setting item, press R/5
DISPLAY SETTINGS
| Default: XX | |
| DISPLAY | |
| COLOR | Select color for ALL ZONE, LCD DISPLAY and KEY separately. |
| SELECT | 1 Select a zone. (See the illustration on page 26.)2 Select a color for the selected zone.INITIAL COLOR/VARIABLE SCAN/CUSTOM R/G/B/preset colors*To make your own color, select [CUSTOM R/G/B]. The color you have made will be stored in [CUSTOM R/G/B].1 Press the volume knob to enter the detailed color adjustment.2 Press I◄◄ / ►►I to select the color (R/G/B) to adjust.3 Turn the volume knob to adjust the level (0 to 9), then press the knob. |
| DIMMER | Dim the illumination.ON: Dimmer is turned on. OFF: Cancels.DIMMER TIME: Set the dimmer on and off time.1 Turn the volume knob to adjust the [ON] time, then press the knob.2 Turn the volume knob to adjust the [OFF]time, then press the knob.(Default: [ON]: 18:00; [OFF]: 6:00) |
| BRIGHTNESS | 1 Select a zone. (See the illustration on page 26.)2 0 to 31: Select your preferred brightness level for the selected zone. |
| TEXT SCROLL AUTO /ONCE: Select whether to scroll the display information automatically, or scroll only once. ; OFF: Cancels. | |
* Preset colors:RED1/RED2/RED3/PURPLE1/PURPLE2/PURPLE3/PURPLE4/BLUE1/BLUE2/BLUE3/SKYBLUE1/SKYBLUE2/LIGHTBLUE/AQUA1/AQUA2/GREEN1/GREEN2/GREEN3/YELLOWGREEN1/YELLOWGREEN2/YELLOW/ORANGE1/ORANGE2/ORANGERED
TROUBLESHOOTING
| Symptom Remedy | ||
| General | Sound cannot be heard. | Adjust the volume to the optimum level.Check the cords and connections. |
| "MISWIRING CHECK WIRING THEN PWR ON" appears. | Turn the power off, then check to be sure the terminals of the speaker wires are insulated properly. Turn the power on again. | |
| "PROTECTING SEND SERVICE" appears. | Send the unit to the nearest service center. | |
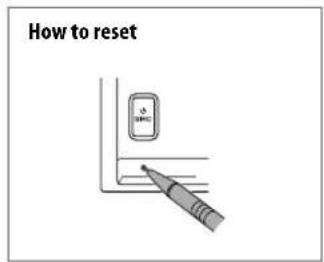
| The unit does not work at all. Reset the unit. (→) | ||
| Digital Radio | DAB reception is poor. Make sure [ON] is selected for[DAB ANT POWER].(→) | |
| "DAB ANT ERR" Check the DAB antenna. If a passive antenna(without a booster) is used, set[DAB ANT POWER] to [OFF]. (→) | ||
| "RELATED SERV FOUND"Press the volume knob to activate Soft-Link.(→)Press no cancel. | ||
| Analog Radio | Radio reception is poor.Static noise while listening to the radio. | Connect the antenna firmly. |
TROUBLESHOOTING
| Symptom Remedy | ||
| CD/USB/iPod | Disc cannot be ejected. | Press and hold ▲ to forcibly eject the disc. Be careful not to drop the disc when it is ejected. If this does not solve the problem, reset the unit. (→) |
| Noise is generated. Skip to another track or change the disc. | ||
| Tracks do not play back as you intended them to play. | Playback order is determined when files are recorded. | |
| “READING” keeps flashing. | Do not use too many hierarchical levels or folders. | |
| Elapsed playing time is not correct. | This is caused by how the tracks are recorded. | |
| “LOADING” appears when you enter search mode by pressing 🔒/→. | This unit is still preparing the iPod/iPhone music list. It may take some time to load, try again later. | |
| Correct characters are not displayed (e.g. album name). | This unit can only display uppercase letters, numbers, and a limited number of symbols.Depending on the display language you have selected (→), some characters may not be displayed correctly. | |
| “NA FILE” Make sure the disc contains supported audio files. (→1) | ||
| “NO DISC” Insert a playable disc into the loading slot. | ||
| “TOC ERROR” Make sure the disc is clean and inserted properly. | ||
| “PLEASE EJECT” Reset the unit. If this does not solve the problem, consult your nearest service center. | ||
| “NO DEVICE” Connect a USB device, and change the source to USB again. | ||
| “COPY PRO” A copy-protected file is played. | ||
| Symptom Remedy | ||
| CD/USB/iPod | “UNSUPPORTED DEVICE” | Check whether the connected device is compatible with this unit and ensure the file systems are in supported formats. (→1)Reattach the device. |
| “UNRESPONSIVE DEVICE” Make sure the device is not malfunction and reattach the device. | ||
| “USB HUB IS NOT SUPPORTED” | This unit cannot support a USB device connected via a USB hub. | |
| The source does not change to “USB” when you connect a USB device while listening to another source.“USB ERROR” appears | The USB port is drawing more power than the design limit. Turn the power off and unplug the USB device. Then, turn on the power and reattach the USB device. If this does not solve the problem, turn the power off and on (or reset the unit) before replacing with another USB device. | |
| “NO MUSIC” Connect a USB device that contains playable audio files. | ||
| “iPod ERROR” | Reconnect the iPod.Reset the iPod. | |
| ANDROID | Sound cannot be heard during playback.Sound output only from the Android device. | Reconnect the Android device.If ir[HAND MODE], launch any media player application on the Android device and start playback.If ir[HAND MODE], relaunch the current media player application or use another media player application.Restart the Android device.If this does not solve the problem, the connected Android device is unable to route the audio signal to unit. (→1) |
TROUBLESHOOTING
| Symptom Remedy | ||
| ANDROID | Cannot playback at [BROWSE MODE]. | Make sure KENWOOD MUSIC PLAY APP is installed on the Android device. (→1)Reconnect the Android device and select the appropriate control mode.If this does not solve the problem, the connected Android device does not support [BROWSE MODE]. (→1) |
| "NO DEVICE" or "READING" keeps flashing. | Switch off the developer options on the Android device.Reconnect the Android device.If this does not solve the problem, the connected Android device does not support [BROWSE MODE]. (→1) | |
| Playback is intermittent or sound skips. | Turn off the power saving mode on the Android device. | |
| "ANDROID ERROR"/ "NA DEVICE" | Reconnect the Android device.Restart the Android device. | |
| Spotify | "DISCONNECTED" USB is disconnected from the head unit. Please make sure the device is connected properly through USB. | |
| "CONNECTING" | Connected via USB input terminal: The device is connecting to the head unit. Please wait-connected via Bluetooth: The Bluetooth is disconnected.Please check Bluetooth connection and make sure both the device and the unit are paired and connected. | |
| "CHECK APP" The Spotify application is not connected properly, or user is not login. End the Spotify application and restart, then login to your Spotify account. | ||
| Symptom Remedy | ||
| Bluetooth® | No Bluetooth device is detected. | Search from the Bluetooth device again.Reset the unit. (→) |
| Bluetooth pairing cannot be made. | Make sure you have entered the same PIN code to both the unit and Bluetooth device.Delete pairing information from both the unit and the Bluetooth device, then perform pairing again. (→6) | |
| Echo or noise is heard during a phone conversation. | Adjust the microphone unit's position. (→6)Check the[ECHO CANCEL] setting. (→8) | |
| Phone sound quality is poor. | Reduce the distance between the unit and the Bluetooth device.Move the car to a place where you can get a better signal reception. | |
| Voice calling method is not successful. | Use voice calling method in a more quiet environment.Reduce the distance from the microphone when you speak the name.Make sure the same voice as the registered voice tag is used. | |
| Sound is being interrupted or skipped during playback of a Bluetooth audio player. | Reduce the distance between the unit and the Bluetooth audio player.Turn off, then turn on the unit and try to connect again.Other Bluetooth devices might be trying to connect to the unit. | |
| The connected Bluetooth audio player cannot be controlled. | Check whether the connected Bluetooth audio player supports Audio/Video Remote Control Profile (AVRCP). (Refer to the instructions of your audio player.)Disconnect and connect the Bluetooth player again. | |
TROUBLESHOOTING
| Symptom Remedy | |
| Bluetooth® | “DEVICE FULL” The number of registered devices has reached its limit.Retry after deleting an unnecessary device.(20, DEVICE DELETE) |
| “N/A VOICE TAG” Make sure the same voice as the registered voice tag is used. | |
| “NOT SUPPORT” The connected phone does not support Voice Recognition feature or phonebook transfer. | |
| “NO ENTRY”/“NO PAIR” There is no registered device connected/found via Bluetooth. | |
| “ERROR” Try the operation again. If “ERROR” appears again, check if the device supports the function you have tried. | |
| “NO INFO”/“NO DATA” Bluetooth device cannot get the contact information. | |
| “HF ERROR XX”/“BT ERROR” Reset the unit and try the operation again. If this does not solve the problem, consult your nearest service center. | |
| “SWITCHING NG” The connected phones might not support phone switching feature. | |
REFERENCES
Maintenance
Cleaning the unit
Wipe off dirt on the faceplate with a dry silicone or soft cloth.
Handling discs
- Do not touch the recording surface of the disc.
- Do not stick tape etc. on the disc, or use a disc with tape stuck on it.
- Do not use any accessories for the disc.
- Clean from the center of the disc and move outward.
- Clean the disc with a dry silicone or soft cloth. Do not use any solvents.
- When removing discs from this unit, pull them out horizontally.
- Remove burrs from the center hole and disc edge before inserting a disc.
■ More information
For: – Latest firmware updates and latest compatible item list
- KENWOOD original application
— Any other latest information
Visit
General
• This unit can only play the following CDs:


- For detailed information and notes about the playable audio files, visit
REFERENCES
playablefiles
- Playable audio file:
For disc: MP3 (.mp3), WMA (.wma), AAC (.aac)
For USB mass storage class device: MP3 (.mp3), WMA (.wma), AAC (.aac), AAC (.m4a), WAV (.wav), FLAC (.flac) - Playable disc media: CD-R/CD-RW/CD-ROM
- Playable disc file format: ISO 9660 Level 1/2, Joliet, Long file name
- Playable USB device file system: FAT12, FAT16, FAT32
Even when audio files comply with the standards listed above, playback may be impossible depending on the types or conditions of media or device.
The AAC (.m4a) file in a CD encoded by iTunes cannot be played on this unit.
Unplayable discs
• Discs that are not round.
• Discs with coloring on the recording surface or discs that are dirty.
- Recordable/ReWritable discs that have not been finalized.
- 8 cm CD. Attempting to insert using an adapter may cause malfunction.
About USB devices
- You cannot connect a USB device via a USB hub.
- Connecting a cable whose total length is longer than 5 m may result in abnormal playback.
- This unit cannot recognize a USB device whose rating is other than 5 V and exceeds 1.5 A.
About iPod/iPhone
- Via USB:
Made for
– iPod touch (5th and 6th generation) - iPod nano (7th generation)
- iPhone 4S, 5, 5S, 5C, 6, 6 Plus, 6S, 6S Plus, SE, 7, 7 Plus
- Via Bluetooth:
Made for - iPod touch (5th and 6th generation)
- iPhone 4S, 5, 5S, 5C, 6, 6 Plus, 6S, 6S Plus, SE, 7, 7 Plus
- You cannot operate iPod if "KENWOOD" or "√" is displayed on iPod.
- Depending on the version of the operating system of the iPod/iPhone, some functions may not operate on this unit.
About Android device
• This unit supports Android OS 4.1 and above.
- Some Android devices (with OS 4.1 and above) may not fully support Android Open Accessory (AOA) 2.0.
- If the Android device supports both mass storage class device and AOA 2.0, this unit always playback via AOA 2.0 as priority.
About Spotify
- Spotify application supports:
- iPhone 4S, 5, 5S, 5C, 6, 6 Plus, 6S, 6S Plus, SE, 7, 7 Plus (iOS 8 or above)
– iPod touch (5th and 6th generation) - Android OS 4.0.3 or above
- Spotify is a third-party service, therefore the specifications are subject to change without prior notice. Accordingly, compatibility may be impaired or some or all of the services may become unavailable.
- Some functions of Spotify cannot be operated from this unit.
- For issues using the application, please contact Spotify at
.
About Bluetooth
- Depending on the Bluetooth version of the device, some Bluetooth devices may not be able to connect to this unit.
- This unit may not work with some Bluetooth devices.
- Signal conditions vary, depending on the surroundings.
REFERENCES
Change the display information
Each time you press DISP, the display information changes.
- If the information is unavailable or not recorded, "NO TEXT", "NO INFO", or other information (eg. station name, playing time) appears.
| Source name | Display information |
| STANDBY | Source name (Date)* |
| DIGITAL AUDIO | Service label (Ensemble) → Service label (Date)* → Dynamic label (Date)* → Song title (Artist) → Song title (Date)* → Next program (Date)* → Signal level (Date)* → (back to the beginning) |
| RADIO | Frequency (Date)* |
| (For FM Radio Data System stations only)Station name (Date)* → Radio text (Date)* → Radio text+ (R.TEXT+) → Song title (Artist) → Song title (Date)* → Frequency (Date)* → (back to the beginning) | |
| CD or USB | (For CD-DA)Track title (Artist) → Track title (Disc name) → Track title (Date)* → Playing time (Date)* → (back to the beginning) |
| (For MP3/WMA/AAC/WAV/FLAC files)Song title (Artist) → Song title (Album title) → Song title (Date)* → File name (Folder name) → File name (Date)* → Playing time (Date)* → (back to the beginning) | |
| iPod USB/iPod BT or ANDROID | When [MODE OFF]/[BROWSE MODE] is selected (-42) :Song title (Artist) → Song title (Album name) → Song title (Date)* → Playing time (Date)* → (back to the beginning) |
| SPOTIFY/SPOTIFY BT | Context title (Date)* → Song title (Artist) → Song title (Album name) → Song title (Date)* → Playing time (Date)* → (back to the beginning) |
| BT AUDIO | Song title (Artist) → Song title (Album name) → Song title (Date)* → Playing time (Date)* → (back to the beginning) |
| AUX | Source name (Date)* |
* Battery and signal strength of the Bluetooth device will be shown if [BATT/SIGNAL] is set to [AUTO]. (-18)
SPECIFICATIONS
| Digital radio | DAB Frequency Range Band III174.928 MHz — 239.200 MHz | |
| Sensitivity -100 dBm | ||
| Signal-to-Noise Ratio 90 dB | ||
| Antenna Connector Type SMB | ||
| Antenna Output Voltage 14.4 V (11 V – 16 V) | ||
| Antenna Maximum Current < 100 mA | ||
| Analog radio | FM Frequency Range 87.5 MHz — 108.0 MHz(50 kHz space) | |
| Usable Sensitivity (S/N = 30 dB) | 0.71 μV/75 Ω | |
| Quieting Sensitivity (DIN S/N = 46 dB) | 2.0 μV/75 Ω | |
| Frequency Response (±3 dB) 30 Hz — 15 kHz | ||
| Signal-to-Noise Ratio (MONO) 64.0 dB | ||
| Stereo Separation (1 kHz) 40 dB | ||
| MW (AM) | Frequency Range 531 kHz — 1 611 kHz (9 kHz space) | |
| Usable Sensitivity (S/N = 20 dB) 28.2 μV | ||
| LW (AM) | Frequency Range 153 kHz — 279 kHz (9 kHz space) | |
| Usable Sensitivity (S/N = 20 dB) 50 μV | ||
| CD player | Laser Diode GaAlAs | |
| Digital Filter (D/A) 8 times over sampling | ||
| Spindle Speed | 500 rpm — 200 rpm (CLV) | |
| Wow & Flutter | Below measurable limit | |
| Frequency Response (±1 dB) | 20 Hz — 20 kHz | |
SPECIFICATIONS
Subject to change without notice.
| CD player | Total Harmonic Distortion (1 kHz) 0.01 % | |
| Signal-to-Noise Ratio (1 kHz) 105 dB | ||
| Dynamic Range 90 dB | ||
| Channel Separation 85 dB | ||
| MP3 Decode Compliant with MPEG-1/2 Audio Layer-3 | ||
| WMA Decode Compliant with Windows Media Audio | ||
| AAC Decode AAC-LC “.aac” files | ||
| USB | USB Standard USB 1.1/USB 2.0 Full Speed | |
| File System FAT12/16/32 | ||
| Maximum Supply Current DC 5 V --- 1.5 A | ||
| MP3 Decode Compliant with MPEG-1/2 Audio Layer-3 | ||
| WMA Decode Compliant with Windows Media Audio | ||
| AAC Decode AAC-LC “.aac”, “.m4a” files | ||
| WAV Decode Linear-PCM | ||
| FLAC Decode FLAC file (Up to 96 kHz/24 bit) | ||
| Bluetooth | Version Bluetooth 3.0 | |
| Frequency Range 2.402 GHz — 2.480 GHz | ||
| Output Power | +4 dBm (MAX), 0 dBm (AVE) Power Class 2 | |
| Maximum Communication Range | Line of sight approx. 10 m (32.8 ft) | |
| Profile | HFP 1.6 (Hands-Free Profile)A2DP (Advanced Audio Distribution Profile)AVRCP 1.5 (Audio/Video Remote Control Profile)SPP (Serial Port Profile)PBAP (Phonebook Access Profile) | |
| Audio | Maximum Output Power | 50 W × 4 |
| Full Bandwidth Power | 22 W × 4 (at less than 1 % THD) | |
| Speaker Impedance 4 Ω — 8 Ω | ||
| Tone Action | Band 1: 62.5 Hz ±9 dBBand 2: 100 Hz ±9 dBBand 3: 160 Hz ±9 dBBand 4: 250 Hz ±9 dBBand 5: 400 Hz ±9 dBBand 6: 630 Hz ±9 dBBand 7: 1 kHz ±9 dBBand 8: 1.6 kHz ±9 dBBand 9: 2.5 kHz ±9 dBBand 10: 4 kHz ±9 dBBand 11: 6.3 kHz ±9 dBBand 12: 10 kHz ±9 dBBand 13: 16 kHz ±9 dB | |
| Preout Level/Load (CD) | 4 000 mV/10 kΩ | |
| Preout Impedance | ≤ 600 Ω | |
| Auxiliary | Frequency Response (±3 dB) | 20 Hz — 20 kHz |
| Input Maximum Voltage | 1 000 mV | |
| Input Impedance | 30 kΩ | |
| General | Operating Voltage | 14.4 V (10.5 V — 16 V allowable) |
| Maximum Current Consumption | 10 A | |
| Operational Temperature Range | -10°C — +60°C | |
| Installation Size (W × H × D) | 182 mm × 111 mm × 158 mm | |
| Weight | 1.7 kg | |
INSTALLATION/CONNECTION
▲ Warning
- The unit can only be used with a 12 V DC power supply, negative ground.
- Disconnect the battery's negative terminal before wiring and mounting.
- Do not connect Battery wire (yellow) and Ignition wire (red) to the car chassis or Ground wire (black) to prevent a short circuit.
• To prevent short circuit: - Insulate unconnected wires with vinyl tape.
- Be sure to ground this unit to the car's chassis again after installation.
- Secure the wires with cable clamps and wrap vinyl tape around the wires that come into contact with metal parts to protect the wires.
Caution
- For safety's sake, leave wiring and mounting to professionals. Consult the car audio dealer.
• Install this unit in the console of your vehicle. Do not touch the metal parts of this unit during and shortly after use of the unit. Metal parts such as the heat sink and enclosure become hot. - Do not connect the wires of speakers to the car chassis or Ground wire (black), or connect them in parallel.
- Mount the unit at an angle of less than 30^ .
- If your vehicle wiring harness does not have the ignition terminal, connect Ignition wire (red) to the terminal on the vehicle's fuse box which provides 12 V DC power supply and is turned on and off by the ignition key.
- Keep all cables away from heat dissipate metal parts.
- After the unit is installed, check whether the brake lamps, blinkers, wipers, etc. on the car are working properly.
- If the fuse blows, first make sure the wires are not touching car's chassis, then replace the old fuse with one that has the same rating.
Basic procedure
1 Remove the key from the ignition switch, then disconnect the ⊖ terminal of the car battery.
2 Install the DAB antenna.
See Installing the DAB antenna. (-38)
3 Connect the wires properly.
See Wiring connection. (36, 37)
4 Install the unit to your car.
See Installing the unit (in-dash mounting). (35)
5 Connect the terminal of the car battery.
6 Press ⏻ SRGN on the power.
7 Reset the unit. (→3)
Part list for installation
(A) Mounting sleeve
(B) Trim plate
(C) Wiring harness
(D) Extraction key

INSTALLATION/CONNECTION
Installing the unit (in-dash mounting) How to remove the unit
Do the required wiring.
(86,37)
1 Fit the catch pin on the extraction keys into the holes on both sides of the trim plate, then pull it out.
2 Insert the extraction keys deeply into the slots on each side, then follow the arrows as shown on the illustration.
When installing without the mounting sleeve
1 Remove the mounting sleeve and trim plate from the unit.
2 Align the holes in the unit (on both sides) with the vehicle mounting bracket and secure the unit with screws (commercially available).
⚠ Use only the specified screws. Using wrong screws might damage the unit.
INSTALLATION/CONNECTION
Wiringconnection
When connecting to an external amplifier, connect its ground wire to the car's chassis to avoid damaging the unit.
If your car does not have an ISO terminal:
We recommend installing the unit with a commercially available custom wiring harness specific for your car and leave this job to professionals for your safety. Consult your car audio dealer.
Connecting the ISO connectors on some VW/Audi or Opel (Vauxhall) automobiles
You may need to modify the wiring of the supplied wiring harness as illustrated below.
flowchart
graph LR
    A["A7 (Red) Ignition wire (Red)"] --> B["UnitVehicle"]
    C["A4 (Yellow) Battery wire (Yellow)"] --> B
    B --> D["Default wiring"]
    style B stroke-dasharray: 5 5
    note right of B Default wiring
ISOconnectors
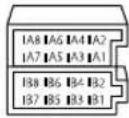
| Pin | Color and function (for ISO connectors) | |
| A4 Yellow | : Battery | |
| A5 Blue/White *1 | : Power control | |
| A7 Red | : Ignition (ACC) | |
| A8 Black | : Earth (ground) connection | |
| B1 | Purple ⊕ | : Rear speaker (right)For 3-way crossover: Tweeter (right) |
| B2 | Purple/black ⊖ | |
| B3 | Gray ⊕ | : Front speaker (right)For 3-way crossover: Mid range speaker (right) |
| B4 | Gray/black ⊖ | |
| B5 | White ⊕ | : Front speaker (left)For 3-way crossover: Mid range speaker (left) |
| B6 | White/black ⊖ | |
| B7 | Green ⊕ | : Rear speaker (left)For 3-way crossover: Tweeter (left) |
| B8 | Green/black ⊖ | |
*1 (-37)
INSTALLATION/CONNECTION
Wiringconnection
flowchart
graph TD
    A["Antenna terminal"] --> B["Microphone input jack (16)"]
    B --> C["Fuse (10 A)"]
    D["Rear/Front/Subwoofer output For 3-way crossover: Tweeter/Mid Range/Woofer output"] --> E["DAB antenna jack (6)"]
    E --> F["(C)"]
    G["Yellow (Battery wire)"] --> H["Red (Ignition wire)"]
    H --> I["Red (A7)"]
    I --> J["Yellow (A4)"]
    J --> K["ISO connectors"]
    L["Blue/White*2"] --> M["Light blue/yellow (Steering remote control wire)"]
    N["P. CONT"] --> O["To the steering wheel remote control adapter"]
    P["MUTE"] --> Q["To connect the Kenwood navigation system, refer your navigation manual"]
    R["Water"] --> S["Blue/White*2 (Power control wire/Antenna control wire)"]
    T["Water"] --> U["Brown (Mute control wire)"]
    V["Water"] --> W["To the power control terminal when using the optional power amplifier or to the antenna control terminal in the vehicle"]
    X["Water"] --> Y["To the steering wheel remote control adapter"]
INSTALLATION/CONNECTION
Installing the DAB antenna
Connect the supplied DAB antenna to the DAB antenna jack. (-37)

Caution
- The film antenna (E) is exclusively for use inside the vehicle.
- Do not install at the following locations:
— where it may block the driver's view.
- where it may obstruct the operation of safety devices such as air bags.
— on movable glass surfaces such as the rear hatch.
- at side of vehicle (e.g. door, front quarter window).
- on rear window.
- Signal strength will weaken when installed at the following locations:
- on IR reflecting glass or locations covered with mirror type glass film.
- where it overlaps with genuine radio antenna (pattern).
— where it overlaps with window heating wires. - on glass that blocks radio signals (e.g. IR reflecting glass, thermal insulation glass).
- Poor reception may occur:
- due to noise when windscreen wiper, air conditioner, or motor is turned on.
– depending on the direction of the broadcast station with respect to the vehicle (antenna).
- Thoroughly wipe oil and dirt from the pasting surface with the supplied cleaner (H).
- Do not bend or damage the film antenna (E).
- It may not be possible to install on certain vehicles.
- Check the cable routing of the film antenna (E) and amplifier unit (F) before pasting.
- Do not apply any glass cleaner after pasting the film antenna (E).
Determine the antenna installation position
- The direction of the film antenna (E) changes depending on whether the film antenna (E) is installed on the right side or left side.
- Be sure to check the installation location of film antenna (E) before installing. Film antenna cannot be re-pasted.
- Separate from other antennas by at least 100 mm.
- Do not paste the amplifier unit (F) on the ceramic line (black part) around the front glass. Because there is not enough adhesion.

Installing the antenna on the left side

Installing the antenna on the right side
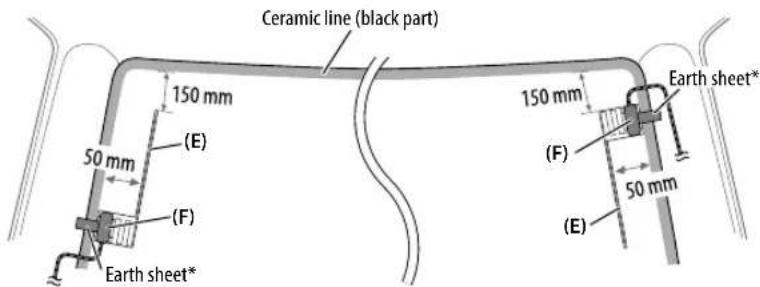
* Paste the earth sheet of the amplifier unit (F) on the metal part of the front pillar.
Part list for installation
(E) Film antenna
(F) Amplifier unit (cable with booster, 3.5 m)

(×3)
(G) Cable clamper

(H) Cleaner
INSTALLATION/CONNECTION
Caution
When installing the antenna cable inside the front pillar with the air bag installed
- The front pillar cover is secured with a special clip which may need to be replaced when it is removed. Contact your vehicle dealer for details on removing the front pillar cover and availability of replacement parts.
• Install the amplifier unit (F) above the air bag so that it does not obstruct the operation of the air bag.

Installation overview
The antenna should be installed on the passenger side for safety.
Antenna installation
1 Remove the front pillar cover of your car.
2 Clean the windscreen with the supplied cleaner (H).
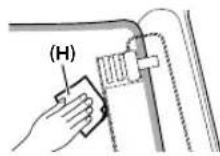
- Wait until the glass surface is completely dry before proceeding.
- Warm the surface of the windscreen with defroster if it is cold (during winter).
3 Remove the separator (tag 1) of film antenna (E) horizontally and paste the antenna on the windscreen.

Do not touch the pasting surface (adhesive side) of the film antenna (E).
INSTALLATION/CONNECTION
4 Rub the film antenna gently onto the windscreen in the direction of the arrow shown to allow it to stick firmly.
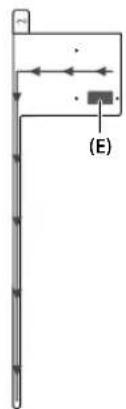
5 Remove the separator (tag 2) of film antenna (E) vertically.
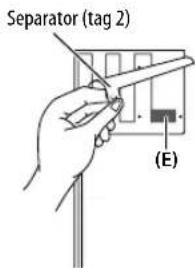
6 Set the position of the protrusion of the amplifier unit (F) with the ▼ mark on the film antenna (E) and paste.
Do not touch the lead terminal or the pasting surface (adhesive side) of the amplifier unit (F).
- When installing the antenna on the right side
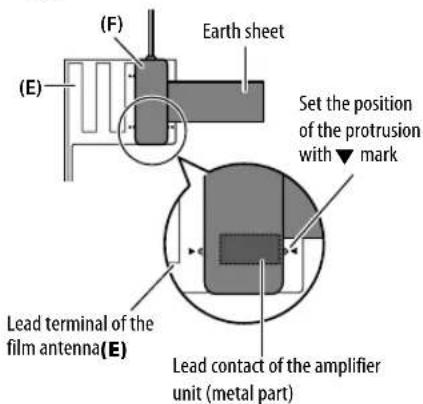
- When installing the antenna on the left side
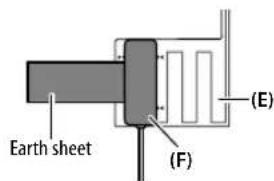
7 Remove the film covering the earth sheet and paste the earth sheet on the metal part of the vehicle.
Provide sufficient leeway for the earth sheet so that it does not interfere with the interior parts (front pillar cover). Also take care that the interior parts do not interfere with the amplifier unit (F).
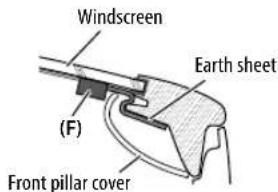
8 Wire the antenna cables.
Use cable clamper (G) to secure the antenna to the pillar at several positions.
9 Attach the front pillar cover back to its original position.
Be sure not to damage the earth sheet and amplifier unit (F) when covering.
10 Connect the amplifier unit (F) to the DAB input terminal on the rear of the unit.
11 Set [DAB ANT POWER] to [ON]. (-5)
TABLE DES MATIERES

SPEECH: NEWS, AFFAIRS, INFO (information), SPORT, EDUCATE, DRAMA, CULTURE, SCIENCE, VARIED, WEATHER, FINANCE, CHILDREN, SOCIAL, RELIGION, PHONE IN TRAVEL, LEISURE DOCUMENT
SPEECH : NEWS, AFFAIRS, INFO (information), SPORT, EDUCATE, DRAMA, CULTURE, SCIENCE, VARIED, WEATHER, FINANCE, CHILDREN, SOCIAL, RELIGION, PHONE IN, TRAVEL, LEISURE, DOCUMENT
- iPod touch (5th et 6th generation)
- iPod nano (7th generation)
- iPhone 4S, 5, 5S, 5C, 6, 6 Plus, 6S, 6S Plus, SE, 7, 7 Plus
- Via Bluetooth:
Made for
- iPod touch (5th et 6th generation)
- iPhone 4S, 5, 5S, 5C, 6, 6 Plus, 6S, 6S Plus, SE, 7, 7 Plus
INSTALLATION/RACCORDEMENT
Avertissement
INSTALLATION/RACCORDEMENT
INSTALLATION/RACCORDEMENT
Connexions
INSTALLATION/RACCORDEMENT
Connexions
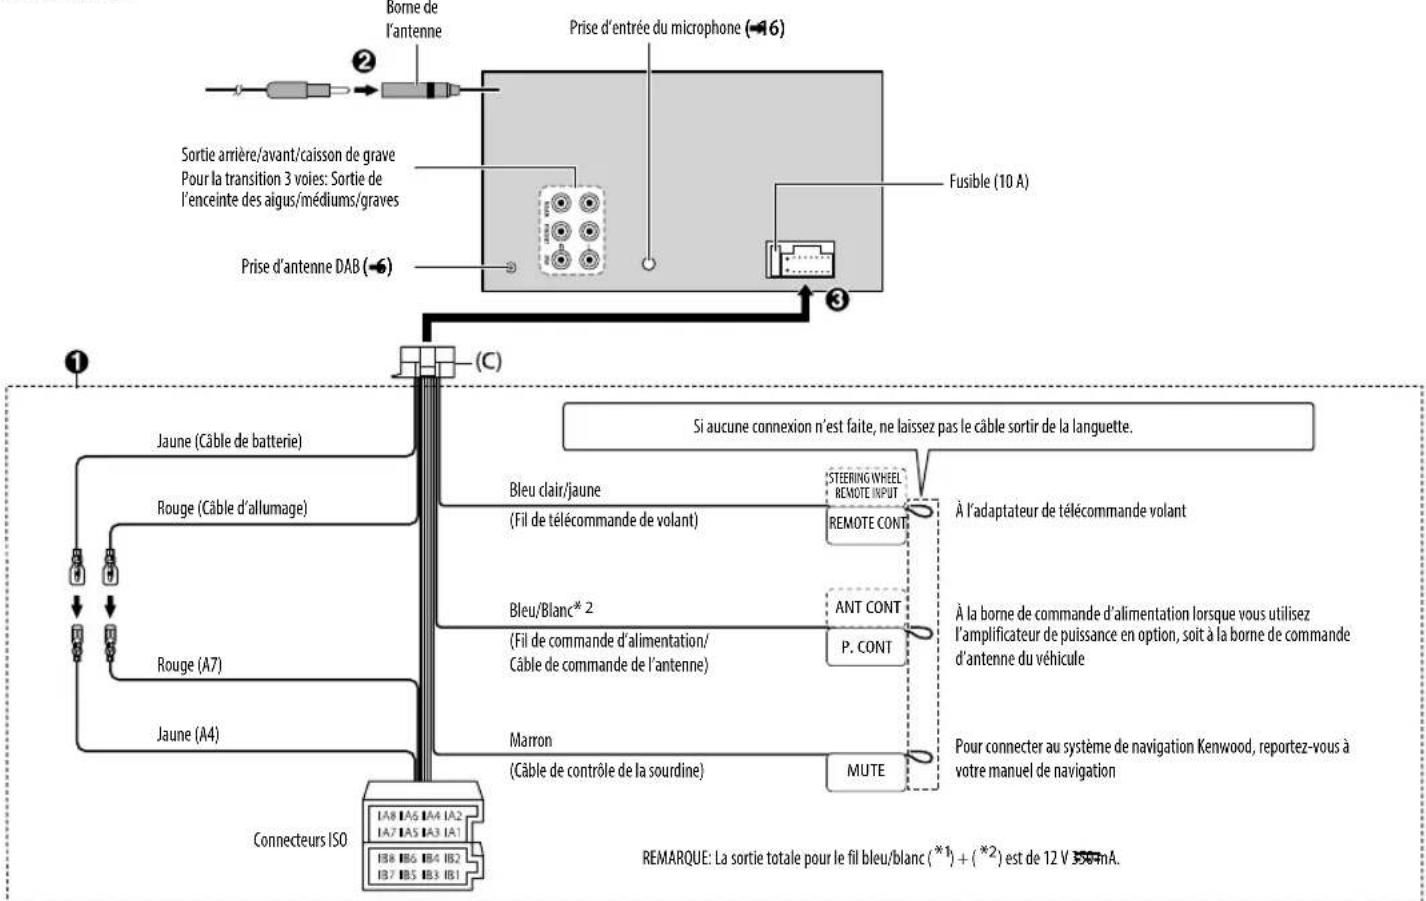
INSTALLATION/RACCORDEMENT
INSTALLATION/RACCORDEMENT
Précautions
INSTALLATION/RACCORDEMENT
SPEECH: NEWS, AFFAIRS, INFO (Information), SPORT, EDUCATE, DRAMA, CULTURE, SCIENCE, VARIED, WEATHER, FINANCE, CHILDREN, SOCIAL, RELIGION, PHONE IN TRAVEL, LEISURE DOCUMENT
SPEECH : NEWS, AFFAIRS, INFO (Information), SPORT, EDUCATE, DRAMA, CULTURE, SCIENCE, VARIED, WEATHER, FINANCE, CHILDREN, SOCIAL, RELIGION, PHONE IN, TRAVEL, LEISURE, DOCUMENT
- Hands-Free Profile (HFP)
- Advanced Audio Distribution Profile (A2DP)
– Audio/Video Remote Control Profile (AVRCP) - Serial Port Profile (SPP)
– Phonebook Access Profile (PBAP)
EINBAU/ANSCHLUSS
Einbauübersicht
- Microsoft and Windows Media are either registered trademarks or trademarks of Microsoft Corporation in the United States and/or other countries.
- "Made for iPod," and "Made for iPhone" mean that an electronic accessory has been designed to connect specifically to iPod, or iPhone, respectively, and has been certified by the developer to meet Apple performance standards. Apple is not responsible for the operation of this device or its compliance with safety and regulatory standards. Please note that the use of this accessory with iPod or iPhone may affect wireless performance.
- iPhone, iPod, iPod classic, iPod nano, and iPod touch are trademarks of Apple Inc., registered in the U.S. and other countries.
• Lightning is a trademark of Apple Inc. - SPOTIFY and the Spotify logo are among the registered trademarks of Spotify AB.
• The "AAC" logo is a trademark of Dolby Laboratories. - The Bluetooth ^ word mark and logos are registered trademarks owned by Bluetooth SIG, Inc. and any use of such marks by JVC KENWOOD Corporation is under license. Other trademarks and trade names are those of their respective owners.
• Android is trademark of Google Inc.
libFLAC
Copyright (C) 2000-2009 Josh Coalson
Copyright (C) 2011-2013 Xiph.Org Foundation
Redistribution and use in source and binary forms, with or without modification, are permitted provided that the following conditions are met:
- Redistributions of source code must retain the above copyright notice, this list of conditions and the following disclaimer.
- Redistributions in binary form must reproduce the above copyright notice, this list of conditions and the following disclaimer in the documentation and/or other materials provided with the distribution.
- Neither the name of the Xiph.org Foundation nor the names of its contributors may be used to endorse or promote products derived from this software without specific prior written permission. THIS SOFTWARE IS PROVIDED BY THE COPYRIGHT HOLDERS AND CONTRIBUTORS "AS IS" AND ANY EXPRESS OR IMPLIED WARRANTIES, INCLUDING, BUT NOT LIMITED TO, THE IMPLIED WARRANTIES OF MERCHANTABILITY AND FITNESS FOR A PARTICULAR PURPOSE ARE DISCLAIMED. IN NO EVENT SHALL THE FOUNDATION OR CONTRIBUTORS BE LIABLE FOR ANY DIRECT, INDIRECT, INCIDENTAL, SPECIAL, EXEMPLARY, OR CONSEQUENTIAL DAMAGES (INCLUDING, BUT NOT LIMITED TO, PROCUREMENT OF SUBSTITUTE GOODS OR SERVICES; LOSS OF USE, DATA, OR PROFITS; OR BUSINESS INTERRUPTION) HOWEVER CAUSED AND ON ANY THEORY OF LIABILITY, WHETHER IN CONTRACT, STRICT LIABILITY, OR TORT (INCLUDING NEGLIGENCE OR OTHERWISE) ARISING IN ANY WAY OUT OF THE USE OF THIS SOFTWARE, EVEN IF ADVISED OF THE POSSIBILITY OF SUCH DAMAGE.
