SLH12 - Heating SunRed - Free user manual and instructions
Find the device manual for free SLH12 SunRed in PDF.

| Technical Features | Electric heating, 1200W power, radiant type |
|---|---|
| Dimensions | Compact dimensions for indoor use |
| Usage | Ideal for heating small spaces, such as offices or bedrooms |
| Maintenance | Regular cleaning of the grille and surfaces, check the power cord |
| Safety | Equipped with an overheat protection system |
| General Information | Quiet, easy to move, modern design |
Frequently Asked Questions - SLH12 SunRed
User questions about SLH12 SunRed
0 question about this device. Answer the ones you know or ask your own.
Ask a new question about this device
Download the instructions for your Heating in PDF format for free! Find your manual SLH12 - SunRed and take your electronic device back in hand. On this page are published all the documents necessary for the use of your device. SLH12 by SunRed.
USER MANUAL SLH12 SunRed
Manual Patio Heater Slimline (EN)
Handbuch Terrassenheizung Slimline (DE)
Handleiding Electrische Patio Heater Slimline (NL)
Manual Appareil de chauffage Slimline (FR)
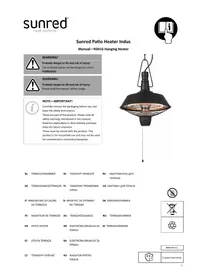
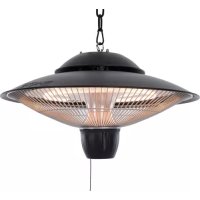
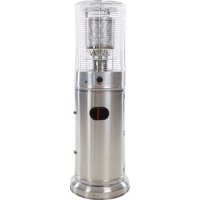
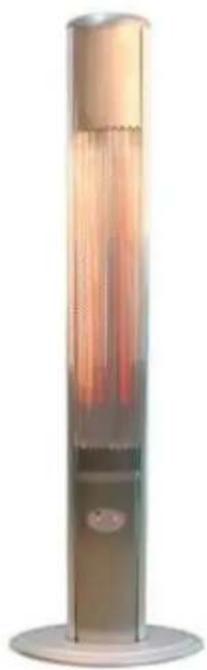
SLH12 - Electric Patio Heater Slimline
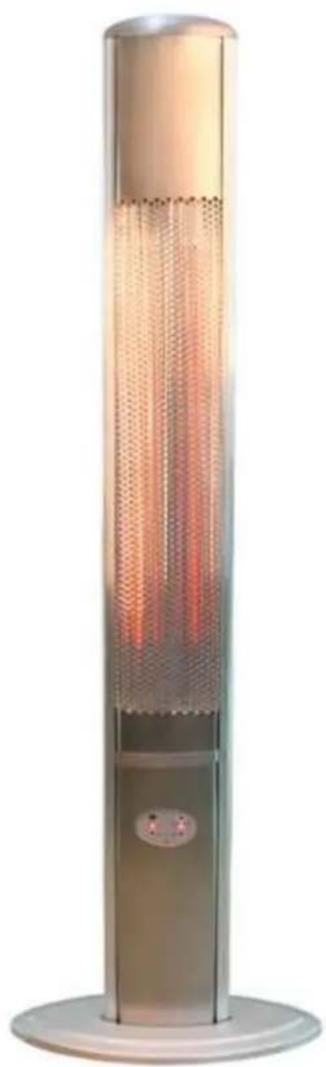
Electric Patio Heater Slimline (SLH12) EN
User instructions - please keep for future reference
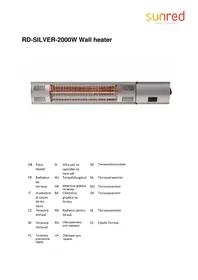
TECHNICAL INFORMATION
Wattage: 1000-2000W
Element type: Halogen
Expected Life span elements: 5000 hrs.
Weight: 17.0kg
Ingress Protection Rating: IP55
Certificates: CE, GS, PAH, Rohs
Cable Cord: 2 Meters
Dimensions: H106cm
Remarks: Remote control included
All measurements are approximate.
IMPORTANT - Carefully remove any packaging before use, but retain the safety instructions.
These instructions form part of the product.
Please take note of all the safety warning listed in these instructions.
Please read these instructions in their entirety and retain them for future reference.
These instructions should be stored with the product.
This product is for domestic use ONLY and should not be used commercially or for contract purposes.
Please read these instructions carefully before using your new heater.
Unpack the halogen heater making sure that all the items are present and that there are no components left in the box and that the heater head is free from any packing material.
Using the detailed drawing follow the steps to assemble your halogen heater.
Do not connect the halogen heater to the electrical supply until the assembly is complete.
Do not connect the halogen heater to the electrical supply if any of the components or the power cord is damaged in any way.
If in doubt contact your supplier.
Assembly
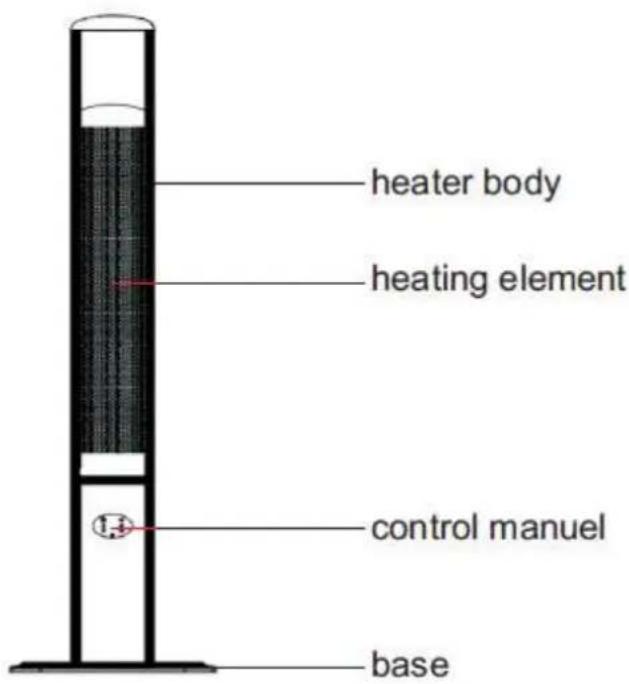
Step 1: Fix the heater body to the base using four M6*10 bolts.
Complete!
Operation
Connect the power cable to a 13 amp supply that is located in a safe, dry area.
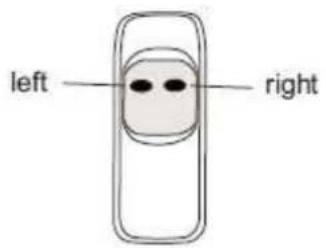
- The buttons on the heater control panel are used to control the two heating levels. The button on the left side is for controlling the heating element (1000W) on the left side. The button on the right side is for controlling the heating element (1000W) on the right side.
- On the remote control, the left button controls the heating element (1000W) on the left side. The right button controls the heating element (1000W) on the right side. If the two buttons are "ON" at the same time, the total heater power is 2000W.
Although the patio heater is shower proof, do not use when raining or in wet conditions.
- Always disconnect the power cable from the electrical supply, when the patio heater is not in use.
Care and maintenance
- When disconnected from the electrical supply, clean the outside of the patio heater with a damp cloth. Never use corrosive or solvent cleaners or immerse in water.
- Any maintenance or repairs including replacing the halogen tube should only be carried out by a qualified electrician or by a recommended service center.
Caution
Only use the halogen heater on a firm solid horizontal area, with the base firmly positioned on the floor (the heater is equipped with a tilt switch - should the heater tilt or fall over the unit will be switched off automatically).
- Place the heater outside or in a large open area and well away from any obstructions such as branches or where the heater is near any objects that can be affected by heat, such as furniture, curtains or other inflammable objects (minimum distance 1 meter).
- Do not use near bath tubs, washing areas, bathrooms, showers or swimming pools.
- Do not use in unventilated areas
- Do not use where gas, petrol, paint or other inflammable goods are stored.
- Do not push any items through, obstruct or cover the grill of the heater.
- Do not position immediately above or below an electrical socket.
- Do not move when connected to an electrical supply and always wait for the patio heater to cool down before storing away.
- Do not touch the heater head when in use.
- Do not leave turned on and unattended especially when children and/or animals are in the vicinity.
- The indication of the different positions of switches shall be visible from a distance of 1 meter.
- The marking concerning the covering shall be visible after the heater has been installed. It shall not be placed on the back of the heater.
- The unit must be placed with the clearance of 100cm to the wall.
- The unit must be correctly installed according to the instructions.
- The unit must be securely placed on a horizontal and flat surface.
- The unit is at high temperature during operation. It keeps hot for a period after shut down. Potential danger would occur when touching it during this period.
- DO NOT COVER! In order to avoid overheating, do not cover the unit with anything during operation or a short time after it has been turned off.
- Do not wrap the power supply cord around the unit.
- The unit must be handled with care; avoid vibration or hitting.
- The unit must be securely grounded during operation.
- If the unit gets damaged, it must be repaired by professional electricians.
- When the power supply cord is damaged, it must be replaced by authorized agent or a professional electrician to avoid danger.
- When assembling, keep clear from any board or flammable material.
- The unit must be supervised by adults if it is used by a child.
- The unit is for household use only. It is not safe to use on a building site, in a greenhouse, barn or stable where there is flammable dust.
- The head of the unit is at high temperature during operation. Unplug the unit and wait till it cools before cleaning.
- Do not use this unit in place where causticity or volatile air exists, i.e. dust, steam, gas, etc.
- Do not use this unit as a cloth drier or towel drier.
- Do not use this unit as a sauna heater.
- Do not use this unit as a room heater.
- Do not use this unit in place of animal propagating and raising.
-
Do not immerse this unit into water for cleaning.
-
The unit should be plugged in a socket that is easily visible and reachable.
- One dark point may exist on the surface of the heating elements during the first few minutes after it is turned on. This is normal, and will not affect the performance of the unit.
- Do not use this heater with a programmer, timer, separate remote-control system or any other device that switches the heater on automatically, since a fire risk exists if the heater is covered or positioned incorrectly.
- The appliance is not to be used by children or persons with reduced physical, sensory or mental capabilities, or lack of experience and knowledge, unless they are supervised or have been instructed.
- Children should not play with the unit.
Technical Specification
Power supply 230V 50Hz
Wattage max 2000W
Net weight 17.00kg
Insulation class I
- Height 160 cm
Certificates: CE, GS, PAH, Rohs
Specifications techniques