LP380 - Piano KORG - Free user manual and instructions
Find the device manual for free LP380 KORG in PDF.
| Product type | Digital piano |
| Brand | Korg |
| Model | LP380 |
| Keyboard | 88 keys (A0-C8), RH3 (Real Weighted Hammer 3) action with counterweights |
| Maximum polyphony | 120 notes |
| Number of sounds | 30 (10 sounds × 3 banks) |
| Digital effects | Brilliance, Reverb, Chorus (each with 3 levels) |
| Built-in metronome | Yes, with tempo (40-240), beat, accent and volume settings |
| Pedals | 3 (damper/sostenuto/soft), half-pedal function |
| Built-in speakers | 2 × 10 cm |
| Connectivity | 2 headphone jacks (stereo mini-jack front/rear), LINE OUT (stereo mini-jack), MIDI IN/OUT, pedal jack, speaker jack, DC 19V |
| Playing modes | Single, Layer, Partner (keyboard split) |
| Touch sensitivity | 3 levels: Light, Normal, Heavy |
| Temperaments | 9 types (including Equal, Pure, Arabic, Pythagorean, Werckmeister, Kirnberger, Slendro, Pelog) |
| Auto power-off | Yes (can be disabled), after 30 minutes of inactivity |
| Dimensions (W×D×H) | 1355 × 351 × 772 mm (lid closed); 1355 × 351 × 936 mm (lid open) |
| Total weight (with stand) | 37 kg |
| Power supply | DC 19V AC adapter (included), consumption 15W |
| Included accessories | AC adapter, power cord, stand (pre-assembled) |
| Maintenance and cleaning | Dry, clean cloth; avoid solvents, benzene or thinners |
| Safety instructions | Do not expose to moisture, heat, dust; use only the supplied adapter; unplug before cleaning |
Frequently Asked Questions - LP380 KORG
User questions about LP380 KORG
0 question about this device. Answer the ones you know or ask your own.
Ask a new question about this device
Download the instructions for your Piano in PDF format for free! Find your manual LP380 - KORG and take your electronic device back in hand. On this page are published all the documents necessary for the use of your device. LP380 by KORG.
USER MANUAL LP380 KORG
Using the unit in the following locations can result in a malfunction.
- In direct sunlight
- Locations of extreme temperature or humidity
- Excessively dusty or dirty locations
- Locations of excessive vibration
- Close to magnetic fields
Power supply
Please connect the designated AC adapter to an AC outlet of the correct voltage. Do not connect it to an AC outlet of voltage other than that for which your unit is intended.
Interference with other electrical devices
Radios and televisions placed nearby may experience reception interference. Operate this unit at a suitable distance from radios and televisions.
Handling
To avoid breakage, do not apply excessive force to the switches or controls.
Care
If the exterior becomes dirty, wipe it with a clean, dry cloth. Do not use liquid cleaners such as benzene or thinner, or cleaning compounds or flammable polishes.
Keep this manual
After reading this manual, please keep it for later reference.
Keeping foreign matter out of your equipment
Never set any container with liquid in it near this equipment. If liquid gets into the equipment, it could cause a breakdown, fire, or electrical shock. Be careful not to let metal objects get into the equipment. If something does slip into the equipment, unplug the AC adapter from the wall outlet. Then contact your nearest Korg dealer or the store where the equipment was purchased.
- All product names and company names are the trademarks or registered trademarks of their respective owners.
THE FCC REGULATION WARNING (for USA)
NOTE: This equipment has been tested and found to comply with the limits for a Class B digital device, pursuant to Part 15 of the FCC Rules. These limits are designed to provide reasonable protection against harmful interference in a residential installation. This equipment generates, uses, and can radiate radio frequency energy and, if not installed and used in accordance with the instructions, may cause harmful interference to radio communications. However, there is no guarantee that interference will not occur in a particular installation. If this equipment does cause harmful interference to radio or television reception, which can be determined by turning the equipment off and on, the user is encouraged to try to correct the interference by one or more of the following measures:
Reorient or relocate the receiving antenna.
- Increase the separation between the equipment and receiver.
- Connect the equipment into an outlet on a circuit different from that to which the receiver is connected.
- Consult the dealer or an experienced radio/TV technician for help.
If items such as cables are included with this equipment, you must use those included items.
Unauthorized changes or modification to this system can void the user's authority to operate this equipment.
Notice regarding disposal (EU only)

When this "crossed-out wheeled bin" symbol is displayed on the product, owner's manual, battery, or battery package, it signifies that when you wish to dispose of this product, manual, package or battery you

must do so in an approved manner. Do not discard this product, manual, package or battery along with ordinary household waste. Disposing in the correct manner will prevent harm to human health and po
tential damage to the environment. Since the correct method of disposal will depend on the applicable laws and regulations in your locality, please contact your local administrative body for details. If the battery contains heavy metals in excess of the regulated amount, a chemical symbol is displayed below the "crossed-out wheeled bin" symbol on the battery or battery package.
IMPORTANT NOTICE TO CONSUMERS
This product has been manufactured according to strict specifications and voltage requirements that are applicable in the country in which it is intended that this product should be used. If you have purchased this product via the internet, through mail order, and/or via a telephone sale, you must verify that this product is intended to be used in the country in which you reside.
WARNING: Use of this product in any country other than that for which it is intended could be dangerous and could invalidate the manufacturer's or distributor's warranty. Please also retain your receipt as proof of purchase otherwise your product may be disqualified from the manufacturer's or distributor's warranty.
Table of Contents
Introduction 3
Main features 3
Parts and their functions 4
Preparation and demo performances ---5
Before you begin playing 5
Listening to demo performances 7
Playing the LP-380 -8
Playing a single sound (Single mode) 8
Playing two sounds at the same time (Layer mode) 8
Performing with another person (Partner mode) 9
Using pedals 9
Effects 9
The metronome 10
Other functions 11
- Touch settings 11
Transpose 11
Function mode 11
MIDI 14
What is MIDI? 14
What can you do with MIDI? 14
Connections 14
MIDI function mode 14
Appendix 16
Troubleshooting 16
Specifications 16
Assembling the Stand 17
Caution during assembly 17
Other cautions 17
Assembly procedure 17
Check following assembly 18
MIDI implementation chart 87
Introduction
Main features
Thirty high-quality sounds
The LP-380 provides 30 built-in expressive high-quality sounds, including a stereo concert grand piano. You can use Layer mode to simultaneously play two sounds at once, or you can use Partner mode, which allows two people to play the same range, one on each half of the keyboard.
Effects
The LP-380 provides 3 built-in digital effects. These effects can adjust the brightness of the tone (Brilliance), simulate the natural ambience of a concert hall (Reverb) and add richness to the sound (Chorus).
Pedal effects
As on an acoustic piano, the LP-380 has three pedals that control the damper, sostenuto and soft effects. The damper pedal and soft pedal will respond to half-pedaling, allowing you to vary the depth of the effect by how far you're pressing the pedal. When pressing the damper pedal, you can also add the damper resonance to the classic piano and the grand piano tone (bank 1 and 2 of Piano1).
Metronome
The built-in metronome allows you to select the time signature, tempo, and volume, and you can even choose a bell sound as the accent.
Touch control
You can choose from three different settings to adjust how the sound will respond to your keyboard playing dynamics.
Temperaments
For authentic performance of a wide range of music, the LP-380 allows you to select from nine temperaments, including the equal temperament, pure temperaments (major and minor), classical temperaments (Kirnberger and Werckmeister) as well as temperaments used with Middle Eastern and Indian folk music. When an acoustic piano sound is selected, the stretched tuning used on pianos is automatically selected.
Adjustable pitch
The Transpose function lets you change the pitch of the piano, and the Pitch Control function allows you to make finely tuned adjustments.
Two headphone jacks
Two headphone jacks are provided, allowing two people to listen simultaneously.
LINE OUT jack
An amplified speaker or recording equipment can be connected by using the LINE OUT jack.
MIDI capabilities
The LP-380 supports the MIDI protocol, the standard that allows music data to be transferred between musical instruments and computers. MIDI allows two or more devices to control or be controlled by each other, and also allows you to use the LP-380 as a 16-part multitimbral tone generator.
Parts and their functions
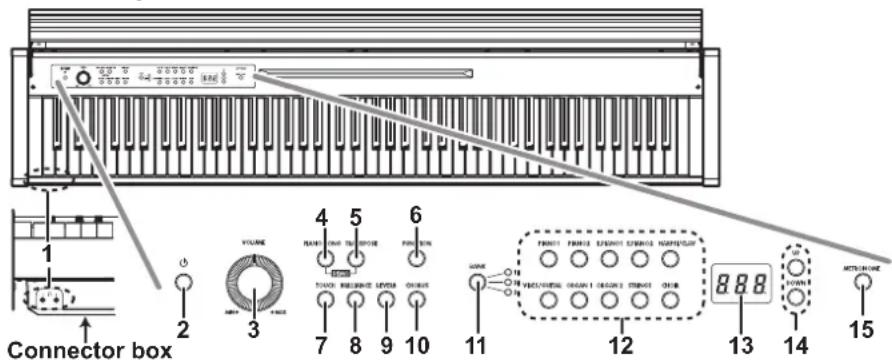
Control panel
- Headphone )jacks (Front of the conector box):
Two stereo mini plugs for headphones can be inserted here. When the headphone plug is inserted, the internal speaker will not produce sound.
- Power button:
This button turns the LP-380 on or off.
- VOLUME Knob:
This knob adjusts the volume for the speakers, the Output and the Phones connectors.
- PIANO SONG button:
This button is used to enter the Piano song mode, after which the button lights up. Simultaneously pressing this button and the TRANSPOSE button enters the Sound demo song mode.
- TRANSPOSE button:
This button is used to adjust transposition. While transposing, the button lights up. Simultaneously pressing this button and the PIANO SONG button enters the Sound demo song mode.
- FUNCTION button:
This button is used to enter the Function mode, where pitch, temperament and other settings can be specified. Hold down the button to enter the MIDI function mode, where MIDI settings can be specified. The button lights up when the LP-380 enters the Function mode and blinks when it enters the MIDI function mode.
- TOUCH button:
This button lets you select the keyboard sensitivity.
- BRILLIANCE button:
This button is used to adjust the brightness of the tone.
- REVERB button:
This button is used to turn on/off the reverb, which adds ambience to the sound. When this effect is on, the button will be lit up.
- CHORUS button:
This button is used to turn on/off the chorus, which adds richness to the sound. When this effect is on, the button will be lit up.
- BANK button/LEDs:
This button is used to select the desired sound bank. The LED for the bank that's currently selected will light up.
- Sound buttons:
This button is used to select from 30 sounds (10× 3 banks). Two buttons can be pressed to play two sounds simultaneously (Layer mode).
- Display:
The display shows settings, for example, for the Function mode and the metronome.
- UP/DOWN buttons:
These buttons are used to select a value for the various settings.
- METRONOME button:
This button is used to start/stop the metronome. While the metronome is being used, the button lights up. In addition, hold down the button to enter the Metronome settings mode, where various metronome settings can be specified.
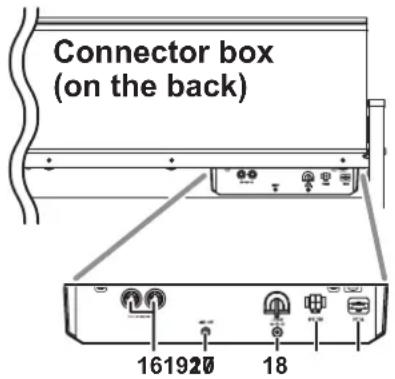
- MIDI (IN, OUT) connectors:
These are jacks that are used to connect other MIDI devices (sequencer, keyboards, etc.).
OUT: Data output
(to be connected to the MIDI IN connector of another MIDI device).
IN: Data input
(to be connected to the MIDI OUT connector of another MIDI device).
- LINE OUT jack:
This is the main audio output jack, where a stereo mini plug can be connected to the input jack of an amplifier or powered speakers, or to the AUX In jack of other gear.
Use the VOLUME knob to set the output volume.
- DC 19V jack:
Connect the included AC adapter here.
- Speaker connector:
Connect the cable from the speaker box here (cf. Assembling the stand).
- Pedal connector:
Connect the cable from the pedal unit here (cf. Assembling the stand).
Preparation and demo performances
Before you begin playing
About the included stand
The LP-380 is used with the included stand.
Make sure that you read the "Assembling the stand" section that can be found on page 17 before proceeding.
Connecting the Power
Connect the supplied AC adapter to the power cord. Insert the DC plug end into the DC19V jack on the rear of the conector box. Next, plug the power cord into an AC outlet.
Pass the AC adapter cord through the cord hook so that the plug won't be removed from the jack accidentally (Fig. 1). When you unhook the cord, don't pull on the cord with force.
Be sure to use the AC adapter that came with your unit. Using other AC adapters may cause the malfunctions or other unforeseen events.
A Be sure to plug the unit into an AC outlet of the appropriate voltage.
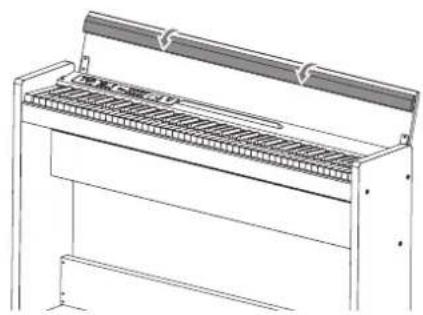
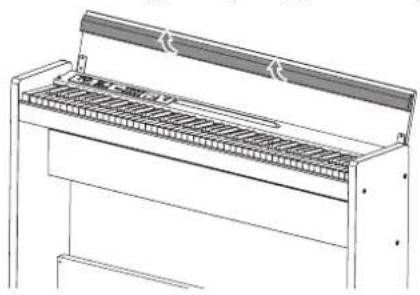
Opening or closing the key cover
Opening the key cover
- Using both hands, gently lift the key cover to open it.

- Fold down the edge on the end of the key cover.
Closing the key cover
- Raise the edge, and gently pull the key cover toward yourself.
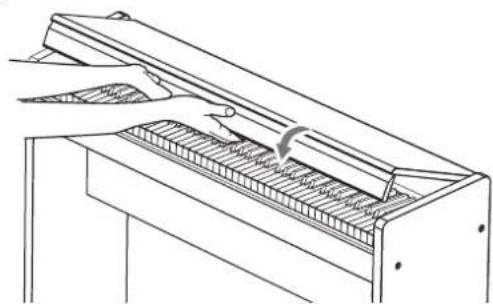
- When the key cover begins to close on its own, release it.
The key cover is designed to close softly on its own from about mid-way down.
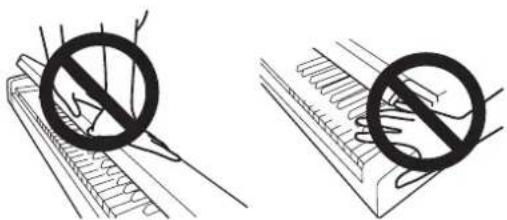
Do not forcibly pull the key cover when closing this. In addition, do not forcibly close the key cover by applying strong pressure. Doing so will damage the unit.
Be careful not to pinch your fingers or hands when closing the key cover.
The temperature and humidity will affect how fast the key cover closes.
The key cover may make a faint clicking sound when it's being closed slowly. This is normal behavior for the unit.
Using the headphones
Use stereo headphones with a stereo 1 / 8'' mini plug.
Since there are two headphone jacks on the lower left side of the LP-380 keyboard, two people can enjoy the sound.
If headphones are plugged into the headphone jack, the LP-380's speakers will not produce sound.
Use headphones at night or when you don't want disturb others.
If your headphones feature a standard-to-mini adapter plug, be sure to hold the adapter plug when you connect or disconnect the headphones.
To protect your hearing, do not listen to loud, high-volume sounds for extended periods of time through headphones.
Using the music stand
The key cover serves as a convenient music stand. (Fig. 2)
When placing opened music, do not apply strong pressure onto the key cover.
Turning the instrument on
Press the power button to turn on the LP-380. (Fig. 3)
When the instrument is turned on, the buttons on the control panel will light up.
To turn the instrument off, press the power button again.
When the instrument is turned off, all functions and parameters, except the auto power off function return to their factory default settings.
Auto power off function
When 30 minutes have passed without user input or demo performance, the instrument will be automatically turned off. To disable this function, turn off the auto power off function (see page 13).
Adjust the volume
Rotate the VOLUME knob that's located next to the power switch toward "MAX" to raise the volume level.
Rotate it left toward "MIN" to lower the level. (Fig. 3)
The VOLUME knob controls the output level of the built-in speakers, the headphones jacks and the LINE OUT jacks.
It is always better to start with a low volume and then increase gradually.
Using the LINE OUT jack
Use the LINE OUT jack, if you want to connect your LP-380 to a mixer, stereo hi-fi, or a couple of active monitors. When using a stereo hi-fi, connect the LINE OUTs to the AUX or LINE inputs.
You must only connect devices with the power turned off. Careless operation may damage the LP-380 or the device where it's connected, or malfunctions may be caused.
Connection cables are sold separately. You will need to obtain the appropriate commercially-available cables for your equipment.
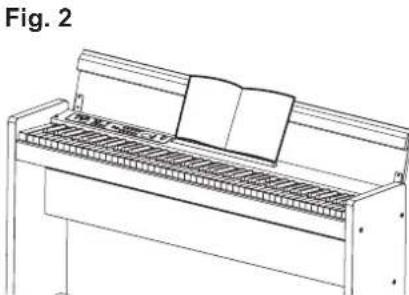
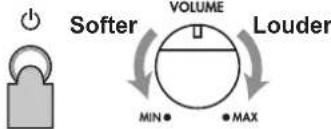
Fig. 3
Listening to demo performances
The LP-380 contains a total of 30 demo performances (10 demo songs using 10 high-quality sounds and 20 familiar piano songs using the piano sounds).

During playback of a sound demo song, you can play using the keyboard; however, the sound cannot be changed by using the sound buttons.

During playback of a sound demo song, the settings for effects (reverb and chorus) cannot be changed.
Listening to a demo song
- Simultaneously press the PIANO SONG button and the TRANSPOSE button.
The PIANO SONG button blinks, and the sound buttons blink sequentially.
In addition, the number for the sound demo song (d01) appears in the display.

- After about 3 seconds, the PIANO1 button will blink, and playback of the demo song corresponding to that button will begin.
When playback of the PIANO1 demo song is finished, playback continues sequentially with PIANO2, E.PIANO1, etc. When playback of the CHOIR demo song is finished, playback begins again with the PIANO1 demo song.
Listening to a specific sound demo song
When the sound buttons are blinking sequentially, press the sound button for the demo song that you want to hear.
If a different sound button is pressed, even while a song is being played, playback of the corresponding demo song will begin after a few seconds.
In addition, a song can be selected by pressing the UP or DOWN button beside the display.
- To stop playback of a demo song, press the PIANO SONG button again.
Sound demo song list
| display | Sound button | Song title | Composer |
| d01 | PIANO1 | Jardins sous la pluie | C.Debussy |
| d02 | PIANO2 | Danny boy | Irish Folk Song |
| d03 | E.PIANO1 | Jam Session | N. Nishi |
| d04 | E.PIANO2 | In Memory | M.Giesel |
| d05 | HARPSI/CLAV | Invention No.8 | J.S.Bach |
| d06 | VIBES/GUITAR | Jazz in Spain | KORGoriginal |
| d07 | ORGAN1 | Improvisation | M.Geisel |
| d08 | ORGAN2 | Toccata in D moll | J.S.Bach |
| d09 | STRINGS | Scoring Interlude | M.Geisel |
| d10 | CHOIR | Autumn Flares | M.Geisel |
Listening to a piano song
- Press the PIANO SONG button.
The PIANO SONG and PIANO1 buttons will light up, and the number for the piano song (001) will appear in the display.

- After about 3 seconds, the PIANO1 button will blink, and playback of the piano song will begin.
When playback of the first piano song is finished, playback continues sequentially with second, third, etc. When playback of the twentieth piano song is finished, playback begins again with the first piano song.
Listening to a specific piano song
The number for the song that you want to hear can be selected by pressing the UP or DOWN button beside the display. If a different number is selected by pressing the buttons, even while a song is being played, playback of the corresponding song will begin after a few seconds.
- To stop playback of a piano song, press the PIANO SONG button again.
Piano song list
No. display Song titleComposer
| 1 001 Etude Op.10-12 F.Chopin | ||
| 2 002 Claire de lune C.Debussy | ||
| 3 003 Fantaisie-Impromptu Op.66 F.Chopin | ||
| 4 004 Waltz No.6 Db-major Op.64-1 F.Chopin | ||
| "Prelude 1" The Well-Tempered | ||
| 5 005 Clavier, Book 1 J.S.Bach | ||
| 6 006 "Turkish March" Sonata K.331 W.A.Mozart | ||
| 7 007 Arabesque No.1 C.Debussy | ||
| 8 008 Für Elise L.v.Beethoven | ||
| 9 009 Liebesträume Nr.3 F.Liszt | ||
| 10 010 La Campanella F.Liszt | ||
| 11 011 Nocturne Op.9-2 F.Chopin | ||
| 12 012 Spring Song Op.62-6 F.Mendelssohn | ||
| 13 013 Reflets dans l'eau C.Debussy | ||
| 14 014 Gymnopédie No.1 E.Satie | ||
| 15 015 Etude Op.10-3 F.Chopin | ||
| 16 016 Old Feather Blues KORG original | ||
| 17 017 La fille aux cheveux de lin C.Debussy | ||
| 18 018 The Entertainer S.Joplin | ||
| 19 019 Sunflowers KORG original | ||
| 20 020 Amazing Grace Hymn |
Playing the LP-380
Playing a single sound (Single mode)
You can select a sound from the thirty sounds supplied with the instrument (10 sounds x 3 banks).
| Sound button Bank Sound name # | ||
| PIANO1 1 Classic | Piano 3 | |
| 2 Grand Piano 3 | ||
| 3 Jazz Piano 2 | ||
| PIANO2 1 Live Piano | Piano | 2 |
| 2 Honky-Tonk | 2 | |
| 3 Elec.Grand | 1 | |
| E.PIANO1 | 1 Stage E.piano | 1 |
| 2 Bright E.Piano | 2 | |
| 3 Tremolo EP | 3 | |
| E.PIANO2 | 1 Dig.E.Piano1 | 2 |
| 2 60's E.Piano | 1 | |
| 3 Dig.E.Piano2 | 2 | |
| HARPSI/CLAV | 1 Harpsichord | 2 |
| 2 Clav | 1 | |
| 3 Synth Clav | 2 | |
| VIBES/GUITAR | 1 Vibraphone | 1 |
| 2 Marimba | 1 | |
| 3 Acoustic Guitar | 2 | |
| ORGAN1 | 1 Jazz Organ1 | 2 |
| 2 Jazz Organ2 | 2 | |
| 3 Jazz Organ3 | 2 | |
| ORGAN2 | 1 Pipe Organ1 | 2 |
| 2 Pipe Organ2 | 2 | |
| 3 Positive Organ | 2 | |
| STRINGS | 1 Strings | 2 |
| 2 Cinema Strings | 2 | |
| 3 Analog Strings | 2 | |
| CHOIR | 1 Aah Choir 2 | |
| 2 Ooh Voices | 2 | |
| 3 Classical Choir | 3 | |
(#) These columns show the number of oscillators per voice that are used by each sound. (refer to "About maximum polyphony" on page 16.)
- Press the sound button for the sound that you want to play.
The selected button will light up.
- Press the BANK button to select one of the three sounds.
Each press of the BANK button switches the bank in the order 1, 2, 3, 1, ..., and the corresponding LED to the right of the BANK button will light up.
For example, to select the electric grand piano sound, press the PIANO2 button, after which its button lights up.
Then, press the BANK button twice to select bank 3 (electric grand piano); the LED below and to the right of the BANK button will light up.
In addition, the bank selected for a sound button remains the same, even if a different sound button is pressed.

Each time the LP-380 is turned on, the sound in bank 1 is selected for all sound buttons.
Playing two sounds at the same time (Layer mode)
You can play two sounds at the same time on the keyboard. This is called the Layer mode.
Simultaneously press the two sound buttons for the sounds to be played at the same time.
The two selected sound buttons will light up.

The leftmost or uppermost selected sound button is layer 1, and the other (rightmost or lowermost) one is layer 2 (see the diagram at the below).
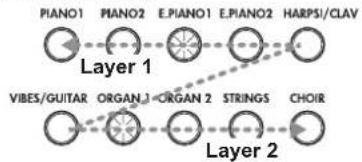
For example, if E.PIANO1 and ORGAN1 are selected, E.PIANO1 is layer 1 and ORGAN1 is layer 2. In order to use sounds in different banks, first select the banks in the Single mode for the sound buttons to be pressed.
For example, to play by layering the grand piano and jazz organ 2 sounds, select bank 1 (grand piano) for the PIANO1 button and bank 2 (jazz organ 2) for the ORGAN1 button, and then press both buttons simultaneously.
When selecting Layer mode, the total number of voices that can play at the same time is reduced, depending on the total number of oscillators used by the selected sounds. (refer to "About maximum polyphony" on page 16.)
Sounds in different banks for the same sound button (grand piano and jazz piano for the PIANO1 button) cannot be selected.
Returning to the Single mode
To return to Single mode, just press a single sound selection button.
Layer mode settings
In Layer mode, the volume balance between sounds can be adjusted, the octave for each sound can be shifted, and the damper pedal can be enabled or disabled for each sound. (refer to "Function mode" on page 11.)
Performing with another person (Partner mode)
Two people can play in the same range with the keyboard divided in half between them. This is called the Partner mode.
- Press the FUNCTION button.
The FUNCTION and PIANO1 buttons will light up.
- Press the E.PIANO1 button.
The E.PIANO1 sound button lights up, and OFF appears in the display.

- Press the UP button beside the display to select on.
Partner mode is turned on, and the PIANO1 sound is used for both the left and right sides of the keyboard. While the Partner mode is ON, a dot in the lower right of the display appears.
The right side of the keyboard, from E4 to C8, produces sounds in a range two octaves lower (E2-C6).
The left side of the keyboard, from A0 to E b4, produces sounds in a range two octaves higher (A2-E6).

Pitches A2 to E6 for the player on the left side
Pitches E2 to C6 for the player on the right side
-
To exit Partner mode, press the DOWN button beside the display to select OFF.
-
Press the FUNCTION button.
The FUNCTION button turns off.
In Partner mode, the sound for the left and right sides can be changed, and the volume can be adjusted. For details, refer to "Partner mode settings" on page 12.
Using pedals
The LP-380 has three pedals; damper, sostenuto, and soft.
You can use the pedals to make your playing more expressive and realistic.
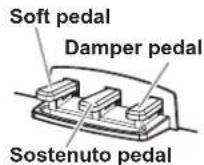
Soft pedal (left)
Pressing this pedal will make the tone softer. You can control the softness of the tone by how far down you press the on pedal ("half-pedaling").
Sostenuto pedal (center)
Pressing this pedal will apply the damper effect only to the notes that are already being held down on the keyboard, and will sustain only those notes. The damper effect will not be applied to any additional notes that you play while holding down the Sostenuto pedal.
Damper pedal (right)
Pressing this pedal will sustain the sound, producing a richly resonant decay. You can also add the damper resonance to the classic piano and the grand piano tone (bank 1 and 2 of Piano1). You can also use halfpedalling, with a gradual resonance effect depending on the depth of the pedal pressure ("half-pedaling").
In Layer mode, you can select the sound(s) where you want to apply the pedal. (refer to "Specifying layer pedals" on page 13)
In Partner mode (see page 12), the damper effect can be applied independently by both players.
Effects
Brilliance
This effect changes the brightness of the tone.
The setting can be changed by holding down the BRILLIANCE button and pressing the UP or DOWN button beside the display.

The setting appears in the display with 3 producing a brighter sound and 1 producing a less bright sound.
The same setting is applied to all sounds and remains applied until the LP-380 is turned off. When the instrument is turned on, the default setting 2 is selected.

Brilliance cannot be turned off.
Reverb
This effect adds ambience and depth to the sound, producing the sense of performing in a concert hall. As a factory default, the on/off setting for this effect as well as this effect's setting are saved with each sound.
Each press of the REVERB button turns the reverb on (button lights up) or off (button turns off).
To change this setting, hold down the REVERB button and press the UP or DOWN button beside the display.

The setting appears in the display with 3 producing a deep reverber effect and 1 producing a light reverber effect.
If a different sound is selected or if the LP-380 is turned off, the on/off setting for this effect as well as this effect's setting return to their factory defaults (default settings).
Chorus
Chorus adds modulation to the sound, producing an expansively rich sound. As a factory default, the on/off setting for this effect as well as this effect's setting are saved with each sound.
Each press of the CHORUS button turns the Chorus effect on (button lights up) or off (button turns off). To change this setting, hold down the CHORUS button and press the UP or DOWN button beside the display.

The setting appears in the display with 3 producing a deep chorus effect and 1 producing a light chorus effect.
If a different sound is selected or if the LP-380 is turned off, the on/off setting for this effect as well as this effect's setting return to their factory defaults (default settings).
The metronome
The LP-380 is equipped with a metronome, which can be changed to a bell sound, which is convenient for practicing.
Turning on/off the metronome
Press the METRONOME button. The button lights up, and the metronome starts.

To stop the metronome, press the METRONOME button again. The button turns off.
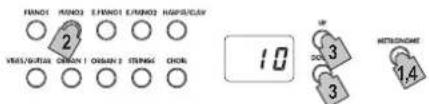
Specifying the tempo
When the tempo appears in the display (default setting of 120), regardless of whether the metronome is turned on or off, the tempo can be specified with the UP and DOWN buttons beside. The setting range is = 40 - 240
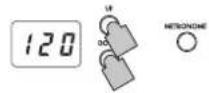
To return to the default setting, simultaneously press the UP and DOWN buttons.
Selecting the time signature
- Hold down the METRONOME button until the Metronome settings mode is entered.
The METRONOME button blinks, the PIANO1 sound button lights up, and the time signature (04) appears in the display.
When the Metronome settings mode is entered, the time signature setting normally appears.
-
To select the time signature after changing other settings in the Metronome settings mode, press the PIANO1 button.
-
Select the setting with the UP or DOWN button beside the display.
The setting range consists of 02 (2/4), 03 (3/4), 04 (4/4) and 06 (6/4); the default setting is 04.
To return to the default setting, simultaneously press the UP and DOWN buttons.

- Press the METRONOME button to exit the Metronome settings mode.
Adjusting the metronome volume
-
Hold down the METRONOME button until the Metronome settings mode is entered.
-
Press the PIANO2 button, and the volume will appear in the display.
-
Specify the setting with the UP or DOWN button that's located beside the display.
The setting range is 1-13; the default setting is 10. To return to the default setting, simultaneously press the UP and DOWN buttons.
- Press the METRONOME button to exit the Metronome settings mode.
Selecting a bell for the accent
- Hold down the METRONOME button until the Metronome settings mode is entered.
- Press the E.PIANO1 button, and the accent sound setting will appear in the display.
- Select the setting with the UP or DOWN button beside the display.
The setting range consists of oFF (no accent sound), on1 (emphasized sound for the accent beat) and on2 (bell sound for the accent beat); the default setting is oFF.
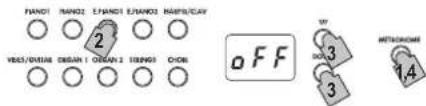
- Press the METRONOME button to exit the Metro-nome settings mode.
Specifying the tempo (Metronome settings mode)
- Hold down the METRONOME button until the Metronome settings mode is entered.
- Press the E.PIANO2 button, and the tempo will appear in the display.
- Specify the setting with the UP or DOWN button that's located beside the display. The setting range is = 40 - 240 ; the default setting is 120 To return to the default setting, simultaneously press the UP and DOWN buttons.
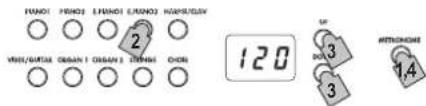
- Press the METRONOME button to exit the Metro-nome settings mode.
Selecting the Metronome Sound
- Hold down the METRONOME button until the Metronome settings mode is entered.
- Press the HARPSI/CLAV button, and the metronome sound setting will appear in the display.
- Specify the setting with the UP or DOWN button that's located beside the display. The setting range consists of 1 (acoustic) and 2 (electronic sound); the default setting is 1.

- Press the METRONOME button to exit the Metro-nome settings mode.
Other functions
Touch settings
The keyboard sensitivity, or touch, can be programmed. To change the setting, hold down the TOUCH button and press the UP or DOWN button beside the display.
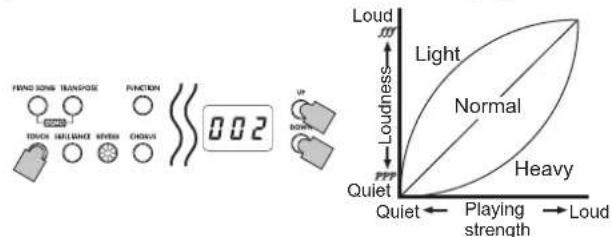
| Display | Touch sensitivity |
| 1 Light. Loud notes can be produced even by playing lightly. | |
| 2 Normal. Normal piano touch. | |
| 3 Heavy. Loud notes can be produced only by playing very hard. | |
When the instrument is turned on, the touch setting is reset to Normal.
The settings are applied to all sounds.
Transpose
In some cases, a song may be written in a difficult key (e.g., many black keys), or you may wish to shift the pitch to match another instrument or vocalist. In such cases, you can transpose (shift the pitch) so that you can use an easier fingering, or use the same familiar fingering to play at a different pitch. This is called the Transpose function.
For example if you transpose upward by one semitone, playing the notes shown at the lower left will produce the pitches shown at the right.

When the instrument is turned on, the transposing is reset.
While holding down the TRANSPOSE button, press the keyboard key (F6-F7) for the desired transposition.
If a keyboard key other than C7 is pressed, the TRANSPOSE button lights up to indicate that the keyboard is transposed.
The pitch of the entire keyboard is transposed according to the pitch of the pressed keyboard key in relation to C7.
To return to the original pitches, hold down the TRANSPOSE button and press the C7 key. The TRANSPOSE button turns off, and transposition is canceled.
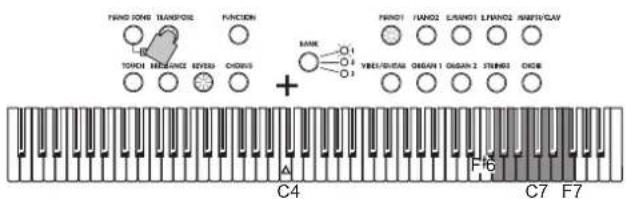
| key Effect | |
| F#6-B6 6-1 semitones below | |
| C7 Standard pitch | |
| C#7-F7 1-5 semitones higher | |
Function mode
The temperament as well as other pitch settings can be specified from the Function mode.
Setting procedure for functions in the Function mode.
- Press the FUNCTION button.
The FUNCTION and PIANO1 buttons light up.
- Press the sound button corresponding to the desired function.
The current setting appears in the display.
-
Specify the desired setting.
-
After specifying the desired settings, press the FUNCTION button to return to the mode for playing. The FUNCTION button turns off.

When the LP-380 is turned off, all functions, except the auto power off function, return to their default settings.
The settings are applied to all sounds.
Fine tuning
In order to adapt the LP-380 pitch to that of another instrument, you can adjust the pitch in steps of 0.5Hz over a range of A4 = 427.5 - 452.5Hz .
27.5-52.5 appears in the display.
The standard pitch is A = 440 ~Hz , and the default setting is 40.0.
- When you enter the Function mode, the PIANO1 sound button lights up.
When the Function mode is entered, the pitch setting normally appears.
-
To specify the pitch after changing other settings in the Function mode, press the PIANO1 button.
-
Specify the setting with the UP or DOWN button beside the display.
Simultaneously press the UP and DOWN buttons to return to 440Hz .

Selecting a temperament
You can select from nine temperaments, including the equal temperament, pure temperaments (major and minor), classical temperaments (Kirnberger and Werckmeister) as well as temperaments used with Middle Eastern and Indian folk music.
| Display | Temperament |
| 00 Equal temperament (default setting): Spacing all semitones at equal pitch intervals, this temperament is the most widely used. | |
| 01 Pure temperament [major]: Major chords in the selected key are perfectly tuned. | |
| 02 Pure temperament [minor]: Minor chords in the selected key are perfectly tuned. | |
| 03 Arabic: This scale includes the quarter-tone intervals used in Arabic music. | |
| 04 Pythagorean: This ancient Greek scale is especially effective for playing melodies. It consists of perfect fifths; however, other intervals – the major third in particular – is out of tune. | |
| 05 Werckmeister: The Werckmeister III scale was created in the later Baroque period to allow relatively free transposition. | |
| 06 Kirnberger: The Kirnberger III scale is used mainly for tuning harpsichords. | |
| 07 Sfendro scale: This is an Indonesian gamelan scale with five notes per octave. | |
| 08 Pe log scale: This is an Indonesian gamelan scale with seven notes per octave. | |
1. Enter the Function mode, and then press the PIANO2 button.
The PIANO2 sound button lights up, and the tempera-ment setting (00) appears in the display.
2. Select the setting with the UP or DOWN button beside the display.

About stretched tuning
In order to produce the most natural resonance, PIANO1 and PIANO2 sounds use a "stretched tuning" that makes the notes of the lower range slightly flatter than equal temperament, and the upper range slightly sharper. This is how an acoustic piano is normally tuned by professional tuners.
Partner mode settings
- Enter the Function mode, and then press the E.PIANO1 button.
The E.PIANO1 sound button lights up, and the on/off setting appears in the display.
2. Each press of the UP or DOWN button beside the display turns the mode on (on) or off (off).

When the Partner mode is turned on, the PIANO1 sound is used for both the left and right sides of the keyboard, and the PIANO1 button lights up.
Simultaneously, a dot on the lower right of the display appears (Partner mode indication).

The right side of the keyboard, from E4 to C8, produces sounds in a range two octaves lower (E2-C6). The left side of the keyboard, from A0 to E ^口4 produces sounds in a range two octaves higher (A2-E6).

The division for the left and right sides of the keyboard as well as the range (pitches) cannot be changed.

In the Partner mode, the transposition settings are ignored. In addition, keyboard information (Note On and Note Off) is not sent with MIDI.
Selecting the sound for the left side
Exit the Function mode, and then press the sound button for the sound to be used with the left side of the keyboard. The right side of the keyboard remains set to the PIANO1 sound.
In this case, only the sound button for the left side of the keyboard will light up.
Selecting sounds for the left and right sides
Exit the Function mode, and then simultaneously press the two sound buttons for the sounds to be used. The two selected sound buttons light up.
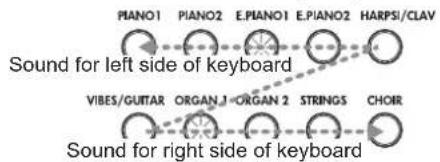
The leftmost or uppermost selected sound button is for the left side of the keyboard, and the other (rightmost or lowermost) one is for the right side of the keyboard. For example, if E.PIANO1 and ORGAN1 are selected, E.PIANO1 is for the left side of the keyboard and ORGAN1 for the right side of the keyboard.
In order to use sounds in different banks, first select the banks in the Single mode for the sound buttons to be pressed.
If the Partner mode is turned off and the Function mode is exited with the left and right sides of the keyboard set to different sounds, the sounds whose buttons are lit will be selected.
Using the same sound (other than PIANO1) for both the left and right sides
Exit the Function mode, and then simultaneously press two sound buttons, making sure that the rightmost one is for the sound to be used. Then, press the rightmost selected sound button again. For example, after pressing the PIANO2 and ORGAN1 buttons, press the ORGAN1 button again to use the ORGAN1 sound with both the left and right sides of the keyboard.
Changing the volume for the left and right sides
If the sounds for the left and right sides of the keyboard have been changed, the volume can be specified for each sound. refer to "Specifying the volume balance for layers" on page 13.
Using dampers
The damper pedal and the soft pedal can be used as separate damper pedals for the right and left sides of the keyboard respectively.
Damper: Used as a damper pedal for the player on the right side of the keyboard.
Sostenuto: Not used
Soft: Used as a damper pedal for the player on the left side of the keyboard.
Specifying the volume balance for layers
The volume balance for sounds in the Layer mode (or the Partner mode) can be adjusted. The setting range is 1-9... 9-9...9-1, with the number on the left for layer 1 (or the left side of the keyboard) and the number on the right for layer 2 (or the right side of the keyboard). The default setting is 9-9.
- Enter the Function mode, and then press the E.PIANO2 button.
The E.PIANO2 sound button lights up, and the balance setting (9-9) appears in the display:
- Specify the volume balance setting with the UP or DOWN button beside the display.
To return to the default setting, simultaneously press the UP and DOWN buttons.

If the sound is in the Single mode, - - - appears in the display, and a setting cannot be specified.
Specifying layer octaves
In the Layer mode, the octave for each sound can be specified. The setting range is ± 1 octave for each sound, and -01, 00 and 01 appear in the display. The default setting is 00.
- Enter the Function mode, and then press the HARPSI/CLAV button.
The HARPSI/CLAV sound button lights up, and the layer (L1) whose octave is to be specified appears in the display.
- Select the layer with the UP or DOWN button beside the display.
L1 appears for layer 1, and L2 appears for layer 2.
- Press the BANK button.
The octave setting (00) appears in the display.
- Select the octave setting with the UP or DOWN button beside the display.
To return to the default setting, simultaneously press the UP and DOWN buttons.
To select the octave for the other layer, press the HARPSI/ CLAV button to select the layer.

If the sound is in the Single mode, - - - appears in the display, and a setting cannot be specified.
Specifying layer pedals
In the Layer mode, a damper setting can be specified for each sound.
The settings are only for the layer 1 sound (0 - - ) ,only for the layer 2 sound (- - o) and for both sounds (0 - 0)
The default setting is o-o.
- Enter the Function mode, and then press the VIBES/GUITAR button.
The VIBES/GUITAR sound button lights up, and the damper setting (o-o) appears in the display.
- Select the damper setting with the UP or DOWN button beside the display.

If the sound is in the Single mode, - - - appears in the display, and a setting cannot be specified.
Specifying the auto power off function
When 30 minutes have passed without a key pressed on the keyboard or without an automatic performance played, the instrument is automatically turned off. To disable this function, turn off (oFF) this function. The default setting is this function turned on. If this setting is changed, the new setting is saved and remains selected, even if the LP-380 is turned off.
- Enter the Function mode, and then press the ORGAN1 button.
The ORGAN1 sound button lights up, and the setting (on) appears in the display.
- Select the on/off setting with the UP or DOWN button beside the display.

MIDI
What is MIDI?
MIDI, is the abbreviation of Musical Instrument Digital Interface. It is an international standard that was created to connect and transfer data between electronic musical instruments, computers and other devices.
What can you do with MIDI?
Thanks to MIDI, you can use the LP-380 to control other instruments, use other instruments to control the LP-380, and use a sequencer to create complex musical pieces. When you use the LP-380 keyboard or pedal, or select a sound, the notes, pedal activation and change in sound are transmitted to another instrument, or are recorded by a sequencer.
Connections
Commercially available MIDI cables are used to transfer MIDI data. Connect these cables from the MIDI connectors of the LP-380 to the MIDI connectors of the external MIDI device that you want to exchange data with. There are two types of MIDI connector.
MIDI IN connector
This connector receives MIDI messages. The MIDI IN connector lets you play the LP-380's sounds from an external MIDI device (e.g., MIDI keyboard or sequencer). Use a MIDI cable to connect the LP-380's MIDI IN connector to your external MIDI device's MIDI OUT connector.
MIDI OUT connector
This connector transmits MIDI messages. The MIDI OUT connector lets you control an external MIDI device using the MIDI messages transmitted from the LP-380.Use a MIDI cable to connect the LP-380's MIDI OUT connector to your external MIDI device's MIDI IN connector.
MIDI function mode
When the LP-380 is turned on, the MIDI parameters are set to transmission channel 1, all reception channels (1-16), Local On and Omni Off. These settings can be changed from the MIDI function mode.
Setting procedure for parameters in the MIDI function mode
-
Hold down the FUNCTION button with the function mode not established. The PIANO 1 button lights up, and the MIDI channel setting (C01) appears in the display. The FUNCTION button is blinking.
-
Press the sound button corresponding to the desired parameter. The current setting appears in the display.
-
Specify the desired setting.
-
After specifying the desired settings, press the FUNCTION button to return to the mode for playing. The FUNCTION button turns off.

When the LP-380 is turned off, all parameters return to their default settings.
Changing the MIDI channels
Data can be transmitted and received on MTDI channels 1 through 16 (C01-C16). When the LP-380 is turned on, transmission channel 1 (C01) is automatically selected.
- When you enter the MIDI function mode, the PIA-NO1 sound button lights up.
When the MIDI function mode is entered, the MIDI channel setting normally appears.
To specify the MIDI channel setting after changing other settings in the MIDI function mode, press the PIANO1 button.
In the Layer mode, selecting the transmission channel specifies the channel for layer 1. The transmission channel for layer 2 will automatically be set to the following channel. For example, if MIDI channel 7 is selected for the sound of layer 1, MIDI channel 8 will automatically be specified for the sound of layer 2. If MIDI channel 16 is selected for the sound of layer 1, channel 1 will be specified for the sound of layer 2.
Local On/Off
With the Local On setting, playing the LP-380's keyboard produces the sounds of the performance as well as transmits MIDI data. With the Local Off setting, playing the LP-380's keyboard does not produce the sounds of the performance; MIDI data is only transmitted. Normally this parameter is set to Local On (default setting: on). The Local Off setting should be selected when using the LP-380 as a master keyboard, for example, to play sounds from a connected MIDI device (a keyboard, sound module, etc.). The LP-380 will not produce sound, but the performance will be played by the connected MIDI device. Select the Local Off setting (oFF) when using the LP-380 as a sound module, for example, when the LP-380 is connected to a sequencer with its Echo Back setting (function that sends back data that the sequencer received) selected in order to prevent echoing of returned data.
- Enter the MID1 function mode, and then press the PIANO2 button.
The PIANO2 sound button lights up, and the Local On/ Off setting (on) appears in the display.
Enabling/disabling program change transmission/reception filtering
The programs on a connected MIDI device can be changed by sending a MIDI change number from the LP-380. In addition, the programs on the LP-380 can be changed by receiving a MIDI change number from a connected MIDI device.
For program change numbers and their corresponding sounds, refer to "Table of sounds and corresponding program change numbers" below.
To transmit/receive program change messages, disable this function (oFF: default setting). To not transmit/receive the messages, enable this function (on).
- Enter the MIDI function mode, and then press the E.PIANO1 button.
The E.PIANO1 sound button lights up, and the setting (oFF) appears in the display.
Transmitting program changes
When a sound is selected using the sound buttons and BANK button on the LP-380, the corresponding MIDI program change number is transmitted.
Receiving program changes
When the LP-380 receives a MIDI program change number, the sound is changed to the corresponding number.

If an incompatible program change number is received, the LP-380 sound is not changed.
Table of sounds and corresponding program change numbers
CC0: Bank Select (MSB) for all sounds is set to 121.
| Sound Button Bank | CC32 | PC | Sound |
| PIANO1 1 1 0 | Classic Piano | ||
| 2 0 0 | Grand Piano | ||
| 3 0 1 | Jazz Piano | ||
| PIANO2 1 2 0 | Live Piano | ||
| 2 0 3 | Honky-Tonk | ||
| 3 0 2 | Elec.Grand | ||
| E.PIANO1 | 1 0 4 | Club E.piano | |
| 2 1 4 | Vintage E.Piano | ||
| 3 3 4 | Tremoro EP | ||
| E.PIANO2 | 1 0 5 | Dig.E.Piano1 | |
| 2 2 4 | 60's E.Piano | ||
| 3 1 5 | Dig.E.Piano2 | ||
| HARPSI/CLAV | 1 0 6 | Harpsichord | |
| 2 0 7 | Clav | ||
| 3 1 7 | Synth Clav | ||
| VIBES/GUITAR | 1 0 | 11 | Vibraphone |
| 2 0 | 12 | Marimba | |
| 3 0 | 24 | Acoustic Guitar | |
| ORGAN1 | 1 0 | 16 | Jazz Organ1 |
| 2 1 | 16 | Jazz Organ2 | |
| 3 0 | 17 | Jazz Organ3 | |
| ORGAN2 | 1 0 | 19 | Pipe Organ1 |
| 2 1 | 19 | Pipe Organ2 | |
| 3 2 | 19 | Positive Organ | |
| STRINGS | 1 0 | 48 | Strings |
| 2 0 | 50 | Cinema Strings | |
| 3 1 | 50 | Analog Strings | |
| CHOIR | 1 0 | 52 | |
| 2 1 | 52 | Aah Choir | |
| 3 2 | 52 | Ooh Voices | |
| Classical Choir |
Enabling/disabling control change transmission/ reception filtering
Messages, such as usage of the LP-380's damper pedal, can be transmitted to a connected external MIDI device to control it, and these messages can be received from the external MIDI device to control the LP-380.
To transmit/receive control change messages, disable this function (oFF: default setting). To not transmit/receive the messages, enable this function (on).
- Enter the MIDI function mode, and then press the E.PIANO2 button.
The E.PIANO2 sound button lights up, and the setting (OFF) appears in the display.
Using the LP-380 as a multi-timbral sound module
The LP-380 can operate as a 16-part multi-timbral sound module when an external MIDI device is used to control its internal sound generator.
- Connect a MIDI cable to the LP-380's MIDI IN connector and to the MIDI OUT connector of a sequencer or other MIDI device.
- Transmit MIDI data from the connected sequencer or other MIDI device.
For details on transmitting data from the connected sequencer or other MIDI device, refer to its user's manual.
- When the LP-380 receives the program change message along with the performance data, it will play with the sound corresponding to that program number.
If the LP-380 is not to be used as a multi-timbral sound module, disable this function (oFF).
- Enter the MIDI function mode, and then press the HARPSI/CLAV button.
The HARPSI/CLAV sound button lights up, and the setting (on: default setting) appears in the display.
Appendix
Troubleshooting
If during use any of the following problems should occur, carefully examine the instrument to see if you can find out what the problem is, and try resolving it by following the suggestions below. If the instrument will still not function properly refer to your dealer.
The instrument will not turn on
- Check that the AC adapter is correctly connected to the piano and the outlet.
No sound
Is the speaker cord of the speaker box on the stand connected with the speaker connector on the LP-380 correctly?
Make sure that the volume is not set on MIN. If it is, bring it up to an adequate level.
- Make sure that the MIDI Local function is not set on OFF. If it is, set it to ON (or turn the instrument off and then on again).
- Make sure there is not a jack plugged into one of the Headphones jacks. This would turn the internal speakers off. if so, unplug the jack.
Notes are interrupted
- You have exceeded the maximum polyphony. See "About maximum polyphony."
The pitch or tone of the piano sounds wrong in some key regions
The LP-380's piano sounds replicate the sound of an actual piano as faithfully as possible. This means that in some regions of the keyboard, you may feel that the overtones seem stronger, or that the tone or pitch seems wrong. This is not a malfunction.
The connected MIDI device does not respond to transmitted MIDI data
Make sure that all MIDI cables are correctly connected. Make sure that the LP-380 is receiving MIDI data on the same channel as the MIDI device.
About maximum polyphony
If the number of notes being played simultaneously exceeds the maximum polyphony, some notes will be lost since the LP-380 is equipped with a mechanism that stops the first note being played to give priority to notes played with keys pressed later. Some LP-380 sounds, although they may be a single sound, are generated by two or more oscillators (one note of a sound-generating circuit). Sounds using just one oscillator, such as those in banks 1 and 2 of VIBES/GUITAR, have a maximum polyphony of 120 notes. Sounds using two oscillators, such as those in banks 1 and 2 of PIANO2 and in banks 1 and 3 of E.PIANO2, have a maximum polyphony of 60 notes.
120 ÷ Number of sound oscillators = Maximum polyphony Keep the maximum polyphony in mind and carefully choose sounds when using Layer mode to play two sounds simultaneously or when using the damper pedal.
Specifications
Keyboard RH3 (Real weighted hammer action 3) keyboard:88 note A0-C8
Touch selection Light, Normal, Heavy
Pitch Transpose, Fine tuning
Temperament Nine kinds
Sound generation Stereo PCM System
Polyphony 120 notes (max)
Sounds 30 sounds (10 x 3 banks)
Effects Brilliance,Reverb,Chorus (3 levels each)
Demo 30 (Sound demo song x 10, Piano Song x 20)
Metronome
Tempo, Time signature, Accent, sound and Volume controls
Pedal
Damper, Sostenute, Soft (*half-pedaling supported)
Connections
LINE OUT, MIDI (IN, OUT), Headphones×2, PEDAL, SPEAKER
Controls
Power, VOLUME, PIANO SONG, TRANSPOSE, FUNCTION, TOUCH, BRILLIANCE, REVERB, CHORUS, BANK, Sound × 10 , UP, DOWN, METRONOME
Amplification 22W× 2
Sperkers 10cm× 2
Power supply DC 19 V, AC adapter (included)
Power consumption 15 W
Dimensions (W× D× H)
1355 × 351 × 772 ~mm / 53.35 × 13.82 × 30.39 inches 1355 × 351 × 936 ~mm / 53.35 × 13.82 × 36.85 inches (with the key cover opened)
Weight 37 kg / 81.57 lbs. (including Stand)
Included accessories
Stand
AC adapter ( ) ,Power cord,
- Specifications and appearance are subject to change without notice for improvement.
Assembling the Stand
Warning
- At least one other person must help you assemble the stand.
Caution during assembly
In order to assemble the stand safely, please observe the following points.
Make sure that you have the correct part in the correct orientation, and perform the assembly in the order given.
Other cautions
Please check the following points after assembly.
- Loosened screws
The screws may loosen as time passes after assembly. You should periodically check whether any screws have become loose. If you feel that the stand vibrates excessively, it is possible that screws have come loose. If so, re-tighten them.
- When moving the digital piano to another location To move the assembled stand, remove the AC adapter cord from the stand, close the key cover, and then move it slowly with at least two people keeping it as level as possible.
Disassembly
If you need to disassemble the stand, do so by reversing the steps of the assembly procedure. After disassembly, keep the screws and other parts in a safe place so that they are not lost.

The LP-380 should always be laid down before disassembled.
Assembly procedure
You'll need a Phillips (+) screwdriver.
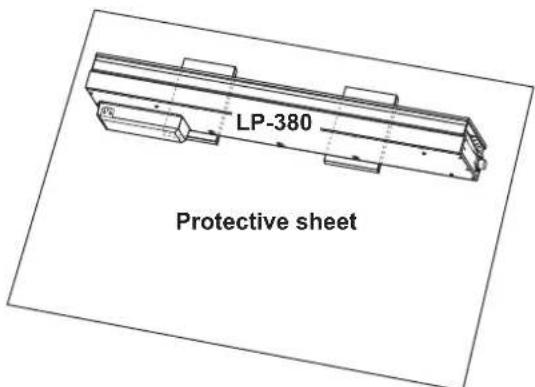
- Put the protective sheet, which had covered the LP-380, on a flat floor, and place the LP-380 on that sheet with its rear facing the floor.
In addition, place cloths or magazines so that you may easily put your hands under the LP-380 when assembling and raising the stand.
Ensure that the LP-380's key cover will not to open until the end of the assembly.
- Make sure that all of the following parts are available.

Screws (M6) x 6 pcs.
Screws (M4) x 8 pcs.
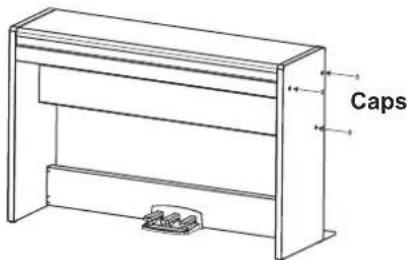
Caps x 6 pcs.
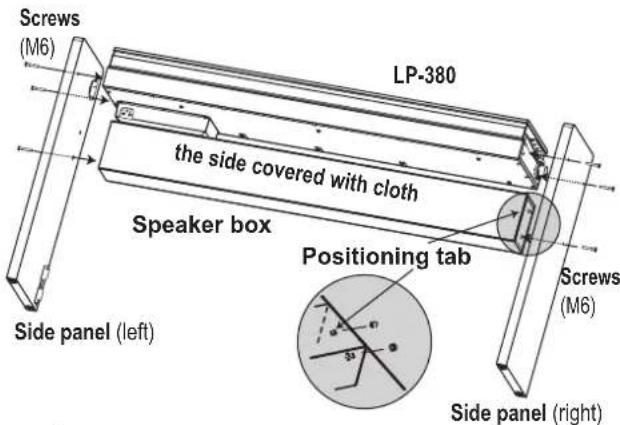
- Fasten the LP-380 and the speaker box to the right and left side panels using eight screws (M6).
Position the speaker box so that the speaker cord is on the left side. In this position, the speaker (the side covered with cloth) faces you.
First temporarily tighten the screws on the right side panel, and then temporarily tighten the screws on the left side panel.
- To temporarily tighten the screws is to tighten them leaving a clearance of about 2 mm.

Be careful not to pinch your fingers.
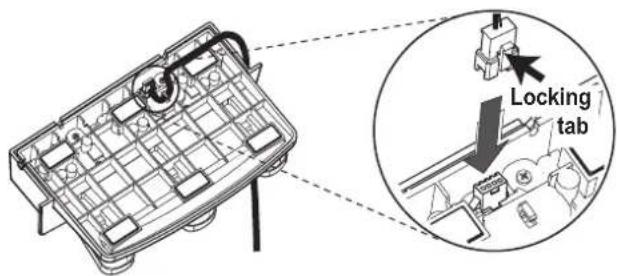
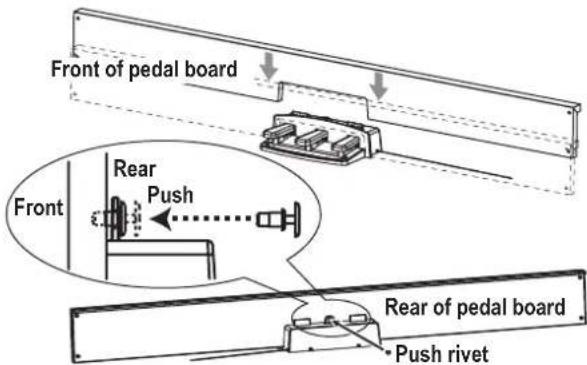
- Connect the attached pedal cord, observing the correct orientation, to the connector on the reverse side of the pedal unit, and then engage it with a slot in the pedal unit.
The pedal cord can be attached to or detached from the connector with its locking tab held down.
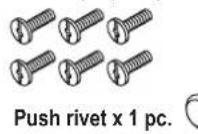
- Insert the pedal unit into the pedal board, and then fasten it by pressing a push rivet into the hole (above the cutout) at the rear of the pedal board.
After pressing it into there, lift the pedal board to check that the pedals do not drop.
The push rivet will prevent the pedal unit from falling out. Therefore, it cannot be fully fastened to the pedal board.
- Temporarily tighten the pedal board, with the pedal unit fastened, to the hardware inside the side panels of the stand, using four screws (M4).

-
Raise the assembled stand slowly with two people.
-
Make sure to attach the anti-tipping brackets behind both side panels. And the anti-tipping bracket fastened to the left of the code holder at this time. Joints between the side panels and the attached anti-tipping brackets should be even (with no level difference left).
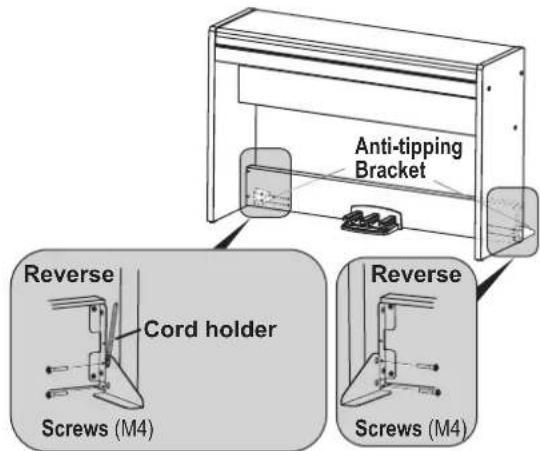
- Then, firmly tighten all the screws that are temporarily tightened in step 3 and 6.
When tightening the screws on the LP-380, adjust the up/down and front/rear positions on the left and right side panels so that they are equal.
-
Ensure that the stand has no gaps and is not tilted, and that all the screws are tightened firmly.
-
Put caps on the screw heads on the right and left side panels.
- Connect the pedal cord and the speaker cord to the connectors on the rear of the LP-380's connector box. When connecting the pedal cord and the speaker cord, observe the correct orientations of the connectors. The pedal cord or the speaker cord can be detached from the connector with its locking tab held down.
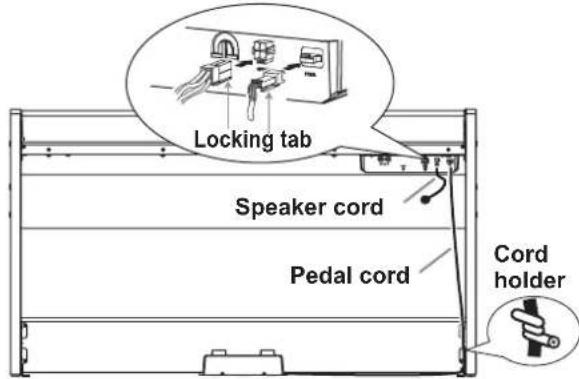
- Use the cord holder to hold the pedal cord.
After securing the cord with the cord holder, ensure that excess pressure is not applied to the connectors.
-
Connect the dedicated cord to the AC adapter. Then, plug the AC adapter into the DC IN connector, and wrap the cord around the cord hook of the piano. For details, refer to "Connecting the Power" on page 5.
-
Place the LP-380 where you intend to use it. Make sure to place it in a safe location where the floor is flat and stable.
When setting the digital piano in place, make sure that the stand does not rest on the AC adapter cable or pedal cable.
For greater safety, be sure to attach the anti-tipping brackets to the rear of the left and right side panels.
Check following assembly
Are any parts left over?
If any parts are left over, carefully review the assembly procedure to see where those parts should have been used.
Make sure that all screws are tight.
Précautions
Emplacement
16. Prises MIDI (IN, OUT):
Parametre Local (On/Off)
LINE OUT, MIDI (IN, OUT), Casque × 2 PEDAL, SPEAKER
Commands
Interrupteur d'alimentation, VOLUME, PIANO SONG, TRANSPOSE, FUNCTION, TOUCH, BRILLIANCE, REVERB, CHORUS, BANK, boutons de timbres × 10 , UP, DOWN, METRONOME
Amplification 22 W x 2
Included accessories Stander
16. Conectores MIDI (IN, OUT):
Dimensiones (Anch. x Prof. x Alt.)
1355× 351× 772mm
| Function... Transmitted | Received Remarks | |||
| Basic Channel | Default | 1 | 1 | |
| Changed | 1-16 | 1-16 | ||
| Mode | Default | 3 | ||
| Messages | X | X | ||
| Altered | ********** | |||
| Note Number | True Voice | 3-125 | 0-127 | Reception range differs depending on sound. |
| ********** | 0-127 | |||
| Velocity | Note On | O 9n, V=1-127 | O 9n, V=1-127 | |
| Note Off | X V=64 | X | ||
| After Touch | Key's | X | X | |
| Channel | X | O | ||
| Pitch Bend | X | O | ||
| Control Change | 0,32 | O | O | Bank Select (MSB, LSB) *1 |
| 1 | X | O | Modulation *1 | |
| 6 | X | O | Data Entry MSB *1 | |
| 38 | X | O | Data Entry LSB *1 | |
| 5 | X | O | Portamento Time *1 | |
| 65 | X | O | Portamento On/Off *1 | |
| 7 | O | O | Volume *1 | |
| 11 | X | O | Expression *1 | |
| 10 | X | O | Pan *1 | |
| 91,93 | X | O | Reverb Send, Chorus Send *1 | |
| 64,66,67 | O | O | Damper, Sostenuto, Soft *1 | |
| 71 | X | O | Resonance *1 | |
| 72,73 | X | O | EG Time (Release, Attack) *1 | |
| 74 | X | O | Brightness *1 | |
| 75,76,77,78 | X | O | Decay Time, Vibrato Rate, Depth, Delay *1 | |
| 100,101 | X | O | RPN (LSB, MSB) *1 | |
| 120 | X | O | All Sounds Off *1 | |
| 121 | O | O | Reset All Controllers *1 | |
| Program Change | True Number | O | O | *1 |
| ********** | X | |||
| System Exclusive | O | O | *2 | |
| System Common | Song Position | X | X | |
| Song Select | X | X | ||
| Tune Request | X | X | ||
| System Real Time | Clock | X | X | |
| Commands | X | X | ||
| Aux Measages | Local On/Off | X | O | *1 |
| All Notes Off | O | O (123-125) | *1 | |
| Active Sense | O | O | ||
| System Reset | X | X | ||
| Notes *1: Transmitted and received when the MIDI filter is disabled. *2: Includes Inquiry and GM Mode On. Received when GM Mode On, but all GM sounds are unsupported. | ||||
Mode 1: Omni On, Poly
Mode 2: Omni On, Mono
O: Yes
Mode 3: Omni Off, Poly
Mode 4: Omni Off, Mono
X:No