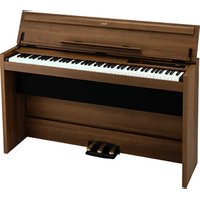
Concert C-1500 - Piano KORG - Free user manual and instructions
Find the device manual for free Concert C-1500 KORG in PDF.

User questions about Concert C-1500 KORG
0 question about this device. Answer the ones you know or ask your own.
Ask a new question about this device
Download the instructions for your Piano in PDF format for free! Find your manual Concert C-1500 - KORG and take your electronic device back in hand. On this page are published all the documents necessary for the use of your device. Concert C-1500 by KORG.
USER MANUAL Concert C-1500 KORG
Thank you for purchasing the Korg Digital Piano Concert C-1500. To ensure long, trouble-free operation, please read this manual carefully.
Contents
IMPORTANT
SAFETY INSTRUCTIONS ---- 2
Main features 3
Specifications 3
-
Preparations for playing---- 4
-
Listening to the demo songs ---- 5
-
Selecting and playing different sounds ---- 5
-
Using the pedals ---- 6
-
Various functions ---- 6
6.MIDI 7
- Troubleshooting 8
Assembling the ST-1500 ---- 9
MIDI Implementation Chart ----11
INSTRUCTIONS PERTAINING TO A RISK OF FIRE, ELECTRIC SHOCK, OR INJURY TO PERSONS
IMPORTANT SAFETY INSTRUCTIONS
WARNING—When using electric products, basic precautions should always be followed, including the following:
1) Read all the instructions before using the product.
2) Do not use this product near water—for example, near a bathtub, washbowl, kitchen sink, in a wet basement, or near a swimming pool, or the like.
3) This product should be used only with a cart or stand that is recommended by the manufacturer.
4) This product, either alone or in combination with an amplifier and headphones or speakers, may be capable of producing sound levels that could cause permanent hearing loss. Do not operate for a long period of time at a high volume level or at a level that is uncomfortable. If you experience any hearing loss or ringing in the ears, you should consult an audiologist.
5) The product should be located so that its location or position does not interfere with its proper ventilation.
6) The product should be located away from heat sources such as radiators, heat registers, or other products that produce heat.
7) The product should be connected to a power supply only of the type described in the operating instructions or as marked on the product.
8) This product may be equipped with a polarized line plug (one blade wider than the other). This is a safety feature. If you are unable to insert the plug into the outlet, contact an electrician to replace your obsolete outlet. Do not defeat the safety purpose of the plug. (for U.S.A. and Canada)
9) The power-supply cord of the product should be unplugged from the outlet when left unused for a long period of time.
10) Care should be taken so that objects do not fall and liquids are not spilled into the enclosure through openings.
11) The product should be serviced by qualified service personnel when:
a) The power-supply cord or the plug has been damaged; or
b) Objects have fallen, or liquid has been spilled onto the product; or
c) The product has been exposed to rain; or
d) The product does not appear to operate normally or exhibits a marked change in performance; or
e) The product has been dropped, or the enclosure damaged.
12) Do not attempt to service the product beyond that described in the user-maintenance instructions. All other servicing should be referred to qualified service personnel.
SAVE THESE INSTRUCTIONS
WARNING:
TO REDUCE THE RISK OF FIRE OR ELECTRIC SHOCK DO NOT EXPOSE THIS PRODUCT TO RAIN OR MOISTURE.
text_image
CAUTION RISK OF ELECTRIC SHOCK DO NOT OPEN AVERTISSEMENT: RISQUE DE CHOC ÉLECTRIQUE—NE PAS OUVRIR. 注意 感電の恐れあり、キャビネットをあけるな CAUTION: TO REDUCE THE RISK OF ELECTRIC SHOCK, DO NOT REMOVE COVER (OR BACK). NO USER-SERVICEABLE PARTS INSIDE. REFER SERVICING TO QUALIFIED SERVICE PERSONNEL.
The lightning flash with arrowhead symbol, within an equilateral triangle, is intended to alert the user to the presence of uninsulated "dangerous voltage" within the product's enclosure that may be of sufficient magnitude to constitute a risk of electric shock to persons.

The exclamation point within an equilateral triangle is intended to alert the user to the presence of important operating and maintenance (servicing) instructions in the literature accompanying the product.
CAUTION: TO PREVENT ELECTRIC SHOCK, MATCH WIDE BLADE OF PLUG TO WIDE SLOT, FULLY INSERT(for U.S.A. and Canada)
ATTENTION: POUR ÉVITER LES CHOC ÉLECTRIQUES, INTRODUIRE LA LAME LA PLUS LARGE DE LA FICHE DANS LA BORNE CORRESPONDANTE DE LA PRISE ET POUSSER JUSQU' AU FOND. (for Canada)
THE FCC REGULATION WARNING (for U.S.A.)
This equipment has been tested and found to comply with the limits for a Class B digital device, pursuant to Part 15 of the FCC Rules. These limits are designed to provide reasonable protection against harmful interference in a residential installation. This equipment generates, uses, and can radiate radio frequency energy and, if not installed and used in accordance with the instructions, may cause harmful interference to radio communications. However, there is no guarantee that interference will not occur in a particular installation. If this equipment does cause harmful interference to radio or television reception, which can be determined by turning the equipment off and on, the user is encouraged to try to correct the interference by one or more of the following measures:
- Reorient or relocate the receiving antenna.
- Increase the separation between the equipment and receiver.
- Connect the equipment into an outlet on a circuit different from that to which the receiver is connected.
- Consult the dealer or an experienced radio/TV technician for help.
Unauthorized changes or modification to this system can void the user's authority to operate this equipment.
CE mark for European Harmonized Standards
CE mark which is attached to our company's products of AC mains operated apparatus until December 31, 1996 means it conforms to EMC Directive (89/336/EEC) and CE mark Directive (93/68/EEC).
And, CE mark which is attached after January 1, 1997 means it conforms to EMC Directive (89/336/EEC), CE mark Directive (93/68/EEC) and Low Voltage Directive (73/23/EEC).
Also, CE mark which is attached to our company's products of Battery operated apparatus means it conforms to EMC Directive (89/336/EEC) and CE mark Directive (93/68/EEC).
IMPORTANT NOTICE FOR THE UNITED KINGDOM
As the colours of the wires in the mains lead of this apparatus may not correspond with the coloured markings identifying the terminals in your plug, proceed as follows:
- the wire which is coloured blue must be connected to the terminal which is marked with the letter N or coloured black.
- the wire which is coloured brown must be connected to the terminal which is marked with the letter L or coloured red.
- Do not connect the wire to the earth terminal of a three-pin plug.
Main features
A wide variety of sounds
Eight different expressive and high-quality sounds, including a concert grand piano, are produced by Korg's proprietary HI (Hyper Integrated) synthesis system.
Pedal effects (
p.6)
The C-1500 has the same three pedals as on an acoustic piano: damper, sostenuto, and soft.
The damper pedal and soft pedal allow half-pedaling techniques, where the amount of effect can be adjusted by the depth with which you press the pedal.
Touch control function ( p.6)
You can choose from three different settings to adjust how the sound will respond to your keyboard playing dynamics.
Adjustable pitch (
p.6,7)
The Transpose function lets you change the pitch of the piano, and the Pitch Control function allows you to make fine adjustments in the tuning.
MIDI capability (
p.7)
The C-1500 supports MIDI, the standard that allows musical data to be transferred between musical instruments and computers. MIDI allows two or more devices to control or be controlled by each other, and also allows you to use the C-1500 as a 16-part multi-timbral tone generator.
Consideration for others when playing your piano
Please remember to take others into consideration as you enjoy playing music. Depending on the time of day, it may be appropriate to adjust the volume or to use headphones.
Even when using headphones or when playing at a low volume, please remember that the keyboard mechanism will still produce a slight amount of audible sound.
Specifications
Keyboard 88 note (A0–C8)
Sounds 8 sounds
Piano 1, Piano 2, Electric piano 1, Electric piano 2, Harpsichord, Vibraphone, Organ, Strings
Polyphony 64 notes / 32 notes (stereo)
Controls ---- Power switch, Master Volume slider, Function switch
Pedals ---- Damper*, Soft*, Sostenuto (*: supports half-pedaling)
Connectors ---- Phones × 2, MIDI (IN, OUT), Pedal, AC inlet
Main amp 15W × 2
Speakers 12cm × 2
Power supply ---- AC Local Voltage
Power consumption - 40W
Dimensions ---- 1379(W)x432(D)x798.5(H)mm
Weight (with stand) -- 35.5kg
Included items ---- AC power cable, special stand
* Specifications and appearance are subject to change without notice for product improvement.
• Sound Processed with INFINITY™
Conventions in this manual
Switches
Switches on this instrument are enclosed in [square brackets].
:This symbol indicates a caution.
(■ p.■): This indicates a reference page.
1. Preparations for playing
1. Plug in the power cable.
○ Plug the power cable into an outlet.
Make sure that the AC outlet is the correct voltage for your piano.
○ Plug the connector into the socket on the bottom of the instrument (p.10).
text_image
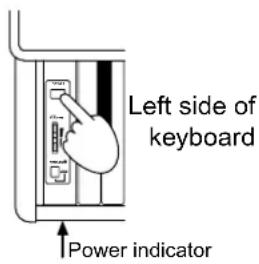
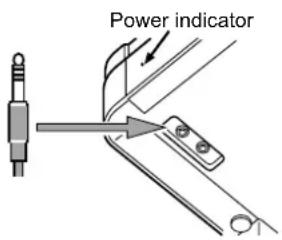
Left side of keyboard Power indicator2. Turn on the power.
Press the [POWER] switch to turn on the power. When the power is turned on, the power indicator located at the left side of the piano will light.
To turn off the power, press the [POWER] switch once again. When the power is turned off, the power indicator located at the left side of the piano will turn off.
text_image
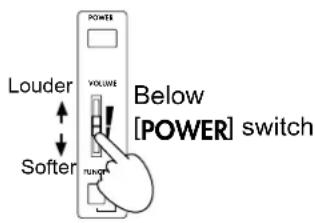
POWERS Louder VOLUME Softer Below [POWER] switch3. Adjust the volume.
○ Raise the [VOLUME] slider to the middle position.
The volume will increase as you move the slider up, and will decrease as you move the slider down. At the "0" position, there will be no sound.
While playing the instrument, adjust the volume to an appropriate level.
The [VOLUME] slider controls the volume of the built-in speakers and the output of the headphone jacks.
text_image
Power indicator■ When using headphones
If headphones are plugged in, no sound will be output from the built-in speakers. Use headphones when you do not wish to be heard by those around you, such as when playing at night. Since two headphone jacks are provided, you can enjoy playing together with another person.
Insert the plug (1/4" phone plug) of your stereo headphones into the headphone jack located at the left side of the bottom panel of the instrument.
If your headphones have a mini' phone jack conversion plug, grasp the conversion plug when plugging in or unplugging the headphones.

When using headphones, protect your hearing by avoiding extended listening at high volumes.

Do not use the headphone jacks for any purpose other than connecting headphones.
natural_image
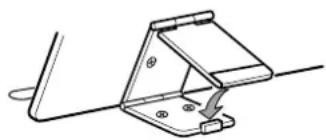
Technical line drawing of a mechanical clamp or bracket assembly (no text or symbols)■ When using the music stand
○ Raise the music stand, and use the two stops located on the back panel to prevent it from falling over.
2. Listening to the demo songs
text_image
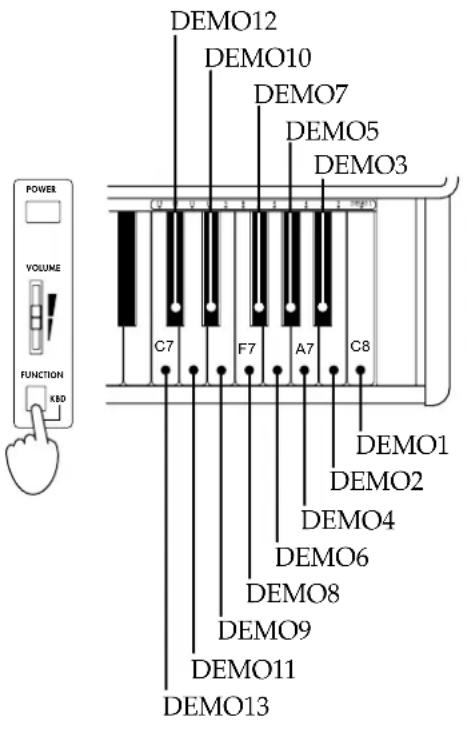
POWER VOLUME FUNCTION K80 DEMO12 DEMO10 DEMO7 DEMO5 DEMO3 C7 F7 A7 C8 DEMO1 DEMO2 DEMO4 DEMO6 DEMO8 DEMO9 DEMO11 DEMO13The C-1500 contains 13 demo songs.
Listen to the demo songs to experience the C-1500's rich sounds and expressive potential.
While holding down the [FUNCTION] switch located below the [VOLUME] slider, press one of the keys between C7 and C8 at the right end of the keyboard. One of the following demo songs will begin playing, according to the key that you pressed.
Beginning at the selected song, the demo songs will play consecutively until you stop playback. To stop playback, press the [FUNCTION] switch.
Demo1: F.Chopin/Fantasy-Impromptu Op.66
Demo2: KORG Original/Harmony of Love
Demo3: KORG Original/The Harp of Wind
Demo4: KORG Original/The Garden
Demo5: J.S.Bach/Italian Concert BWV971
Demo6: N.Rimsky-Korsakov/The Flight of The Bumble Bee
Demo7: F. Mendelssohn/Wedding March
Demo8: J.S.Bach/Air on the G string
Demo9: L.v.Beethoven/For Elise
Demo10: W.A.Mozart/Sonata K.331
Demo11: F.Chopin/Etude Op.10-3
Demo12: F.Chopin/Valse No.6 D b-major Op.64-1
Demo13: C. Debussy/"Arabesque"No.1
3. Selecting and playing different sounds
text_image
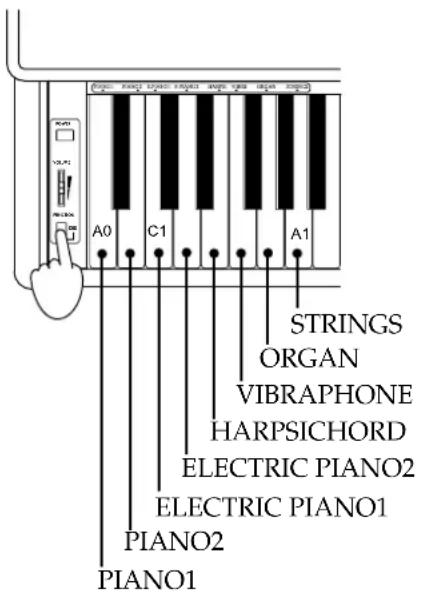
A0 C1 A1 STRINGS ORGAN VIBRAPHONE HARPSICHORD ELECTRIC PIANO2 ELECTRIC PIANO1 PIANO2 PIANO1Eight different sounds are built in to the C-1500.
Hold down the [FUNCTION] switch located below the [VOLUME] slider, and press one of the white keys between A0 to A1, located at the left end of the keyboard. The sound corresponding to the key you pressed will be selected.
When the power is turned on, this setting will return to the default sound (Piano 1).
Piano 1: A deep and rich stereo grand piano with sparkling reverberation
Piano 2: A clear and bright grand piano
Electric piano 1: A light and transparent electric piano sound
Electric piano 2: A tight electric piano sound with a sense of attack
Harpsichord: A delicate harpsichord with a classical flavor
Vibraphone: A mellow vibraphone sound
Organ: A solemn pipe organ sound
Strings: The sound of an ensemble with violin and other string instruments
4. Using the pedals

text_image
Soft pedal Damper pedal Sostenuto pedalThis instrument has three pedals: damper, sostenuto, and soft. They can be used to make your performance more expressive.
Damper pedal
While you continue pressing the pedal, the sound will be sustained, and a rich resonance will be produced. The depth at which you press the pedal will adjust the degree of the damper effect (Half-damper effect).
Sostenuto pedal
The damper effect will be applied only to notes which were already held while the pedal was pressed, so that these notes will continue sustaining while the pedal remains pressed. The damper effect will not apply to new notes that are newly played while the sostenuto pedal is already pressed.
Soft pedal
The sound will be softer and more mellow while you press the pedal. The depth at which you press the pedal will adjust the softness of the sound (half-pedal effect).
5. Various functions
text_image
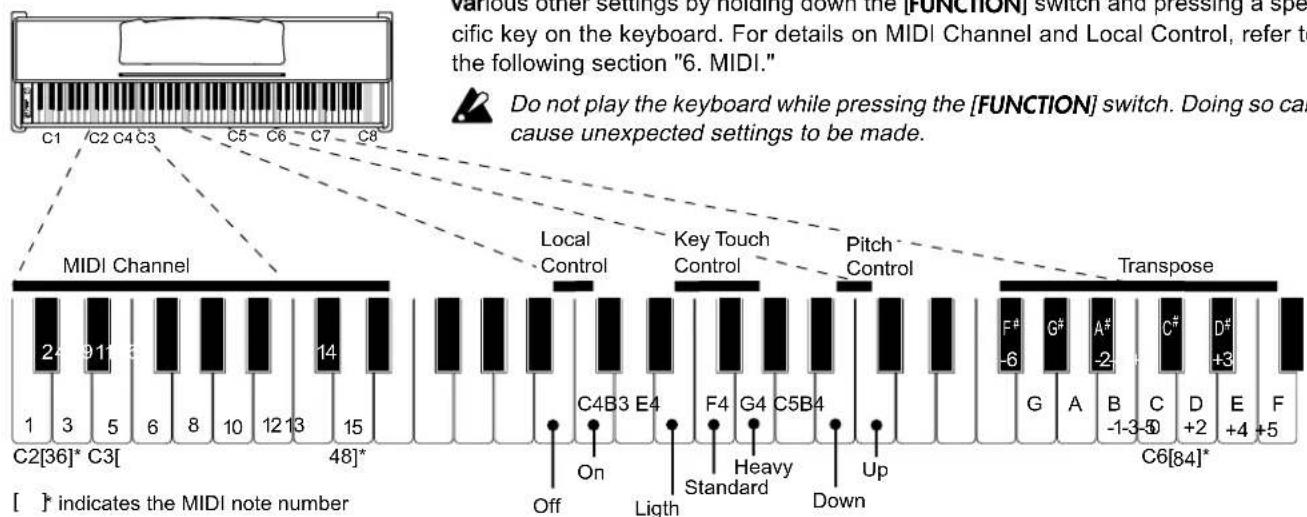
C1 C2 C3 C4 C5 C6 C7 C8 MIDI Channel Local Control Key Touch Control Pitch Control Transpose 2 91 1 3 5 6 8 10 12 13 15 C2[36]* C3[ 48]* Off On Ligth F4 G4 C5B4 Up F# G# A# C# D# E F [ ] indicates the MIDI note number G A B -1-3-50 -1-3-50 +2 +4 +5 C6[84]*KEYBOARD touch control
text_image
Strong (ffr) Light Note loudness Standard Heavy Soft (ffr) Playing strength Soft StrongPitch control
You can make fine adjustments to the pitch. This allows you to precisely match the pitch when playing with other instruments.
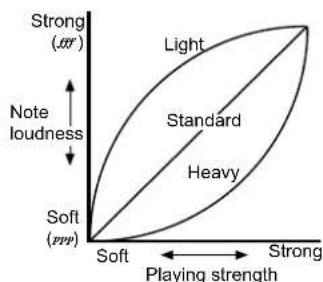
KEYBOARD touch control function
You can use the white keys E4 through G4 to specify how your keyboard playing dynamics will affect the volume of the sound (see diagram at left).
If you want to be able to produce loud notes by playing gently, hold down the [FUNCTION] switch and press E4 (light).
If you do not want loud notes to be produced unless you play strongly, hold down the [FUNCTION] switch and press G4 (heavy).
If you hold down the [FUNCTION] switch and press F4 (standard), the volume will respond to your playing dynamics like on a conventional piano.
When the power is turned on, the standard setting is selected as the default.
Pitch control function (Tuning)
You can use the B4 and C5 keys to adjust the pitch of the C-1500 in a range of 452.5 Hz to 427.5 Hz in 0.5 Hz steps.
Each time you press B4 while holding down the [FUNCTION] switch, the pitch will fall 0.5 Hz. Each time you press C5 while holding down the [FUNCTION] switch, the pitch will rise 0.5 Hz. If you simultaneously press B4 and C5 while holding down the [FUNCTION] switch, the pitch will return to 440 Hz.
When the power is turned on, the pitch will be set to 440 Hz (A4) as the default.
flowchart
graph TD
    A["F6 note\n+5 semitones. The F6 pitch\nwill be sounded by the\nC6 key."] --> B["C6 note\n+/-0. Normal pitch."]
    B --> C["F#5 note\n-6 semitones. The F#6 pitch\nwill be sounded by the\nC6 key."]
    D["POWER\nVOLUME\nFUNCTION\nKBD"] --> E["-3 semitones\nA5\nC6\nF6\n+3 semitones\nA6"]
    E --> F["D#6"]
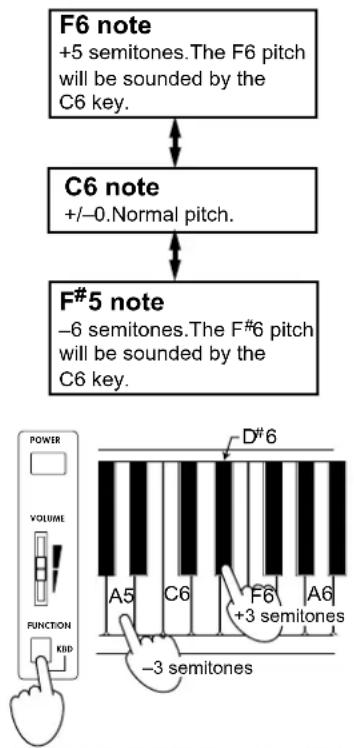
Transpose function
In some cases, a song may be written in a difficult key (e.g., many black keys), or you may wish to shift the pitch to match another instrument or vocalist. In such cases, you can transpose (shift the pitch) so that you can use easier fingering, or to use the same familiar fingering to play at a different pitch. This is called the Transpose function. You can transpose over a range of 11 semitones.
For example if you transpose upward by one semitone, playing the notes shown at the lower left will produce the pitches shown at the right.

text_image
Musical notation showing a treble clef and a right-handled musical staff with notes and restsWhile holding down the [FUNCTION] key, press a key in the range of F#5 to B5, or C#6 to F6 to transpose the pitch accordingly.
If you wish to produce a pitch that is lower than the key you play, for example if you wish to produce the A5 pitch (-3 semitones) when you play the C6 key, hold down the [FUNCTION] switch and press A5.
If you wish to produce a pitch that is higher than the key you play, for example if you wish to produce the D#6 (+3 semitones) when you play the C6 key, hold down the [FUNCTION] switch and press D#6.
Holding down the [FUNCTION] switch and pressing C6 will defeat Transpose (+/-0). With the default settings when the power is turned on, there will be no transposition.
6. MIDI
text_image
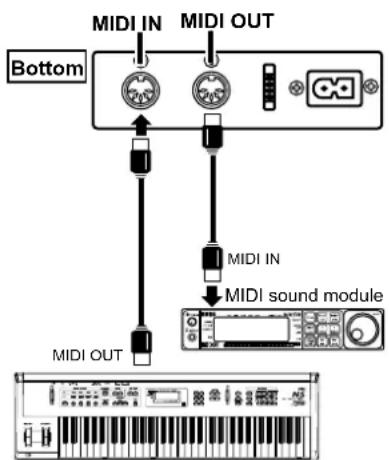
MIDI IN MIDI OUT Bottom MIDI IN MIDI sound module MIDI OUTMIDI keyboard
MIDI channel
If you wish to use the MIDI connectors to play another MIDI device from the keyboard of the C-1500, or to use another MIDI keyboard or sequencer (automatic playback device) to control the C-1500 and play its built-in sounds, you will need to set the C-1500 to the same channel as the connected device.
What is MIDI?
MIDI (Musical Instrument Digital Interface) is a world-wide standard that allows a variety of MIDI data to be exchanged between electronic musical instruments and computers, etc.
By playing the C-1500, you can trigger other MIDI instruments that are connected via MIDI. Sound selections and damper pedal operations etc. that you perform on the C-1500 will also control the connected MIDI device. You can also control the C-1500 from another MIDI keyboard or sequencer (automatic playback device), causing the C-1500's internal tone generator to sound. By combining two or more MIDI devices, you can enjoy additional sounds with the C-1500.
This section will explain how MIDI can be used in ways relating to the C-1500. If you would like to learn more about MIDI, please refer to one of the many introductory books on MIDI that are commercially available.
MIDI connections
Special MIDI cables are used to transfer MIDI data. These cables are connected between the MIDI connectors of the C-1500 and the MIDI connectors of the external MIDI device to (or from) which you want to transfer data. There are two types of MIDI connector.
MIDI OUT...MIDI messages are transmitted from this connector. The MIDI messages transmitted when you play the keyboard of the C-1500 can be transmitted to an external MIDI device to control it. Use a MIDI cable to connect the MIDI OUT connector of the C-1500 to the MIDI IN connector of the external MIDI device.
MIDI IN...MIDI messages are received at this connector.
This connector can be used to play the C-1500's sounds from an external MIDI device (MIDI keyboard or sequencer etc.). Use a MIDI cable to connect the MIDI IN of the C-1500 to the MIDI OUT of the external MIDI device.
Changing the MIDI channel
You can use the C2 through D#3 keys to change the MIDI channel (1...16) on which MIDI data is transmitted from the MIDI OUT and MIDI IN connectors located on the bottom of the C-1500.
For example if you want to use the C-1500's keyboard to play (control) an external MIDI device that is connected to the MIDI OUT jack and which is set to MIDI channel 2, you need to set the C-1500 to MIDI channel 2 by holding down the [FUNCTION] switch and pressing the D2 key.
When the power is turned on, the MIDI channel will be 1 by default.
Local control
Turn this off in the following situations.
- When you do not want the C-1500 to sound when you play its keyboard, but want only a connected MIDI tone generator to sound.
- When you are using a sequencer that is set to echo back (re-transmit) the data it receives, and wish to prevent notes from being sounded in duplicate by the C-1500.
C-1500 Program List
| PC# sound | |
| 0 Piano1 | |
| 1 Piano2 | |
| 2 Electric piano1 | |
| 3 Electric piano2 | |
| 4 Harps chord | |
| 5 Vibraphone | |
| 6 Organ | |
| 7 Strings | |
This instrument will switch sounds when it receives MIDI program numbers 0–7. If MIDI program numbers above 8 are received from the external MIDI device, the C-1500 will not switch sounds.
Changing the Local Control setting
Use the C4 and B3 keys to switch Local Control on/off.
If you do not want the C-1500 to produce sound when its keyboard is played (i.e., to only transmit and receive MIDI data), hold down the [FUNCTION] switch and press B3 to turn Local Off. If you hold down the [FUNCTION] switch and press C4, you will turn Local On, and the C-1500 will sound normally when you play its keyboard. When the power is turned on, this setting will be Local On (default).
If you turn Local Control off, playing the keyboard will normally produce no sound.
Transmitting and receiving Program Changes
The program numbers of a connected MIDI device can be selected from the C-1500, or you can use a connected MIDI device to select program numbers on the C-1500. When you select a sound on the C-1500 (p.5 "3. Selecting and playing different sounds"), MIDI program change numbers (PC#) 0...7 will be transmitted, as shown in the table at left. When a program change number (PC#) is received from an external device, the corresponding sound will be selected for the C-1500 timbre of that MIDI channel. At this time, no program change will occur for the sound that is played from the keyboard.
Using the C-1500 as a multi-timbral tone generator
The C-1500 will function as a 16-part multi-timbral tone generator that can be controlled and played from an external MIDI device. If you transmit performance data together with program change messages from a connected sequencer etc., the C-1500 will play using its sounds that correspond to those program numbers. By using the C-1500 as a multi-timbral tone generator you can produce performances similar to demo number 2 (p.5)
7. Troubleshooting
| If you suspect a malfunction, please check the following points first. If this does not resolve the problem, please contact your dealer or a Korg service center. | |
| Power does not turn on | · Is the power cable connected to an appropriate AC outlet? ...... p.4 · Is the power cable connector plugged into the socket on the bottom of the C-1500? ...... p.10 · Is the power switch turned on? ...... p.4 |
| No sound from the speakers | · Is the [ VOLUME] slider raised? ...... p.4 · Have headphones been plugged in? ...... p.4 · Was the Local Control setting turned off? ...... p.8 |
| Notes are interrupted | · The sounds of the C-1500 are produced by sampling (recording) the sounds of actual instruments, and processing or analyzing them. Some sounds play one piece of sampled data when a note is played (mono), while other sounds play two pieces (stereo). The PIANO 1 sound is stereo, so the maximum number of notes that can be played simultaneously (i.e., the polyphony) will be 32 notes, even if the damper pedal is pressed. For other sounds, the polyphony is 64 notes. |
| The pitch or tone of piano sounds is wrong in certain key ranges | · The piano sounds of the C-1500 are designed to simulate the sounds of a real piano as accurately as possible. For this reason, it may sound as though there is something unusual about the pitch or tone, such as an emphasis in the overtones of certain ranges. This is not a malfunction. |
| An external device does not respond to transmitted MIDI data | · Make sure that MIDI cable connections are correct. · Make sure that the C-1500 is transmitting MIDI data on the channel that the receiving device is set to receive...... p.7 |
| Pedal effects do not apply correctly | · Has the pedal connector been disconnected? ...... p.10 |
Assembling the ST-1500
Caution
Use two or more people to assemble the stand.
When placing the piano on the stand, be careful not to pinch your hand. Be sure that the correct parts are assembled in the correct orientation, and follow the steps in the order that they are given.
If you apply weight to the front edge of the piano before tightening the screws, the piano may fall down.

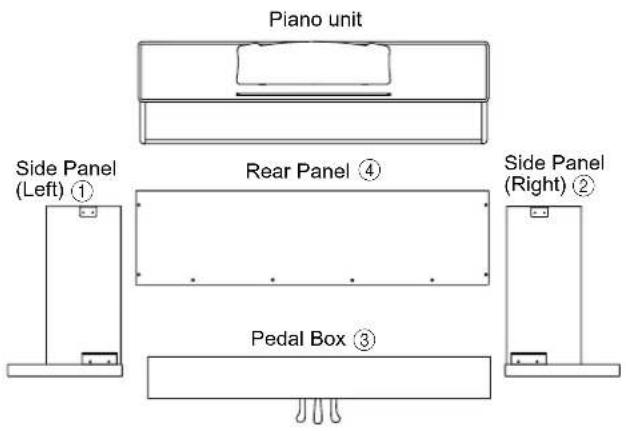
1. Open the packing carton and remove the contents.
Check that all of the following items are present. You will need a Phillips head screw driver to tighten the screws.
text_image
Piano unit Side Panel (Left) ① Rear Panel ④ Side Panel (Right) ② Pedal Box ③In the plastic bag
- Long screws ⑤ × 4 (M6 x 16)
- Adjuster ⑥
- Short screws ⑦ × 8 (M3.5 × 16)


- Adjustable bolts ⑧ × 2
- Cable holder ⑨ × 2


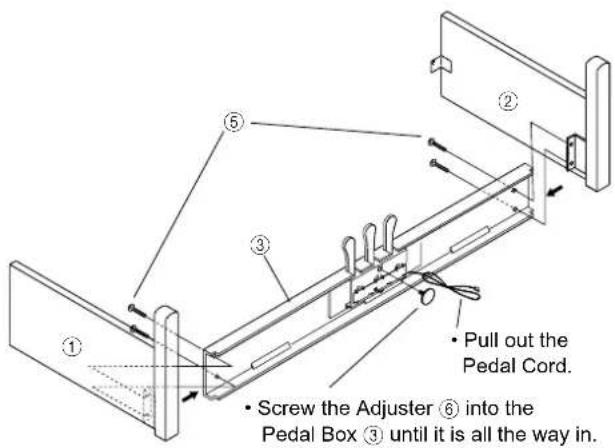
- Attach the side panel (left) ① and side panel (right) ② to the pedal box ③, and use four long screws ⑤ to fasten them.
text_image
① ② ③ ⑤ • Pull out the Pedal Cord. • Screw the Adjuster ⑥ into the Pedal Box ③ until it is all the way in.3. Attach the back panel ④.
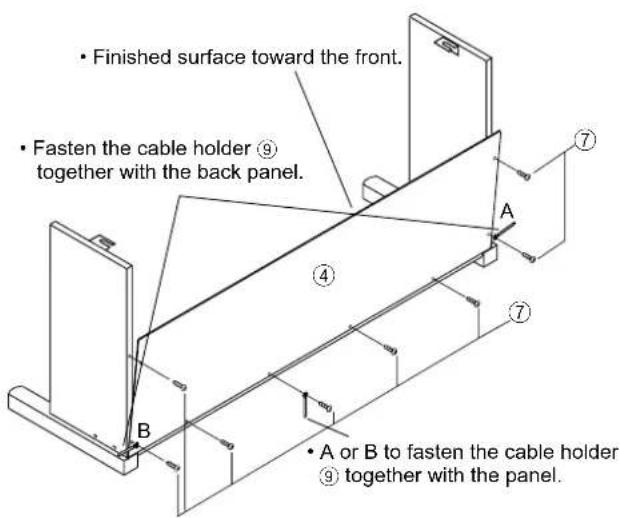
First, use screws ⑦ to fasten the bottom of the back panel ④ (at three locations). Then use screws ⑦ to fasten the side panels (two locations on each side). At this time, use one screw ⑦ (either A or B as appropriate for the location of installation) to fasten the cable holder ⑨ together with the panel, so that it can be used to hold the power supply cable. To hold the pedal cable, use one screw ⑦ to fasten the cable holder ⑨ together with the panel.
text_image
Finished surface toward the front. Fasten the cable holder ⑨ together with the back panel. A B A or B to fasten the cable holder ⑨ together with the panel.●At this time, make sure that there are no gaps in the stand, and that it does not tilt.
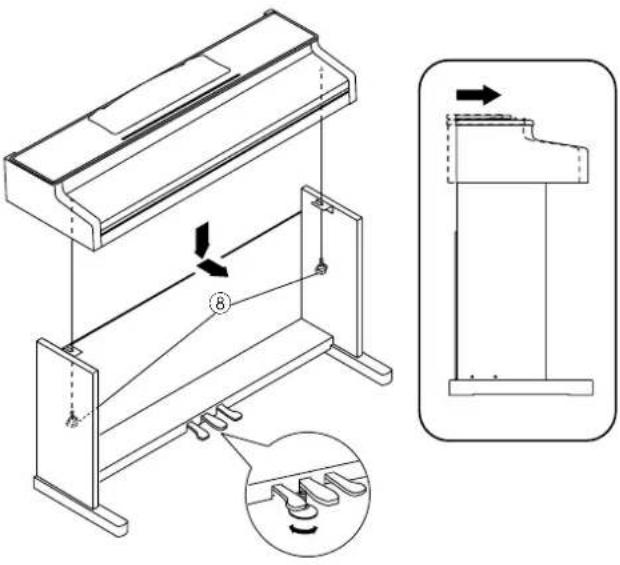
Place the piano on the left and right panels of the stand. Screw two adjustable bolts ⑧ part of the way into the holes on the bottom of the piano. Lightly lift the piano from behind, and slide it forward. Tighten the two adjustable bolts ⑧ to fasten the piano to the stand.
text_image
Technical diagram of a mechanical assembly with labeled components and directional arrows indicating motion or force
Rotate the adjuster so that it firmly contacts the floor. If the adjuster is not in firm contact with the floor, the pedal may wobble and cause malfunctions.
5. Connect the pedal cable, and fasten them. Connect the power cable, and fasten them.
- Use the cable holder to fasten the power supply cable.
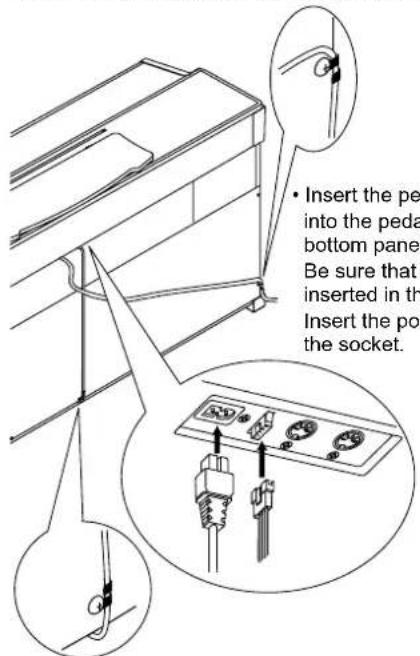
text_image
• Insert the pe into the peda bottom pane Be sure that inserted in th Insert the po the socket.- Use the cable holder to fasten the power cable.
Check after assembly
□Are any parts left over?
If any parts are left over, check the diagrams to see where they should be used.
□Make sure that all screws are tight.
●Before transporting or disassembling the stand and piano, read the cautions in the owner's manual for the piano.

Caution
Caution when transporting the instrument
Remove the piano from its stand, and transport them separately. After transportation, refer to these instructions and re-assemble the piano and stand.
Loosened screws
After assembly, the various screws of the stand may loosen after prolonged use, causing the stand to wobble. If this occurs, re-tighten the screws.
Disassembly
If you need to packup the C-1500, reverse the order by which the piano was attached to the stand and the stand was assembled. After disassembly, save the screws and other parts so that no parts are lost.
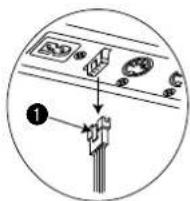
To disconnect the pedal cord, pull on the cord connector while pressing the little tab ① on the connector. Do not exert too much force on the cord, since it could break.
| Function ... | Transmitted | Recognized | Remarks | |
| Basic channel Changed 1 - 16 1 - 16 | 1 | 1 | ||
| Mode Messages × Altered | × | |||
| Note 15- 113 number : True voice | 0 - 127 | 21 - 108 | ||
| Velocity Note ON Note OFF | O 9n, V=1 - 127 × | O 9n, V=1 - 127 × | ||
| After Touch Polyphonic Channel | × × | × × | ||
| Pitch Bender | × | × | ||
| Control Change | 7 11× 64 66 67 | × O O O O | O Volume Expression O Sostenuto Pedal O | Damper Pedal * Soft Pedal * |
| Program Change : True# | 0 - 7********** | 0 - 70 - 7 | ||
| System Exclusive | O | O | Device Inquiry | |
| : Song Pos System Common : Song Sel : Tune | × × × | × × × | ||
| System Realtime : Clock : Commands | O × | × × | ||
| Aux Messages : Local ON/OFF : All Notes OFF : Active Sense : Reset | × O O × | O O 123-127 O × | ||
| Notes | * Half-pedal output value (0, 38, 74, 127) | |||
Mode 1: OMNI ON, POLY Mode 2: OMNI ON, MONO O : Yes
Mode 3: OMNI OFF, POLY Mode 4: OMNI OFF, MONO × : No
NOTICE
KORG products are manufactured under strict specifications and voltages required by each country. These products are warranted by the KORG distributor only in each country. Any KORG product not sold with a warranty card or carrying a serial number disqualifies the product sold from the manufacturer's/distributor's warranty and liability. This requirement is for your own protection and safety.