
Concert C-6500 - Piano KORG - Free user manual and instructions
Find the device manual for free Concert C-6500 KORG in PDF.


| Product Type | Digital Piano |
| Number of Keys | 88 |
| Key Action | Weighted Hammer Action (RH3) |
| Touch Sensitivity | 3 levels + Fixed |
| Polyphony | 120 notes |
| Sound Engine | PCM Stereo Sampling |
| Number of Sounds | 30+ internal sounds |
| Effects | Reverb, Chorus, Brilliance |
| Pedals | 3 (Damper, Soft, Sostenuto) |
| Connectivity | USB to Host, MIDI In/Out, Audio In/Out, 2 Headphones |
| Speakers | 2 x 30W |
| Power Supply | AC adapter (12V, 2A) |
| Dimensions (W x D x H) | 1360 x 350 x 780 mm |
| Weight | 22 kg |
| Accessories Included | Music Rest, AC Adapter, Pedal Unit, User Manual |
| Maintenance | Wipe with a dry, soft cloth; avoid liquids. |
| Reparability | Contact authorized Korg service centers for repairs and spare parts. |
Frequently Asked Questions - Concert C-6500 KORG
User questions about Concert C-6500 KORG
0 question about this device. Answer the ones you know or ask your own.
Ask a new question about this device
Download the instructions for your Piano in PDF format for free! Find your manual Concert C-6500 - KORG and take your electronic device back in hand. On this page are published all the documents necessary for the use of your device. Concert C-6500 by KORG.
USER MANUAL Concert C-6500 KORG
natural_image
Musical notation symbols including treble clef, eighth note, and fourteenth notes (no text or labels)C-6500

natural_image
Musical notation symbols including treble clef, eighth notes, and quarter notes on black background (no text or labels)Thank you for purchasing the Korg Digital Piano Concert C-6500. To ensure long, trouble-free operation, please read this manual carefully.
Owner's Manual
Table of contents
Main features .... 4
Parts of the C-6500 and their function .... 4
Switch and key functions 6
-
Sound selector switches....6
-
Recorder section....6
-
Keyboard 6
Getting ready to play 7
-
Before you start playing 7
-
Using headphones with the C-6500 7
-
Using the music stand....7
Listening to the demo songs....8
-
To listen to all the demo songs 8
-
To listen to an individual demo song 8
-
To pause the Demo playback 9
-
Practicing along with a demo song ..... 9
-
Adjusting the tempo of the demo playback .... 9
Playing the C-6500....10
-
Selecting sounds 10
-
Adding effects to the sound 12
-
Using the pedals 12
-
Playing along with the metronome 13
-
Selecting the Touch Response Curve ...... 14
-
Changing the key (Transposing) 15
-
Making fine adjustments to the pitch.... 15
-
Selecting a temperament 16
Recording and playing-back your performance .... 17
-
Recording your performance.... 17
-
Listening to a song you recorded.... 18
-
Erasing parts.... 18
Connecting to other devices 19
-
Connections with a synthesizer, or audio system .... 19
-
Connections with MIDI devices ..... 19
Troubleshooting 23
Specifications....23
Assembling the stand (STD-3000) 24
Cautions for assembly.... 24
Assembly procedure 24
Other cautions 26
Removing the wire 26
MIDI Implementation Chart.... 27
KORG
IMPORTANT SAFETY INSTRUCTIONS
- Read these instructions.
- Keep these instructions.
- Heed all warnings.
- Follow all instructions.
- Do not use this apparatus near water.
- No objects filled with liquids, such as vases, shall be placed on the apparatus.
- Clean only with dry cloth.
- Do not block any ventilation openings, install in accordance with the manufacturer's instructions.
- Do not install near any heat sources such as radiators, heat registers, stoves, or other apparatus (including amplifiers) that produce heat.
- Do not defeat the safety purpose of the polarized or grounding-type plug. A polarized plug has two blades with one wider than the other. A grounding type plug has two blades and a third grounding prong. The wide blade or the third prong are provided for your safety. If the provided plug does not fit into your outlet, consult an electrician for replacement of the obsolete outlet. (for U.S.A. and Canada)
- Protect the power cord from being walked on or pinched particularly at plugs, convenience receptacles, and the point where they exit from the apparatus.
- Only use attachments/accessories specified by the manufacturer.
- Unplug this apparatus during lightning storms or when unused for long periods of time.
- T urning of the power switch does not completely isolate this product from the power line so remove the plug from the socket if not using it for extended periods of time.
- Refer all servicing to qualified service personnel. Servicing is required when the apparatus has been damaged in any way, such as power-supply cord or plug is damaged, liquid has been spilled or objects have fallen into the apparatus, the apparatus has been exposed to rain or moisture, does not operate normally, or has been dropped.
- Do not install this equipment on the far position from wall outlet and/or convenience receptacle.
- Do not install this equipment in a confined space such as a box for the conveyance or similar unit.
- Use only with the cart, stand, tripod, bracket, or table specified by the manufacturer, or sold with this apparatus. When a cart is used, use caution when moving the cart/apparatus combination to avoid injury from tip-over.

WARNING:
TO REDUCE THE RISK OF FIRE OR ELECTRIC SHOCK DO NOT EXPOSE THIS PRODUCT TO RAIN OR MOISTURE.
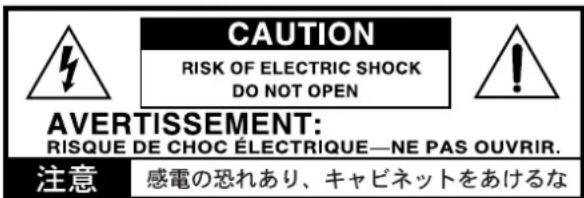
The lightning flash with arrowhead symbol within an equilateral triangle, is intended to alert the user to the presence of uninsulated "dangerous voltage" within the product's enclosure that may be of sufficient magnitude to constitute a risk of electric shock to persons.

The exclamation point within an equilateral triangle is intended to alert the user to the presence of important operating and maintenance (servicing) instructions in the literature accompanying the product.
THE FCC REGULATION WARNING (for U.S.A.)
This equipment has been tested and found to comply with the limits for a Class B digital device, pursuant to Part 15 of the FCC Rules. These limits are designed to provide reasonable protection against harmful interference in a residential installation. This equipment generates, uses, and can radiate radio frequency energy and, if not installed and used in accordance with the instructions, may cause harmful interference to radio communications. However, there is no guarantee that interference will not occur in a particular installation. If this equipment does cause harmful interference to radio or television reception, which can be determined by turning the equipment off and on, the user is encouraged to try to correct the interference by one or more of the following measures:
- Reorient or relocate the receiving antenna.
- Increase the separation between the equipment and receiver.
- Connect the equipment into an outlet on a circuit different from that to which the receiver is connected.
- Consult the dealer or an experienced radio/TV technician for help.
Unauthorized changes or modification to this system can void the user's authority to operate this equipment.
CE mark for European Harmonized Standards
CE mark which is attached to our company's products of AC mains operated apparatus until December 31, 1996 means it conforms to EMC Directive (89/336/EEC) and CE mark Directive (93/68/EEC).
And, CE mark which is attached after January 1, 1997 means it conforms to EMC Directive (89/336/EEC), CE mark Directive (93/68/EEC) and Low Voltage Directive (73/23/EEC).
Also, CE mark which is attached to our company's products of Battery operated apparatus means it conforms to EMC Directive (89/336/EEC) and CE mark Directive (93/68/EEC).
- Other product names and company names are registered trademarks and trademarks of their respective owners.
About the backup battery
This product contains a backup battery that prevents the contents of internal memory from being lost when the power is turned off. If the Touch switch indicator blinks when the power is turned on, the battery must be replaced. Please contact a nearby Korg dealer or a Korg service center.
O When you press the Touch switch, it will stop blinking.
About Recorder data
Since it is possible for the contents of memory to be accidentally lost, you should save important data on an external data filer (storage device) etc. (Cp. 22). Korg will accept no responsibility for any damages that may result from loss of data.
Conventions in this manual

This symbol indicates a caution.
(¬p.**) This indicates a reference page.

This indicates an explanation concerning a setting.
Main features
Expressive piano sounds
Dynamic Switching technology selects different sound waveforms in response to variations in your keyboard touch, producing the richly expressive piano sounds that you expect from Korg.
Weighted Hammer Action
The C-6500 features the RH (Real Weighted Hammer Action) keyboard, which varies the resistance of the keyboard in four stages, just as on a grand piano.
Rich array of sounds (p.10)
Choose from eight high-quality sounds developed by Korg, including a superb concert grand piano. There is also an additional Bass sound. You can use the Layer or Split functions to play two sounds at the same time. The stereo sampling tone generator provides a concert grand piano that not only sounds rich, but also reproduces a spacious ambience.
Effects (p.12)
The built-in digital effects provide both Reverb, which can recreate the ambience of a concert hall, and Chorus to add fullness and enhance the stereo imaging of the sound.
Pedal effects (p.12)
The C-6500 provides the same three pedals as a grand piano, controlling the soft, sostenuto, and damper functions respectively. The damper pedal simulates the natural string resonances of an acoustic piano. Both the damper pedal and the soft pedal let you vary the amount of the effect by how far you press down on the pedal (half-pedal function).
Metronome (p.13)
The built-in metronome provides a steady beat for practice. You can set the time signature, tempo, and volume, and can even select a different sound for the downbeat.
Recorder (p.17)
You can record, overdub and play back your own performance using the built-in recorder. The functions are easier to use than a traditional tape recorder.
Touch control (p.14)
Three touch curves allow you to tailor the keyboard response to your own playing style.
Temperaments (p.16)
In addition to the traditional equal temperament, you can also select one of the two classical temperaments (Kirnberger or Werckmeister) for historically authentic performances.
Adjustable pitch (p.15)
You can use Transpose to transpose the pitch in semitone steps, and Pitch Control to make fine adjustments to the pitch.
MIDI (p.19)
"MIDI" is a world-wide standard that allows performance data to be transferred between electronic musical instruments and computers. Via the C-6500's MIDI connectors, it can control (or be controlled by) another MIDI device, and can even be used as a 16-part multi-timbral tone generator.
Parts of the C-6500 and their function
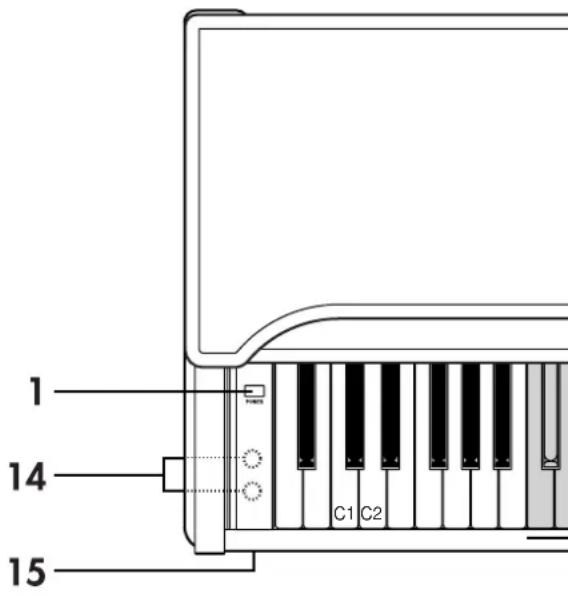


1. Power switch
This switch turns the power on and off (p.7).
2. Volume slider
This slider controls the volume level of the speakers, headphone jacks, and output jacks (p.7).
3. Split switch
This switch splits the keyboard into two areas (Upper and Lower) and allows a separate sound to be assigned to each one. By default, the Bass sound is assigned to the Lower area, but any sound can be selected. (Cp.11).
4. Transpose/Function switch
Holding down this switch while pressing other switches or keys will allow you to access the Transpose feature (p.15), make MIDI-related settings (p.19) and various other settings.
5. Touch switch
This switch selects the touch response curve of the keyboard (p.14).
6. Brilliance switch
This controls the overall brightness of the tone (p.12).
7. Reverb switch
This switch turns the reverb effect on and off (p.12).

8. Chorus switch
This switch turns the chorus effect on and off (p.12).
9. Sound selector switches
Use these switches to select a sound (p.10).
You can choose any of the eight sounds: Piano 1, Piano
2, Piano 3, E.Piano 1, E.Piano 2, Harpsichord (Harpsichord), Organ, and Strings.
You can also select two sounds and they will play together (Layer function).
10. Tempo slider
This slider adjusts the tempo of both the metronome and the recorder (©p.13)
11. Metronome switch
This switch starts and stops the metronome (p.13).
12. Recorder section
These controls are used to record and play back your performance (©p.17).
13. Demo switch
This switch is used to enter and exit the Demo mode, where the demo songs may be played (¶p.8).
14. Headphone jacks (on the bottom panel)
Stereo headphones can be connected to these jacks (p.7).
15. Power indicator
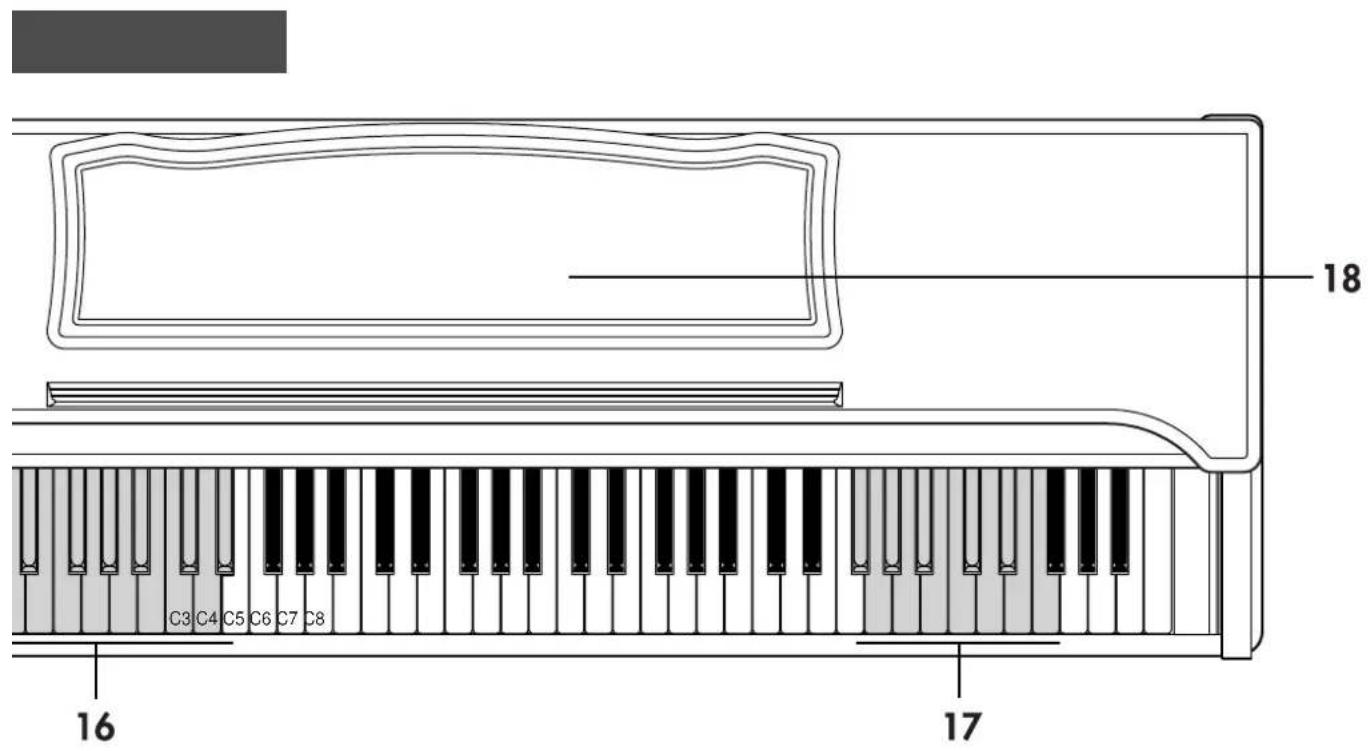
16. MIDI channel keys
While holding down the Transpose/Function switch, these keys can be used to select the MIDI channel (Cp.19).
17. Transpose keys
While holding down the Transpose/Function switch, these keys can be used to transpose the C-6500 into another key (€p.15).
18. Music stand (p.7)
Switch and key functions
This page lists the functions you can set from the switches and keys.
1. Sound selector switches
| TRANSPOSE FUNCTION | MIDI settings (p.20-22) Program change ON/OFF | Control change ON/OFF | Data dump | Volume setting* (p.10, 11) | Octave setting* (p.10, 11) | ||
| Increase volume of layer 1/low range | Increase volume of layer 2/high range | Lower the octave of layer 1/low range | Raise the octave of layer 1/low range | ||||
| TOUCH + | Keyboard touch (p.14) Light Heavy Werckmeister | KirnbergerNormal | Temperament setting (p.16) | Octave setting* (p.10, 11) Lower the octave of layer 2/high range | Raise the octave of layer 2/high range | ||
| BRILLIANCE + | Brightness setting (p.12) Mellow BrightNormal | Volume of demo playback(p.10) Lower the volume of the mute part | Raise the volume of the mute part | ||||
| REVERB + | Reverb effect setting (p.12) Light DeepestDeeper | ||||||
| CHORUS + | Chorus effect setting (p.12) Light DeepestDeeper | ||||||
| METRONOME + | Time signature setting (p.13) no accent 3 beats2 beats | 4 beats | Strong beat of metronome (p.14) Normal sound6 beats Bell sound | ||||
*Settings for the Layer function / Split function
2. Recorder section

3. Keyboard
![C1 [24]* 1 (C2)—16 (D#3) MIDI channel (c-p.19) C4 [60]* C5 [72]* C6 [84]* -6 (F#6)—+5 (F7) semitones Transpose (c-p.15) C8 [108]*](/content/2026/05/976429/images/d732eb24b7ba95d41615960e001fac2b4e9f9464a418441701aae49572ed3db8.jpg)
Tempo (.) setings(=p.13)
* [ ] is the MIDI note number
Getting ready to play
1. Before you start playing
1. Connect the power cable.
Plug the power cable connector into the socket located on the bottom of the piano (p.26). Plug the other end of the power cable into an electrical outlet.
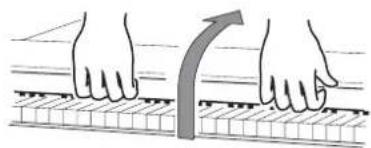
2. Open the key cover.
To open the key cover, use both hands to gently raise the front edge of the key cover.
natural_image
Illustration of hands pressing down on a piano keyboard with a curved arrow indicating motion (no text or symbols)To close the key cover, hold the front edge and gently pull it forward. The cover is designed to close slowly. Do not force it shut.

The key cover may be damaged if you use excessive force when opening or closing it.

natural_image
Diagram of a mechanical assembly with a central X mark, showing no text or symbols
Be careful not to pinch your fingers or hand while opening or closing the key cover.
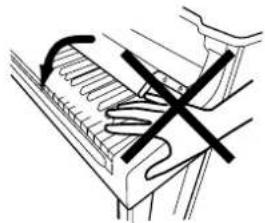
natural_image
Diagram of a piano keyboard with a crossed hammer indicating press or binding (no text or symbols present)
Before you open the key cover, make sure that no foreign objects such as papers or coins are on the top of the key cover itself. Otherwise, these objects may fall into the instrument.
3. Turn on the power.
Press the Power switch to turn on the power. The power indicator located at the left side will light.

To turn off the power, press the Power switch once again. The power indicator will go dark.
4. Adjust the volume.
The Volume slider controls the volume of the built-in speakers, the headphone jacks, and the output jacks.

Raise the Volume slider to approximately the center position. Moving the slider toward the right will increase the volume, and moving it toward the left will decrease the volume. At the "0" position there will be no sound.
Adjust the volume to an appropriate level for your playing.
2. Using headphones with the C-6500
Insert the plug (1/4" phone plug) of your stereo headphones into the headphone jack located on the left side of the bottom panel.
When the headphones are plugged in, no sound will be heard from the built-in speakers.
You can use headphones when you do not want to be heard by those around you, such as when practicing at night.
There are two headphone jacks so two people can listen through headphones at the same time, such as student and teacher, etc...
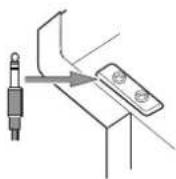

When using headphones, protect your ears by avoiding long periods of use at high volumes.

If you use headphones that have a 1/8" → 1/4" adaptor plug, grasp the adaptor plug when plugging-in or unplugging.
3. Using the music stand
Tilt the music stand upright, and use the two stoppers located on the rear to hold the music stand in place.

natural_image
Technical line drawing of a mechanical clamp or bracket assembly (no text or symbols)Listening to the demo songs
The C-6500 contains a total of 32 demo songs, with 8 stored in each of the four banks (A–D).
Bank A (No.1–No.8) contains demo songs that each feature one of the 8 internal sounds. Banks B–D (No.9–No.32) contain demo songs that use the piano sound.
Take a moment to listen to the demo songs and experience the C-6500's rich and expressive sounds.
| Bank | No. | Sound selector switch | Title /Composer |
| A | 1 | Piano 1 Fantasy | Impromptu Op.66 / F. Chopin |
| 2 | Piano 2 PANORAMA | / KORG Original | |
| 3 | Piano 3 Harmony of | Love / KORG Original | |
| 4 | E.Piano 1 Confusion | / KORG Original | |
| 5 | E.Piano 2 The Garden | / KORG Original | |
| 6 | Harpsi Invention No.1 | / J.S. Bach | |
| 7 | Organ Fuga G minor | / J.S. Bach | |
| 8 | Strings | Air on the G string / J.S. Bach | |
| B | 9 | Piano 1 The Well | -Tempered Clavier, Book 1,Prelude No.1 |
| 10 | Piano 2 Sonata K.54 | 5 / W.A. Mozart | |
| 11 | Piano 3 Sonata K.33 | 1 / W.A. Mozart | |
| 12 | E.Piano 1 For Elise | / L.v. Beethoven | |
| 13 | E.Piano 2 “Arabesque” | Op.100-2 / F. Burgmuller | |
| 14 | Harpsi “La styrienne” | Op.100-14 / F. Burgmuller | |
| 15 | Organ “La chevaleresque” | Op.100-25 / F.Burgmuller | |
| 16 | Strings | Springs Song Op.62-6 / F. Mendelssohn | |
| C | 17 | Piano 1 | Waltz No.6 Db-major Op.64-1 / F. Chopin |
| 18 | Piano 2 Waltz No.6 | E-minor Op.64-2 / F. Chopin | |
| 19 | Piano 3 Nocturne Op.9-2 / F. Chopin | ||
| 20 | E.Piano 1 Mazurka Op.7-1 / F. Chopin | ||
| 21 | E.Piano 2 A Dream Op.15-7 / R. Schumann | ||
| 22 | Harpsi “Heidenroslen” / G. Lange | ||
| 23 | Organ Spinning Song / A. Ellmenreich | ||
| 24 | Strings | Dolly’s Dreaming and Awaking / T. Oesten | |
| D | 25 | Piano 1 | Golliwog’s Cake walk / C. Debussy |
| 26 | Piano 2 “La fille auxcheveux de lin” / C. Debussy | ||
| 27 | Piano 3 “Arabesque” | No.1 / C. Debussy | |
| 28 | E.Piano 1 “Claire delune” / C. Debussy | ||
| 29 | E.Piano 2 Etude Op.10-5 / F. Chopin | ||
| 30 | Harpsi Etude Op.10-3 / F. Chopin | ||
| 31 | Organ “Gymnopedia” | No.1 / E. Satie | |
| 32 | Strings | “Salut d’Amour” / E. Elgar |
1. To listen to all the demo songs
1. Press the Demo switch.
The Demo switch indicator will light, and the C-6500 will enter the Demo mode.
The sound selector indicators will light one by one in a repeating pattern.

2. Press the Start/Stop switch.
Demo song no.1 "Fantasy Impromptu, Op.66" will begin, and the playback will continue consecutively through no.32 "Salut d'Amour."
When demo song no.32 finishes playing, the demo playback will return to no.1 and continue repeating.

If you press any of the sound selector switches while a song is playing, the demo songs within that bank will play repeatedly.
For example if no.10 "Sonata K.545, First Movement" is playing and you press the Strings sound selector switch, no.16 "Spring Song, Op.62-6 (from Songs Without Words, volume 6)" will be played. Then playback will return to no.9, and continue repeating.

It is not possible to change the sound used for each demo song. Nor will the metronome operate during demo playback.
3. To stop the demo playback, press the Demo switch.
You will exit Demo mode.
2. To listen to an individual demo song To select a song from bank A
1. Press the Demo switch.
The sound selector indicators will light one by one in a repeating pattern.
2. Press a sound selector switch to choose a demo song.
From the left, the sound selector switches correspond to demo songs no.1–no.8.
The selected song will begin, and playback will continue in order up to no.8. Then playback will return to no.1 and continue repeating.
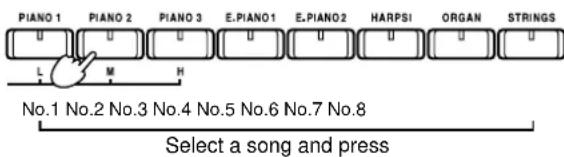
3. To stop the demo playback, press the Demo switch.
You will exit the Demo mode.
To select a song from bank B
- Press the Demo switch twice.
All of the sound selector indicators will blink simultaneously.
- Press a sound selector switch to choose a demo song.
From the left, the sound selector switches correspond to demo songs no.9–no.16.
The selected song will begin, and playback will continue in order up to no.16. Then playback will return to no.9 and continue repeating.
- To stop the demo playback, press the Demo switch.
You will exit the Demo mode.
To select a song from bank C
- Press the Demo switch three times.
Every other sound selector indicator will blink in alternation.
- Press a sound selector switch to choose a demo song.
From the left, the sound selector switches correspond to demo songs no.17-no.24.
The selected song will begin, and playback will continue in order up to no.24. Then playback will return to no.17 and continue repeating.
- To stop the demo playback, press the Demo switch.
You will exit the Demo mode.
To select a song from bank D
- Press the Demo switch four times.
Adjacent pairs of sound selector indicators will blink successively.
- Press a sound selector switch to choose a demo song.
From the left, the sound selector switches correspond to demo songs no.25–no.32.
The selected song will begin, and playback will continue in order up to no.32. Then playback will return to no.25 and continue repeating.
- To stop the demo playback, press the Demo switch.
You will exit the Demo mode.
Note
Pressing the Start/Stop switch will also stop the playback without exiting the Demo mode. This way you can select another Demo song, using the Start/Stop key once again to begin playback.
3. To pause the Demo playback
-
During playback, press the Pause switch. Playback will pause.
-
Playback will resume when you once again press the Pause switch or press the Start/Stop switch.
4. Practicing along with a demo song
To practice right and left hands separately
For the demo songs in banks B–D, you can listen to the demo playback of either the right-hand or left-hand part, and turn dnɪ\~ u;\~ volume of the other part so that you can play it yourself.
- Select a song from no.9-no.32.
The song will begin playing.
- To minimize the volume of the left-hand part, press the Part 1 switch. To minimize the volume of the right-hand part, press the Part 2 switch.
The indicator of the switch you pressed will blink. Now you can play along with the song.
Note
You can adjust the level of the minimized volume. While the demo is playing, hold down the Brilliance switch and press the Organ sound selector switch to decrease the volume even further. Alternatively, hold down the Brilliance switch and press the String sound selector switch to increase the volume.
- To restore the left and right-hand parts to the same volume, press the switch for the part whose indicator is blinking.
The indicator will change from blinking to lit.
5. Adjusting the tempo of the demo playback
You can adjust the playback tempo of the demo songs in banks B–D.
- While playing or while paused, use the Tempo slider to adjust the tempo (p.13).
A
The tempo of the demo playback will not match the printed markings of the Tempo slider.
Each demo song has its own specified tempo. When the song changes, the tempo will revert to the setting that is specified for the new song even if you had modified the tempo of the previous song.
Playing the C-6500
1. Selecting sounds
- Press one of the sound selector switches to select a sound.
The selected switch indicator will light.

Piano 1 Top-quality stereo concert grand piano sound with superb presence
Piano 2 Light and refined stereo grand piano sound
Piano 3 All-purpose grand piano sound usable for any style
E. Piano 1 Vintage electric piano with excellent dynamics
E.Piano 2 Crisp, bell-like electronic piano sound
Harpsi Realistic harpsichord with a classic aura
Organ Broad, full pipe organ sound
Strings The sound of an ensemble string section
Playing two sounds together (the Layer function)
When you use the Layer function, two sounds (for example, Piano 1 and Strings) will be heard simultaneously when you play each key.
- Simultaneously press two of the sound selector switches.
Both switch indicators will light.
Of the two indicators that are lit, the sound at the left is referred to as Layer 1, and the sound at the right as Layer 2.

When the Layer function is used, the polyphony will be reduced to 32 notes (or 21 notes if you selected the Piano 1 or Piano 2 sound).
- To turn off the Layer function, press just one sound selector switch.
To adjust the volume balance of the two sounds
You can adjust the volume balance of the two sounds you selected.
Note The C-6500 can remember this setting even when the power is turned off.
- Hold down the Transpose/Function switch, and press the E.Piano 2 or the Harpsi sound selector switches to adjust the volume balance.
Layer 1
Hold down the Transpose/Function switch and repeatedly press the E.Piano 2 sound selector switch to increase the volume of Layer 1.
Layer 2
Hold down the Transpose/Function switch and repeatedly press the Harpsi sound selector switch to increase the volume of Layer 2.
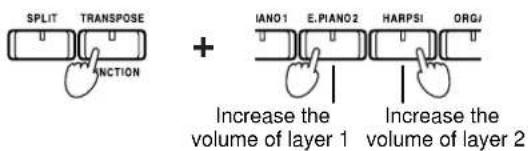
- Use the Volume slider to adjust the overall volume.
To change the octave of the two sounds
You can shift the pitch of each layer up or down 1 octave.
Note The C-6500 can remember this setting even when the power is turned off.
Layer 1
Hold down the Transpose/Function switch and press the Organ sound selector switch to shift the pitch of Layer 1 down one octave.
Hold down the Transpose/Function switch and press the Strings sound selector switch to shift the pitch of Layer 1 up one octave.

Layer 2
Hold down the Touch switch and press the Organ sound selector switch to shift the pitch of Layer 2 down one octave.
Hold down the Touch switch and press the Strings sound selector switch to shift the pitch of Layer 2 up one octave.

Using the Split function
You can select different sounds for the lower and upper ranges of the keyboard. This is called the Split function.
1. Press the Split switch.
The Split switch indicator will light. The upper range will continue to play the selected sound.
The lower range will play a Bass sound. To select a sound other than Bass for the lower range, see step 3 below.
Note
If you press the Split switch while you were using the Layer function, the sound selected for Layer 1 will be assigned to the upper range.
2. To change the split point, hold down the Split switch and press the desired note.
The note you pressed will become the split point, and will be part of the upper range.

3. Selecting sounds.
Upper range
Select a sound by pressing one of the sound selector switches. The switch indicator will light.
Lower range
To select a sound other than Bass, hold down the upper range sound selector switch, and press a different sound selector switch to select a sound for the lower range.
The sound selector switch indicators for both the upper and lower sounds will light.
To return to the Bass sound, press the sound selector switch that you had chosen for the lower range.
The lower range will return to the Bass sound. However, this sound will now be selected for the upper range, so you may need to re-select the sound for the upper range.
4. To turn off the Split function, press the Split switch.
The Split switch indicator will go dark.
To adjust the volume balance of the two sounds
You can adjust the volume balance of the two sounds you selected.
1. Hold down the Transpose/Function switch, and press the E.Piano 2 or the Harpsi sound selector switches to adjust the volume balance.
Lower range
Hold down the Transpose/Function switch and repeatedly press the E.Piano 2 sound selector switch to increase the volume of the lower range.
Upper range
Hold down the Transpose/Function switch and repeatedly press the Harpsi sound selector switch to increase the volume of the upper range.
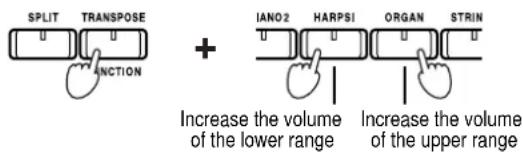
2. Use the Volume slider to adjust the overall volume.
To change the octave of the two sounds
You can shift the pitch of each range (upper and lower) up or down 1 octave.
Lower range
Hold down the Transpose/Function switch and press the Organ sound selector switch to shift the pitch down one octave.
Hold down the Transpose/Function switch and press the Strings sound selector switch to shift the pitch up one octave.

Upper range
Hold down the Touch switch and press the Organ sound selector switch to shift the pitch down one octave.
Hold down the Touch switch and press the Strings sound selector switch to shift the pitch up one octave.

2. Adding effects to the sound Adjusting the brightness of the sound
Note
The C-6500 can remember this setting even when the power is turned off.
- Hold down the Brilliance switch and press either the Piano 1/L, Piano 2/M, or Piano 3/H sound selector switch to select the desired brightness.
If you selected the Piano 1/L switch or Piano 3/H switch, the Brilliance switch indicator will light.
| Piano 1/L Softer tone |
| Piano 2/M Normal tone |
| Piano 3/H Brighter tone |
Adding reverb to the sound
The Reverb effect re-creates the acoustic characteristics of playing in a concert hall, adding depth and ambience to your sound.
Note
The C-6500 can remember this setting even when the power is turned off.
- Hold down the Reverb switch and press either the Piano 1/L, Piano 2/M, or Piano 3/H sound selector switch to select the desired depth of reverb.

Piano 1/L Light reverb
Piano 2/M Medium reverb
Piano 3/H Deep reverb
- To turn off the reverb effect, press the Reverb switch.
The Reverb switch indicator will go dark.

The Piano 1, Piano 2 and Piano 3 sounds simulate the string resonances of an acoustic piano, so a slight reverb effect will remain even if you turn the Reverb effect off.
Adding Chorus to the sound
The Chorus effect adds modulation, making the sound richer and more spacious.
Note
The C-6500 can remember this setting even when the power is turned off.
- Hold down the Chorus switch and press either the Piano 1/L, Piano 2/M, or Piano 3/H sound selector switch to select the desired depth of chorus.

Piano 1/L Light chorus
Piano 2/M Medium chorus
Piano 3/H Deep chorus
- To turn off the chorus effect, press the Chorus switch.
The Chorus switch indicator will go dark.
3. Using the pedals
The C-6500 has three pedals: soft, sostenuto, and damper. You can use these pedals to add expression to your playing, as on a traditional piano.
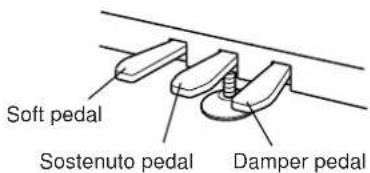
Damper pedal
Pressing this pedal will sustain the sound, producing a richly resonant decay. You can control the damper depth by how far down you press the on pedal ("half-pedaling").
Sostenuto pedal
Pressing this pedal will apply the damper effect only to the notes that are already being held down on the keyboard, and will sustain only those notes. The damper effect will not be applied to any additional notes that you play while holding down the Sostenuto pedal.
Soft pedal
Pressing this pedal will make the tone softer. You can control the softness of the tone by how far down you press the on pedal ("half-pedaling").
Pedal settings for the Layer and Split functions
You can select which sound(s) will be affected by the damper pedal when using the Layer and Split functions.
Note
The C-6500 can remember this setting even when the power is turned off.
When using the Layer function, or the Split function with a sound other than bass in the lower range
- Hold down the Transpose/Function switch, and press the damper pedal.
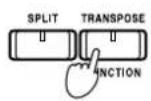
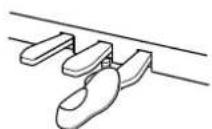
Each time you press the damper pedal, the pedal effect will be applied as shown below. At this time, the sound selector switch(s) will light to indicate which sounds will be affected by the damper pedal.

flowchart
graph TD
    A["When the Layer function is used"] --> B["Layer 2"]
    B --> C["Layer 1"]
    C --> D["Layer 1 and 2"]
    E["When the Split function is used"] --> F["Upper range"]
    F --> G["Lower range"]
    G --> H["Upper and lower ranges"]
- When you have finished making settings, release the Transpose/Function switch.
When using the Split function with Bass selected in the lower range
- Hold down the Transpose/Function switch, and press the damper pedal.
Each time you press the damper pedal, the pedal effect will be applied as shown below. At this time, the sound selector switch indicator of the upper range sound will light in different ways to indicate which sound(s) will be affected by the damper pedal.

flowchart
graph TD
    A["Upper range and bass sound (upper range indicator will light)"] --> B["Upper range (upper range indicator will blink)"]
    B --> C["Bass sound (upper range indicator will be dark)"]
    C --> D["↑"]
- When you have finished making settings, release the Transpose/Function switch.
4. Playing along with the metronome
It is convenient to use the metronome when you want to play in a precise tempo. The metronome can also be set to a specific time signature and tempo; and can be used when recording your performance.
Using the metronome
- Press the Metronome switch to start the metronome.
The Metronome switch indicator will light.

- Press the Metronome switch once again to stop the metronome.
The Metronome switch indicator will go dark.
To adjust the tempo
- Press the Metronome switch to start the metronome.
The Metronome switch indicator will light.
- Move the Tempo slider to adjust the tempo.
You can set the tempo in the range from ♪=40-200.
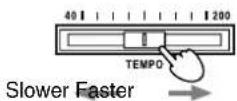

The markings of the Tempo slider may not always match the actual tempo.
If you want to set the tempo precisely, hold down the Metronome switch and press the note on the keyboard that corresponds to the desired tempo value (Tp.6).
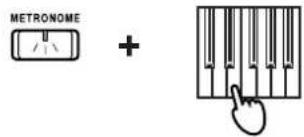
To set the time signature
When you first turn the C-6500 on, pressing the Metronome switch will play straight quarter notes at the selected tempo. You can select a time signature, and the metronome will accent the first beat of the measure.
- Press the Metronome switch to start the metronome.
The Metronome switch indicator will light.
2. Hold down the Metronome switch and press a sound selector switch.
The indicator of the switch you pressed will light.
When you press one of the sound selector switches (Piano 2/M through E.Piano 2) to select the corresponding time signature, the first beat of the measure will be sounded with an accented beat.
If you press the Piano 1/L switch, the metronome will not provide an accent, and there will be no time signature.
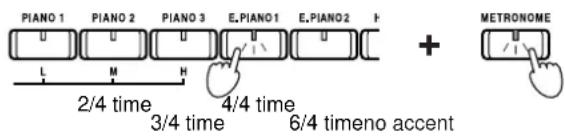
To adjust the metronome volume
Note The C-6500 can remember this setting even when the power is turned off.
1. Press the Metronome switch to start the metronome.
The Metronome switch indicator will light.
2. Hold down the Metronome switch, and press either the Part 1 or Part 2 switch to adjust the volume.
Hold down the Metronome switch and repeatedly press the Part 1 switch to decrease the volume.
Hold down the Metronome switch and repeatedly press the Part 2 switch to increase the volume.

3. To return to the original volume, hold down the Metronome switch and press both the Part 1 and Part 2 switches simultaneously.
To sound a bell on the strong beat
Note The C-6500 can remember this setting even when the power is turned off.
1. Press the Metronome switch to start the metronome.
The Metronome switch indicator will light.
2. Hold down the Metronome switch and press the Organ sound selector switch.
The Organ switch indicator will light, and a bell sound will be used on the accented beat.

3. To return to the conventional sound for the accented beat, hold down the Metronome switch and press the Harpsi sound selector switch.
The Harps switch indicator will light.
5. Selecting the Touch Response Curve
The C-6500 offers three touch response curves, so you can select the way in which your keyboard playing strength will affect the loudness of the sound.
When the power is turned on, the Normal touch setting will be selected.
1. Hold down the Touch switch and press either the Piano 1/L, Piano 2/M, or Piano 3/H switch to select the desired touch sensitivity.
If you select the Piano 1/L switch or Piano 3/H switch, the Touch switch indicator will light.

Piano 1/L: Light touch (even light touch can produce loud notes)

line
| Playing strength | Note loudness | | ---------------- | ------------- | | Soft | 0 | | Strong | High |Piano 2/M: Normal touch

line
| Playing strength | Note loudness | | ---------------- | ------------- | | Soft | 0 | | Strong | 1 |Piano 3/H: Heavy touch (heavy touch is necessary to produce loud notes)
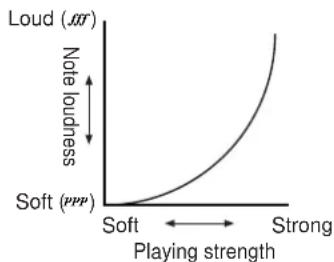
line
| Playing strength | Note loudness | | ---------------- | ------------- | | Soft | 0 | | Strong | High |6. Changing the key (Transposing)
The C-6500's Transpose function lets you change the pitch in semitone steps. You can use this function to play a song at the correct pitch but in an easier key (e.g., a key with fewer sharps or flats), or to play a song at a different pitch to match another instrument or vocalist while still using the familiar fingering.
The pitch can be transposed in a range of eleven semitones.
1. Hold down the Transpose/Function switch and press a key in the range of F#6-F7.
If you press a key other than C7, the Transpose/Function switch indicator will light, showing that the pitch has been transposed.
The pitch of the entire keyboard will be shifted so that the key you pressed will produce the C7 pitch.

2. To return to the original (non-transposed) setting, hold down the Transpose/Function switch and press the C7 key.
The C-6500 will also return to the original pitch when the power is turned back on.
To raise the pitch of a song by one semitone
Here's an example where a C# will sound when you play a C key.
- Hold down the Transpose/Function switch and press the C#7 key.
The pitch has been transposed upward by a semitone, and playing the notes shown in the lower left will sound the pitches shown in the lower right.

To play a song in the key of Bb using the fingering of the G-scale
Bb is a minor third (three semitones) above G. So you will need to transpose the C-6500 so that when you play the C7 key, the D#7 pitch (three semitones above C7) will sound.
- Hold down the Transpose/Function switch and press the D#7 key.
7. Making fine adjustments to the pitch
You can make fine adjustments to the pitch.
Use this to correct small differences in pitch when you play together with other instruments, or when playing along with an existing recording.
The pitch can be adjusted in a range of +/-12.5 Hz (427.5 Hz—452.5 Hz).
Note The C-6500 can remember this setting even when the power is turned off.
To raise the pitch
- Hold down the Touch switch and press the Part 2 switch.
The pitch will rise by approximately 0.5 Hz each time you press the switch.

To lower the pitch
- Hold down the Touch switch and press the Part 1 switch.
The pitch will fall by approximately 0.5 Hz each time you press the switch.

To return to the original pitch
- Hold down the Touch switch and press the Part 1 and Part 2 switches simultaneously.
The pitch will return to the original setting (A4=440 Hz).

8. Selecting a temperament
Many classical compositions were originally composed using various temperaments. So that you can reproduce the original sound of these compositions, the C-6500 lets you select two types of historical temperament, Kirnberger and Werckmeister, as well as the Equal Temperament that is used on most keyboard instruments today.
Werckmeister
This is the Werckmeister III temperament created by the German organist and music theorist, Andreas Werckmeister. This temperament was created in the late Baroque era to allow relatively free modulation between keys.
Kirnberger
This is the Kirnberger III temperament created by Johann Philip Kirnberger in the early 18th century. This is used mainly for tuning harpsichords.
Equal temperament
This is the system of tuning used on virtually all keyboard instruments today. Since all semitones are spaced at equal intervals, you can play identical scales in any key.
To change the temperament
- Hold down the Touch switch and press the E.Piano 2 or Harpsi sound selector switch.

To return to equal temperament
- Hold down the Touch switch and press the sound selector switch whose indicator is lit.
The indicator will go dark. You can also return to equal temperament by turning the power off and on again.
Note
Piano 1, Piano 2 and Piano 3 sounds use stretched tuning. This is a method of tuning in which the lower range is tuned slightly flatter and the upper range is tuned slightly sharper than the equal tempered pitches, in order to produce a more natural-sounding resonance.
Recording and playing-back your performance
The built-in recorder of the C-6500 lets you record and play back your performance as easily as when using a tape recorder.
There are two individual parts. You can use the two parts to record two different songs, or to separately record two parts of the same song and play them back together. Each part can play a different sound and, when done recording, you can even play along using a different sound

When you record over a previously-recorded part, the existing data will be overwritten and lost. Before you record, make sure that it is OK to lose the existing data.
Note
The recorded data will be preserved even when you turn off the power.
1. Recording your performance To record your performance
- Press a sound selector switch to select the sound you will use for recording the first part.

- Press the Record switch.
The Record switch indicator will light.
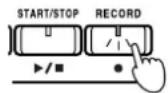
- Look at the Part 1 and Part 2 switch indicators to see the recorded status of each part.
If a part has already been recorded, its indicator will be lit green. If the indicator for a part is blinking green, then it contains recorded data, but its playback will be muted when the recorder is running.
- Select the part that you want to record, and press its switch to make the indicator blink red.
Red blinking indicates that the part is in record-ready mode.
Note
If you press the switch repeatedly, the switch indicator will cycle through the following states.
A part with no recorded data A part containing recorded data

flowchart
graph TD
    A["Dark (no data)"] --> B["Blinking red (record-ready)"]
    B --> C["Press"]
    D["Lit green (data exists)"] --> E["Blinking green (muted)"]
    E --> F["Press"]
    G["Blinking red (record-ready)"] --> H["Press"]

It is not possible to put both parts in record-ready mode at the same time. If one part is set to record-ready, and the other part already contains data, pressing the switch for the recorded part will alternate between the playback and mute modes.
ex: Part 1 contains recorded data, and part 2 is in record-ready status

flowchart
graph TD
    A["Lit green (data exists)"] --> B["PART 1"]
    A --> C["PART 2"]
    B --> D["Blinking red (record-ready)"]
    C --> E["Blinking red (record-ready)"]
    D --> F["PART 1"]
    E --> G["PART 2"]
    F --> H["Blinking green (muted)"]
    G --> I["Blinking red (record-ready)"]
- Press either the Start/Stop switch, the keyboard, or a pedal.
If you press the Start/Stop switch, recording will begin after a two-measure count. If you press the keyboard or a pedal, recording will begin immediately.
Recording will also begin if a MIDI message is received on the MIDI channel that matches the part you selected in step 4 (p.19).

During recording, the Start/Stop switch indicator will blink in time with the time signature, red on the first beat and green on other beats.
If you use the sound selector switches to change sounds during recording, these sound selections will be recorded as part of the data. During playback, the same sound selections will change automatically.

Data for changes in the pedal settings (©p.13 "Pedal settings for the Layer and Split functions") cannot be recorded.
Note
You can record at an accurate tempo while listening to the metronome (Cp.13).
- When you have finished recording, press the Start/Stop switch.
The recorder will automatically return to the first measure.
Note
You can pause recording by pressing the Pause switch while recording (the Pause switch indicator will light).
To resume recording, first press the Record switch. Then press the switch for the part you are recording twice to return that part to the record-ready mode.
If you press the Start/Stop switch or the Pause switch while in record-ready mode, you will hear a two-measure count and then recording will start from the beginning of the measure at which you paused.
If you play the keyboard while in record-ready mode, recording will start from the paused location without a count.
When you resume recording after pausing, the transition may not always be recorded smoothly. When using this function, we recommend that you use the metronome while you record, and pause on the beat that the last recorded note ends. When you resume recording, you will start from the beat at which you stopped.
2. Listening to a song you recorded To play back a song you recorded
1. Look at the Part 1 and Part 2 switch indicators to see the recorded status of each part.
If a part has already been recorded, its indicator will be lit green. If you do not wish to hear one of the recorded parts during playback, press its switch to make the indicator blink green.
2. Press the Start/Stop switch to begin playback.
During playback, the Start/Stop switch indicator will blink according to the time signature, red on the first beat and green on the other beats.
You can use the Tempo slider etc. to adjust the playback tempo (p.13).
3. To stop playback, press the Start/Stop switch.
Playback will end, and you will automatically return to the first measure.
Note
During playback, you can press the Pause switch (the Pause switch indicator will light) to pause playback.
To resume playback, press the Start/Stop switch or the Pause switch.
When all of the recorded data has finished playing, playback will stop automatically and the Start/Stop switch indicator will go dark.
To adjust the volume balance of the two parts
Note
The C-6500 can remember this setting even when the power is turned off.
- If parts 1 and 2 are playing simultaneously, hold down the Brilliance switch and repeatedly press the switch (either Part 1 or Part 2) for the part that you want to make louder.
To return to the original setting, hold down the Brilliance switch and press the Part 1 and Part 2 switches simultaneously.
To play back your performance in a loop
You can make the entire recorded song play back repeatedly.
- During playback, press the Transpose/Function switch.
The Transpose/Function switch indicator will blink, and the playback will repeat. To stop playback, press the Start/Stop switch. The repeat setting will also be cancelled at this time.
3. Erasing parts
To erase a recorded part.
1. With playback stopped, hold down the Transpose/Function switch and press the switch of the part you wish to erase.
The indicators of the Transpose/Function switch and the switch whose part you pressed will blink alternately red and green, indicating that you are ready to erase that part.
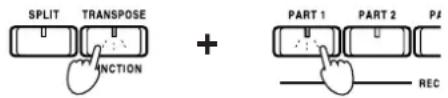
If you decide to not erase the part, press the Transpose/Function switch again to cancel.
2. Once again, press the part switch that you pressed in step 1, its performance data will be erased.

To check the amount of data that has been recorded
- Simultaneously hold down the Transpose/Function switch and Start/Stop switch.
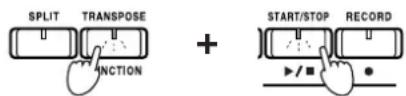
The amount of performance data that has been recorded will be shown by the number of sound selector indicators that are lit. If a larger amount of data has been recorded, more of the indicators will be lit.

During recording, the Record switch indicator will blink if the amount of available memory decreases to 10% of the total memory.
10% or less means that 1,400 or fewer remaining notes can be recorded, or that 900 measures have been recorded (a maximum of 999 measures can be recorded).
Note
If you want to save your recorded performance, we recommend that you save it using a computer or a commercially-available MIDI data filer.
$$ (\text { p.22 }) $$
Connecting to other devices
1. Connections with a synthesizer, or audio system
You can connect a synthesizer or audio system to the C-6500, and play their sounds through the speakers of the C-6500, or record your performances on a tape recorder.
INPUT jacks (L/MONO, R)
These jacks allow you to play the output of another device - such as a synthesizer or audio system - through the C-6500's built-in speakers. To adjust the volume, use the volume control of the connected instrument or audio device.
OUTPUT jacks (L/MONO, R)
These jacks will allow you to play the C-6500 through an audio system for performing at higher volumes, or to record your performances on a tape recorder or other audio recording device.

2. Connections with MIDI devices What is MIDI?
MIDI (Musical Instrument Digital Interface) is a world-wide standard that allows various types of performance-related data to be exchanged between electronic musical equipment and computers.
MIDI lets you use the keyboard of the C-6500 to play another MIDI-connected instrument. Sound selections, pedal operations, etc. will also be controlled.
Alternatively, you can use another MIDI keyboard or sequencer (automatic playback device) to control the C-6500 and play its internal sound generator. By using multiple MIDI devices together, you can enjoy even more varied ensembles. You can also use MIDI to save data that you have recorded on the C-6500's recorder.
This section of the manual explains various ways in which you can use MIDI with the C-6500. If you would like to learn more about MIDI, you can read one of the many books available that explain MIDI in an easy to understand way.
MIDI connections
Commercially-available MIDI cables are used to transfer MIDI data. Connect these cables between the MIDI connectors of the C-6500 and the MIDI connectors of the other MIDI device. The C-6500 has two types of MIDI connector.
MIDI IN connector
This connector receives MIDI data.
It lets you use an external MIDI device (MIDI keyboard or sequencer) to play the sounds in the C-6500. Use a MIDI cable to connect the C-6500's MIDI IN connector to the MIDI OUT connector of the external MIDI device.
MIDI OUT connector
This connector transmits MIDI data.
The MIDI messages transmitted from this connector when you play the C-6500 can be used to control an external MIDI device. Use a MIDI cable to connect the C-6500's MIDI OUT connector to the MIDI IN connector of the external MIDI device.
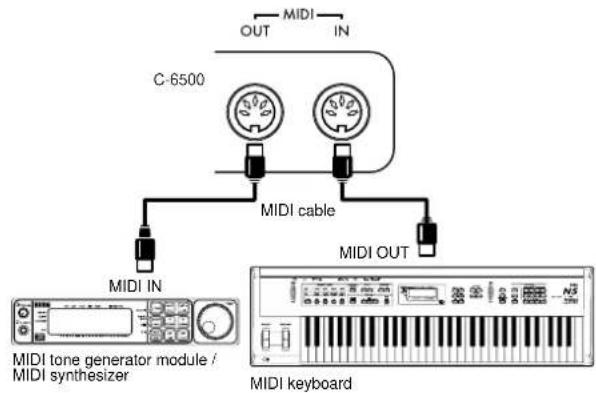
MIDI channels
When you have finished making connections, set the C-6500 to the same MIDI channel as the connected MIDI device. There are sixteen MIDI channels, numbered 1–16. When the C-6500 is first turned on, part 1 will automatically be set to channel 1, and part 2 will be set to channel 2.
- To set the channel for part 1, hold down the Transpose/Function switch and press the key in the range of C2-D#3 that corresponds to the desired channel.
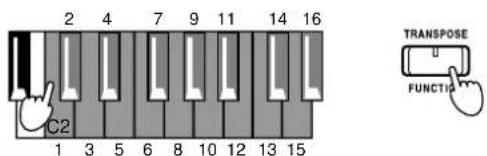
When you set the MIDI channel for part 1, part 2 will automatically be set to the next higher MIDI channel (i.e., one more than the MIDI channel of part 1). However if you set the part 1 MIDI channel to 16, the part 2 MIDI channel will be set to channel 1.
Using the C-6500 as a multi-timbral tone generator
The C-6500 can function as a 16-part multi-timbral tone generator that can be controlled and played from an external MIDI device.
- Use a MIDI cable to connect the MIDI IN of the C-6500 to the MIDI OUT of your sequencer (or similar device).
- Transmit MIDI data from the connected sequencer (or similar device).
For details on how to transmit data from a connected sequencer, refer to the owner's manual for that device.
The C-6500 can be set to receive program change messages along with the performance data. Reception of program changes and control changes can be disabled independently for each MIDI channel 1–16 (see “Program changes”, below)

When using the C-6500 as a multi-timbral tone generator, the sound that is selected from the C-6500's panel cannot be played by incoming data on the specified MIDI channel.
Local On/Off setting
The C-6500 provides a Local On/Off setting. You should use the Local Off setting when you want to play the C-6500's keyboard without sounding its internal tone generator, in order to play only an external tone generator connected via MIDI. You should also use this setting when using the C-6500 and an external sequencer. This will prevent notes from being double triggered (MIDI Echo).
Normally, you will leave the Local setting On so that the C-6500's internal sounds will be heard when you play the keyboard.
When the C-6500 is first turned on, the Local setting will be On.
- Hold down the Transpose/Function switch and press the Piano 1/L sound selector switch.
The Local setting will alternate between On and Off each time you press the switch.
| Local On Piano 1/L switch indicator is lit |
| Local Off Piano 1/L switch indicator is dark |
Program changes
Program numbers on a connected external MIDI device can be selected from the C-6500, or program numbers of the C-6500 can be selected from a connected MIDI device.
Transmitting program changes
Program numbers on a connected external MIDI device can be selected from the C-6500.
- When you use the sound selector switches to select a sound, a MIDI program change number (0–99) will be transmitted as shown in the table.
Receiving program changes
When a program change is received from an external device, sounds of the C-6500 will change as shown in the following table.
The C-6500 will switch sounds when it receives a MIDI program change number in the range of 0–99. The C-6500 will not respond to program change numbers higher than 99.
| Single PC# | Sound |
| 00 Piano 1 | |
| 01 Piano 2 | |
| 02 Piano 3 | |
| 03 E.Piano 1 | |
| 04 E.Piano 2 | |
| 05 Harpsi | |
| 06 Organ | |
| 07 Strings | |
| Layer PC# | Sound (Layer 1, Layer 2) |
| 08 Piano 1, Piano 2 | |
| 09 Piano 1, Piano 3 | |
| 10 Piano 1, E.Piano 1 | |
| 11 Piano 1, E.Piano 2 | |
| 12 Piano 1, Harpsi | |
| 14 Piano 1 ,Strings | |
| 15 Piano 2, Piano 3 | |
| 17 Piano 2, E.Piano 2 | |
| 18 Piano 2, Harpsi | |
| 19 Piano 2, Organ | |
| 20 Piano 2, Strings | |
| 21 Piano 3, E.Piano 1 | |
| 22 Piano 3, E.Piano 2 | |
| 23 Piano 3, Harpsi | |
| 24 Piano 3, Organ | |
| 25 Piano 3, Strings | |
| 26 E.Piano 1, E.Piano 2 | |
| 27 E.Piano 1, Harpsi | |
| 28 E.Piano 1, Organ | |
| 29 E.Piano 1, Strings | |
| 30 E.Piano 2, Harpsi | |
| 31 E.Piano 2, Organ | |
| 32 E.Piano 2, Strings | |
| 33 Harpsi, Organ | |
| 34 Harpsi, Strings | |
| 35 Organ, Strings | |
| Split PC# | Sound (Lower, Upper) |
| 36 Piano 1, Piano 2 | |
| 37 Piano 1, Piano 3 | |
| 38 Piano 1, E.Piano 1 | |
| 39 Piano 1, E.Piano 2 | |
| 40 Piano 1, Harpsi | |
| 41 Piano 1, Organ | |
| 42 Piano 1, Strings | |
| 43 Piano 2, Piano 1 | |
| 44 Piano 2, Piano 3 | |
| 45 Piano 2, E.Piano 1 | |
| 46 Piano 2, E.Piano 2 | |
| 47 Piano 2, Harpsi | |
| 48 Piano 2, Organ | |
| 49 Piano 2, Strings | |
| Split PC# Sound (Lower, Upper) | |
| 50 Piano 3, Piano 1 | |
| 51 Piano 3, Piano 2 | |
| 52 Piano 3, E.Piano 1 | |
| 53 Piano 3, E.Piano 2 | |
| 54 Piano 3, Harpsi | |
| 55 Piano 3, Organ | |
| 56 Piano 3, Strings | |
| 57 E.Piano 1, Piano 1 | |
| 58 E.Piano 1, Piano 2 | |
| 59 E.Piano 1, Piano 3 | |
| 60 E.Piano 1, E.Piano 2 | |
| 61 E.Piano 1, Harpsi | |
| 62 E.Piano 1, Organ | |
| 63 E.Piano 1, Strings | |
| 64 E.Piano 2, Piano 1 | |
| 65 E.Piano 2, Piano 2 | |
| 66 E.Piano 2, Piano 3 | |
| 67 E.Piano 2, E.Piano 1 | |
| 68 E.Piano 2, Harpsi | |
| 69 E.Piano 2, Organ | |
| 70 E.Piano 2, Strings | |
| 71 Harpsi, Piano 1 | |
| 72 Harpsi, Piano 2 | |
| 73 Harpsi, Piano 3 | |
| 74 Harpsi, E.Piano 1 | |
| 75 Harpsi, E.Piano 2 | |
| 76 Harpsi, Organ | |
| 77 Harpsi, Strings | |
| 78 Organ, Piano 1 | |
| 79 Organ, Piano 2 | |
| 80 Organ, Piano 3 | |
| 81 Organ, E.Piano 1 | |
| 82 Organ, E.Piano 2 | |
| 83 Organ, Harpsi | |
| 84 Organ, Strings | |
| 85 Strings, Piano 1 | |
| 86 Strings, Piano 2 | |
| 87 Strings, Piano 3 | |
| 88 Strings, E.Piano 1 | |
| 89 Strings, E.Piano 2 | |
| 90 Strings, Harpsi | |
| 91 Strings, Organ | |
| 92 Bass, Piano 1 | |
| 93 Bass, Piano 2 | |
| 94 Bass, Piano 3 | |
| 95 Bass, E.Piano 1 | |
| 96 Bass, E.Piano 2 | |
| 97 Bass, Harpsi | |
| 98 Bass, Organ | |
| 99 Bass, Strings | |
Disabling program changes
If you do not want to receive or transmit program change messages, you can disable them.
When the C-6500 is first turned on, program changes will automatically be enabled for all MIDI channels.
- Hold down the Transpose/Function switch and press the Piano 2/M sound selector switch.
The setting will alternate between Enable and Disable each time you press the switch.
Enable Piano 2/M switch indicator is lit
Disable Piano 2/M switch indicator is dark
Program Change Disable can be set independently for each MIDI channel 1–16. For example if you set the MIDI channel to 1 and then set Program Change to Disable, the Disable setting for channel 1 will be remembered even if you then change the MIDI channel to 2.
Control changes
Messages such as Damper Pedal can be transmitted from the C-6500 to a control an external MIDI device. Conversely, these messages can be received from an external MIDI device to control the C-6500.
If you do not want to receive or transmit these messages, you can disable them.
When the C-6500 is first turned on, control changes will automatically be enabled for all MIDI channels.
- Hold down the Transpose/Function switch and press the Piano 3/H sound selector switch.
The setting will alternate between Enable and Disable each time you press the switch.
Enable Piano 3/H switch indicator is lit
Disable Piano 3/H switch indicator is dark
Control Change Disable can be set independently for each MIDI channel 1–16. For example if you set the MIDI channel to 1 and then set Control Change to Disable, the Disable setting for channel 1 will be remembered even if you then change the MIDI channel to 2.

Control changes from an external device will always affect both sounds of the Layer or Split functions, regardless of the pedal settings of the C-6500 ( .13 “Pedal settings for the Layer and Split functions”).
Synchronizing an external sequencer
An external MIDI sequencer or rhythm machine can be synchronized to the C-6500's recorder.
Since the C-6500 functions as the “master” device (the controlling device), the connected sequencer (or similar device) will be the “slave” device (the device that is controlled).
-
Use a MIDI cable to connect the MIDI OUT of the C-6500 to the MIDI IN of your sequencer.
-
Set the connected sequencer so that it will function as a slave device.
For details on how to make MIDI clock settings etc. on the connected device, refer to the owner's manual of that device.
- Press the Start/Stop switch of the C-6500 to begin synchronized playback.
The C-6500 will transmit MIDI Clock messages (messages used to synchronize the tempo) based on the tempo that you set on the C-6500.
Saving recorder data (Data Dump)
Performance data recorded on the C-6500's recorder can be saved on an external MIDI data filer (storage device), and then reloaded back into the C-6500's recorder for playback when necessary.

Carefully read the owner's manual for your data filer so that you do not accidentally erase important data.
To save performance data to a data filer
-
Use a MIDI cable to connect the C-6500's MIDI OUT to the MIDI IN of your data filer.
-
Operate your data filer to make it ready to receive MIDI data from the C-6500.
-
Hold down the C-6500's Transpose/Function switch and press the E.Piano 1 sound selector switch.
The indicators of the Transpose/Function switch and E.Piano 1 switch will blink, and the C-6500 will be ready to transmit the data dump.
If you decide to cancel without transmitting the data, press the C-6500's Transpose/Function switch.
- Press the Start/Stop switch.
The data dump will begin, and the performance data will be transmitted to your data filer. While transmission is occurring, the Start/Stop switch indicator will blink.
When transmission is completed, the Start/Stop switch indicator will go dark, and the C-6500 will return to its normal condition.

The C-6500 will not produce sound while it is ready to transmit a data dump, nor while it is transmitting performance data to the data filer. The C-6500 will return to its normal operating condition when data transmission ends and the data has been stored in the data filer.
To load performance data from a data filer back to the C-6500's recorder
-
Use a MIDI cable to connect the MIDI IN of the C-6500 to the MIDI OUT of your data filer.
-
Hold down the C-6500's Transpose/Function screen and press the E.Piano 1 sound selector switch.
The indicators of the Transpose/Function switch and E.Piano 1 switch will blink, and the C-6500 will wait to receive a data dump.
If you decide to cancel the operation at this point, press the C-6500's Transpose/Function switch.
- Set your data filer to transmit the saved C-6500 performance data. For details on how to do this, refer to the owner's manual of your data filer.
The C-6500 will receive the performance data. The Record switch indicator will blink while the data is being received.
When the performance data has been completely received, the Record switch indicator will go dark, and the C-6500 will return to its normal state.

The C-6500 will not produce sound while it is receiving performance data from the data filer. The C-6500 will return to its normal operating condition when data reception ends and the data has been loaded back into the internal recorder.
Troubleshooting
Power does not turn on
- Is the power cable connected to the C-6500?
- Is the power cable connected to an appropriate AC outlet?
- Is the power switch turned on? (p.7)
- Did you verify that the outlet is working? (Plug a device known to be working into the same outlet.)
- If the power still does not turn on, unplug the power cable from the AC outlet, and contact the distributor for your country.
No sound
- The C-6500's Volume slider may be set to "0". (Cp.7)
• A plug may be inserted in the headphone jack. - Have you made settings so that the selected part will play back? (p.18)
- Has performance data been recorded for the selected part? (€p.18)
• Make sure that the Local setting is turned On. (p.20)
Notes are interrupted
- You have exceeded the maximum polyphony. If you exceed the maximum polyphony, the C-6500 will turn off a currently-sounding note and give priority to the last-played note. This means that a currently-sounding note will be interrupted.
For sounds other than Piano 1 and Piano 2, the maximum polyphony is 64 notes. However, Piano 1 and Piano 2 use two notes of data, meaning that the maximum polyphony will be 32 notes.
When using the damper pedal, when using the Layer function to play two sounds together, or when playing back recorded data using multiple sounds, you should keep the maximum polyphony in mind as you select sounds.
Something is wrong with the pitch or tone of a piano sound in a specific range
- The piano sounds of the C-6500 re-create the sound of a piano as faithfully as possible. This may mean that certain overtones may appear to be louder in some ranges, or you may notice differences between different pitches or ranges. This is not a malfunction.
Pedal functions do not work correctly
- Is the pedal connector plugged in correctly? (p.26)
- If the pedal effect does not work when using Layer or Split, make the settings once again. (€p.13)
Can't record
- Is there enough free space in the recorder? (p.18)
External device does not respond to the transmitted MIDI data
- Make sure that the MIDI cable is connected correctly. (19p.19)
- Make sure that the C-6500 is transmitting MIDI data on the same channel as selected on the receiving device. (Cp.19)
Specifications
| Keyboard 88 key (A0-C8) | |
| RH (Real Weighted Hammer Action) keyboard | |
| Sounds 9 sounds: Piano 1 | |
| Piano 2Piano 3E.Piano 1E.Piano 2Harpsi (Harpsichorde)OrganStringsBass (when using Split) | |
| Tone generator system | Stereo Sampling (using Dynamic Switching Technology) |
| Maximum polyphony 64 notes | |
| Effects Reverb (3 levels) | |
| Chorus (3 levels)Brilliance (3 levels) | |
| Recorder 2 parts | |
| maximum 14,000 notesTempoMetronomeRecordStart/StopPause | |
| Keyboard modes Single, Layer, Split | |
| Temperaments 3 (Equal | Temperament,Kirnberger, Werckmeister) |
| Touch Control 3 curves (Light, Normal, Heavy) | |
| Controls Power switch | |
| Volume sliderSplit switchTranspose/Function switchTouch switchBrilliance switchReverb switchChorus switchSound selector switchesTempo sliderMetronome switchDemo switch | |
| Pedals Soft* | |
| SostenutoDamper*(*: half-pedaling supported) | |
| Connectors | Headphone jacks x 2MIDI connectors (IN, OUT)Input jacks (L/MONO, R)Output jacks (L/MONO, R) |
| Main amp | 20 W x 2 |
| Speakers | 12 cm x 2, 5 cm x 2 |
| Power supply | 117 V 65 W |
| Dimensions (W x D x H) | 1,386 x 458 x 893 mm /54.57 x 18.03 x 35.16 inches(including stand; with music stand folded down) |
| Weight | 48 kg / 105.82 lbs. (with stand) |
| Included items | Special standPower cable |
* Specifications and appearance are subject to change without notice for product improvement.
- Other product names and company names are registered trademarks and trademarks of their respective owners.
- Sound processed with INFINITY (TM).
Assembling the stand (STD-3000)

Warning

Two or more people are required in order to assemble the stand.
Cautions for assembly
In order to assemble the stand correctly, please note the following points.
- Assemble the stand according to the procedure given here, and make sure that you use the correct parts in the correct orientation.
- If you apply excessive force to the front of the digital piano before fastening it to the stand, it may fall off the stand. Please use caution.
Assembly procedure
You will need to provide a Philips (+) screwdriver.
- Open the packing carton and remove the contents. Make sure that you have all of the following items.

Screws (c) (M4 x 14)... 6 pcs. / Vis (c) (M4 x 14)... 6 pcs.

Adjuster... 1 pc. / Vis de réglage... 1 pc.

- Use the longscrewss(a) to fasten the effect to side panels AA and BB. Align the two protrusions on each foot with the holes in the side panel.

- Uses screws (b) to loosely fasten the special block to the side panels that you assembled in step 2. Tighten screws (b) only as far as necessary to keep them from falling out.

- Insert the back panel into the grooves of the side panels.

natural_image
Technical line drawing of a mechanical frame assembly with a downward arrow indicating motion (no text or symbols)- Use screws (c) to fasten the back panel.
First use screws to fasten the two top locations.
When fastening the lower screws, fasten a cable holder along with the second screw from the left (by passing the screw through the hole in the cable holder). Then fasten the other cable holder in the same way together with the far-right or far-left screw, depending on the location of the electrical outlet you will be using.

-
Check that there are enogaps in the stand and that it is not skewed, and firmly tighten all screws, including those in step 3.
-
Attachcapsstothelheadsoffscrews(b)(seestep33).
-
Attachtheepianoottotheestandl.
Place the piano on the stand so that the plastic feet on the bottom of the piano enter the holes in the metal brackets of the side panel. Then use the wing knob bolts to fasten the piano from below.

Get another person to help you place the piano on the stand, and set it down slowly and carefully so that you do not pinch your hand or drop the piano.

- Loosen the adjuster located below the pedals until it firmly contacts the floor.

If the adjuster does not contact the floor firmly, the pedals may wobble, causing malfunctions.
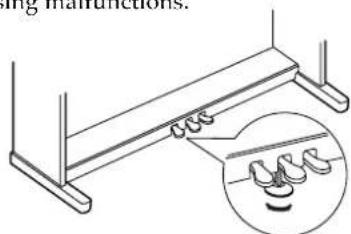
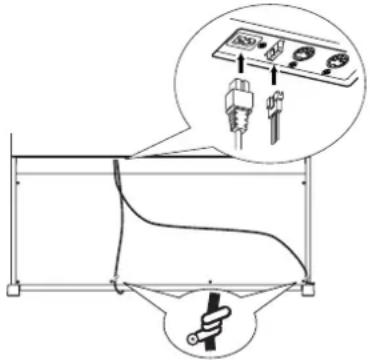
- Connect the pedal cable and power cable to the bottom panel of the panel, and use the cable holders to fasten the cables.

Pay attention to the orientation of the connectors when you plug them in.
Check after assembly
- Are any parts left over?
If any parts are left over, check them against the assembly procedure to determine where they should be used, and reassemble the stand correctly. - Make sure that all screws are correct, and that they are tight.
Other cautions
After you have assembled the stand, please observe the following cautions.
- Loosened screws
After the stand has been assembled, screws may loosen as time passes. We recommend that you regularly check for screws that have become loose. If you feel that the stand has become unsteady, screws may be loose. Please retighten the screws. - Transport Remove the digital piano from the stand, and use two people to carry it separately from the stand. At the new location, reassemble the piano and stand as described in "Assembly procedure."
- Disassembly If you need to disassemble the stand, do so in the reverse order of assembly. After disassembly, keep all screws and other parts together so that they don't get lost.
Removing the wire
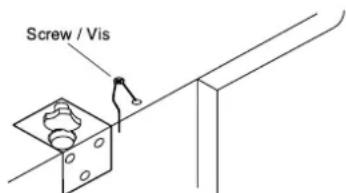
A security wire is fastened to this instrument in order to protect the keyboard. After assembly, you must remove this wire.
- Loosen the two screws on either side of the bottom of the piano, and remove the wire that is wrapped around the screw.
| Function Transmitting Receiving Remarks | ||||
| Basic channel: | Default Changed | 1 1-16 | 1 1-16 | |
| Mode: | Default Message Altered | ☐ X********** | 3 X | |
| Note number: | True Voice | 15-113********** | 0-127 21-108 | |
| Velocity: | Note ON Note OFF | O9n, V=1-127 X | O9n, V=1-127 X | |
| Afertouch: | Key's Ch's | X X | X X | |
| Pitch bender: | X | X | ||
| Control change: | 7 11 64 66 67 91, 93 120, 121 7, 11, 91, 93 | X ☐ X ☐ ☐ O ☐ O ☐ X ☐ X ☐ ☐ O | O ☐ O ☐ ☐ O ☐ O ☐ O ☐ O | Volume ☐ *1 Expression ☐ *1 ☐ ☐ Damper pedal ☐ *3, *1 Sostenuto pedal ☐ *1 Soft pedal ☐ *3, *1 Reverb send, Chorus send ☐ *1 All sound off, Reset all controllers ☐ Sequence data |
| Prog change: | True# | 0-99********** | 0-99 0-99 | *2 |
| Exclusive: | O | O | Device Inquiry ☐ Sequence Data Dump | |
| Common: | Song position Song select Tune | X X X | X X X | |
| Realtime: | Clock Commands | O O | X X | |
| Aux message: | Local ON/OFF All notes OFF Active sensing Reset | X X O X | O 123-127 O X | |
| Remarks: | *1: Transmitted/received when control changes are enabled ☐ *2: Transmitted/received when program changes are enabled ☐ *3: Half-pedal output value (0, 38, 74, 127) ☐ | |||
Mode 1: OMNI ON, POLY□ Mode 2: OMNI ON, MONO□
O: Yes □
Mode 3: OMNI OFF, POLY□ Mode 4: OMNI OFF, MONO
X: No
* Consult your lacal Korg distributor for more information on MIDI Implementation.
IMPORTANT NOTICE TO CONSUMERS
This product has been manufactured according to strict specifications and voltage requirements that are applicable in the country in which it is intended that this product should be used. If you have purchased this product via the internet, through mail order, and/or via a telephone sale, you must verify that this product is intended to be used in the country in which you reside.
WARNING: Use of this product in any country other than that for which it is intended could be dangerous and could invalidate the manufacturer's or distributor's warranty.
Please also retain your receipt as proof of purchase otherwise your product may be disqualified from the manufacturer's or distributor's warranty.

- C-6500
- Owner's Manual
- Table of contents
- KORG
- IMPORTANT SAFETY INSTRUCTIONS
- WARNING:
- THE FCC REGULATION WARNING (for U.S.A.)
- CE mark for European Harmonized Standards
- About the backup battery
- About Recorder data
- Conventions in this manual
- Main features
- Expressive piano sounds
- Weighted Hammer Action
- Rich array of sounds (p.10)
- Effects (p.12)
- Pedal effects (p.12)
- Metronome (p.13)
- Recorder (p.17)
- Touch control (p.14)
- Temperaments (p.16)
- Adjustable pitch (p.15)
- MIDI (p.19)
- Parts of the C-6500 and their function
- Power switch
- Volume slider
- Split switch
- Transpose/Function switch
- Touch switch
- Brilliance switch
- Reverb switch
- Chorus switch
- Sound selector switches
- Tempo slider
- Metronome switch
- Recorder section
- Demo switch
- Headphone jacks (on the bottom panel)
- Power indicator
- MIDI channel keys
- Transpose keys
- Music stand (p.7)
- Switch and key functions
- Sound selector switches
- Recorder section
- Keyboard
- Getting ready to play
- Before you start playing
- Connect the power cable.
- Open the key cover.
- Turn on the power.
- Adjust the volume.
- Using headphones with the C-6500
- Using the music stand
- Listening to the demo songs
- To listen to all the demo songs
- Press the Demo switch.
- Press the Start/Stop switch.
- To stop the demo playback, press the Demo switch.
- To listen to an individual demo song To select a song from bank A
- Press a sound selector switch to choose a demo song.
- To select a song from bank B
- To select a song from bank C
- To select a song from bank D
- To pause the Demo playback
- Practicing along with a demo song
- To practice right and left hands separately
- Adjusting the tempo of the demo playback
- Playing the C-6500
- Selecting sounds
- Playing two sounds together (the Layer function)
- To adjust the volume balance of the two sounds
- Layer 1
- Layer 2
- To change the octave of the two sounds
- Using the Split function
- Press the Split switch.
- Note
- To change the split point, hold down the Split switch and press the desired note.
- Selecting sounds.
- Upper range
- Lower range
- To turn off the Split function, press the Split switch.
- Hold down the Transpose/Function switch, and press the E.Piano 2 or the Harpsi sound selector switches to adjust the volume balance.
- Use the Volume slider to adjust the overall volume.
- Adding effects to the sound Adjusting the brightness of the sound
- Adding reverb to the sound
- Adding Chorus to the sound
- Using the pedals
- Damper pedal
- Sostenuto pedal
- Soft pedal
- Pedal settings for the Layer and Split functions
- When using the Layer function, or the Split function with a sound other than bass in the lower range
- When using the Split function with Bass selected in the lower range
- Playing along with the metronome
- Using the metronome
- To adjust the tempo
- To set the time signature
- Hold down the Metronome switch and press a sound selector switch.
- To adjust the metronome volume
- Press the Metronome switch to start the metronome.
- Hold down the Metronome switch, and press either the Part 1 or Part 2 switch to adjust the volume.
- To return to the original volume, hold down the Metronome switch and press both the Part 1 and Part 2 switches simultaneously.
- To sound a bell on the strong beat
- Hold down the Metronome switch and press the Organ sound selector switch.
- To return to the conventional sound for the accented beat, hold down the Metronome switch and press the Harpsi sound selector switch.
- Selecting the Touch Response Curve
- Hold down the Touch switch and press either the Piano 1/L, Piano 2/M, or Piano 3/H switch to select the desired touch sensitivity.
- Changing the key (Transposing)
- Hold down the Transpose/Function switch and press a key in the range of F#6-F7.
- To return to the original (non-transposed) setting, hold down the Transpose/Function switch and press the C7 key.
- To raise the pitch of a song by one semitone
- - Hold down the Transpose/Function switch and press the C#7 key.
- To play a song in the key of Bb using the fingering of the G-scale
- - Hold down the Transpose/Function switch and press the D#7 key.
- Making fine adjustments to the pitch
- To raise the pitch
- - Hold down the Touch switch and press the Part 2 switch.
- To lower the pitch
- - Hold down the Touch switch and press the Part 1 switch.
- To return to the original pitch
- - Hold down the Touch switch and press the Part 1 and Part 2 switches simultaneously.
- Selecting a temperament
- Werckmeister
- Kirnberger
- Equal temperament
- To change the temperament
- To return to equal temperament
- Recording and playing-back your performance
- Recording your performance To record your performance
- Listening to a song you recorded To play back a song you recorded
- Look at the Part 1 and Part 2 switch indicators to see the recorded status of each part.
- Press the Start/Stop switch to begin playback.
- To stop playback, press the Start/Stop switch.
- To adjust the volume balance of the two parts
- To play back your performance in a loop
- - During playback, press the Transpose/Function switch.
- Erasing parts
- To erase a recorded part.
- With playback stopped, hold down the Transpose/Function switch and press the switch of the part you wish to erase.
- Once again, press the part switch that you pressed in step 1, its performance data will be erased.
- To check the amount of data that has been recorded
- Connecting to other devices
- Connections with a synthesizer, or audio system
- INPUT jacks (L/MONO, R)
- OUTPUT jacks (L/MONO, R)
- Connections with MIDI devices What is MIDI?
- MIDI connections
- MIDI IN connector
- MIDI OUT connector
- MIDI channels
- Using the C-6500 as a multi-timbral tone generator
- Local On/Off setting
- Program changes
- Transmitting program changes
- Receiving program changes
- Disabling program changes
- Control changes
- Synchronizing an external sequencer
- Saving recorder data (Data Dump)
- To save performance data to a data filer
- To load performance data from a data filer back to the C-6500's recorder
- Troubleshooting
- Power does not turn on
- No sound
- Notes are interrupted
- Something is wrong with the pitch or tone of a piano sound in a specific range
- Pedal functions do not work correctly
- Can't record
- External device does not respond to the transmitted MIDI data
- Assembling the stand (STD-3000)
- Warning
- Cautions for assembly
- Assembly procedure
- Check after assembly
- Other cautions
- Removing the wire
- IMPORTANT NOTICE TO CONSUMERS
Brand : KORG
Model : Concert C-6500
Category : Piano