
FUBE50060 - Security alarm ABUS - Free user manual and instructions
Find the device manual for free FUBE50060 ABUS in PDF.
| Technical Features | Details not available |
|---|---|
| Usage | Details not available |
| Maintenance and Repair | Details not available |
| Safety | Details not available |
| General Information | Details not available |
Frequently Asked Questions - FUBE50060 ABUS
User questions about FUBE50060 ABUS
0 question about this device. Answer the ones you know or ask your own.
Ask a new question about this device
Download the instructions for your Security alarm in PDF format for free! Find your manual FUBE50060 - ABUS and take your electronic device back in hand. On this page are published all the documents necessary for the use of your device. FUBE50060 by ABUS.
USER MANUAL FUBE50060 ABUS
A:Zone # sper01? TERXON M
Intruder alarm panel Terxon MX - Operating instructions

Perfect Security for home and office
These operating instructions are an important product accessory. They contain important installation and operation information. Bear this in mind if you pass the product on to others. Store these instructions in a safe place for future reference.
For a list of contents with page numbers, see page 3.
1 Introduction
Dear Customer,
thank you for purchasing the Burglar Alarm Panel Terxon MX. You have purchased a product that has been designed and constructed according to the state-of-the-art,
which complies with the current standards of domestic and European regulations. The CE has been proven and all related certifications are available from the manufacturer (www.abus-sc.eu) upon request.
To maintain this status and to guarantee safe operation, it is your obligation to observe these operating instructions!
In the event of questions, please contact your local specialist dealer.
ABUS Security-Center GmbH & Co. KG 86444 Affing
GERMANY
www.abus-sc.eu
info@abus-sc.eu
2 Usage in accordance with regulations
This burglar alarm panel uses detectors and transmitters to secure your property. You can use it to protect your company, house, garage, garden house, weekend cottage, etc.
The alarm centre registers unauthorised break-ins by switching output contacts to which you can connect visual, acoustic or silent alarm transmitters.
The alarm centre contacts and connected components must be kept free of moisture (bathrooms and similar surroundings are to be strictly avoided).
Use of this product for other than the described purpose may lead to damage of the product.
Other hazards such as short-circuiting, fire, electric shock, etc., are also possible. The power unit is designed for operation with mains electricity at 230 Volt AC / 50 Hz.
No part of the product may changed or modified in any way.
Connection to the public power network is subject to country-specific regulations. Please be aware of applicable regulations in advance
3 Contents
1 Introduction 2
2 Usage in accordance with regulations 2
3 Contents 3
4 Precautions. 4
5 Control unit 5
6 Activation 6
6.1 Complete activation 6
6.1.1 Display when active 7
6.1.2 Open zones 7
6.1.3 Abort 7
6.2 Internal activation 8
6.3 Key switch 8
7 Deacitvation 9
8 Alarm 9
8.1 Alarm display 9
8.2 Resetting the system 9
9 User functions. 10
9.1 Blocking zones 10
9.2 User code 11
9.3 Changing the user name 12
9.4 Touch-free proximity reader (chip key) 13
9.5 Deleting a chip key 13
9.6 Event memory 14
9.7 Changing date and time 15
9.8 Switching door chime on/off 16
9.9 System tests 16
9.9.1 Siren test 16
9.9.2 Walk test. 16
10 Operating a partitioned system 18
10.1 Control unit 18
10.2 Activating a partition 18
10.3 Deactivating a partition 18
10.4 After an alarm 19
10.4.1 Switching off the sirens 19
10.4.2 Resetting the system 19
10.5 Blocking zones 19
11 System plan 20
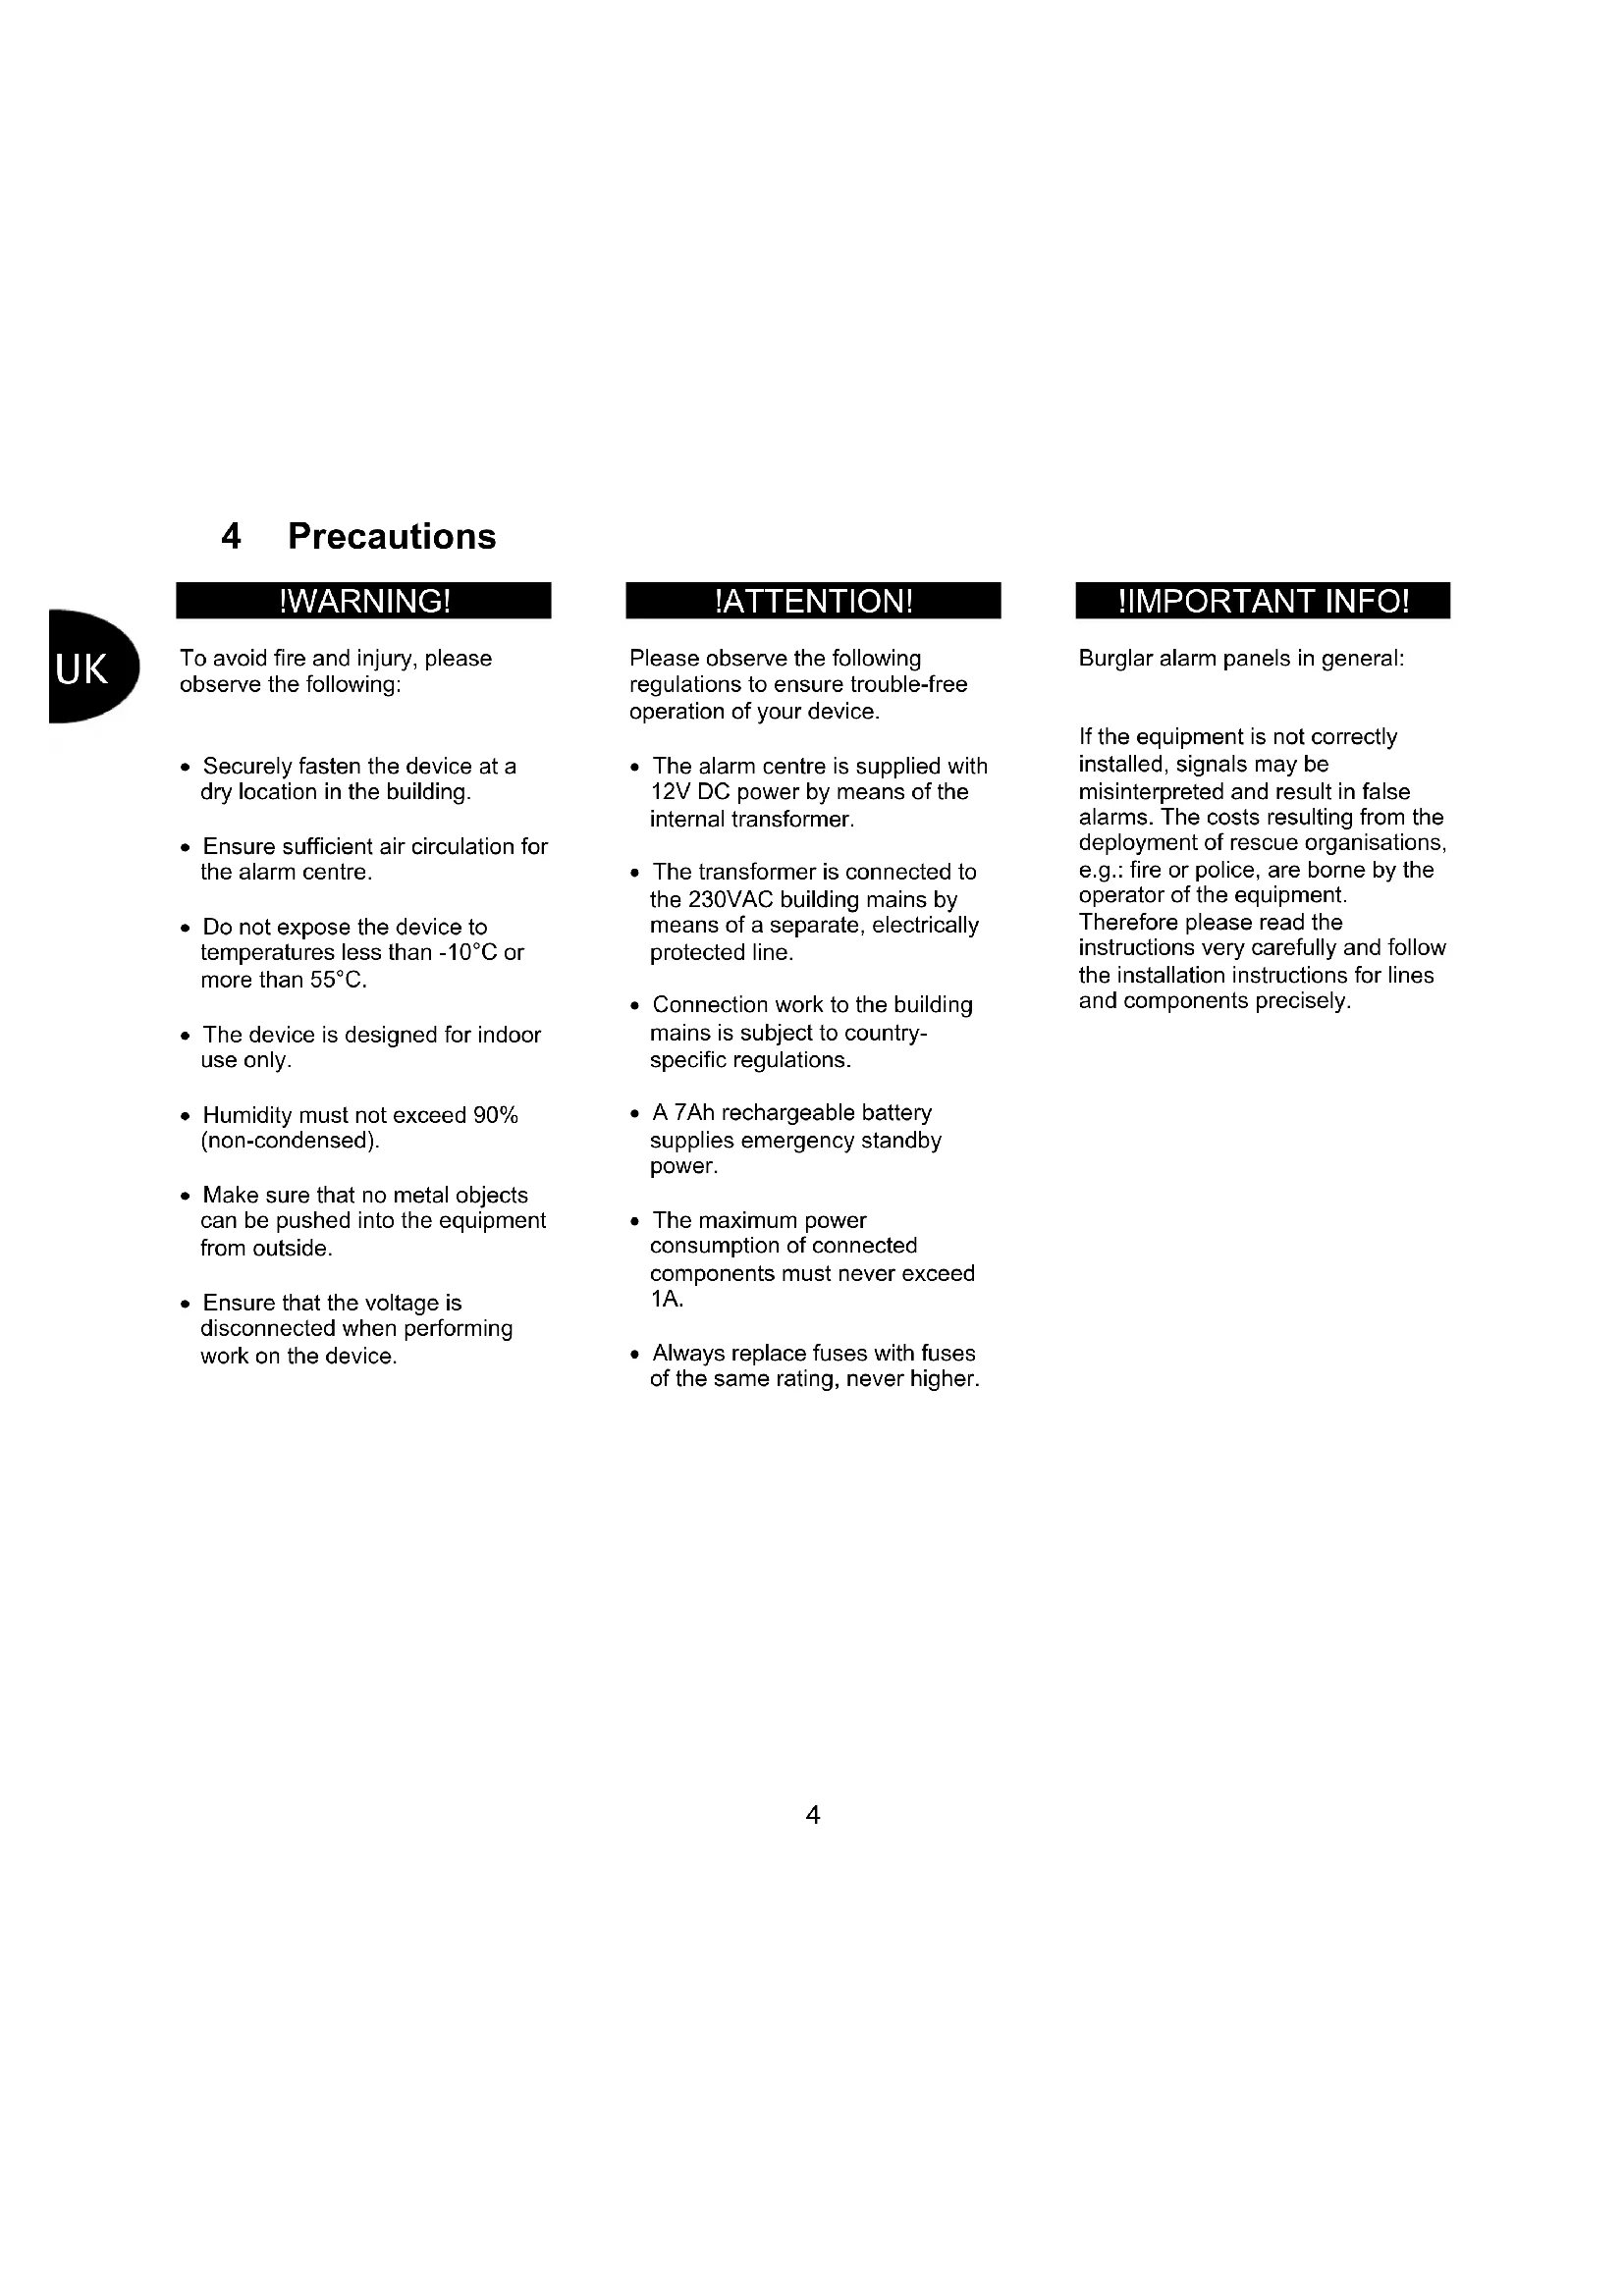
4 Precautions
WARNING!
UK
To avoid fire and injury, please observe the following:
- Securely fasten the device at a dry location in the building.
- Ensure sufficient air circulation for the alarm centre.
- Do not expose the device to temperatures less than -10^ or more than 55^ .
- The device is designed for indoor use only.
- Humidity must not exceed 90% (non-condensed).
- Make sure that no metal objects can be pushed into the equipment from outside.
- Ensure that the voltage is disconnected when performing work on the device.
!ATTENTION!
Please observe the following regulations to ensure trouble-free operation of your device.
- The alarm centre is supplied with 12V DC power by means of the internal transformer.
- The transformer is connected to the 230VAC building mains by means of a separate, electrically protected line.
- Connection work to the building mains is subject to country-specific regulations.
- A 7Ah rechargeable battery supplies emergency standby power.
The maximum power consumption of connected components must never exceed 1A.
Always replace fuses with fuses of the same rating, never higher.
IMPORTANT INFO!
Burglar alarm panels in general:
If the equipment is not correctly installed, signals may be misinterpreted and result in false alarms. The costs resulting from the deployment of rescue organisations, e.g.: fire or police, are borne by the operator of the equipment. Therefore please read the instructions very carefully and follow the installation instructions for lines and components precisely.
5 Control unit
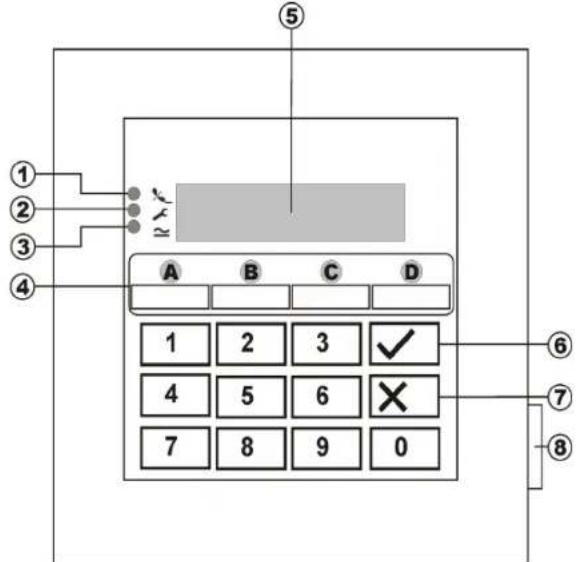
Additional buttons (see programming menu "87
Control Unit Alarm"):
1 & 3: Press simultaneously to trigger a panic alarm on the control unit.
4 & 6: Press simultaneously to trigger a medical emergency alarm on the control unit.
7 & 9: Press simultaneously to trigger a fire alarm on the control unit.
| Point | Description |
| 1 | The LED lights constantly if the there is a fault in the telephone line. |
| 2 | The LED lights constantly if the system has a fault and must be checked. |
| 3 | The LED lights constantly if the power supply is present and working. The LED flashes if the power supply fails and the alarm system is being operated by the battery. |
| 4 | These buttons activate the alarm system in the different areas. |
| 5 | LCD control unit plain-text display |
| 6 | This button confirms input. |
| 7 | This button cancels input and calls the blocking user function. |
| 8 | This buttons opens the front cover. |

6 Activation
6.1 Complete activation
The alarm system is usually completely activated if you intend to leave the object completely unattended. The alarm centre can be activated only if all zones are ready - i.e., all windows and doors are closed. There are two ways of completely activating the alarm system via the control unit (another way is via a key switch, see page 8):
1.) Enter a valid user code: 1234
and then press:
2.) Enter a valid user code: 1 2 3 4 and then press:
A
(In Single System only. In a Partitioned System only partition A will be activated).
You now have three variants, depending on how the alarm centre was programmed to behave when you activate the alarm system:
a) Exit delay
The alarm system is activated after the specified exit delay time expires.
b) Last door
The alarm system is activated when you close a zone with the entry/exit property.
c) Manual
The alarm system is activated when a contact connected to the control unit is closed.
Exit delay
If the exit delay variant is programmed, you now see the following on the LCD display:
Setting A 006 TERXON M
The alarm centre has now started the exit delay time so that you can leave the object. The delay time is now counted down in seconds. A constant signal tone is now generated for the duration of the delay time (if you hear no constant tone, read the section "Open zones" on page 7).
IMPORTANT: The signal tone is generated only if this is set in the program menu.
Last door
If the last door variant is programmed, you now see the following on the LCD display:
Level A --- TERXON M
The alarm centre now generates a constant signal tone (if you hear no constant tone, read the section "Open zones" on page 7). You can now leave the object. The alarm system is not activated until you close a zone with the entry/exit property. If this zone is already closed when you activate, it must be opened and closed again (opening and closing the entrance door). The alarm system is activated seven seconds after the zone is closed.
IMPORTANT: The signal tone is generated only if this is set in the program menu.

Manual
If the manual variant is programmed, you now see the following on the LCD display:
Level A --- TERXON M
The alarm centre now generates a constant signal tone (if you hear no constant tone, read the section "Open zones" on page 7). You can now leave the object. The alarm system is not activated until you close the entry/exit zone and close a contact connected with the control unit. The alarm system is activated seven seconds after this contact is activated.
IMPORTANT: The signal tone is generated only if this is set in the program menu.
6.1.1 Display when active
After the delay time expires, the alarm centre is activated and emits a double tone to confirm successful activation, irrespective of how it is programmed. The control unit display shows:
Level A Set TERXON M
IMPORTANT: This display appears only if this is set in the program menu.
In the program menu, you can make the setting so that the display disappears after about 30 seconds and the date and time are shown instead.
6.1.2 Open zones
If the alarm centre cannot be activated because a zone is still open, it issues a double tone. It then displays the zone(s) preventing activation of the alarm system.
Zone Open Z03 TERXON M
Close the open zones and activate the alarm system again.
If a zone is opened during the delay time, the constant tone is interrupted and you hear a pulsed signal tone. These zones are shown on the LCD display. The zones must be closed within the exit delay time, otherwise there is an internal alarm and the system is not activated. Confirm this alarm by entering a valid user code. The control unit LCD displays the zones preventing activation of the alarm system.
Set Fail Z03 TERXON M
Before you can activate the alarm system again, you have to reset the alarm centre. To do this, enter a valid user code:
IMPORTANT: If defined in the program menu, you have to enter a program code (installer code) to reset the alarm centre.
Some zones are allowed to be open at the moment of activation. Despite the open zones, the alarm system starts counting down the exit delay time, but instead of a constant tone, it issues a pulsed signal tone. You must close these zones within the delay time, otherwise there will be an internal alarm as described above. Zone types that are allowed to be open are: entry/exit and entry to follow zones.
6.1.3 Abort
You can cancel the exit delay by entering a valid user code.


6.2 Internal activation
If you want to monitor only part of your object - e.g., only the contacts of your windows or the ground floor - you can activate the alarm system internally. In the alarm centre's program mode, you can define zones not to be monitored by internal activation. To activate internal mode B, C or D:
Enter a valid user code: 1234 and then press: B, C or depending on programming, the different zones are now activated.
Level B Set TERXON M
The alarm centre has now started the exit delay time so that you can leave the area. The delay time is now counted down in seconds. A constant signal tone is generated for the duration of the delay time. The remaining sequence of events is as for activating the complete alarm system.
IMPORTANT: Immediate activation of internal areas can also be programmed - i.e., without a delay time. In that case, there is no constant tone and the system acknowledges successful activation of the area.
6.3 Key switch
With a key switch, you can activate or deactivate your alarm system with a key instead of a user code. It is also possible to activate via the control unit and deactivate using a key switch, or vice versa.
The alarm system can also be activated in different areas with a key switch, depending on how the zone is programmed. Also, only the area programmed for a key switch can be deactivated. An alarm can be stopped immediately at any time.
TIP:
The use of key switches is particularly useful in the commercial area. In particular, where there are many different users, or the risk of passing on the user code to unauthorised persons is to be avoided.
7 Deacitvation
You can deactivate your alarm system at any time (even after an alarm) by entering a valid user code. When you enter the object through an entry/exit zone, the programmed entry delay time starts. You now have to enter your user code within the programmed delay time, otherwise an alarm is triggered when the delay time expires. Proceed as follows:
Enter the building by a door programmed as an entry/exit door. The entry delay time starts. A fast pulsed signal tone is sounded.
Level A Set TERXON M
Enter a valid user code: 1234. If you enter a valid code before the entry delay time expires, the alarm system is deactivated. A double tone follows and the LCD display shows the date and time again.
8 Alarm
8.1 Alarm display
If an alarm situation occurs when the alarm system is active, an internal, local or external alarm is triggered, depending on the setting in the program menu. After the alarm centre is deactivated, the zone that triggered the alarm is displayed. The alarm centre shown the zone via the LCD display:
Burg Z03 Alarm TERXON M
Following an alarm, the alarm system must be reset.
8.2 Resetting the system
RESET Required TERXON M
To reset following an alarm, you have to enter a valid user code. Enter the user code again.
IMPORTANT: If defined in the program menu, you have to enter a program code (installer code) to reset the alarm centre.


9 User functions
A series of functions can be performed via the control unit. Summary of user functions.
| Input Function | |
| User code +X | Locks a zone |
| Master code +4 Changes user name and user code | |
| User code +5 Displays the event memory | |
| Master code +6 Date and time input | |
| User code +7 Switches door chime on/off | |
| User code +8 Tests acoustic and visual signalling device | |
| User code +9 Walk test | |
To perform these functions, you have to enter a valid user code or master code. Instead of the user code, you can also point a chip key to the control unit.
9.1 Blocking zones
This enables you to block (hide) individual zones to remove them from surveillance. The zone is blocked once only (for the next active monitoring period - i.e., until the next deactivation) and, if required, must be blocked again the next time you activate the alarm system. Proceed as follows:
Enter a valid user code. The LCD display shows:
Select? TERXON M
Press: X
The control unit shows:
Omit Zone? TERXON M
Now enter the two-digit zone number of the zone you want to block (i.e., remove from surveillance).
Press:
The control unit shows:
Omit Zone 01o TERXON M
To block further zones, enter their numbers. To unblock a zone, re-press the key.
To quit the display, press the following key: X
IMPORTANT: Some zone types cannot be blocked. You can only block zones released during the programming of the zone property. Zones that cannot be blocked are displayed with an "X" after the zone number. The control unit shows:
Omit Zone 01X TERXON M
To activate the alarm system with blocked zones:
Enter your user code and activate an area. The system emits an error tone and the display shows (example):
A:Omit Zone 01? TERXON M
To activate the alarm system with the blocked zone, press the following key:
If you have blocked more than one zone, press the key again until you have confirmed all zones. If you do not want to activate the alarm system, press the following key:
X
After you have activated the last zone, the alarm system starts the delay time.
IMPORTANT: Blocked zones are blocked for one activation period only.
9.2 User code
The first user code is also the master code. With this code, you can create further user codes and user names. The alarm system can store up to 16 user codes. All users should have their own codes.
Every time a user is entered, this event is stored in the event memory with the user number B001, B002,... The factory-set codes for users 002 to 016 are x002 to x016.
Apart from the user codes, there is also a panic code (B017). If the panic code is entered instead of the user code to deactivate the alarm system, the alarm system is deactivated, but another exit is activated that can be silently transmitted by telephone.
User codes B002 to B016 plus the panic code B017 do not function until they are changed.
To change the user code:
Enter the master code.
The control unit shows:
Select? TERXON M
Press: 4
The control unit shows:
Old Code=TERXON M
Enter the user code you want to change. If the user codes have not been changed, enter for users B002 to B016 and for the panic code B017 the codes x002 to x016 and x017 respectively.
Confirm your input by pressing:
The control unit shows:

U02:User 02 TERXON M
If you do not want to change the user name, press the following key: if you want to change the name, see the section "Changing a name" on page 11.
After confirming the input of the user name, you are asked to enter the new user code.
The control unit shows:
User 02= TERXONM
Enter the new four-digit code. Do not use a "0" (zero) as the first digit.
Confirm your input and press the following key:
IMPORTANT: To delete a code, enter 0 0 0 0.
9.3 Changing the user name
Enter the user name (max. 12 characters) via the keypad.
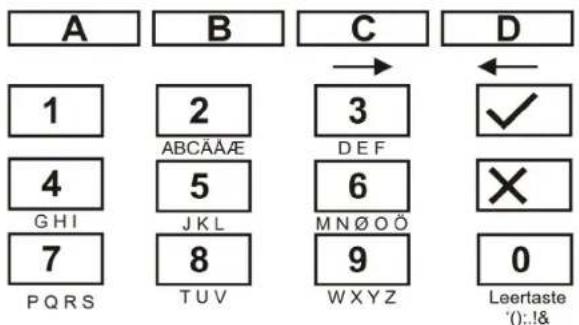
In the following, the zone name "HOFNED" is entered.
On the control unit, enter:
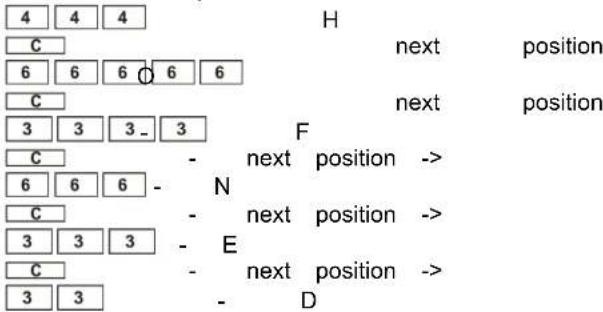
If you make a mistake, you can move the cursor back by pressing the D key D
You can delete a letter or digit by entering a blank at the respective position with the 0 key 0
After entering a new user name, confirm your input. On the control unit, enter:
9.4 Touch-free proximity reader (chip key)
Instead of entering a user code, a user can obtain legitimation using a touch-free proximity reader (chip key). Point the chip key at the control unit instead of entering a user code. You can give both the master code and a chip key to any user code. To add a chip key to the system:
Enter the user code 1 (B001 or the master code).
The control unit shows:
Select? TERXON M
Press: 4
The control unit shows:
Old Code= TERXON M
Enter the user code to which you want to add a chip key.
The control unit shows:
U02:HOFNED TERXON M
Confirm your input by pressing.
The control unit shows:
HOFNED=---TERXON M
Hold the chip key in front of the control unit. The control unit now loads the chip key function and confirms successful learning with a double tone.
The control unit now displays the date and time. To add a new chip key, repeat the above steps.
9.5 Deleting a chip key
A chip key can only be deleted together with the user code. If you delete the user code, you simultaneously delete the chip key.
Delete the chip key in the same way as you delete a user code, and then enter this user code: 0 0 0 0.
Confirm your input by pressing.
The alarm centre confirms the deletion of the user code and the chip key with a double tone.

9.6 Event memory
The alarm system stores the last 250 events. To read the alarm memory:
Enter a valid user code.
The control unit shows:
Select? TERXON M
Press: 5
The LCD display shows the latest events first.
You can page forwards and backwards in the event memory. Press key 1 to page forwards and key 3 to page backwards.
Press to switch between the event and the date.
Press to exit the event memory.
The event memory cannot be deleted by the programmer or the user.
Entries in the event memory and their meaning:
| Entry Meaning | |
| Power fault | Failure of 230V AC power supply |
| Power OK | 230V AC power supply restored |
| Alarm cancellation | Alarm aborted manually by user |
| AUX DC fault 12V DC power supply failed or AUX fuse defect | |
| AUX DC fault OK | 12V DC power supply restored |
| Bad Checksum | Error in alarm centre memory |
| Battery fault Failure of battery charger or battery fuse defect | |
| Battery fault OK | Battery charger restored |
| Break-in zone nn alarm | Zone nn has triggered a burglar alarm |
| Break-in Zone Zone nn OK | |
| nn OK | |
| Factory settings loaded | Factory settings restored |
| EEPROM fault | Memory error in the alarm centre |
| Fire zone nn alarm | Zone nn has triggered a fire alarm |
| Fire zone nn reset | Zone nn reset |
| Fire zone nn re-connected | Zone nn re-connected |
| BDTnn code lock | A user has tried too often to enter code in the control unit |
| BDTnn fault | Control unit nn failed |
| BDTnn connected | Control unit nn reconnected |
| BDTnn Sabo Control unit has triggered a tamper alarm | |
| BDTnn Sabo OK | Control unit nn tamper reset |
| BDTnn FE Alarm | Fire alarm triggered at control unit nn |
| BDTnn MN Alarm | Medical emergency alarm triggered at control unit nn |
| SSL active ZN nn | Alarm centre activated via key switch of zone nn |
| Entry Meaning | |
| SSL de-active ZN nn | Alarm centre deactivated via key switch of zone nn |
| SBox ZN nn closed | Zone nn with key box property closed |
| SBox ZN nn open | Zone nn with key box property opened |
| Sabo central alarm | The lid contact of the alarm centre was triggered |
| Sabo central alarm OK | The lid contact of the alarm centre is closed again |
| Battery fault | Fault in battery power supply |
| Battery fault OK | Fault in battery power supply remedied |
| BDTnn ÜF Alarm | BDT nn has triggered a panic alarm |
| Panic ZN nn alarm | Zone nn has triggered a panic alarm |
| Panic ZN nn reset | Panic alarm of zone nn reset |
| Aktiv fehlg. ZN nn | The alarm centre could not be activated since ZN nn was triggered |
| Rauchm. Ala. ZN nn | Zone nn has triggered a fire alarm |
| Rauchm. Ala. ZN nn | Zone nn fire alarm reset |
| Detector test ZN nn | Zone nn sensor test failed |
| Siren tamper reset | Siren tamper alarm reset |
| Sir. Sabo | Siren tamper alarm triggered |
| System auto active | System automatically rearmed |
| System started | System supplied with power and started |
| Sabo ZN nn | Zone nn has triggered a panic alarm |
| Sabo ZN nn OK | Zone nn panic alarm reset |
| Tech ZN nn alarm | Zone nn has triggered a technical alarm |
| Tech ZN nn OK | Zone nn alarm reset |
| Tel line error | Error in transmission (not for Terxon S) |
| Tel line error OK | Transmission error reset |
| Bnn changed | User nn has changed the user code of user nn |
| Bnn deleted Bnn | User nn has deleted the user code of user nn |
| Bnn exit | has exited the program menu |
| Bnn enter | has entered the program menu |
| Bnn SYS OK | User nn has reset the alarm centre |
| Bnn SYS act | User nn has reset the alarm centre |
| Bnn SYS deact | User nn has deactivated the alarm centre |
| Bnn time/date | User nn has changed the time and date |
| Bnn ZN nn locked | User nn has removed ZN nn from monitoring |
| Bnn ZN nn unlocked | User nn has returned ZN nn to monitoring |
The master code is saved as B00, and user codes 01 to 16 as B01 to B16. If you activate the system via a key switch, this is shown as B21.
9.7 Changing date and time
The internal clock continues to run as long as it is supplied with power If both the mains and the battery supply fail, the date and time are reset. To change the date and time (e.g., from summertime to wintertime):
Enter user code 1 (or B001 or the master code). Only this code can change the date and time.
The display shows:
Select? TERXON M
Press 6.
The display shows:
D04 M05 Y05 TERXON M
Enter two-digit numbers for the date, month and year. Use 01 for January and 12 for December. Confirm your input by pressing:
After the final input, the display shows:
H16 M48 TERXON M
Now enter two-digit numbers for the time. Confirm your input by pressing:
After you enter the date and time, the alarm centre confirms with a double tone and the control unit shows the current date and time again.


9.8 Switching door chime on/off
Your alarm system can be programmed so that some zones trigger a tone when entered. To activate/deactivate the door chime for these zones:
Enter your user code.
The control unit shows:
Select? TERXON M
Press 7.
The control unit shows:
Chime = ON TERXON M
To toggle between on and off, press 7 again.
To confirm the setting, press
When the setting is saved, the alarm centre confirms with a double tone and shows the date and time again.
9.9 System tests
9.9.1 Siren test
You can test all connected acoustic and visual signalling devices. Proceed as follows:
Enter your user code.
The control unit shows:
Select? TERXON M
Press 8.
The control unit shows:
Test: Bell TERXON M
The alarm centre now tests in this order the outputs marked as sirens, the outputs for the flashlight, the output for the loudspeaker, and the control unit. At the end of the test, the alarm centre emits with a double tone and shows the date and time again.
9.9.2 Walk test
You can make a walk test to check that all sensors are working properly. However, make sure that nobody else can trigger a sensor during the test, since this would result in a false test evaluation.
Enter your user code.
The control unit shows:
Select? TERXON M
Press 9.
The control unit shows:
Walk Test TERXON M
Walk through your alarm system and trigger the sensors. If a sensor is triggered, this is reported acoustically by the control units and the internal alarms. Simultaneously, the control unit shows the zone that was triggered.
The control unit shows:
A: Zone 02 TERXON M
If more than one sensor is triggered, the zones are alternately displayed one after the other.
After triggering all sensors, end the test by pressing
IMPORTANT: You can end the test at any time by pressing. You cannot test fire, panic or 24 hour zones.
You cannot test tamper contacts.


10 Operating a partitioned system
The installer can program the alarm centre so that it behaves like 4 separate alarm centres. The partitions are called partition A, B, C and D. These can be switched active or inactive independent of each other. Several partitions can be switched active or inactive simultaneously; this is set by the installer.
10.1 Control unit
In partitioned systems, buttons A, B, C and D have the following functions:
| Button Meaning | |
| A | Active / inactive Partition A |
| B | Active / inactive Partition B |
| C | Active / inactive Partition C |
| D | Active / inactive Partition D |
10.2 Activating a partition
- Enter your user code via the keyboard or hold your proximity code key at the control unit. If no other partition is active then the display shows:
Option? Terxon M
If another partition is active then the display shows:
Unset?BTERXONM
- Press the required partition button. The display shows:
Set?B TERXON M
3. Press
The display shows which partition the alarm centre is currently activating and the time until completion of the process. A beep is emitted at the control unit if this has been programmed.
After completion of the time, the alarm centre sets the partition to active and the control unit shows which partition is switched to active.
10.3 Deactivating a partition
The entry time starts when you open the entry door. An intermittent beep is sounded during the entry time.
- Enter your user code or hold your proximity code key at the control unit. The display shows the partitions that you can enter.
Unset? A B TERXON M
- Press the corresponding partition button A, B, C or D and then press
The entry beep stops. The partition is now deactivated.
10.4 After an alarm
10.4.1 Switching off the sirens
Every partition can issue an alarm, independent of the other partitions. But not all users have access to all partitions. However, the system allows all users to switch off the sirens after an alarm.
The system shows an alarm in Partition A.
Alarm Part. A TERXON M
- Enter your user code. The sirens are switched off. The display shows the partitions that you can access.
Unset? A B TERXON M
- Press the corresponding button to deactivate the required partition. Press
10.4.2 Resetting the system
A partitioned system uses the same reset methods as a single system. However, there are a few differences:
- User reset
Enter the user code or hold a proximity code key at the control unit. The display shows the partitions you can access.
-
Press The display shows a 4-digit reset code.
-
Carry out a remote reset as described in the installation instructions.
10.5 Blocking zones
The method used for blocking zones within the partitioned system has changed. Zones can no longer be blocked as long as the system is active.
- Enter your access code (or proximity code key), and press
The display shows:
Omit Zone? TERXON M
- Enter the number of the zone you want to block. If you are not authorized to block this zone, the display shows:
Omit Zone 01X TERXON M
If you are authorized to block a zone then the following is shown:
Omit Zone 01o TERXON M
If you have blocked an immediate alarm zone then the next time the system is activated, you are prompted to confirm the zone block. Press and the alarm centre begins to activate the blocked zone. During the next deactivation, the blocking of the zone is once more deactivated.
A blocked 24-hour zone must be manually unblocked via the control unit:
- Enter the user code (or proximity code key)
- Press followed by the number of the zone and
11 System plan
This system plan provides information on components installed in your alarm system, their location and functioning, as well as any modifications. The system plan is always a component on the alarm system and should be stored in a safe place.
| Zone | Description | Completely active A | Internal active B | Internal active C | Internal Active D | Lock possible | Door chime |
| Exit time A | Exit time B | Exit time C | Exit time D | ||||
| Entry time A | Entry time B | Entry time C | Entry time D | ||||
| Siren duration | Flashlight duration |
In the event of problems, please contact:

Centrale d'alarme Terxon MX - Instruction de service
Chere cliente, cher client,
6.1 Activation complete 6
6.1 Activation complete
Test: SIRENETERXON M
Overbr Zone? TERXON M
Overbr Zone? 01o TERXON M
Overbr Zone?01X TERXON M
A:Zone # Ovbr01? TERXON M
Voer de mastercode in.
D.Bel = Aan TERXON M
Overbr Zone? TERXON M
Overbr Zone?01X TERXON M
Overbr Zone? 01o TERXON M


- A:Zone # sper01? TERXON M
- Intruder alarm panel Terxon MX - Operating instructions
- Perfect Security for home and office
- Introduction
- Usage in accordance with regulations
- Contents
- Precautions
- WARNING!
- !ATTENTION!
- IMPORTANT INFO!
- Control unit
- Activation
- Complete activation
- Setting A 006 TERXON M
- Level A --- TERXON M
- Manual
- Display when active
- Level A Set TERXON M
- Open zones
- Zone Open Z03 TERXON M
- Set Fail Z03 TERXON M
- Abort
- Internal activation
- Level B Set TERXON M
- Key switch
- TIP:
- Deacitvation
- Alarm
- Alarm display
- Burg Z03 Alarm TERXON M
- Resetting the system
- RESET Required TERXON M
- User functions
- Blocking zones
- Omit Zone 01X TERXON M
- A:Omit Zone 01? TERXON M
- User code
- Select? TERXON M
- Old Code=TERXON M
- U02:User 02 TERXON M
- User 02= TERXONM
- Changing the user name
- Touch-free proximity reader (chip key)
- Old Code= TERXON M
- U02:HOFNED TERXON M
- HOFNED=---TERXON M
- Deleting a chip key
- Event memory
- Press: 5
- Changing date and time
- D04 M05 Y05 TERXON M
- H16 M48 TERXON M
- Switching door chime on/off
- Chime = ON TERXON M
- System tests
- Siren test
- Test: Bell TERXON M
- Walk test
- Walk Test TERXON M
- A: Zone 02 TERXON M
- Operating a partitioned system
- Control unit
- Activating a partition
- Option? Terxon M
- Unset?BTERXONM
- Set?B TERXON M
- Press
- Deactivating a partition
- Unset? A B TERXON M
- After an alarm
- Switching off the sirens
- Alarm Part. A TERXON M
- Resetting the system
- Blocking zones
- Omit Zone? TERXON M
- Omit Zone 01o TERXON M
- System plan
- Centrale d'alarme Terxon MX - Instruction de service
- Activation complete
- Test: SIRENETERXON M
- Overbr Zone? TERXON M
- Overbr Zone? 01o TERXON M
- Overbr Zone?01X TERXON M
- A:Zone # Ovbr01? TERXON M
- D.Bel = Aan TERXON M
Brand : ABUS
Model : FUBE50060
Category : Security alarm