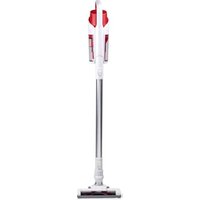
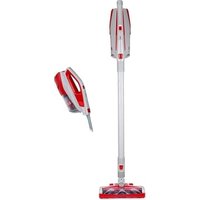
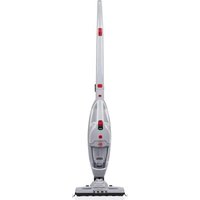
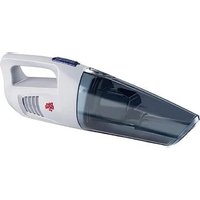
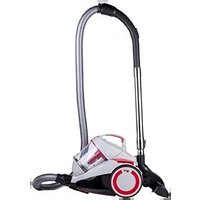
Infinity V8 M5020 - Vacuum Cleaner DIRT DEVIL - Free user manual and instructions
Find the device manual for free Infinity V8 M5020 DIRT DEVIL in PDF.

| Features | Details |
|---|---|
| Vacuum type | Cordless vacuum cleaner |
| Suction power | Max 100 AW |
| Tank capacity | 0.6 L |
| Battery life | Up to 40 minutes |
| Charging time | 4 hours |
| Filtration | HEPA filter |
| Included accessories | Motorized brush, crevice tool, furniture brush |
| Weight | 2.5 kg |
| Dimensions | 25 x 20 x 115 cm |
| Usage | Suitable for hard floors and carpets |
| Maintenance | Empty the tank after each use, clean the filter regularly |
| Safety | Do not use on wet surfaces |
| Warranty | 2 years |
Frequently Asked Questions - Infinity V8 M5020 DIRT DEVIL
User questions about Infinity V8 M5020 DIRT DEVIL
0 question about this device. Answer the ones you know or ask your own.
Ask a new question about this device
Download the instructions for your Vacuum Cleaner in PDF format for free! Find your manual Infinity V8 M5020 - DIRT DEVIL and take your electronic device back in hand. On this page are published all the documents necessary for the use of your device. Infinity V8 M5020 by DIRT DEVIL.
USER MANUAL Infinity V8 M5020 DIRT DEVIL
natural_image
Line drawing of a mechanical device with no visible text or symbols
Operating Manual bagless multicyclone cylinder vacuum cleaner

text_image
Technical diagram of a vacuum cleaner with numbered parts for identification and assembly reference.
text_image
Diagram of a vacuum cleaner with labeled parts and directional arrows indicating assembly steps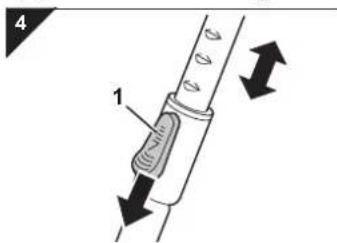
text_image
4 1natural_image
Technical illustration of two mechanical clamps with labeled parts (no text or symbols present)! WARNING:
natural_image
Mechanical component diagram showing a valve assembly with a black arrow indicating direction (no text or symbols present)natural_image
Technical illustration of a device's front and side views, showing internal components (no text or symbols)5.6 Hygiene-Ausblasfilter reinigen
text_image
23 1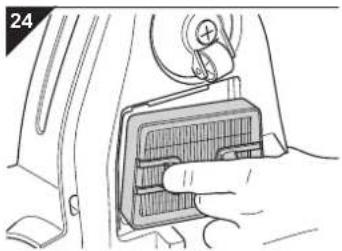
natural_image
Hand inserting a component into a car's air vent (no text or symbols visible)natural_image
Illustration of a hand holding a mechanical component with a curved arrow indicating rotation (no text or symbols)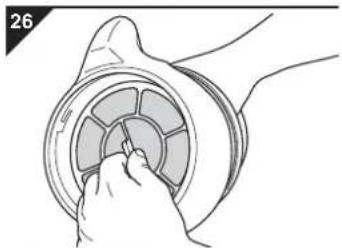
natural_image
Illustration of a hand inserting a circular component into a ring (no text or symbols)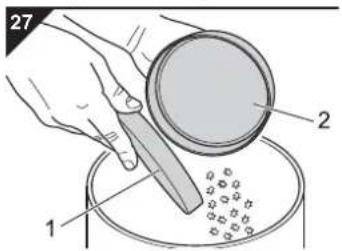
text_image
27 1 2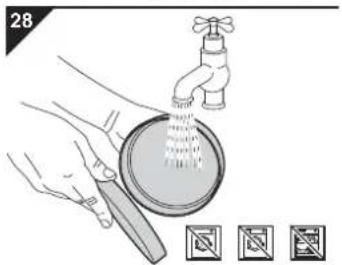
text_image
28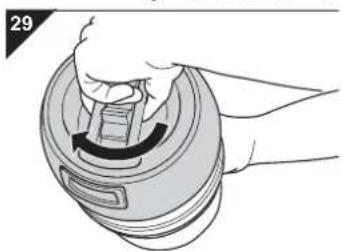
natural_image
Illustration of a hand holding a lid with a curved arrow indicating rotation (no text or symbols)We are happy that you chose our Infinity V8 cylinder vacuum cleaner! Thanks for your purchase and your confidence in us.
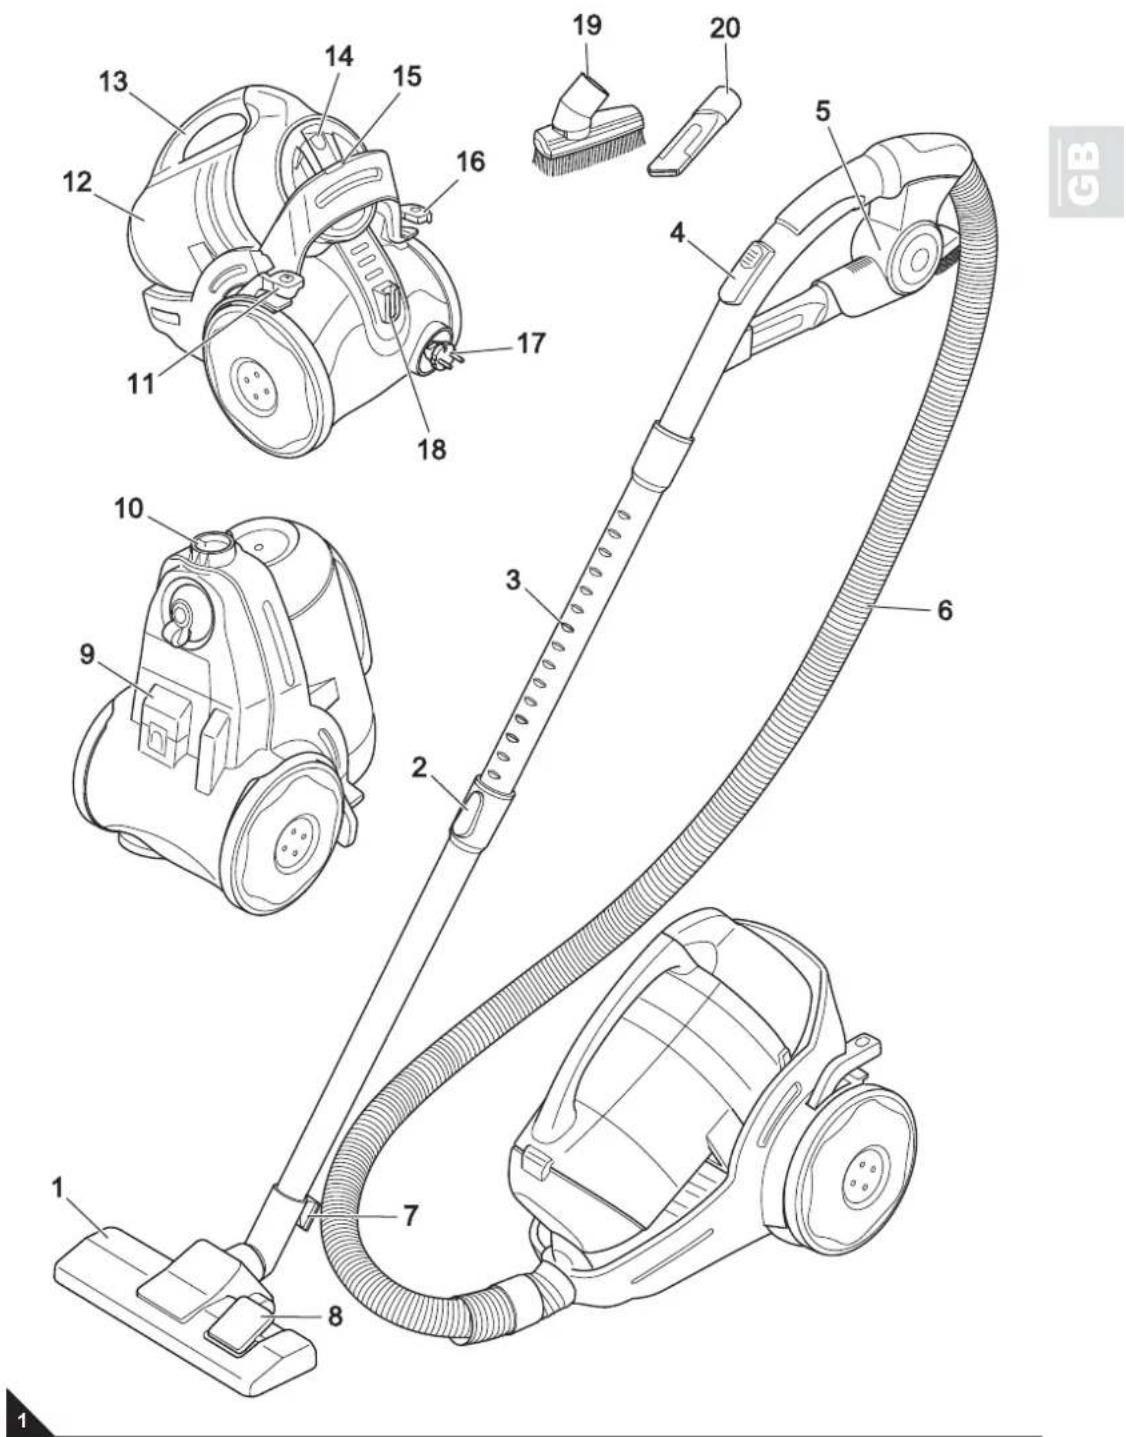
Scope of delivery
(Fig. 1)
1 Floor nozzle
(Fig. as an example)
2 Telescopic tube catch
3 Telescopic tube
4 Bypass vent
5 Accessory bracket
6 Suction hose
7 Parking-hook
8 "Carpet/hard floor" switch
9 Exhaust filter cover
10 Suction hose socket
11 On/Off switch
12 Dust container
13 Carrying-handle
14 Dust container release catch
15 Indicator "Empty dust container" (option)
16 Cable retraction button
17 Power cord with plug
18 Parking bracket
19 2-in-1-combi nozzle
20 Crevice nozzle
optional accessories
- Parquet brush (Fig. 7/1)
- Turbo brush (Fig. 7/2)
Technical data
| Type of appliance | bagless multicyclone cylinder vacuum cleaner |
| Model Infinity V8 | |
| M5020 (-0/-1.../-8/-9), M5021 (-0/-1.../-8/-9), M5022 (-0/-1.../-8/-9), M5023 (-0/-1.../-8/-9), M5028 (-0/-1.../-8/-9), M5029 (-0/-1.../-8/-9) | |
| Voltage 220 - 240 V~, 50 Hz | |
| Power 1400 W nom. - 1600 W max. | |
| Dust container capacity | max. available dust container capacity: approx. 2 litres |
| Filters Motor protection filter, Hygienic exhaust filter | |
| Power cord length | approx. 5 m |
| Suction hose length | approx. 1.5 m |
| Range approx. 7.5 m | |
| Weight approx. 7 kg | |


Technical and design specifications may be changed in the course of continuous product improvement.
© Royal Appliance International GmbH
text_image
Technical diagram of a vacuum cleaner with numbered parts for identification and assembly reference.2.1 Re: Operating Manual

Read this operating manual completely before working with the appliance.
Keep the operating manual for reference. Include the operating manual if you pass the appliance on to someone else.
Non-compliance with these instructions can lead to serious injuries or damage to the appliance.
We take no responsibility for damages due to violations of these operating instructions.
Notices for your safety are especially marked. Always observe these notices to avoid accidents and damage to the appliance.

WARNING:
Warning concerning health hazards describing possible risks of injury.

ATTENTION:
Warning concerning possible dangers to the appliance or other objects.
NOTE:
Highlights tips and information for you.
2.2 Re: Children

This appliance is not intended to be used by persons (including children) with impaired physical, sensorial or mental abilities and/or insufficient experience or knowledge, unless they are supervised by a person responsible for their safety or have been instructed in the proper use of the appliance by this person. Keep the appliance out of reach of people of these groups.
Never leave the appliance unattended and use it with special precaution if children or persons who cannot judge dangers are nearby. Children should be supervised in order to make sure that they don't play with the appliance.
- Packing material must not be used to play with. There is danger of suffocation.
2.3 Re: Appropriate Use

Use the cylinder vacuum cleaner only for cleaning normally soiled floors and rugs.
This appliance may only be used in households. It is not suitable for commercial use.
Any other use is considered inappropriate and is prohibited.
It is especially forbidden:
To vacuum-clean:
- Persons, animals, plants, especially hair, fingers and other parts of the body as well as pieces of clothing worn on the body. They could be sucked in and cause injuries.
- water and other fluids, especially damp carpet cleaning agents. Moisture inside the appliance can cause a short-circuit.
- toner (for laser printers, copying machines, etc.). There is danger of fire or explosion.
- hot ash, burning cigarettes or matches. This could cause a fire.
- pointed objects such as glass shards, nails, etc. Otherwise, the appliance might be damaged.
- plaster, cement, finest drilling-dust, makeup, etc. Otherwise, the appliance might be damaged.
to use the appliance near explosive or easily flammable substances. There is danger of fire or explosion.
■ Outdoor use. There is danger of rain and dirt destroying the appliance.
■ Sticking objects into the appliance's openings. It could overheat.
■ To alter or repair the appliance yourself.
2.4 Re: Power supply
The appliance runs on electricity - that means there is a general risk of electric shock. So please especially observe the following:
- Never touch the plug with wet hands.
- Always pull directly at the plug if you want to disconnect the appliance from the mains. Never pull on the cable as this could damage it.
-
Make sure that the power cable is not bent, caught or run over, and that it does not come into contact with heat sources or sharp edges.
-
Only use extension cords of a capacity sufficient for the power requirement of the appliance.
- Never immerse the appliance in water or other liquids. Keep it away from rain and moisture.
- Only operate the appliance if your mains voltage is the same as that indicated on the appliance's nameplate. Wrong voltage can destroy the appliance.
2.5 If the appliance is defective

Never use a defective appliance or operate an appliance with a defective power cord. If the power cord of this appliance is damaged it must be replaced by the manufacturers, their authorised service representative or a similarly qualified person to avoid danger.
Refer a defective appliance to an authorised dealer or the Royal Appliance service for repair. Address: ▷Page 62, "International Service".
3.1 Unpacking
- Unpack the appliance and all its accessories.
- Check the contents for completeness and possible damages. Information regarding scope of delivery ▷ Fig. 1.
NOTE:
Immediately contact your dealer if you have found damage resulting from transportation.

ATTENTION:
Always transport or ship the appliance in its original packaging to avoid damage. Keep the packaging for such an event. Dispose of no longer needed packaging material according to the applicable regulations of your country.
3.2 Assembly
text_image
2 1 2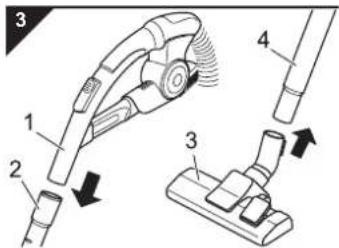
text_image
Diagram of a vacuum cleaner with labeled parts and directional arrows indicating assembly steps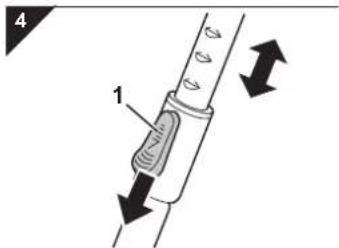
text_image
4 13.3 Using further nozzles (accessories)
text_image
5 1 2 3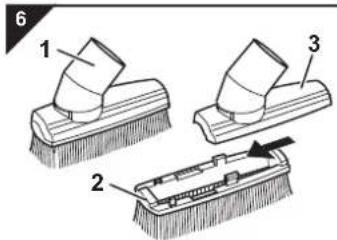
text_image
6 1 2 3
natural_image
Two mechanical clamps with labeled parts, shown from different angles (no text or symbols present)
WARNING:
Danger of injury! Only assemble the appliance if it is not connected to the power supply. Otherwise the machine might start up and parts of your body, hair or pieces of clothing might be sucked in.
- Insert the end of the vacuum hose with the notch topside into the socket. Turn the end of the suction hose clockwise until the lock clicks audibly and noticeably into place (Fig. 2).
- Insert the handle (Fig. 3/1) into the upper end of the telescopic tube (Fig. 3/2).
- Attach the floor nozzle (Fig. 3/3) to the bottom end of the telescopic tube (Fig. 3/4).
NOTE:
It might be necessary to push a bit harder.
- Adjust the length of the telescopic tube. Press down the release latch on the tube (Fig. 4/1) to do this. Then extend the telescopic tube to the desired length. Let go of the release catch while pulling until it locks in place. You will hear a distinct click.
Your cylinder vacuum cleaner is now ready for use.
Besides the floor nozzle you just attached, you may extend the functions of your cylinder vacuum cleaner with other nozzles.
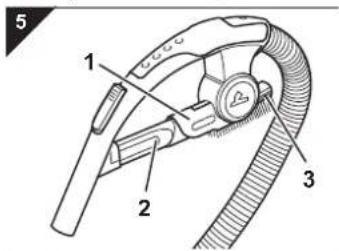
The2-in-1 combi nozzle and the crevice nozzle are included in the package as accessories. They can be attached to the accessory holder (Fig. 5/1).
- Crevice nozzle (Fig. 5/2)
Use this to vacuum dust from hard to reach places.
- The 2-in-1 combi nozzle (Fig. 5/3) is used for:
Furniture brush (Fig. 6/1)
Use this to remove dust from objects with delicate surfaces (e.g. cupboards and tables).
Upholstery nozzle (Fig. 6/3)
By simply taking off the brush attachment (Fig. 6/2) you can transform the 2-in-1 combi nozzle into an upholstery nozzle (Fig. 6/3). Use this to clean soft scratch-resistant surfaces e.g. upholstered furniture).
■ Optionally available are:
- Parquet brush (Fig. 7/1)
This has long bristles making it especially suitable for cleaning delicate surfaces (e.g. parquet and laminate floors).
- Turbo brush (Fig. 7/2)
This has a rotating brush head and is most suitable for thoroughly deep cleaning of carpets.

ATTENTION:
Our turbo brush serves solely to vacuum non-sensitive carpets, runners, doormats, and the like. Do not clean any objects with the turbo brush that you would not clean without a second thought with a conventional brush. Therefore, do not clean furniture, or materials with a delicate texture, nor any other high-quality or polished substrates with the turbo brush. Otherwise material damage might occur. If in doubt, refrain from using the turbo brush. In every instance observe the instructions for care and cleaning of the respective manufacturer.
NOTE:
The brush rotating at high speed makes a loud noise during operation.
text_image
8 1 2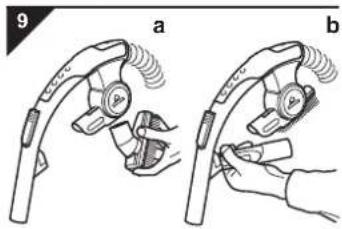
text_image
9 a b4.1 Before starting vacuum-cleaning
WARNING:
Danger of injury! Only assemble the appliance if it is not connected to the power supply. Otherwise the machine might start up and parts of your body, hair or pieces of clothing might be sucked in.
ATTENTION:
Use only intact nozzles. Damaged nozzles may scratch or damage surfaces and objects.
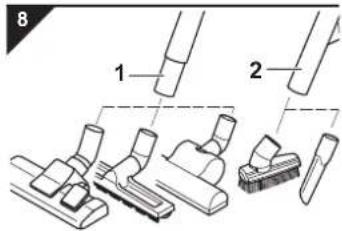
This is how to attach the nozzles:
-
Switch off the vacuum cleaner and pull the plug from the mains socket.
-
Pull the attached nozzle from the telescopic tube.
-
Put the desired nozzle onto the bottom end of the telescopic tube (Fig. 8/1) or if necessary directly onto the handle (Fig. 8/2).
ATTENTION:
Using the cylinder vacuum cleaner without a nozzle attached increases the danger of accidentally sucking in objects.
- Attach the nozzles no longer required to the accessory bracket, as far as this is possible (Fig. 9).
WARNING:
Danger of injury! A damaged appliance must never be used. Check the cylinder vacuum cleaner and the power cord before each use.
ATTENTION:
Only use the cylinder vacuum cleaner with all filters intact, in dry condition and correctly placed. Make sure that the openings of the vacuum cleaner are not clogged or obstructed. Otherwise the vacuum cleaner might be damaged.
ATTENTION:
Check the requirements of your floorings before using the vacuum cleaner. Follow the recommendations of the flooring manufacturers.
NOTE:
Your cylinder vacuum cleaner is equipped with a safety switch to prevent overheating. It automatically cuts off the power supply if the motor is overheated. If this happens switch off the cylinder vacuum cleaner and disconnect it from the mains. Remove the cause of the overheating. Wait for about 45 minutes. After it has cooled off, you may use the cylinder vacuum cleaner again.
4.2 Vacuum cleaning
text_image
10 1 2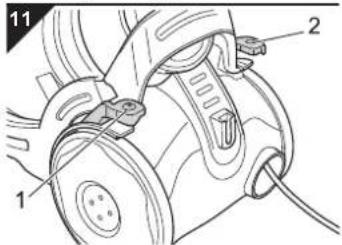
text_image
Technical diagram of a mechanical assembly with labeled parts 1 and 2
text_image
12 a b 1
text_image
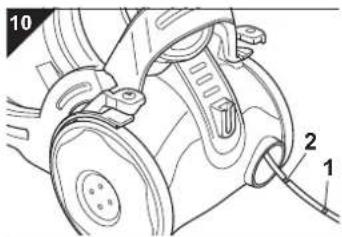
13 1- Attach the desired nozzle ▷Chapter 3.2, "Assembly" or ▷Chapter 3.3, "Using further nozzles (accessories)".
- Pull out the cord by the plug up to the yellow mark (Fig. 10/1).
WARNING:
Danger of electric shock! If the red marking (Fig. 10/2) is visible, retract the cord by pressing the retract button (Fig. 11/2) to pull in the cable up to the yellow mark again. Otherwise the cord might break.
WARNING:
Danger of tripping! Pull out the power cord only as far as necessary. After vacuuming, roll up the power cord again by pressing the cable retract button (Fig. 11/2) immediately..
-
Switch on the cylinder vacuum cleaner with the on/off switch (Fig. 11/1).
-
Set the nozzle switch to "carpet" or "hard floor" (Fig. 12/1) according to the floor to be cleaned:
- Hard floor (Fig. 12/a)
Laminate, tiles, PVC, etc.
- Carpet (Fig. 12/b)
Short- and deep-pile carpets, rugs, etc.
- When working with the cylinder vacuum cleaner, pull if after you like a sleigh.
NOTE:
With the bypass vent (Fig. 13/1) you can quickly reduce suction power if less suction is needed, e.g. to release objects accidentally sucked in.
5.1 Switching off and retracting the power cord
text_image
14 1 25.2 Transport and storage
natural_image
Mechanical component diagram showing a valve assembly with a black arrow pointing to a specific part (no text or symbols present)5.3 Emptying the dust container
text_image
16 1 R###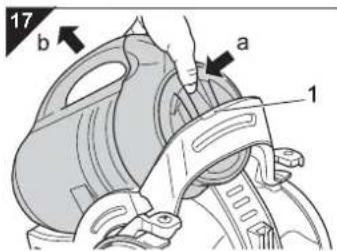
text_image
17 b a 1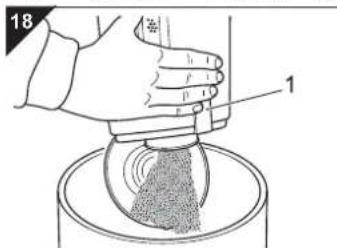
text_image
18 1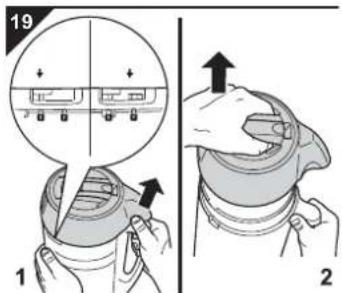
text_image
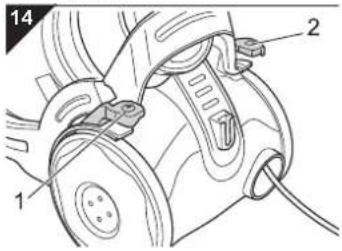
19 1 2- Switch off the cylinder vacuum cleaner with the on/off switch (Fig. 14/1) and pull the plug from the mains socket.
- Keep the plug in your hand.
WARNING:
Danger of injury! During retraction the power cord can whip around, become an obstacle or overthrow objects.
- Push the cord retracting button (Fig. 14/2) to retract the power cord.
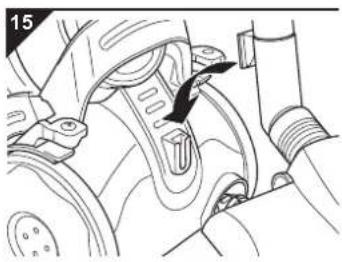
To transport the cylinder vacuum cleaner you can carry it by the handle (Fig. 1/13).
WARNING:
Danger of injury! Switch off the appliance when not working with it and observe the notices under ▷Chapter 5.1, "Switching off and retracting the power cord".
To store it or when not working with it you can hook the parking-hook onto the parking-bracket (Fig. 15). It is recommended to first retract the telescopic tube.
ATTENTION:
Never store the appliance next to heat sources (e.g. stoves or radiators). Avoid exposing it to direct sunlight. Heat can damage the appliance.
Before storing it for a longer time empty the dust container an dispose of it in an orderly manner.
Also clean or replace the filters ▷Chapter 5.5, "General information about the filters".
■Always store the appliance in a cool, dry place and out of reach of children.
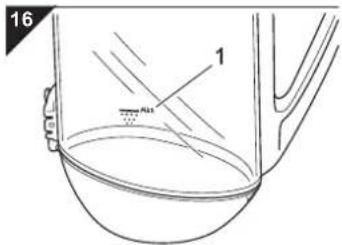
■ Empty the dust container after each use.
However, empty the dust container at latest when the accumulated dust in the container has reached the "MAX" mark (Fig. 16/1) or the indicator "Empty dust container" (Fig. 17/1, option) lights up.
ATTENTION:
Before emptying the dust container switch off the appliance and observe the notices under ▷Chapter 5.1, "Switching off and retracting the power cord". In this way you avoid dust destroying the appliance.
- Remove the dust container by unlatching it with your thumb as shown (Fig. 17/a) and then fold it down (Fig. 17/b).
NOTE:
Be careful when removing the dust filter bag so that no dust escapes.
NOTE:
You can dispose of the dust filter bag with your regular domestic trash if it contains no waste materials prohibited in domestic trash.
- Empty the dust container:
either
■ by folding down the bottom plate (Fig. 18):
- Hold the container low over the dustbin before doing this
- Unlatch the bottom plate (Fig. 18/1.).
or
■ by removing the cyclone unit (Fig. 19):
- Release the cyclone unit by first turning it away from the dust container with your thumb as shown (Fig. 19/1).
- The arrow moves from to (Fig. 19/magnifier).

- Remove the cyclone unit from the dust container (Fig. 19/2).
- Empty the container into the dustbin carefully.
text_image
20 !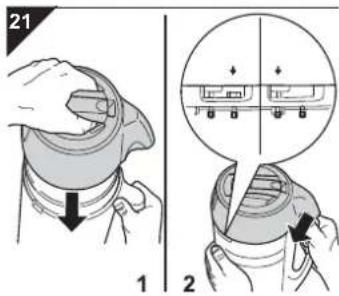
text_image
21 1 25.4 Cleaning the housing
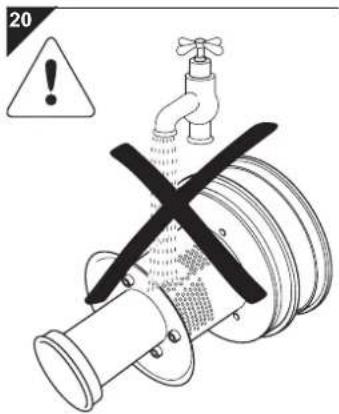
- Remove any residual dust remaining in the dust container and in the cyclone unit. Use only a dry cloth for this, or, if necessary, a brush with soft bristles.
ATTENTION:
The cyclone unit must by no means come in contact with water. Otherwise adhering dirt will clog the cyclone unit.
-
Also clean the motor protection filter when emptying the dust container. ▷Chapter 5.7, "Cleaning the dual motor protection filter".
-
Put the cyclone unit back correctly onto the dust container and latch it by twisting it clockwise (Fig. 21/2). The arrow moves from tq (Fig. 21/magnifier).

- If the bottom plate is still open, fold it back up, pressing until it snaps into place with a distinct click.
- Check that the elements are properly and securely in position.
- Put the dust container back into its holder. You must feel and hear it clicking into place.
- Also check that the dust container is securely in place before carrying the appliance by the handle.
WARNING:
Before you clean the appliance, switch off the appliance and remove the mains plug, ▷Chapter 5.1, "Switching off and retracting the power cord".
ATTENTION:
Do not use cleaning or scouring agents or alcohol, as these might damage the appliance's housing.
■ Clean the outside of the housing using a slightly damp cloth only.
5.5 General information about the filters
natural_image
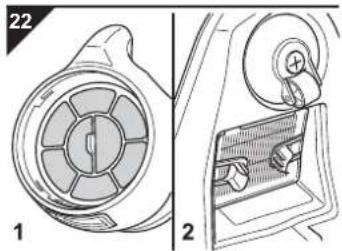
Technical illustration of a mechanical component with two views: top shows internal gear-like structure, bottom shows internal housing with handle (no text or symbols)Your cylinder vacuum cleaner is equipped with the following filters:
- Dual motor protection filter (Fig. 22/1)
- Hygienic exhaust filter (Fig. 22/2)
The filters can get dirty during use and therefore must be checked regularly:
■ Adhere to the following intervals for checking filters.
■ Clean the filters as described below.
■ Damaged or deformed filters, however, must be replaced immediately.
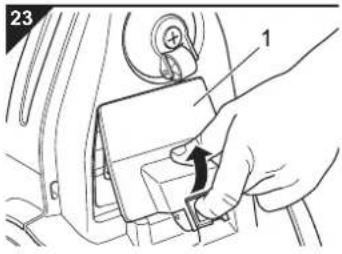
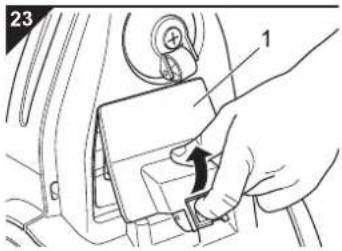
5.6 Cleaning the hygienic exhaust filter
text_image
23 1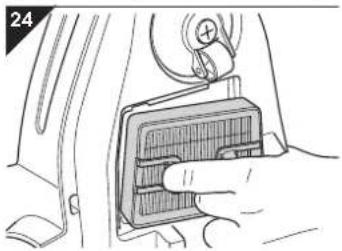
natural_image
Hand inserting a component into a car interior panel (no text or symbols visible)5.7 Cleaning the dual motor protection filter
natural_image
Illustration of a hand holding a mechanical component with a curved arrow indicating rotation (no text or symbols)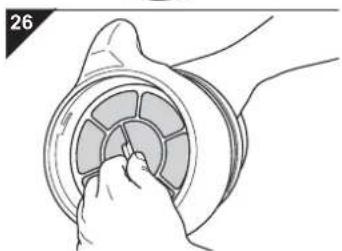
natural_image
Illustration of a hand inserting a circular component into a ring (no text or symbols)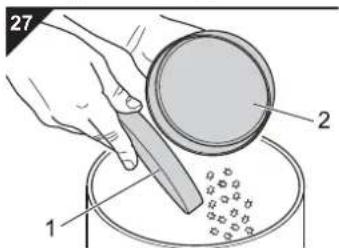
text_image
27 1 2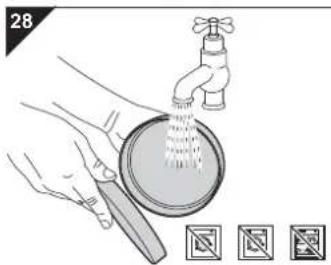
natural_image
Illustration of hands cleaning a faucet with water spray, accompanied by three icons below (no text or symbols)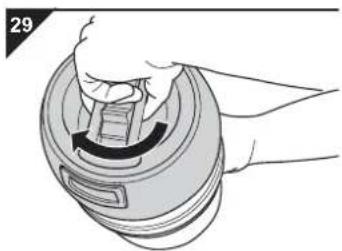
natural_image
Hand holding a mechanical component with a curved arrow indicating rotation (no text or symbols)The hygienic exhaust filter (Fig. 24) filters finest particles from the exhaust air stream.
- Checking: Check the hygienic exhaust filter regularly, at least every 3 – 6 months.
-
Cleaning: If during checking you see that the filter is dirty, clean it as described below:
-
Switch the appliance off and stand it upright.
- Press down the release catch of the exhaust filter cover on the bottom of the appliance (Fig. 23/1) and fold it down.
- Remove the hygienic exhaust filter pulling it by the ears provided for this (Fig. 24).
- Clean the hygienic exhaust filter by tapping out the dirt over a dustbin. Should this be insufficient, clean the filter with a soft brush, e.g. the furniture brush supplied with the appliance. If this dry cleaning is still insufficient, then rinse the filter in clear cold water.
ATTENTION:
The filter is washable, but not suitable for cleaning in washing machines or dishwashers. Also, do not use cleansers for cleaning the filters. Leave the filter element to dry after cleaning (approx. 24 hours at room temperature). Only put it back into the appliance when it is completely dry.
- Put the cleaned hygienic exhaust filter back into place (Fig. 24). Push it down firmly until it fits snugly into the holder.
- Attach the exhaust filter cover first at the upper side and then fold it down until it snaps into place.
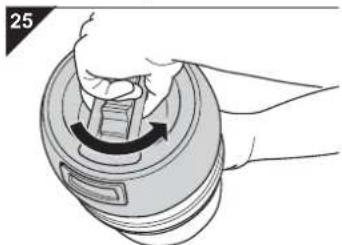
The dual motor protection filter (Fig. 26) prevents coarse particles from destroying the motor.
- Checking: Always check the dual motor protection filter when emptying the dust container.
-
Cleaning: If during checking you see that the filter is dirty, clean it as described below. However, the filter should be cleaned at least every 3 – 6 months.
-
Switch off the appliance and remove the dust container as described in ▷Chapter 5.3, "Emptying the dust container", steps 1-2.
- Open the upper cover of the dust container by turning it counter-clockwise (Fig. 25).
-
Remove the dual motor protection filter by pulling it out by the tab provided for this (Fig. 26).
-
Separate the motor protection filter element (Fig. 27/1) from the filter holder (Fig. 27/2) over a dustbin.
-
Thoroughly rinse both filter elements by hand with clear cold water (Fig. 28).
ATTENTION:
The filter is washable, but not suitable for cleaning in washing machines or dishwashers. Also, do not use cleansers for cleaning the filters. Then leave the filter elements to dry (approx. 24 hours at room temperature). Only put them back into the appliance when they are completely dry.
- If a filter element is damaged or deformed, replace it by a new one (Chapter 6.2, "Accessories and Spare Parts").
- Put the motor protection filter element (Fig. 27/1) back into the filter holder (Fig. 27/2).
-
Put the dual motor protection filter back into the dust container (Fig. 26).
-
Close the upper cover of the dust container by turning it clockwise (Fig. 29)
-
Put the dust container back into the appliance. It must catch with a click.
6.1 If the appliance does not work as it should
Before contacting your authorised Royal dealer, Royal service partner or appliance market, first follow the procedure in the following table to check if you can handle the problem yourself
WARNING:
Danger of injury! Never use a defective appliance! Always switch off the appliance and disconnect it from the mains before starting troubleshooting ▷Chapter 5.1, "Switching off and retracting the power cord".
| Problem Possible | cause Solution | |
| The appliance will not start P | lug is not plugged in or the appliance is not switched on. | Insert the plug into a mains socket and switch on the appliance ▷Chapter 4.2, "Vacuum cleaning". |
| The socket does not carry any current. Test the cylinder vacuum cleaner at another socket which you are sure carries current. | ||
| Power cable is damaged. Have the cord replaced by the Royal Appliance Customer Service, address ▷Page 62, "International Service". | ||
| The cleaning result is unsatisfactory or the indicator "Empty dust container" (option) lights up. | Dust container is overfilled. Empty/clean the dust container. | |
| Nozzle, telescopic tube or suction hose are blocked. | Remove the obstacle. If necessary, use a long wooden stick (e.g. a broomstick) to do this. | |
| The nozzle you are using does not suit the flooring. | Change nozzles ▷Chapter 3.3, "Using further nozzles (accessories)". | |
| The "carpet/hard floor" switch (Fig. 1/9) is in the wrong position for the particular type of floor. | Set the "carpet/hard floor" switch to the correct position for the type of floor, ▷Chapter 4.2, "Vacuum cleaning", step 4. | |
| The appliance makes unusual noises. | Sucked-in objects are obstructing the air stream. | Remove the objects. If necessary, use a long wooden stick (e.g. a broomstick) to do this. |
NOTE:
If you were unable to solve the problem following this table, contact the Royal customer service ( Page 62, "International Service").
6.2 Accessories and Spare Parts
| Item number Description | Contents | |
| 5020001 | Dual motor protection filter | 1 motor protection filter element + filter holder |
| 5020002 | Hygienic exhaust filter | 1 hygienic exhaust filter |
| M209 | Turbo brush | 1 turbo brush |
| M203 | Parquet brush | 1 parquet brush |
6.3 Sources
Accessories and spare parts can be reordered. You can get these:
■ at the dirt devil online shop at www.dirtdevil.de
or from ▷Page 62, "International Service"
6.4 Disposal

Dispose of the appliance in compliance with the environmental protection laws of your country. Electrical waste may not be disposed of together with domestic waste. Use local old-appliance collection points instead. The filters used are made of environment-friendly materials and can be disposed of with your domestic trash.
6.5 Conditions of warranty
We grant a warranty of 24 months from the date of purchase for the distributed appliance.
Within this period we will either repair or replace the appliance or accessory (damages to accessories do not automatically cause a replacement of the complete appliance) all defects due to manufacturing or materials at no cost. Damages due to inappropriate use (operation on wrong voltage or type of current, connecting to unsuitable power supplies, breakage, etc.) are exempt from warranty, as are normal wear and minor defects that only negligibly affect the appliance's value or serviceability. Intrusions by unauthorised parties and the use of spare parts not supplied by Royal Appliance invalidate the warranty. Consumable parts are not included in the warranty and must be paid for!
The warranty is only valid if the date of purchase has been acknowledged by the dealer's stamp and signature on the warranty card or if a copy of the invoice or sales slip is included with the sent-in appliance. Warranty work does not extend the warranty period nor does it constitute a claim for a new warranty!
6.6 In case of a warranty claim
Send us the appliance with its dust container empty and a short description of the fault in printed letters. Head your accompanying letter with the notice "warranty claim". Send it to the following address, including the warranty card or a copy of the invoice or purchase slip:

▷Page 62, "International Service"
Merci beaucoup !
- Turbobrosse (ill. 7/2)
text_image
Technical diagram of a vacuum cleaner with numbered parts for identification and assembly reference.text_image
Diagram showing a mechanical assembly with labeled parts and directional arrows indicating motion or force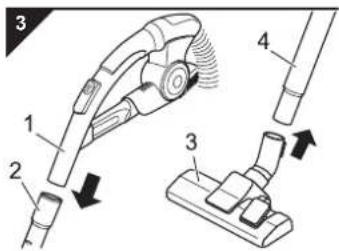
text_image
Diagram of a vacuum cleaner with labeled parts and directional arrows indicating motion or assembly.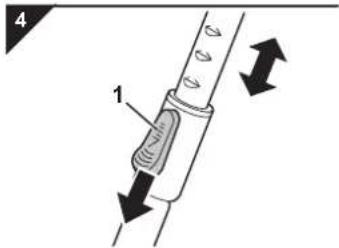
text_image
4 1natural_image
Technical illustration of two mechanical components labeled 1 and 2, showing different assembly styles (no text or symbols present)! AVERTISSEMENT:
natural_image
Mechanical assembly diagram showing a component with a black arrow indicating a specific part (no text or symbols present)natural_image
Technical illustration of a mechanical component with two views: top shows a circular component with internal segments, bottom shows a close-up view of a mechanical part with a handle (no text or symbols)natural_image
Hand inserting a component into a car's air vent (no text or symbols visible)natural_image
Illustration of a hand pressing down on a mechanical component with a curved arrow indicating rotation (no text or symbols)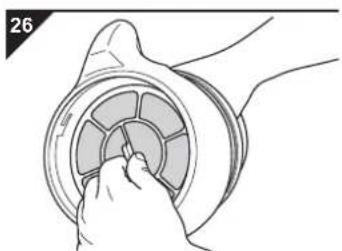
natural_image
Illustration of a hand inserting a circular component into a ring (no text or symbols)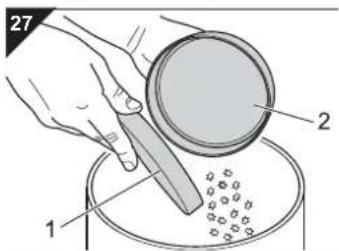
text_image
27 1 2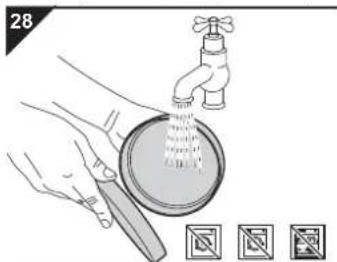
natural_image
Illustration of hands cleaning a faucet with a drain, showing water spray and a magnified view of the drain (no text or symbols)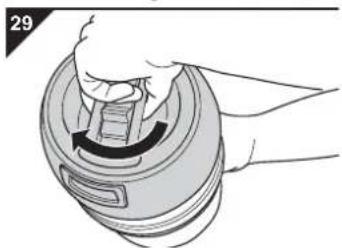
natural_image
Illustration of a hand holding a circular device with a curved arrow indicating rotation (no text or symbols)TD "MEDJIMURKA" D.D.
Trg Republike 6
40000 Čakovec
HRVATSKA
Tel.: +385 - 40 - 31 27 60
Fax: +385 - 40 - 32 86 61
NL
Z.E.S. Goes B.V.
T.a.v. afd. Service
Pearyweg 1
4462 GT Goes
NEDERLAND
Tel: +31 - 113 - 24 07 00
Fax: +31 - 113 - 24 07 50
dirtdevil@zesgoes.nl
SK
Aspico Slovakia s r.o.
Kracanska 40/104
The image contains a single, solid black rectangular outline on a white background. According to the correction guidelines, such stylistic or background lines must be ignored by the OCR result. Therefore, the corrected OCR text is: [Empty]
Royal Appliance Espana, SL
Royal, Dirt Devil, Stellar
C/CRONOS, N° 20, PORTAL 2,3° 13
28037 Madrid
ESPAÑA
Tel: +34 - 902 - 43 06 63
HU
Aspico Kft.
Puskás Tivadar út.4.
9027 Győr
MAGYARORSZÁG
Tel.: +36 - 96 - 51 12 91
szerviz@aspico.hu
PL
OBSŁUGA GWARANCYJNA I SERWISOWA
QUADRA-NET Sp. z o.o.
DYSTRYBUTOR I GWARANT
DSV Sp. z o.o. S.K.A. Gdynia,
Plac Kaszubski 8
The image contains a single, solid black rectangular outline on a white background. According to the correction guidelines, such stylistic or background lines must be ignored by the OCR result. Therefore, the corrected OCR text is: [Empty]
Bluepoint-Service SAGL
Via Cantonale 14
6917 Barbengo
SWITZERLAND
Tel. +41 (0) 91 980 49 73
E-Mail: info@bluepoint-service.ch
www.bluepoint-service.ch
The image contains a single, solid black rectangular outline on a white background. According to the correction guidelines, such stylistic or background lines must be ignored by the OCR result. Therefore, the corrected OCR text is: [Empty]
OPM France Nant'Est entreprise
natural_image
Line drawing of a vacuum cleaner device with mesh casing and threaded port (no text or symbols)Fehlerbeschreibung • Description of the malfunction • Description du problème • Omschrijving van de fout • Descripción del fallo • Descrizione del difetto • Hata tanimi:
![DIRT DEVIL Infinity V8 M5020 - The image contains a single, solid black rectangular outline on a white background. According to the correction guidelines, such stylistic or background lines must be ignored by the OCR result. Therefore, the corrected OCR text is: [Empty] - 1](/content/2026/03/436262/images/edb669c399c4bca8f6edb006905910c0c5010afcaa99af94f24ca7dd249c633f.jpg)
Royal Appliance International GmbH
Jagenbergstraße 19
41468 Neuss
Germany
+49 (0) 2131 - 60 90 0
+49 (0) 2131 - 60 90 60 95
info@dirtdevil.de
www.dirtdevil.de