
DD9002 - Vacuum Cleaner DIRT DEVIL - Free user manual and instructions
Find the device manual for free DD9002 DIRT DEVIL in PDF.

| Product Type | 2-in-1 Cordless Stick Vacuum |
| Brand | Dirt Devil |
| Model | DD9002 |
| Dimensions (L x W x H) | 392 x 110 x 164 mm |
| Net Weight | 2.2 kg |
| Gross Weight | 2.9 kg |
| Power Supply | Lithium battery 22.2 V (non-replaceable) |
| Charger | Power adapter 100-240 V ~50/60 Hz, output 26.0 V = 0.45 A |
| Runtime (low speed mode) | ~30 minutes |
| Runtime (high speed mode) | ~15 minutes |
| Charging time | ~4.5 hours |
| Maximum power consumption | 150 W |
| Maximum suction power | 10 kPa (10,000 Pa) |
| Dust container capacity | 0.5 L |
| Filtration system | Washable, bagless |
| Brush type | Motorized brush + 2-in-1 crevice tool |
| Noise level | 78 dB |
| Number of power settings | 2 (low / high) |
| Material | ABS plastic |
| Adapter cable length | 1 m |
| Package contents | Vacuum cleaner, 2-in-1 crevice tool, wall mount, adapter |
| Use | Household use only |
| Maintenance | Clean the filter and dust container with water, dry before reuse |
| Safety | Read instructions carefully, do not use with liquids, keep out of reach of children |
| Recycling | Do not dispose of with household waste, follow local regulations (2012/19/EU) |
Frequently Asked Questions - DD9002 DIRT DEVIL
User questions about DD9002 DIRT DEVIL
0 question about this device. Answer the ones you know or ask your own.
Ask a new question about this device
Download the instructions for your Vacuum Cleaner in PDF format for free! Find your manual DD9002 - DIRT DEVIL and take your electronic device back in hand. On this page are published all the documents necessary for the use of your device. DD9002 by DIRT DEVIL.
USER MANUAL DD9002 DIRT DEVIL
natural_image
White and red clean vacuum cleaner with gray handle and black base (no text or symbols visible)

STICK VACUUM CLEANER
ITEM: 871125247506
A.I.&E. Adriaan Mulderweg 9-11
5657 EM Eindhoven, The Netherlands


This product is a rechargeable electric vacuum cleaner: it must be used under normal conditions. Never leave a vacuum cleaner running unattended.
Note: Please read the instruction carefully before use.
Please keep the instruction manual for future reference.
Please do not use outdoors in rainy weather.
Warning: Safety precautions are essential when using any household appliances, including not limited to fire, short circuit, and personal injury prevention.
Personal Safety
- Check if the voltage indicated on the appliance corresponds to the local mains voltage before you connect the appliance.
- Do not use the vacuum cleaner or the charger if it is damaged.
- The charger and its adapter cannot be replaced. If the charger or its adapter is damaged, the appliance must be discarded.
- The adapter contains a transformer. Do not cut off the adapter to replace it with another plug, as this causes a hazardous situation.
- Do not hold the appliance with the dust compartment pointing upwards and do not tilt the appliance to one side when you vacuum up liquids.
- This appliance is not intended for use by persons (including children) with reduced physical, sensory or mental capabilities, or lack of experience and knowledge, unless they have been given supervision or instruction concerning use of the appliance by a person responsible for their safety. Children should be supervised to ensure that they do not play with the appliance.
- Keep the appliance and its cord out of the reach of children.
- The plug must be removed from the socket-outlet before cleaning or maintaining the appliance.
- User maintenance and cleaning shall not be made by children without supervision.
- Keep the appliance and its cord out of the reach of children.
- This appliance can be used by children aged from 8 years and
above.
- This appliance contains batteries that are non-replaceable.
Caution
- Please use the charger provided in the package.
- Please do not change the charger in any way.
- Please ensure that the input voltage is consistent with the voltage marked on the charger.
- Chargers and batteries are compatible. If chargers of other specifications are used, fire hazard may occur.
- Please check whether the charger power cord is damaged or aged before use. Damaged or tangled chargers increase the risk of fire and short circuits.
- Please treat the charger power cord correctly.
- Do not pull electrical appliances through charging cable.
- Do not pull the charging cable to unplug the charger. You need to hold the charger by hand for plugging and unplugging.
- Do not store the charger by winding the charger line.
- The charger line must be away from hot surface or sharp objects.
- The charger line cannot be replaced by itself. If the charger line is damaged, please contact the after-sales service for replacement.
- Do not touch the charger or the machine with damp hands.
- Do not store the machine outdoors or charge the machine outdoors.
- When cleaning and maintaining the machine, make sure to remove the charger from the plug.
Services:
- Before use, please carefully check whether the product is damaged or abnormal.
- If a part of the product is damaged or defective, please do not use it.
- Please find a professional after-sales service and carry out maintenance according to relevant safety regulations. Maintenance by non-professionals can be dangerous.
- Please do not alter this product in any way to avoid any personal injury.
- Please use replacement parts or spare parts provided or recommended by the manufacturer.
Tips:
- Dry vacuum cleaner.
- This vacuum cleaner is not waterproof, so please do not breathe water or damp dust.
- This vacuum cleaner cannot absorb any burning or smoking dust.
- Please use it according to the instructions.
- Please do not use in the cement road, asphalt road and other rough surface;
- This type of vacuum cleaner is for household use. Please do not use it in factories or commercial places.
- Do not use it to absorb construction waste and heavy metal dust.
- The first use, must be fully charged before use.
Warning:
- Please do not use water, solvent or polishing agent to clean the surface of electrical appliances, please use dry cloth cleaning.
- Do not soak the vacuum cleaner in water or wash it in the dishwasher.
- Do not use it without central filtration system installed.
- If you hear a shrill sound when using the machine, it must be due to the reduction of suction force. At this time power off the appliance and clean all ventilation ducts.
- Remove large or sharp items to prevent damage to the dust bucket and the center filter system before cleaning.
Danger:
- In order to avoid fire or explosion cause by electric equipment (arc or spark), keep it away from flammable, explosive and other objects or liquids when operating the vacuum cleaner.
- When the vacuum cleaner is not working, does not charge or operation time of the battery is not sufficient to operate, the vacuum cleaner must be replaced by a professional.
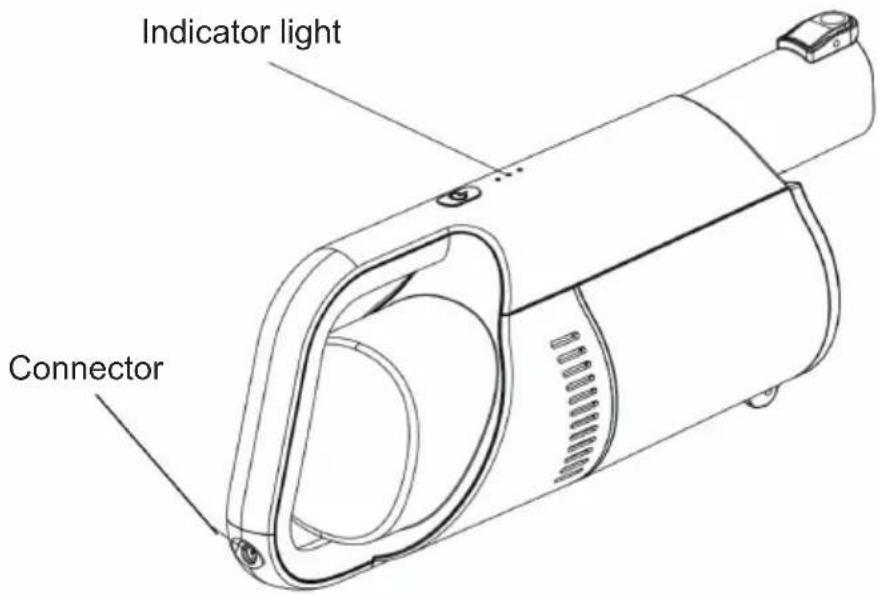
2. PARTS
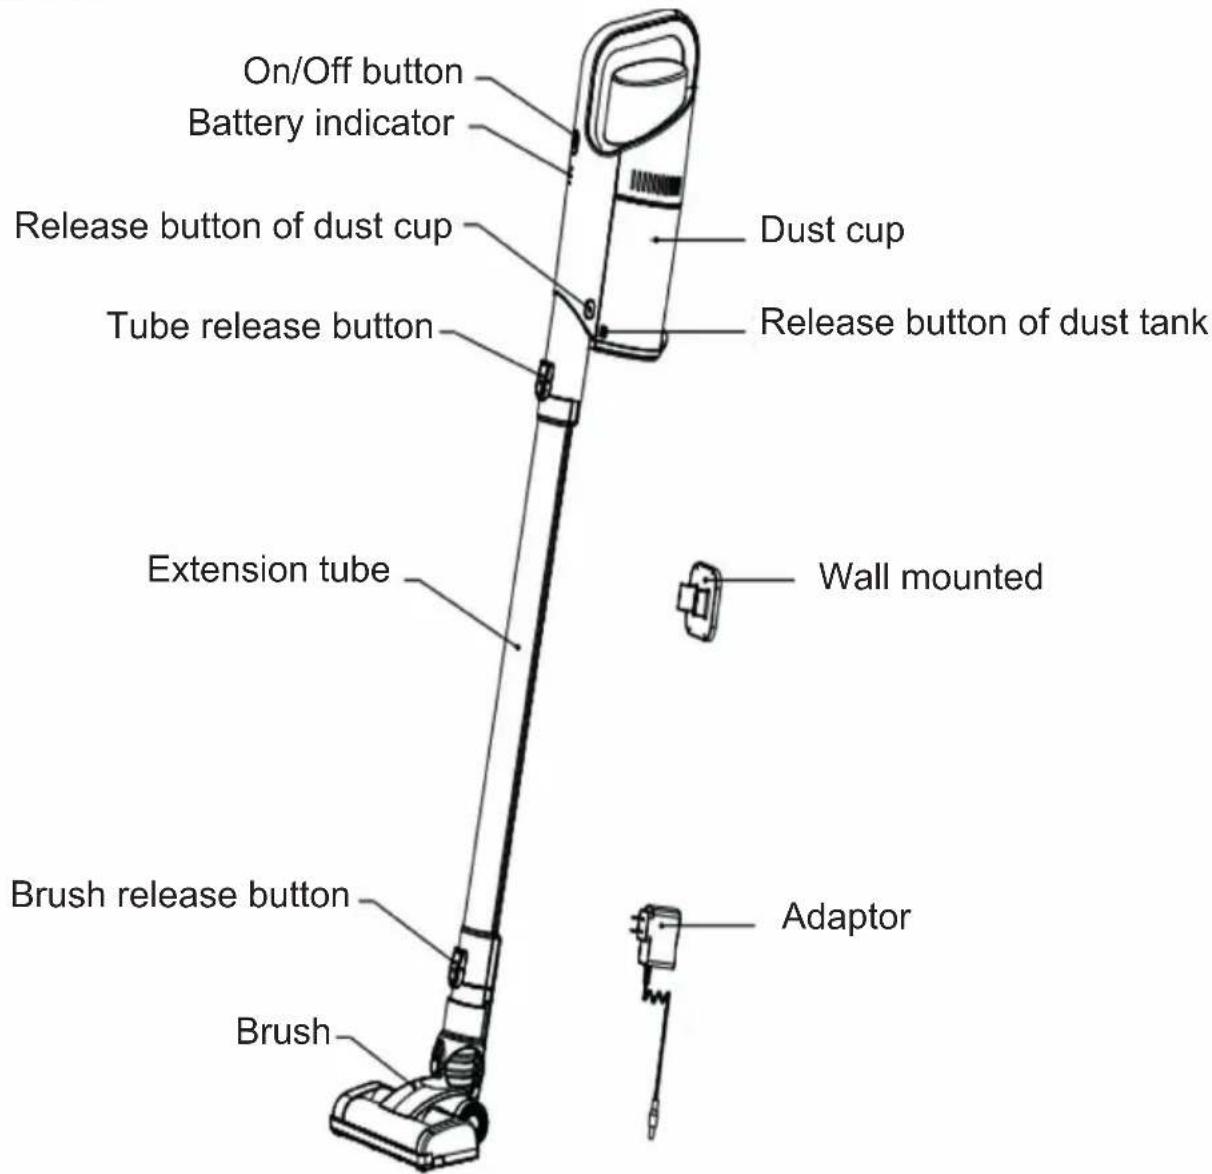
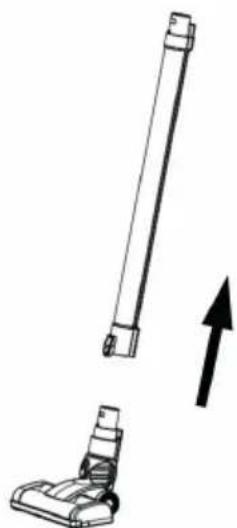
3. ASSEMBLY
- Connect the extension tube to floor brush. You'll hear a "Click" when they're connected.
natural_image
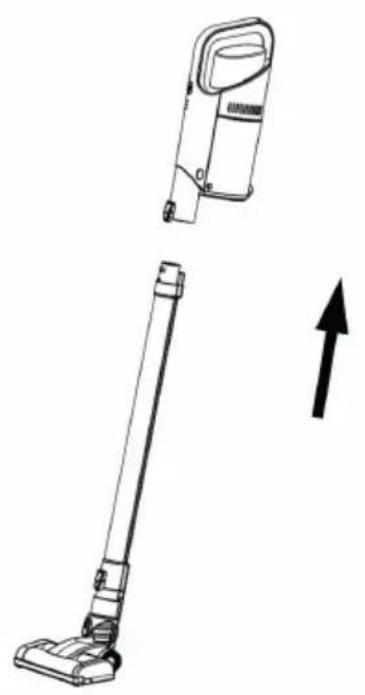
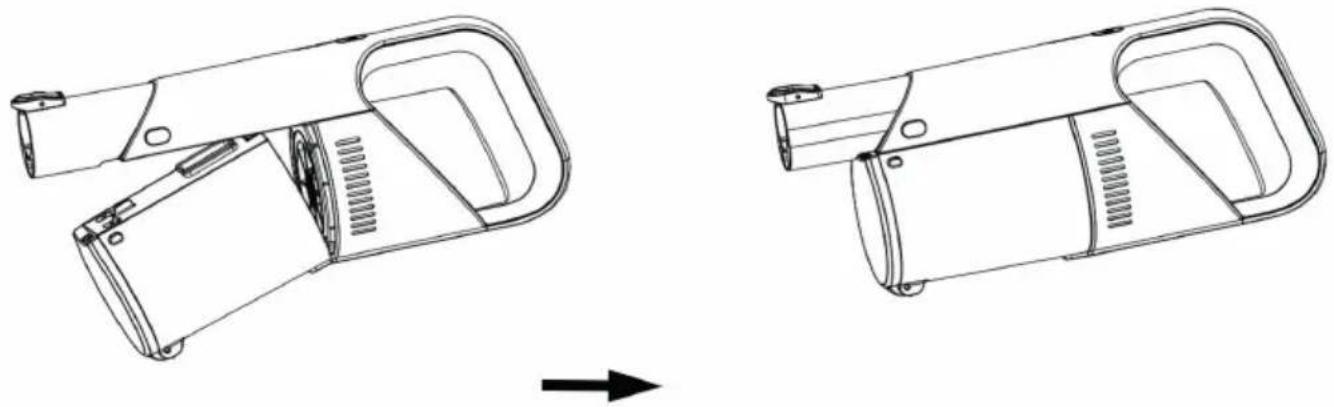
Diagram showing a vertical brush and a base device with an upward arrow, no text or symbols present- Connect the hand vacuum assembly to the extension tube. You'll hear a "Click" when they're connected.
natural_image
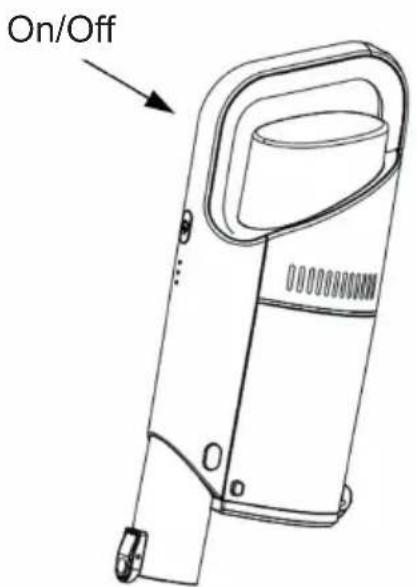
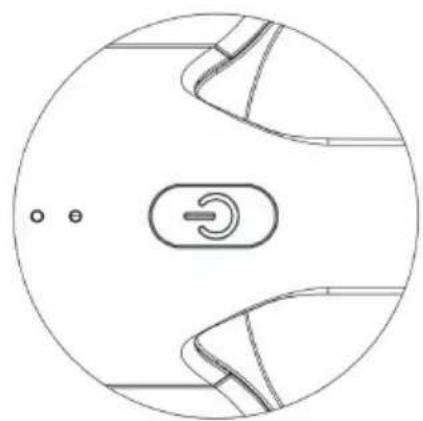
Line drawing of a vacuum cleaner with an arrow indicating upward motion (no text or symbols)- On/off button
a) Press the on/off button for more than 3 seconds, the machine power on and works in low speed, the indicator lights up.
b) Press the on/off button again to switch to high speed.
c) Press the on/off button again and the machine stops working.
natural_image
Circular diagram with internal mechanical components and a central switch symbol (no text or labels)4. Charging
a) When the indicator light flashes, it indicates that the battery is low and needs to be charged.
b) When charging, connect the adaptor to the power supply and the machine. The three blue lights on the machine are flashing, indicating that it is charging. When the three blue lights are on mean that the battery is full.
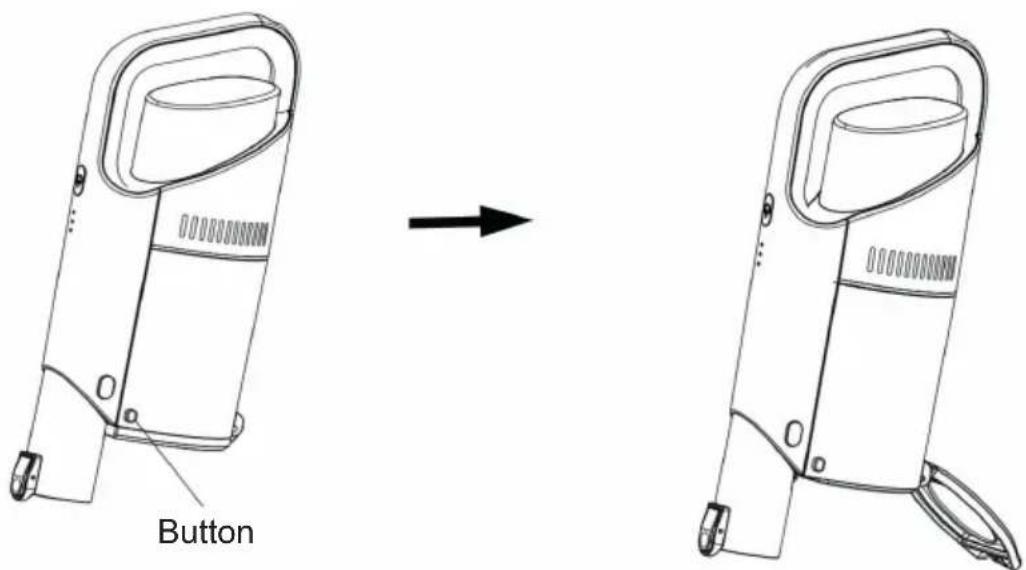
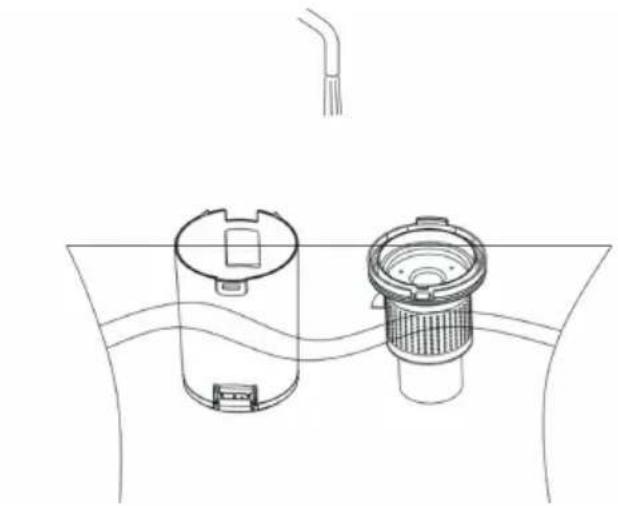
4. CLEAN THE FILTER SYSTEM
- Take the machine to the top of the garbage container and press the button to open the dust cup lid will open automatically and the garbage in the dust cup can be poured out as followed.
- If the cotton silk with large lump in the dust cup cannot be poured out, take off the dust cup and take out the filtration system in the dust cup, and then pour out the garbage in the dust cup, as shown below.
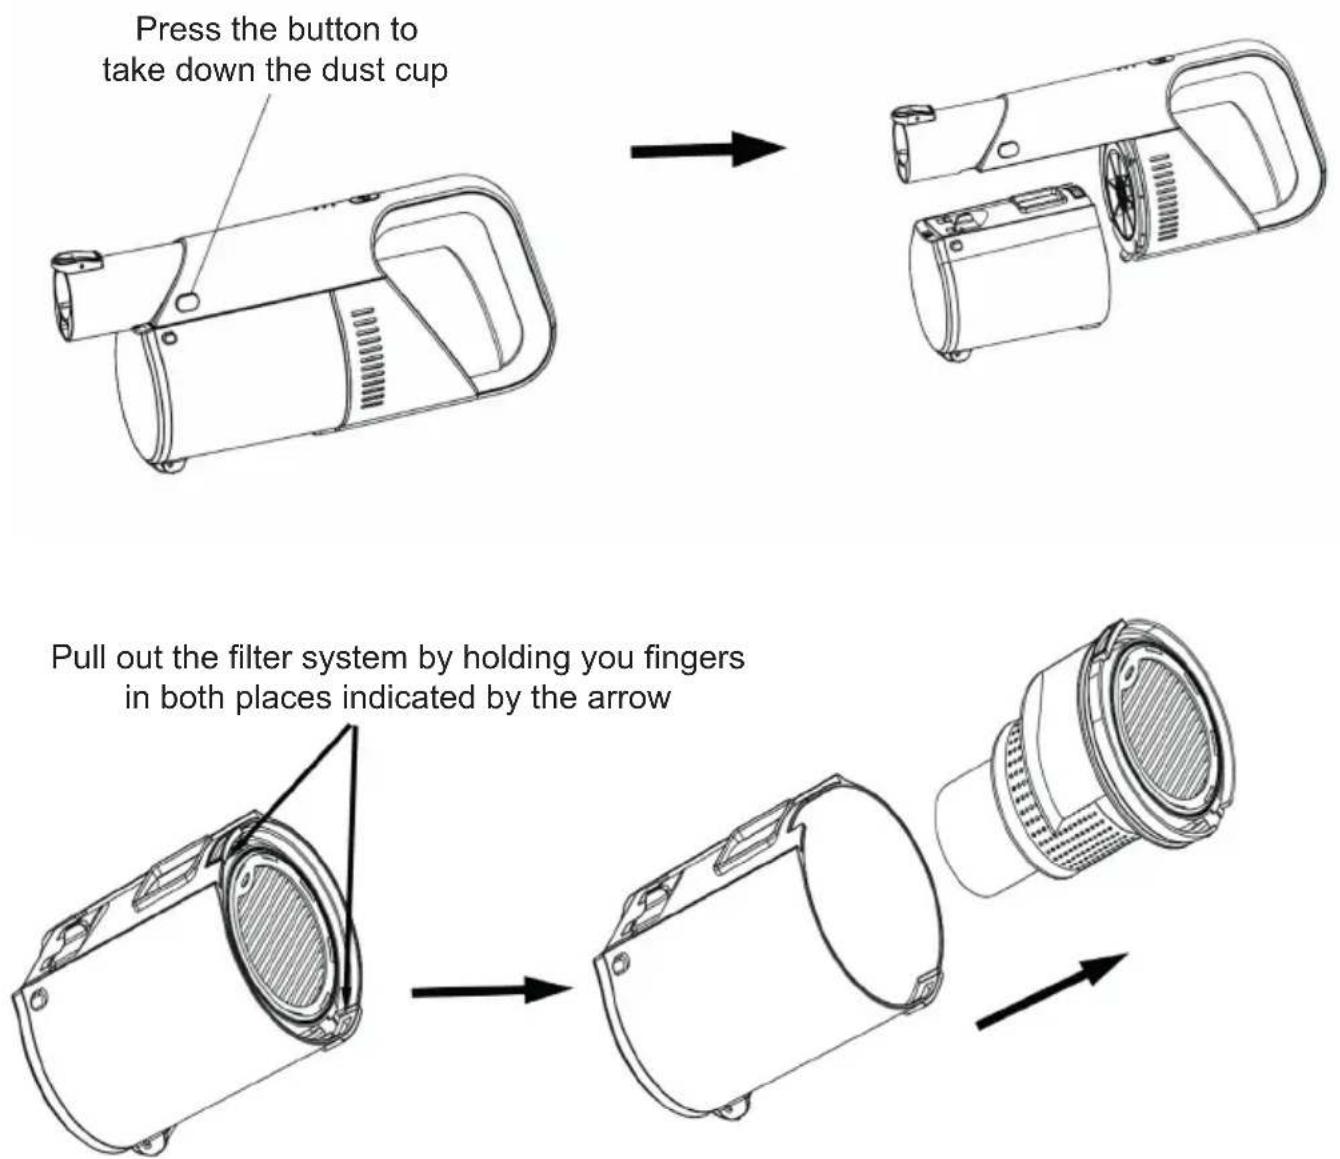
- The dust cup and filtration system can be cleaned with water as followed picture.
natural_image
Line drawing of a cylindrical device with a side-mounted sensor or filter inside, connected to a curved surface (no text or symbols)-
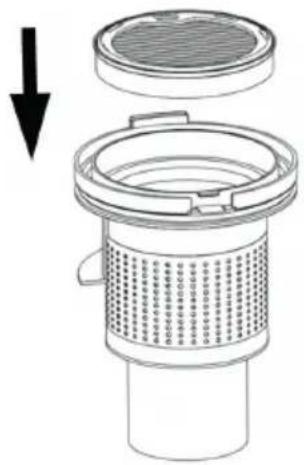
After cleaning, be sure to dry the dust cup and filter cover system before loading into the machine.
-
Install the filter hype in the direction shown
natural_image
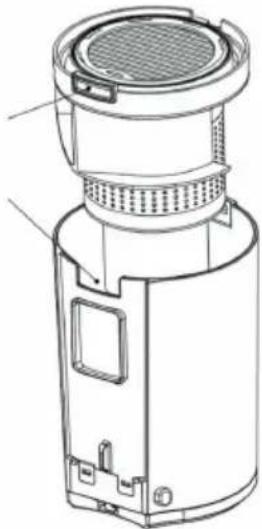
Diagram of a mechanical component with a downward arrow indicating force or direction (no text or symbols present)- Install the filter system into the dust cap and then install the dust cup on the host machine as shown below (note the slot position).
The upper hand of the filter is placed in the dust cup against the gap
natural_image
Technical line drawing of a cylindrical device with internal components and mounting brackets (no text or symbols)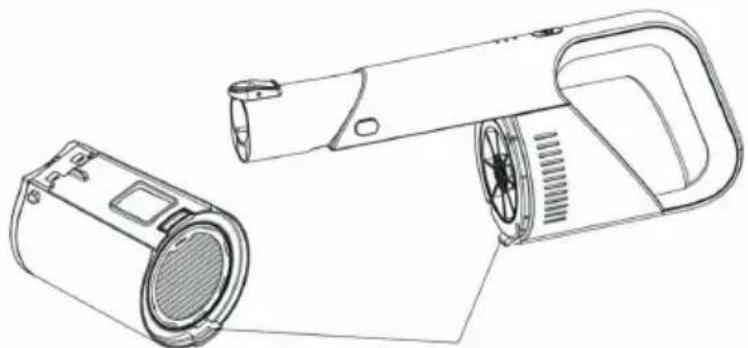
natural_image
Line drawing of a handheld device with a speaker and ventilation slots (no text or symbols)The rib protruding here on the main machine is put into a groove in the dust cup
natural_image
Technical line drawing of a device component before and after assembly (no text or symbols)- When the machine has cleaned up the dust, it can be arranged according to the following picture.1. Take out the 4 accessories 3M rubber pad and stick it on the bottom of the storage seat. Then stick the storage seat on the wall and put the host on the storage seat. (note that the position of the receiving seat should not be too high from the ground, and the floor brush on the receiving seat should be placed on the ground).
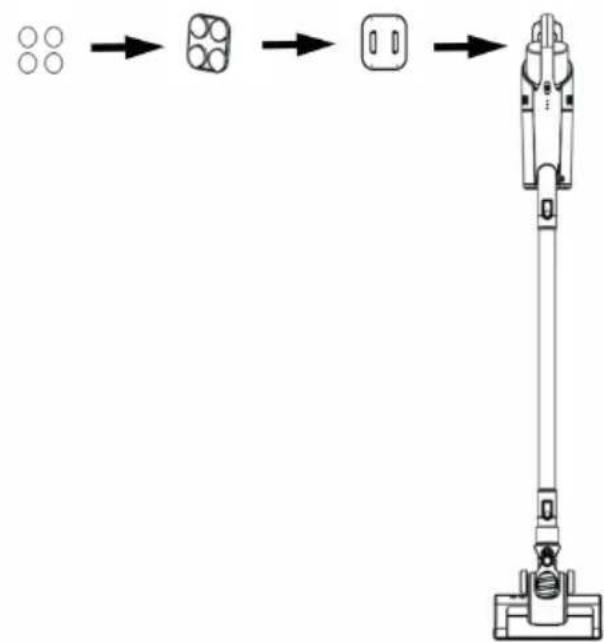
flowchart
graph LR
    A[" "] --> B[" "]
    B --> C[" "]
    C --> D[" "]
5. MAINTENANCE AND REPAIR Attention
- When cleaning the machine, please turn off the power and pull out the plug.
- Do not expose the machine to outdoor in damp environment, and do not put any accessories into the dishwasher for cleaning.
- The shell of the vacuum cleaner, dust bucket can be cleaned with a wet towel, but in the machine operation, be care of liquid
substances into the machine.
- Do not use strong detergent (such as detergent, thinner) to clean the machine, to prevent corrosion of the machine surface.
- Make sure all air frames and accessories are dry before connecting to the power during using.
6. SPECIFICATIONS
PRODUCT SPECIFICATIONS
Power source type : Battery powered
Power plug : Adapter
Power adapter cable length : 1m
Maximum power consumption : 150W
Dust capacity : 0.5L
Material : ABS plastic
With dust bag or bagless : Bagless
Charging cradle : No
Suitable for liquids : No
Cordless : Yes
Number of power settings : 2
HEPA air filter : N/A
Operating voltage : 22.2V
Brush type : Motor brush
Maximum suction power : 10000Pa
Brushless motor : No
Weight : 2200g
Operation time lowest power mode : ± 30 min
Operation time in highest power mode : ± 15 min
Charging time : ± 4.5h
PACKAGING CONTENT
1x stick vacuum cleaner
1x 2-in-1 crevice nozzle
1x wall mount
1x power adapter
| Vacuum >10kPa Noise Level 78dB | |||
| Battery 22.2V/2000mAh Charging Time ≈ ± 4.5 hours | |||
| Adaptor Input 100-240V~50/60Hz 0.3A Adaptor | Output 26.0V | 0.45A | --- |
| Working time | ± 30min (low speed)± 15min (high speed) | Power 150W | |
| Dust Capacity 0.5L | Product Size 392*110*164mm | ||
| N.W. | 2.2Kg | G.W. | 2.9Kg |
7. POSSIBLE PROBLEM AND SOLUTION
| Problem | Possible Cause | Solution |
| Vacuum cleaner won’t pick up dirt | 1. Filters are dirty2. Batteries are low | 1. Remove and rinse filter. Allow enough time for them to dry properly before reinserting2. Recharge the batteries |
| Vacuum cleaner won’t charge | 1. Wrong charger is being used2. Charger is not plugged into the machine properly. | 1. Use only the charger that comes with the machine2. Remove the charger and rein-stall into the hand vacuum |
RECYCLING
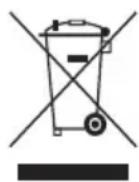
CE
This symbol means that this product should not be disposed of with regular household waste (2012/19/EU). Observe the applicable rules in your country for the separated collection of electric and electronic products By disposing of the product correctly, you prevent negative consequences for the environment and for public health.
The packaging material of this product can be recycled 100%, return packaging material separately.
This symbol indicate that a specific separate supply unit is required for connecting electrical equipment to the supply mains.
natural_image
Diagram showing a vertical brush and a small base with an upward arrow, no text or symbols presentnatural_image
Technical line drawing of a vacuum cleaner with an upward arrow indicating motion (no text or symbols)- Ein-/Aus-Taste
natural_image
Circular diagram with internal mechanical components and a central switch symbol (no text or labels)4. Laden
natural_image
Technical line drawing of a device showing a before-and-after assembly (no text or symbols)natural_image
Diagram of a water tank with two internal components and a piping outlet (no text or labels)natural_image
Technical diagram of a mechanical component with a downward arrow indicating force or direction (no text or symbols present)natural_image
Technical line drawing of a mechanical device with labeled components (no text or symbols present)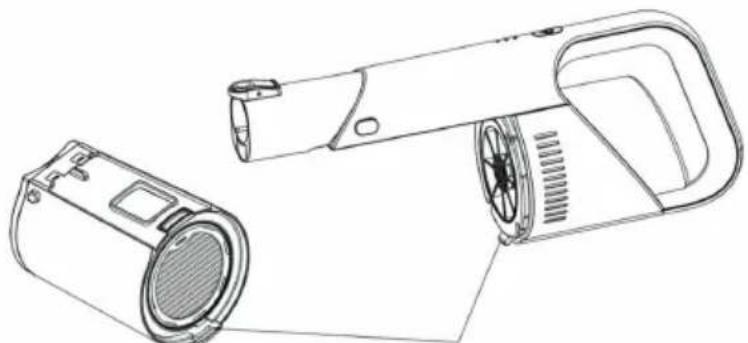
natural_image
Line drawing of a handheld device with a speaker and ventilation slots (no text or symbols)natural_image
Technical line drawing of a device with two views showing internal components and a directional arrow (no text or symbols)natural_image
Diagram showing a vertical brush and a base device with an upward arrow, no text or symbols presentnatural_image
Technical line drawing of a vacuum cleaner with an upward arrow indicating motion (no text or symbols)- Bouton marche/arrêt
natural_image
Diagram of a water tank with two cylindrical tanks and a filter, connected by a pipe (no text or symbols)natural_image
Diagram of a mechanical component with a downward arrow indicating force or direction (no text or symbols present)natural_image
Technical line drawing of a mechanical device before and after assembly (no text or symbols)SPÉCIFICATIONS DU PRODUIT
Station de charge : Non
Convient aux liquides : Non
Sans fil : Oui
natural_image
Diagram showing a vertical brush and a base device with an upward arrow, no text or symbols presentnatural_image
Line drawing of a vacuum cleaner with an arrow indicating upward motion (no text or symbols)- Aan-/Uitknop
natural_image
Diagram showing a mechanical assembly process with three stages of lighting or component alignment (no text or symbols present)natural_image
Diagram of a water tank with two internal components and a pipe above (no text or symbols)natural_image
Technical diagram of a mechanical component with a downward arrow indicating force or direction (no text or symbols present)natural_image
Technical line drawing of a cylindrical device with internal components and mounting brackets (no text or symbols)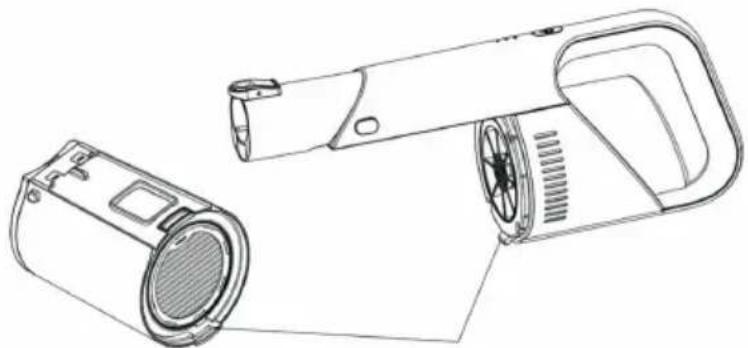
natural_image
Line drawing of a handheld electric shaver with speaker and control panel (no text or symbols)natural_image
Technical line drawing of a handheld device with handle and internal components (no text or symbols)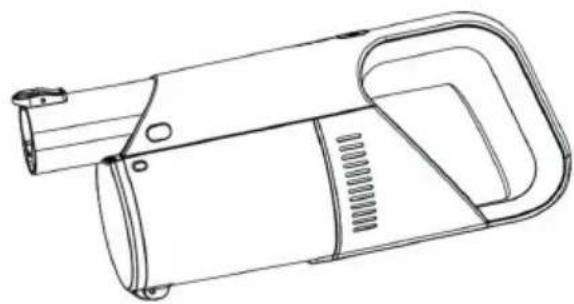
natural_image
Line drawing of a handheld device with handle and internal components (no text or symbols)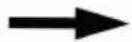
flowchart
graph LR
    A["Four Circuits"] --> B["Square Units"]
    B --> C["Square Unit"]
    C --> D["Handheld Robot"]
5. ONDERHOUD EN REPARATIE Let op
natural_image
Diagram showing a vertical tube and a base device with an upward arrow, no text or symbols presentnatural_image
Line drawing of a vacuum cleaner with an arrow indicating upward motion (no text or symbols)- Pulsante on/off
natural_image
Circular diagram with a central button and three small dots, no text or symbols presentRicarica
natural_image
Diagram of a water tank with two internal components and a pipe above (no text or symbols)natural_image
Technical diagram of a mechanical component with a downward arrow indicating force or direction (no text or symbols present)natural_image
Technical line drawing of a cylindrical device with internal components and mounting brackets (no text or symbols)
natural_image
Line drawing of a handheld device with a speaker and lamp (no text or symbols)natural_image
Technical line drawing of a handheld device with handle and internal components (no text or symbols)
natural_image
Line drawing of a handheld device with handle and internal components (no text or symbols)
1 bocchetta per fessure 2-in-1
natural_image
Diagram showing a vertical tube and a base device with an upward arrow, no text or symbols presentnatural_image
Technical line drawing of a vacuum cleaner with an upward arrow indicating motion (no text or symbols)natural_image
Line drawing of a handheld device with handle and control panel (no text or symbols)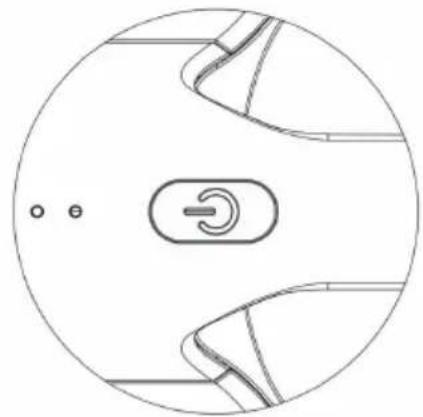
natural_image
Circular diagram with internal mechanical components and a central switch symbol (no text or labels)4. Carga
natural_image
Diagram of a water filter or drain system with two components and a pipe above (no text or labels)natural_image
Technical diagram of a filter or drain component with a downward arrow indicating flow direction (no text or symbols present)natural_image
Technical line drawing of a cylindrical device with internal components and mounting brackets (no text or symbols)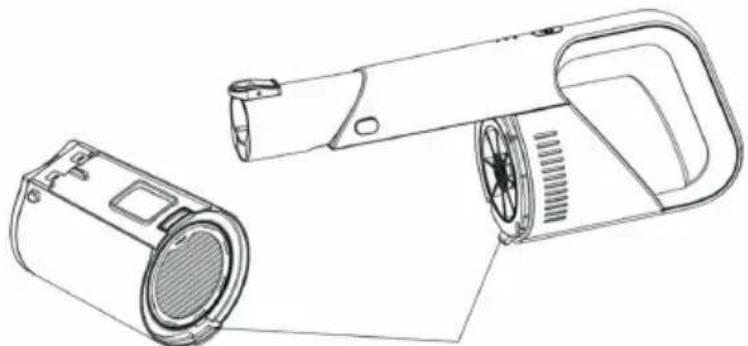
natural_image
Line drawing of a handheld device with a speaker and lamp (no text or symbols)natural_image
Line drawing of a handheld device with handle and internal components (no text or symbols)
natural_image
Line drawing of a handheld device with handle and internal components (no text or symbols)

Brand : DIRT DEVIL
Model : DD9002
Category : Vacuum Cleaner