Luna - Bed Vermeiren - Free user manual and instructions
Find the device manual for free Luna Vermeiren in PDF.

| Technical Features | Vermeiren Luna medical bed, height adjustable, with mattress included. |
|---|---|
| Dimensions | Length: 210 cm, Width: 90 cm, Height adjustable: 40 to 80 cm. |
| Maximum Supported Weight | 150 kg. |
| Usage | Designed for home and hospital care, suitable for people with reduced mobility. |
| Maintenance | Regularly check fastenings and adjustment mechanism, clean with non-abrasive products. |
| Safety | Equipped with safety rails, wheel brake checks recommended. |
| Warranty | 2 years on the frame, 1 year on electrical parts. |
| General Information | CE certified, compliant with current safety standards. |
Frequently Asked Questions - Luna Vermeiren
User questions about Luna Vermeiren
0 question about this device. Answer the ones you know or ask your own.
Ask a new question about this device
Download the instructions for your Bed in PDF format for free! Find your manual Luna - Vermeiren and take your electronic device back in hand. On this page are published all the documents necessary for the use of your device. Luna by Vermeiren.
USER MANUAL Luna Vermeiren
Instructions to the specialist dealer
This instruction manual is part and parcel of the product and must accompany every product sold.
Version: A, November 2010
All rights reserved, including translation.
No part of this manual may be reproduced in any form what so ever (print, photocopy, microfilm or any other process) without written permission of the publisher, or processed, duplicated or distributed by using electronic systems.
N.V. Vermeiren N.V. 2010

Version: A, November 2010
1.1 Intended Use 3
1.2 Technical specifications 4
1.3 Components 5
1.4 Explanation of symbols 5
1.5 Accessories 6
1.6 For your safety 6
2 Use 7
2.1 Disabling box (IF INSTALLED ON THE BED) 7
2.2 Manual control without lock function 8
2.3 Manual control with lock function 9
2.4 Operating the steering casters 9
2.5 Strain relief 10
2.6 Power cable 10
2.7 Emergency lowering of the headrest 11
2.8 Side railings 11
2.9 Lifting pole 12
2.10 Stop notch (when available) 12
2.11 Transfer in and out the bed 13
2.12 Transport 13
2.13 Cable placement 13
3 Installation and adjustment 14
3.1 Tools 14
3.2Manner of delivery 14
3.3 Assembly 14
4 Maintenance 18
4.1 Regular Maintenance. 18
4.2 Shipping and storage 19
4.3 Care 19
4.4 Inspection 20
4.5 Disinfection 24
5 Guarantee 27
6 Disposal 27
7 Declaration of conformity 27
8 Maintenance plan 28
9 Disinfection book 28
Preface
First of all we want to thank you for putting your trust in us by selecting one of our products.
The Vermeiren beds are the result of many years of research and experience. During the development, special attention was given to the ease of use and the serviceability of the bed.
The expected lifetime for your bed is strongly influenced by the care and maintenance of the bed.
This manual will help you get acquainted with the operation of your bed.
Following the user instructions and the maintenance instructions are an essential part of the warranty.
This manual reflects the latest product developments. Vermeiren has the right to introduce changes without the obligation to adapt or replace previously delivered models.
For any further questions, please consult your specialist dealer.
1 Productdescription
1.1 Intended Use
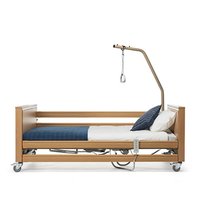
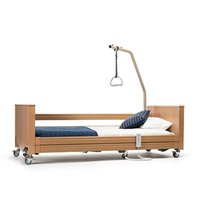
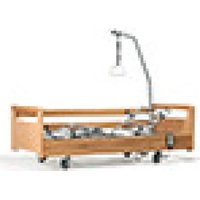
With the LUNA model, you have acquired a nursing bed that was developed entirely for your comfort. This nursing bed offers various individual adjustment possibilities which are explained below.
The nursing bed is designed for a single adult patient (from 12 years, up to 140kg (308.6lb.) max.
The bed shall be used with a suitable mattress (min. RG 35, 120 mm (4.7 in) thick, max. 20 kg (44 lb.))
The LUNA nursing bed is designed for dry indoors use on level, solid floors.
The different types of fittings and accessories, and the modular construction allow full use by persons disabled by:
- paralysis
- loss of limbs (leg amputation)
- limb defects or deformations
- stiff or damaged joints
- heart insufficiencies and poor blood circulation
balance disturbances - cachexia (decrease in muscle)
and also for aged persons.
When providing for individual requirements:
- body size and weight (max. 140kg (308.6 lb.))
- physical and psychological condition
residential circumstances
environment
should be taken into consideration.
The bed shall be used as application environment 4: "care provided in a domestic area where ME equipment is used to alleviate or compensate for an injury, disability or disease".
Your bed should only be used on surfaces where all four wheels are touching the ground.
The bed should not be used as a ladder, nor is it a transport for heavy or hot objects.
When used on mats, carpeted floors or loose floor coverings, the floor covering can get damaged and it is difficult to push over such surfaces (without patient).
Use only Vermeiren approved accessories.
The manufacturer is not liable for damage caused by the lack of or improper service or as a result of not following instructions from this manual.
Compliance with the user and maintenance instructions are an essential part of the guarantee conditions.
1.2 Technical specifications
Technical terms below are valid for the bed in standard settings. If other accessories are used, the tabulated values will change.
Table 1: Technical specifications
| Make | Vermeiren | |
| Address | Vermeirenplein 1/15, B-2920 Kalmhout | |
| Type | bed | |
| Model | Luna | |
| Maximum occupant mass | 140 kg (308.6 lb.) | |
| Description | Min. | Max. |
| Length | 2150 mm (84.6 in) (Luna models) | 2240 mm (88.2 in) (Luna X-low) |
| Width | 1030 mm (40.6 in.) | |
| Height adjustment of the bed surface | 400 mm (15.7 in) (without mattress) 200 mm (7.9 in) (Luna X-low) | 805 mm (31.7 in) (without mattress) 600 mm (23.6 in) (Luna X-low) |
| Folded length | 445 mm (17.52 in.) | |
| Folded width | 935 mm (36.81 in.) | |
| Folded height | 1045 mm (41.14 in.) | |
| Total mass | 95 kg (209.4 lb.) | |
| Adjustment of the back section | 83° | |
| Max. thigh angle | 31.7° | |
| Max. angle for lower leg | -14.8° | |
| Max. safe load | 175 kg (385.8 lb.) | |
| Lifting pole | Nominal load 80 kg (176.4 lb.) | |
| Mattress | Min. RG 35, thickness 120 mm, 2000 x 900 mm, max. 20 kg (thickness 4.7 in, 78.7 x 35.4 in, max. 44 lb.) | |
| Under clearance for patient lift | 150 mm (5.9 in) (except for Luna X-low) | |
| Steering casters (4 pieces) | Ø 125 mm (4.9 in), can be locked | |
| Front part of motor | LA273100-A01405040, Linak | |
| Back section motor | LA270022-00, Linak | |
| Leg section motor | LA270022-00, Linak | |
| Manual operation | HBW074-072, Linak | |
| Disabling box | ACL 403500, Linak | |
| Transformer | CB6404+10019, Linak | |
| Nominal voltage, transformer | U input: 230 V- ± 10%, 50 Hz, current: max. 1.5 A, output voltage: 24V -, max. 70 VA | |
| Period switched on | 10%, max. 6 min/hour | |
| Noise level | < 65 dB(A) | |
| Class / Kind of protection | Protection class II, application part Type B / IP54 (spray protection) | |
| Storage and use temperature | + 5 °C (+41 °F) | + 41 °C (+106 °F) |
| Storage and use humidity | 30% | 70% |
| We reserve the right to introduce technical changes. Measurement tolerance ± 15 mm / 1,5 kg / ° (0.59 in. / 3,3 lb. / 1,5°) | ||
The bed complies to the requirements set up in:
EN 1970: Adjustable beds for disabled persons: Requirements and test methods
EN 1970+ A1: Adjustable beds for disabled persons: Requirements and test methods
EN 60601-2-38/A1: Medical electrical equipment - Part 2-38: Particular requirements for the safety of electrically operated hospital beds
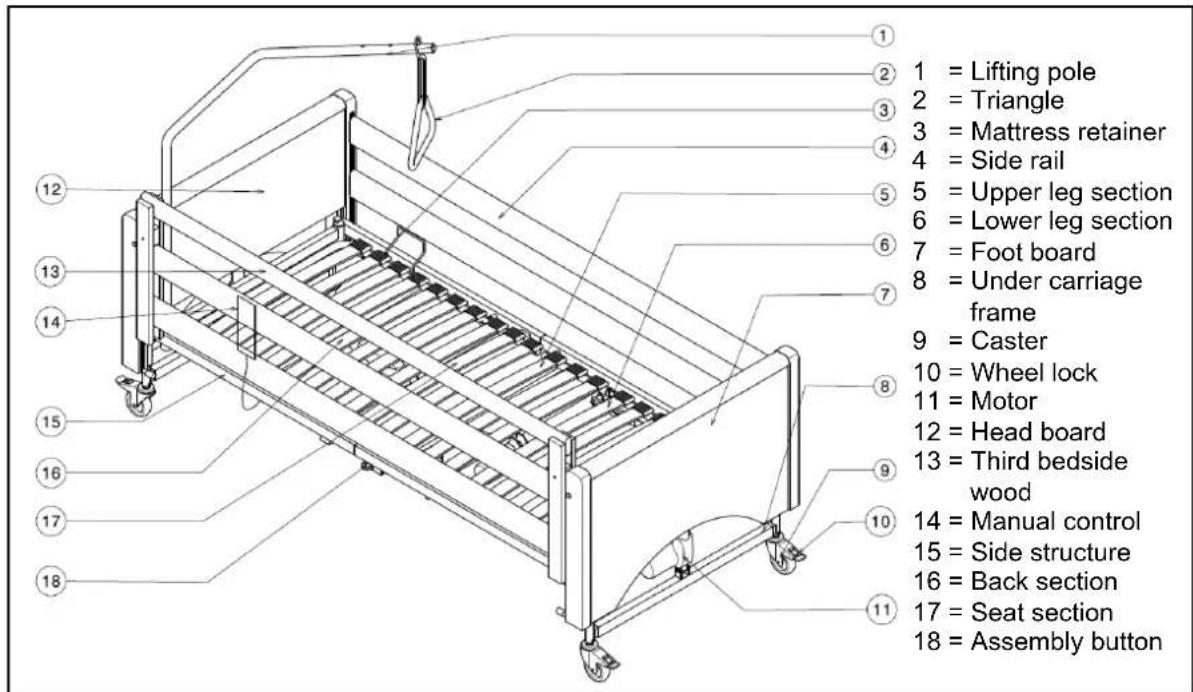
1.3 Components
1.4 Explanation of symbols

Maximum mass

CE conformity

Safety instructions

Observe the instructions for use.

Correct procedure or method of use

Direct procedure or method of use

Protection class II

Type B application
1.5 Accessories
WARNING: Precautions shall be taken if accessories not listed below are used.
- Disabling box + manual control without lock function
- Third bedside wood
1.6 For your safety
Carefully read the instruction manual before using the nursing bed.
Place and use your nursing bed only on straight and level surfaces and ensure that all four steering castors stand securely on the floor.
When the bed is placed in position, make sure that no obstacles are present inside the entire adjustment range.
If the patient is not supervised, the bed must be adjusted beforehand to the lowest position to reduce the danger of injury by falling when getting into, getting out of, or lying on the bed.
If the patient is not under supervision, the side railings on both sides should be raised to the highest position. The railings may only be lowered on one or both sides when a supervisor is present.
Watch your hands when assembling, disassembling or using the bed -- danger of squashing!
When transporting the bed, grasp it only by solid frame parts and wooden parts.
All four steering castors must always be locked before using the nursing bed.
Medical-electrical treatments are forbidden inside the nursing bed!
Do not lean against or on the side railings -- danger of accidents!
Avoid leaning out sideways with the upper body -- danger of accidents!
Do not rest your legs on other objects -- danger of accidents!
When adjusting hinges, joints or other clamps, make sure that no body parts or objects are present -- danger of squashing!
Do not place your hands between the frame and the mattress when adjusting leg or back rests -- danger of squashing!
Use only power sockets conforming to VDE (220 V / 230 V, 50 Hz) for plugging in.
Plugs must only be pulled out by grasping the plug itself; never pull on the lead.
Lock manual operation with the disabling box each time after use.
The nursing bed must only be used in dry rooms.
Only use mattresses which comply with the prescriptions of the bed manufacturer.
If the overhead boom is distorted, it should be replaced.
The side railings must be fitted even if the relevant side is situated against the wall.
Do not undertake repairs on your own -- danger of accidents!
Do not open any housings of the driving system -- danger of accidents!
A patient may only be conveyed in the nursing bed when lying in the lowest horizontal position.
Make sure that all power leads are laid without kinks, shearing or other mechanical damages.
All cables should be laid without making contact with the floor and with no kinks.
No additional mechanical or electric appliances may be used or fitted.
Servicing, inspection, repairs and disinfection should only be undertaken by authorized, trained persons.
Use only genuine replacement parts of the manufacturer for your nursing bed.
Do not exceed the maximum load of 140 kg (308.6 lb.) as stated by the manufacturer.
The use of open flames like candles or glowing objects like cigarettes is forbidden inside the nursing bed.
Replace the side railings if they are bent or broken, otherwise there is a risk of the patient falling out of the bed.
Use of your bed could influence other electrical devices (noises). Avoid using such devices at the same time.
Obey all safety and operational instructions.
Electrically operated bed is placed with a distance to the power supply plug.
The medical bed shall only be used with a hoist that can positioned under the limited space of the medical bed.
2 Use
This chapter describes the everyday use. These instructions are for the user and the specialist dealer.
The bed is delivered fully assembled by your specialist dealer. The instructions intended for the specialist dealer on how to set up the bed are given in § 3.
WARNING: Avoid squeezing from routing cables of other equipment between parts of the medical bed.
WARNING: The medical bed shall only be used with a hoist that can positioned under the limited space of the bed.
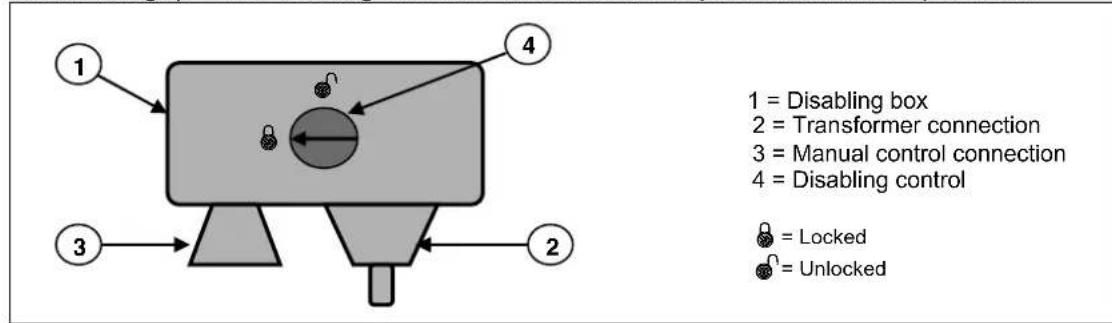
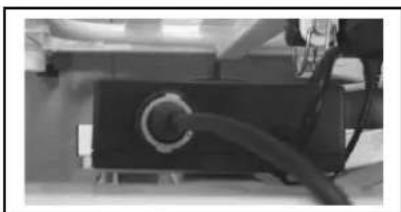
2.1 Disabling box (IF INSTALLED ON THE BED)
CAUTION: Risk of injury - Protect electric cables from crushing.
This paragraph shall be used if the disabling box is installed on the bed and in combination with the manual control without lock function.
A disabling box is situated between the transformer and the manual control to prevent involuntary electric operation of the nursing bed (mounted on the cross bar of the bed undercarriage). It has rotating switches that activate or prevent manual operation.
2.2 Manual control without lock function

CAUTION: Risk of injury - Adjustments made by the patient must be allowed under supervision only.
This manual control shall be used in combination with the disabling box.
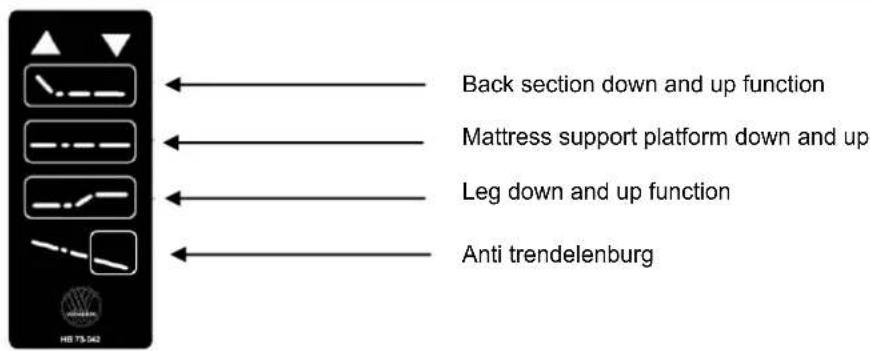
The height of the bed surface, the angle of the backrest and the knee-bend angle can be adjusted with the manual control. After use the manual control needs to be hung on the side rail and secured by means of the disabling box.
Following adjustments can be used:
When connecting the manual control to the disabling box please make sure that the connection plug in the disabling box is especially secure. Proceed as follows:
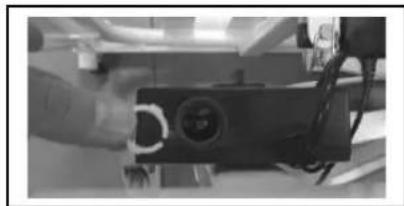
- Remove the safety ring from the connection.
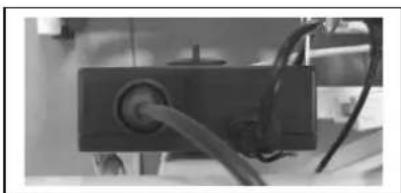
- Insert the connection plug for the manual control in the disabling box.
- Place the safety ring in the disabling box connection so the cable cannot be removed involuntarily.
The connection cable can only be removed from the disabling box after the safety ring has been removed.
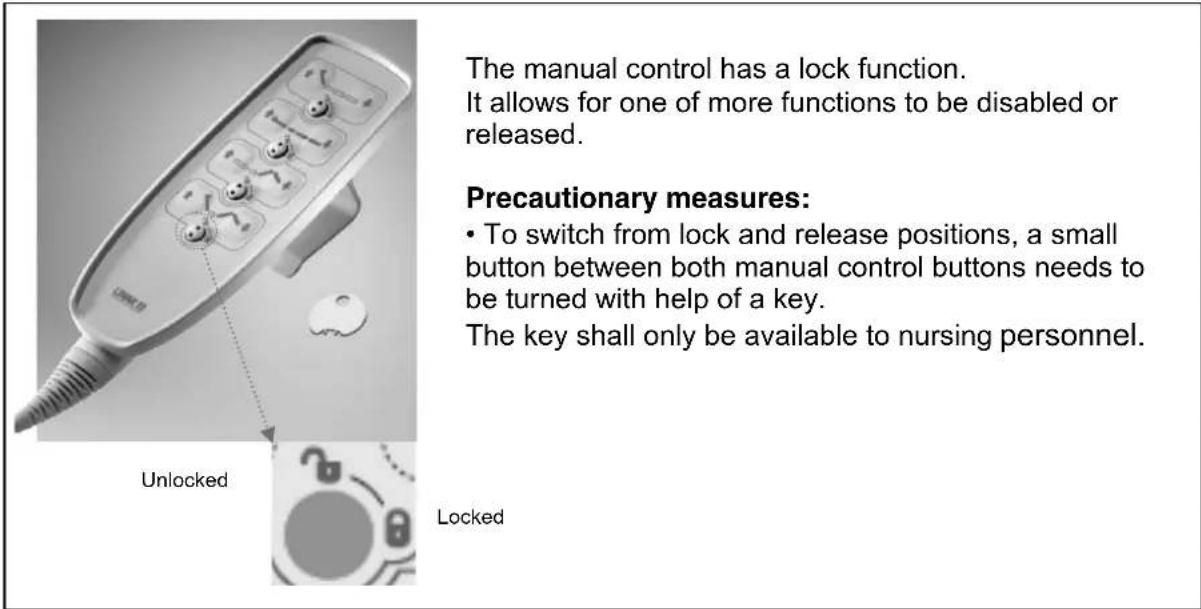
2.3 Manual control with lock function
The disabling box can be replaced with a manual control with locking function.
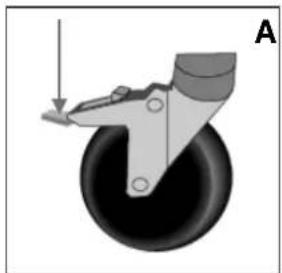
2.4 Operating the steering casters
WARNING: Good operation of the steering casters is influenced by wear and contamination of the tires (water, oil, ...) - Check the condition of the tires before each use.
WARNING: The steering casters can wear - Check the operation of the steering casters before each use.
WARNING: Danger of accidents - All steering casters should always be braked. If only one caster is braked, the free running wheels rotate around the locked one.
All steering wheels can be locked to prevent involuntary rolling.
Securing (A)
Push the surface of the tilting lever downwards by foot until it brakes the wheel.
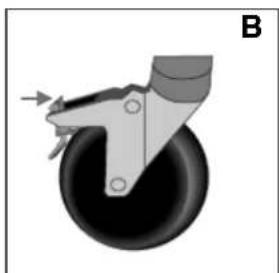
Releasing (B)
Push the surface of the tilting lever forwards by foot until the wheel is released.
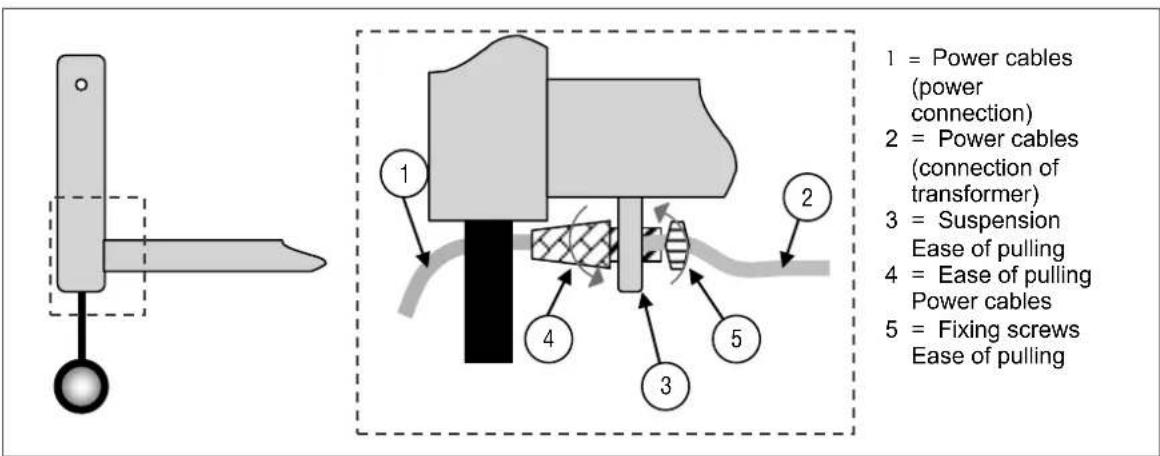
2.5 Strain relief
WARNING: Do not remove the relief unit.
WARNING: Nothing must be fitted to or hung on the relief unit.
Below the spar of the head slatted frame there is a socket for the tightening of the relief unit.
- Insert the relief unit of the power cable (4) into the suspension (3).
- Pull the desired length of the power cable (1) in such a way that the power cable (2) can be laid under the slatted frame without sagging. Be careful to avoid that the cable (2) come under the traction in any adjustment position.
- Fasten the power cable by properly tightening the relief unit of the power cable (4).
- Fasten the position of the relief unit by properly tightening the fixing screws (5).
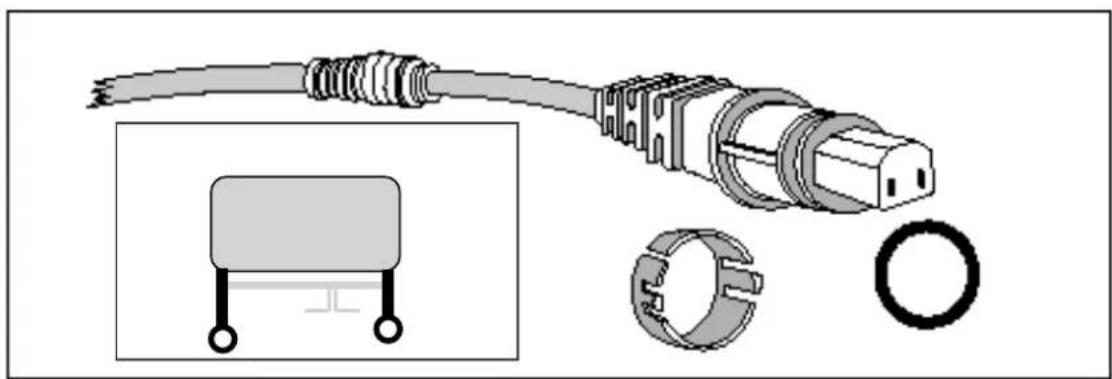
2.6 Power cable
WARNING: Nothing but the power cable should be suspended here.
WARNING: The power cable can be damaged - The power cable must be carefully positioned without kinks, pulling, shearing or other mechanical damages and without making contact with the floor.
To ensure that your power cable stays properly functional and in a technically secure condition even after protracted use, and in the case that you do not operate your bed electrically, we have at the spar of the slatted frame (below the relief unit) provided a device where you might safely leave the rolled-up cable beneath the nursing bed.
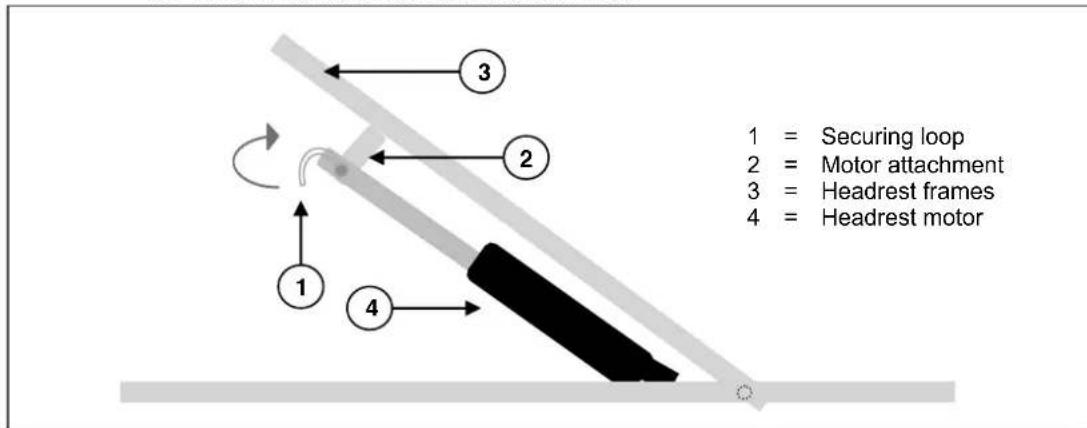
2.7 Emergency lowering of the headrest
WARNING: Risk of squashing - Check that there are no objects or body parts between the headrest and the frame.
The headrest can be lowered manually (emergency lowering in the case of motor failure). Emergency lowering is only permitted if at least two persons are available.
Procedure: 1. Turn the securing loop of the upper motor over.
- One person holds on to the side of the headrest while another person pulls the securing bolts out and removes the motor from its suspension.
- Then the headrest can be lowered.
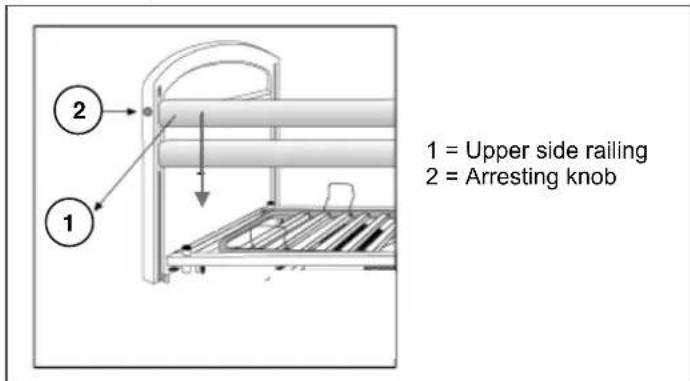
2.8 Side railings
The side railings can be lowered on one side.
- Lowering
WARNING: Risk of squashing - Secure the side railings against falling involuntarily.
WARNING: Risk of squashing - No objects or body parts may extend above the lying surface!
WARNING: Risk of injury - Do not lower the side railings on one side if the patient is not supervised.
Raise the upper side slat gently, press the arresting knob on the side of the headrest or foot-end and lower the side railing slowly. (Always take hold of the upper wooden slat only!)
For the Luna Basic bed, the knob is located on the outside of the head- and foot part.
If raising the side railings or covering these are required for additional security of the patient (e.g. very skinny patient), it should be noted that no functions of the bed should be impaired, nor the CE-conformable implementation as when first delivered.
2.9 Lifting pole
The overhead boom can be mounted on either side of the headrest (use only for LUNA!).
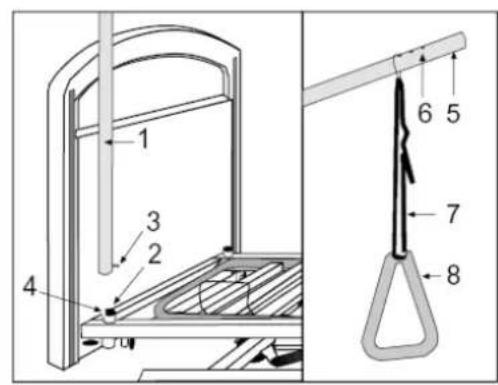
1 = Lifting pole
2 = Boom socket
3 = Locking bolts
4 = Insert nut
5 = Upper frame boom
6 = Socket holes
7 = Strap
8 = Triangle
- Insert the boom (1) as far as it will go into the relevant socket (2).
- Let the arresting bolts (3) slide into the groove (4).
- Pull the metal loop over the end of the upper frame (5) until the bolts engage one of the three socket holes (6).
- Also pull strap (7) into the metal loop and through the triangle (8); then fix its length. Secure the strap.
2.10 Stop notch (when available)
CAUTION: Risk of injury - No people or objects allowed close to where adjusting is being done.
To adjust the lying surface of the lower leg, grip the foot-end toggle strap in the middle of the frame. Pull the lying surface of the lower leg to the desired height. The stop notch locks in distances of approx. 2cm. To lower the lying surface of the lower leg, use the foot-end toggle strap and pull it to the upper position. The stop notch will now stop locking and you can slowly completely let down the lying surface of the lower leg until it reaches the bed frame.
Perform adjustments only by means of the foot-end toggle strap to avoid tilting or damage to the frame adjustors.
2.11 Transfer in and out the bed
CAUTION: In case you can't perform the transfer in a safe manner, ask someone to assist you.
- Position you as close as possible to the bed.
- Check the brakes from the bed are in the on position.
- Remove or fold down the side railings of the bed.
- Transfer to/from the bed.
2.12 Transport
WARNING: Risk of injury - See that the bed is attached properly. So you can avoid injury from the passengers during collision or sudden braking.
WARNING: Risk of injury - Use for attaching the bed and passenger NEVER the same seatbelt.
WARNING: Risk of injury - Patients may only be transported when recumbent in the lowest horizontal position.
To avoid damage when transported, the overhead boom should be detached. the power cable and check that no cables hang near the floor.
2.13 Cable placement

1 = Head slatted frame
2 = Feet slatted frame
3 = Boom sockets
4 = Relief device
5 = Power cable
6 = Transformer / control box
7 = Disabling box
8 = Motor of headrest surface
9 = Knee-bending angle motor
10 = Motor of head part
11 = Motor of foot part
12 = Manual operation
All cables inside the bed frame, have been fitted in such a way that prevents contact with the floor as well as squashing or pinching.
3 Installation and adjustment
The instructions in this chapter are for the specialist dealer.
The Vermeiren Luna has been designed to be adjust with a minimum of replacements parts. There is no need for extra stock of spare parts.
To find a service facility or specialist dealer near you, contact the nearest Vermeiren facility. A list of Vermeiren facilities can be found on the last page.

WARNING: Risk of unsafe settings - Use only the settings described in this manual.
3.1 Tools
To set up the bed the following tools are needed.
Allen key
Screwdriver
3.2 Manner of delivery
The Vermeiren Luna shall be delivered with:
- 2 front parts incl. engine + wooden lagging Approx. 17kg (37.5 lb.) / unit
- Slatted frame, foot-end incl. motor Approx. 20 kg (44 lb.)
- Slatted frame, headrest incl. transformer and motor Approx. 20 kg (44 lb.)
- Side railings (2 x 2 wooden slats) Approx. 3 kg (6.6 lb.)/ unit
Overhead boom + triangular grip Approx. 10 kg (22 lb.) - Manual operation Approx. 10 kg (22 lb.)
- Disabling box
- Allen key (for assembly)
- Instruction Manual
The nursing bed may only be used with the parts listed here. If parts are omitted or if foreign furnishings, components or electrical systems are included, then this bed is not regarded as a nursing bed supplied by the manufacturer, and you use it at your own risk. Then the CE conformity and the warranty of the manufacturer do not apply.
Contents above might be different depending on your type: Luna, Luna Basic, Luna Deluxe, Luna X-low. Depending on your type of Luna bed, certain images might appear different in the manual.
3.3 Assembly

CAUTION: Chance of pinching - Do not place fingers between the components of the bed.

CAUTION: Risk of clamping - Keep fingers away from moving parts of the bed.
Assembly shown below applicable for types: Luna, Luna Basic, Luna Deluxe, Luna X-low. Depending on your type of Luna bed, certain images might appear different.
You should obey the assembly instructions of your nursing bed as explained below.
3.3.1 Front parts
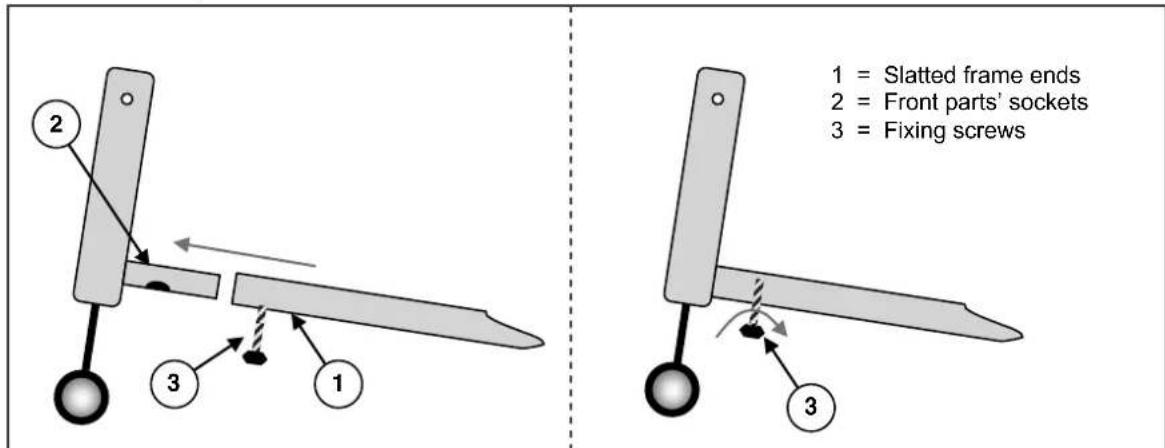
- Place the slatted frame ends into front parts' sockets (fixing screws must be loosened beforehand; don't tilt!).
N.B: The slatted frame headrest comes fitted with sockets for the boom as well as a power cable suspension.
- Fasten with the securing screws by tightening them far enough to go through the fixing holes of the front parts' sockets and thus locking it in place (tighten very properly!).
Protect the electric lead to the motor against damage by squashing.
3.3.2 Slatted Frame
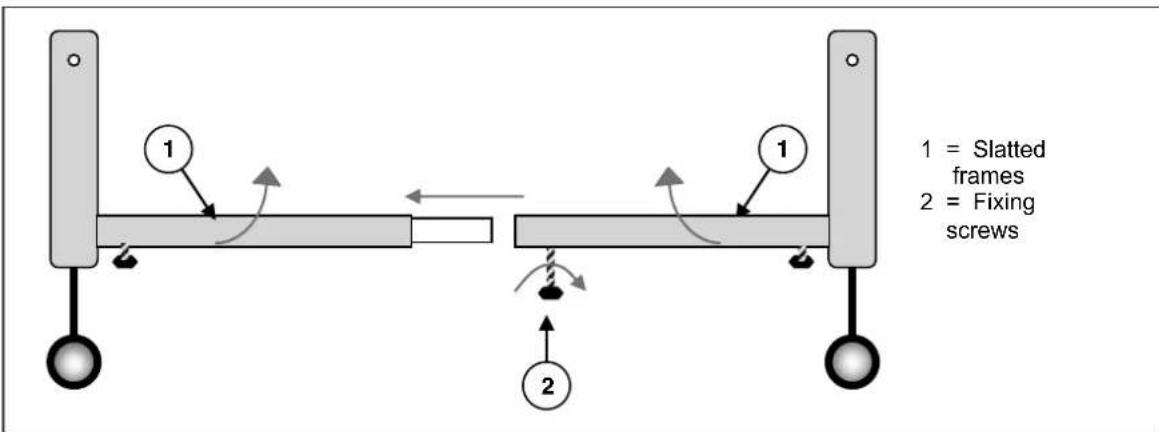
- Erect both slatted frames and insert them into each other flush.
- Then properly retighten the fixing screws of the slatted frame connection.
Protect the electric lead to the motor against damage by squashing.
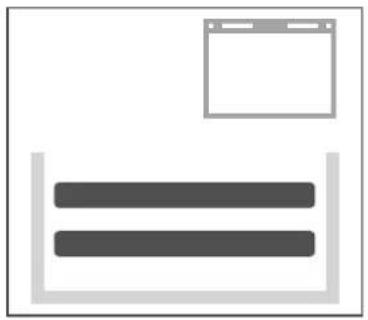
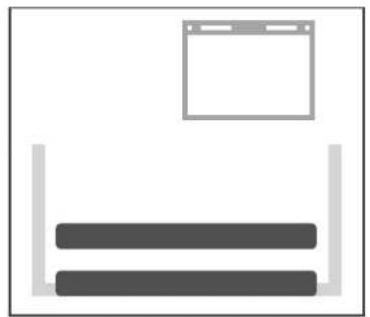
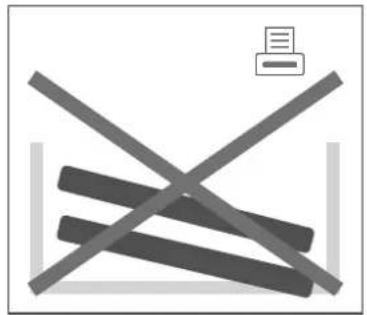
3.3.3 Wooden side railings
Assembly shown below applicable for types: Luna, Luna Basic, Luna Deluxe, Luna X-low. Depending on your type of Luna bed, certain images might appear different.
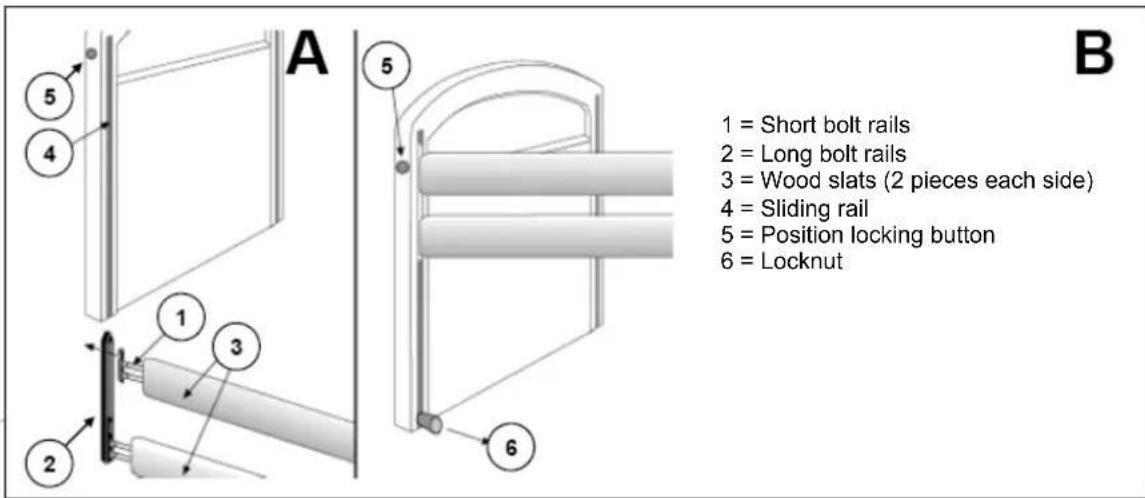
A. Insert the short bolt rails (1) on the right and left in the upper wood slat. Insert the long bolt rails (2) right and left in the lower wood slat.
Insert the long bolt rails (2) in the wood slat in the sliding rail for the head and foot section one by one and secure them by inserting the rails until the upper end is inserted and clicks. On one side release this rail again until the tip by pressing the position locking button (5) and pulling the upper wooden slat gently upwards.
Let the bolt rails (2) fall from the sliding rail once more until the tip of the rail is just barely in the guide. The short bolt rail (1) will now be inserted together with the wooden slat between the walls of the long bolt rails and the entire bolt rail system (1) + (2) will placed in the relevant sliding rail (4) by pulling upwards when grasping only the upper wooden slat and then locking the structure in position.
B. Insert the locknuts (6) and tighten them manually.
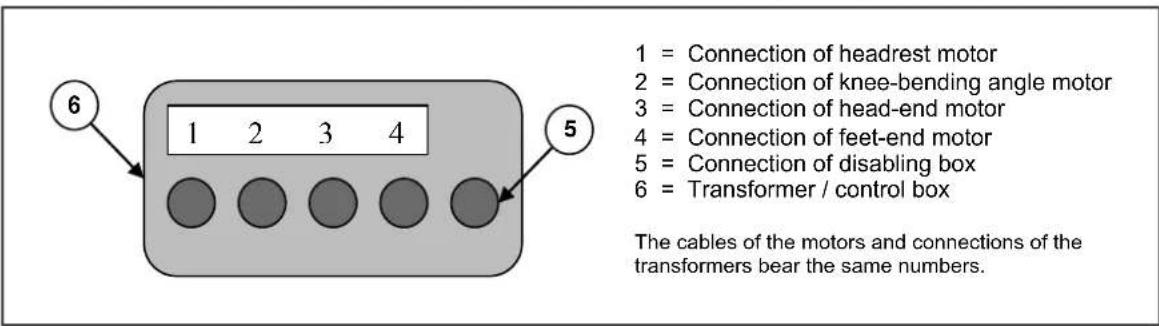
3.3.4 Transformer connections
CAUTION: Risk of injury - Do not touch the plug with wet hands.
CAUTION: Risk of injury - Do not place any objects on the connection and the lead, and protect these against mechanical loads.
- A 220 V / 230 V, 50 Hz power socket conforming to the VDE specifications is required
- The diagram for the transformer connections is given in the figure below:
Take hold of the plug only to remove it from the power socket.
The power lead must be laid without any loops or kinks and should not pass around sharp edges.
The power cable leading to the manual switch must be protected against squashing.
4 Maintenance
Lifetime of the bed is influenced by its use, storage, regular maintenance, servicing and cleaning.
4.1 Regular Maintenance
The maintenance activities to ensure a good condition for your Vermeiren bed are described below:
Before every use
- Check the tyres and make them clean. If necessary change the tire.
- Check the brakes and adjusted if necessary.
- Check the bed (cleanliness, cracks, damage on structural parts ... ) and make it clean. If necessary change the coating.
- Check the cables for visible signs of damage and whether all plugs are properly inserted as indicated in the instruction manual. In the case of damage immediately unplug the power lead.
- Check the functioning of the mechanically adjustable elements (side railings, overhead boom, foot-end).
-
Check that the manual controls function properly. If a function is faulty, kindly disconnect the power plug.
-
Every 8 weeks: inspection or adjusting from
Operation of the sliding rail of the side railings (headrest and foot-end)
- Placement of the slats in the slatted frame (if available)
The condition of the wooden parts
Overhead boom (fit / deformation)
- Lubricating from moving parts
- Every 6 months or for every new user
General review
Disinfection
- Cleanness
- Airing of the mattress used
For your convenience, on the back of this manual is a maintenance plan.
Repairing and assembling of spare parts for your bed may only be performed by the specialist dealer.
Only authorized Vermeiren spare parts may be installed.
4.2 Shipping and storage
The shipping and storage of the bed shall be according following instructions:
- Store in a dry place (between +5^ and +41^ ).
The relative humidity of the air should be between 30% and 70% . - Provide sufficient covering or packaging to protect the bed from rust and foreign bodies. (e.g. salt water, sea air, sand, dust).
- Store all removed parts together in one place (or mark them if necessary) to avoid mixing up with other products when re-assembling.
- Components must be stored without being subjected to strains (Don't put too heavy parts on the bed, not clamping between something, ...).
- Carefully roll up the power lead with no kinks and place it in the receptacle provided
- Check internal cables for squashing and the prevention of kinks.
4.3 Care
4.3.1 Metal frames, wooden parts
The cleaning of the metal frames and the wooden parts shall be according:
- Clean metal frames and the wooden parts with a cloth moistened with hot water. Be aware that you don't soak the metal frames and the wooden parts.
- Use a mild commercial detergent for removing stubborn dirt.
Stains can be removed by using a sponge or a soft brush. - Do not use strong cleaning liquids like solvents, nor use hard brushes.
- Never clean with steam and/or pressure washers.
4.3.2 Plastic parts
Clean plastic parts of your bed with commercial plastic cleaners. Only use a soft brush or soft sponge.
The motors and the manual unit should only be cleaned with a slightly damp cloth.
4.3.3 Coating
The high quality of the surface layer guarantees optimal protection against corrosion. If the outer coat is damaged by scratching or in some other way, get your specialist dealer to repair the affected surface.
When cleaning, only use warm water and normal household detergents and soft brushes and cloths. Ensure that no wetness gets into the tubes.
Initially the zinc parts only require rubbing with a dry cloth. Stubborn dirt can best be removed by using a suitable commercial zinc polish.
4.4 Inspection
In principle we recommend one inspection every year, and a minimum of one before usage is resumed. All of the following checks must be performed and documented by authorized persons:
- Check the frame parts for plastic deformation, cracks and impaired functioning (lying surface, undercarriage, backrest, foot-end, erection boom, receptacle for the boom, wheels).
- Visually check for damage to the paintwork (danger of corrosion)
- Check the operation of the braking wheels (free running, safety, locking etc.)
- Check the solidity and seating of all screws.
- Verify the amount of grease on the metal joints of movable parts.
- Visually check all housings for damage, screws must be securely fixed, seals and gaskets should not exhibit visible damage.
- Visually check all plastic parts for cracks and brittle spots
- Visual inspection of the power connection (EPR or similar)
- Condition of the power lead (especially: squashing, abrasion, cuts, visible insulation or inner conductors, visible metallic veins, kinks, bulges, color changes of the outer covering, brittle places)
- Check the internal cabling of the power supply (especially: crushing, abrasion, cuts, visible insulation of the inner conductor, visible metallic veins, kinks, lumpiness, color changes of the outer sleeve, brittle spots)
- Humidity protection of the electric system, at least IPX4 (see Type label).
Device for suspending the power cable during transportation. - The power cable and other electric leads must be laid down securely in such a way that shearing, squashing, and other mechanical stresses are improbable.
Measure the resistance of the protective braid (Ohm) according to VDE 0751-1.
Measure the residual diversion current (A) according to VDE 0751-1
Measure the insulation resistance (MOhm) according to VDE 0751-1 - Check the functioning of the side railings (locking, distances according to EN 1970: 2000, also when loaded, deformation and wear through loading)
- Check the operation of the drives (over the full adjustment range of the motors noises, speed, free running, etc., final switching (e.g. current limiting, main switch), if necessary: Measure the performance, first with no load, and then with the nominal load ("SWL") to investigate the wear and tear of the motors by comparing the values of the electric current with the values when the bed was delivered.
- Check the condition of the mattress (not when use of the bed is resumed)
- Completeness of the delivery condition, instruction manual available?
Electrical measurements may only be carried out by persons at least trained on the nursing bed and instructed by an electrician about the instruments and procedures to be used. Only an electrician can release the nursing bed for use after making the measurements and performing the servicing.
The service must only be signed off in the maintenance plan if a minimum of all the above-mentioned aspects have been checked.
| Requirement: | Remark: | |||
| 1.) Check: | NA □Yes No ReMark | |||
| 1.1) Power leadEPR cable or comparable quality | NA □Yes No ReMark | |||
| 1.2) Condition of the power leadIn particular look for:crushing, abrasion, cuts, visible insulationof the inner conductor, visible metallic veins, kinks,bulges, color changes to outer cover,brittle spots | NA □Yes No ReMark | |||
| 1.3) Condition of internal cablesIn particular look for:crushing, abrasion, cuts, visible insulation of the innerconductor, visible metallic veins, kinks, lumpiness, colorchanges of the outer sleeve, brittle spots) | NA □Yes No ReMark | |||
| 1.4) Sufficient ease of pulling and anti-kink of thepower cable | NA □Yes No ReMark | |||
| 1.5) Sufficient ease of pulling and anti-kink of theinternal cables | NA □Yes No ReMark | |||
| 1.6) The power cable and other electric leads mustbe laid down securely in such a way thatshearing, squashing, and other mechanicalstresses are improbable. | NA □Yes No ReMark | |||
| 1.7) Humidity protection IP X4 | NA □Yes No ReMark | |||
| 1.8) Device for suspending the power cable duringtransportation | NA □Yes No ReMark | |||
| 1.9) Check the frame parts for plastic deformationand/or wear and tear.- bottom of bed- bed lift- backrest, seat area, feet area- boom- boom socket- rollers | NA □Yes No ReMark | |||
| 1.10) HousingVisually check all housings for damage, screws mustbe securely fixed, seals and gaskets should not exhibitvisible damage. | NA □Yes No ReMark | |||
Table (A) on Picture (B)
| Symbol | Size | Requirement in mm |
| A | The smallest distance between the elements within the circumference of the side railings in an erect/inserted position, or the area included by the side railings and fixed parts of the bed. | A ≤120 |
| B | Thickness of the mattress in accordance with regulatory use | As indicated by manufacturer |
| C | Height of the top sides of the side railings over the mattress (see ‘B’) without compression. | C ≥220 |
| D | Distance between the headrest or food part and the side railings. | D ≤60 or D ≥235 |
| E | Distance between side railings taken apart with the lying surface in flat position. | E ≤60 or E ≥235 |
| F | Smallest distance of all accessible openings between the side railing and the lying surface. | If D ≥235 then F ≤ 60 If D ≤60 then F ≤120 |
| G | Overall length of the side railings or sum total of the lengths of the side railings taken apart on one side of the bed. | G ≥1/2 of the length of the lying surface |
| H | Distance between headrest and foot-end without extension of these parts. | No requirements |
Actual size: mm
Actual size: mm
Actual size: mm
Actual size: mm
Actual size: mm
Actual size: mm
Actual size: mm
Actual size: mm
NA □ Yes □ No Remark
With beds of which the side railings exceed the indicated measure by less than 10% , such side railings must not be used with small or underweight patients, or else additional measures must be taken to avoid such patients from getting clamped or sliding through.
Side railings that exceed the indicated values by 10% or more, may until such time as the shortages have been solved, not be used anymore and must be exchanged or upgraded.
In addition to the following points, the full functionality (i.e. locking, fixing elements) of the side railings must be checked. Any defects must be eliminated. Observing the sizes of the side railing components in accordance with the following sketch.
NA □Yes No Remark
NA Yes No Remark
NA □Yes No Remark
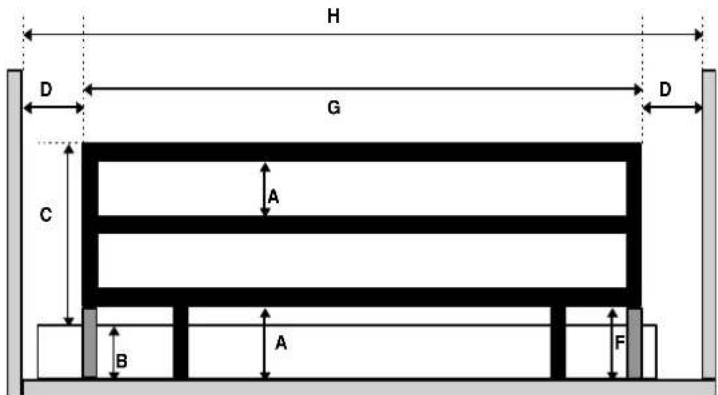
Picture (B) on Table (A)
Remark: If the braces of the side railing are outside (indicated in dark gray), side railings distance A becomes compulsory for the lying surface.
| 2.) Checking sizes | NA □Yes □No ▨Remark □ |
| 2.1) Resistance of the protective braidActual size: Ohm | NA □Yes □No ▨Remark □ |
| 2.2) Residual diversion currentActual size: A | NA □Yes □No ▨Remark □ |
| 2.3) Insulation resistanceActual size: MOhm | NA □Yes □No ▨Remark □ |
| 3.) Functional check | NA □Yes □No ▨Remark □ |
| 3.1) Functional check of the side railings:- locking, e.g. play in the locking device- distances, including under load- deformation-wear and tear owing to load | NA □Yes □No ▨Remark □ |
| 3.2) Functional check of the brakes:- safety- braking-neutral | NA □Yes □No ▨Remark □ |
| 3.3) Functional check of the drives:- over the full adjustment range of the motors(noises, speed, neutral, etc.)- final switching (e.g. current limiting, main switch)- if necessary, measure the motor performance first without load and then with the nominal load (SWL) to check for wear and tear of the motorsCompare with the values given at the time of delivery. The manufacturer will provide you with the limits. | NA □Yes □No ▨Remark □ |
| Other: |
4.5 Disinfection
WARNING: Dangerous Products - The use of disinfectants is restricted to authorized personnel.
WARNING: Dangerous Products, change on irritate your skin - You should wear suitable protective clothing because the disinfectants could irritate your skin. For this purpose you should also take note of the product information of the solutions concerned.
All parts of the bed can be treated by scrubbing with a disinfectant.
All steps taken to disinfect rehabilitation equipment, their components or other accessory parts are to be recorded in a disinfection report containing a minimum of the following information (with product documentation appended):
Table 2: Example of a disinfection book
| Date of the disinfection | Reason | Specification | Substance and concentration | Signature |
Abbreviations used in column 2 (reason):
V = Suspected infection IF = Infection case W = Repetition I = Inspection
For a blank sheet of a disinfection book see § 9.
The recommended disinfectants for scrubbing (based on the list provided by the Robert Koch Institute, RKI) are standing in the table below. The current state of the disinfectants included in the RKI list can be obtained from the Robert Koch Institute (RKI) (homepage: www.rki.de).
| Active substance | Product name | Laundry disinfection | Surface disinfection (scrubbing/wiping disinfection) | Disinfection of excretions 1 part sputum or stools + 2 parts diluted solution or 1 part urine + 1 part diluted solution | Area of effectiveness | Manufacturer or Supplier | |||||||
| Sputum | Stools | Urine | |||||||||||
| Diluted solution | Time to take effect | Diluted solution | Time to take effect | Diluted solution | Time to take effect | Diluted solution | Time to take effect | Diluted solution | Time to take effect | ||||
| % | Hr. | % | Hr. | % | Hr. | % | Hr. | % | Hr. | ||||
| Phenol or phenol derivative | Amocid | 1 | 12 | 5 | 6 | 5 | 4 | 5 | 6 | 5 | 2 | A | Lysoform |
| Gevisol | 0,5 | 12 | 5 | 4 | 5 | 4 | 5 | 6 | 5 | 2 | A | Schülke & Mayr | |
| Helipur | 6 | 4 | 6 | 4 | 6 | 6 | 6 | 2 | A | B. Braun | |||
| m-cresylic soap solution (DAB 6) | 1 | 12 | 5 | 4 | A | ||||||||
| Phenol | 1 | 12 | 3 | 2 | A | ||||||||
| Chlorine, organic or inorganic substances with active chlorine | Chloramin-T DAB 9 | 1,5 | 12 | 2,5 | 2 | 5 | 4 | \( A^1 B \) | |||||
| Clorina | 1,5 | 12 | 2,5 | 2 | 5 | 4 | \( A^1 B \) | Lysoform | |||||
| Trichlorol | 2 | 12 | 3 | 2 | 6 | 4 | \( A^1 B \) | Lysoform | |||||
| Per combinations | Apesin AP100 \( {}^{2} \) | 4 | 4 | AB | Tana PROFESSIONAL | ||||||||
| Dismozon pur \( {}^{2} \) | 4 | 1 | AB | Bode Chemie | |||||||||
| Perform \( {}^{2} \) | 3 | 4 | AB | Schülke & Mayr | |||||||||
| Wofesterif \( {}^{2} \) | 2 | 4 | AB | Kesla Pharma | |||||||||
| Formaldehyde and/or other aldehydes or derivatives | Aldasan 2000 | 4 | 4 | AB | Lysoform | ||||||||
| Antifect FD 10 | 3 | 4 | AB | Schülke & Mayr | |||||||||
| Antiseptica surface disinfection 7 | 3 | 6 | AB | Antiseptica | |||||||||
| Apesin AP30 | 5 | 4 | A | Tana PROFESSIONAL | |||||||||
| Bacillocid special | 6 | 4 | AB | Bode Chemie | |||||||||
| Buraton 10F | 3 | 4 | AB | Schülke & Mayr | |||||||||
| Desomed A 2000 | 3 | 6 | AB | Desomed | |||||||||
| Hospital disinfectant cleaner | 8 | 6 | AB | Dreiturm | |||||||||
| Desomed Perfekt | 7 | 4 | \( AB^* \) | Desomed | |||||||||
| Formaldehyde-solution (DAB 10), (formaline) | 1,5 | 12 | 3 | 4 | AB | ||||||||
| Incidin Perfekt | 1 | 12 | 3 | 4 | AB | Ecolab | |||||||
| Incidin Plus | 8 | 6 | A | Ecolab | |||||||||
| Kohrsolin | 2 | 12 | 3 | 4 | AB | Bode Chemie | |||||||
| Formaldehyde | Lysoform | 4 | 12 | 5 | 6 | AB | Lysoform | ||||||
Table 3: Disinfectants
| Active substance | Product name | Laundry disinfection | Surface disinfection (scrubbing/wiping disinfection) | Disinfection of excretions 1 part sputum or stools + 2 parts diluted solution or 1 part urine + 1 part diluted solution | Area of effectiveness | Manufacturer or Supplier | |||||||
| Sputum | Stools | Urine | |||||||||||
| Diluted solution | Time to take effect | Diluted solution | Time to take effect | Diluted solution | Time to take effect | Diluted solution | Time to take effect | Diluted solution | Time to take effect | Hr. | |||
| % | Hr. | % | Hr. | % | Hr. | % | Hr. | % | Hr. | % | |||
| and/or other aldehydes or derivatives | Lysoformin | 3 | 12 | 5 | 6 | AB | Lysoform | ||||||
| Lysoformin 2000 | 4 | 6 | AB | Lysoform | |||||||||
| Melsept | 2 | 12 | 4 | 6 | AB | B. Braun | |||||||
| Melsitt | 4 | 12 | 10 | 4 | AB | B. Braun | |||||||
| Minutil | 2 | 12 | 6 | 4 | AB | Ecolab | |||||||
| Multidor | 3 | 6 | AB | Ecolab | |||||||||
| Nuscoept | 5 | 4 | AB | Dr. Nusken Chemie | |||||||||
| Optisept | 7 | 4 | AB* | Dr. Schumacher | |||||||||
| Pursepl-FD | 7 | 4 | AB* | Merz | |||||||||
| Ultrasol F | 3 | 12 | 5 | 4 | AB | Fresenius Kabi | |||||||
| Amphoteric surfactants (amfotensiden) | Tensodur 103 | 2 | 12 | A | MFH Marienfelde | ||||||||
| Lye | Lime-milk3 | 20 | 6 | A3B | |||||||||
| 1 Not effective against myco-bacteria when service disinfecting, especially in the presence of blood.2 Not suitable for disinfecting blood-contaminated or porous surfaces (e.g. raw wood).3 Useless for tuberculosis; preparation of Lime-milk: 1 part dissolved lime (calcium hydroxide) + 3 parts water.* Checked for effectiveness on viruses in accordance with checking methods of the RKI (Federal Health Reporting 38 (1995) 242).A: Suitable for killing vegetative bacterial germs including myco-bacteria as well as fungi, including fungal spores.B: Suitable for deactivating viruses. | |||||||||||||
Kindly consult your specialist dealer if you have queries on matters related to disinfection; he will gladly assist you.
5 Guarantee
Excerpt from the "General Business Conditions":
(…)
- The guarantee period for warranty claims is 24 months.
The guarantee excludes damage arising from structural changes to our products, insufficient maintenance, defective or improper handling or storage or the use of non-original parts. Likewise, the guarantee excludes parts or working parts subject to natural wear and tear.
(…)
6 Disposal
When disposing of the bed, contact your local disposal centre or return the product to your specialist dealer who, after submitting it to a hygienic procedure, will be able to send it back to the manufacturer who will dispose of and recycle it correctly, separating it into its component materials.
Packaging materials can be taken to disposal or recycling centers or to your specialist dealer.
7 Declaration of conformity
The manufacturer or his authorized representative :
N.V. VERMEIREN N.V
Address:
Vermeirenplein 1/15
2920 Kalmthout
Belgium
declares under his sole responsibility that the CE marked medical devices :
Productgroup:
Electric sick beds
Brand:
Vermeiren
Type
Luna, Luna basic, Luna X-Low, Luna Deluxe
have been classified as class I, according to annex IX MDD 93/42/EEC, rule 12,
and is manufactured in full conformity with the European instructions below - including the latest modifications - and with the national law, that organizes this directions :
Medical devices directive MDD 93/42/EEC
and is in conformity with the relevant European harmonized standards:
EN 12182: 1999, EN 1970: 2000, EN 1970 A1: 2005
8 Maintenance plan
| Date | Maintenance | Remarks | Paraph |
| 1/1/2010 | Greasing and general servicing | non | |
9 Disinfection book
| Date of the disinfection | Reason | Specification | Substance and concentration | Signature |
| Abbreviations used in column 2 (reason): V = Suspected infection IF = Infection case W = Repetition I = Inspection | ||||
Contents
Préface 2
V = Infection suspectée IF = Cas d'infection W = Répartition I = Inspection
Type: Luna, Luna basic, Luna X-Low, Luna Deluxe
7 Declaration of conformity 27
8 Onderhoudsplan 28
7 Declaration of conformity
Luna, Luna basic, Luna X-Low, Luna Deluxe
Luna, Luna basic, Luna X-Low, Luna Deluxe
Luna, Luna basic, Luna X-Low, Luna Deluxe
Luna, Luna basic; Luna X-Low, Luna Deluxe
The bed was serviced:
Le lit contrôle:
We offer 5 years of warranty on standard wheelchairs, lightweight wheelchairs 4 years. Electronic wheelchairs, tricycles,
beds and other products : 2 years (batteries 6 months ) andmultiposition wheelchairs 3 years . This warranty is limited to
APPLICATION CONDITIONS
In order to claim this warranty, part "B" of this card has to be
given to your official verminen dealer . The warranty is onlyvalid when parts are replaced by Vermögen in Belgium
This warranty is not valid in case of:
-
damage during transport. der Garantie ausgenommen.
-
involvement in an accident,
of our company and/or official Vermeiren
Non-Return of the Warranty Card
.
-
please return within 6 days of date or purchase of register your producer at
our website, http://www.vermeiren.be/registration
in our van hertelling, heort “P” bi-ji-mo-oo
website: www.realtime.it
e-mail: info@realtime.it
Poland
Vermeiren Polska Sp. z o.o
ul. czna 1
PL-55-100 Trzebnica
Tel: +48(0)71 387 42 00
Fax:+48(0)713870574
website: www.vermeiren.pl
e-mail: info@vermeiren.pl
Spain
Vermeiren Iberica, S.L.
Trens Petits, 6. - Pol. Ind. Mas Xirgu.
17005 Girona
Tel: +34 902 48 72 72
Fax: +34 972 40 50 54
website: www.vermeiren.es
e-mail: info@vermeiren.es
Germany
Tel: +43(0)732 37 13 66
Fax: +43(0)732 37 13 69
website: www.vermeiren.at
e-mail: info@vermeiren.at
Switzerland
Vermeiren Suisse S.A.