USER MANUAL RoboMix Compact 1769 ARIETE
The necessary precautions must be taken when using electrical appliances, and these include the following:
Make sure that the voltage on the appliance rating plate corresponds to that of the 1. mains electricity.
Never leave the appliance unattended when connected to the power supply; 2. unplug it after every use.
Never place the appliance on or close to sources of heat.3.
Always place the appliance on a flat, level surface during use.4.
Never leave the appliance exposed to the elements (rain, sun, etc....).5.
Make sure that the power cord does not come into contact with hot surfaces.6.
- This appliance is not intended for use by persons (including children) with reduced physical, sensory or mental capabilities, or lack of experience and knowledge, unless they have been given supervision or instruction concerning use of the appliance by a person responsible for their safety.
Children should be supervised to ensure that they do not play with the appli-8. ance.
NEVER PLACE THE APPLIANCE BODY, PLUG OR POWER CORD IN WATER 9. OR OTHER LIQUIDS: ALWAYS WIPE CLEAN WITH A DAMP CLOTH.
10.ALWAYS UNPLUG THE POWER CORD FROM THE ELECTRICITY MAINS BEFORE FITTING OR REMOVING SINGLE ATTACHMENTS OR BEFORE CLEANING THE APPLIANCE.
Always make sure that your hands are thoroughly dry before using or adjusting 11. the switches on the appliance, or before touching the power plug or power connections.
Before removing the lid, unplug the appliance and make sure that the blade has stopped moving.
-
Never operate the appliance when empty.
-
Never use the appliance if the blade is damaged.
NEVER PLACE INGREDIENTS, INCLUDING LIQUIDS, ABOVE THE MAXIMUM 16. LIMIT SHOWN ON THE BOWL.
Never use the appliance to chop excessively hard foods (e.g., ice cubes or meat 17.
on the bone).
Never use the fitted bowl to move the appliance; i.e., the handle on the bowl is 18. not a carry handle for the appliance as a whole..
To prevent accidents or damage to the appliance, always keep hands and cook-19. ing utensils well away from moving blades or cutting discs.
The blades are sharp. Handle them with care. Always hold them by the plastic 20. parts.
Never introduce foods by hand. Always use the pusher.21.
Never remove foods from the sides of the bowl while the appliance is operating. 22. Switch off the appliance, unplug the power cord from the mains and use the special spatula.
THIS APPLIANCE HAS BEEN DESIGNED TO OPERATE ONLY IF THE BOWL 23. AND RELEVANT LID HAVE BEEN FITTED CORRECTLY. IF THIS IS NOT THE CASE, TAKE IT TO YOUR NEAREST AUTHORISED ASSISTANCE CENTRE. ALWAYS UNPLUG THE APPLIANCE BEFORE CARRYING OUT ANY 24. OPERATION INSIDE THE BOWL.
To unplug the appliance, grip the plug and remove it directly from the power 25. socket. Never pull the power cord to unplug the appliance.
Never use the appliance if the power cord or plug are damaged or if the appli-26.
ance itself is faulty; in this case, take it to your nearest Authorised Assistance
Centre.
To prevent any risks, if the power cord is damaged, it must be replaced by the 27. manufacturer, its Technical Assistance Service or a similarly qualified person.
This appliance is designed for HOME USE ONLY and may not be used for com-28.
mercial or industrial purposes.
This appliance conforms to the 2006/95/EC and EMC2004/108/EEC directives.29.
Any changes to this product that have not been expressly authorised by the 30. manufacturer may lead to the user's guarantee being rendered null and void.
In the event that you decide to dispose of the appliance, we advise you to make 31. it inoperative by cutting off the power cord. We also recommend that any parts that could be dangerous be rendered harmless, especially for children, who may play with the appliance or its parts.
Packaging must never be left within the reach of children since it is potentially 32. dangerous.
DO NOT THROW AWAY THESE INSTRUCTIONS
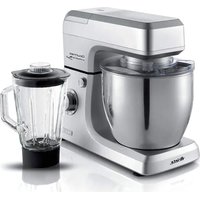
DESCRIPTION OF THE APPLIANCE (Fig. 1)
A Operating dial
B Power base
C Motor shaft
D Blade support
E Chopping blade
F Mixing blade
G Pusher
H Whisking disc
I Blade disc
L Julienne blade
M Slicing blade
N Chip cutting blade
O Lid
P Bowl
WARNING
The appliance is fitted with a device to prevent it from operating if the lid (O) is not securely locked in place and the bowl (P) is not correctly inserted.
INSTRUCTIONS FOR USE
WARNING: Make sure that the appliance is unplugged and that the control dial (A) is set to "0" before cleaning it or fitting or removing attachments.
- Insert the motor shaft (C) into the special seating on the power base (B) (Fig. 2).
- Fit the bowl (P) onto the power base (B) and lock it into place turning it clockwise so that the tab in the bottom section of the handle clicks perfectly into the slit in the power base (Fig. 3).
- Fit the blade support (D) onto the motor shaft (C) inside the bowl (P) (Fig. 4).
Chopping, mixing or whisking
- To use the appliance as a chopper, fit the metal blade (E) onto the blade support (D), while for mixing, fit the plastic blade (F) by making sure that the slots inside the base of the blade are in line with the notches in the support and pressing the blade downwards (Fig. 5).
WARNING: The blades are sharp; handle them with care.
- To use the appliance to whisk egg whites or whip cream, fit the special attachment (H) onto the blade support (D), as illustrated in Fig. 6.
WARNING: Before starting the appliance, make sure that the bowl (P) and the disc (H) are perfectly clean and without any traces of butter or egg yolk.
- Cut the foods into small pieces (1.5 x 1.5 cm) and place them inside the bowl (P) or for mixing, insert the ingredients.
WARNING: Never add foods over the maximum level marked on the bowl (P).
- Fit the lid (O) over the bowl (P) moving the mark inside the bowl (P) so that it is in line with the symbol (D) Block the lid (O) so it clicks into place by moving it clockwise () (Fig 7).
WARNING: Make sure that the lid is firmly locked into place before starting the appliance.
EN
- Plug the appliance into the mains power.
- Start the appliance, selecting the rotation speed of the blade using the operating dial (A).
The appliance has two operating speeds: minimum «1» and maximum «2».
WARNING: When the appliance is used to mix or whisk, we recommend starting at speed "1" and then passing on to speed "2". When used to chop, it is advisable to use the pulse function, turning the dial (A) anticlockwise to the "P" setting. For optimum use, press the button in short bursts (2/3 sec.).
WARNING: Never operate the appliance for more than 30 seconds at a time. Wait at least 2 minutes before operating it again.
- For smoother, finer chopped foods, remove the food, if necessary, from the sides of the bowl with a spatula, pushing it towards the centre.
WARNING: Never remove foods from the sides of the bowl while the appliance is operating. Switch off the appliance first and unplug it from the mains power.
WARNING: To prevent accidents or damage to the appliance, always keep hands and cooking utensils well away from moving blades or discs.
WARNING: Never use your fingers to remove food from the sides of the bowl while the appliance is operating. Always use the special spatula.
- If it is necessary to add foods during appliance operation, use the opening in the lid (O). Push the foods down with the pusher (G) on its own (Fig. 8).
WARNING: Never insert foods by hand. Always use the pusher.
- To stop the appliance, turn the dial (A) to "0".
Slicing
WARNING: The blades are sharp; handle with care.
- Fit the required blade, the slicing blade (M), julienne blade (L) or chip blade (N) into the blade disc (I) so that the hole in the blade is in the centre of the disc (Fig. 9).
- Fit the assembled blade support disc (I) on the motor shaft (C), gripping it by the relevant slots and keeping the blade so it is facing upwards (Fig. 10).
- Fit the lid (O) over the bowl (P) and proceed as described in the section "Chopping, mixing or whisking".
CLEANING
WARNING: NEVER PLACE THE APPLIANCE BODY, PLUG OR POWER CORD IN WATER OR OTHER LIQUIDS; ALWAYS WIPE CLEAN WITH A DAMP CLOTH.
WARNING: ALWAYS UNPLUG THE POWER CORD FROM THE ELECTRICITY MAINS BEFORE FITTING OR REMOVING SINGLE ATTACHMENTS OR BEFORE CLEANING THE APPLIANCE.
WARNING: The blades are extremely sharp. Always handle them with care.
- Remove all of the attachments used, working in the opposite order to the way they were fitted.
- All attachments can be washed in the top rack of the dishwasher, at a maximum temperature of 50^ / 122^ .
- Wipe the power base (B) clean with a slightly damp cloth.
INSTRUCTIONS IMPORTANTES
LIRE CES INSTRUCTIONS AVANT L'EMPLOI.
BESCHRIJVING VAN HET APPARAAT (Fig. 1)
TO PEYMATOAHINTH ANO THN PIPA TOY HAEKTPIKOY PEYMATOI PIN TOIOOTHEETE H' AFAIPEETE TA IAΦOPA MEPH H' PIPIN IPOXQPHTET E TON KAθAPIEMO THS.
BHIMAHNE: IpoDyKTbI He DoJIxHbI IpeBblaTb OTMeTKn MaKcImaJIbHOrO yPOBHa, Yka3aHHOro Ha EMKoCTn (P).
- YcTaHOBInTe KpbIuKy (O) Ha YaUy (P), CoBMeCTINB PnCKy BHyTpN YaUu (C) C CmMBoJOM () 3a6IoknpoBaTb KpbIuKy (O) Do IeUka, NoBepHyB ee no YaCoBOJ CTpeJIke (Pnc.7).
BHIMAHNE: Y6eIITbCRA B TOM, UTO KpbIuKa PNOTHO 3aKpbItA, PpeXde Yem BKJIIOUaTb npi6Op.
- BCTaBntb BnIky npOBoJa B 3JIeKtpnueckyUo po3eTky.
- BkIIOuHTb np6op, BbI6paB CKOpOCTb BpaSeHnHa cAdKn pRi NOMoU pyKn BKJIoueHnA (A). Pnp6op nMeet DBe CKOpOCTn: MmHMmaIbHyU 1 ] mAKcMmaIbHyU 2 ].
BHIMAHNE: He pa6oTaTb c np6opom 60nee 30 cekyHd noDpyd. PdoJdaTb He Mehee 2 MmHyT, npexde yem CHOba BkIouaTb np6op.
-ДяТоуTO6bI MeIko I3MeIbYHTb npOdyKTbI IN OJyHTb 6OJIe OJHOpOHyO CMEcB, peKOMeH dyETc, pRn Heo6xOdmocTn, nepNoJnueckn CHImaTb npOdyKTbI CO CTeHOK EMKoCTN HAnpaBJIaTB IN B cEHrP pRn NOMOUs n PpNJraHOUeJc JONaTKn.
BHUMAHNE: He TpOraTb npOdyKtbl, HaxoJaIeScr Ha CTeHkax EMcOCTn, ecn npi6op pa6oTaet.
Chauana BbIKIOHTb np6op n OTcoeHNHTB BNJKy O T 3neKtpuecko p03ETKn.
BHUMAHNE:Bo n36eXaHne HeCuaCTHbIX CnyaEB N NOBpeXdEHNr np6op, depKaatb pykn N KxyOHhble npHaIeJxHOCTN BdaNN OT BpaUoUHXcR HOKei N DnCKOB.
BHIMAHNE: He ydaTne octaTK co cTeHOK yaun naIbcaMn BO BpeM pa6oTb np6opa. Bcerda IcnoJb3yIte cneuaJIbHbI uNaTeJIb.
- Ecni BO Bpemr nepemueuBaHn rOobnAOTc npdykbl, TTo nra 3Toro Heo6xOIMo HcnoIb30BaTb OTBepCTne, ImeoueeecHa Kpblike (O). IpotoJKNHyTB HaxoJaunec BHyTpri npoDyktbl pni nOMoUToNbko Ondoro 6oNbWoTo npotaiknbatejra (G) (Pnc.8).
BHIMAHHE: Hikorda He npoBnRaTb npOyKtby pykam. POnb3OBaTbcra Bcerda npotaKnBaTeJeM.
-Дя OCTaHOBKn npi6opa noBepHyt b pyky (A)do noloxhen "0".
Hape3ka
BHIMAHHE: Hoxn ouehb octpbie. ObpaaainTeCb c HmN octopoxkHo.
-Пометит b hyжн b Hox (Дя ЛOMТИКOB - (M); Дя наpeЗк Jульен - (L); Дя карToФЕЯ Фр n (N)) Ha диСК-дерЖаTeь dЯ HOж e TAKIM OБразм, YTOБы OTВерстпе HOж a OKa3aJIOcB BцENTpe dIscKa (Pnc. 9).
- YctaHOBInTe DnCK-dePkaTeIb Inra HOKei (I) Ha 1nnHdIeN bDnIaTeIa (C), 3axBaTnB eroo 3a COOT-BETCTByUoIe npOuShnbl, HOK DOJXeH 6bITb NOBepHyT BBePx (pnc. 10).
- YctaHOBtB KpbIshky (O) Ha EMKoCTn (P) n daJe e DeiCTBOBaTb no onucaHIO naparpaΦa «N3MeJIbYeHne, 3aMeUINBaHne, B36UBAHne».
UNCCTKA
BHIMAHNE: HIKOITDA HE IORPYKATb KOPNYC MOTOPA, 3JEKTPNUECKYIO BUNIKU IN IPOBOID B OODY IIN DpyTne XnDKOCTN. IJRA IX OYNCTKN NCNOJB3OBATb TOJIbKO BJIAXHYIO TKAHb.
BHIMAHNE: JAXE ECJN IN PINBOP BbIKIOUeyH, HEOBXOJIMO OTCOEINHHTB BNJKY INPOBOJA OT 3JIKTPNUECKO PO3ETKN, INPEXJE YEM COBIPATb INI PA3BNPATb ETO DETAJN IN INPCTUYATb K UNTKE.
BHIMAHHE: HoXn ouEnb ocTpbIe. ObpaaainTeCb c HmN KpaIHe octopoxHo.
- CHIMATb BCE DeTJIIN NO OINCAHNI C6OpKN, INPBEDEHHOMy paHee, HO B O6paTHoN PocJeIOBaTeJIbHOCTN.
- Bce deTaN MOryT MbITbCBy B BepxHei Yactn NocydomOeHOn MaunHbI npN MaKcImaJIbHOJ Temnepatype, paBHO 50^ / 122^
-Дя ounctkn 6Joka MOTopa (B) nCnoNb3ObaTb CneRka BnaXHyTO TkaHb.
BHIMAHNE: Iocne MbITbra TzataTeNbHO BbICyHNTb KaKdyu DeTaIb, npexde yem npunctynaTb Kc6opke kombaHa.
Дату n3roTOBNeHЯ уka3aHa Na kopnyce n3deJIЯ B 3aIINФpoBaHHOM BnDE SN wk/yrabcdefg, rDe wk- HeDJIЯ npOu3BOdCTBa
yr- roD npOn3B0dCTBa
abcdefg - cepiHbI Homep n3deJIy
CoOTBeTCTByeT Tpe6oBaHnIaM
TP TC 004/2011 «О 6e3oNaChOCTn Hn3KOBbTHOrO o6OpyIOBaHn, yTBePxJdEN PeSeHnEm Komccnn TamoxeHHoro coH3a N768 ot 16 abrycta 2011 roda
TP TC 020/2011 «Злектомагиная COBmectUMOCTb texHnuecknx cpeDCTB», yTbepxdeH
PeueHnem Komnccnn TamoxeHHoro coo3a N879 ot 9 deka6pra 2011 roda
HOpMaIgOceTnKauN B npINOxEHN K rapaHTnHOMy TaHOHy n/INn Ha ynaKOBKe I3eJIy.
220-240B~ - 50/60Γι - 500Вт - Knacc II - IPX0
CdeJanaHO BKnTae
HmnpTeP:OOO«Mednatex»,
IOpndueckn aDpec:127006, ropod MockBa, yuua CaObaa-TpnuMpaJIbHa, dom 16, cTpoEHe 3, IOM. I, KOM 2
Фaktnueckn aDpec:119048, r. MockBa, yI. YcaueBa, d.29, Kopnyc 3, nom.II, kom.3
Изговпель: De' Longhi Appliances Srl /«Денин Anплаенсс CPЛ» Адес: 50013 Итalia, Флоренья, Кампи Биэнци, Ва C. Кунрко 300.
Cnncok opraHn3aun, ynoHMOueHHbIX n3roTOBnteJem Ha pa6Otu C npTeH3nA Mn noTpe6nteJen n cepBnchbIM obcnyKuBaHneM, pa3Meuen Ha caIte: http://www.ariete.net/ru/assistance
Togya Jinyi Ariete +7915165611
Tobap noctabnayetcB co6paHOM Bnde, cneuaIbHbIX Tpe6oBaHNI K nepeBO3Ke I xpaHeHIO He yctaHOJIeHO.
YTNIN3NPOBaT B COOTBETCTBNN C 3aKOHoDaTeJIbCTBOM MeCTa peaIN3aCNI.
TapaHTnHbI cpoK 2 roJa. Cpok cnJxkbI n3dennr 2 roJa.
HOpMaIgOceTnKauN B npINOxEHN K rapaHTnHOMy TaHOHy n/INn Ha yNaKOBKe I3deJIy.
BAXJIINBA IHΦOPMAÇIÀ
YBAXHO O3HAIOMNTNc8 3 LIMN IHCTPYKlIaMNI PEPeI NOyATKOM EKCPIyATAUII.
Пд час ecnnyataci ekeTpunHnx npucTroB cnid doTPmYBaTncr HaneKnX npabnil 6e3neKn, a came:
IpekeohatncB TOMy, 9o Happya npnctpoB iDnOBiDae Happy3i Baoi Mepe-1. Xi eJIeKTPnHOrO XnBJIeHHra.
3a6bopohyetbcra 3aIIuHaTN npncTpiy yBIMKHyTM y Mepexy eJeKtpnHOrO KINB-2.
JIeHn8 6e3 HaJy; nCJIa KOxHOro BnKOpNCtAHNcIiD BnMkHyTn npncTpiY Ta
BID'EDHaTN Ioro BiD MepeXi XnBHeHHa.
3a6opohreTbcra 3aIIuataH npictroi Ha dxpeIax TeIla a6o 6iIy Hnx.3.
CπiδκybaTn 3a Tm, οo6 πιη He 6abnncs3 npictpoeM.8.
3ABOPOHЯETbCra 3AHUPOBATN Y BODY TA IHSSI PIINHN KOPNYC 9. PnCTPOIO, WTENCJIbHy BNIKY ABO NPOBID EJEKTPuHORO XNBJIeHHRA TAKOX KOPNUCTyBATNcRA BOJIOROI TKAHINHOI DnI DOJIy 3A PPnCTPOEM.
IPEd Tm, Jk BCTAHOBITn ABO 3HrTn JIKcB CKJAdOBI YACTINH 10. 3 IPICTPOIO 3 METOIO DOrAу 3A Hm, CIId CNoyATKY BInHrTn 8TEENCEJIbHy BNJKY 3 PO3ETK IN EJEKTPNCHOrO XINBJIeHHa, HABITb RkIo IPICTPII HE IPAUoE.
jlll ppepepepepepepepepepepepepepepepepepepepepepepepepepepepepepepepepepepepepepepepepepepepepepepepepepepepepepepepepepepepepepepepepepepepepepepepepepepepepepepepepepepepepepepepepepepepe pe
p 9