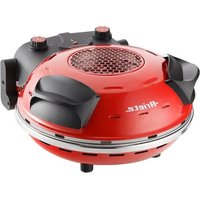
RoboMax Metal 1783 - Food Processor ARIETE - Free user manual and instructions
Find the device manual for free RoboMax Metal 1783 ARIETE in PDF.

| Product type | Food processor |
| Brand | Ariete |
| Model | RoboMax Metal 1783 |
| Power supply | 220-240 V ~ 50/60 Hz |
| Rated power | 700 W (estimated) |
| Main bowl capacity | 1,5 L (estimated) |
| Blender capacity | 1 L maximum |
| Bowl material | Plastic |
| Blade material | Stainless steel |
| Main functions | Chop, knead, whisk, slice, grate (julienne, sticks), blend, juice citrus fruits |
| Speed control | Variable from 0 to MAX + pulse function (P) |
| Included accessories | Chopping blade, kneading blade, whisk, blade holder disc, 3 cutting discs (slicing, julienne, sticks), blender with lid and measuring cap, citrus press (cup and cone), spatula |
| Safety | Bowl and lid locking device preventing operation if incorrectly installed |
| Cleaning | Motor unit wiped with a damp cloth; accessories washable by hand with warm water and mild detergent |
| Repairability | Power cord replaceable by an authorized professional; contact authorized after-sales service |
| Usage | Household use only |
| Dimensions (estimated) | 30 x 20 x 25 cm |
| Weight (estimated) | 3 kg |
Frequently Asked Questions - RoboMax Metal 1783 ARIETE
User questions about RoboMax Metal 1783 ARIETE
0 question about this device. Answer the ones you know or ask your own.
Ask a new question about this device
Download the instructions for your Food Processor in PDF format for free! Find your manual RoboMax Metal 1783 - ARIETE and take your electronic device back in hand. On this page are published all the documents necessary for the use of your device. RoboMax Metal 1783 by ARIETE.
USER MANUAL RoboMax Metal 1783 ARIETE
The necessary precautions must be taken when using electrical appliances, and these include the following:
Make sure that the voltage on the appliance rating plate corresponds to that of the 1. mains electricity.
Never leave the appliance unattended when connected to the power supply; 2. unplug it after every use.
Never place the appliance on or close to sources of heat.3.
Always place the appliance on a flat, level surface during use.4.
Never leave the appliance exposed to the elements (rain, sun, etc....).5.
Make sure that the power cord does not come into contact with hot surfaces.6.
Appliances can be used by persons with reduced physical, sensory or mental 7. capabilities or lack of experience and knowledge if they have been given supervision or instruction concerning use of the appliance in a safe way and if they understand the hazards involved.
This appliance shall not be used by children. Keep the appliance and its cord out 8. of reach of children.
Children shall not play with the appliance.9.
NEVER PLACE THE APPLIANCE BODY, PLUG OR POWER CORD IN WATER 10. OR OTHER LIQUIDS; ALWAYS WIPE CLEAN WITH A DAMP CLOTH.
ALWAYS UNPLUG THE POWER CORD FROM THE ELECTRICITY MAINS 11.
BEFORE FITTING OR REMOVING SINGLE ATTACHMENTS OR BEFORE CLEANING THE APPLIANCE.
Always make sure that your hands are thoroughly dry before using or adjusting 12. the switches on the appliance, or before touching the power plug or power connections.
- WARNING: ALWAYS FIT THE BLADE BEFORE INSERTING THE FOOD. Before removing the lid, unplug the appliance and make sure that the blade has stopped moving.
Never operate the appliance when empty.15.
- Never use the appliance if the blade is damaged.
NEVER PLACE INGREDIENTS, INCLUDING LIQUIDS, ABOVE THE MAXIMUM 17. LIMIT SHOWN ON THE BOWL.
Never use the appliance to chop excessively hard foods (e.g., ice cubes or meat 18. on the bone).
Never use the fitted bowl to move the appliance; i.e., the handle on the bowl is 19. not a carry handle for the appliance as a whole..
To prevent accidents or damage to the appliance, always keep hands and cook-20. ing utensils well away from moving blades or cutting discs.
The blades are sharp. Handle them with care. Always hold them by the plastic 21. parts.
Never introduce foods by hand. Always use the pusher.22.
Never remove foods from the sides of the bowl while the appliance is operating. 23. Switch off the appliance, unplug the power cord from the mains and use the special spatula.
THIS APPLIANCE HAS BEEN DESIGNED TO OPERATE ONLY IF THE BOWL 24. AND RELEVANT LID HAVE BEEN FITTED CORRECTLY. IF THIS IS NOT THE CASE, TAKE IT TO YOUR NEAREST AUTHORISED ASSISTANCE CENTRE. ALWAYS UNPLUG THE APPLIANCE BEFORE CARRYING OUT ANY 25. OPERATION INSIDE THE BOWL.
PREPARE THE BLENDER GOBLET WITH THE FOODS TO BE BLENDED AND 26. FIT IT TO THE POWER BASE BEFORE PLUGGING IN THE APPLIANCE.
Never pick up or carry the appliance by the bowl when fitted. In other words, the 27. bowl handle must never be used to carry the appliance.
To unplug the appliance, grip the plug and remove it directly from the power 28. socket. Never pull the power cord to unplug the appliance.
Never use the appliance if the power cord or plug are damaged or if the appli-29. ance itself is faulty; in this case, take it to your nearest Authorised Assistance Centre.
To prevent any risks, if the power cord is damaged, it must be replaced by the 30. manufacturer, its Technical Assistance Service or a similarly qualified person.
This appliance is designed for HOME USE ONLY and may not be used for com-31.
mercial or industrial purposes.
This appliance conforms to the directives 2014/35/EU and EMC 2014/30/EU, 32. and to the regulations (EC) No. 1935/2004 of 27/10/2004 regarding material in contact with foods.
Any changes to this product that have not been expressly authorised by the 33. manufacturer may lead to the user's guarantee being rendered null and void.
In the event that you decide to dispose of the appliance, we advise you to make 34.
it inoperative by cutting off the power cord. We also recommend that any parts that could be dangerous be rendered harmless, especially for children, who may play with the appliance or its parts.
Packaging must never be left within the reach of children since it is potentially 35. dangerous.

- To dispose of product correctly according to European Directive 2012/19/
CE, please refer to and read the provided leaflet enclosed with the product.
DO NOT THROW AWAY THESE INSTRUCTIONS
DESCRIPTION OF THE APPLIANCE (Fig. 1)
A Operating dial
B Power base
C Spatula
D Blade support
E Chopping blade
F Mixing blade
G Pusher
H Whisking disc
I Blade disc
L Julienne blade
M Slicing blade
N Chip cutting blade
O Lid
P Blender lid cap
Q Blender
R Blender cover
S Squeezing bowl
T Squeezing cone
U Bowl
WARNING
The appliance is fitted with a device to prevent it from operating if the lid (O) is not securely locked in place and the bowl (P) is not correctly inserted.
INSTRUCTIONS FOR USE
WARNING: Make sure that the appliance is unplugged and that the control dial (A) is set to "0" before cleaning it or fitting or removing attachments.
- Before using the appliance, clean all parts that will be in contact with food using a cloth with warm water and a mild detergent. Wipe thoroughly.
- Fit the bowl (U) onto the power base (B) and lock it into place turning it clockwise so that the tab in the bottom section of the handle clicks perfectly into the slit in the power base (Fig. 2).
- Fit the blade support (D) on the central pin inside the bowl (U), Fig. 3.
Chopping, mixing or whisking
- To use the appliance as a chopper, fit the stainless steel blade (E) onto the blade support (D), while for mixing, fit the plastic blade (F) by making sure that the slots inside the base of the blade are in line with the notches on the support and pressing the blade downwards (Fig. 4).
- To use the appliance to whisk egg whites or whip cream, fit the special attachment (H) onto the
blade support (D), as illustrated in Fig. 5.
WARNING: Before starting the appliance, make sure that the bowl (U) and the disc (H) are perfectly clean and without any traces of butter or egg yolk.
- Cut the foods into small pieces (1.5 x 1.5 cm) and place them inside the bowl (U) or for mixing, insert the ingredients.
- Place the lid (O) onto the bowl (U) and lock it by rotating it clockwise, so that the flap on the lid perfectly engages in the opening on the bowl handle (Fig. 6).
- Plug the appliance into the mains power.
- Start the appliance, selecting the rotation speed of the blade using the operating dial (A).
The appliance is equipped with a speed scale, from the minimum to the "MAX" one.
WARNING: When using the appliance for mixing or whipping, it is recommended to start at a low speed and to continue with a higher one. When used to chop, it is advisable to use the pulse function, turning the dial (A) anticlockwise to the "P" setting. For optimum use, press the button in short bursts (2/3 sec.).
- For smoother, finer chopped foods, remove the food, if necessary, from the sides of the bowl with a spatula, pushing it towards the centre.
- If it is necessary to add foods during appliance operation, use the opening in the lid (O). Push the foods down with the pusher (G) on its own (Fig. 7).
- To stop the appliance, turn the dial (A) to "0".
Slicing
WARNING: The blades are sharp; handle with care.
- Insert the required blade, the slicing blade (M), the julienne blade (L) or the chip cutting blade (N) onto the blade disc (I) so that the front hole engages on the disc central shaft. Slightly press the blade on the rear side, until it locks (Fig. 8).
- Mount the complete blade disc (I) onto the motor shaft (C) by taking it from the central shaft, with the blade upwards (Fig. 9).
- Fit the lid (O) over the bowl (U) and proceed as described in the section "Chopping, mixing or whisking".
INSTRUCTIONS FOR BLENDER USE
- Fit the blender (Q) onto the power base (B) and turn it clockwise until it clicks into place and so that the tabs on the blender fit perfectly into the slots in the power base (Fig. 10).
- Fit the lid (R) onto the blender (Q) and press it gently down until fully inserted (Fig. 11).
- Insert food previously prepared through the hole of the cover (R), without exceeding the max. level indicated on the blender (Q), and then place the cap (P) onto the cover (R), so that the notches of the cover engages perfectly into the corresponding slots on the cover (Fig. 12).
Note: The plug (P) also has a measure.
- Switch on the appliance, selecting the blade rotation speed with the operating dial (A).
The appliance is equipped with a speed scale, from the minimum to the "MAX" one.
It is also possible to select pulse operation by turning the dial (A) anticlockwise to "P". For the best use of this function, only turn the dial for a very short time (2-3 sec.).
EN
Note: For softer fruit and vegetables (e.g., bananas), start at slow speed and then increase the speed as required. For firmer fruit or vegetables (e.g., carrots), use the maximum speed.
- For a smoother result, switch the appliance off, unplug it, remove the cover (R) and, using the spatula (C) supplied, bring food stuck on the sides of the blender (Q) towards the centre (Fig. 13).
- Repeat the above steps for processing other foods.
Note: Never place more than 300g of firm fruit or vegetables into the blender at any one time.
Note: To prevent liquid spills, never place more than 1000 ml of soups, purées or other liquids into blender.
WARNING:
The blades are sharp; handle them with care.
Remove the protections of the stainless steel blade before use.
Never add foods over the maximum level marked on the bowl.
Make sure that the lid is firmly locked into place before starting the appliance.
Never operate the appliance for more than 30 seconds at a time. Wait at least 2 minutes before operating it again.
Never remove foods from the sides of the bowl or the blender while the appliance is operating. Always switch off the appliance and unplug it from the mains power.
To prevent accidents or damage to the appliance, always keep hands and cooking utensils well away from moving blades or discs.
Do not use your fingers to remove food from the sides of the bowl while the appliance is functioning. Always use a suitable cooking spatula.
Never press foods into the opening in the lid using your hands. Always use the food presser.
Always fit the lid before starting the blender.
Before blending warm liquids, always remove the blender filler cap. Never place hot liquids inside the blender.
SQUEEZING ACCESSORY USE
- Place the bowl (P) onto the motor body (B) and lock it by rotating it clockwise, so that the flap on the lower part of the handle perfectly engages in the opening on the motor body.
- Fit the blade support (D) on the central pin inside the bowl (U).
- Position the squeezing bowl (S) first (Fig. 14), by rotating it clockwise until it locks, and then the cone (T), on the blade support (D), Fig. 15.
- Plug appliance in.
- Switch the appliance on by selecting the minimum speed.
CLEANING
WARNING: NEVER PLACE THE APPLIANCE BODY, PLUG OR POWER CORD IN WATER OR OTHER LIQUIDS; ALWAYS WIPE CLEAN WITH A DAMP CLOTH.
WARNING: ALWAYS UNPLUG THE POWER CORD FROM THE ELECTRICITY MAINS BEFORE FITTING OR REMOIVING SINGLE ATTACHMENTS OR BEFORE CLEANING THE APPLIANCE.
WARNING: The blades are extremely sharp. Always handle them with care.
- Remove all of the attachments used, working in the opposite order to the way they were fitted.
- Wash all components that were in contact with food by hand with warm water and mild detergent.
- Wipe the power base (B) clean with a slightly damp cloth.
INSTRUCTIONS IMPORTANTES
LIRE CES INSTRUCTIONS AVANT L'EMPLOI.
BESCHRIJVING VAN HET APPARAAT (Fig. 1)
- Hikorda He pa6oTaTb C np6opom BXOIOCTyIO.
He nCnoJb3OBaTb np6Op, ecn HOx NOBpeXdEh. 16.
HINKOrIa HE IIOBABJIaIe INHPeIeNHTbI, BKJIIOUaJ XnIDKne, CBEPX 17. OTMETKN MAKcIMAlbHOro UPOBHa HA YAWe.
He nCnoIb3OBaTb npI6Op IJIy I3MeIbUeHnO ueHb TBePdbIX npOdyKToB 18. (HaIprIMep: KByIKOB IIbDa, MraCa C KOCTMa).
He noHmMaTe np6op 3a MOHTnPOBaHHyU qa7y, To ec7b, pyuKa ya7n He 19. DOnJHa IcNoJIb3OBAtbc8 dIg nepeHoCKn np6opa.
20.Bo n36exaHne noJyehn TpaBM n NobpeXeHn npnbopa Heo6xOIMO Bcerda depKatab pyKn i KuxOHhble npHaIJIeXHOCTH BdaII N OT DBNrAIOUHXc HoxeN I NCKOB.
Hoxn ouenb octpbe. Obaaatbcra c HmN ouenb octopoxho. Y6eintbcra B TOM, 21. UTO OHN XopoOo 3akpeIneHb I Ha IIpaCTIKOBOI deTaJIe.
HnkOrda He npoBnraTb npOyKtby pykam. Bcerda noIb30BaTbcra npotaiknBa-22. TeJem.
He ydaJIaIe ocTaTkn PnIu n Co CTeHOK Yaun npn pa6oTaHOzem npnbope. 23. BbIKJIOHTb np6Op, BbIHytb BNJKy n3 PO3eTKn I BCERda NcNoJb3OBAtB cneun- aIbHbI WnataIb.
N3DEJIIE CKOHCTPYUNPOBAHO TAKIM OBPA3OM. YTO NYCK 24.
ПОНСХОДNT TOЛБКО ПРИ ПAPВILьHОУCTAHOBKE YAши C
KРышков.В ПOTИВHOM CJУСЕ,ОБРАТьСЯВ ABTOП3OBAHHBI CEPВИСHBI ΚEHTP.
PPEKDE YEM PINTYATb K KAKOJ-JINBO ONEPAUIN C EMKOCTbIO, 25.
CHAUYA HEOBXOIMO OTCOEINHHTB BUNKY PPOBODA OT 3JEKTPNUECKOJ PO3ETKN.
IIOJXITb IODrTOBJIeHHbIE IJRA N3MEJIbUeHnI PPOyKtbl B 26.
EMKOCb, YCTAHOBNTb EE HA KOPNyc MOTOPA N TOJBKO 3ATEM NOIDCOEINHITb BUNKU PPOBODA K 3JEKTPNUECKOJ PO3ETKE.
He nepeDbIratb np6op npn nOmoUcBemHOeMKoCTn Hne NcNoIb3OBaTbe 27. pyky dIy nepenocn np6opa.
28.При OTcoeHHeHn O T 3JIeKTPnuecko P03eTKI 6paTbC pyKaMn HEnocpeDCTBeHHo 3a WTeNcEJIb. HnkOrda He TAnHyTb 3a IpoBOd IJRA TORO, YTO6bl BbITaUHTb erO.
29.He nCnoJb3yIe np6op B clyuae, ecn 3JeKtpueckn npoBOD nIn BnJa Ka NobpeXdEhbl, nIn xe cam np6op HcnpueH. B 3Tom clyuae o6paTntEcB B 6nHexn CneuaJn3npoBaHHbI CepBncHbI UeHTp.
30. Ecnn 3neKtpnueckn npoBOD nOBpeJdEHN, OH DoJIKeH 6bITb 3aMeHEn PpOIN3BOIDTeIeM IIn erO CepBnCHbIM LcHTpOM, IIn JxpeDpyrIM IInCtOM, IMeIO- UIm MdoJXHyIO KBaIIuΦnKaUIO, BO n36exHHe NIO6Oro Tnna pNcKa.
Ipn6op npedna3nueH TOJIbKO IJIa BbITOBOFO NcPONb3OBAHnI n He 31.
IpeDCTaBnTb ONaCHOCTb, B Cnyae INX NcNoIb3OBaHnA DeTbMn DnA CBOx Irg.
CocTAbHbIe yactn ynaKOBKn He doJxHbI OCTaBnTbcra B MeCTax, Doctynhbx dIy 35.
Tei, TaK KaK OHN MOyT PpeDCTaBnTb NCTOuHnK ONaCHOCTN.

- OTHOWeHn npaBnIbHOy yTINI3aun npnbopa B COOTBETCTBn C Ebponecko dIpeKTHBOY 2012/19/CE npouHTaTe nHΦOpMaTHNHBiJ NICTOK, npnilaraembl K npnbopy.
COXPAHNTb NHCTPYKcNIO
ONICAHNE IPIPUEOPA (Pnc.1)
A Pyka BkJIIOueHnIa
B Kopnyc npnbopa
C UlnataeB
DДерха teIb IЯн haCaIkn
E Hacaikda nIy I3MeJbueHnA
F HacaKa dny nepemeunBaHnra
G PpoTaKnBaTeIb
H Nsck JnB36uBaHnA
I Dnck-DepeXaTeIb Inna HOxa
L Hoxdna Hape3KxJyIbeH
M HoK dIa Hape3Kn JOMTnKOB
N Hox dIy hape3kn KapTopeJra
O KpbIuKa
P PpO6Ka KpbIuKmNkcepa
Q MmKcep
R KpbIuKa MmKcepa
S YaHa cOKOBbIXIMaJIKN
T KoHyc cOKOBbIXmamAIKN
U EMKOCTb
BHUMAHNE
Iata n3roTOBHeHna yka3aHa Ha Kopnyce n3deHnB 3aunpOBAHHOM BnDe SN wk/yrabcdefg, rKe Wk - HeDJI npON3BOIDCTBa
yr- roD npOn3B0dCTBa
abcdefg - cepiHbI Homep n3deJIy
CoOTBeTCTByeT Tpe6oBaHnIaM
TP TC 004/2011 «О 6e3oNaChOCTи Hn3KOBbTHOrO obOpyIOBaHЯ, yTBepxdEN PeSeHneM Komccnn TaMOxehHoro coH3a N768 ot 16 abrycta 2011 roda
TP TC 020/2011 «Злектомагиная COBmectUMOCTb texHnuecknx cpeDCTB», yTbepxdeH
PeueHnem Komnccnn TamoxeHHoro coo3a N879 ot 9 deka6pra 2011 roda
IHHOpMaun O cepTnOkaun B npNIOxHnn K rapaHTnHOMy TaHOHy n/INn Ha ynaKOBke I3deJIy.
220-240B~ - 50/60Γι - 1000Вт - KnaccI - IPX0
CdeJanaHO BKnTae
HmnpTeP:OOO«Mednatex»,
IOpndueckn aDPEC:127006, ropod MockBa, yuua CaOBAr-TpumfpaJIbHa, dom 16, cTpoEHe 3, IOM. I, KOM 2
Фaktnueckn aDpec:119048, r. MockBa, yI. YcaueBa, d.29, kOpnyc 3, nom.II, kom.3
Изговпел: De' Longhi Appliances Srl /«Дени Anплаенсс CPЛ» Адес: 50013 Итalia, Флоренья, Кампьиэнци, Ва C. Кунрiko 300.
Cnncok opraHn3aun, ynoHMOueHHbIX n3roTOBnteMeHa pa6Otu C npTeH3nA Mn NOTpe6BnteN I cepBnchbIM obcnyxnbAHneM, pa3Meuen Ha caTe: http://www.ariete.net/ru/assistance
Topraya liinra Ariete +7915165611
Tobap noctabnraetcB co6paHOM Bnde, cneuaIbHbIX Tpe6oBaHNI K nepeBO3Ke I XpaHeHIO He yctaHOJIeHO.
YTNIN3NPOBaTB B COOTBETCTBnC 3aKHOdaTeJIbCTBOM MeCTa peaJIN3aIIN.
TapaHTnHbI cpoK 2 roJa. Cpok cnJxkbI n3dennr 2 roJa.
HOpMaIg O cepTnOkaIIN B npNIOxEHNI K rapaHTnHOMy TaHOHy n/IIHa yNaKOBKe I3deJIy.
aeg
1
y
aaii jzjiey 5s iiaol g jg jiln
[\therefore y = 1]
y
Jaaai J5 jill
.
JooWyI cIi IaBwio g aaiiaa Bw Gg jglalg 1gog
()
i 1
aiaaa aaii gaii aai iaiii 1
gilbc! 1 g l a r jn n jn jn jn jn jn jn jn jn jn jn jn jn jn jn jn jn
Aai jie aaiy buiy jaiy 100000000000000000000000000000000000000
Jl 1 Jglio j 1 1 1 1 1 1 1 1 1 1 1 1 1 1 1
jglly Jbiy 9
p 1
aaii iiaai iiaai iiaia
Jg 11
1
J 1
1
1
1 1
y
10
.
yV.
(1)
19
jll jil liy jia
1 1
.
i 1
J 1 J 1 J 1 J 1 J 1 J 1 J 1 J 1 J 1 J 1 J 1 J 1 J 1 J 1 J 1 J 1 J 1 J 1
a 1
- 4
aaiiia iiaiiia aiaii jai jaiai jaiai
J 10
J 1
y = y1 - y2
J
J
J
J
J
J
J
J
J
J
J
J
J
J
J
J
J
J
J
J
J
J
J
J
J
J
J
J
J
J
J
J
J
J
J
J
J
J
J
J
J
J
J
J
J
J
J
J
J
J
J
J
J
J
J
J
J
J
J
J
J
J
J
J
J
J
J
J
J
J
J
J
J
J
J
J
J
J
J
J
J
(D)gE(E)aJyRjFgFgFgFgFgFgFgFgFgFgFgFgFgFgFgFgFgFgFgFgFgFgFgFgFgFgFgFgFgFgFgFgFgFgFgFgFgFgFgFgFgFgFgFgFgFgFgFgFgFgF
(1) (2)
J 1
(A)
MAX" 1