S3120 - Shaver PHILIPS - Free user manual and instructions
Find the device manual for free S3120 PHILIPS in PDF.
| Features | Details |
|---|---|
| Type of razor | Electric razor |
| Shaving system | Dry and wet shaving |
| Number of shaving heads | 3 shaving heads |
| Battery life | 40 minutes of cordless shaving |
| Charging time | 8 hours |
| Charge indicator | LED light |
| Cleaning | Fully washable |
| Included accessories | Protective cap, cleaning brush |
| Warranty | 2 years |
| Weight | 0.5 kg |
| Dimensions | 15.5 x 5.5 x 5.5 cm |
| Safety | Overload protection |
Frequently Asked Questions - S3120 PHILIPS
User questions about S3120 PHILIPS
0 question about this device. Answer the ones you know or ask your own.
Ask a new question about this device
Download the instructions for your Shaver in PDF format for free! Find your manual S3120 - PHILIPS and take your electronic device back in hand. On this page are published all the documents necessary for the use of your device. S3120 by PHILIPS.
USER MANUAL S3120 PHILIPS
S3520, S3510, S3120, S3110

natural_image
Black Philips Series 3000 electric shaver with three rotary buttons and a power button (no visible text or symbols on body)
natural_image
Simple line drawing of an open book with a grid pattern on the left and a closed page on the right (no text or symbols)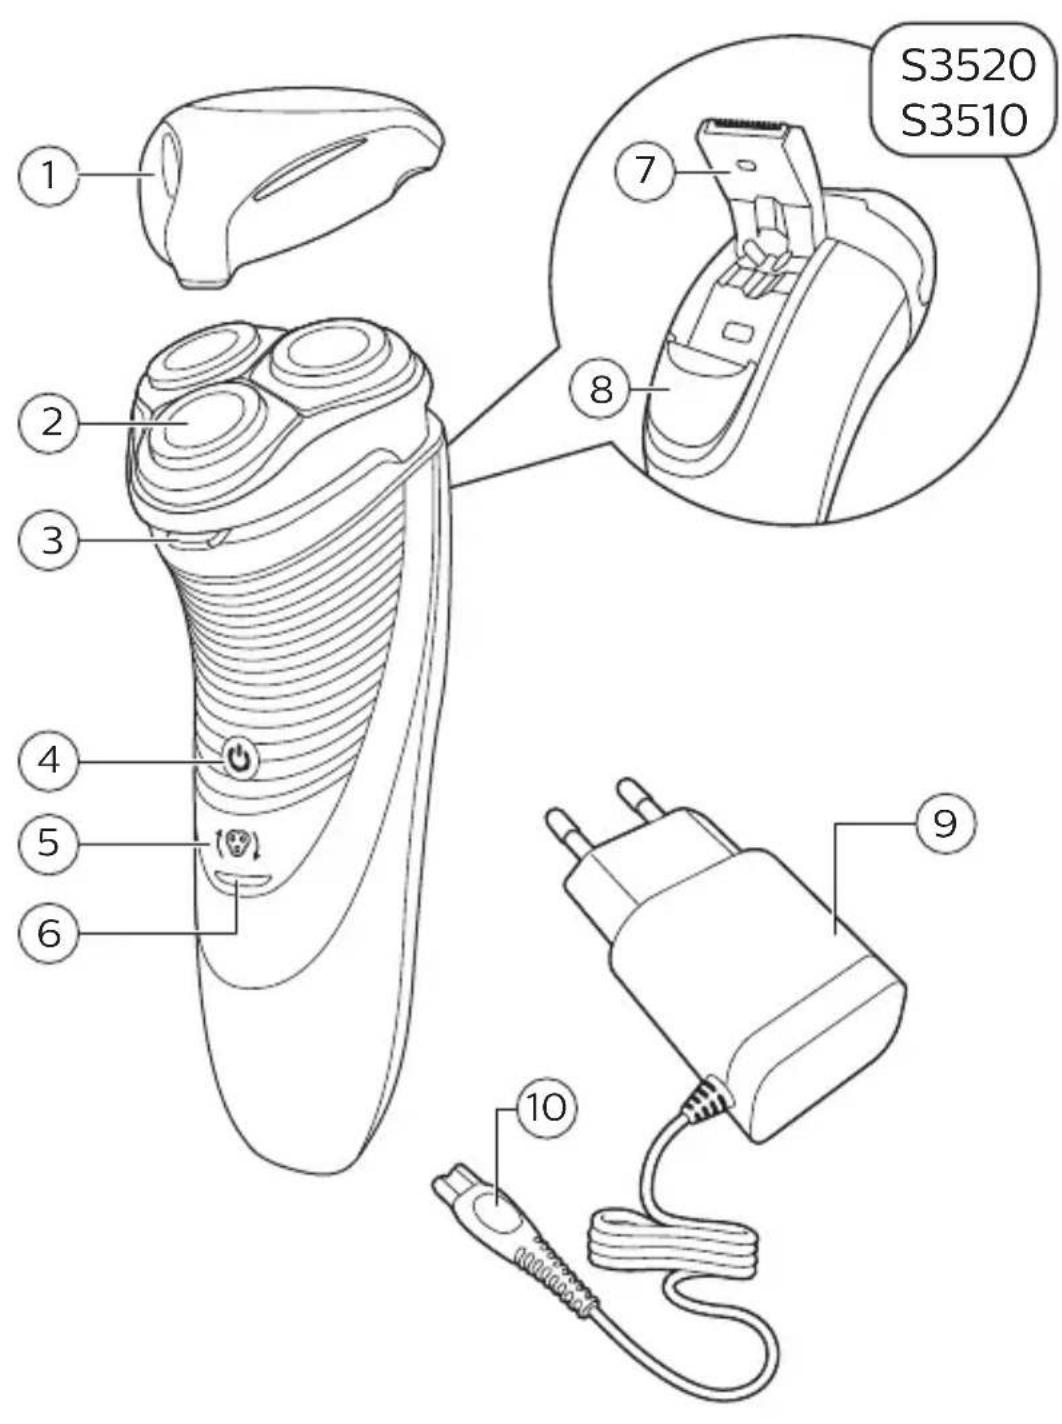
text_image
S3520 S3510 1 2 3 4 5 6 7 8 9 10English 6
Dansk 22
Deutsch 36
Español 54
Français 69
Italiano 84
Nederlands 99
Norsk 114
Português 128
Suomi 143
Svenska 157
Türkçe 171
Ελληνικα 185
Introduction
Congratulations on your purchase and welcome to Philips! To fully benefit from the support that Philips offers, register your product at www.philips.com/welcome.
General description (Fig. 1)
1 Protection cap
2 Shaving unit
3 Shaving unit release button
4 On/off button
5 Shaving head symbol
6 Charging light
7 Trimmer (S3520, S3510 only)
8 Trimmer release slide (S3520, S3510 only)
9 Supply unit (adapter, type HQ8505)
10 Small plug
Important safety information
Read this important information carefully before you use the appliance and its accessories and save it for future reference. The accessories supplied may vary for different products.
Danger

natural_image
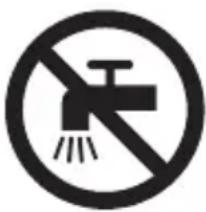
Prohibition sign of a faucet without any text or symbols- Keep the supply unit dry.
Warning
- To charge the battery, only use the detachable supply unit (type HQ8505) provided with the appliance.
- The supply unit contains a transformer. Do not cut off the supply unit to replace it with another plug, as this causes a hazardous situation.
- This appliance can be used by children aged from 8 years and above and persons with reduced physical, sensory or mental capabilities or lack of experience and knowledge if they have been given supervision or instruction concerning use of the appliance in a safe way and understand the hazards involved. Children shall not play with the appliance. Cleaning and user maintenance shall not be made by children without supervision.
- Always unplug the shaver before you clean it under the tap.
- Always check the appliance before you use it. Do not use the appliance if it is damaged, as this may cause injury. Always replace a damaged part with one of the original type.
- Do not open the appliance to replace the rechargeable battery.
Caution
natural_image
Prohibition sign showing a faucet without raindrops, enclosed in a circle (no text)- Never immerse the cleaning system or the charging stand in water and do not rinse it under the tap.
- Never immerse the shaver in water. Do not use the shaver in the bath or in the shower.
- Never use water hotter than 80°C to rinse the shaver.
- Only use this appliance for its intended purpose as shown in the user manual.
- For hygienic reasons, the appliance should only be used by one person.
- Never use compressed air, scouring pads, abrasive cleaning agents or aggressive liquids such as petrol or acetone to clean the appliance.
- If your shaver comes with a cleaning system, always use the original Philips cleaning fluid (cartridge or bottle, depending on the type of cleaning system).
- Always place the cleaning system on a stable, level and horizontal surface to prevent leakage.
- If your cleaning system uses a cleaning cartridge, always make sure the cartridge compartment is closed before you use the cleaning system to clean or charge the shaver.
- When the cleaning system is ready for use, do not move it to prevent leakage of cleaning fluid.
- Water may drip from the socket at the bottom of the shaver when you rinse it. This is normal and not dangerous because all electronics are enclosed in a sealed power unit inside the shaver.
- Do not use the supply unit in or near wall sockets that contain an electric air freshener to prevent irreparable damage to the supply unit.
Electromagnetic fields (EMF)
- This Philips appliance complies with all applicable standards and regulations regarding exposure to electromagnetic fields.
General
natural_image
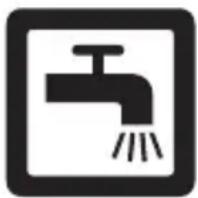
Simple black-and-white icon of a faucet with raindrops, no text or symbols present.- This shaver can be safely cleaned under the tap.
- The appliance is suitable for mains voltages ranging from 100 to 240 volts.
- The supply unit transforms 100-240 volts to a safe low voltage of less than 24 volts.
Charging
It takes approx. 1 hour (S3520, S3510) or 8 hours (S3120, S3110) to fully charge the appliance. When you charge the appliance for the first time or after a long period of disuse, let it charge until the charging light lights up continuously. A fully charged appliance provides up to 50 minutes (S3520, S3510) or 45 minutes (S3120, S3110) of shaving time. The shaving time may be less than 50 or 45 minutes as a result of your shaving behavior, your cleaning habits or your beard type.
Charging with the adapter
text_image
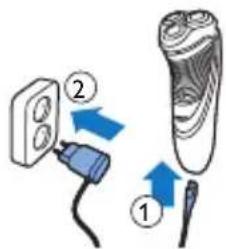
Diagram showing two electrical connections: one with a plug and arrow labeled '②', the other with a blade and arrow labeled '①'.1 Put the small plug in the appliance.
2 Put the adapter in the wall socket.
- The charging light shows the charging status of the appliance (see section ‘Charge indications’ in this chapter).
3 After charging, remove the adapter from the wall socket and pull the small plug out of the appliance.
Charge indications
natural_image
Abstract diagram with concentric curved lines and a central triangular shape, no text or symbols presentBattery low
- When the battery is almost empty (when there are only 5 or fewer shaving minutes left), the charging light starts to flash orange.
- When you switch off the appliance, the charging light continues to flash orange for a few seconds.
Quick charging
When you start charging the empty battery, the charging light alternately flashes orange and green. After approx. 3 minutes the charging light starts flashing green only. The appliance now contains enough energy for a 5-minute shave.
12 English

natural_image
Diagram showing wave propagation with a power button and a star-shaped light source (no text or symbols)Charging
- When the appliance is charging, the charging light flashes green.

natural_image
Diagram of a curved surface with concentric lines and a central circular symbol (no text or labels)Battery fully charged
- When the battery is fully charged, the charging light lights up green continuously.
Note: After approx. 30 minutes, the charging light goes out to save energy.
Using the appliance
Note: This appliance can be used without cord or when it is connected to the wall socket.
Shaving tips and tricks
- Make circular movements during use. Circular movements provide better shaving results than straight movements.
- Your skin may need 2 or 3 weeks to get accustomed to the Philips shaving system.
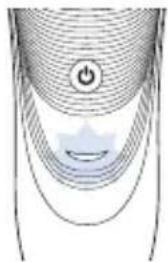
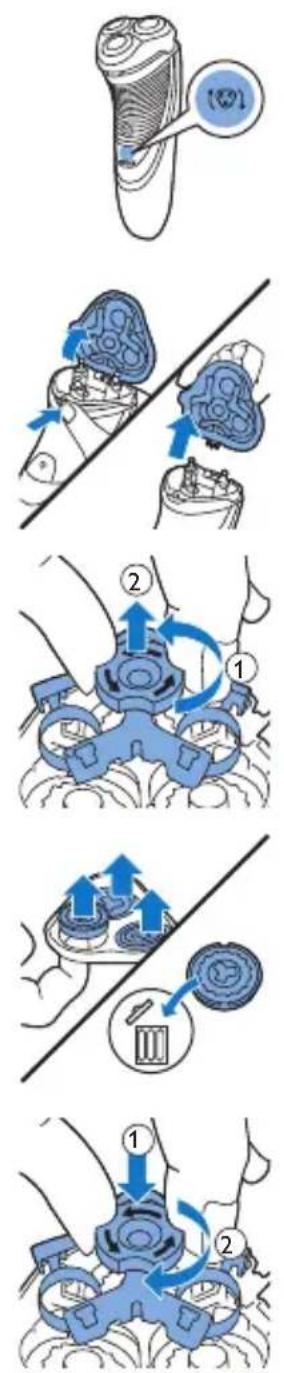
Switching the appliance on and off
natural_image
Diagram of a curved, layered structure with a blue arrow pointing to a small circular feature (no text or symbols)1 To switch on the appliance, press the on/off button once.
2 To switch off the appliance, press the on/off button once.
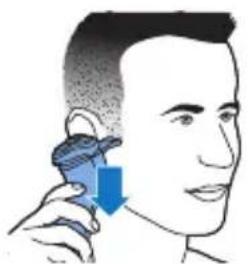
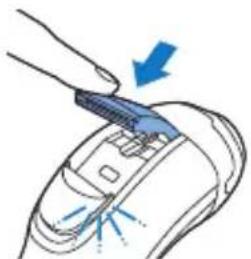
Shaving
1 Switch on the appliance.

natural_image
Illustration of a person brushing teeth with a tool, no text or symbols present2 Move the shaving heads in circular movements over your skin.
3 After shaving, switch off the appliance.
4 Clean the appliance (see chapter ‘Cleaning and maintenance’).
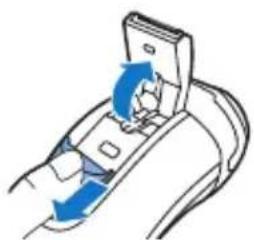
Trimming (S3520, S3510 only)
You can use the trimmer to groom your sideburns and moustache.
natural_image
Diagram of a device being inserted into a socket with blue arrows indicating direction (no text or symbols)1 Push the trimmer slide downwards to open the trimmer.
2 Switch on the appliance.
natural_image
Illustration of a person using a handheld device to interact with another person (no text or symbols present)- You can now start trimming.
3 After trimming, switch off the appliance.
4 Clean the trimmer (see chapter 'Cleaning and maintenance').
natural_image
Illustration of a hand holding a device with a blue arrow pointing to it, showing no text or symbols.5 Close the trimmer ('click').
Cleaning and maintenance
Danger: Remove the detachable cord from the handheld part before cleaning this part in water.
Caution: Never use compressed air, scouring pads, abrasive cleaning agents or aggressive
liquids such as petrol or acetone to clean the appliance.
- Clean the appliance after every shave for optimal shaving performance.
- Regular cleaning guarantees better shaving performance.
- Be careful with hot water. Always check if the water is not too hot, to prevent your hands from getting burnt.
Note: Water may leak from the socket at the bottom of the appliance when you rinse it. This is normal and not dangerous because all electronics are enclosed in a sealed power unit inside the shaver.
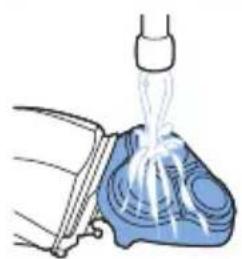
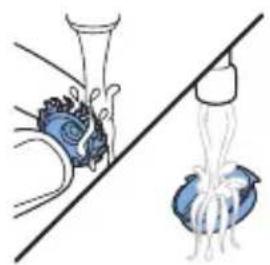
Cleaning the shaving unit under the tap
natural_image
Illustration of a shoe with blue suit and white sole, showing a diagonal line crossing the sole (no text or symbols)1 Switch off the appliance and make sure it is disconnected from the wall socket.
2 Press the release button to open the shaving unit. Rinse the inside of the shaving unit and the hair chamber under a hot tap for 30 seconds.
- Rinse the outside of the shaving unit.
3 Close the shaving unit and shake off excess water.
Caution: Be careful not to hit the shaving unit against anything while you shake off excess water.
Caution: Never dry the shaving unit and the hair chamber with a towel or tissue, as this may damage the shaving unit.
4 Open the shaving unit again and leave it open to let the appliance dry completely.
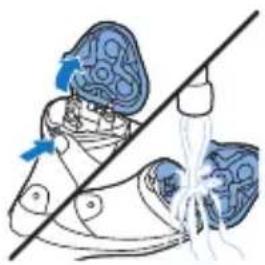
Thorough cleaning
Clean the shaving heads thoroughly once a month for optimal performance.
natural_image
Diagram showing two blue circular objects with arrows indicating movement or force, intersected by a diagonal line (no text or symbols)1 Switch off the appliance and make sure it is disconnected from the wall socket.
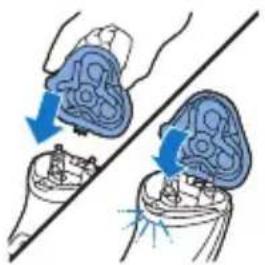
2 Press the release button to open the shaving unit. Pull the shaving unit off the appliance.
text_image
Diagram showing a hand holding a device with labeled parts and directional arrows indicating motion or operation.3 Turn the lock anticlockwise and remove the retaining frame.

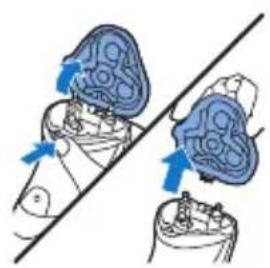
natural_image
Illustration of a hand holding two containers with upward arrows indicating flow or movement (no text or symbols)4 Remove and clean one shaving head at a time. Each shaving head consists of a cutter and a guard.
Note: Do not clean more than one cutter and guard at a time, since they are all matching sets. If you accidentally mix up the cutters and guards, it may take several weeks before optimal shaving performance is restored.
natural_image
Illustration of a hand holding a bottle and a bulb, with a diagonal line crossing through it (no text or symbols)- Remove the cutter from the shaving guard and clean both parts under the tap.
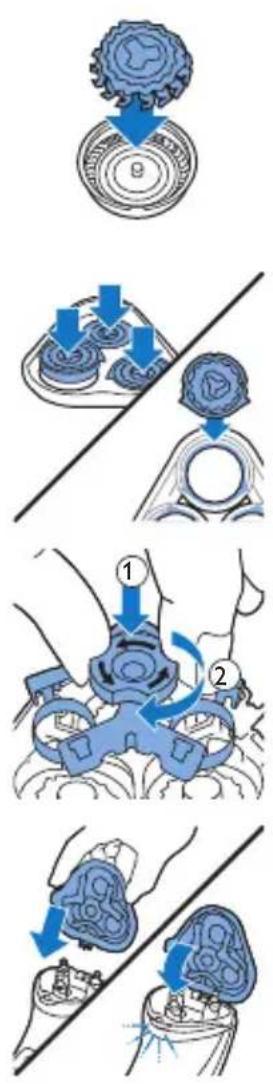
5 Put the cutter back into the guard.
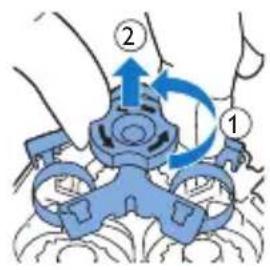
6 Put the shaving heads back into the shaving unit.
Note: Make sure that the projections of the shaving heads fit exactly into the recesses of the shaving head holder.
7 Put the retaining frame back into the shaving unit and turn the lock clockwise.
8 Insert the lug of the shaving unit into the slot in the top of the appliance. Then close the shaving unit ('click').
Note: If the shaving unit does not close smoothly, check if you have inserted the shaving heads properly and if the retaining frame is locked.
Cleaning the trimmer under the tap (S3520, S3510 only)
Clean the trimmer every time you have used it.
1 Switch off the appliance and make sure it is disconnected from the wall socket.

text_image
Diagram illustrating three steps of oil extraction: adding fuel, pouring water, and dissolving oil.2 Push the trimmer slide downwards to open the trimmer.
3 Switch on the appliance and clean the trimmer under the tap.
4 Switch off the appliance and leave the trimmer open to let it dry.
5 Close the trimmer ('click').
Tip: For optimal trimming performance, lubricate the trimmer teeth with a drop of sewing machine oil every six months.
Storage
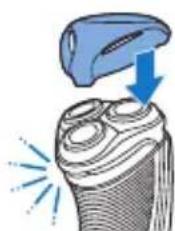
natural_image
Illustration of a hairdryer with blue spray and sparkles (no text or symbols)Note: We advise you to let the appliance dry before you put the protection cap on it.
Put the protection cap on the appliance to prevent damage.
Replacement

For maximum shaving performance, we advise you to replace the shaving heads every two years.
Replace damaged shaving heads immediately.
Always replace the shaving heads with original
Philips shaving heads' (see 'Ordering accessories').
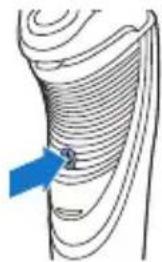
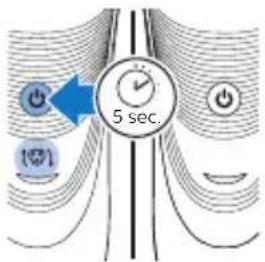
Replacement reminder
The shaving unit symbol will light up to indicate that the shaving heads need to be replaced.
1 The shaving unit symbol lights up orange continuously.
2 Switch off the appliance and make sure it is disconnected from the wall socket.
3 Press the release button to open the shaving unit. Pull the shaving unit off the appliance.
4 Turn the lock anticlockwise and remove the retaining frame.
5 Remove the shaving heads from the shaving unit and throw them away.
6 Place new shaving heads in the shaving unit.
Note: Make sure that the projections of the shaving heads fit exactly into the recesses of the shaving head holder.
7 Put the retaining frame back into the shaving unit and turn the lock clockwise.
natural_image
Illustration of two medical devices with blue arrows indicating movement or force, no text or symbols present8 Insert the lug of the shaving unit into the slot in the top of the appliance. Then close the shaving unit ('click').
Note: If the shaving unit does not close smoothly, check if you have inserted the shaving heads properly and if the retaining frame is locked.
text_image
5 sec.9 Press and hold the on/off button for 5 seconds to reset the replacement reminder on the shaver. The orange light goes out.
Ordering accessories
To buy accessories or spare parts, visit www.shop.philips.com/service or go to your Philips dealer. You can also contact the Philips Consumer Care Center in your country (see the worldwide guarantee leaflet for contact details).
The following accessories and spare parts are available:
- SH30 Philips Shaving Heads.
- HQ110 Philips shaving head cleaning spray
Recycling
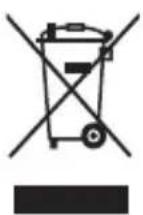
- This symbol means that this product shall not be disposed of with normal household waste (2012/19/EU).
- This symbol means that this product contains a built-in rechargeable battery which shall not be disposed of with normal household waste (2006/66/EC). We strongly advise you to take your product to an official collection point or a Philips service centre to have a professional remove the rechargeable battery.
- Follow your country's rules for the separate collection of electrical and electronic products and rechargeable batteries. Correct disposal helps prevent negative consequences for the environment and human health.
Guarantee and support
If you need information or support, please visit www.philips.com/support or read the separate worldwide guarantee leaflet.
Guarantee restrictions
The shaving heads (cutters and guards) are not covered by the terms of the international guarantee because they are subject to wear.
Troubleshooting
This chapter summarizes the most common problems you could encounter with the appliance. If you are unable to solve the problem with the information below, visit www.philips.com/support for a list of frequently asked questions or contact the Consumer Care Center in your country.
Problem Possible cause Solution
| The appliance does not shave as well as it used to. | The shaving heads are damaged or worn. | Replace the shaving heads (see chapter 'Replacement'). |
Problem Possible cause Solution
| Long hairs obstruct the shaving heads. | Clean the shaving heads one by one (see chapter 'Cleaning and maintenance'). | |
| You have not inserted the shaving heads properly. | Make sure that the projections of the shaving heads fit exactly into the recesses (see chapter 'Cleaning and maintenance'). | |
| The appliance does not work when I press the on/off button. | The rechargeable battery is empty. | Recharge the battery (see chapter 'Charging'. |
| The temperature of the appliance is too high. In this case, the appliance does not work. | As soon as the temperature of the appliance has dropped sufficiently, you can switch on the appliance again. |
Introduktion
natural_image
Prohibition sign showing a faucet without raindrops, enclosed in a circle (no text)natural_image
Prohibition sign showing a faucet without raindrops, enclosed in a circle (no text)natural_image
Simple black-and-white icon of a faucet with a showerhead, no text or symbols present.- Denne shaver kan skylles under rindende vand uden risiko.
text_image
Diagram showing two connected electrical components with labeled parts and directional arrows indicating connection or movement.natural_image
Abstract diagram with concentric curved lines and a central circular symbol (no text or labels)natural_image
Diagram of a curved surface with concentric lines and a central star-like shape, no text or symbols present.Opladning
natural_image
Diagram of a curved surface with concentric lines and a central circular feature, no text or symbols present.natural_image
Diagram of a curved surface with a blue arrow pointing to a specific area (no text or symbols present)natural_image
Illustration of a person brushing their teeth with a tool, no text or symbols presentnatural_image
Diagram of a device being inserted into a socket with blue arrows indicating direction (no text or symbols)1 Tryk trimmerens skydekontakt nedad for at åbne trimmeren.
natural_image
Illustration of a person using a handheld device to interact with the ear (no text or symbols present)natural_image
Illustration of a hand using a tool to adjust or install a component, with no visible text or symbols.natural_image
Illustration of a shoe with blue patterned fabric and a diagonal line, no text or symbols presentnatural_image
Illustration of a pipette dispensing liquid into a blue container (no text or symbols)natural_image
Diagram showing two views of a biological structure with blue arrows indicating direction (no text or labels)text_image
Diagram showing a mechanical device with labeled parts and directional arrows indicating motion or forcenatural_image
Diagram showing two mechanical components with blue arrows indicating direction, no text or symbols presentnatural_image
Illustration of a medical procedure showing a surgical procedure with tubing and a catheter (no text or symbols present)natural_image
Diagram showing two mechanical components with blue arrows indicating direction, no text or symbols presenttext_image
Diagram showing a blue mechanical device with labeled parts and directional arrows indicating motion or rotation.natural_image
Illustration of two medical devices with blue arrows indicating force or movement, no text or symbols presentnatural_image
Diagram of a device being inserted into a socket with blue arrows indicating direction (no text or symbols)natural_image
Diagram of a car interior with a blue plastic component being inserted, showing fluid flow (no text or symbols)2 Tryk trimmerens skydekontakt nedad for at åbne trimmeren.
natural_image
Illustration of a tool interacting with a textured surface, showing a blue tool above and a blue arrow pointing downward (no text or symbols)natural_image
Illustration of a medical device with a magnified inset showing internal tissue structure (no text or symbols)natural_image
Diagram showing two mechanical components with blue arrows indicating motion or force direction, intersected by a diagonal line (no text or symbols)text_image
Diagram showing a blue mechanical device with labeled parts and directional arrows indicating motion or force4 Drej låsen venstre om, og tag samlerammen af.

natural_image
Illustration of a hand using a tool to interact with a device, showing upward arrows and a circular component (no text or symbols)text_image
Diagram showing a blue mechanical device with labeled parts and directional arrows indicating motion or force.natural_image
Illustration of two medical devices with blue arrows indicating force or movement (no text or symbols)natural_image
Prohibition sign showing a faucet with a diagonal line and raindrops, no text presentnatural_image
Prohibition sign showing a faucet without spraying water, enclosed in a circle (no text)text_image
Diagram showing two connected components: a plug and a cable, with numbered arrows indicating direction of movement.natural_image
Abstract diagram with curved lines and a central circular symbol (no text or labels)Batterie schwach
natural_image
Diagram of a curved surface with concentric lines and a central star-like shape, no text or symbols present.Laden
natural_image
Diagram of a curved surface with concentric lines and a central circular feature, no text or symbols present.natural_image
Diagram of a curved, layered structure with a blue arrow pointing to a small circular feature (no text or symbols)natural_image
Illustration of a person brushing teeth with a blue X mark (no text or symbols)natural_image
Illustration showing two steps of a shoe cleaning procedure: one with blue fabric and blue plastic wrap, the other with white tubing and a tool (no text or symbols)natural_image
Diagram showing two hands operating a device with blue arrows indicating motion or force (no text or symbols present)text_image
Diagram showing a mechanical device with labeled parts and directional arrows indicating motion or forcenatural_image
Diagram showing a hand holding a container with blue arrows indicating upward motion, alongside a separate gear mechanism (no text or symbols)natural_image
Illustration of a hand pouring liquid into a container with a bulb, alongside a droplet on a stand (no text or symbols)natural_image
Diagram showing two mechanical components with downward arrows, one above and one below, separated by a diagonal line (no text or symbols)text_image
Diagram showing a blue mechanical device with labeled parts and directional arrows indicating motion or assembly.natural_image
Illustration of two hands performing a medical procedure on a device, showing force application and alignment (no text or symbols)natural_image
Diagram of a hand holding a device with blue arrows indicating rotation or movement (no text or symbols)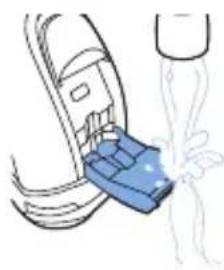
natural_image
Diagram of a blue plastic component being inserted into a car's seat, with a white spray bubble indicating fluid or particle flow (no text or symbols)natural_image
Illustration of a tooth with a blue object above it, showing a highlighted area and radiating lines (no text or symbols)Austausch

text_image
2yrsnatural_image
Diagram showing two hands operating a device with blue arrows indicating movement or force (no text or symbols present)text_image
Diagram showing a blue mechanical device with labeled parts and directional arrows indicating motion or forcenatural_image
Illustration of a hand using a tool to adjust a cylindrical component with upward arrows, alongside a circular object with a pointer (no text or symbols)text_image
Diagram showing a hand holding a blue mechanical device with labeled parts and directional arrows indicating motion or force.natural_image
Illustration of two medical or surgical procedures with blue arrows indicating force or movement (no text or symbols present)text_image
Diagram showing two types of waste sorting symbols: one with a bin and cross, the other with a container and cross.natural_image
Prohibition sign showing a faucet crossed out by a diagonal line, indicating no leakage or anti-poaching action (no text present)natural_image
Prohibition sign showing a faucet crossed out by a diagonal line, indicating no pollution or water release.natural_image
Simple black-and-white icon of a faucet with a drain, no text or symbols present.text_image
Diagram showing two connected components with blue arrows indicating direction of movement, labeled ① and ②.natural_image
Abstract diagram with concentric curved lines and a central circular symbol, no text or labels presentBatería baja
natural_image
Diagram of a medical or electrochemical device with concentric layers and a central power button (no text or symbols)Carga
natural_image
Diagram of a curved surface with concentric lines and a central circular feature, no text or symbols present.natural_image
Diagram of a curved, layered structure with a blue arrow pointing to a specific region (no text or symbols present)text_image
Illustration showing a person brushing teeth with a blue tool, labeled 'X' indicating the tooth's direction.natural_image
Illustration of a shoe being lifted by a tool, showing the blade and base with water droplets (no text or symbols)natural_image
Diagram showing two blue anatomical views of a human head with arrows indicating movement or force direction (no text or labels)text_image
Diagram showing a mechanical device with labeled parts and directional arrows indicating motion or assembly.natural_image
Diagram showing two circular objects on a tray with upward arrows, separated by a diagonal line (no text or symbols)natural_image
Illustration of a medical procedure showing a hand holding a bottle and a catheter attached to a blue bulb (no text or symbols present)natural_image
Diagram showing two blue arrows pointing downward on a circular object, separated by a diagonal line (no text or symbols)text_image
Diagram showing a hand holding a blue mechanical device with labeled parts and directional arrows indicating motion or assembly.natural_image
Illustration of two hands performing a medical procedure on a device, with arrows indicating force or movement (no text or symbols present)natural_image
Diagram of a hand inserting a device into a cable, showing blue arrows indicating direction (no text or symbols)
natural_image
Illustration of a blue plastic container being inserted into a car (no text or symbols)natural_image
Illustration of a hairdryer with blue ink and light rays, no text or symbols presentnatural_image
Illustration of two medical devices with blue arrows indicating force or movement, no text or symbols presenttext_image
10Ω 5 secnatural_image
Prohibition sign showing a faucet without raindrops, enclosed in a circle (no text)natural_image
Prohibition sign showing a faucet without raindrops, enclosed in a circle (no text)text_image
Diagram showing two connected components with numbered arrows indicating direction of connection or operation.natural_image
Abstract diagram with curved lines and a central circular symbol (no text or labels)Batterie faible
natural_image
Diagram of a curved surface with concentric lines and a central star-like symbol, no text or labels present.Charge
natural_image
Diagram of a curved surface with concentric lines and a central circular feature, no text or symbols present.natural_image
Diagram of a curved, layered structure with a blue arrow pointing to a specific region (no text or symbols present)text_image
Illustration showing a person brushing teeth with a 'X' mark, likely indicating dental or oral health advice.natural_image
Diagram of a device being inserted into a socket, showing blue arrows indicating direction (no text or symbols present)natural_image
Illustration of a person using a handheld device to interact with another person (no text or symbols present)natural_image
Illustration of a hand holding a device with a blue arrow pointing to a component (no text or symbols present)natural_image
Illustration of two-step medical procedure: first showing foot positioning and surgical tool, second showing surgical instrument with fluid flow (no text or symbols)natural_image
Diagram showing two hands performing a medical procedure on a patient's abdomen, with arrows indicating direction of movement (no text or labels present)text_image
Diagram showing a blue mechanical device with labeled parts and directional arrows indicating motion or assembly.natural_image
Diagram showing two mechanical components with blue arrows indicating direction, no text or symbols presentnatural_image
Illustration of a hand pouring liquid into a bottle, with another droplet partially submerged in liquid (no text or symbols)text_image
Medical procedure diagram showing steps to organize a patient's abdomen with blue arrows indicating movement or insertion.natural_image
Diagram of a hand holding a device with blue arrows indicating rotation or movement (no text or symbols)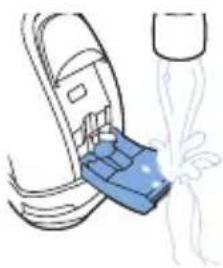
natural_image
Line drawing of a blue mechanical component inserted into a car seat, with a splashing water nearby (no text or symbols)natural_image
Illustration of a hand pressing down on a textured surface with a blue object above, emitting a blue arrow (no text or symbols)natural_image
Illustration of two medical devices with blue arrows indicating force or movement, no text or symbols presentnatural_image
Prohibition sign showing a faucet crossed out by a diagonal line, indicating no leakage or anti-poaching action (no text present)natural_image
Prohibition sign showing a faucet without raindrops, enclosed in a circle (no text)text_image
Diagram showing two connected components with numbered arrows indicating direction of movement or interaction.natural_image
Diagram of magnetic field lines around a star-shaped magnet (no text or symbols)Batteria scarica
natural_image
Diagram showing concentric curved lines with a central circular symbol and a blue star-like shape, no text or labels present.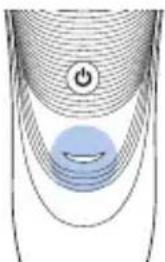
natural_image
Diagram of a curved surface with concentric lines and a central blue circle, no text or symbols presentnatural_image
Diagram of a curved, layered structure with a blue arrow pointing to a specific region (no text or symbols present)text_image
Illustration showing a person brushing teeth with blue 'X' marks, likely illustrating dental or oral care techniques.natural_image
Illustration of two-step medical procedure: first showing foot positioning and surgical tool, second showing surgical instrument with fluid flow (no text or symbols)natural_image
Diagram showing two medical devices with blue arrows indicating movement or force, no text or symbols presenttext_image
Diagram showing a robotic device with labeled parts and directional arrows indicating motion or operation.natural_image
Diagram showing two gear-like objects with upward arrows above them, separated by a diagonal line (no text or symbols)natural_image
Illustration of a medical procedure showing a hand holding a bottle and tubing, connected to a device with tubing (no text or symbols present)natural_image
Diagram showing two blue arrows pointing downward on a circular object, separated by a diagonal line (no text or symbols)text_image
Diagram showing a blue mechanical device with labeled parts and directional arrows indicating motion or assembly.natural_image
Illustration of two hands performing a medical procedure on a patient's abdomen, with arrows indicating movement (no text or symbols present)natural_image
Diagram of a hand inserting a device into a cable (no text or symbols visible)
natural_image
Illustration of a blue plastic container being inserted into a car (no text or symbols)natural_image
Illustration of a tooth being cut with a blue arrow indicating the process (no text or symbols present)natural_image
Illustration of two hands performing a medical procedure on a patient's abdomen, with arrows indicating force or point of change (no text or symbols present)natural_image
Prohibition sign showing a faucet without spraying water, enclosed in a circle (no text)natural_image
Prohibition sign showing a faucet with a diagonal line and raindrops (no text)text_image
Diagram showing two connected electrical components with labeled parts and directional arrows indicating connection or movement.natural_image
Diagram of magnetic field lines around a star-shaped magnet (no text or symbols)Batterij bijna leeg
natural_image
Diagram of a curved surface with concentric lines and a central star-like shape, no text or symbols present.
natural_image
Diagram of a curved surface with concentric lines and a central circular feature, no text or symbols present.natural_image
Diagram of a curved, layered structure with a blue arrow pointing to a small circular feature (no text or symbols)text_image
Diagram showing a person brushing teeth with a blue tool, labeled 'X' indicating the tooth's measurement.natural_image
Diagram of a device being inserted into a socket, showing blue arrows indicating direction (no text or symbols present)natural_image
Illustration of a person using a handheld device to interact with another person (no text or symbols present)natural_image
Illustration of a hand using a tool to press or install electronic components, with no visible text or symbols.natural_image
Illustration of two-step medical procedure: first showing foot positioning and surgical tool, second showing surgical instrument with fluid flow (no text or symbols)natural_image
Diagram showing two hands performing a medical procedure on a patient's abdomen, with arrows indicating direction of movement (no text or labels present)text_image
Diagram showing a blue mechanical device with labeled parts and directional arrows indicating motion or assembly.natural_image
Diagram showing a hand holding a device with blue arrows indicating direction, alongside a separate view of a gear mechanism (no text or symbols present)natural_image
Illustration of a hand holding a blue object with a bulb, connected to a diagonal line (no text or symbols)text_image
Medical procedure diagram showing steps to organize a patient's abdomen with blue arrows indicating movement and placement.natural_image
Diagram of a device being inserted into a socket with blue arrows indicating direction (no text or symbols)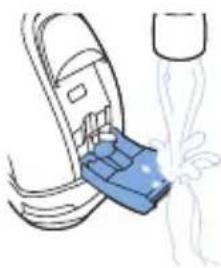
natural_image
Illustration of a blue plastic container being inserted into a car (no text or symbols)natural_image
Illustration of a tool interacting with a textured object, showing a blue tool tip and a magnified view of the tool (no text or symbols)natural_image
Illustration of two medical devices with blue tubing and arrows indicating movement or force (no text or symbols)natural_image
Prohibition sign showing a faucet crossed out by a diagonal line, indicating no water release or pollution (no text present)natural_image
Prohibition sign showing a faucet without a shower, enclosed in a circle (no text)natural_image
Simple black-and-white icon of a faucet with raindrops falling (no text or symbols)text_image
Diagram showing two connected components with blue arrows indicating direction of movement, labeled ① and ②.natural_image
Abstract diagram with concentric curved lines and a central circular symbol (no text or labels)natural_image
Diagram of a curved surface with concentric lines and a central star-like shape, no text or symbols present.Fulladet batteri
- Når batteriet er fulladet, lyser ladelampen kontinuerlig grønt.
natural_image
Diagram of a curved surface with concentric lines and a central circular feature, no text or symbols present.Bruke apparatet
Merk: Dette apparatet kan brukes uten ledning eller när det er koblet til en stikkontakt.
natural_image
Diagram of a curved, layered structure with a blue arrow pointing to a specific region (no text or symbols present)text_image
Illustration showing a person using a handheld device to interact with another person, with a blue X mark indicating the interaction point.1 Slå på apparatet.
natural_image
Diagram of a device being inserted into a cable, showing blue arrows indicating direction (no text or symbols present)natural_image
Illustration of a person using a handheld device to apply eye care (no text or symbols present)- You can now start trimming.
natural_image
Illustration of a hand using a tool to adjust or install a component, with no visible text or symbols.natural_image
Illustration of a person wearing a helmet and holding a tool, with no visible text or symbolsnatural_image
Illustration of a pipette dispensing liquid into a blue container (no text or symbols)natural_image
Diagram showing two views of a shoe with blue arrows indicating movement or force direction (no text or symbols)text_image
Diagram showing a mechanical device with labeled parts and directional arrows indicating motion or forcenatural_image
Illustration of a hand holding two circular objects with upward arrows, separated by a diagonal line (no text or symbols)natural_image
Illustration of a medical procedure showing a bottle being inserted into a cup and then being placed on a stand (no text or symbols present)natural_image
Diagram showing two blue arrows pointing downward on a circular object, separated by a diagonal line (no text or symbols)text_image
Diagram showing a hand holding a blue mechanical device with labeled parts and directional arrows indicating motion or assembly.natural_image
Illustration of two medical or surgical procedures with blue arrows indicating force or movement (no text or symbols present)natural_image
Diagram of a hand holding a device with blue arrows indicating direction (no text or symbols)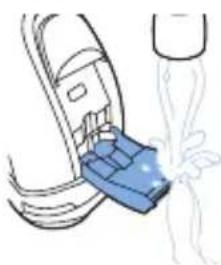
natural_image
Diagram of a car interior with a blue plastic component being inserted, showing fluid flow (no text or symbols)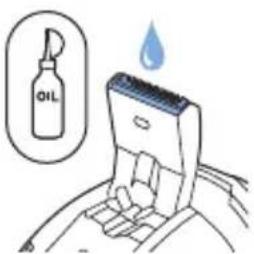
text_image
OILnatural_image
Illustration of a hairdryer with blue spray and sparkles (no text or symbols)natural_image
Illustration of two medical devices with blue arrows indicating force or movement, no text or symbols present
text_image
5 sec.natural_image
Prohibition sign showing a faucet crossed out by a diagonal line, indicating no leakage or anti-poaching action (no text present)natural_image
Prohibition sign showing a faucet without a shower, enclosed in a circle (no text)text_image
Diagram showing two connected electrical components with numbered arrows indicating connection stepsnatural_image
Abstract diagram with curved lines and a central circular symbol (no text or labels)Bateria fraca
natural_image
Diagram of a waveform with a power button and a star-shaped signal overlay (no text or symbols)natural_image
Diagram of a curved surface with concentric lines and a central blue circle, no text or symbols presentnatural_image
Diagram of a curved, layered structure with a blue arrow pointing to a specific region (no text or symbols present)natural_image
Illustration of a person using a handheld device to interact with another person (no text or symbols present)text_image
Illustration showing three-step hairpin usage technique: adding a cable to a phone, using a tool to remove the ear.natural_image
Illustration of a shoe being cut with a tool, showing the blade and base (no text or symbols)natural_image
Illustration of two medical devices with blue arrows indicating movement or force (no text or symbols)text_image
Diagram showing a mechanical device with labeled parts and directional arrows indicating motion or forcenatural_image
Diagram showing a hand holding three circular objects with blue arrows indicating upward motion, separated by a diagonal line (no text or symbols)natural_image
Illustration of a hand holding a blue object with a coiled cord, connected to a wire and a separate blue object (no text or symbols)natural_image
Diagram showing two blue arrows pointing downward on a circular object, separated by a diagonal line (no text or symbols)text_image
Diagram showing a blue mechanical device with labeled parts and directional arrows indicating motion or assembly.natural_image
Illustration of two hands performing a medical procedure on a patient's abdomen, with arrows indicating movement (no text or symbols present)natural_image
Diagram of a hand inserting a device into a cable (no text or symbols visible)
natural_image
Illustration of a blue plastic container being inserted into a car (no text or symbols)natural_image
Illustration of a tooth being cut with a blue arrow indicating the process (no text or symbols)natural_image
Illustration of a hairpin with a magnified inset showing internal structure (no text or symbols)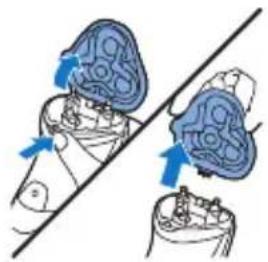
natural_image
Diagram showing two hands operating a device with blue arrows indicating movement or force (no text or symbols present)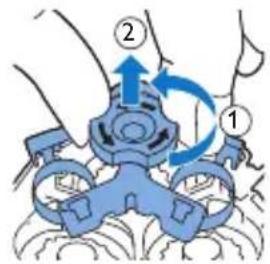
text_image
Diagram showing a hand holding a device with labeled parts and directional arrows indicating motion or movement.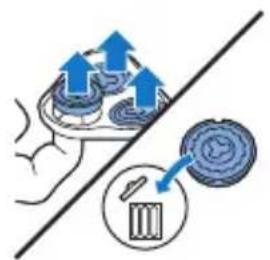
natural_image
Illustration of a hand using a tool to interact with a device, showing upward arrows and a circular button (no text or symbols)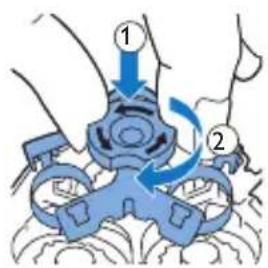
text_image
Diagram showing a blue mechanical device with labeled parts and directional arrows indicating motion or assembly.natural_image
Illustration of two medical devices with blue arrows indicating force or movement, no text or symbols presentEncomendar acessórios
text_image
Two identical diagrams showing a waste bin with crosshairs and a blank horizontal bar, each marked with 'No' symbols.natural_image
Prohibition sign showing a faucet without raindrops, enclosed in a circle (no text)natural_image
Prohibition sign showing a faucet without shower, enclosed in a circle (no text)natural_image
Simple black-and-white icon of a faucet with a showerhead, no text or symbols present.text_image
Diagram showing two connected components with numbered arrows indicating direction of movement or interaction.natural_image
Abstract diagram with concentric curved lines and a central circular symbol (no text or labels)Lataus vähissä
natural_image
Diagram of a curved surface with concentric lines and a central star-shaped highlight, no text or symbols present.natural_image
Diagram of a curved surface with concentric lines and a central circular feature, no text or symbols present.Akku täynnä
natural_image
Diagram of a curved, layered structure with a blue arrow pointing to a small object (no text or symbols present)text_image
Illustration showing a person using a handheld device to interact with another person, with a blue X mark indicating the interaction point.natural_image
Diagram of a device being inserted into a device, showing blue arrows indicating direction (no text or symbols present)natural_image
Illustration of a person using a handheld device to apply eye care (no text or symbols present)natural_image
Illustration of a hand using a tool to adjust or install a component, with no visible text or symbols.natural_image
Illustration of a shoe with blue patterned fabric and a diagonal line, no text or symbols presentnatural_image
Illustration of a medical procedure with a pipette inserted into a blue container (no text or symbols)natural_image
Illustration of two blue anatomical views of a shoe with arrows indicating movement or force (no text or symbols)text_image
Diagram showing a blue mechanical device with labeled parts and directional arrows indicating motion or forcenatural_image
Diagram showing a hand holding a device with blue arrows indicating direction, alongside a separate view of a mechanical component (no text or symbols present)natural_image
Illustration of a medical procedure involving a surgical instrument and a catheter (no text or symbols present)natural_image
Diagram showing two mechanical components with blue arrows indicating direction, no text or symbols presenttext_image
Diagram showing a blue mechanical device with labeled parts and directional arrows indicating motion or rotation.natural_image
Illustration of two hands performing a medical procedure on a device, showing force application and alignment (no text or symbols)text_image
Diagram illustrating three steps of oil extraction: adding a blue object, pouring liquid into a container, and finally adding a drop in oil.natural_image
Illustration of a hairdryer with blue spray and sparkles (no text or symbols)natural_image
Illustration of two medical devices with blue arrows indicating force or movement, no text or symbols present
text_image
5 sec.natural_image
Prohibition sign with a faucet and diagonal line, no text or symbols presentnatural_image
Prohibition sign showing a faucet without a shower, enclosed in a circle (no text)natural_image
Simple black-and-white icon of a faucet with a showerhead, no text or symbols present.text_image
Diagram showing two connected components with blue arrows indicating direction of movement, labeled ① and ②.natural_image
Diagram of a curved surface with concentric lines and a central star-like symbol, no text or labels present.natural_image
Diagram showing concentric curved lines with a central star-like shape and a power button, no text or symbols present.Batteriet fulladdat
natural_image
Diagram of a curved surface with concentric lines and a central circular feature, no text or symbols present.Använda apparaten
natural_image
Diagram of a curved, layered structure with a blue arrow pointing to a small object (no text or symbols present)text_image
Illustration showing a person using a handheld device to interact with another person, with a blue X mark indicating the interaction point.1 Slå på apparaten.
natural_image
Diagram of a hand holding a device with blue arrows indicating rotation or movement (no text or symbols)natural_image
Illustration of a person using a handheld device to interact with their ear (no text or symbols present)natural_image
Illustration of a hand holding a device with a blue arrow pointing to a component (no text or symbols)natural_image
Illustration of a pair of blue sneakers with a diagonal line crossing through them (no text or symbols)natural_image
Illustration of a medical procedure with a pipette inserted into a blue container (no text or symbols)natural_image
Diagram showing two blue anatomical views of a human head with directional arrows indicating movement or force (no text or labels)text_image
Diagram showing a blue mechanical device with numbered parts and directional arrows indicating motion or flow.natural_image
Diagram showing a hand holding a container with blue arrows indicating flow or movement, alongside another container with blue arrows (no text or symbols)natural_image
Illustration of a medical procedure involving a surgical instrument and a catheter (no text or symbols present)natural_image
Diagram showing two mechanical components with blue arrows indicating direction, no text or symbols presenttext_image
Diagram showing a blue mechanical device with labeled parts and directional arrows indicating motion or rotation.natural_image
Illustration of two hands performing a medical procedure on a device, showing force application and movement (no text or symbols)text_image
Diagram illustrating oil extraction process with labeled steps: adding fuel, pouring water, and oil drop.natural_image
Illustration of a toothbrush applying blue liquid to a tooth (no text or symbols)natural_image
Illustration of two medical devices with blue arrows indicating force or movement, no text or symbols present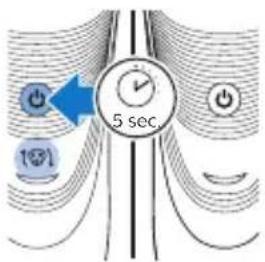
text_image
5 sec 100natural_image
Prohibition sign showing a faucet without raindrops, enclosed in a circle (no text)natural_image
Prohibition sign showing a faucet without a shower, enclosed in a circle (no text)natural_image
Simple black-and-white icon of a faucet with a drain, no text or symbols present.text_image
Diagram showing two connected electrical components with labeled parts and directional arrows indicating connection or movement.natural_image
Diagram of a curved surface with concentric lines and a central star-like symbol, no text or labels present.natural_image
Diagram showing concentric curved lines with a central star-like shape and a power button, no text or symbols present.natural_image
Diagram of a curved surface with concentric lines and a central circular feature, no text or symbols present.Cihazın kullanımı
natural_image
Diagram of a curved, layered structure with a blue arrow pointing to a small circular feature (no text or symbols)natural_image
Illustration of a person brushing their face with a toothbrush, showing two different angles (no text or symbols)natural_image
Illustration showing a hand holding a smartphone with blue arrows indicating motion, and a close-up of a person's ear with a blue arrow pointing to the ear (no text or symbols present)natural_image
Illustration of a hand using a tool to adjust or install a component, with no visible text or symbols.natural_image
Illustration of a shoe with blue tassels and a diagonal line, no text or symbols presentnatural_image
Illustration of a medical procedure with a pipette inserted into a blue container (no text or symbols)natural_image
Illustration of two medical devices with blue arrows indicating movement or force (no text or symbols)text_image
Diagram showing a blue mechanical device with labeled parts and directional arrows indicating motion or forcenatural_image
Diagram showing a hand holding a container with blue arrows indicating flow or movement, alongside a separate container with arrows and a label 'e' (no text or symbols on the containers themselves)natural_image
Illustration of a medical procedure involving a catheter and a syringe (no text or symbols present)natural_image
Diagram showing two mechanical components with blue arrows indicating direction, no text or symbols presenttext_image
Diagram showing a blue mechanical device with labeled parts and directional arrows indicating motion or rotation.natural_image
Illustration of two hands performing a medical procedure on a device, showing blue surgical tools and force arrows (no text or symbols)natural_image
Illustration of a hand turning a tooth with a blue object above and a light burst below (no text or symbols)text_image
Diagram of a hairbrush with a magnified inset showing facial features and color adjustmentnatural_image
Diagram showing two mechanical components with blue arrows indicating motion or force direction, no text or symbols presenttext_image
Diagram showing a hand holding a blue mechanical device with labeled parts and directional arrows indicating motion or force.natural_image
Illustration of a hand using a tool to interact with a device, showing upward arrows and a circular component (no text or symbols)text_image
Diagram showing two labeled steps of a mechanical or electrical component with directional arrows indicating motion or movement.natural_image
Medical illustration showing two surgical procedures on a tool, with arrows indicating force direction (no text or symbols present)text_image
Diagram showing three types of waste sorting symbols: a trash bin, a blank rectangular block, and a recycling bin with no text or labels.natural_image
Prohibition sign of a faucet without any text or symbolsnatural_image
No smoking sign with faucet symbol (no text)natural_image
Simple black-and-white icon of a faucet with a showerhead, no text or symbols present.text_image
Diagram showing two connected components with numbered arrows indicating process flownatural_image
Abstract diagram with curved lines and a central star-like shape, no text or symbols presentΧαμηλή μπαταρία
natural_image
Diagram of a medical or electrical system with concentric curved lines and a central power button (no text or symbols)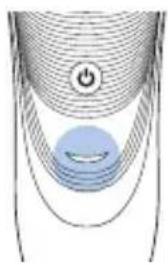
natural_image
Diagram of a curved surface with concentric lines and a central circular object, no text or symbols present.natural_image
Diagram of a curved, layered structure with a blue arrow pointing to a specific region (no text or symbols present)natural_image
Illustration of a person brushing teeth with a blue tool, no text or symbols presentnatural_image
Diagram of a hand inserting a device into a cable (no text or symbols visible)natural_image
Illustration of a person using a handheld device to interact with another person (no text or symbols present)natural_image
Illustration of a hand using a tool to adjust or install a device component, with no visible text or symbols.natural_image
Medical illustration showing a surgical procedure with surgical tools and tubing (no text or labels)