Odyssee Elec F117 - Pan ATLANTIC - Free user manual and instructions
Find the device manual for free Odyssee Elec F117 ATLANTIC in PDF.

| Product type | Electric heater |
| Brand | Atlantic |
| Model | Odyssee Elec F117 |
| Power supply | 230 V / 50 Hz |
| Nominal power | Up to 2000 W (estimate) |
| Protection rating | IP24 (protection against water splashes) |
| Electrical class | II |
| Installation | Wall-mounted or mobile (with optional foot kit) |
| Dimensions (approx.) | Height: 45 cm, Width: 60 cm, Depth: 15 cm |
| Weight (approx.) | 5 kg |
| Functions | Comfort, Eco, Frost Protection, programming by pilot wire or carrier current |
| Temperature adjustment | Adjustment knob with slider or switch (depending on version) |
| Heating indicator | Indicates heating periods (electronic models) |
| Control lock | Possible on electronic models (limiting the knob and slider) |
| Maintenance | Dusting of grilles twice a year; internal inspection every 5 years by a professional |
| Cleaning | With a damp cloth, without abrasive products |
| Safety | Very hot surface (caution burns); do not cover; children under 3 years kept away |
| Country of use | France (models with plug not authorized for fixed installation in France) |
| Warranty | 2 years (up to 30 months without proof of purchase) |
| Repairability | Spare parts available; replacement by the manufacturer or after-sales service |
| Standards | NFC 15-100 (France), WEEE 2002/96/EC |
| Rating plate | On the right side of the device |
Frequently Asked Questions - Odyssee Elec F117 ATLANTIC
User questions about Odyssee Elec F117 ATLANTIC
0 question about this device. Answer the ones you know or ask your own.
Ask a new question about this device
Download the instructions for your Pan in PDF format for free! Find your manual Odyssee Elec F117 - ATLANTIC and take your electronic device back in hand. On this page are published all the documents necessary for the use of your device. Odyssee Elec F117 by ATLANTIC.
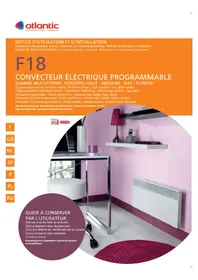
USER MANUAL Odyssee Elec F117 ATLANTIC
Caution very hot surface.
CAUTION: Portions of this product may become hot and cause burns. Pay particular attention to the presence of children and vulnerable people.
- Keep away from this unit child under 3 years unless they are under continuous surveillance.
- Children between 3 and 8 years should only put the unit on or off, to provided that the latter has been placed or installed in a normal position and that these children have supervision or have received instructions on using the machine safely and understand the potential hazards. Children aged between 3 and 8 years must not connect or adjust or clean the device and perform maintenance or user.
- This unit can be used by older children at least 8 years and by people with physical, sensory or mental capabilities or lack of experience or knowledge, they (if) is monitored correctly (s) or instructions for using the appliance safely given to them and if the risks were apprehended. Children should not play with the appliance. Cleaning and maintenance by the user should not be performed by children without supervision.
- This device must be plugged or connected according to the rules and standards applicable by an authorized person.
- The instruction book of this product is available by contacting the after-sales service with the number indicate on the warranty part included in this manual service.
- Do not use the appliance if the power cable is damaged.
| Caution: to avoid overheating and for safety reasons, do not cover the panel heater. | |
| Devices with this symbol should not be disposed with househol waste but must be collected separately and recycled. The collection and recycling of end of life must be made according to the provisions and local ordinances (DEEE 2002/96/CE). | |
| The installation of the device in high altitude causes an increase of the temperature air outlet (about 10 °C per 1000 m elevation). |
In case of mobile utilisation of the device (see applicable models below):
- Do not use this heater near a bathtub, a shower or a pool.
- Do not use this heater in small areas when they are occupied by people unable to leave the room by themselves unless if a constant supervision is provided.
1. Installation
1.1 Where to install your heater?
- This equipment was designed to be installed in a residence. Please ask your distributor before using it for any other purpose.
- The panel heater should be installed according to normal trade practice and incompliance with legislation in the relevant country (NFC 15-100 for France).
- The equipment is class 2 and is protected against splashed water IP 24. The device can be installed in volume 2 of a bathroom (Figure 1). It's forbidden to install the device in the volume 1. The device is to be installed so that switches and other controls cannot be touched by a person in the bath or shower.
- Comply with the minimum clearance distances for positioning of the panel (Figure 2).
- The wall bracket allows keeping a free space behind the device to not disturb its regulation. The distance between the unit and the wall should not be obstructed.
1.2 Do not install the panel heater
- In a draught that might affect adjustment (for example, under a central mechanical ventilation unit etc...). Under a fixed power socket (Figure 3) or near curtains or other combustible materials.
- In a conform position, the air outlet grid and the control unit is visible in the upper part of the device. It is forbidden to install a vertical unit horizontally and vice versa (Figure 4).
1.3 How to install the panel heater?
1.3.1 Mobile device (CHG2-TAC/M)
WARNING: Devices without plug can not be used in mobile version
- The mobile installation with feet is allowed only for electronic device with plug (CHG2-TAC/M, Figure 5 & 10). The device must be placed on a horizontal surface. Refer to the feet instruction book (ref 517000).
1.3.2 Wall mounted device
1.3.2.1 Preparation
- The wall mounted installation concern all Mechanical devices and Electronic devices.
a. Release the appliance's hook-on bracket (Figure 6)
- We recommend that you place the panel heater flat, face down. Have a straight head screwdriver to hand and lift the tab taking care not deform. While holding the tab rose, push the locking bracket to the bottom of the unit to release the upper hooks. Rotate the attachment tab around the lower hooks and remove the attachment tab.
b. Fix the hook-on bracket (Figure 7)
- Place the bracket on the ground and against the wall and mark the drilling points A. These give the position of the bottom fasteners. Replace the brackets in alignment with the drilling point A to locate drilling points B. These give the position of the upper fasteners. In case of special support, use proper anchors. Position and screw the wall brackets.
1.3.2.2 Electrical connexion
-
The appliance should have a 230 / 50Hz power supply. The panel heater must be connected to the mains by a 2-wire cable for Mechanical Device or 3-wire cable for Electronic Device (Brown= Phase, Blue = Neutral, Black = Pilot wire) by means of a connexion box. In humid areas such as bathrooms and kitchens the power socket must be installed at least 25 cm above the floor. The installation should be fitted with a double pole break device with a break of at least 3 mm.
-
Connection to earth is prohibited / Do not connect the pilot wire (black) to earth. If a driver or driven device is protected by a 30mA differential (for example for bathroom) it is necessary to protect the power supply of the pilot wire on that differential.
| Commands Received | No current | Complete alternation 230 V | Negative Half/alternation - 115V | Positive Half/alternation + 115V |
| Oscilloscope Ref/Neutral | —— | —— | —— | |
| Mode obtained | COMFORT ECO ANTI-FREEZE | STOP HEATING LOAD SHEDDING | ||

1.3.2.3 Wall mounted installation (Figure 8)
- Place the device inclined on the brackets C and rotates the device to place it on the brackets D. Lowering the device on the bracket. A click indicates that the device is attached and locked. To unlock the attachment tab, grab a screwdriver and push the tab (at the top left of the attachment tab behind the device) towards the wall. Lift the device while holding the tab with the screwdriver. Tilt it forward and remove it from the supports C.
2. Maintenance
- To maintain performances of your unit, you should clean the upper and lower grids of the unit about twice a year using a vacuum cleaner or a brush.
- Have a professional check the inside of the unit every five years. Dirt may collect on the grids of the unit if the atmosphere is polluted. This phenomenon is due to the poor quality of the ambient air. In this case, it is recommended to check that the room is well ventilated (ventilation, air inlet, etc.), and that the air is clean. The unit will not be replaced under the guarantee because of this type of dirt. The unit casing should be cleaned with a damp cloth, never use abrasive products.
3. Utilisation
2.1 Mechanical Device (Figure 9, refer to the table)
2.1.1 How to fix the comfort mode?
- For a temperature setting « Comfort», put the switch E on I, adjust the control knob F and wait for the temperature to stabilise.
| E | Switch I/0 |
| F | Control knob of the temperature |
2.1.2 How to fix the frost free mode?
- For the frost free mode, let the switch E on I, and adjust the control knob F on the minimum setting. The control knob allow to maintain a temperature of about 7^ in the room when you are absent for a prolonged period (more than 24 hours).
2.2 Electronic Device (Figure J & K)
2.2.1 How to fix the comfort mode?
-
The Comfort mode allows setting the desired temperature using the control knob.
-
Put the switch H on and then set the control knob I on the desired position, the heating indicator G lights if the ambient temperature is lower than desired one. Wait until the temperature stabilizes.
| G | Indicator for heating. It indicates the periods in which the resistance is working. With a stabilized temperature, it flashes and if the temperature is too high, it stops. |
| H | Slider or switch |
| I | Control knob of the temperature |
2.2.2 How to fix the Eco mode?
- ECO mode allows lowering the temperature of Comfort mode from 3 to 4^ during unoccupied periods of the room. It is recommended that this mode should be used if the room is unoccupied for more than 2 hours. Put the switch H on ECO and then set the control knob I to the desired position, the heating indicator G lights if the ambient temperature is lower than desired ECO temperature. Wait until the temperature stabilizes.
2.2.3 How to fix the Frost Free mode?
- It is the position of the switch that keeps the temperature at approximately 7^ C in the room during prolonged absence from the house (usually more than 24 hours). Put the switch H on
2.2.4 How to program your device in Comfort, ECO or Frost Free mode?
-
Devices equipped with an electronic thermostat are able to receive orders. There are two solutions:
-
By pilot wire (black wire) for devices without plug thanks to the system Chronopass or a wall pilot wire box
-
By carrier current with an interface on each device in addition to a Chronopass system or a wall carrier current box.
2.2.5 How to lock the commands (Figure 12)?
It is possible to lock or limit the use of the control knob I and to lock the switch H to prevent manipulation. Lift the unit from the wall bracket. On the back of the thermostat, remove the pins J from their support:
- The K position allows locking the control knob.
- The L position allows limiting the utilisation of the control knob.
- The M position allows locking the H switch on the desired mode.
4. Recommendations for use
- There is no point in setting maximum heating; the room temperature will not rise any quicker. If you leave for several hours, remember to reduce the temperature.
If you have several units in a room, let them operate simultaneously. This will give you a more uniform temperature without increasing electricity consumption. This also applies for an unoccupied room; it is more interesting to let the device operate on a lower setting than turn it off completely.
5. Trouble-Shooting
The device does not heat : Make sure that the installation circuit breakers are switched on, or that the load shedding (if you have one) has not switched off the unit power supply. Check the air temperature in the room. For the device equipped, check that the programmer is in Comfort mode.
- The unit is permanently heating : Make sure that it is not in a draft and that the temperature setting has not been changed.
- The unit does not carry out programming orders (Device equipped): Make sure that the programming unit is being correctly used (refer to its user's manual) or that the Chronocarte is properly inserted in its housing and that it is operating normally (batteries). The device with electronic control is equipped with a microprocessor that can be distributed by some severe mains voltage disturbances (outside EC standards defining the disturbance protection level). If there are any problems (thermostat blocked, etc.) switch off the unit power supply (fuse, circuit breaker, etc.) for about 5 minutes to allow the unit to start again. If this phenomenon occurs frequently, control the power supply by your energy supplier.
The device is very hot on the surface : It is normal that the device when working, the maximum surface temperature is limited in accordance with standards. However, if you believe that your radiator is still too hot, make sure the power is adapted to the surface of your room (we recommend 100W / m²) and the unit is not placed in a stream of air that would disrupt its regulation.
6. Warranty conditions
KEEP THIS DOCUMENT IN A SAFE PLACE
(This certificate should only be produced if you are making a complaint, attached with the invoice of the purchase)
- This guarantee is applicable for 2 years from the date of original purchase and shall be valid for no more than 30 months from the date of manufacture.
- The warranty covers the replacement and supply of accepted defective parts except damages and interest components.
Labour costs, travel and transportation are under the responsibility of the user. - Damage linked to an improper installation, to a supply network not complying with standards, to an abnormal using or to the non-compliance to the instructions of the manual are not covered by the warranty.
- Present this certificate only in case of claim with your distributor or installer attaching your invoice.
- The provisions of these warranty conditions are not exclusively of benefits for the purchaser of the legal guarantee for defects and hidden defects that apply in any case in terms of articles 1641 and following of the Civil Code.
-
To claim under guarantee, contact your installer or dealer. If necessary, contact: ATL International Tel: (+33)146836000, Fax: (+33)146836001, 58 av Gen. Leclerc 92340 Bourg-la-Reine (France).
DEALER STAMP -
This information is shown on the plate which can be seen on the left-side or behind the front grille of the unit
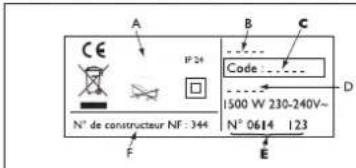
A. Standards, quality labels
B Commercial name
C Commercial reference
D Manufacturing reference
E Serial Number
F Manufacturer number
| Type of Device * | |
| Serial Number * | |
| Name and address of the customer * |
Advertencias (SP)

1.2 He nHcTaInpaIte ypeJa:
-
Ha TeueHne, KOeTo MOKe Da OkaKe BInnHne Bbpxy pa6oTaMy (NoI ceHTpaJIHa BeHTnlaUOnHHa CnCTema N T.H.)
-прази пи пол устер-кема (ФИгура 3) пи в 6лн3ocTdo 3aBeCS nIIN dpyrN leCHOb3ПЯмEHIMM MaTePnAJI. -
JIameJIte 3a n3XoJauny Bb3dyx n Ta6IoTO 3a ynpaBneHne Tp8Ba Da ca B roPHaTa YacT Ha ypeDa. 3a6paHeNo e ypeD 3a BEptnKaJeH MOHTaK Da ce MOHTnpa XOpN3OHTaJHo N O6paTHOT. (ΦIrpya 4).
1.3 MoNTaX Ha ypeDa
1.3.1 Повинкев Варнат (CHG2-TAC/M)
BHIMAHHE: yctpoicTba, 6e3 5eIcJIbT He MoKe Da ce I3NoI3Ba B MObIHaTa BepCnA
-Повижн我不是ВарпаNT=(урдн=c=цencel=n=КOMпгкт =Кpaчета 3a =ПОДOB =MOHTaЖ) =Тябва =Дa =Бьдe =НOCТаBEH =Ha =XOPИЗOTаJIH NOВьрхнocT. (CHG2-TAC/M,ФИгурn 5 & 10).
1.3.2 YpeiN 3a cTeHeH MOHTaX
1.3.2.1 Повтовka 3a MOHTажа
-ФИКСИРАНЯТ =MOHTаЖ =Ha CTeHa =e =прИLOЖИМ =3a BCИЧК =уpeДи =мexAHUNeH n eJIeKТpoHEn TepMOCTaT.
a. CbaTe paMKkata 3a MOHTax Ha CteHa (Furpa 6)
- =ПpenopbчBaMe =Да =НOCtABnTe =уpeДa =С =Лицe =КьМ =Юдa, =КATO BHIMaBaTe ПОкптнTo My Дa 6ьдe 3aшnteHo OT ДраСКOTиH. C ПOMOHTa Ha ПLOOCKa OTВерТka NOВДИrHete ПАЛЧeTO, KaTO BHIMaBaTe Дa =He =То =Orhete. =ДOKATO =ПалчeTO =e =NOBДИrHaTO, =HaTINCHeTe СToIKAta NaIOny, 3a Дa OCBOБODITE rOPHte cKOBn.3aВьрТeTe СToIKAta NaIOny, 3a ДaЯ OCBOБODITE OT DoJIHnTE cKOBn. МaxHete СToIKAta.
b. MoHTaX Ha cKo6aTa 3a cTeHa (Furpa 7)
IocTabete cToKata 3a cTeHa Ha nOda Do cTeHaTa.OTBeJexTe MxCTOTO 3a OTBOpNTe A. Te Noka3Bat MxCTOTO Ha DOJHOTo 3axBaUaHe. IocTabete =cToKata, =kato =Cna3BaTe =OTBopNTe A, =3a Da OTBeJexNte MeCTaT ha OTBOpNTe B. Te Noka3Bat MxCTOTO Ha ROPHOTo 3axBaUaHe. PpO6nIte YetnpTE OTBopa n NOCTabete IIO6JIi, KOraTO MaTePnaJIbT e CneuΦnueH (rINCKapTOH n T.H.).IocTabete cToKata n 3akpenete CBHTOBe.
1.3.2.2 Cbbp3BaHe Ha ypeDa KbM eJekTpHueckaTa MpeKa
3axpaHbHeTo Tp6Ba Da 6bJe 230 V / 50Hz.
1.3.2.2.1 Ycmpoucmea 6e3 uencen:
- 3a cBbP3BaHeTo Ha ypeDa ce n3NoJ3Ba 2-kenen Ka6eI 3a ypeN C
MexAHnueH TepMOCTaT N 3-kenen, 3a ypeN C eJeKTPoHEn TepMOCTa (KaFyB= pa3a, CnH=HyJa, UpeH=nnIoTeH), NocpeDcTBOM JyCtepKlema. =BbB =BnaXn =nomeUeHn =kato =6aHn =n =kyxHn, =nyctepKlemaT Ta P6Ba Da 6bDe MOHTnpaHa Ha MNHMym 25cm. OT noJa.
3axpaHbAHeTo Ha ypeDa Tp6Ba Da 6bDe Cbbp3aHO DnpeKTHO KbMeIeKTpueckata MpeKa, CneD BByNIOCeH PpeKbCBAu C KOHTaKTehOTBOP MNHMym 3MM.
- YpeIbT He Tp6Ba Da ce 3a3em8Ba/He Cbbp3BaIte cepHna Ka6eI KbM „3em8" Ako KOHTpoInpaIo OII NIO KOHTPOIpaHO yCTpOoiCTBO ca 3aIITeHN C ppeKbcBau 30mA (HaNP. B 6aH), 3axpaHBAHeTo Ha IINOTTHNIA Ka6eI Tp6Ba Da e 3aIITeHO C TO3N IIpeKcbBaU.

1.3.2.2.2. Ycmpoucmeama c uencei:
BHIMAHHE: Te3n yctpoiCTBa He MORaT Da ce HnHCTaIInpaT B HeNoDnXHo NIOJKeHne Ha fpeHcKna3ap.
1.3.2.3 3aKpeBbHe Ha ypeHa Ha paMkata 3a cTeHa (Φnrgpa 8)
- NocTaBete ypeDa Bbpxy ckoBnte C B JneKo HAKNoHeHO nOIOXeHne.
I3npaBete ypeDa, taKa Ye da ce 3akpen Ha ckoBn D.
IeKo HATnCHTe ypeDa Bbpxy CToiKaTa 3a CteHa. Ue CyyeTe JekO
UpaKbaHe, KOeTO NOKa3Ba, Ye ypeDbT e 3dpaBO 3aKpeHEn Ha MxCTO.
3a Da CBaNITe ypeDa OT CToiKaTa 3a CteHa, B3eMeTe NIOCKa OTBepTK
HATnCHTe NaNHTo (HAMIPAso Ce B TropHnJ LAB bYbl Ha CToiKaTa
3aD ypeDa) KbM CTEHATA. NobnHete ypeDa, KATO DpbXnTe NaNHTo
C OTBepTkata. HAKNoHete ypeDa HAnpei n rO OTkauhe Te OT Cko6nte
C.
2. Nopdprbxxka
-Почистваіte rophnte ndoJIHn OTBOPn Ha ypeDa IBa IbTn rOДИshO CnomoHTaHa npaxocMykaUka IIIN YeTka.
-Bbtpeunha Taact Ha ypea Tp8Ba Da 6bde npOBepBaHa OT KBAHnOuPAno Jnue Ha BceKn 5 r. IIO OTBOpHTe Ha ypea MoKe Da ce Hacno3aMbpCraBaHe nopadn HeuNCTOTata Ha Bb3dyxa. B Te3n Cnyan npOBepTe DaJI NOMeUeHNTo e Do6pe BeHTnIpaHO n DaJI N Bb3dYxbT e cHcT. YpeNbT HMa Da 6bDe rapaHcNoHH NOIMHeH, Nopadn TaKbB Bd 3aMbpcBaHe.
BbHnHnte NOBbpxHocTn Ha ypeDa Tpra6Ba Da 6bDaT NOuNCTBaHc BnJaxHen napcaI, KaTo ce 3a6paHЯBa ynoTppe6aTa Ha a6pa3nBHI NOUcTBAuI npenapatn.
3.Интукции 3aуnotpe6a
2.1 Upei c mexaHueh TepMoctat (Hnrgpa 9, BnK TaBnuaTa)
2.1.1 Kac da hactpoim TemnepaTypaB pexm Kompopt?
- 3a HactpoBaHe Ha XeJHaHata TempepaTypa B pexm « Kompopt », HatncheTe KInOua E B NOLOXeHne I, Harnacete NOTehUOnometbP
FиИЗчakай Te Tempepatypata Da cTa6nIn3npa
1.2 He yctHaBnBaTb HarpeBaTeNbHyo naHeJIb
-B cnyaX, KOtOpbIe MoryT NOBnIaTb Ha peryIuPoBaHne Tempepatypb (HaNPmep, POnd ceHTpaJIbHOJ MexaHuecko BEHTnIaUeNe I T.D.).
-Пд Илп NOBepx CtaционapнОй АльктprueckOу po3eTKoI (PucyHOK 3)ИлвБбИЗИ WTOp ИлДpyrNx RopUOuX MaTepeNaJIOB.
-B noJoxeHn, KOrda ceTka DnB BbInycka Bo3dyxa np6opa n ynpabIoua naHeIb BnDhbl B BepxHei erO yactn. KaTeOpueckn 3anpeucho YcTaHaBnBaTb BepTKaJIbHbI np6op Hao6opot (PncyHok 4).
1.3 Kac yctaHOBtB HaraeBaTeJbHbI npu6op?
1.3.1 Ppehenocno npn6op (CHG2-TAC/M)
BHIMAHNE:Приборбe3Вилкн He MOжeT 6bIb ИспОьБаHo C HOЖКAMN
b. YctaHOBNTe KPOHHTeH Ha cTeHe (PucyHOK 7)
PacnoJoxnTe KPOHSTeH y cTeHb Ha ypOBHe nOJa. HAMetbTe TocKn CBepIeHnA DnHnxNtX OTBepCTnKPOHSTeHa. PnIOHIMTe KPOHSTeH, COBMecTINB OTMeTKN C HIXHMN OTBepCTnMn KPOHSTeHa, NocJe Yero HAMetbTe OCTaBWeCg Da BmecTa dJIa BEPxHx OTBepCTn KPOHSTeHa B. PpOCBepIte OTBepCTn I 3aΦHKcpyIte KPOHSTeHn Ha cTeHe npn NOMoU INIOBeNe IN BnHTOB. He 3abYbTe BCTaBNTb IpOKnaIK MExdy KPOHSTeHOM IN CTeHOJ pRn Heo6xOdmOCTn. YcTaHOBIne IN 3akpeIne HAcTeHHbIe KPOHSTeHbI.
1.3.2.2 Θлжтпческoe noДКЛЮЧЕнe
-CoeiHHeHc 3a3emHeHcM 3anpeeHo / He noKJIouaTb ynpabJIIOUuN = npOBoD = (yepbI) = K = 3a3emJeHIO. =EcNI = Boduuee nn = BeDMoe = yCTpOJCTBO = 3aUuSeHO = 30 = mA = dNΦΦepENuaHa (HaNPIMep,ДЯ BAHHO KOMHaTbI), 3TO HeO6XoIMO dJa 3aUNTbI NITaHry ynpabJIIOUuN npOBoD Ha 3Tom dNΦΦepENuaJIe.
1.3.2.3 YcTaHOBka np6opa Ha KpoHwTeHHe (PucyHOK 8)
-Пocтавыпnpибop Ha HIXHнe BblcTуnbI кpoHшTeиha C. ПрnxMnte npибop K BepxHIM BblcTynam kpoHшTeиha D. 3aueJKNHTe KOHBekTOp Ha KPOHSTeHne NO HanpaBnEHIO CBepxv BHN3. YTo6bI CHrTB =Pnp6Op =C =KPOHSTeHna, =C =NOMOuH =NIOCKoN =OTBePTkn HaxMNTe =Ha Ra3bUOK = (B =JIeBOM =BepxHem =yRny =KpoHSTeHna) =K CTHe. ПОднмITE npибop, Держа Ra3bUOK C NOMOuH O TBePTkn. ПоТолКНITE erO Bneped, 3aTeM ChmMNTe C BblcTynOB C.
2. 06cnyxmbaHne
-Дяподерханя pa6obtbl Baшero np6opa, ouицайтЕ Верхнe ИНжнe peшetkn np6opa kak MHHmym Дba pa3aВ rod c nOMOuIbIpbInecoCa IINI ηETKN.
-Korda Bbl npoBeTpnaeTe NOMEueHne, BBIKIOuAte O6OrpeB, NOCTaBnB KypCop Ha.
-При ИСЮЛБЗОВАнNприбopaВ сильно 3агрзHeHNo aTmocфepeHa NOBepxHOCHTn peшetok пri6opa MoryT NOBtbcrЯТha.TakneNOBepxHOCTHbIe 3агр3HeHnHe NOKpbIBaOTcR rapaHTneI np6opaN He YBnIOTc OCHOBAHnEM DnE erO 3ameHb.I. Prn HAnuNHype3MepHO 3агр3HeHOro BO3dUxa B NOMEseHnX peKOMeHdyETcOcySectBnTb 6OJee ChTbE NpoBeTpNBaHnN 6OJee qactoPpOBODNTb YnCTKy pri6opa.KOpNyc pri6opa He06xoDnMo OUnsTaBBnaXHo TprANKoN.
-BHmAHne : Hn B KOem cnyae He nCNoJIb3OBAtB dIa OYnCT abpa3HBhIE n aIrpeCCNBHbIe MaTePnaIbI, KOTOpblc MOyT NOBpeDITb NOBepxHOCTb np6opa
-KaXdbie PnTb JeT BHyTpEHHne KOMNoHEnTbI npnbopa DOJXHBi 6bITb npOBepHbI n IpOteCTnPoBaHbI KBaINΦnCnPoBaHHbIM CNEUAnlntom.
3.Испοльбоване
2.1 MexaHueckn np6op (PncyHok 9, Cbeptb c Ta5nuei)
2.1.1 Kac yctaHOBntb peXIM KomΦopt?
2.2.3 KaYcTaHOBnTb AHTNo6neDeHeHHe?
-3TO no3mua nepekniouateIa, KOtopa noDnepKnaeT TemnepaTypo OKoI O C B KOMHaTe BO BpMa DnntBHOOTCYTCTBMA DomA (OblyHoo 60one 24acob).YcTaHOBnTE nepeknUaTeNb H on
2.2.4 KaK 3anporpaMMnpoBaT np6op B pexmMax KomΦoPT, ECO nHn ANTHno6neHeHHe?
- YcTPOCTBA, o60pOBOAHHbIe 3JIeKTPoHHbIM TepMOCTaOM, MOrY T bIb 3AnporpAMMPOBaHbI. CyUeCTBYET DBe BO3MOXHOCTn IaI 3TO:
- Upe3 npraJIauOIOI npoBOD (HepHbI npoBOD) Iyra yctpoCTB 6e3 BNIKI 6nAgoapr cNCTeM E Chronopass INHactEHOMy nporpaMAtOpry,
- Yep3 Hecuu TOK C INTEp4c3iCOM Ha KaJdOM PnIbOpe B DOnOpHHeNc K CnCTeMe Chronopass IIN HAcTeHHOM nporpaMmATopy.
2.2.5 KaK 3a6nokpoBaTb KOMaHdbI (PncyHOK 12)?
IJI INI PNDOTBAPUHEH NIMEMEHN HACTPOE Bb MOKETe 3a6nKIOPOBb IIN ORPANHITb NCNOB3OBAHME PERYJTOPA I 3a6nKIOPOBb BYIKHOATENB H.CHNMITE NPHOBCKPOHHTHe. Ha 3aHHe Nactn TepMOCTa YdAnHb WNTDb JOTHX NODEPKHM: - PONsII K DonyckaeT E6nKIOPOBY PERYJTOPA YpnaBHeH.
- L nonoxhenme N03oBnENT orpahnHmC nncbObaHne pyerntopA npypanBnHn. - PooaM N03oBnENT 6bnKOpBNy BkblKnOuTeLa H ha NyhKbIe pexMM.
4. Pekomehdaunno 3kcnnyataunn
- Becneon3No 3yctahabnBbTt hactpOIOI pnpOHa MaKcHmym, TMeNTHpTa y KomHate He CTaHET NOINHMATbCt OT 3r0f 6bIcTeP. Ecnbl YXoJHMeHO HA KeckONKO YacOB, He 3a6yDte NoHN3HbT MEmHPaTyD.
- EcnB N OmeHn HecKbKO OTOnIeMbHbN pN60OB, NcTb OH pa6OtaOT odHOpeMeHHo - 3to o6ceuHT 60JI paBHmOBpCnOHOBBHOHON TOnIMBaueH paxoDB Ha 3neKtpueCTBO. Pn yxoJe, Bmcto nIHorO OKIOHNEH pN60ba, IyUHe octaBte erO BKIOHHeHM ha 60Jee cna6b oborPB.
5. B cnyuae npo6nem
- Pn6bOp He rpeT: 8eDnTeB, TTO np6bop nokKHeH K cTm. PnpoeBte TemnePATEpy BoaXy B Komhate. Ima Modenie B KOMNkEKAUIO, KOptbIX BXoDIT nporpAMMToP, 8eDnTeB TOM, TTO np6bop HaxOJTCB R peKIMe KOMOPT. Pnp6Op NoctOnHO rpeT: 8eDnTeB, TTO OH HE HxOJNTCBA HA CKB03HKe I TO YCTAHOBA TM NcHMeHEA. Pnp6Op He CNeYET 3AnpOPAMMOBAHBM KOMAHAM: 8eDnTeB TOM, TTO np6pAmMPOBaHHE BIO NOCPKEHIO pmeHEO (CM, HNCTpyKUHIO HA 3TO, INI YTO Chronocarte PranBPbBO HCTABNEH B H3EIO, INO OTHa FyHKUNOHpyET HOPAmbIO (NopeBpTE 6bapeIK). Ha paoty 3eKtpoHHOrO np6bopa, Coepkaueero MHKponpoJeCCOPMOTNOBINrT NOMEXN B 3eKTPuVECKO CEIN (3a npedamn EC CTahdptbI ONepeHbY IOBpHM HApUEHMy 3aHTbI). B Cnyae BO3HNKOBHeKAA KANs IIO np6bn (TePMoCTAT n.t.) OKKnOHTe Pnp6Op OT hOToCHNA KITAHN (PedeoxpAHENTN, BblNKOTAEHn T.I.D., INPE3aENCTe Iero cepE5 MHTN. B Cnyae qactoRO B03HNKOBHeH Np6bem, np6peBte IcTOHNI NITAHN IIN ObpaTIeK B BAeMHy NOCTABUKNK 3eKTPo3HePII. Pnp6Op OehbROPAA Rypar: 8eDnTeB B TOM, TO MOUHOCT COBTETCYET NIOUAIIO NObEPXHOCT (peKoHdyTc 100W Ha m2) IN TO np6bpHe H XAOJNTCA HA CKB03HKe, KOptbI MoR 6bl NobJIrHa HAcTPOKnI.