
Silency - Vacuum Cleaner TERMOZETA - Free user manual and instructions
Find the device manual for free Silency TERMOZETA in PDF.

| Product type | Canister vacuum cleaner |
| Brand | Termozeta |
| Model | Silency |
| Power supply | Mains 220-240 V, 50/60 Hz |
| Power | 2000 W (estimated) |
| Filtration system | Washable motor filter + activated carbon exhaust filter |
| Dust bag capacity | 3 L (estimated) |
| Suction tube | Telescopic with length adjustment |
| Main brush | Dual-purpose floor/carpet brush with foot lever |
| Included accessories | Parquet brush, crevice tool, removable bristle nozzle |
| Cable length | 5 m (estimated) |
| Cable rewinder | Automatic with button |
| Power adjustment | Electronic by slider |
| Full bag indicator | Yes, color change |
| Ionizing system | Operation LED |
| Motor protection | Anti-overheating safety thermostat |
| Weight | 5 kg (estimated) |
| Dimensions (L x W x H) | 40 x 30 x 30 cm (estimated) |
| Filter maintenance | Wash motor filter with cold water, regular replacement |
| Spare parts | Bags and filters available at Termozeta authorized centers |
Frequently Asked Questions - Silency TERMOZETA
User questions about Silency TERMOZETA
0 question about this device. Answer the ones you know or ask your own.
Ask a new question about this device
Download the instructions for your Vacuum Cleaner in PDF format for free! Find your manual Silency - TERMOZETA and take your electronic device back in hand. On this page are published all the documents necessary for the use of your device. Silency by TERMOZETA.
USER MANUAL Silency TERMOZETA
1.Appliance body
2ON switch
3.Cable rewind button
4.Power slider
5.Dustbag full indicator
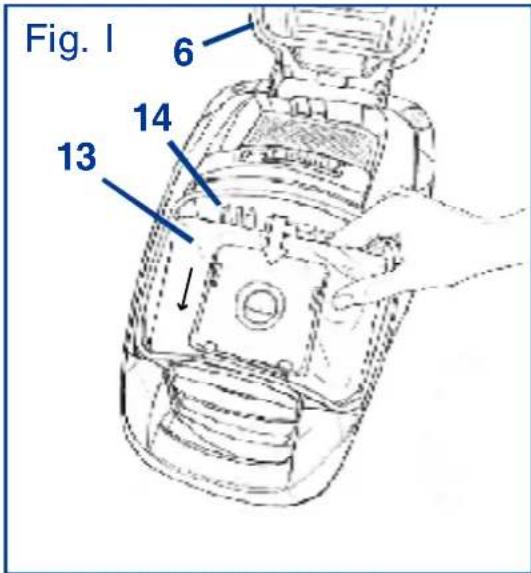
6. Dustbag-filter compartment cover
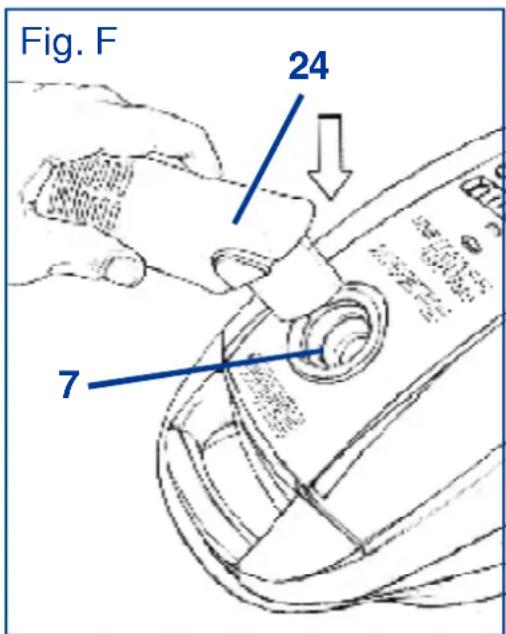
7. Flexible tube connection socket
&Cover release button
9.Carrying handle
10. Ionizing system operation LED
- Air grating
- Feeding cable
- Dustbag-filter
- Dustbag-filter seat
- Motor filter
- Filter for the air coming out of the appliance
- Telescopic extension tube
-
Extension tube adjusting button
-
Brush with two positions
for hard floors/mats-carpets - Pedal button to extend or retract the bristles
- Brush for parquet floor
- Crevice nozzle
- Nozzle with removable bristles
- Connection nozzle
- Flexible tube
- Flexible tube handle
F
DESCRIPTION
The present manual is an integral part of the appliance and must be carefully read before using it as it gives important indications with regard to safety of installation, use and maintenance. Keep it with care.
- After taking off the packing make sure that the appliance is intact. In case of doubt do not use it and contact an assistance centre authorised by TERMOZETA.
- Do not leave pieces of packing (plastic bags, polystyrene foam, nails etc.) within reach of children or persons with reduced mental capacities since these are potential sources of danger.
- Before connecting the plug to the socket check that the working voltage of the appliance corresponds to the one in your house. If in doubt, contact professionally qualified staff.
- Use of adaptors, multiple sockets and extension leads is not advisable. In case of necessity use exclusively approved devices in conformity with the current safety regulations while making sure that they are compatible with the appliance power. If in doubt, contact professionally qualified staff.
- Any use which doesn't comply with what is specified can endanger your safety and the warranty expires.
- The appliance was exclusively intended for dust suction in a domestic environment.
-
For safety reasons pay attention and:
-
do not use the appliance when you are barefoot or having wet hands or feet
- do not use the appliance outside the domestic environment
- do not leave the appliance exposed to atmospheric agents (sun, rain, ect.)
- never pull the feeding cable or the appliance itself in order to disconnect the plug from the socket
- do not leave the appliance unattended when it is plugged into the main power supply
-
never immerge the appliance in water or other liquids
-
The feeding cable of the appliance should never be replaced by the user himself. In case of necessity contact an assistance centre
authorised by TERMOZETA or professionally qualified staff.
- In case of failure and/or malfunctioning of the appliance, turn it off and do not tamper with it. For any repairs contact an assistance centre authorised by TERMOZETA and ask for the use of original spare parts.
- The appliance is not intended for being used by people (including children) whose physical, sensorial or mental capacities are reduced, or who are lacking in experience or knowledge, unless they can benefit from the presence of someone who is responsible for their safety and who is provided with the instructions for use.
- At the end of the life-cycle of the appliance, put it out of service by cutting the feeding cable after disconnecting the plug from the socket. For the disposal of the appliance follow the regulations which are valid in your place of residence.
- TERMOZETA cannot be considered responsible for any damage to persons, animals or things caused by the incorrect installation or as a result of an illegitimate, mistaken or unreasonable use.
INSTRUCTIONS FOR USE
VACUUM CLEANER ASSEMBLY

After switching off the appliance and removing the plug from the outlet, proceed as follows.
- Connect the flexible tube (25) to the vacuum cleaner: push the connection nozzle (24) of the flexible tube into the appliance connection socket (7), until it clicks into position (fig. F).
- Connect one end of the extension tube (17) to the flexible tube handle. Position the most suitable tool for your needs on the other end of the
extension tube (fig.E). Extend the extension tube by pressing the button (18) until it clicks.
- Brush with two positions (19)
(hard floors/mats-carpets)
Can be used with the bristles extended for smooth hard surfaces (e.g. tiles), or with the bristles retracted for carpets and mats. Use the pedal button (20) of the brush in order to extract or retract the bristles.
- Brush for parquet floors (21)
Can be connected to the extension tube and allows vacuuming parquet floors.
- Nozzle with removable bristles (23)
Can be connected directly to the flexible tube or to the extension tube.
It allows vacuuming upholstery or curtains. It can be used with or without bristles: to extract the bristles, remove the unit from this nozzle.
- Crevice nozzle (22)
Can be connected directly to the handle of the flexible tube or to the extension tube. It allows cleaning in places which are difficult to reach (corners, interstices, radiators, etc.).
OPERATION
- Make sure the dustbag-filter (13) is correctly lodged in the proper seat. For further information, read the "Changing the dustbag-filter" section.
- Pull out the feeding cable to its fullest extend and insert the plug into the power outlet.
- Press the switch (2) in order to start the appliance.
- The vacuum cleaner is provided with an indicator (5) informing when the dustbag-filter is full. When the indicator (5) changes its
colour, replace the dustbag-filter according to the instructions of the "Replacement of the dustbag-filter" section.
ELECTRONIC POWER ADJUSTMENT
During the use, it is possible to change the suction power.
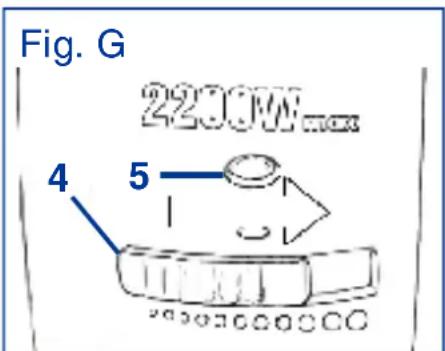
To increase the power move the slider (4) leftward as shown in figure G.
To decrease the power move the slider rightward.

WARNING!
- Do not vacuum explosive or inflammable materials (e.g. lit cigarettes).
- Do not use the appliance on damp or wet surfaces.
- Do not vacuum water or other liquids.
- Do not cover the air grating.
- Do not vacuum pointy objects.
- Do not trap the feeding cable in the doors and do not make it touch sharpening edges.
- Do not use the appliance without the dustbag-filter.
- The vacuum cleaner is equipped with a safety thermostat which stops the appliance if the motor overheats. If the thermostat is enabled, the vacuum cleaner stops; disconnect the appliance from the power outlet, make sure that the filters are not clogged and make it cool down.
- In case of insufficient suction or if there is no suction, replace the dustbag, clean the filters and clear the clogged tubes.
AFTERUSE
- Press the switch (2) to turn the appliance off and disconnect the plug from the power outlet.
- Press the automatic rewind button (3) in order to rewind the feeding cable: when carrying out this operation, follow the feeding cable while it is being rewound.
- The appliance was designed to be stored in a vertical position with the flexible tube, the extension tube and the brush attached. Once the appliance
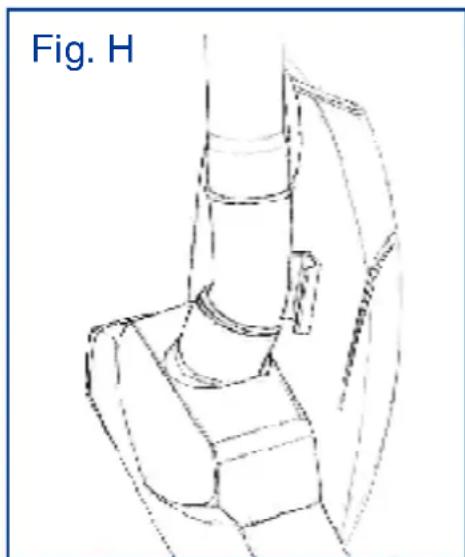
has been placed in a vertical position, it is possible to hook the brush to the rear part of the appliance by means of the proper hook, as shown in fig.H.
- The accessories can be disassembled by pressing the buttons on the connection and unhooking the flexible tube from the appliance.
REPLACEMENT OF THE DUSTBAG-FILTER

This operation must be carried out with the appliance off and with the plug disconnected from the power outlet.
When the indicator (5) changes its colour, it means that the dustbag-filter is full.
Regularly replace the filter in order to prevent the appliance suction power from losing its efficacy and the dustbag from breaking when it is too full.
- Press the release button (8) and lift the cover (6).
- Extract the dustbag-filter (13) from its seat (14) by taking the cardboard at its base.
- Insert the new dustbag-filter into the seat being careful that the arrow symbol on the cardboard enters first (fig.1).
- Close the cover (6) again.

WARNING!
Make sure that the cover IS PERFECTLY CLOSED. Otherwise repeat the operation until the cover is correctly assembled.
CLEANING AND MAINTENANCE

Always disconnect the plug from the power outlet before carrying out any cleaning operations.
- Only use a slightly damp and soft cloth in order to clean the appliance body (1) and the accessories. Never use acid or abrasive substances.
Never immerge the appliance in water or other liquids.
- Before using the appliance again, make sure that all of its parts are completely dry.
- Periodically clean and, if needed, replace the motor filter (15) and the filter of the air coming out of the appliance (16).
- To purchase the dustbags-filters and the filters exclusively contact an assistance centre authorised by TERMOZETA and ask for original spare parts only.
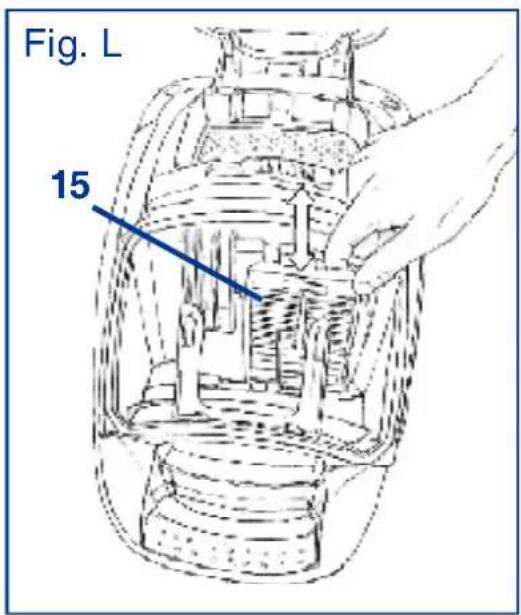
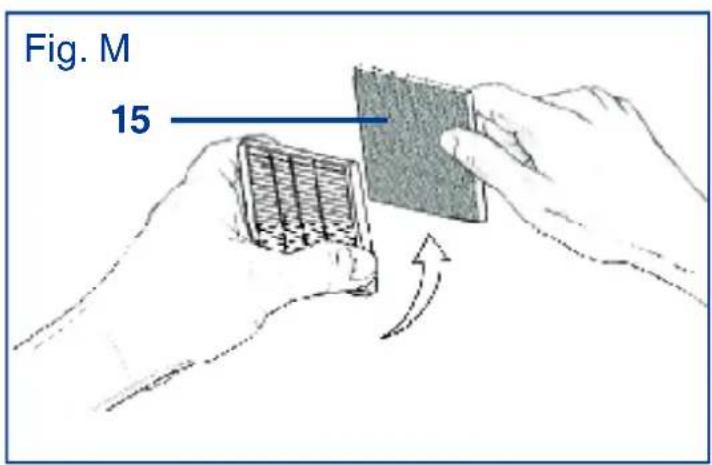
FILTER REMOVAL AND CLEANING
The motor filter (15) situated in the dustbag-filter compartment must be washed or replaced at regular intervals.
Proceed as follows:
- unhook the flexible tube;
open the cover (6); - move the dustbag and, if it is full, remove it from the basket;
- remove the filter clamp and the filter (15) from the seat as shown in figure L and in figure M;
- insert the new filter or wash the dirty filter with cold water and wait
for it to completely dry before replacing.
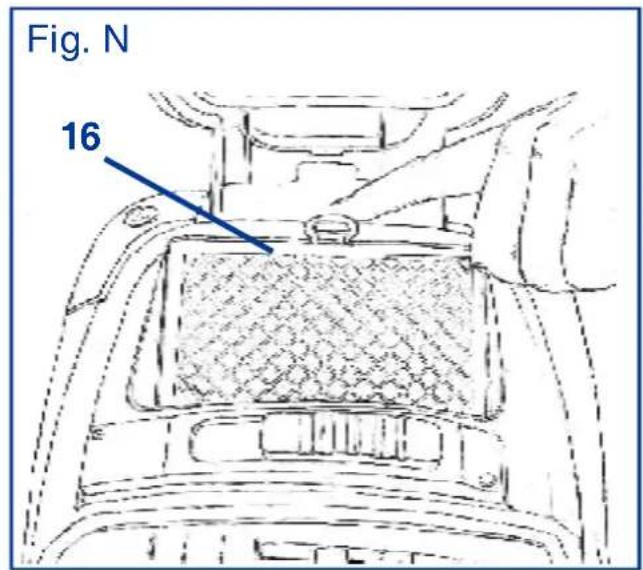
The air filter (16), situated in the rear part of the appliance, under the cover (6), must be changed at regular intervals, since it contains activated carbons.
Proceed as follows:
-
remove the filter (16), as shown in figure N, by unhooking the central lever and by pulling the filter towards yourself
-
replace the filter with a new one, insert it into the proper seat and push it until it clicks.
PRESCRIPIONS DE SECURITE

This operation does not require the use of a cable or d-alimentation.
In accordance with European Directives 2002/95/CE, 2002/96/CE and 2003/108/CE on the restriction of the use of dangerous substances in electric and electronic equipment as well as their waste disposal.
- The barred symbol of the rubbish bin shown on the equipment indicates that, at the end of its useful life, the product must be collected separately from other waste.
- Therefore, any products that have reached the end of their useful life must be given to waste disposal centres specialising in separate collection of waste electrical and electronic equipment, or given back to the retailer at the time of purchasing new similar equipment, on a one for one basis.
- The adequate separate collection for the subsequent start-up of the equipment sent to be recycled, treated and disposal of in an environmentally compatible way contributes to preventing possible negative effects on the environment and health and optimises the recycling and reuse of components making up the apparatus.
- Abusive disposal of the product by the user involves application of the administrative sanctions according to the laws in force.