
CB2526GLWH - Refrigerator SABA - Free user manual and instructions
Find the device manual for free CB2526GLWH SABA in PDF.
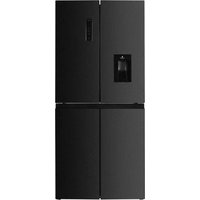
| Product type | Household refrigerator-freezer, freestanding |
| Brand | SABA |
| Model | CB2526GLWH |
| Energy class | A+ |
| Annual consumption | 241 kWh/year |
| Refrigerator volume | 188 L |
| Freezer volume | 64 L (4-star) |
| Refrigerator defrost | Automatic |
| Freezer defrost | Manual |
| Power failure autonomy | 19 hours |
| Freezing capacity | 3.0 kg/24h |
| Climate class | ST (from +16°C to +38°C) |
| Noise level | 42 dB(A) |
| Power supply | 220-240 V ~50 Hz, 89 W |
| Lighting | Bulb 240V/10W, Type E14 |
| Refrigerant | R600a (isobutane), 69 g |
| Dimensions (W x D x H) | 547 x 545 x 1806 mm |
| Net weight | 57 kg |
| Temperature setting | Rotary thermostat from 0 (off) to 7 |
| Cold zone indicator | Present (displays "OK" if temperature correct) |
| Door reversal | Possible (kit included) |
| Accessories included | Ice cube tray, egg tray, ice scraper, spare left upper hinge |
| Maintenance and cleaning | Cleaning with hot water and baking soda; manual defrosting of freezer |
| Safety instructions | Do not damage the refrigeration circuit; do not use electrical appliances inside; keep ventilation openings clear; do not use mechanical devices for defrosting |
Frequently Asked Questions - CB2526GLWH SABA
User questions about CB2526GLWH SABA
0 question about this device. Answer the ones you know or ask your own.
Ask a new question about this device
Download the instructions for your Refrigerator in PDF format for free! Find your manual CB2526GLWH - SABA and take your electronic device back in hand. On this page are published all the documents necessary for the use of your device. CB2526GLWH by SABA.
USER MANUAL CB2526GLWH SABA
ACHAT DE PRODUITS SURGELES
Thank you for choosing SABA quality. This product has been developed by our team of professional and according to European regulations. In order to get the most out of your new appliance, we recommend that you read this instruction manual carefully and keep it for future reference.
TABLE OF CONTENTS
Safety instructions 28
Technical information. 32
Description of the device 33
Installation 34
Use 34
Reverse door. 40
Maintenance. 43
Cleaning 47
Troubleshooting 47
Accessories 48
Disposal. 48
Disposal of old electrical appliances 49
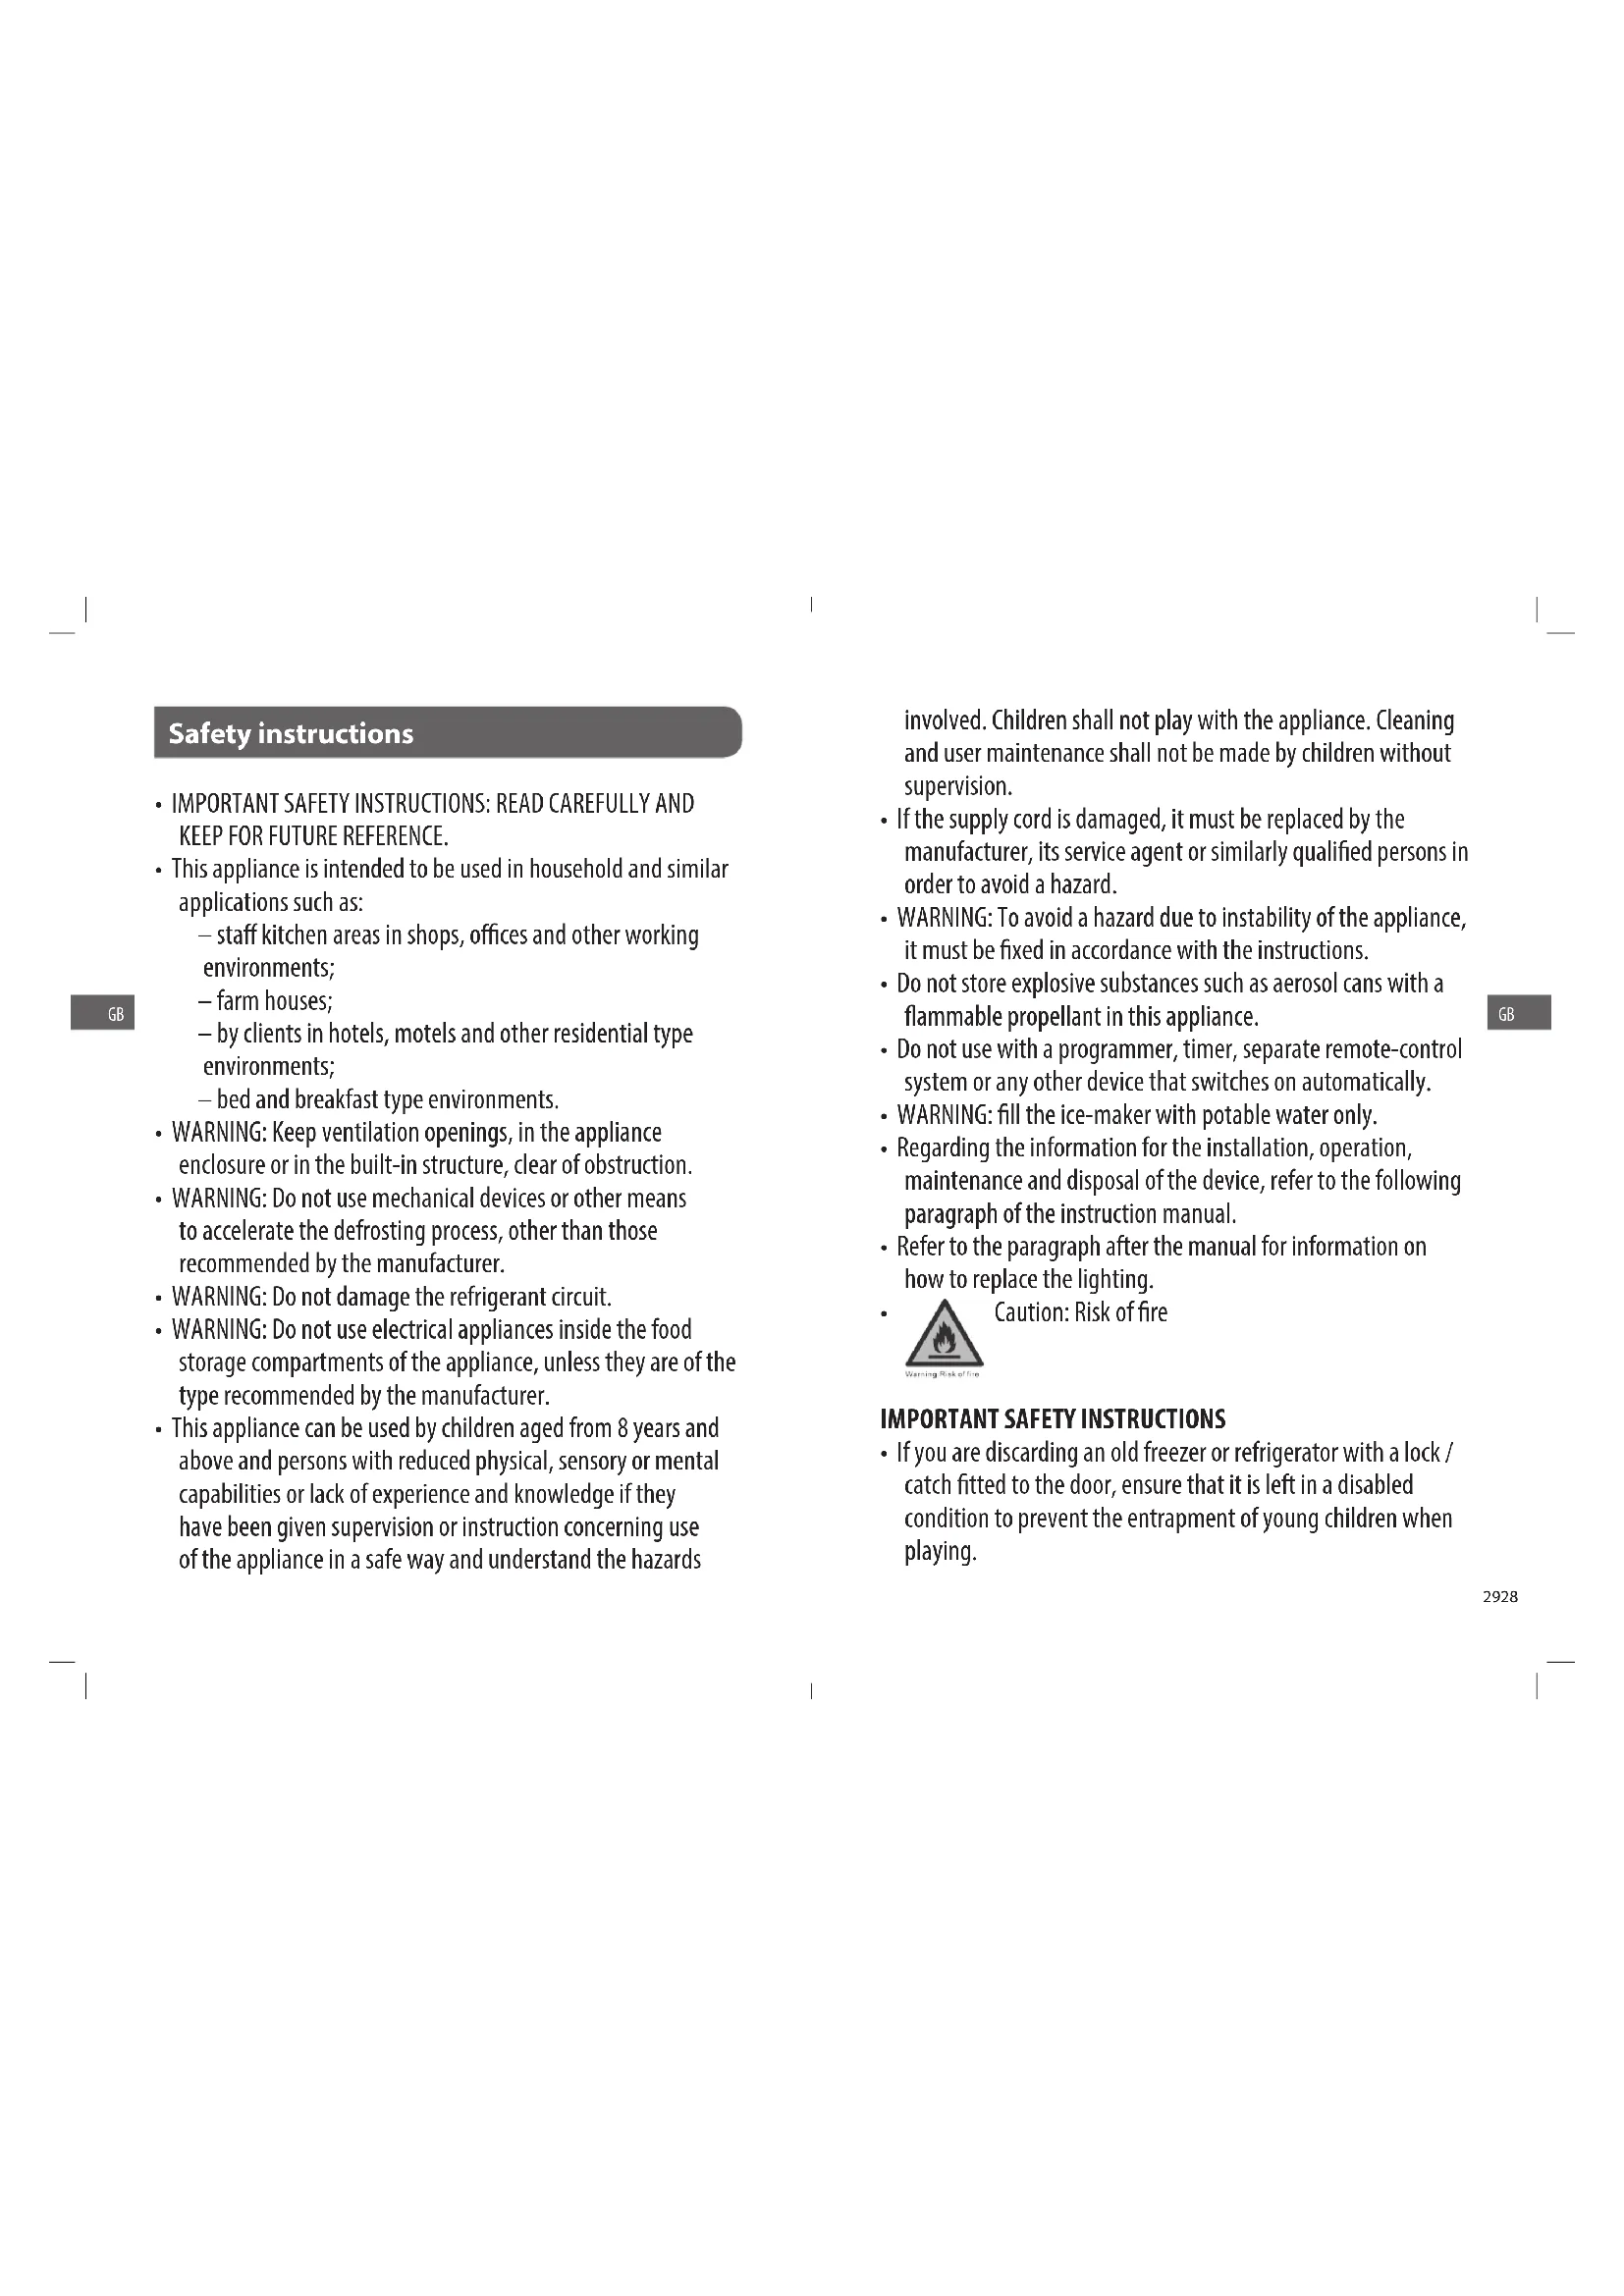
Safety instructions
- IMPORTANT SAFETY INSTRUCTIONS: READ CAREFULLY AND KEEP FOR FUTURE REFERENCE.
-
This appliance is intended to be used in household and similar applications such as:
-
staff kitchen areas in shops, offices and other working environments;
-farm houses; -
by clients in hotels, motels and other residential type environments;
bed and breakfast type environments. -
WARNING: Keep ventilation openings, in the appliance enclosure or in the built-in structure, clear of obstruction.
- WARNING: Do not use mechanical devices or other means to accelerate the defrosting process, other than those recommended by the manufacturer.
- WARNING: Do not damage the refrigerant circuit.
- WARNING: Do not use electrical appliances inside the food storage compartments of the appliance, unless they are of the type recommended by the manufacturer.
- This appliance can be used by children aged from 8 years and above and persons with reduced physical, sensory or mental capabilities or lack of experience and knowledge if they have been given supervision or instruction concerning use of the appliance in a safe way and understand the hazards
involved. Children shall not play with the appliance. Cleaning and user maintenance shall not be made by children without supervision.
- If the supply cord is damaged, it must be replaced by the manufacturer, its service agent or similarly qualified persons in order to avoid a hazard.
- WARNING: To avoid a hazard due to instability of the appliance, it must be fixed in accordance with the instructions.
- Do not store explosive substances such as aerosol cans with a flammable propellant in this appliance.
- Do not use with a programmer, timer, separate remote-control system or any other device that switches on automatically.
- WARNING: fill the ice-maker with potable water only.
- Regarding the information for the installation, operation, maintenance and disposal of the device, refer to the following paragraph of the instruction manual.
Refer to the paragraph after the manual for information on how to replace the lighting.

IMPORTANT SAFETY INSTRUCTIONS
-
If you are discarding an old freezer or refrigerator with a lock / catch fitted to the door, ensure that it is left in a disabled condition to prevent the entrapment of young children when playing.
-
Unplug the appliance from the mains socket when not in operation and before cleaning. Remove food before cleaning the appliance.
- Do not insert oversized food as this could cause incorrect operation.
- Extreme caution must be used when moving an appliance.
- To turn the appliance off, turn the thermostat knob fully anticlockwise to OFF, then remove the plug from the mains socket.
- Do not give children ice-cream and water ices direct from the freezer as the low temperature may cause 'freeze burns' on the lips.
- The appliance must be installed on the floor, on a flat and horizontal surface, ensuring that the air vents are not obstructed. Never attempt to replace or repair part of the appliance yourself. If necessary, seek help from trained, qualified staff.
- Always handle the device with care to prevent injury.
- Prevent undesirable impacts on the environment and human health caused by the uncontrolled disposal of electrical waste. Recycle the appliance responsibly to promote the re-use of material resources.
- The appliance must be disposed of safely at a public waste collection point designed for this purpose.
- As old refrigeration equipment may contain CFC's which will damage the ozone layer, when disposing of any refrigeration equipment please contact your local waste disposal
department for advice on the correct method of disposal.
CLEANING
- Unplug the appliance.
- Remove all substances.
- Clean the inside and outside walls with a clean sponge or soft cloth using warm water or 1 teaspoon of bicarbonate of soda to 1.2 liters of water.
-
Rinse well and wipe dry with a clean soft cloth.
-
If the appliance is not to be used for a long period of time then it is recommended to remove all the food stuff, clean the inside of the appliance and leave the door open to allow the air to circulate thus avoiding unpleasant odors.
Technical information
| Brand SABA CB2526GLWH CB2526GLBK | |
| Category of household refrigerating appliance | catalogue 7 |
| Energy class A+ | |
| Annual energy consumption | 241 kWh/an |
| Storage volume Refrigerator: 188L Freezer: 64L※※※ | |
| Defrost Refrigerator: automatic Freezer: manual | |
| Autonomy 19 h | |
| Freezing capacity 3.0 kg / 24 h | |
| Climate class + Ambient range | ST (+16°C to +38°C) |
| Noise 42 dB (A) re 1 pW | |
| Rated voltage and frequency / Input power | 220V-240V / 50Hz~89W |
| Lamp 240V / 50Hz - 10W max Type E14 | |
| Refrigerant/Amount R600a / 69g | |
| Product dimension (W x D x H) | 547 x 545 x 1806 (mm) |
| Net weight 57 kg | |
| Type of installation Free Standing | |
(1) Calculation on the basis of results for 24 hours under standard test conditions. The actual energy consumption will depend on use and the location of the device.
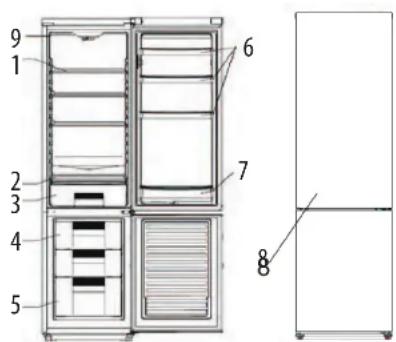
Description of the device
- Refrigerator shelf
- Vegetable box cover
- Vegetable box
- Upper Freezer drawer
- Bottom Freezer drawer
- Upper refrigerator door shelf
- Bottom refrigerator door shelf
- Handle
- Thermostat & light
NOTE: The appliance design is subject to change without prior notice.
Installation
- Position the appliance and allow it to stand for two to three hours before it is turned on for the first time to allow the system to settle. Do not position next to any heat source e.g. cooker, boiler or in direct sunlight etc.
- Allow at least 10cm of space at the top and 10cm of space on both sides of the appliance and between the back of the appliance and the wall for adequate air circulation. The appliance is not designed for recessed installation ("building in").
- Install on a good firm level surface, and any unevenness of the floor should be corrected prior to installation, slight unevenness can be overcome by adjusting the front feet.
- NOTE: If the appliance is positioned on a carpet, soft floor covering you should readjust the front feet once the appliance has had time to settle.
Use
- This appliance is designed to operate in ambient temperature between 16^ and 38^ . If these temperatures are exceeded, i.e. colder or warmer, the appliance will not operate correctly. If the ambient temperatures are exceeded for long periods, the temperature in the freezer section will rise above -18^ and food spoilage may occur.
- Remove all packaging materials from the appliance. Wash the
inside of the cabinet with lukewarm water and bicarbonate of soda (5ml to 0.5 liter of water). Dry the appliance thoroughly.
- When you use the freezer for the first time or after defrosting, set the thermostat control to the maximum position for at least 2 hours before introducing food to be stored, and then readjust to the normal position.
- If there is a power failure, do not open the door. Frozen food should not be affected if the failure lasts for less than 19 hours. If the failure is longer, then the food should be checked and either eaten immediately or cooked and then re-frozen.
SETTING THE THERMOSTAT KNOB
- The refrigerator is controlled with a thermostat knob located inside the fridge, towards the upper right-hand corner. Turn the knob from the STOP (0) position towards the higher numbers for colder temperatures. The knob can be adjusted from setting 1 to 7.
- Higher settings on the knob (MAX) mean lower temperatures (colder) in all compartments of the appliance.
Changes of the ambient temperature affect temperature in the interior of the appliance so choose a correct setting of the temperature control knob, depending on your ambient conditions. - In the STOP (0) position the appliance does not operate (the cooling system is switched off), but power supply is not interrupted.
- Set the thermostat knob to a middle position to achieve -18^
in the freezer compartment.
- Please Note: If the appliance is switched off you must wait at least 5 minutes before restarting the appliance or re-inserting the plug into the wall outlet. This is to allow the protection device in the compressor to reset.
- If the compressor fails to start correctly remove the plug and wait for 5 minutes before you try again then the compressor should restart normally.
The storage temperature may be affected by:
- The room temperature
- How often the door is opened
- How much food is stored
Position of the appliance
When you set the correct temperature, all these factors mentioned above shall be taken into account.
TEMPERATURE INDICATE
In order to help you get the correct adjustment of your device, it is equipped with a temperature gauge placed in the coldest area.
For the proper storage of food in your refrigerator and in particular in the coldest area, make sure that "OK" appears in the temperature indicator.

The symbol on the left side indicates the location of the coldest area of your refrigerator. It defines the height of this area.

If "OK" is not displayed, the average temperature in this area will be very high. You ought to adjust the thermostat to a colder setting.
For every modification of your thermostat, you are supposed to wait for the stabilization of the temperature inside the unit before proceeding, if necessary, to a new setting. Do change the position of the thermostat gradually and wait at least 12 hours before re-checking.
NOTE: after charging the device for fresh food or after repeated or prolonged door openings, it is normal that the inscription "OK" does not appear in the temperature indicator.
Wait at least 12 hours before readjusting the thermostat.
SHOPPING FOR FROZEN FOOD
The appliance is rated as a 4 star freezer and can freeze fresh food and store pre-frozen food. When you are buying frozen food, look at the Storage Guidelines on the packaging. You will be able to store each item of frozen food for the period shown against the 4 star rating.
FREEZING FRESH FOOD
- Ensure that your freezing operations are carried out under the most hygienic conditions as freezing alone does not improve the food.
- Never put hot or even warm foodstuffs into the freezer.
- Prior to freezing the food, food should always be covered tightly with foil, plastic film, placed in plastic bags or stored in airtight containers. This will prevent food from dehydrating and to prevent any strong odors of some foods transferring to milder ones.
- To freeze raw meat, wrap in plastic bags or in airtight
containers and place on the lowest shelf to avoid cross contamination.
- Do not allow raw meat to come into contact with cooked foods. For safety, only store raw meat for two or three days. Fruit and vegetables should be thoroughly cleaned and placed in the crispers.
- Milk and other liquids should be sealed with lids and placed in the bottle shelf in the door.
- NOTE: The ambient temperature of the freshly stored food and how often the door is opened affect the temperature in the refrigerator. If required, change the thermostat temperature settings.
STORING FROZEN FOOD
- All frozen food you purchase should be placed in the freezer as soon as possible to avoid them from defrosting and spoiling.
- All storage recommendations printed on the packaging of frozen food by the manufacturer should always be followed.
- When using the freezer for the first time or after defrosting, set the thermostat knob to the maximum position for at least 2 hours before introducing food to be stored, and then readjust it to the normal position.
- The technical data mentioned in the 'Specifications' are obtained in the case that the freezing drawers are removed.
MAKING ICE CUBES
- Fill the ice tray with 34 full of clean water.
-
Place the tray in the top freezing drawer.
-
Close the door.
To remove the ice cubes from the tray, put the tray under running water for a while and then twist the tray slightly to loosen the ice cubes.
ENERGY-SAVING TIPS
- Install the fridge or freezer in a cool place out of direct sunlight and away from cookers, heaters, dishwashers or any hot air emitting items.
- Do not set the fridge and freezer temperatures lower than necessary. Set the internal temperature within the correct range e.g. adjust the thermostat at middle position for 4^ in the fridge compartment and -18^ in the freezer respectively.
- Let pre-cooked foods cool down before placing them in the fridge or freezer. This will prevent the internal temperature of the fridge from rising.
- Keep your fridge full, but not over crowded, this helps reduce "cold" air loss.
- Meanwhile, avoid overloading the fridge or freezer. Try to leave about 20% free space for air circulation.
- To prevent cold air escaping, limit the frequency of opening door. When retuning from shopping, sort foods to be kept in your fridge before opening the door. Only open the door to put food in or take it out.
- Make sure the door seal is clean and in good condition. It should hold a piece of paper tightly in place when shut.
- Defrost regularly or when ice is more than 5mm thick. Thick ice
covering the inner sides significantly increases energy use.
- The combination of the drawers, baskets and shelves shown in the device description is optimal for efficient energy savings. Changing the combination proposition could alter the efficiency.
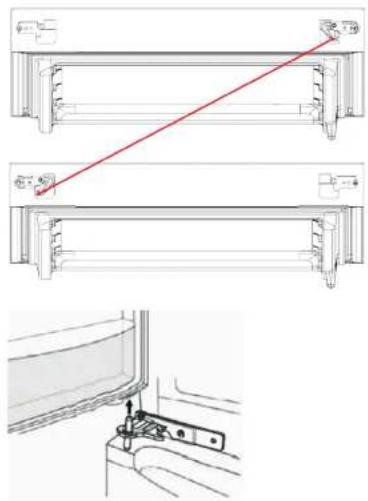
Reverse door
Follow the following stages to reverse the door from its initial position.
DEPOSIT DOORS
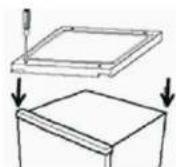
- Take away all hole covers and remove all the top-cover's screws. Lift the top-cover away from the Fridge.

- Remove the left slip-cover then Insert the right slip-cover.
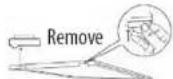
- Uncover the right hinge cover then unscrew the screws, remove the upper hinge. Deposit the door of the refrigerating compartment.
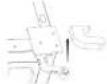
- Remove the right middle hinge; Deposit the door of the freezing compartment.
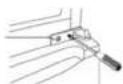
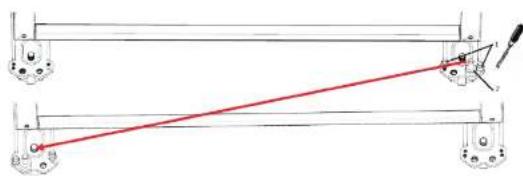
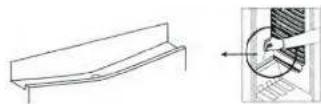
- Unscrew the limited block(1) and hinge axis(2) from bottom hinge and refit it to the mirror position.
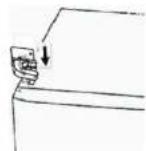
ASSEMBLY OF THE DOORS
- Remove door stopper from the freezer door and put it to the opposite side. Align the hole of the door to the gun of the hinge while taking care of the alignment of the door compared to the refrigerator.
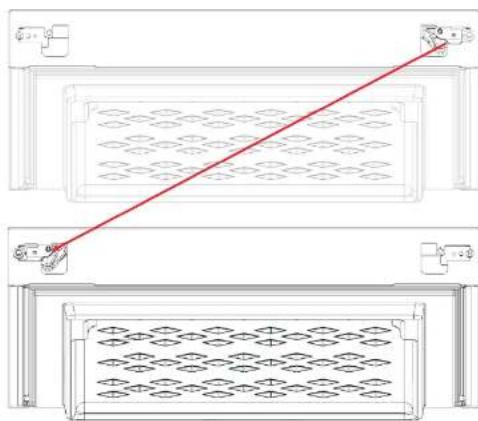
- Position the middle hinge on the left of the refrigerator and insert the gun of hinge in the hole of hinge in the hole of the door then fix it firmly.
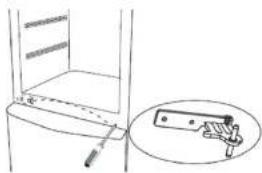
- Remove the door stop of the fridge door and put it to the opposite side. Align the lower hole of the door to the gun of the left middle hinge while taking care of the alignment of the door compared to the refrigerator.
- Insert the gun of the upper hinge in the upper hole of the door then fix it firmly.
- Screw the top cover back to the top of fridge then install all hole covers.
Maintenance
FRIDGE DEFROSTING
- The fridge defrosting process is carried out automatically every time the compressor stops.
- The defrost water is automatically routed to the drain port and into a tray placed on the top of the compressor to the rear of the appliance from which it evaporates.
- Make sure the drain port on the fridge at the rear of the appliance is kept clear.
FREEZER DEFROSTING
- Frost will accumulate inside the freezer depending upon the length of time during which the door is left open or the amount of moisture introduced.
- It is essential to ensure that no frost or ice is allowed to form at places where it will affect the close fitting of the door seal.
- This might allow air to penetrate the cabinet, thus encouraging continuous running of the compressor.
- Thin frost formation is quite soft and can be removed with a brush or plastic scraper. Do not use metal or sharp scrapers, mechanical devices or other means to accelerate the defrosting process. Remove all dislodged frost from the cabinet floor.
- For the removal of thin frost it is not necessary to switch off the appliance.
- For the removal of heavy ice deposits disconnect the appliance from the mains supply and empty the contents into cardboard boxes and wrap in thick blankets or layers of paper to keep them cold. Defrosting will be most effective if carried out when the freezer is empty, and it should be carried out as quickly as possible.
- An increase in temperature of frozen food packages during defrosting will shorten the storage life. Provided that the contents are well wrapped and placed in a cool area, they should keep for several hours.
- Examine the contents when replacing them in the freezer and if some of the packages have thawed out.
- After defrosting is finished clean the inside with a solution
of warm water with a little bicarbonate of soda and then dry thoroughly. Wash all removable parts in the same way and reassemble.
- Reconnect the appliance to the mains supply and leave for 2 to 3 hours on setting number 7 before introducing the food back into the freezer and setting the thermostat to your normal setting.
NOISE FROM YOUR APPLIANCE
- You may notice some rather unusual noises. The noises are caused by circulation of refrigerant in the cooling system. It has become more pronounced since the introduction of CFC free gases. This is not a fault and will not affect the performance of your fridge.
PROLONGED OFF PERIODS
If the appliance is not in use for a long period of time, proceed as follows:
- Disconnect from the mains supply.
- Clean and dry the inside (see 'Cleaning and maintenance').
- Leave the door open to prevent any unpleasant smells from building up while the appliance is not in use.
NOTES FOR USE
- Do clean and defrost your appliance regularly.
- Do check contents of the compartments every so often.
- Do store commercially prepared food in accordance with the instructions given on the packets.
- Do choose high quality fresh food and be sure it is thoroughly
clean before freezing it.
- Do wrap all food in food quality polythene bags or air tight containers and make sure any air is excluded.
- Do Not store poisonous or any dangerous substances in your freezer. It is designed for the freezing of edible foodstuffs only.
- Do Not consume food which has been frozen for an excessive length of time.
- Do Not leave the door open for long periods, as this will make the appliance more costly to run and cause excessive ice formation.
- Do Not use sharp objects such as knives to remove the ice from the appliance. Only use a plastic scraper.
- Do Not put hot food into the appliance. Let it cool down to room temperature.
- Do Not put liquid-filled bottles or sealed cans containing carbonated liquids into the freezer as they may burst.
- Do Not give children ice-cream and water ices direct from the freezer as the low temperature may cause 'freeze burns' on the lips.
- Do Not try to keep frozen food which has thawed; it should be eaten within 24 hours or cooked and re-frozen.
CHANGING THE LIGHT BULB
- Set the thermostat knob to the off position (0) then unplug the appliance.
- Remove the food.
-
Push upward to remove the light shield.
-
Unscrew the bulb and screw a new bulb of the same shape same power (240V-10W E14 base).
- Attach the light shield.
Cleaning
- Unplug the appliance.
- Remove all substances.
- Clean the inside and outside walls with a clean sponge or soft cloth using warm water or 1 teaspoon of bicarbonate of soda to 1.2 liters of water.
- Rinse well and wipe dry with a clean soft cloth.
If the appliance is not to be used for a long period of time then it is recommended to remove all the food stuff, clean the inside of the appliance and leave the door open to allow the air to circulate thus avoiding unpleasant odors.
Troubleshooting
Before calling for service please check the following.
THE APPLIANCE IS NOT WORKING.
Check the plug is inserted correctly into the mains socket.
Check there is power to the mains socket by plugging another appliance in, if the other appliance do not work either, check the fuse in the plug.
THE APPLIANCE IS NOISY WHEN OPERATING.
Check the appliance is level and it is not in contact with another
appliance or kitchen furniture.
THE APPLIANCE DOES NOT COOL SUFFICIENTLY.
If the door has been opened too often or it has been left open for a while it will take time for the appliance to reach its set temperature.
Check the airflow over the rear of the appliance has not been reduced due to insufficient clearance.
Check if a large quantity of fresh food has been introduced.
Accessories
Energy label
FR/ENG manual
Ice box
Egg tray
Ice scraper
Left upper hinge
Left upper hinge cover
Disposal
The refrigerating gas contained in the circuit of this appliance is isobutane (R600a); it causes a low level of pollution but is inflammable. Please contact your local disposal department for advice on the correct method of disposal.
Disposal of old electrical appliances

The European directive 2012/19/EU on Waste Electrical and
Electronic Equipment (WEEE), requires that old household electrical appliances must not be disposed of in the normal
unsorted municipal waste stream. Old appliances must be collected separately in order to optimize the recovery and recycling of the materials they contain, and reduce the impact on human health and the environment.
The crossed out "wheeled bin" symbol on the product reminds you of your obligation, that when you dispose of the appliance, it must be separately collected.
Consumers should contact their local authority or retailer for information concerning the correct disposal of their old appliance.

- ACHAT DE PRODUITS SURGELES
- TABLE OF CONTENTS
- Safety instructions
- IMPORTANT SAFETY INSTRUCTIONS
- department for advice on the correct method of disposal.
- CLEANING
- Installation
- Use
- SETTING THE THERMOSTAT KNOB
- TEMPERATURE INDICATE
- SHOPPING FOR FROZEN FOOD
- FREEZING FRESH FOOD
- STORING FROZEN FOOD
- MAKING ICE CUBES
- ENERGY-SAVING TIPS
- Reverse door
- DEPOSIT DOORS
- ASSEMBLY OF THE DOORS
- Maintenance
- FRIDGE DEFROSTING
- FREEZER DEFROSTING
- NOISE FROM YOUR APPLIANCE
- PROLONGED OFF PERIODS
- NOTES FOR USE
- CHANGING THE LIGHT BULB
- Troubleshooting
- THE APPLIANCE IS NOT WORKING.
- THE APPLIANCE IS NOISY WHEN OPERATING.
- THE APPLIANCE DOES NOT COOL SUFFICIENTLY.
- Accessories
- Disposal
- Disposal of old electrical appliances
Brand : SABA
Model : CB2526GLWH
Category : Refrigerator