
MP3525ILD - Fridge SABA - Free user manual and instructions
Find the device manual for free MP3525ILD SABA in PDF.

| Brand | SABA |
| Model | MP3525ILD |
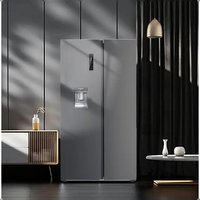
| Product type | Refrigerator |
| Capacity (estimated) | Approximately 250 liters |
| Power supply | 220-240 V ~ 50 Hz, 1.3 A |
| Refrigerant | R600a (isobutane) – 73 g |
| Climate class | SN, N, ST (10 °C to 38 °C) |
| Main functions | No Frost, LED lighting, electronic regulation, Super and Vacation modes |
| Temperature setting | 2 °C to 8 °C (fresh compartment); Super mode at 2 °C, Vacation mode at 17 °C |
| Included accessories | Egg tray, easy-open handle, wine rack, refrigerated box, vegetable bins, door balconies |
| Maintenance and cleaning | Clean with warm water and mild soap; do not use abrasive products or solvents; automatic defrost (No Frost) |
| Safety | Keep ventilation openings clear; do not damage the refrigerant circuit; do not store explosive substances |
| Spare parts | Available for 10 years after purchase |
| Warranty | Legal conformity warranty of 2 years |
| General information | Manufactured under license CONFORAMA France; brand SABA since 1923 |
Frequently Asked Questions - MP3525ILD SABA
User questions about MP3525ILD SABA
0 question about this device. Answer the ones you know or ask your own.
Ask a new question about this device
Download the instructions for your Fridge in PDF format for free! Find your manual MP3525ILD - SABA and take your electronic device back in hand. On this page are published all the documents necessary for the use of your device. MP3525ILD by SABA.
USER MANUAL MP3525ILD SABA
natural_image
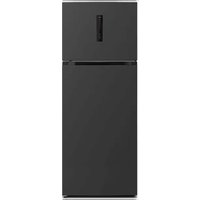
Front view of a modern stainless steel refrigerator with a single digital display (no visible text or symbols)FR
GB
natural_image
Warning sign depicting a flame inside a triangle (no text or symbols)natural_image
Pure technical line drawing of a mechanical assembly without any text, numbers, or symbols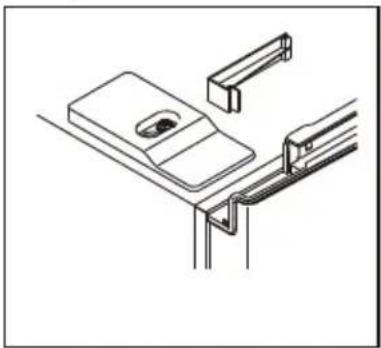
natural_image
Technical line drawing of a mechanical assembly or mounting bracket (no text or symbols)natural_image
Technical line drawing of a mechanical clamp or bracket assembly (no text or symbols)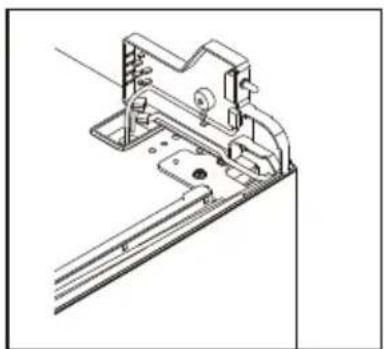
natural_image
Technical line drawing of a mechanical bracket assembly (no text or symbols)natural_image
Technical line drawing of a mechanical assembly with mounting holes and a bracket (no text or symbols)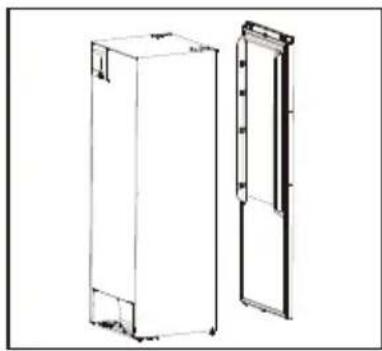
natural_image
Technical line drawing of two rectangular electronic devices with internal components (no text or symbols)natural_image
Simple line drawing of a door handle with a clip and plus symbol (no text or labels)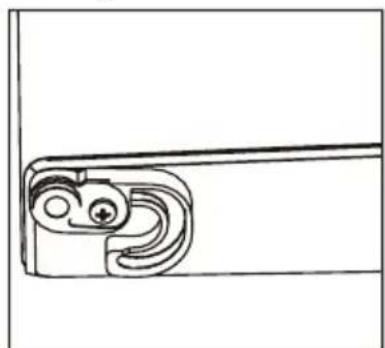
natural_image
Pure mechanical component diagram without any text, numbers, or symbolsnatural_image
Technical line drawing of a mechanical bracket with mounting holes and a separate bracket component (no text or symbols)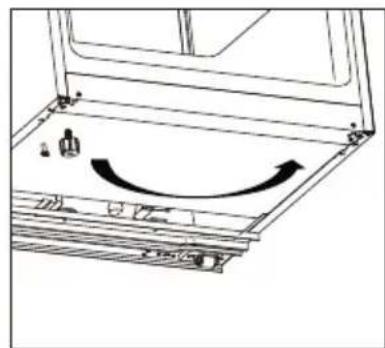
natural_image
Diagram of a mechanical assembly with a curved arrow indicating motion or direction (no text or symbols present)natural_image
Mechanical assembly diagram showing a bolt and nut assembly with a directional arrow (no text or labels)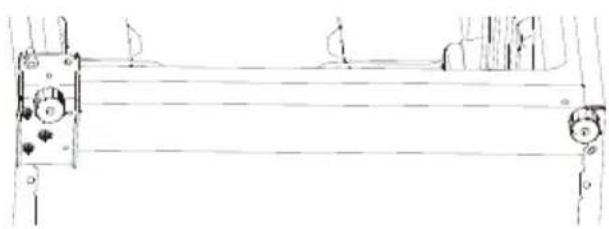
natural_image
Technical line drawing of a mechanical assembly with rollers and brackets (no text or symbols)FR
natural_image
Technical line drawing of a mechanical bracket with two bolts and a curved arrow indicating rotation (no text or symbols)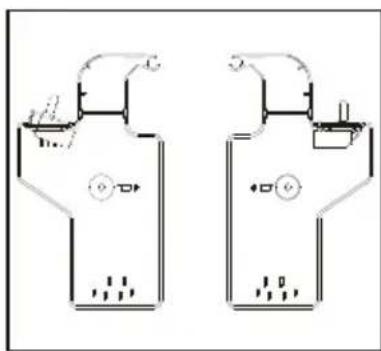
natural_image
Two identical architectural floor plan diagrams with no text, numbers, or symbolsnatural_image
Simple line drawing of a mechanical bracket with a small inset detail (no text or symbols)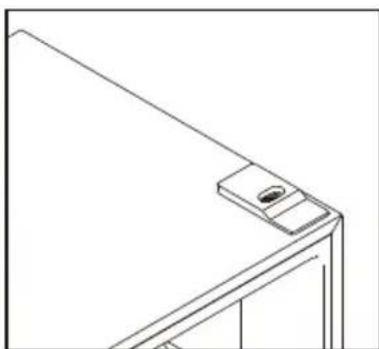
natural_image
Line drawing of a cabinet or shelf with a small object on top (no text or symbols)natural_image
Simple line drawing of a document with arrows indicating rotation around it (no text or symbols)natural_image
Technical line drawing of a mechanical bracket or frame structure (no text or symbols)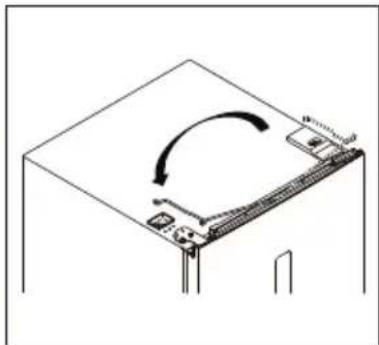
natural_image
Diagram of a computer monitor with an open screen and scroll, showing a curved arrow indicating rotation (no text or symbols present)natural_image
Technical line drawing of a mechanical assembly with mounting brackets and mounting holes (no text or symbols)natural_image
Technical line drawing of a mechanical assembly with no visible text or symbols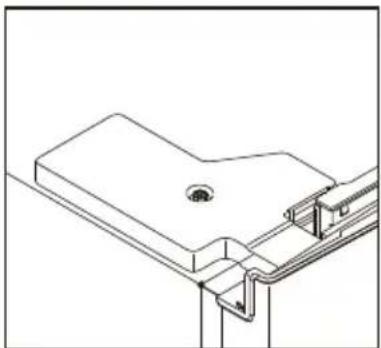
natural_image
Technical line drawing of a mechanical assembly with no visible text or symbolsnatural_image
Technical line drawing of a metal bracket assembly (no text or symbols)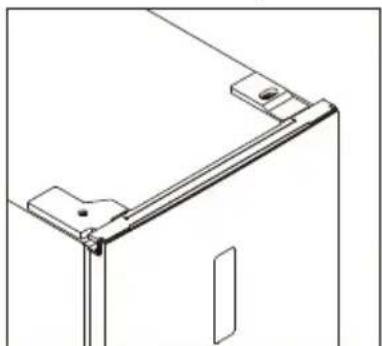
natural_image
Technical line drawing of a mechanical bracket or frame structure (no text or symbols)INSTALLATION
| A | 600 |
| B | 650 |
| C | 1850 |
| D | min=50 |
| E | min=50 |
| F | min=50 |
| G | 835 |
| H | 1323 |
| L | 115° |
MISE A NIVEAU DE L'APPAREIL
INTERFACE UTILISATEUR
UTILISATION DU PANNEAU DE COMMANDE
USAGE QUOTIDIEN
PREMIÈRE UTILISATION
NETTOYAGE DE L'INTÉRIEUR
natural_image
Line drawing of a hand holding a shelf with a handle, no text or symbols presentPOSITIONNEMENT DES BALCONS DE PORTE
natural_image
Pure technical diagram of a mechanical component with two upward arrows, no text or symbols presentRÉGLAGE DE L'HUMIDITÉ DANS LE BAC À LÉGUMES
CONSEILS ET ASTUCES UTILES
REPLACEMENT DE LA LUMIÈRE LED
flowchart
graph LR
    A["LED"] <--> B["LED"]
Thank you for choosing SABA quality. This product has been developed by our team of professional and according to European regulations. In order to get the most out of your new appliance, we recommend that you read this instruction manual carefully and keep it for future reference.

SABA is a German brand born in 1923 in the heart of the black forest.
Pioneers in electrical equipment, it continues its search for quality by offering smart products that will accompany you on a daily life.
This product has been manufactured and sold under the responsibility of CONFORAMA FRANCE.
SABA, and the SABA logo are trademarks used under license by CONFORAMA FRANCE – further information at www.saba-brand.com.
All other products, services, companies, trademarks, trade or product names and logos referenced herein are the property of their respective owners.
TABLE OF CONTENT
SAFETY INSTRUCTIONS.... 3
DESCRIPTION OF THE DEVICE....8
DOOR REVERSAL....9
INSTALLATION....13
USER INTERFACE.... 16
DAILY USE 20
MAINTENANCE 24
TROUBLESHOOTING 29
CUSTOMER SERVICE.... 30
TECHNICAL INFORMATION.... 31
DISPOSAL 32
DISPOSAL OF OLD ELECTRICAL
APPLIANCES 32
SAFETY INSTRUCTIONS
- IMPORTANT SAFETY INSTRUCTIONS: READ CAREFULLY AND KEEP FOR FUTURE REFERENCE
- This appliance is intended to be used in household and similar applications such as:
- staff kitchen areas in shops, offices and other working environments;
- farm houses and by clients in hotels, motels and other residential type environments;
- bed and breakfast type environments;
- catering and similar non-retail applications;
- WARNING: Keep ventilation openings, in the appliance enclosure or in the built-in structure, clear of obstruction.
- WARNING: Do not use mechanical devices or other means to accelerate the defrosting process, other than those recommended by the manufacturer.
- WARNING: Do not damage the refrigerant circuit.
- If the refrigerant circuit is damaged:
- Avoid naked flames and sources of ignition.
- Thoroughly ventilate the room in which the appliance is situated.
- WARNING: Do not use electrical appliances inside the food storage compartments of the appliance, unless they are of the type recommended by the manufacturer.
- This appliance can be used by children aged from 8 years and above and persons with reduced physical, sensory or mental capabilities or lack of experience and knowledge if they have been given supervision or instruction concerning use of the appliance in a safe way and understand the hazards involved.
- Children shall not play with the appliance.
- Cleaning and user maintenance shall not be made by children without supervision.
- WARNING: When positioning the appliance, ensure the supply cord is not trapped or damaged.
- If the supply cord is damaged, it must be replaced by the manufacturer, its service agent or similarly qualified persons in order to avoid a hazard.
- WARNING: Do not locate multiple portable socket-outlets or portable power supplies at the rear of the appliance.
-
Do not store explosive substances such as aerosol cans with a flammable propellant in this appliance.
-
For information on the installation, handling, maintenance and disposal of the device, and the method of replacing the lamp, please refer to the following paragraphs of this manual.
-
Gas warning: risk of fire / flammable materials
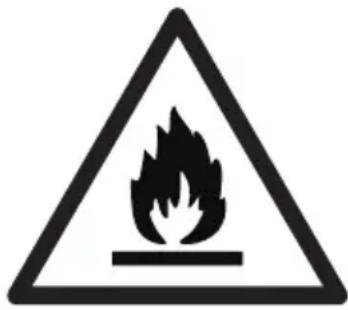
Please keep the product far away fire source during using, service and disposal. There are flammable materials at the back of the appliance. Please according to local regulations regarding disposal of the appliance for its flammable blowing gas, Before you scrap the appliance, please take off the doors to prevent children trapped.
- To avoid contamination of food, please respect the following instructions:
- Opening the door for long periods can cause a significant increase of the temperature in the compartments of the appliance.
- Clean regularly surfaces that can come in contact with food and accessible drainage systems.
- Store raw meat and fish in suitable containers in the refrigerator, so that it is not in contact with or drip onto other food.
- Two-star frozen-food compartments are suitable for storing pre-frozen food, storing or making ice-cream and making ice cubes.
- One-, two- and three-star compartments are not suitable for the freezing of fresh food.
- If the refrigerating appliance is left empty for long periods, switch off, defrost, clean, dry, and leave the door open to prevent mould developing within the appliance.
WARNINGS
- If you are discarding an old freezer or refrigerator with a lock/ catch fitted to the door, ensure that it is left in a disabled condition to prevent the entrapment of young children when playing.
- Unplug the appliance from the mains socket when not in operation and before cleaning. Remove food before cleaning the appliance.
- Do not insert oversized food as this could cause incorrect operation.
- Extreme caution must be used when moving an appliance.
- This refrigerating appliance is not suitable for freezing foodstuffs.
- The appliance must be installed on the ground, on a flat, horizontal surface, making sure that the ventilation openings are completely clear.
- Never try to replace or repair any part or component of the appliance yourself; seek the assistance of professional, qualified personnel, if need be.
-
This refrigerating appliance is not intended to be used as a built-in appliance.
-
In order to improve efficiency of the cooling system and save energy, it is necessary to maintain good ventilation around the appliance for the dissipation of heat. For this reason, sufficient clear space should be available around the refrigerator.
- To save energy, please avoid keeping the door open for a long time when using the appliance.
- Replacing certain parts of your household electrical appliance may lead to a danger. Please ensure that you have the necessary skills and own all tools required to carry out the self-repair operations safely. Otherwise, please contact a qualified professional.
- Regarding the information pertaining to the installation, handling, servicing and disposal of the appliance, thanks to refer to the below paragraph of the manual.
- As old refrigeration equipment may contain CFC's which will damage the ozone layer, when disposing of any refrigeration equipment please contact your local waste disposal department for advice on the correct method of disposal.
- Please according to local regulations regarding disposal of the appliance for its flammable blowing gas. Before you scrap the appliance, please take off the doors to prevent children trapped.
- Children aged from 3 to 8 years are allowed to load and unload refrigerating appliances.
DESCRIPTION OF THE DEVICE
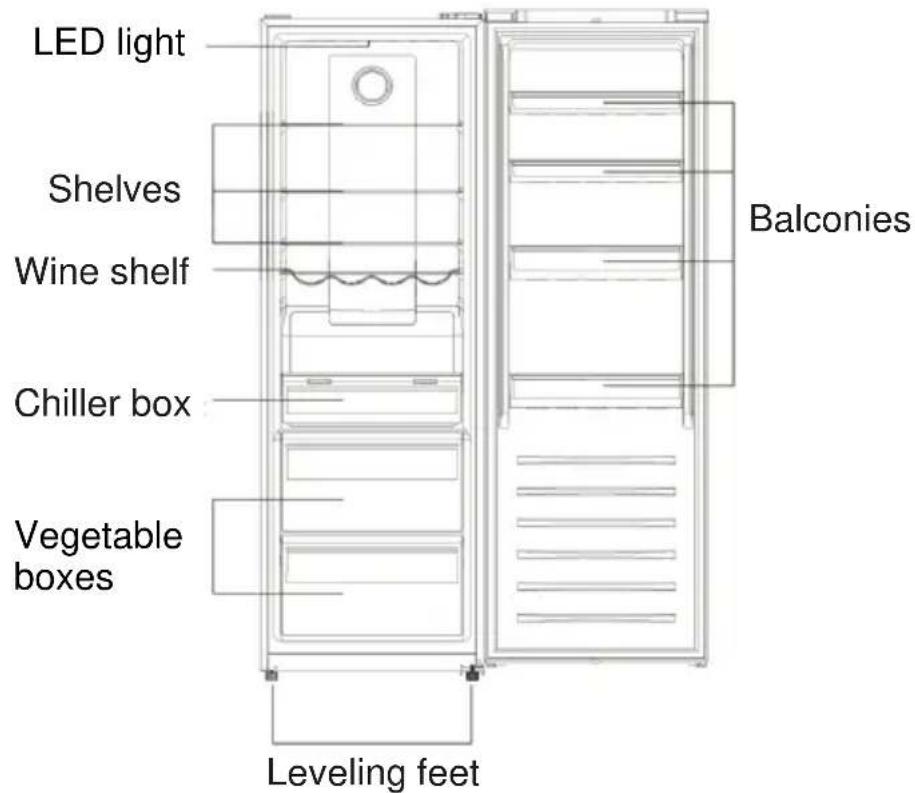
ACCESSORIES:
- Energy label
- User's manual
- Handle
- Egg tray
NOTE:
- The appliance design is subject to change without prior notice.
- Drawers, food boxes, shelves, etc. placed according to the position in the picture above are the most energy efficient.
DOOR REVERSAL
Before reversing the door, please be prepared below tools and material: straight screwdriver, cross screwdriver, spanner and the components included in the poly bag.

natural_image
Pure technical line drawing of a vertical mechanical or architectural component (no text or symbols)Easy open handle ×1
Handle Cover ×2

Screw ×2

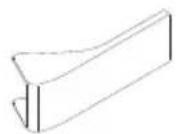
Left Aid-Closer ×1
Left Top Hinge Cover ×1
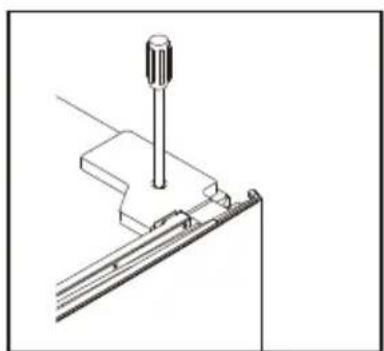
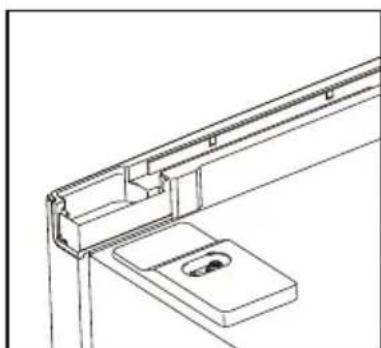
- Remove upper wire box covers.
natural_image
Pure technical line drawing of a mechanical assembly without any text, numbers, or symbols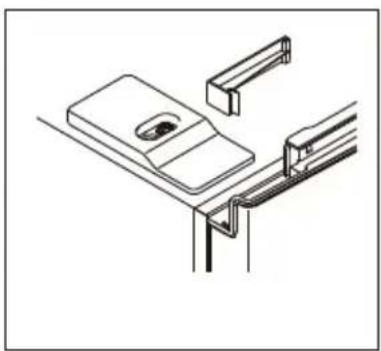
natural_image
Technical line drawing of a mechanical assembly or mounting bracket (no text or symbols)- Unscrew right top hinge cover, and disconnect connectors of door switch and display.
natural_image
Technical line drawing of a mechanical clamp or bracket assembly (no text or symbols)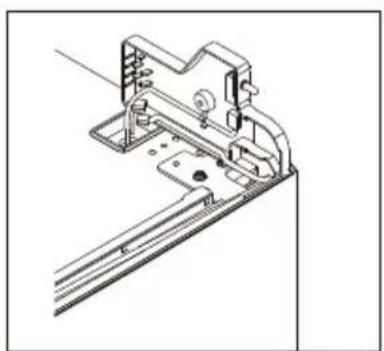
natural_image
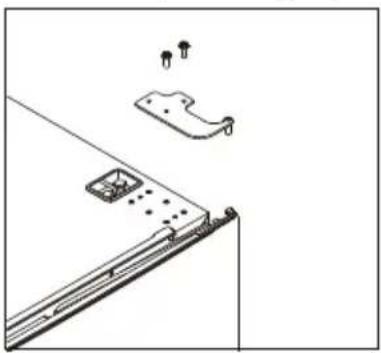
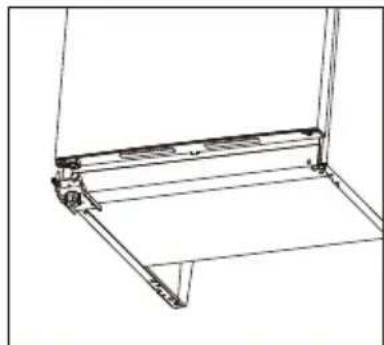
Technical line drawing of a mechanical assembly with no visible text or symbols- Unscrew and remove the top hinge, and then remove the door.
natural_image
Technical line drawing of a mechanical assembly with mounting brackets and fasteners (no text or symbols)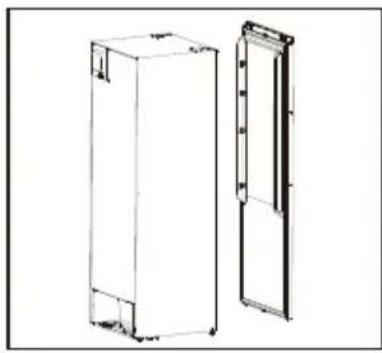
natural_image
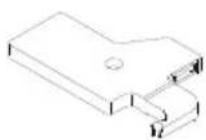
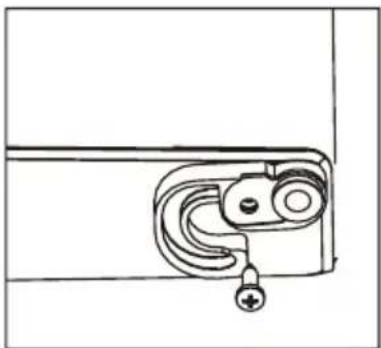
Technical line drawing of two rectangular storage units, one open and one closed, with no visible text or symbols.- Remove the right aid-closer, and take out left aid-closer from accessories bag and install it at left side.
natural_image
Simple line drawing of a door handle with a curved lock and plus button (no text or symbols)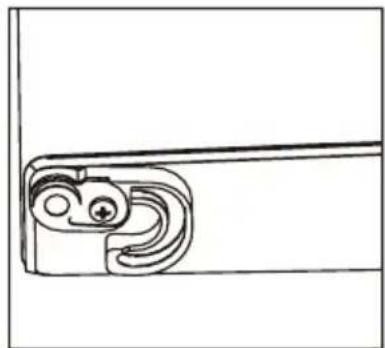
natural_image
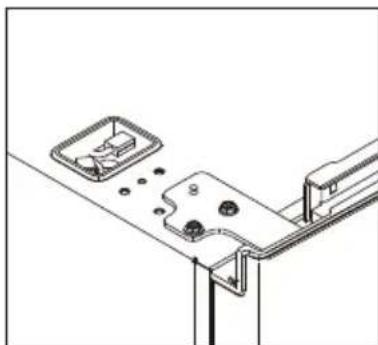
Pure technical line drawing of a mechanical bracket or clamp (no text or symbols)- Unscrew the bottom hinge, and remove the adjustable foot from the left side to the right side.

natural_image
Technical line drawing of a mechanical assembly with mounting holes and a bracket (no text or symbols)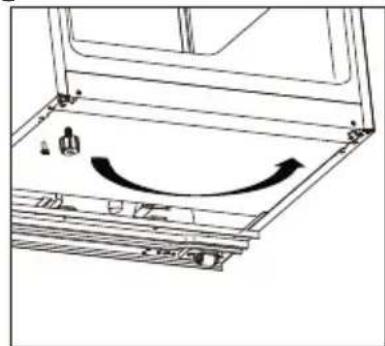
natural_image
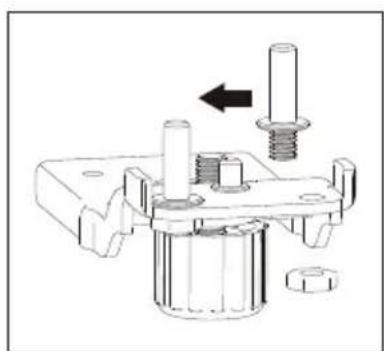
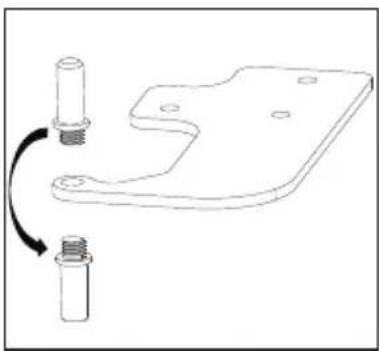
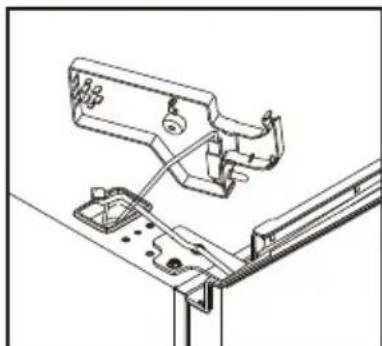
Diagram of a mechanical assembly with a curved arrow indicating motion or direction (no text or symbols present)- Unscrew and move the bottom hinge pin from the right side to the left side, then install the bottom hinge on the left side of the appliance.
natural_image
Mechanical assembly diagram showing a bolted joint with a threaded shaft and nut, no text or symbols present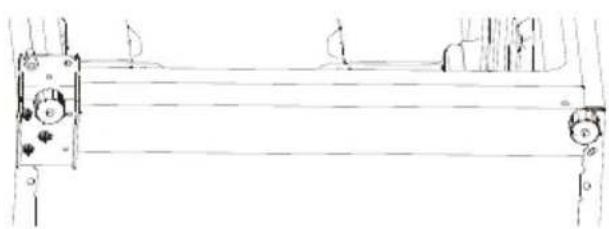
natural_image
Technical line drawing of a mechanical assembly with no visible text or symbols- Unscrew and move the top hinge pin from bottom side to upper side. Remove door switch from right hinge cover and then install it in left hinge cover which is placed in accessory bag.
natural_image
Technical line drawing of a mechanical bracket with two bolts and a curved arrow indicating rotation (no text or symbols)
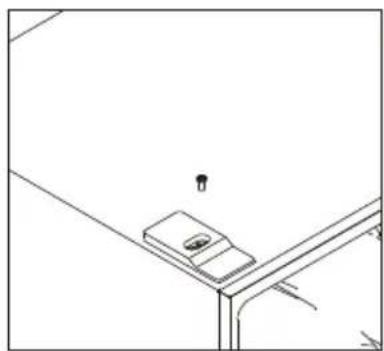
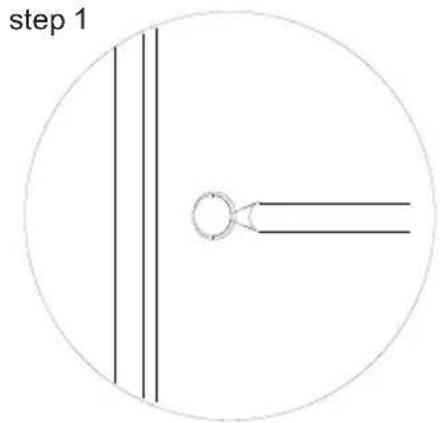
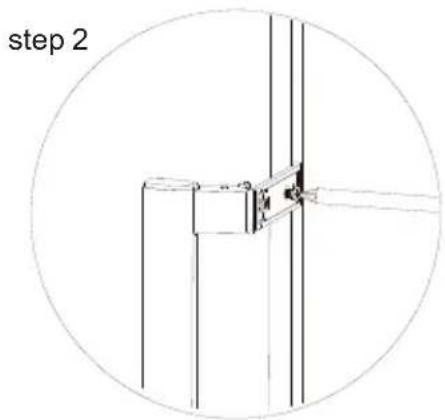
- Unscrew and move the top decorative cover on the left side, and install it on the right side.
natural_image
Simple line drawing of a mechanical bracket with a small inset detail (no text or symbols)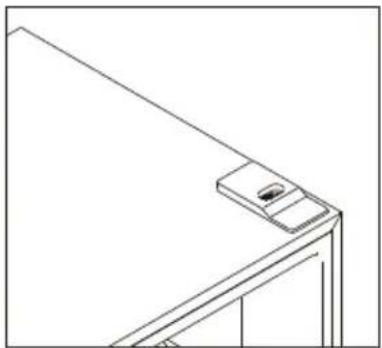
natural_image
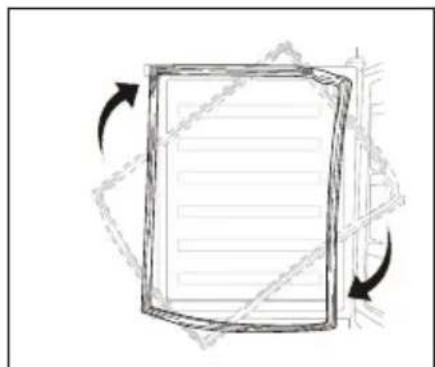
Line drawing of a window frame corner with a small object on top (no text or symbols)- Detach the Fridge and the Freezer door gaskets and then attach them after rotating.
natural_image
Simple line drawing of a document with arrows indicating rotational motion (no text or symbols)- Install the door, and then move the connecting wires from right side to left side.
natural_image
Technical line drawing of a mechanical bracket or support structure (no text or symbols)
natural_image
Diagram of a mechanical device with an arrow indicating rotational motion (no text or symbols)- Install the top hinge to the left side, please slightly adjust the top hinge while installing to make sure gasket is well sealed.
natural_image
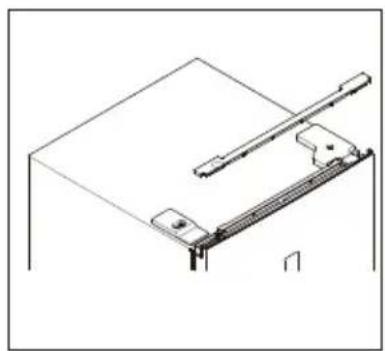
Technical line drawing of a mechanical assembly with mounting brackets and mounting holes (no text or symbols)- Connect connectors of door switch and display, and install the left top hinge cover.
natural_image
Technical line drawing of a mechanical assembly with no visible text or symbols
natural_image
Technical line drawing of a mechanical bracket assembly (no text or symbols)- Install the upper wire box covers to the right side.
natural_image
Technical line drawing of a mechanical bracket assembly (no text or symbols)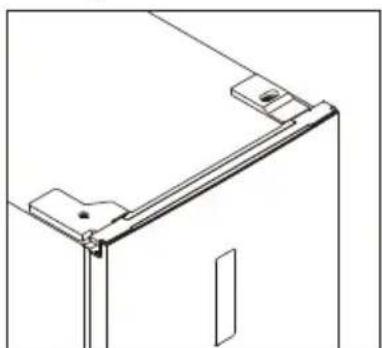
natural_image
Technical line drawing of a mechanical bracket or frame assembly (no text or symbols)INSTALLATION
- Position the appliance and allow it to stand for two to three hours before it is turned on for the first time to allow the system to settle. Do not position next to any heat source e.g. cooker, boiler or in direct sunlight etc.
- Allow at least 10cm of space at the top and 10 cm of space on both sides of the appliance and between the back of the appliance and the wall for adequate air circulation. The appliance is not designed for recessed installation (“building in”).
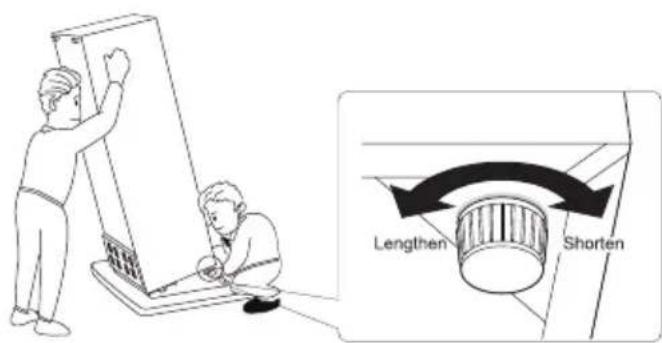
• Install on a good firm level surface, and any unevenness of the floor should be corrected prior to installation, slight unevenness can be overcome by adjusting the front feet. - NOTE: If the appliance is positioned on a carpet, soft floor covering you should readjust the front feet once the appliance has had time to settle.
ELECTRICAL CONNECTION
Before plugging in, ensure that the voltage and frequency shown on the rating label correspond to your domestic power supply. The appliance must be earthed. The power supply cable plug is provided with a contact for this purpose. If the domestic power supply socket is not earthed, connect the appliance to a separate earth in compliance with current regulations, consulting a qualified electrician. The manufacturer declines all responsibility if the above safety precautions are not observed.
This appliance complies with the E.E.C. Directives.
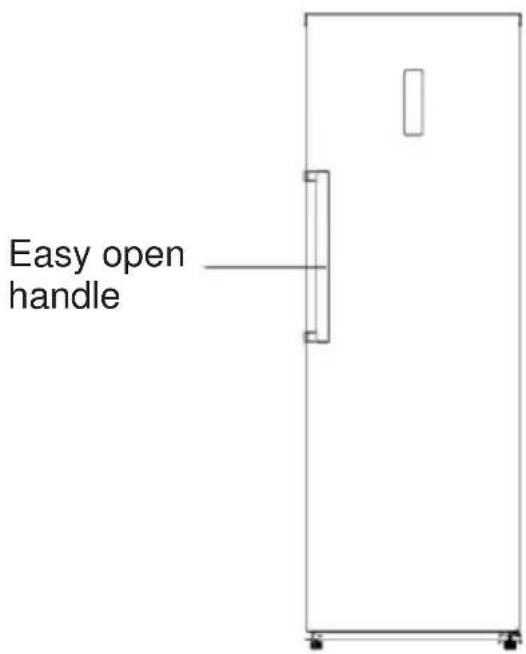
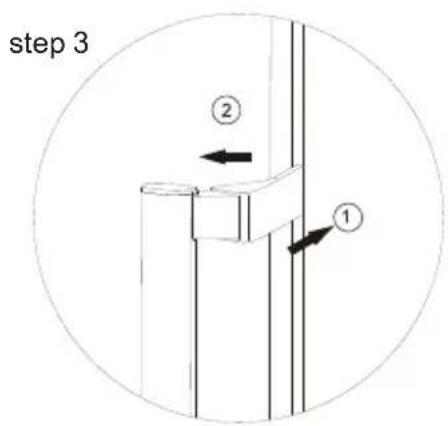
EASY OPEN HANDLE INSTALLATION
- Remove the screw hole covers.
- Take out the easy open handle which is placed in crisper drawer, and install it.
natural_image
Technical line drawing of a mechanical joint or bracket assembly (no text or symbols)- Install the easy open handle covers.
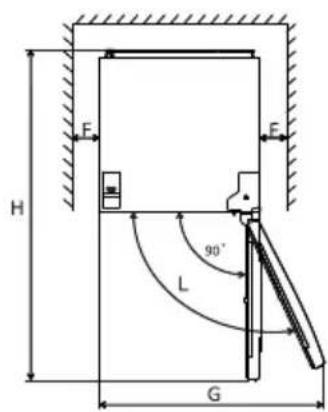
SPACE REQUIREMENT
- Keep enough space of door open.
- Keep at least 100mm gap at two sides and back.
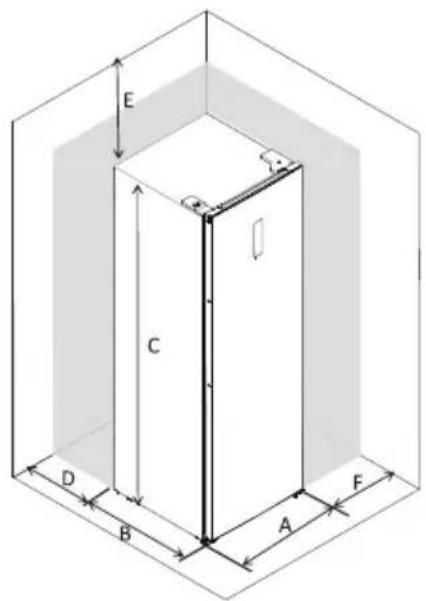
| A | 600 |
| B | 650 |
| C | 1850 |
| D | min=50 |
| E | min=50 |
| F | min=50 |
| G | 835 |
| H | 323 |
| L | 115° |
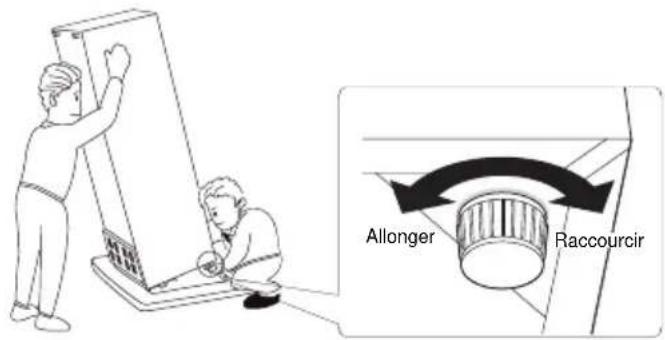
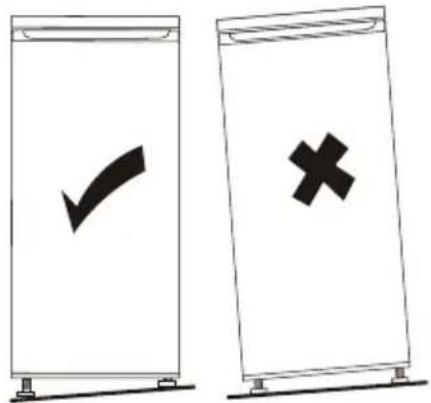
LEVELLING THE UNIT
To do this adjust the two levelling feet at front of the unit.
If the unit is not level, the doors and magnetic seal alignments will not be covered properly.
USER INTERFACE
USING THE CONTROL PANEL
1.0 User interface introduction
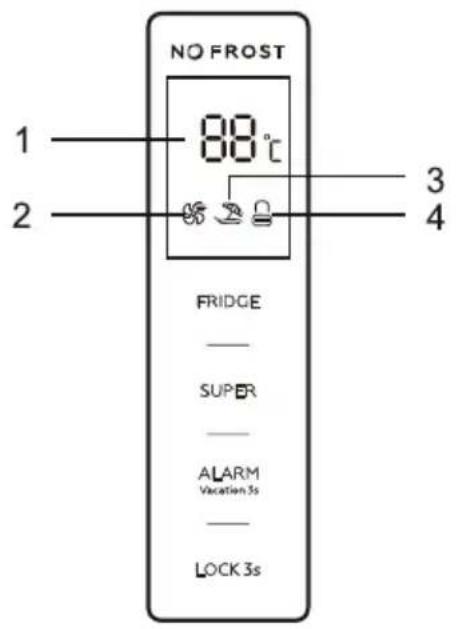
1.1 Operation Buttons
FRIDGE: Temperature control of the appliance
SUPER: Select and deselect super mode
ALARM/VACATION: Clear door opening alarm, select and deselect vacation mode LOCK: Locking and unlocking
1.2 LED Display
- Display window for preset temperature
- Super mode icon
- Vacation mode icon
- Locking and unlocking icon
2.0 Illustration of the Buttons
All buttons are valid only in unlocking status.
Short beep after per touching of buttons.
2.1 FRIDGE: Temperature control of the appliance Available only for user defined mode. Follow methods below to deselect super mode and vacation mode, and then user defined mode is selected.
2.2 SUPER: Select and deselect super mode
Press "SUPER" button to select super mode.
When super mode is selected, super mode icon will light on, and display window will show 2^ C.
In super mode, touching “FRIDGE” button, super mode icon will flash 3 times, but fridge temperature can not be changed.
To exit Super mode,
- Press "SUPER" button to deselect Super mode,
- Or after 3 hours of super mode without any operation, the refrigerator will automatically stop it and enter to previous setting.
Warning: In super mode, noise of the appliance may be slightly higher than normal running.
2.3 ALARM/VACATION: Clear door opening alarm, select and deselect vacation mode
Short touching “ALARM/VACATION” button to clear door opening alarm.
Touching “ALARM/VACATION” button for 3 seconds to select vacation mode. After 5 seconds flashing of vacation mode icon, vacation mode is selected.
When vacation mode is selected, vacation mode icon will light on, and display window will show 17°C. In vacation mode, “FRIDGE” button will not respond to any touching.
Short touching “SUPER” button can exit vacation mode and enter super mode.
Touching “ALARM/VACATION” button for 3 seconds to deselect vacation mode.
2.4 LOCK: Locking and unlocking
Touching “LOCK” button for 3 seconds to lock the control panel, then the locking and unlocking icon will be “☐”.
In locking status, touch any button, the locking and unlocking icon will flash 3 times.
Touching “LOCK” button for 3 seconds to unlock the control panel, then the locking and unlocking icon will be “☐”.
In unlocking status, all buttons are available.
If no operation in 1 minute, the control panel will be locked automatically.
3.0 Door Opening Alarm
If the door keeps opening for 90 seconds, door opening alarm sounds. Close the door to stop the door opening alarm.
Or short touching “ALARM/VACATION” button to clear door opening alarm.
TEMPERATURE INDICATE
- In order to help you get the correct adjustment of your device, it is equipped with a temperature gauge placed in the coldest area.
-
For the proper storage of food in your refrigerator and in particular in the coldest area, make sure that “OK” appears in the temperature indicator.
-
The symbol on the left side indicates the location of the coldest area of your refrigerator. It defines the height of this area.
- If “OK” is not displayed, the average temperature in this area will be very high. You ought to adjust the thermostat to a colder setting.
- For every modification of your thermostat, you are supposed to wait for the stabilization of the temperature inside the unit before proceeding, if necessary, to a new setting. Do change the position of the thermostat gradually and wait at least 12 hours before re-checking.
- NOTE: after charging the device for fresh food or after repeated or prolonged door openings, it is normal that the inscription “OK” does not appear in the temperature indicator. Wait at least 12 hours before readjusting the thermostat.

DAILY USE
FIRST USE
Cleaning the interior
Before using the appliance for the first time, wash the interior and all internal accessories with lukewarm water and some neutral soap so as to remove the typical smell of a brand new product, then dry thoroughly.
IMPORTANT! Do not use detergents or abrasive powders, as these will damage the finish.
Storage Time of Different Foods in Different Compartments Refer to the table below for the recommended storage times of various foods in different compartments.
| Type of foodRefridgeratar comportments time | Storage | |
| Door or balconies of fridge compartment | · Food with natural preservatives, such jams,juices, drinks, condiments.· Do not store perishable foods. | 3 days |
| Crisper drawer(salad drawer) | · Fruits, herbs and vegetables should be placed separately in the crisper bin.· Do not store bananas, onions, potatoes, garlic in the refrigerator. | 1 week |
| Fridge shelf - middle · 1 week | Dairy products, eggs | |
| Fridge shelf - top | · Foods that do not need cooking, such as ready-to-eat food, deli meats, leftovers | 1 week |
TEMPERATURE SETTING TIPS
- Correct temperature settings help minimize food waste and keep food fresh for as long as possible. The recommended temperature for the fresh compartment is 2^ C to 4^ C.
- If the temperature setting is too high (fresh compartment above 4°C), the storage life of foods such as meat and bean products is shortened, leading to food waste.
- If the temperature is too low (fresh compartment lower than 2^ C), vegetables or fruits may freeze and spoil, resulting in unnecessary food disposal.
- Temperature setting recommendation: 4^ C is recommended.
- Under recommended setting, the best storage time of freezer is no more than 3 days.
- The best storage time may reduce under other settings.
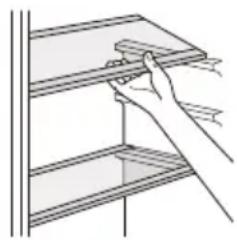
MOVABLE SHELVES
The walls of the refrigerator are equipped with a series of runners, so that the shelves can be positioned as desired.
natural_image
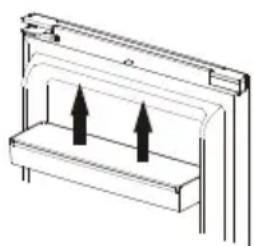
Line drawing of a hand using a tool to clean or store shelves (no text or symbols)POSITIONING THE DOOR BALCONIES
To permit storage of food packages of various sizes, the door balconies can be adjusted to different heights. To make these adjustments, proceed as follows: graduallypull the balcony in the direction of the arrows until it comes free, then reposition it as required.
natural_image
Pure technical diagram of a mechanical assembly with two upward arrows, no text or symbols presentSETTING THE HUMIDITY IN THE CRISPER
Low humidity: move the regulator to the left Hight humidity: move the regulator to the right

HELPFUL HINTS AND TIPS
Hints for fresh food refrigeration
To obtain the best performance:
- Do not store warm food or evaporating liquids in the refrigerator.
- Do cover or wrap the food, particularly if it has a strong flavor.
HINTS FOR REFRIGERATION
Useful hints:
- Make (all types): Wrap in polythene bags and place on the glass shelves above the vegetable drawer.
- For safety, store it in this way for only one or two days at most.
- Cooked foods, cold dishes, etc.: These should be covered and may be placed on any shelf.
- Fruit and vegetables: These should be thoroughly cleaned and placed in the special drawer(s)provided.
- Butter and cheese: These should be placed in special airtight containers or wrapped in aluminum foil or polythene bags to exclude as much air as possible.
- Milk bottles: These should have a cap and should be stored in the balconies on the refrigerator.
- Bananas, potatoes, onions and garlic: If not packed, these items should not be kept in the fridge.
ENERGY-SAVING TIPS
• Install the fridge or freezer in a cool place out of direct sunlight and away from cookers, heaters, dishwashers or any heat-emitting items.
- Do not set the fridge and freezer temperatures lower than necessary. For example, set the internal temperature within the correct range, such as adjusting the thermostat to the middle position for 4^ in the fresh compartment.
- Let pre-cooked foods cool down before placing them in the fridge or freezer. This will prevent the internal temperature of the fridge rising.
- Try not to open the door too often, especially when the weather is humid and hot. Once you open the door, close it as soon as possible.
- Keep your fridge full but not overcrowded. This helps reduce the loss of cold air. Meanwhile, avoid overloading the fridge or freezer. Try to leave about 20% free space for air circulation.
- When returning from shopping, sort foods to be kept in your fridge before opening the door. Only open the door to put food in or take it out.
- Make sure the door seal is clean and in good condition.
MAINTENANCE
NOISE FROM YOUR APPLIANCE
You may notice some rather unusual noises. The noises are caused by circulation of refrigerant in the cooling system. It has become more pronounced since the introduction of CFC free gases. This is not a fault and will not affect the performance of your appliance.
PROLONGED OFF PERIODS
If the appliance is not in use for a long period of time, proceed as follows:
- Disconnect from the mains supply.
- Clean and dry the inside.
- Leave the door open to prevent any unpleasant smells from building up while the appliance is not in use.
NOTES FOR USE
- Do clean and defrost your appliance regularly.
- Do check contents of the compartments every so often.
- Do store commercially prepared food in accordance with the instructions given on the packets.
- Do choose high-quality fresh food and ensure it is thoroughly clean before freezing it.
-
Do wrap all food in food-quality polythene bags or air tight containers and make sure any air is excluded.
-
Do not store poisonous or any dangerous substances in your freezer. It is designed for the freezing of edible foodstuffs only.
- Do not consume food which has been frozen for an excessive length of time.
- Do not leave the door open for long periods, as this will make the appliance more costly to run and cause excessive ice formation.
- Do not use sharp objects such as knives to remove the ice from the appliance. Only use a plastic scraper.
- Do not put hot food into the appliance. Let it cool down to room temperature.
- Do not put liquid-filled bottles or sealed cans containing carbonated liquids into the freezer as they may burst.
- Do not try to keep frozen food which has thawed; it should be eaten within 24 hours or cooked and re-frozen.
CLEANING
- Unplug the appliance.
- Remove all substances.
- Clean the inside and outside walls with a clean sponge or soft cloth using warm water or 1 teaspoon of bicarbonate of soda to 1.2 liters of water.
- Rinse well and wipe dry with a clean soft cloth.
- If the appliance is not to be used for a long period of time, it is recommended to remove all the food stuff, clean the inside of the appliance and leave the door open to allow air circulation, thus avoiding unpleasant odors.
- Dust behind the refrigerator and on the ground should be cleaned timely to improve the cooling effect and energy saving.
- The interior of the refrigerator should be cleaned regularly to avoid odor.
- Check the door gasket regularly to make sure there is no debris.
- Please turn off the power before cleaning, remove all food, shelves, drawers, etc.
- Clean the door gasket with mild soap and water. Use a soft cloth or sponge to clean the inside of the refrigerator, with two tablespoons of baking soda and a quart of warm water. Then rinse with water and wipe clean, and open the door and dry it naturally before the power is turned on.
- For areas that are difficult to clean in the refrigerator (such as narrow splits, gaps or corners), it is recommended to wipe them regularly with a soft rag, soft brush, etc. and when necessary, use some auxiliary tools (such as thin sticks) to ensure no contaminant accumulation in these areas.
- Do not use soap, detergent, scrub powder, spray cleaner, etc., as these may cause odors in the interior of the refrigerator.
-
Wipe the outer surface of the refrigerator with a soft cloth dampened with soapy water, detergent, etc., and then wipe dry.
-
Do not use hard brushes, steel wool, wire brushes, abrasives(such as toothpaste), organic solvents (such as alcohol, acetone, banana oil, etc.), boiling water, or acid or alkaline items to clean refrigerator, as these may may damage the fridge surface and interior. Boiling water and benzene may deform or damage plastic parts.
- Do not rinse with water to avoid affecting the electrical insulation properties.
- It is advisable to clean the appliance regularly and to remove any food deposits or splashes; in particular, clean the door seals, recesses and adjacent parts.
- Don’t overlook parts of the appliance such as the humidity controller, light casing, racks, egg and butter compartments, ice cube tray, and all of the drainage areas.
- If the appliance is not kept clean and in good condition, its surface could deteriorate and inexorably affect the length of its service life, and could lead to a dangerous situation.
- The appliance must not be steam cleaned.
- Use only a non-abrasive sponge, rinse with clean water then dry thoroughly before putting the parts back in place.
- Never use abrasive cleaning products or hard metal scrapers to clean the appliance, as they could scratch the surfaces and break down the coating.
• After cleaning, leave the inside of the appliance to dry with the door open before plugging it into the mains again. - When re-stocking the appliance, be especially careful not to hit, scratch, crack or break the internal surfaces.
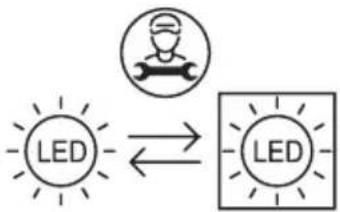
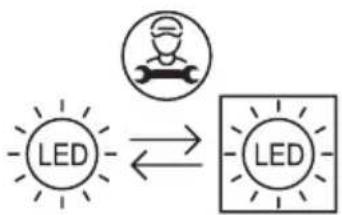
LED LIGHT REPLACEMENT
flowchart
graph LR
    A["LED"] --> B["Worker Icon"]
    B --> C["LED"]
    C --> A
LED lighting source
Replaceable by professional
WARNING: the LED light must not be replaced by the user! If the LED light is damaged, contact an authorized service representative for repairing.
The product contains two light sources of energy efficiency class G.
TROUBLESHOOTING
Caution! Before troubleshooting, disconnect the power supply. Only a qualified electrician of competent person must do the troubleshooting that is not in this manual.
Important! There are some sounds during normal use (compressor, refrigerant circulation).
| Problem | Possible Cause Solution | |
| Appliance does not work | Mains plug is not plugged in or is loose | Insert mains plug |
| Fuse has blown or is defective | Check fuse, replace if necessary | |
| Socket is defective | Mains malfunctions are to be corrected by an electrician | |
| Appliance cools too much | Temperature is set too cold or the appliance runs at Super modes | Turn the temperature regulator to a warmer setting temporarily |
| The food is too warm | Temperature is not properly adjusted | Please look in the initial Temperature Setting section |
| Door was open for an extended period | Open the door only as long as necessary | |
| A large quantity of warm food was placed in the appliance within the last 24 hours | Turn the temperature regulation to a colder setting temporarily | |
| The appliance is near a heat source | Please look in the installation location section | |
| Unusual noises | Appliance is not level | Re-adjust the feet |
| The appliance is touching the wall or other objects | Move the appliance slightly | |
| A component, e.g. a pipe, on the rear of the appliance is touching another part of the appliance or the wall | If necessary, carefully bend the component out of the way |
If the malfunction shows again, contact the Service Center.
CUSTOMER SERVICE
We decline liability for any damage or accident derived from any use of this appliance which is not in conformity with the instructions contained in this manual.
Duration of availability of spare parts: 10 years.
In accordance with Article L. 217 of the Consumer Code, your product benefits from a legal guarantee of conformity of 2 years.
This instruction book is also available on our website: www.conforama.fr
If you have a problem with your product, before going to your Conforama store, please get in touch with our aftersales services for electrical household appliances: http://sav-client.conforama.fr/

09 69 32 05 05
From Monday to Saturday, 08:30 to
19:00 Price of a local call
TECHNICAL INFORMATION
Flash the QR code on the energy label or below to access its main information.
| Model | Website | QR Code |
| MP3525ILD | https://eprel.ec.europa.eu/qr/2424141 |  |
| Reference: | MP3525ILD |
| 220-240V~Rated voltage: | |
| Ampere: | 1.3A |
| 50HzRated frequency | |
| Climate class: | SN,N,ST |
| Refrigerant: | R600a(73g) |
| IProtection against electrical shock: | |
| CYCLOPENTANEInsulation foam: |
Climate class:
- Extended temperate (SN): 'this refrigerating appliance is intended to be used at ambient temperatures ranging from 10 °C to 32 °C'.
- Temperate (N): ‘this refrigerating appliance is intended to be used at ambient temperatures ranging from 16 °C to 32 °C’.
- Subtropical (ST): ‘this refrigerating appliance is intended to be used at ambient temperatures ranging from 16 °C to 38 °C’.
DISPOSAL
The refrigerating gas contained in the circuit of this appliance is isobutane (R600a); it causes a low level of pollution but is inflammable. Please contact your local disposal department for advice on the correct method of disposal.
DISPOSAL OF OLD ELECTRICAL APPLIANCES
European directive 2012/19/EU on Waste from Electrical and Electronic Equipment (WEEE), requires that used household appliances are not thrown into the normal municipal waste stream.
Used appliances must be collected separately in order to optimize the rate of recovery and recycling of materials that compose them, and to reduce the impact on human health and on the environment. The crossed bin symbol is affixed to all the products to remind you of the obligations of separated collection.
CE
CONFORAMA France
- FR
- INSTALLATION
- MISE A NIVEAU DE L'APPAREIL
- INTERFACE UTILISATEUR
- UTILISATION DU PANNEAU DE COMMANDE
- USAGE QUOTIDIEN
- PREMIÈRE UTILISATION
- NETTOYAGE DE L'INTÉRIEUR
- POSITIONNEMENT DES BALCONS DE PORTE
- RÉGLAGE DE L'HUMIDITÉ DANS LE BAC À LÉGUMES
- CONSEILS ET ASTUCES UTILES
- REPLACEMENT DE LA LUMIÈRE LED
- TABLE OF CONTENT
- SAFETY INSTRUCTIONS
- WARNINGS
- DESCRIPTION OF THE DEVICE
- ACCESSORIES:
- NOTE:
- DOOR REVERSAL
- ELECTRICAL CONNECTION
- EASY OPEN HANDLE INSTALLATION
- SPACE REQUIREMENT
- LEVELLING THE UNIT
- USER INTERFACE
- USING THE CONTROL PANEL
- User interface introduction
- Operation Buttons
- LED Display
- Illustration of the Buttons
- LOCK: Locking and unlocking
- Door Opening Alarm
- TEMPERATURE INDICATE
- DAILY USE
- FIRST USE
- Cleaning the interior
- TEMPERATURE SETTING TIPS
- MOVABLE SHELVES
- POSITIONING THE DOOR BALCONIES
- SETTING THE HUMIDITY IN THE CRISPER
- HELPFUL HINTS AND TIPS
- Hints for fresh food refrigeration
- HINTS FOR REFRIGERATION
- ENERGY-SAVING TIPS
- MAINTENANCE
- NOISE FROM YOUR APPLIANCE
- PROLONGED OFF PERIODS
- NOTES FOR USE
- CLEANING
- LED LIGHT REPLACEMENT
- TROUBLESHOOTING
- CUSTOMER SERVICE
- TECHNICAL INFORMATION
- Climate class:
- DISPOSAL
- DISPOSAL OF OLD ELECTRICAL APPLIANCES
Brand : SABA
Model : MP3525ILD
Category : Fridge