
AVENT SCF335 - Breast pump PHILIPS - Free user manual and instructions
Find the device manual for free AVENT SCF335 PHILIPS in PDF.

| Brand | Philips |
| Model | AVENT SCF335 |
| Type | Single/double electric breast pump Plus |
| Use | Expressing and collecting breast milk; relief from engorgement symptoms |
| Modes | Stimulation (8 suction levels) and Expression (16 suction levels) |
| Maximum suction level (expression mode) | -360 mbar (-270 mmHg) |
| Cycle speed (stimulation mode) | 105-120 cycles/min |
| Cycle speed (expression mode) | 53-85 cycles/min |
| Power supply | Mains adapter 100-240 V~, 50/60 Hz; output 5 V DC (1.1 A for single, 1.8 A for double) |
| Weight (motor unit) | 230 g (single) / 310 g (double) |
| Dimensions (motor unit) | 145 x 95 x 45 mm |
| Main materials | ABS, silicone, polypropylene |
| Lifespan | 500 hours |
| Cleaning and disinfection | Disassemble, hand wash or dishwasher, disinfect by boiling in water for 5 min |
| Ingress protection | IP22 (motor unit) |
| Included accessories | Adapter, travel bag, thermal pouch, breast pump kit (1 or 2 depending on version), instruction manual |
| Bottle compatibility | Philips Avent Natural bottles (except glass) |
| Warranty | International 2 years |
| Operating conditions | Temperature 5°C to 40°C, relative humidity 15 to 90% |
Frequently Asked Questions - AVENT SCF335 PHILIPS
User questions about AVENT SCF335 PHILIPS
0 question about this device. Answer the ones you know or ask your own.
Ask a new question about this device
Download the instructions for your Breast pump in PDF format for free! Find your manual AVENT SCF335 - PHILIPS and take your electronic device back in hand. On this page are published all the documents necessary for the use of your device. AVENT SCF335 by PHILIPS.
USER MANUAL AVENT SCF335 PHILIPS
User manual for mother
Introduction
General description
Intended use and indications for use
Important safety information
Before first use - instruction for mother
Cleaning and disinfecting
Using the breast pump
Using the breast pump when you have symptoms of engorgement
After use
Choosing the right teat for your baby
Feeding breast milk with the bottle
Compatibility
Ordering accessories
Recycling
Warranty and support
Troubleshooting
Undesirable side effects
Storage conditions
Electromagnetic fields (EMF)
Technical information
Explanation of symbols
User manual for rental agent
Introduction
General description
Important safety information
Preparing for rental use
Step 1: Register and track
Step 2: Instructions for pump return
Step 3: Quality checklist
Step 4: Factory reset
Step 5: Cleaning before renting
Step 6: Prepare for the next rental use
User manual for mother
Introduction
Thank you for choosing to rent this Philips Avent breast pump. The Philips Avent single/double electric breast pump Plus is inspired by babies and their natural suction movement. The soft silicone cushion stimulates the nipple with gentle massaging movements, helping you to express milk comfortably and effectively. The combination of suction and nipple stimulation triggers fast milk flow. The no-lean-forward design enables you to sit in a relaxed, upright position while expressing.
Healthcare professionals and the World Health Organization recommend to exclusively feed children with breast milk during the first six months of life and to continue giving them breast milk for two years next to offering additional nutritious foods. This is because your breast milk is specially adapted to your baby's needs and helps to protect your baby against infection and allergies. To breastfeed longer, you can express and store your milk so that your baby can still enjoy the benefits of it, even if you cannot be there to provide it yourself. As the pump is compact, quiet and discrete to use, you can take it with you anywhere, allowing you to express milk at your own convenience and to maintain your milk supply.
If breastfeeding goes well, it is advisable (unless recommended otherwise by your healthcare professional) to wait until your milk supply and breastfeeding schedule are established (normally at least 2 to 4 weeks after giving birth) before you start expressing.
General description
① Note: The numbers mentioned below refer to the numbers on the figure of the front foldout page of this user manual.
Note: The double breast pump comes with two pieces of the items shown in Figures B and C.
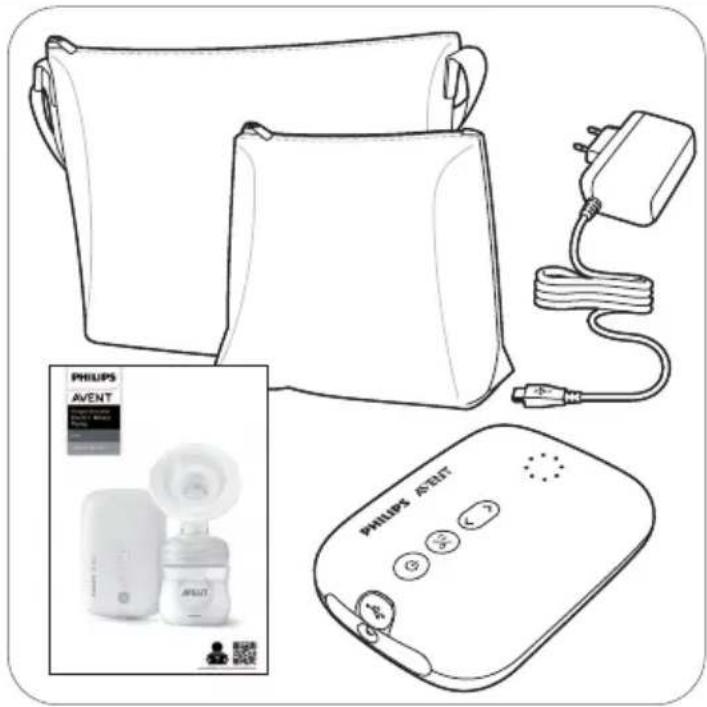
Rental items (Fig. A) - motor unit and adapter (to be returned)
A1 USB power inlet
A2 On/off button with pause/play function
A3 Mode selection button
A4 'Level down' button
A5 'Level up' button
A6 Indicator lights for modes and levels
A7 Tubing port for single breast pump
A8 Tubing ports for double breast pump
A9 Adapter*
- The adapter supplied may vary for different countries.
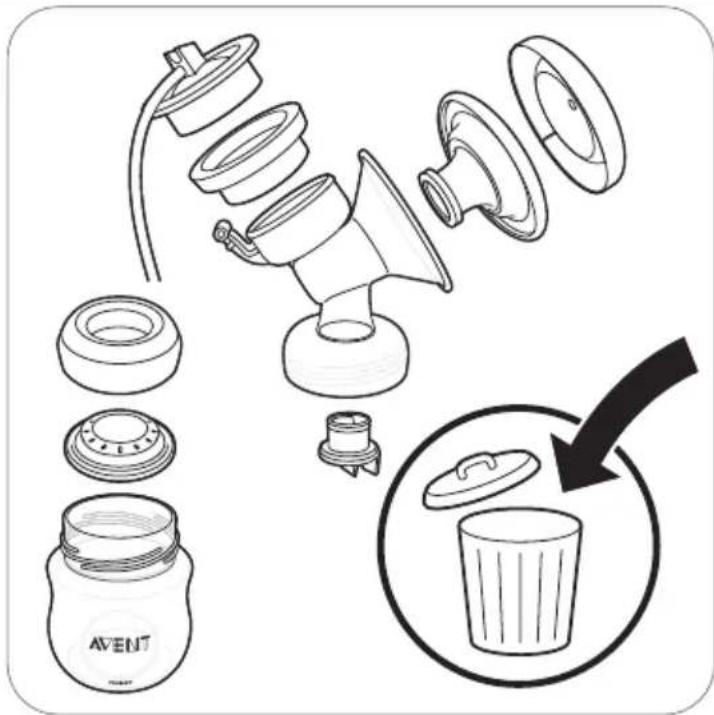
Breast pump kit (Fig. B) (for personal use)
B1 Silicone tube and cap
B4 Cover
B2 Silicone diaphragm
B5 Cushion
B3 Pump body
B6 White valve
Philips Avent Natural bottle (Fig. C) (for personal use)
C1 Screw ring
C2 Sealing disc
C3 Bottle
① Note: The Philips Avent teat and bottle cap are not parts of the rental package but they can be purchased separately. We do not recommend using the Philips Avent Natural Glass bottles with the breast pump. Explore the Philips Avent range of teats and bottles at www.philips.com/avent.
Accessories (to be returned)
These accessories are not shown in the figure:
- Travel bag
Insulation pouch
Additional item (to be returned)
This additional item is not shown in the figure:
- User manual
Intended use and indications for use
The Philips Avent single/double electric breast pump Plus is intended to express and collect milk from the breast of a lactating woman, and indicated to alleviate the symptoms of engorgement. The motor unit and adapter are intended for multiple users. The breast pump kit is intended for a single user.
Important safety information
Read this user manual carefully before you use the breast pump and save it for future reference.
This user manual can also be found online on the Philips Avent website: www.philips.com/avent.
This product is operated by the lactating woman herself.
You can use this breast pump in an everyday environment.
Contraindications

- Never use the breast pump while you are pregnant, as pumping can induce labor.
Warnings

Warnings to avoid choking, strangulation and injury:
- Do not allow children or pets to play with the motor unit, the adapter, packaging materials or accessories.
-
Always unplug the breast pump after use. Store the breast pump when not in use.
-
This breast pump is not intended for use by persons (including children) with reduced physical, sensory or mental capabilities, or lack of experience and knowledge. Such persons can only use this breast pump if they are supervised by or have received proper instruction concerning use of the appliance by a person responsible for their safety.
Warning to prevent transmitting infectious diseases:
- If you are a mother who is infected with Hepatitis B, Hepatitis C or Human Immunodeficiency Virus (HIV), expressing breast milk will not reduce or remove the risk of transmitting the virus to your baby through your breast milk.
Warnings to avoid electric shock:
- Inspect the breast pump, including the adapter, for signs of damage before each use. Do not use the breast pump if the adapter or plug is damaged, if it does not work properly or if it has been dropped or submerged in water.
- Only use the adapter (S009AHz050yyyy) provided with this breast pump.
- Always ensure that it is easy to disconnect the device from the mains in case of malfunction. The adapter is considered the disconnection device.
Warnings to avoid contamination and to ensure hygiene:
-
For hygienic reasons, the breast pump kit is only intended for repeated use by a single user.
-
Multiple-user breast pumps are designed in such a way that the breast milk can never touch the working parts of the breast pump that are shared. The only parts of a multiple-user breast pump that you can safely share are the motor unit and the adapter.
- Clean and disinfect all parts before first use and after each use.
- Do not use antibacterial or abrasive cleaning agents to clean the breast pump parts as this may cause damage.
- Wash your hands thoroughly with soap and water before you touch breast pump parts and breasts to prevent contamination. Avoid touching the inside of containers or lids.
Warnings to avoid cross-contamination:
- Breast pump kits are personal care items intended for use by a single user only and should not be shared between users.
- Clean the motor unit before renting out the device to the next user.
Warnings to avoid breast and nipple problems including pain:
- Do not use the breast pump if the silicone diaphragm appears to be damaged or broken. See chapter 'Ordering accessories' for information on how to obtain replacement parts.
- Only use accessories and parts recommended by Philips Avent.
- There are no user serviceable parts inside the motor unit of the breast pump.
- No modification of the breast pump is allowed. If you do so, your warranty becomes invalid.
- Never use the breast pump while you are sleepy or drowsy to avoid lack of attention during use.
- Always switch off the breast pump before you remove the pump body from your breast, in order to release the vacuum.
- If the vacuum is uncomfortable or causes pain, switch off and remove the breast pump from your breast.
-
Do not continue pumping for more than five minutes at a time if you do not succeed in expressing any milk. Try to express at another time during the day.
-
If the process becomes very uncomfortable or painful, stop using the pump and consult your healthcare professional.
Warnings to prevent damage and malfunction of the breast pump:
- Portable radio frequency (RF) communications equipment (including mobile phones and peripherals such as antenna cables and external antennas) should not be used closer than 30~cm (12 in) to any part of the breast pump, including adapter. This could have a negative effect on the performance of the breast pump.
- Use of this equipment adjacent to or stacked with other equipment should be avoided because it could result in improper operation.
Warning to avoid increased electromagnetic emissions or decreased electromagnetic immunity of this device, resulting in improper operation:
- Do not use any other adapter or charging cable than supplied with the device.
Cautions

Cautions to prevent damage to and malfunctioning of the breast pump:
- Prevent the adapter and motor unit from coming into contact with water.
- Never put the motor unit or the adapter in water or in a dishwasher, as this causes permanent damage to these parts.
- Keep the adapter and the silicone tubes away from heated surfaces to avoid overheating and deformation of these parts.
Before first use – instruction for mother
Disassemble, clean and disinfect all parts that come into contact with breast milk before you use the breast pump for the first time and after every use.
Cleaning and disinfecting
Overview
Clean and disinfect the parts that come into contact with the breast and breast milk as described below:
| When How | ||
| Clean and disinfect before first use and after every use. | Disassemble all parts and then clean them as described in chapter 'Cleaning' and disinfect them as described in chapter 'Disinfecting'. | |
① Note: The Philips Avent teat and bottle cap are not parts of the rental package but they can be purchased separately.
The following parts do not come into contact with the breast and breast milk; clean them as described below:
| When How | ||
| Clean when needed. Wipe with a clean water and mild detergent. |
Step 1: Disassembling
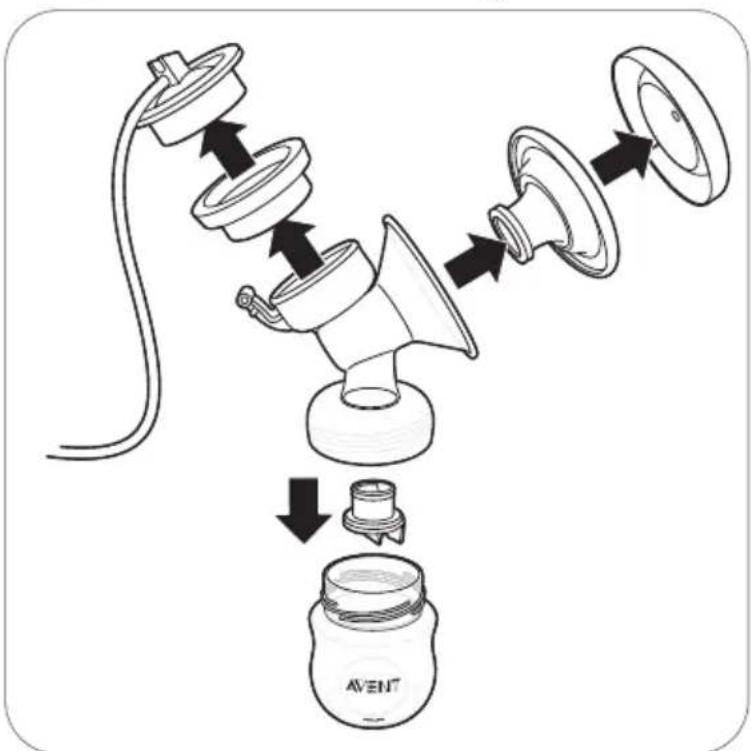
Disassemble the breast pump, bottle and storage cup completely.
Also remove the white valve from the breast pump.
Step 2: Cleaning
The parts that come in contact with milk can be cleaned manually or in the dishwasher.
Warning: Do not use antibacterial or abrasive cleaning agents to clean the breast pump parts as this may cause damage.
Caution: Never put the motor unit or the adapter in water or in a dishwasher, as this causes permanent damage to these parts.
Caution: Be careful when you remove and clean the white valve. If it gets damaged, your breast pump does not function properly. To remove the white valve, gently pull at the ribbed tab on the side of the valve. To clean the white valve, rub it gently between your fingers in warm water with some dishwashing liquid. Do not insert objects into the white valve, as this may cause damage.
Step 2A: Manual cleaning
Supplies needed:
- Mild dishwashing liquid
- Drinking-quality water
-
Soft, clean brush
-
Clean tea towel or drying rack
Clean sink or bowl
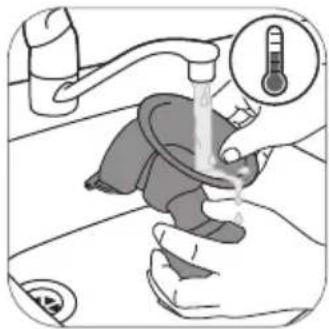
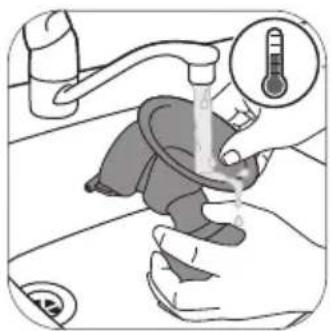
1. Rinse all parts under a running tap with lukewarm water.
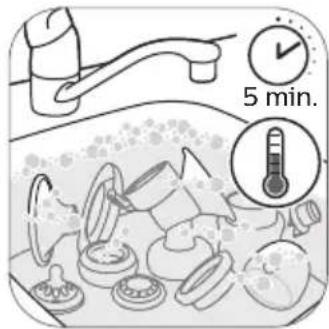
2. Soak all parts for 5 minutes in warm water with some mild dishwashing liquid.
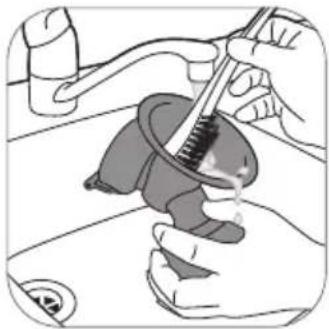
3. Clean all parts with a cleaning brush.
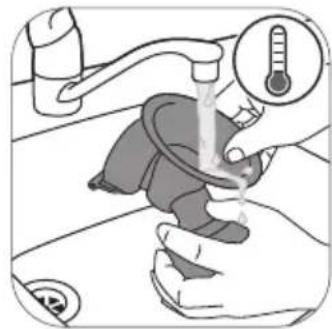
4. Thoroughly rinse all parts under a running tap with cold clear water.

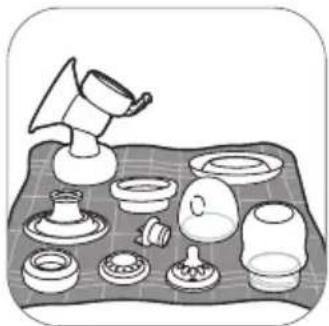
5. Leave all parts to air-dry on a clean tea towel or drying rack.
Step 2B: Cleaning in the dishwasher
Supplies needed:
- Mild dishwashing liquid or a dishwashing tablet
- Drinking-quality water
Note: Food colorings may discolor parts.
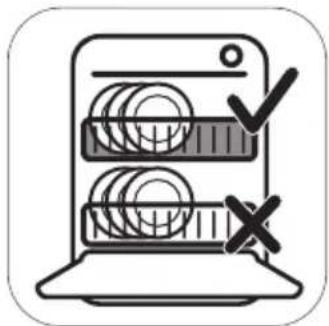
1. Place all parts on the top rack of the dishwasher.
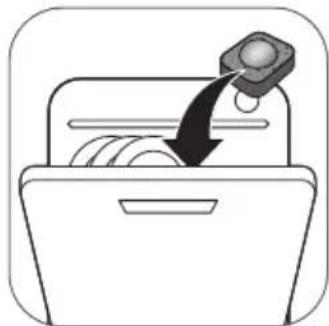
2. Put dishwashing liquid or a tablet in the machine and run a standard program.
3. Leave all parts to air-dry on a clean tea towel or drying rack.
Step 3: Disinfecting
Supplies needed:
A household pot
- Drinking-quality water
Caution: During disinfection with boiling water, prevent the bottle or other parts from touching the side of the pot. This can cause irreversible product deformation or damage that Philips cannot be held liable for.
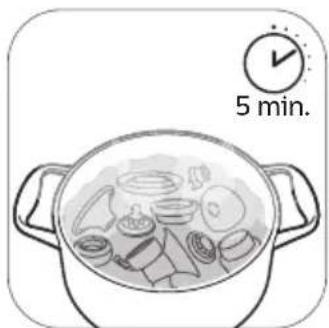
1. Fill a household pot with enough water to cover all parts and place all parts in the pot. Let the water boil for 5 minutes. Make sure the parts do not touch the side of the pot.
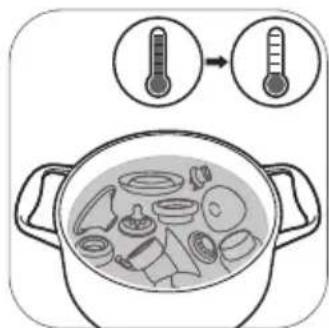
2. Allow the water to cool down.

3. Gently remove the parts from the water. Place the parts on a clean surface/tea towel or drying rack to air-dry.
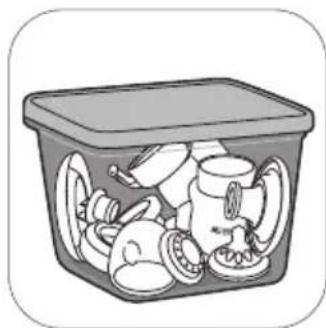
4. Store the dry items safely in a clean, protected area until needed. Ensure the clean parts have air-dried completely before storing them to help prevent germs and mold from growing.
Using the breast pump
Cushion size
The Philips Avent single/double electric breast pump Plus has a soft, active cushion. There is only one cushion size. It gently stimulates your nipple to trigger milk flow. The cushion is made of flexible silicone, fitting nipple sizes up to 30 mm/1.18 in.
Assembling the breast pump
Make sure you have cleaned and disinfected the parts of the breast pump that come into contact with milk.
Warning: Be careful, when you have disinfected the breast pump parts by boiling them, they can be very hot. To prevent burns, only start assembling the breast pump when disinfected parts have cooled down.
Warning: Wash your hands thoroughly with soap and water before you touch breast pump parts and breasts to prevent contamination. Avoid touching the inside of containers or lids.
Check the breast pump kit parts for wear or damage before use and replace them if necessary.
① Note: Correct placement of the cushion, silicone diaphragm and silicone tube is essential for the breast pump to form a proper vacuum.
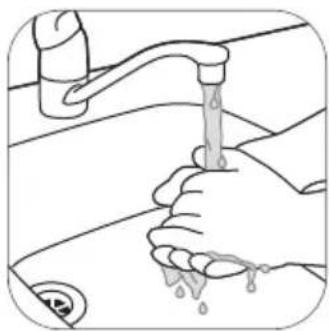
1. Wash your hands thoroughly with soap and water.
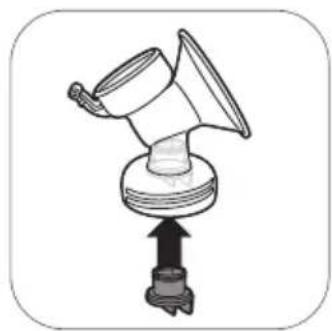
2. Push the white valve in the pump body as far as possible.
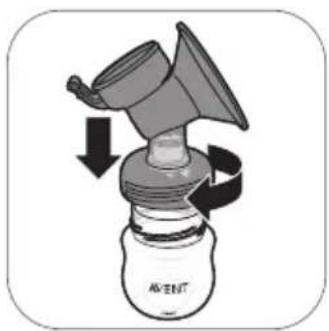
3. Screw the pump body onto the bottle.
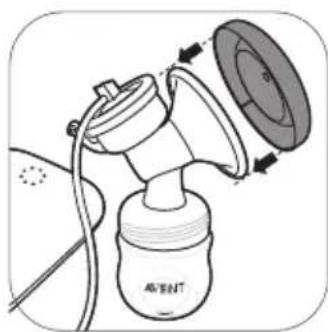
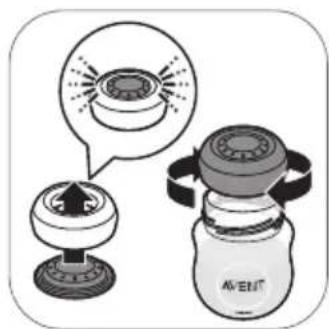
4. Place the cushion in the pump body and make sure that the rim covers the pump body.
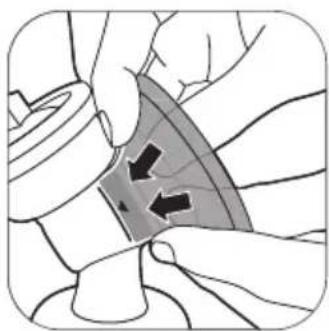
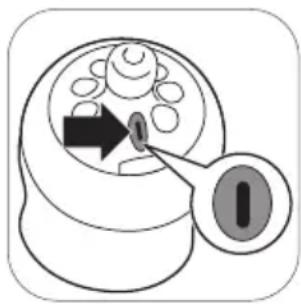
4A. Push the inner part of the cushion into the funnel against the line (indicated with an arrow).
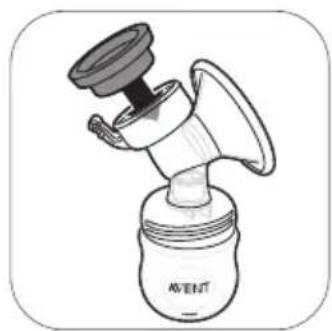
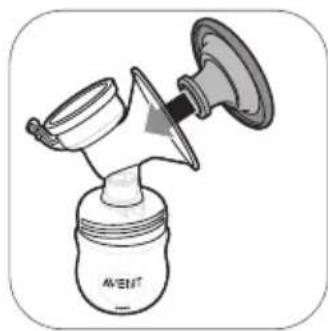
5. Place the silicone diaphragm in the pump body.
5A. Make sure that the silicone diaphragm fits securely around the rim by pressing it down with your thumbs.
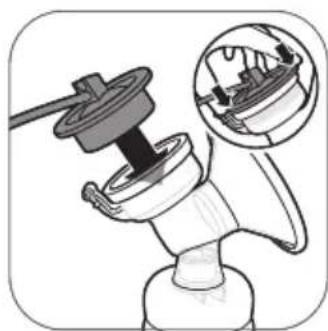
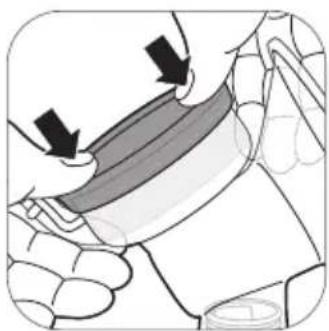
6. Attach the silicone tube and cap onto the silicone diaphragm. Push down the cap until it is securely in place.
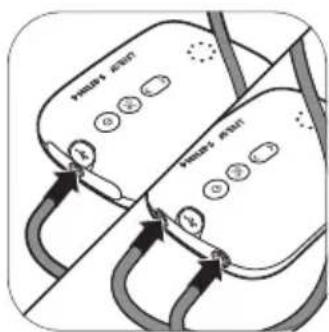
7. Connect the tube(s) to the motor unit.
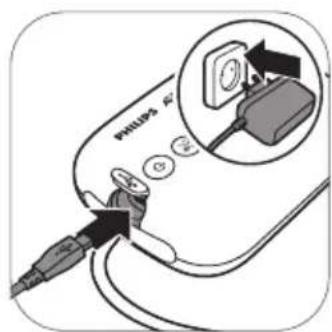
8. Insert the adapter into the wall socket and insert the small plug at the other end into the motor unit.
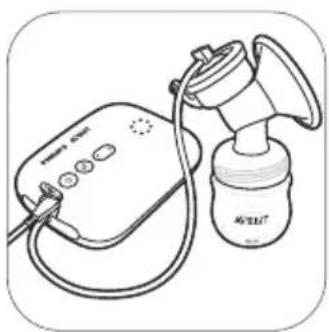
9. The breast pump is now ready for use.
Note: You can place the cover over the cushion to keep the breast pump clean when you take it with you and while you are preparing for expressing.
Motor unit part description
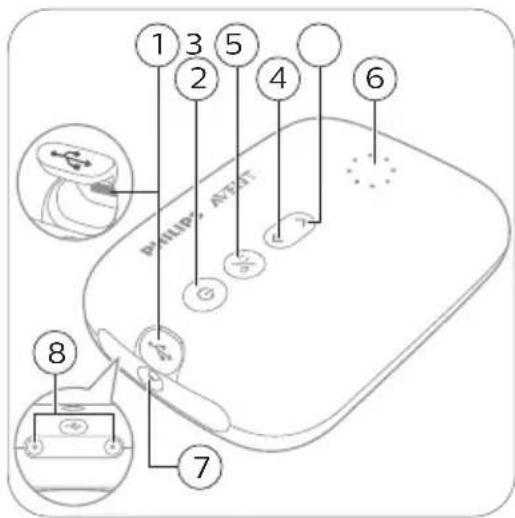
1 USB power inlet
2 On/off button with pause/play function
3 Mode selection button
4 'Level down' button
5 'Level up' button
6 Indicator lights for modes and levels
7 Tubing port for single breast pump
8 Tubing ports for double breast pump
Mode indicator lights
The breast pump has two modes. Below you find an explanation of these modes.
| Indicator lights | Mode Explanation No. of suction levels | |
| Stimulation mode(%) | Mode to stimulate the breast to start up the milk flow. | 8 suction levels |
| Expression mode(%) | Mode for efficient milk removal after milk has started flowing. After 90 sec. of stimulation, the device automatically switches to the expression mode. | 16 suction levels |
Note: When you change the suction level, the display shows the selected suction level for a few seconds and then shows the selected mode again.
Suction level indicator lights
| Suction level 1: Bottom light flashes | Suction level 2: Bottom light steady on | Suction level 3: Bottom light steady on + next light flashes | Suction level 4: 2 lights steady on. | Suction level 5: 2 lights steady on + next light flashes. | Suction level 16: all lights are on |
Note: Every time the level increases, the next light starts flashing or the flashing light becomes solid.
Pumping instructions
Warning: Before you remove the pump body from your breast, always switch off the breast pump to release the vacuum.
Warning: Do not continue pumping for more than 5 minutes at a time if you do not succeed in expressing any milk. Try to express at another time during the day.
Warning: If the process becomes very uncomfortable or painful, stop using the pump and consult your healthcare professional.
Note: If you regularly express more than 125 ml/4 fl oz per session, you can purchase and use a 260 ml/9 fl oz Philips Avent Natural bottle to prevent overfilling and spillage.

1. Wash your hands thoroughly with soap and water and make sure that your breast is clean.
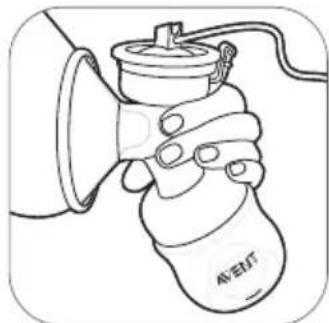
2. Place the breast pump kit onto your breast. Make sure that you center your nipple.
3. Press and hold the on/off button until the device switches on. The indicator lights go on to indicate that the device is in stimulation mode.

4. The breast pump starts in stimulation mode and slowly increases its vacuum to the last used stimulation suction level (or level 5 when used for the first time).
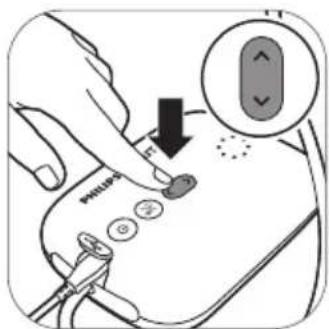
5. Use the 'level up' and 'level down' buttons to change the suction level to your preference.

6. After 90 seconds the breast pump will switch smoothly to expression mode and slowly increase its vacuum to the last used expression suction level (or level 11 when used for the first time).
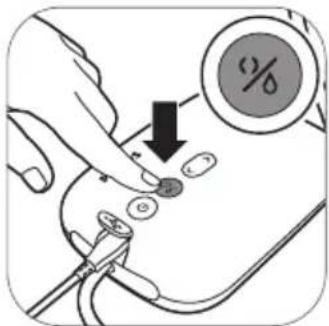
7. If your milk starts flowing earlier or if you want to switch from expression to stimulation mode, you can switch modes with the mode selection button.
8. Briefly press the on/off button if you want to pause. To continue, briefly press the on/off button again.
9. Press and hold the on/off button to switch off.
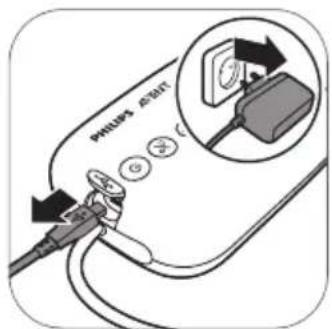
10. Unplug the adapter from the wall socket and pull the small plug out of the motor unit.
Tip: For optimal expression, choose the highest setting that still feels comfortable. This setting may differ across different sessions.
Tip: You can use the double breast pump as a single breast pump by connecting only the tube of one pump kit to the motor unit.
Using the breast pump when you have symptoms of engorgement
Breast engorgement means your breasts are overfilled with milk. This is a painful and unpleasant condition. Frequent extraction of milk and completely emptying the breasts of milk can reduce engorgement. When you have symptoms of engorgement, make sure you use a lower vacuum level to minimize stretching of breast tissue.
Note: When symptoms of engorgement are present, make sure you empty your breasts completely during each expression session.
After use
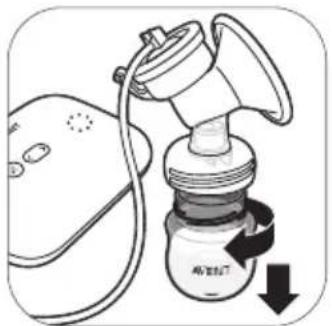
1. Unscrew the bottle. 2A.
To store the breast milk: close the bottle with the sealing disc and screw ring.
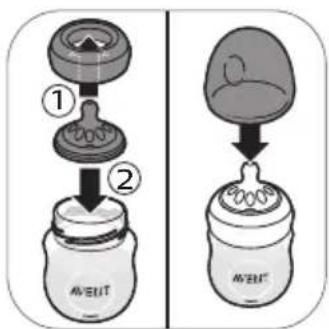
2B. To prepare the bottle for feeding your baby: place a teat in a screw ring and screw the assembled screw ring onto the bottle. Seal the teat with the bottle cap (see 'Assembling the bottle'). The Philips Avent teat and bottle cap are not parts of the rental package but they can be purchased separately.
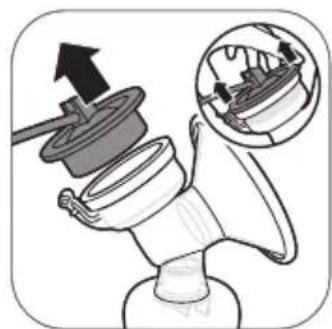
3. Remove the silicone tube and cap from the breast pump kit.
4. Disassemble and clean all parts that have been in contact with breast milk (see 'Cleaning and disinfecting').
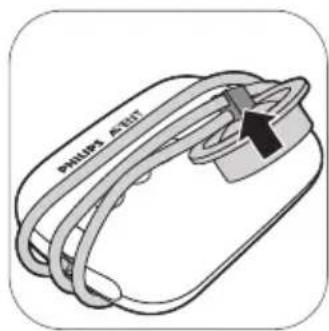
5. For easy storage, wrap the silicone tube around the motor unit and clip the cap onto the tube.
Warning: Refrigerate or freeze expressed milk immediately or keep it at a temperature of 16 - 29 ^ C (60-85 ^ F ) for a maximum of 4 hours before you feed your baby.
For more information about the breast pump and tips for expressing milk, visit www.philips.com/avent.
Storing breast milk
Below you find guidelines for storing breast milk:
Storage location Temperature Max. storage duration
Room 16-29 °C (60-85 °F) 4 hours
Refrigerator 4^ C (39 °F) 4 days
Freezer < -4^ C (25°F) 6 months
Warning: Never refreeze thawed breast milk to avoid a decrease in milk quality.
Warning: Never add fresh breast milk to frozen breast milk to avoid a decrease in milk quality and unintended thawing of the frozen milk.
Choosing the right teat for your baby
Philips Avent Natural teats are available with different flow rates. You can choose a teat number 1. It is a 0m+ teat, ideal for newborn and breastfed babies of all ages.
Use a lower flow rate if your baby chokes often, if milk drips out of its mouth during feeding or if it has trouble adjusting to the drinking speed. Use a higher flow rate if your baby falls asleep during feeding, gets frustrated or if feeding takes very long.
Philips Avent Natural teats are clearly numbered on the side, to indicate flow rate. For more information, see www.philips.com/avent.
Feeding breast milk with the bottle
For your child's safety and health
WARNING!

- Continuous and prolonged sucking of fluids will cause tooth decay.
Always check food temperature before feeding. - Throw away at the first signs of damage or weakness.
- Keep components not in use out of the reach of children.
- Never attach to cords, ribbons, laces or loose parts of clothing. The child can be strangled.
- Never use feeding teats as a soother.
- Always use this product with adult supervision.
- Keep the bottle cap away from children to avoid suffocation.
- Do not allow children to play with small parts or walk/run while using bottles.
- Inspect all parts before use and pull the feeding teat in all directions. Throw away any part at the first signs of damage or weakness.
Always discard any breast milk that is left over at the end of a feed.
Caution: To avoid damage to the bottle

- Do not place in a heated oven, plastic can melt.
- Plastic material properties may be affected by disinfection and high temperatures. This can affect the fit of the bottle cap.
- Do not leave a feeding teat in direct sunlight or heat, or leave in disinfectant for longer than recommended because this may damage the product.
Before using the bottle
- Inspect the bottle and feeding teat before each use and pull the feeding teat in all directions to prevent a choking hazard. Throw away at the first signs of damage or weakness.
- Clean and disinfect the bottle before first use and after every use (see 'Cleaning and disinfecting').
Assembling the bottle
- The teat is easier to assemble if you move it back-and-forth while pulling it upwards instead of pulling it up in a straight line.
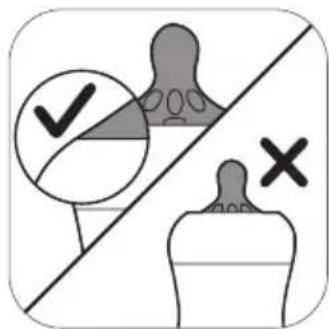
- Make sure you pull the teat through until its lower part is aligned with the screw ring.
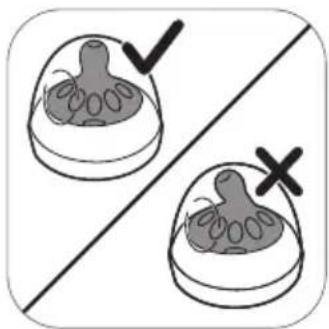
- Make sure you place the cap vertically onto the bottle so that the teat sits upright.
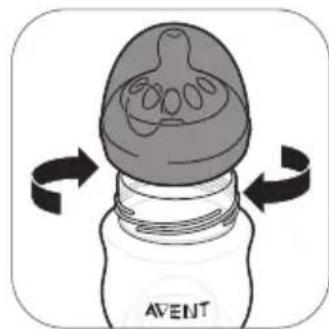
- Screw the screw ring with teat and cap on the bottle.
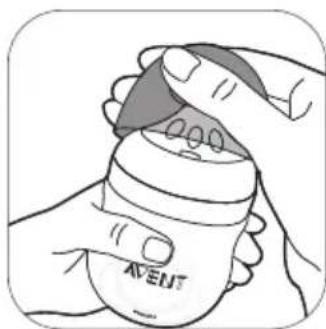
- To remove the cap, place your hand over the cap and your thumb in the dent of the cap.
Heating breast milk
If you use frozen breast milk, let it defrost completely before you heat it.
Note: If you need to feed your baby quickly, you can defrost the milk in a bowl of hot water.
Heat the bottle with defrosted or refrigerated breast milk in a bowl of hot water or in a bottle warmer. Remove the screw ring and sealing disc from the bottle.
Always stir heated breast milk to ensure even heat distribution and test the temperature before serving.
Warning: It is not recommended to use a microwave to warm up breast milk. Microwaves might alter the quality of breast milk and destroy some valuable nutrients and may produce localized high temperatures. If you heat up breast milk in the microwave, only place the container without screw ring, teat and cap in microwave. Always stir heated breast milk to ensure even heat distribution and check the temperature before serving.
Storing the bottles
- Store all parts in a dry, clean and covered container.
- Do not leave a feeding teat in direct sunlight or heat, or leave in disinfectant for longer than recommended because this may damage the product.
- For hygiene reasons, we recommend replacing the teats after 3 months.
Compatibility
The Philips Avent single/double electric breast pump Plus is compatible with all baby bottles in the Philips Avent Natural range and Philips Avent Storage cups with adapter. We do not recommend using the Philips Avent Natural Glass bottles with the breast pump.
Note: The Philips Avent single/double electric breast pump Plus (SCF373/11, SCF371/11) can only be used in combination with the Philips Avent single/double electric breast pump kit (SCF338/11). Do not combine it with other Philips models or different brands.
Warning: For hygienic reasons, the breast pump kit is only intended for repeated use by a single user.
Ordering accessories
To buy accessories or spare parts, visit www.philips.com/parts-and-accessories or go to your Philips dealer. You can also contact the Philips Consumer Care Center in your country.
When you order spare teats, make sure that you use a teat with the correct flow rate for your baby (see 'Choosing the right teat for your baby') and do not mix Philips Avent Anti-colic bottle parts and teats with parts of the Philips Avent Natural bottles. They do not fit and could cause leakage or other issues.
Recycling
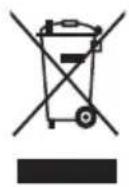
- This symbol means that this product shall not be disposed of with normal household waste (2012/19/EU).
- Follow your country's rules for the separate collection of electrical and electronic products. Correct disposal helps prevent negative consequences for the environment and human health.
Warranty and support
If you need information or support, please visit www.philips.com/support or read the international warranty leaflet.
Troubleshooting
This chapter summarizes the most common problems you could encounter with the breast pump. If you are unable to solve the problem with the information below, visit www.philips.com/support for a list of frequently asked questions or contact the Consumer Care Center in your country.
| Problem Solution | |
| I experience pain when I use the breast pump. | - Choose a suction level that is comfortable for you. - Check if the silicone diaphragm is not damaged (does not have small cracks, holes etc.). - Make sure that your nipple is placed in the center of the cushion. - If the pain persists, stop using the breast pump and consult your healthcare professional. |
| The breast pump does not switch on (indicator lights do not go on). | - Check if you are using the adapter that was supplied with the device and that the adapter is connected correctly to the motor unit and wall socket. - Connect the adapter to another wall socket. Then press and hold the on/off button to check if the breast pump can be switched on. - If the problem persists, contact the Consumer Care Center via www.philips.com/support. |
| All indicator lights on the motor unit are flashing and device shuts off automatically. | - Try to switch on the motor unit again. - Check if you are using the adapter that was supplied with the device. - If the problem persists, contact the Consumer Care Center via www.philips.com/support. |
| I do not feel any suction/the suction level is too low. | If possible, try a higher suction level. Check if the silicone diaphragm is assembled correctly (see 'Assembling the breast pump'). Check if the white valve is not damaged and assembled correctly (see 'Assembling the breast pump'). Check if the other parts of breast pump are intact and assembled correctly (see 'Assembling the breast pump'). Make sure that the pump is positioned correctly on the breast to allow a seal between breast pump and breast. If you still do not feel any suction, please contact the Consumer Care Center via www.philips.com/support. |
| The suction of the breast pump is too strong. | If possible, try a lower suction level. When you express for the first time, start with the default suction level (level 5 in stimulation mode, level 11 in expression mode) and increase/decrease the level when needed. During different expression sessions, different levels may feel most comfortable for you. Make sure that you only use the breast pump parts provided with this breast pump. Check if the silicone diaphragm is not damaged (does not have small cracks, holes etc). If the problem persists, contact the Consumer Care Center via www.philips.com/support. |
| I express little/no milk when I use my breast pump. | If you do not feel enough suction, please check Troubleshooting item 'I do not feel any suction/the suction level is too low'. If you are using the Philips Avent breast pump for the first time, you may need some practice before you are able to express any milk. More expressing tips can be found on the Philips Avent website www.philips.com/avent. |
| When I switch on the breast pump after storage, it does not start working immediately. | Perhaps you stored the breast pump at a temperature below the minimum storage temperature or above the maximum storage temperature. Let the breast pump acclimate in a room of 20 °C/68 °F for 30 minutes to adjust its temperature to the operating range (5 °C/41 °F to 40 °C/104 °F). |
Undesirable side effects
Any serious incident that has occurred in relation to this device should be reported to Philips via www.philips.com/support and to the competent authority of the Member State in which the user and/or patient is established.
When using the breast pump, the below undesirable side effects may occur. If you experience any of these symptoms, contact a healthcare professional or breastfeeding specialist.
| Undesirable side effect | Description |
| Pain sensation Pain felt on the breast or nipple, or felt as a response to the suction being above a comfortable level. | |
| Sore nipples Persistent pain in the nipples at the beginning of the pumping session, or that lasts throughout the entire pumping session, or pain between sessions. | Erythema (redness) Redness of the skin of the breast. |
| Bruise A reddish-purple discoloration that does not fade when pressed. When a bruise fades, it may become green and brown. | Thrombus Thrombus can result into tenderness, pain, redness, swelling and/or heat. |
| Injured tissue on nipple (nipple trauma) | - Fissures or cracked nipples. - Skin tissue peeling off the nipple. Normally occurs in combination with cracked nipples and/or blisters. - Nipple tear. - Blister. Looks like small bubbles on the surface of the skin. - Bleeding. Cracked or torn nipples can lead to bleeding of the affected area. |
Storage conditions
Keep the breast pump out of direct sunlight as prolonged exposure may cause discoloration. Store the breast pump and its accessories in a safe, clean and dry place.
If the device has been stored in a hot or cold environment, place it in an environment with a temperature of 20^ (68°F) for 30 minutes to let it reach a temperature within the usage conditions (5°C to 40°C/41°F to 104°F) before you use it.
Electromagnetic fields (EMF)
This Philips device complies with all applicable standards and regulations regarding exposure to electromagnetic fields.
Technical information
| Single electric breast pump | Double electric breast pump | |
| Vacuum level Stimulation: -60 | to -200 mbar (-45 to -150 mmHg)Expression: -60 to -360 mbar (-45 to -270 mmHg)Adjustable in steps of 20 mbarIntermittent vacuum | |
| Cycle speed Stimulation: 105- | 120 cycles/min, depending on vacuum levelExpression: 53-85 cycles/min, depending on vacuum level | |
| Motor unit rated input 5 V d.c. / 1.1 A 5 V d.c. / 1.8 A | ||
| Mains adapter rated input Externdual mains adapter 100-240 V a.c.50/60 Hz400 mA | ||
| Mains adapter rated output 5 | V d.c. / 1.1 A 5 V d.c. / 1.8 A | |
| Adapter type number S009A | Hz050yyyy The letters "yyyy" represent the output current from 0100 (1000 mA) to 0180 (1800 mA), increments in steps of 100 mA. The letter "z" denotes type of plug, it can be: U, V, B, S, C, A, D, K, T, I, E, F. | |
| Power port Micro-USB | ||
| Operating conditions | Temperature: 5 °C to 40 °C (41 °F to 104 °F) Relative humidity: 15 to 90 % (non-condensing) | |
| Storage and transportation conditions | Temperature: -25 °C to 70 °C (-13 °F to 158 °F) Relative humidity: up to 90 % (non-condensing) | |
| Operating pressure 700-1060 | hPa (<3000 m altitude) | |
| Net weight 230 g 310 g | ||
| External dimensions Motor unit | Unit: 145 mm x 95 mm x 45 mm (LxWxH) | |
| Device classification Applicable | le classifications: Degree of protection against electric shock: - Class II ME equipment - Type BF applied part The breast pump and the adapter are specified as medical electrical system according to IEC 60601-1. | |
| Materials ABS, silicone (motor) | unit) Polypropylene, silicone (other parts) | |
| Service life 500 hours | ||
| Mode of operation Continuous | us operation | |
| Ingress protection IP22 (motor) | unit), IP20 (adapter) | |
Electromagnetic compatibility - compliance information
This device has been tested and found to comply with IEC 60601-1-2:2014 Ed 4.0 for electromagnetic compatibility (EMC) as Class B according to CISPR 11:2009. Tests levels are listed in the accompanying tables. Only use this Philips Avent single/double electric breast pump Plus in combination with the adapter supplied.
Emissions Compliance
Electromagnetic environment - guidance
| RF emissions | Group 1 | The device does not use RF energy for its intended function. Therefore, its RF emissions are very low and are not likely to cause any interference in nearby electronic equipment. |
| CISPR 11 |
Emissions Compliance Electromagnetic environment - guidance
| RF emissions CISPR 11 | Class B | The device is suitable for use in locations in residential environments and in establishments directly connected to a low voltage power supply network which supplies buildings used for domestic purposes. |
| Harmonic emissions IEC 61000-3-2 | Complies Class A Category | |
| Voltage fluctuations / flicker emissions IEC 61000-3-3 | Complies |
Guidance and manufacturer's declaration - electromagnetic immunity
The Philips Avent single/double electric breast pump Plus is intended for use in the electromagnetic environment listed below. The user of the device should ensure that it is used in such an environment to prevent improper operation.
Immunity test Immunity test level Electromagnetic environment - guidance
| Electrostatic discharge (ESD) IEC 61000-4-2 | ±8 kV contact ±15 kV air | Floors can be a source of static electricity. When the air is very dry (<20 % RH) the user is advised to prefer to use the device in a room with concrete or wooden floors (instead of using it in a room with a synthetic floor). |
| Radiated RF EM fields IEC 61000-4-3 | 10 V/m80 MHz - 2.7 GHz80 % AM at 1 kHz | |
| Proximity fields from RF wireless communications equipment IEC 61000-4-3 | 385 (27), 450 (28), 710 (9), 745 (9), 780 (9), 810 (28), 870 (28), 930 (28), 1720 (28), 1845 (28), 1970 (28), 2450 (28), 5240 (9), 5500 (9), 5785 (9) MHz (V/m) | The device is immune against any RF wireless communication device such as smart phone, Wi-Fi or Bluetooth device at a distance of 30 cm or more. Avoid a closer distance as this may result in improper operation. |
| Rated power frequency magnetic fields IEC 61000-4-8 | 30 A/m50 Hz or 60 Hz | |
| Electrical fast transient/ burst IEC 61000-4-4 | ±2 kV100 kHz repetition frequency | Mains power quality expected of a typical commercial or residential environment. |
| Surges IEC 61000-4-5 | ±1 kV Line-to-line±2 kV Line-to-ground | Mains power quality expected of a typical commercial or residential environment. |
Immunity test Immunity test level Electromagnetic environment - guidance
| Conducted disturbances induced by RF fields | 3 Vrms, before modulation is applied | |
| IEC 61000-4-6 | 0.15 MHz - 80 MHz | |
| 6 Vrms, before modulation is applied, in ISM and amateur radio bands between 0.15 MHz and 80 MHz | ||
| 80 % AM at 1 kHz | ||
| Voltage dips, short interruptions and voltage variations on power supply input lines | 0 % UT; 0.5 cycle at 0°, 45°, 90°, 135°, 180°, 225°, 270° and 315° | Mains power quality expected of a typical commercial or residential environment. At power interruptions the breast pump will switch off. |
| IEC 61000-4-11 | 0 % UT; 1 cycle and 70 % UT; 25/30 cycles single phase at 0° | |
| 0 % UT; 250/300 cycle |
Note: UT is the AC mains voltage prior to application of the test level. If in the unlikely event the Philips Avent single/double electric breast pump Plus is locked inoperative in a function by disturbances from other devices beyond the levels stated in the table above, the device will shut-off completely and restart. In that case make sure the distance to the other device causing this disturbance is enlarged.
Explanation of symbols
The warning signs and symbols are essential to ensure that you use this device safely and correctly and to protect you and others from injury. Below you find the meaning of the warning signs and symbols on the label and in the user manual.
| Symbol | Explanation |
| Indicates to follow the instructions for use. | |
| Indicates important information such as warnings and cautions. | |
| Indicates usage tips, additional information or a note. | |
| Indicates the manufacturer. | |
| Indicates the manufacturing date. | |
| € 0344 | Indicates the compliance with the essential requirements of the Council Directive 93/42/EEC of 14 June 1993 concerning medical devices. |
| MD | Indicates that the device is a medical device. |
| Indicates that the part of the appliance that comes into physical contact with the user (also known as the applied part) is of type BF (Body Floating) according to IEC 60601-1. The applied part is the breast pump kit. | |
| Indicates 'Class II Equipment'. The adapter is double-insulated (Class II). | |
| REF | Indicates manufacturer's catalog number of the breast pump. |
| = | Indicates 'direct current'. |
| ~ | Indicates 'alternating current'. |
| Indicates separate collection for electrical and electronic equipment in accordance with the EU directive. Electrical waste products should not be disposed of with household waste. See chapter 'Recycling' for more information. | |
| IP22 | Indicates the protection against ingress of solid foreign objects greater than 12.5 mm and against harmful effects due to the ingress of dripping water when tilted at 15 degrees. |
| IP20 | Indicates the protection against ingress of solid foreign objects greater than 12.5 mm and no protection against ingress of water. |
| LOT | Indicates the batch number of the medical device. |
| SN | Indicates the manufacturer's serial number of the medical device. |
| → | Indicates USB. |
| % | Indicates the relative humidity upper limits to which the device can be safely exposed: up to 90%. |
| Indicates the storage and transportation temperature limits to which the medical device can be safely exposed: -25 °C to 70 °C/-13 °F to 158 °F. | |
| FSC | Indicates Forest Stewardship Council. The FSC trademarks enable consumers to choose products that support forest conservation, offer social benefits, and enable the market to provide an incentive for better forest management. |
| Indicates that an object is capable of being recycled - not that the object has been recycled or will be accepted in all recycling collection systems. | |
| Indicates that the packaging should be recycled and packaging fees have been paid to the green dot recycling organizations. | |
| WORLD-WIDEGUARANTEE | Indicates 2-year Philips worldwide guarantee. |
| Indicates that the breast pump must be kept out of direct sunlight. | |
| Indicates that the breast pump must be kept dry. | |
| Indicates the operating pressure range: 700 to 1060 hPa. |
User manual for rental agent
Introduction
Thank you for choosing to rent out this Philips Avent single/double electric breast pump Plus to your customers. These instructions describe how you can prepare the breast pump for rental use. For all warnings and general specifications of the pump, please refer to section 'User manual for mother' or refer to your Philips sales agent.
Note: The Philips Avent single/double electric breast pump Plus (SCF373/11, SCF371/11) can only be used in combination with the Philips Avent single/double electric breast pump kit (SCF338/11). Do not combine it with other Philips models or different brands.
Warning: For hygienic reasons, the breast pump kit is only intended for repeated use by a single user.
General description
Note: The numbers mentioned below refer to the numbers on the figure of the front foldout page of this user manual.
Note: The double breast pump comes with two pieces of the items shown in Figures B and C.
Rental items (Fig. A) - motor unit and adapter (to be returned)
A1 USB power inlet
A2 On/off button with pause/play function
A3 Mode selection button
A4 'Level down' button
A5 'Level up' button
A6 Indicator lights for modes and levels
A7 Tubing port for single breast pump
A8 Tubing ports for double breast pump
A9 Adapter
The adapter supplied may vary for different countries.
Breast pump kit (Fig. B) (for personal use)
B1 Silicone tube and cap
B2 Silicone diaphragm
B3 Pump body
B4 Cover
B5 Cushion
B6 White valve
Philips Avent Natural bottle (Fig. C) (for personal use)
C1 Screw ring
C2 Sealing disc
C3 Bottle
Accessories (to be returned)
These accessories are not shown in the figure:
- Travel bag
Insulation pouch
Additional item (to be returned)
This additional item is not shown in the figure:
- User manual
Important safety information
Read the important safety information (see 'User manual for mother') before you perform the quality checklist with the breast pump.
Preparing for rental use
Follow the 6 steps below to successfully prepare the Philips Avent single/double electric breast pump Plus for rental use.
Step 1: Register and track
Before renting out the breast pump for the first time, please visit www.philips.com/welcome to register the product.
Step 2: Instructions for pump return
Note: Before unpacking returned items and before performing the checks on returned items, put on personal protective equipment (disposable gloves).
2A Clean the motor unit (the buttons and overall surface). You can do this by using alcohol wipes (isopropanol).
2B Clean the adapter. You can do this by using alcohol wipes (isopropanol).
2C Check if the customer returned only:
- Motor unit
- Adapter
- Travel bag
Insulation pouch - User manual
2D It is important to check whether the customer has not accidentally also returned other items, including the breast pump kit which is for personal use only. Please dispose of all other items in case they are returned to you.
Keep Throw away
Step 3: Quality checklist
Follow steps 3A to 3I to inspect the returned items for any damage or malfunction. In case of damage or malfunction, please contact your Philips sales agent.
3A - Check whether the returned items include a motor unit.
- Also check whether the correct adapter (labeled with type number S0009AHz050yyyy) has been returned.
3B Check whether any damage or malfunction is visible from the outside.
3C Gently shake the motor unit to listen for any loose parts inside.
3D - Insert the adapter into the wall socket and insert the small plug at the other end into the motor unit.
- Press and hold the on/off button until the device switches on.
The indicator lights go on.
3E Check whether the indicator lights for modes and levels (A6 in Fig. A) light up.
3F Listen whether the device starts pumping.
3G Listen to the sound of the pumping; it should be a rhythmic pumping sound.
3H Check whether the two outlets draw in air. In order to check the performance of the pump, you should have a spare breast pump kit to be able to assemble the complete pump.
How to check the performance of the pump:
- Assemble all parts of the breast pump kit: silicone tube and cap, pump body with white valve, Natural bottle and diaphragm (Fig. B).
- Press and hold the on/off button (A2 in Fig. A) until the device switches on and press the 'Level up' button (A5 in Fig. A) several times.
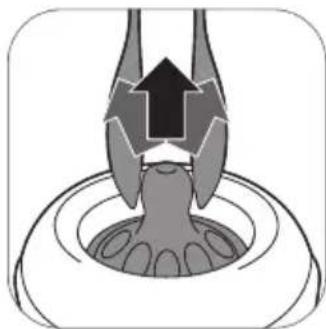
- Check if the silicone diaphragm (B2 in Fig. B) moves gradually to the top of the cap and all the way back down in each pumping cycle.
The above-described checks must be performed for both diaphragms.
If any of diaphragms does not move according to the description above, please contact your Philips sales agent.
31 Check the travel bag and insulation pouch to make sure they are not damaged.
- Check the user manual for completeness.
If the travel bag, insulation pouch or the user manual is damaged, please replace.
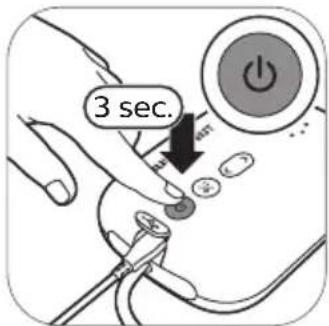
Step 4: Factory reset
Reset the motor unit to factory settings as follows:
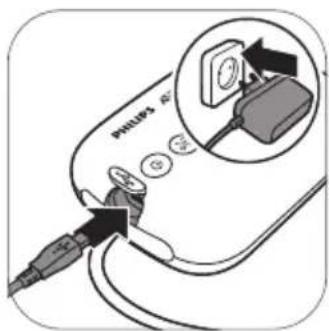
4A. Make sure that the adapter is inserted into the wall socket and that the small plug at the other end is inserted into the motor unit.
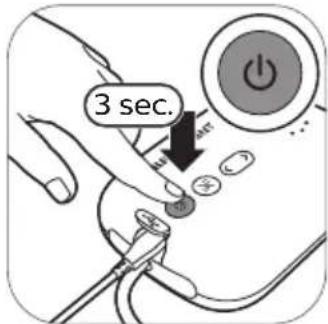
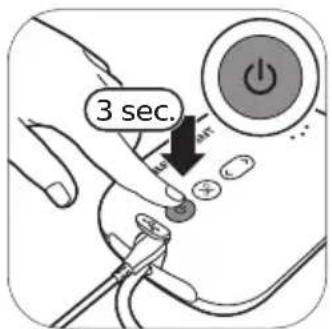
4B. Press and hold the on/off button to switch off.
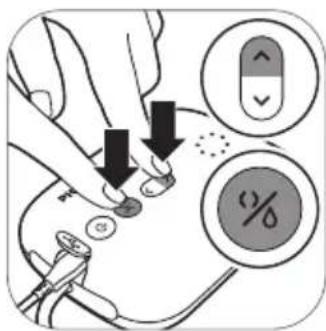
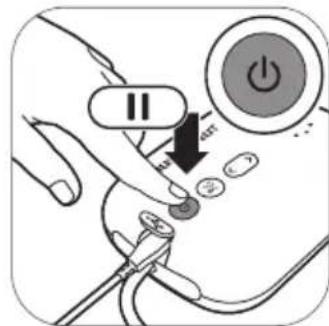
4C. Simultaneously press the mode selection button (see A3 in Fig. A) and the 'Level up' button (see A5 in Fig. A).

4D. Wait until the indicator lights for modes and levels light up (A6 in Fig. A).
Step 5: Cleaning before renting
5A Motor unit Adapter
It is important to repeat cleaning of the motor unit (the buttons and overall surface) and the adapter before the breast pump is rented out to the next customer. This can be done by using alcohol wipes (isopropanol).
5B Travel bag Insulation pouch
Clean the travel bag and the insulation pouch by wiping them with a clean, damp cloth with water and mild detergent.
Warning: Do not use alcohol wipes (isopropanol) to clean the travel bag and the insulation pouch.
5C User manual Do not clean the user manual. If the user manual is dirty or damaged, please replace it.
Step 6: Prepare for the next rental use
Make sure that the following 6 items are included in an assembled package for the next customer:
Motor unit
-Adapter
- Breast pump kit - a new kit for each new customer in case of a single electric breast pump. Please include two new kits for each new customer in case of a double electric breast pump.
-Travelbag
Insulation pouch
-User manual
Inhalt
B2 Diaframma in silicone
B5 Cuscinetto
B3 Tiralatte
B6 Valvola bianca
Biberon Natural Philips Avent (Fig. C) (per uso personale)
Cl Ghiera
C2 Dischetto sigillante
C3 Biberon
