
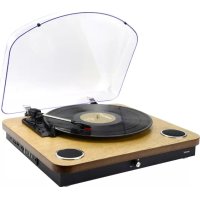
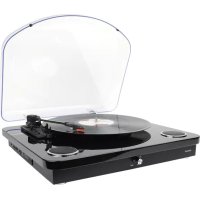
MRD165 - Turntable DENVER - Free user manual and instructions
Find the device manual for free MRD165 DENVER in PDF.
| Brand | Denver |
| Model | MRD165 |
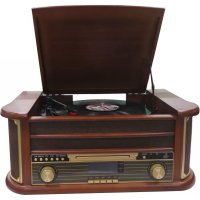
| Product type | Hi-fi system with turntable, CD player, double cassette, DAB+/FM radio, MP3 recording |
| Power supply | 230 V AC, 50 Hz |
| Power consumption | 20 W |
| Dimensions (approx.) | 400 × 300 × 200 mm (estimate) |
| Weight (approx.) | 5 kg (estimate) |
| FM range | 87.5 - 108 MHz |
| DAB range | Band III, 174.92 - 239.2 MHz |
| CD player | Yes (CD audio, CD-R, CD-RW, MP3) |
| Turntable | Yes, with speeds 33⅓, 45 RPM, 45 RPM adapter provided |
| Double cassette | Yes, playback and recording (continuous playback possible) |
| Auxiliary input | Yes (3.5 mm jack) |
| Headphone output | Yes (3.5 mm jack) |
| USB port | Yes, for MP3 playback and recording |
| SD/MMC card reader | Yes, for MP3 playback and recording |
| MP3 recording | From CD, radio, cassette, phono or aux to USB/SD |
| LCD display | Yes, information display |
| Remote control | Yes, with 2×AAA batteries (not included) |
| Timer/Standby | Programmable timer, auto standby after 15 minutes of no playback |
| Equalizer | 4 preset modes (Rock, Pop, Jazz, Classic) |
| Safety | Ventilation, do not expose to water, unplug if not used for a long time |
| Maintenance | Clean with a soft, dry cloth, do not use abrasive products |
Frequently Asked Questions - MRD165 DENVER
User questions about MRD165 DENVER
0 question about this device. Answer the ones you know or ask your own.
Ask a new question about this device
Download the instructions for your Turntable in PDF format for free! Find your manual MRD165 - DENVER and take your electronic device back in hand. On this page are published all the documents necessary for the use of your device. MRD165 by DENVER.
USER MANUAL MRD165 DENVER
facebook.com/denverelectronics

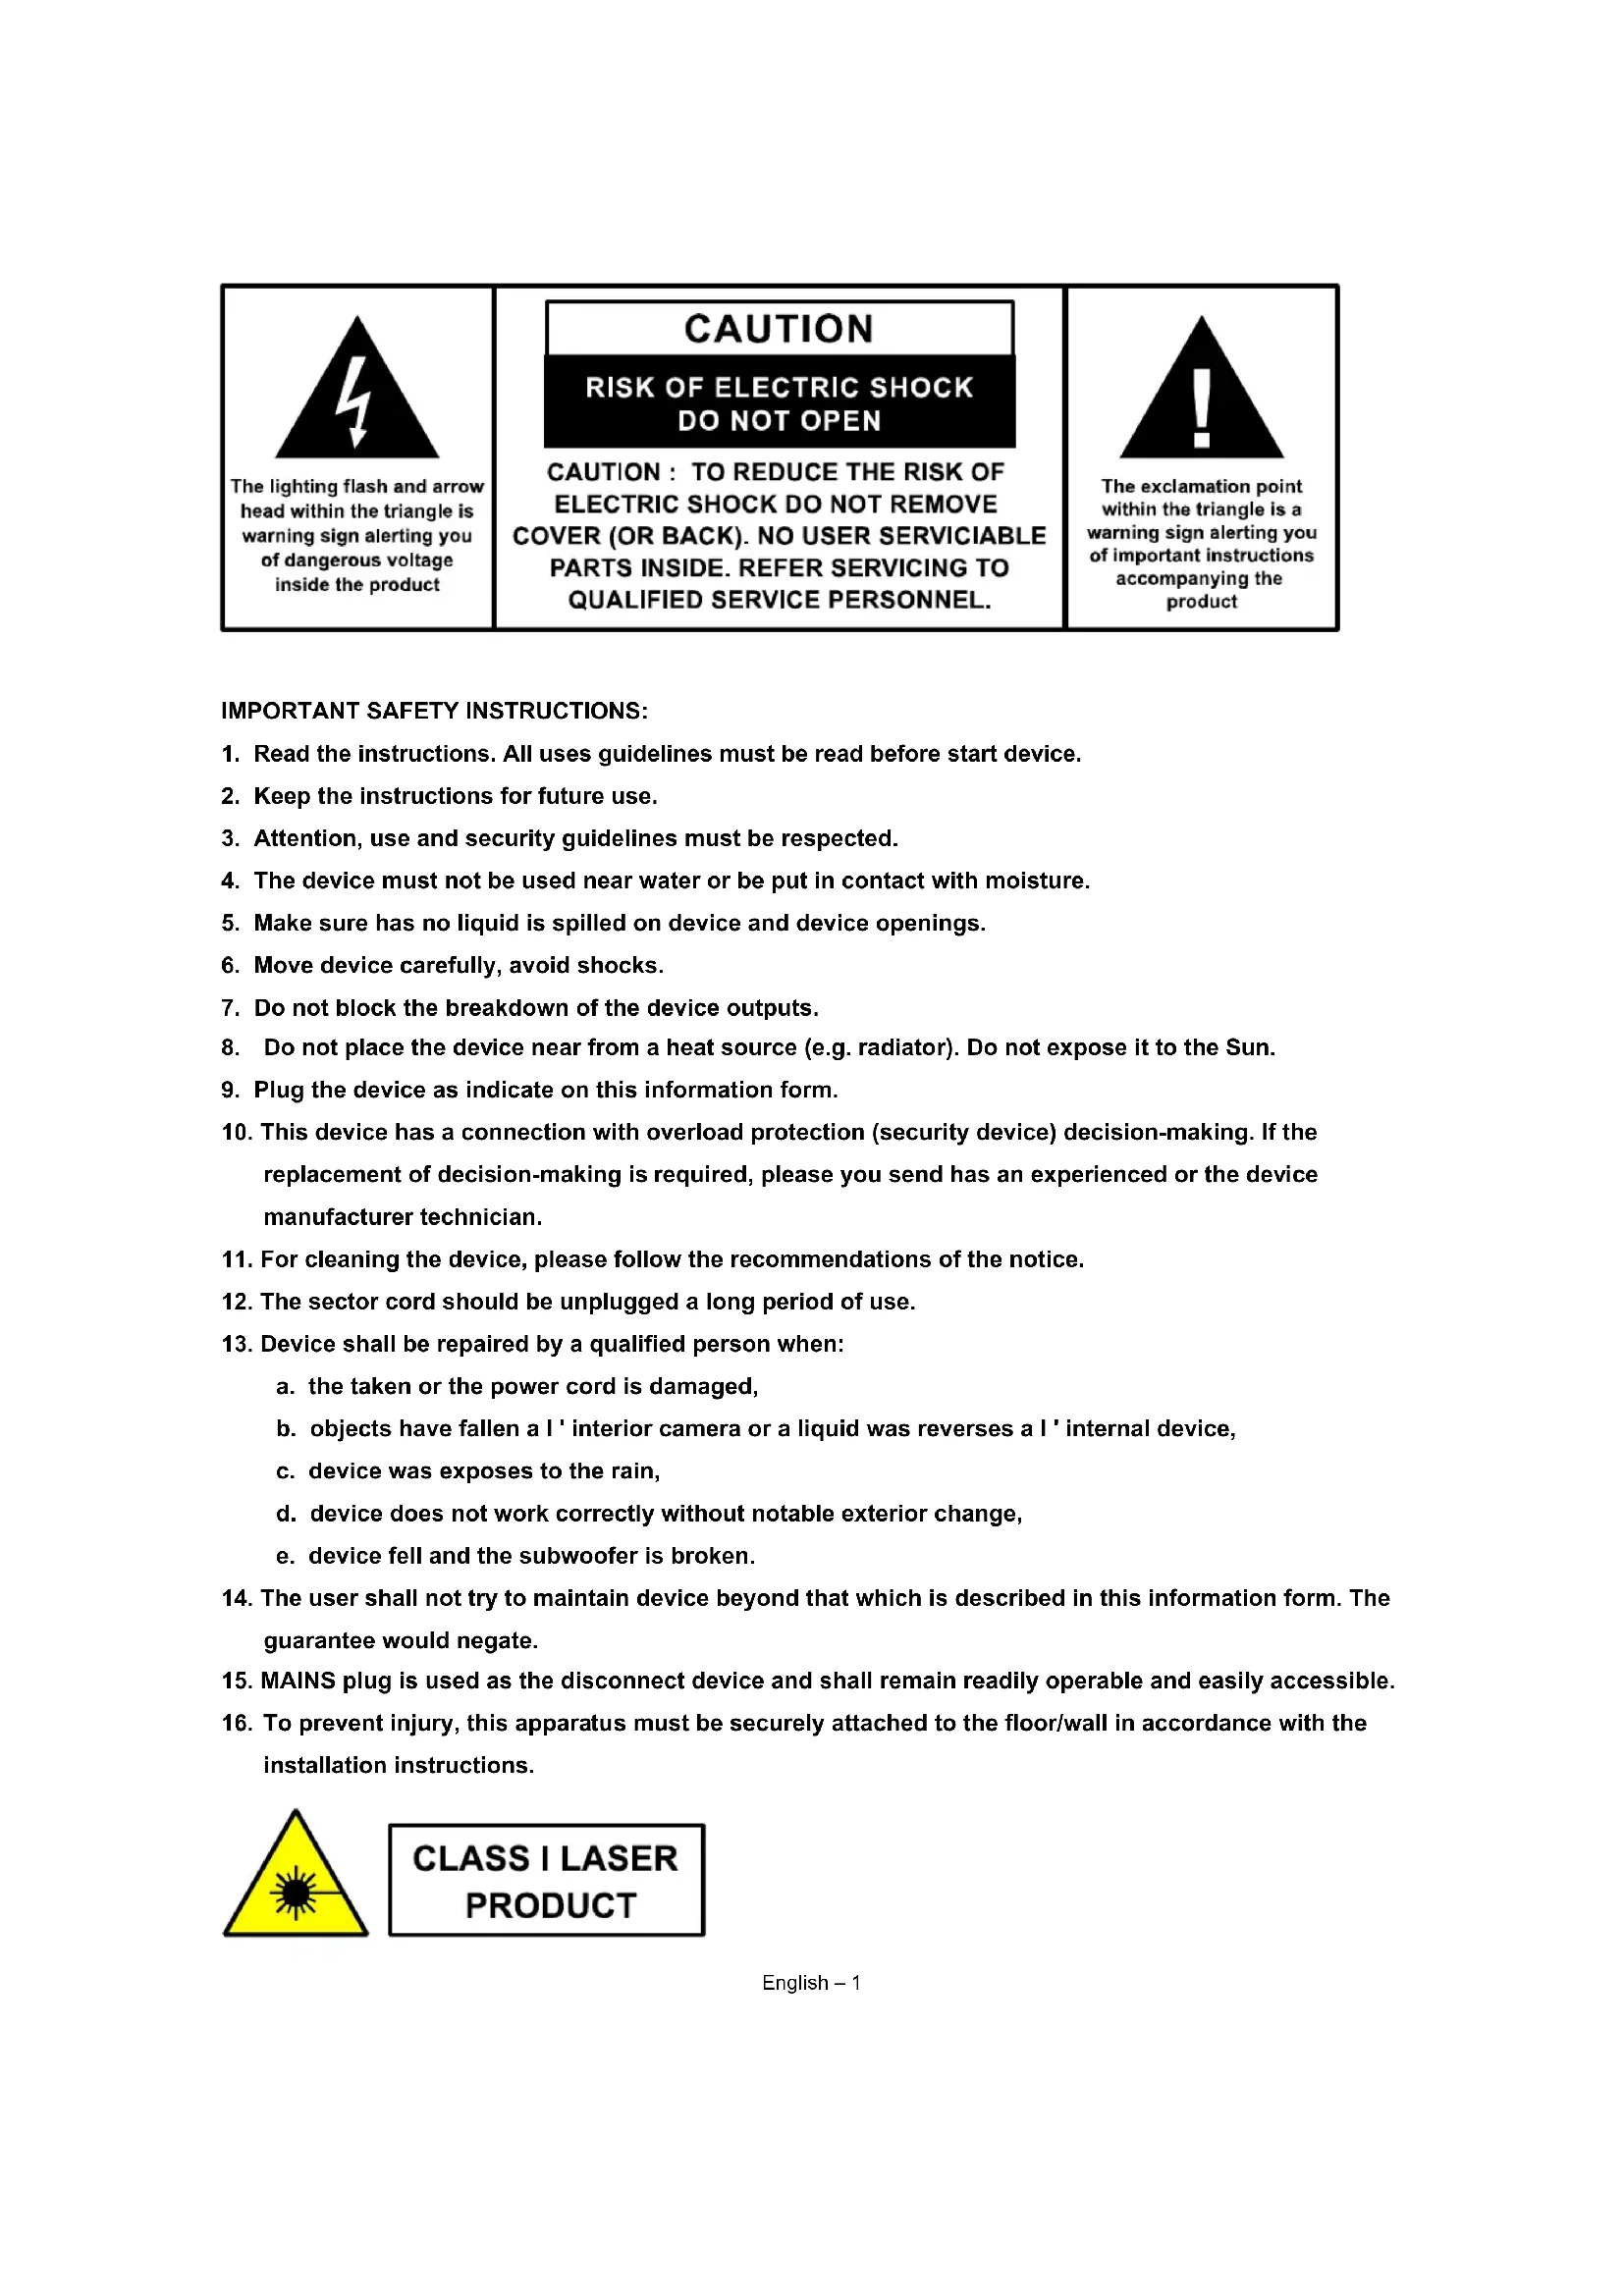
The lighting flash and arrow head within the triangle is warning sign alerting you of dangerous voltage inside the product
CAUTION
RISK OF ELECTRIC SHOCK DO NOT OPEN
CAUTION: TO REDUCE THE RISK OF ELECTRIC SHOCK DO NOT REMOVE COVER (OR BACK). NO USER SERVICIABLE PARTS INSIDE. REFER SERVICING TO QUALIFIED SERVICE PERSONNEL.

The exclamation point within the triangle is a warning sign alerting you of important instructions accompanying the product
IMPORTANT SAFETY INSTRUCTIONS:
- Read the instructions. All uses guidelines must be read before start device.
- Keep the instructions for future use.
- Attention, use and security guidelines must be respected.
- The device must not be used near water or be put in contact with moisture.
- Make sure has no liquid is spilled on device and device openings.
- Move device carefully, avoid shocks.
- Do not block the breakdown of the device outputs.
- Do not place the device near from a heat source (e.g. radiator). Do not expose it to the Sun.
- Plug the device as indicate on this information form.
- This device has a connection with overload protection (security device) decision-making. If the replacement of decision-making is required, please you send has an experienced or the device manufacturer technician.
- For cleaning the device, please follow the recommendations of the notice.
- The sector cord should be unplugged a long period of use.
- Device shall be repaired by a qualified person when:
a. the taken or the power cord is damaged,
b. objects have fallen a I' interior camera or a liquid was reverses a I' internal device,
c. device was exposes to the rain,
d. device does not work correctly without notable exterior change,
e. device fell and the subwoofer is broken.
- The user shall not try to maintain device beyond that which is described in this information form. The guarantee would negate.
- MAINS plug is used as the disconnect device and shall remain readily operable and easily accessible.
- To prevent injury, this apparatus must be securely attached to the floor/wall in accordance with the installation instructions.

CLASS I LASER PRODUCT
BATTERY INSTALLATION
The battery compartment is located on the back of the remote control.
- Remove the battery compartment door by pressing in on the tab and lifting it off.
- Insert two (2) AAA size batteries (not included) into the battery compartment following the polarity markings inside the battery compartment.
- Replace the battery compartment door.
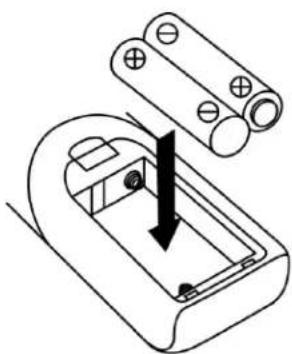
Battery Precautions
- Replacement of batteries must be done by an adult.
- Do not mix old and new batteries.
Do not mix alkaline, standard (carbon-zinc) or rechargeable (nickel-cadmium) batteries.
The supply terminals are not to be short-circuited.
Non-rechargeable batteries are not to be recharged - Exhausted batteries are to be removed.
- Only batteries of the equivalent type are to be used.
- Batteries are to be inserted with the correct polarity.
- Dispose of batteries properly. Do not dispose of batteries in fire. The batteries may explode or leak.
Location of controls
Usage of controls or adjustments or performance of procedures other than those specified herein may result in hazardous radiation exposure. This unit should not be adjusted or repaired by anyone except qualified service personnel.
Important:
Since movement of the CD mechanism and the sensitive circuitry may cause interference to the radio tuner nearby, switch this unit off while operating other radio devices.
Precautions for use
Installation
- Unpack all parts and remove protective material.
Do not connect the unit to the mains before checking the main voltage and before all other connections have been made.
Do not cover any vents and make sure that there is a space of several centimeters around the unit for ventilation.
AC connection
- Plug in the AC cord (33) to the AC outlet. The unit will go to standby mode and the LCD display (2) will dim light up.
- Turn on the unit (6), if the LCD display (2) is on with backlighting, it means the power supply is normal. Now your system is ready to play the music.
Setting the clock
- Set unit in standby mode.
- Press and hold the " Mem/Clk-Adj" button (12) until display will flash "24HR" press the Skip Up or Skip Down button (23/13) to select the clock format between 12 or 24Hour. Then press the " Mem/Clk-Adj" button (12).
- The first digit of " 0:00 " is flashing on the LCD display (2). Press Skip Up or Skip Down button (23/13) to set the correct hour. Press " Mem/Clk-Adj " button (12) to store the correct hour.
- The third & fourth digit of " 00 " is flashing, press the Skip Up or Skip Down button (23/13) to set the correct minutes. Then press " Preset/Clk-Adj " button (12) to store the correct minute.
The clock setting mode will automatically quit if no button is being pressed in a period of about 5 seconds after pressing the "Mem/Clk-Adj" button.
The pre-set time will be re-set completely if dis-connecting the main power supply except backup battery installed. You are recommended to switch the system into standby mode for convenience usage.
Listening to radio
Operation
- Plug in the provided DAB/FM tuner antenna to the antenna socket (30) then switch on the unit by On/Standby button (6), then press Function button (10) to select "DAB" mode then press Band button (16) to select FM mode.
- Tune to the required station by pressing the Tuning Up or Down button (23/13).
- Turn the Volume knob (19) to the desired volume level.
Auto tuning (on the remote control only)
- Set the unit to FM mode.
- Press the Scan button once on the remote control, unit will start to scan at tuning up direct until radio station received. Press and hold the Scan button on the remote control for a second, the unit will scan to tuning down direction. If the radio data system (RDS) broadcasting signal received, the unit will set the actual time automatically.
- Turn the Volume knob (19) to the desired volume level.
Radio data system (RDS)
This is the features to display the information which released from the radio broadcast and will showed on LCD display step by step as below by pressing the Info button(on the remote control) continuously.
Radio text program type signal strength date/time frequency mono/stereo
Digital audio broadcasting (DAB) radio
- Set the unit to "DAB" mode by Function button (10).
- Press the Scan button on the remote control once, unit will start to full scan from range 11b-12d one time within around 2 second. Then press Tune up/down button (23/13) to select your desired DAB channel.
- Press the Info button continuously to check the below info released by DAB.
Group name frequency transfer rate signal strength date/time program type scrolling text
- Press the Volume knob (19) to the desired volume level.
Preset stations
You can store up to total of 40 radio stations in the memory (20-FM/20-DAB).
- Set to FM/DAB mode
- Turn to the desired radio station by "manual" or "auto" tuning method.
- Press and hold the Mem/Clock-Adjust button (12) around four second to enable memory state, the preset station will flash on LCD display.
- Preset the Folder/ Pre up button (22) to select the desired station memory for storage.
- Press Mem/Clock-Adjust button (12) to confirm the preset memory.
- Repeat step 2 to 5 to store other stations.
Recall preset stations
- Press the Mem/Clock-Adjust button (12) once to enable recall state
- Press Folder/ Pre up button (22) to select the desired memory state
- Press Memory/Clock-Adjust button (12) to confirm the recall memory station.
The pre-set memories will be cancelled completely if dis-connecting the main power supply and back up battery did not installed. You are recommended to switch the system into standby mode for convenience usage.
There are 3 seconds for program state, after 3 sec. This state would resume to normal tuning mode automatically.
You can overwrite a present station by storing another frequency in its place.
FM-Stereo reception
- Press the "Enter" knob (3) repeatedly, the FM programs are receiving in mono and stereo mode repeatedly. In particular when stereo signals are weak, it is preferable to receive the program in Mono.
If stereo signal is being received, the stereo indicator " (ST) will appear on LCD display (2) to show FM Stereo program is now receiving.
Hints for best reception:-
FM : the receiver work with detachable DAB/FM wire antenna, made sure the antenna had plugged into the antenna socket (30) and place it on proper location for the best reception.
Aux-in connection
- Connect the unit to other device by connecting the Aux in jack (34) with a 3.5mm cable(not provided) and other end connect to the external device such as Discman/MP3 player to perform the music playback or encoding function etc.
-
- Press the Function button (10) to Phono/Aux position.
-
- Adjust the Power ON-OFF/ Volume Control Knob (19) to desired volume level.
-
- Start to play your external device.
Playing Compact Disc
- Getting start
- Press Function button (10) to select "CD" mode.
- Push the CD tray open (25) to open the CD tray.
- Place a CD with the printed side facing up and then close the CD tray.
- Focus search will performing and the LCD display (2) will show the total number of tracks & total playing time. Then, the unit will start to automatically.
- Turn Volume knob (19) to the desired volume level.
Play/Pause mode
- To interrupt, press the "Play/Pause button (16) once, "PAUES" will show on the LCD display (2). Press again to resume normal playback.
- Stop mode
- If "Stop" button (3) is pressed during play or pause mode, system will go to stop mode.
- Skip mode (skip up / skip down
- During play or pause mode, if "skip up▶" button (23) is pressed. It will go to next track and display the track no. and then remain the play or pause mode.
- During play or pause mode, if "skip down" button (13) is pressed. It will go to the previous track, original track no. is display and remain the play or pause mode.
For MP3 Disc
- After focus search is performing, the total number of track and album will be shown on the LCD display (2). The unit will start to plat directly.
- Turn " Folder/ Pre up ▲/down ▼" knob on the remote control to select the folder number.
- Press "Skip Up" or Skip Down button (23/13) to select the track number.
ID3/Display function (on remote control only)
Press the "Info" button repeatedly, the LCD display (2) show "file" during playback of MP3 file, the song file/album/song/artist name is being displayed few seconds in sequence. Then will change back to current clock time.
Remark:
In that case of no name or not supportive languages had been assigned for the track, LCD display will blank (2) when press the Info button.
No Title/Album name can be recognized if the input format on the Disc is not supporting by the system.
The system support only English and Arabic number for ID3 function.
MP3 track format requirement:-
Bit rate: 32 kbps~320kbps, sampling rate: 32khz, 44.1khz and 48 kHz decodable
The performance of playing MP3 Disc is various from the quality of recording disc and the method of recording. Furthermore, the searching lead-time for MP3-CD is longer than normal CD due to difference format.
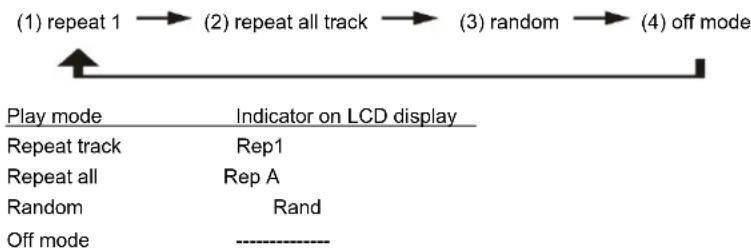
- Repeat/Random mode (on remote control only)
Press the "Play Mode" button on the remote control during playback to select repeat and random function, a single track, all the tracks repeat or folder repeat(MP3 only) and random can be played in difference mode as follow:
For CD
For MP3 Disc
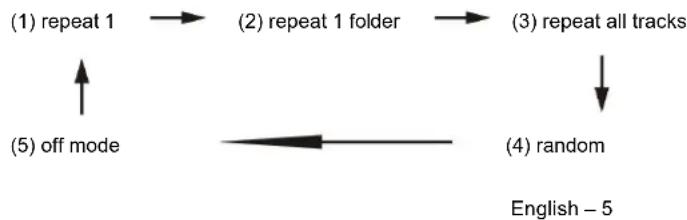
Repeat play
You can listen the desired track, folder(for MP3 only) or whole disc repeat by this function.
- Random play
You can listen all the tracks in a random order by this function.
CD programming
Up to 20 tracks can be programmed for disc play in any order. Before use, be sure to press the "stop" button (3).
- Set in CD mode & stop the CD playback.
- Press the "Mem/Clk-Adj" button (12) and "MEM" will appear on LCD display (2).
- Select a desired track by pressing skip up or down button (23/13).
- Press the "Mem/Clk-Adj" button (12) to store the track into memory.
- Repeat steps 3 and 4 to enter additional tracks into the memory if necessary.
- When all the desired tracks have been programmed, press "Play/Pause button (16) to play the disc in assigned order.
- Press "Stop" button (3) to stop playback, press Stop button again to clear all stored memory.
The programming mode will automatically stop if no button is being pressed in a period of about 10 seconds after pressing the "Mem/Clk-Adj" button.
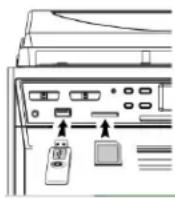
Playback of MP3 song via USB storage media or memory card
Connecting
The system is able to decode and playback all MP3 file which stored in the memory media with USB connecting port or SD/MMC memory card.
- Set the system at standby mode first or other function except SD or USB mode.
- Plug-in the USB pen-drive with the face up & make sure it going into completely or insert the memory card in the direction of the arrow as shown in the label on the underside of the memory card slot. Insert straight without bending.
- Connecting the USB upside down or backwards could damage the audio system or the storage media (USB thumb drive / SD/MMC card). Check to be sure the direction is correct before connection.
- Set Function button (10) to SD/MMC card or USB mode.
- The system will start reading the storage media automatically after connecting, and LCD display (2) will show the total number of MP3 files being detected.
- Repeat the same playback procedure and programming as playing CD disc as above.
Remark
The system can detect and read the file under MP3 format only at USB/SD mode but not other music file format.
If connect the system to MP3 player via the USB socket, due to variances in MP3 encoding format, some MP3 player may not be able to play via the USB socket. This is not a malfunction of the system.
USB port does not support connection with USB extension cable and is not designed for communication with computer directly
Removing of USB / memory card
To remove the USB / memory card, turn off the power or switch the function mode to either CD, aux or tuner first. For USB port - un-plug it by pulling out the USB socket directly, for memory card - pull out the SD/MMC card straightly without bending.
Encoding into MP3 file
The system is able to encode normal CD/Tuner/Phono or cassette tape file to MP3 format and recording at memory media with USB connecting port or SD/MMC card and below explanation was encode to USB port and same procedure if encode to SD/MMC card. The system will create a music folder name - "RIP" for CD-DA encode, "REC" for Tuner, Aux, Cassette encode and "FROMCD" for CD-MP3 disc copy and encode bitrate default at 128kbps.
A) CD encoding
I) encoding 1 track / 1 disc at 1x speed
- Perform normal playback of the CD track you want to encode & record,
- Press "REC" button (4) during the playback of the desire track and the display will show "REC" and "USB" flashing.
- Press " REC " button (4) again the display will show "REC" and "ONE" flashing
-
Press "REC" button (4) again, the system will flashing with "REC USB" icon. Encoding is performing now.
-
After completing of recording, unit will stop playback automatically.
- Press "stop" button (3) to interrupt the recording mode anytime.
- For encode whole CD track, pls stay CD in stop mode then press " REC " button (4) three times until the display flashing "REC USB", then system will start to playback CD and encoding whole disc.
Remark:-
- The recording speed is 1:1 and according to the actual plying time of the CD track
- The recording format is preset at - MP3 bit rate : 128 kbps, sampling rate : 44.1khz
- Press "stop" button (3) to interrupt the recording mode at anytime.
B) Copying of MP3 file
If putting a MP3 disc instead of a CD-disc, the system will copy the files to the USB if press the " ● REC " button (4). The operation procedures is same as CD encoding as stipulate on above, and the system will switch to copying mode only if MP3 file being read.
C) DAB encoding
- Operate tuner mode refer above listening to radio section to receive the station you would like to encode.
- Press the "REC button twice (4) until the unit will display flashing with "REC USB " icon. Encoding is now performing.
- After finish of recoding, press stop button (3) until the symbol "REC USB" disappear.
D) Cassette/Phono encoding
1) Plug in the USB pen drive or SD/MMC card for recording (make sure it had enough empty space).
2) Set the unit to your desired encoding mode by function button (10) such as " tape " mode or phono...etc and then start to playback the track would like to encode, then press the " bREG (4) twice.
3) The LCD display (2) will flashing with "REC USB icon. Now the system is starting the encoding mode.
4) Start playback of cassette tape or your external Aux device which the track you prepare to encoding to MP3 format.
5) After finish of recoding, press stop "button (3) until the symbol "USB" & "REC USB" disappear.
E) track separation(On remote control only)
You can divide the recording music from tape or DAB...etc in to USB track by track during encoding. Every time when press the "T6" (track separation) button (on remote control) once during encoding from tape or Aux in, the system will generate a new track and continuous the recording. The text "SAVE" at LCD display will flashing one time, it mean the unit is creating a new track successfully.
F) Copying of MP3 file
If putting a MP3 disc instead of a CD-disc, the system will copy the files to the USB if press the " REC" button (3). The operation procedures is same as CD encoding as stipulate on above, and the system will switch to copying mode only if MP3 file being read.
File delete at USB / SD card (by remote control)
The system is able to erase the file stored inside the USB pen drive by following:
- Insert the media storage and set at "USB" mode.
- Press the " delete " button and the LCD display (2) will show (del --001)
- Press skip forward or skip backward button to select the file going to delete
- Press the " delete " button to enter " yes / no " mode and then press skip forward or skip backward to select " yes " or "no".
- Press the "delete" button again to confirm the setting.
Remark :
- Press "stop" button once at remote handset to quite delete mode
Phono
noted:
-
Remove the stylus protector.
-
Be sure that the tone arm is being detached from the tone arm rest before operating and re-secured again afterwards.
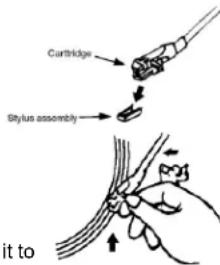
- Select to "Phono" function (10).
- set the speed selector (27) to the proper position depending on the record to be played.
- Place the record on the platter (use the spindle adaptor (26) if required).
- Lift the tone arm from the rest and slowly move it to the record side. The platter will start to rotate.
- Place the tone arm to the desired position of the record.
- Adjust the volume to the desired level (19).
- At the end of record, the platter will automatically stop rotating. Lift the tone arm from the record and return it to the rest.
- To stop manually, lift the tone arm from the record and return it to the rest.
Remark : as some kind of record the auto-stop area was out of the unit setting, so it will stop before the last rack finish. In this case, select the auto-stop switch to “ off “ position, then it will run to the end of the record but will not stop automatically (turn off the power button or switch back the auto-stop switch (28) to “ on “ position to stop the platter rotate). Then put back the tone arm to the rest position.
Listing to tape
General operation
Stop / eject key press to stop all deck operation. Press again to open the cassette door.
Fast forward key & press to start rapid tape winding in either forward or revers
Fast rewind key direction. Press stop / fast rewind key eject keys when the cassette spools stop turning.
Play key press to start playing tape.
Pause key press to stop tape operation temporarily. Press again to resume play.
Playback
- Select "tape" function (10).
Put in the cassette tape. - Press play key to active playback
- Adjust the volume control (14/24) to the desire level.
- Use pause key when you want to stop playback temporarily.
- Press stop / eject key when finished.
Remark:
It is possible to play both cassette players one after the other. If you press the button "pause" and "play" at deck 1 and button "play" at deck 2, than the tape of deck 1 will be start to play automatically after the tape of deck 2 is finished.
More features
A. Sleep function (on remote control only)
- Press " Sleep " button on remote control "SLP-120 " will shown on the LCD display (6).
- Keep pressing the button to adjust the sleep timer in the order of 120 > 90 > 60 > 45 > 15 minutes respectively and sleep icon indicate on LCD.
- System will stop and go to standby mode automatically after running the selected time.
- To cancel the sleep mode, press " Sleep " button until "SLP-off displayed and the " 22Z " indicator disappear on LCD display.
B. Timer clock setting (on remote control only)
This function allows the system to turn on automatically and wake you up by CD, DAB, FM Radio, USB/SD mode respectively.
First, set the unit at standby mode and then press & hold the "Timer" button on the remote control to enter the setting mode, the LCD display will show "SET TIMER" then change to "SELECT SOURCE and timer" icon with flash on display :-
1) Wake up source press the "Function button repeatedly to select the source from CD -- FM -- DAB -- USB -SD". Press "Timer button to confirm the selected source.
2) Wake up volume press the Skip up down "button to adjust the wake up volume level then press "Timer" button to confirm the wake up level.
3) Wake up time press Skip up down "button to set the hour & then press "Timer" button to enter the hours. Press Skip up down "button to set minutes and press "Timer" button "to store the memory.
Remark
If there is no music source being detected (such as USB/CD) when the preset time is reached, system will default to FM mode automatically.
For FM or DAB radio wake up, the system will preset at the latest radio frequency being listened before switching off.
Please switch off the system manually during alarm wake up mode as the system will not turn off automatically after alarm on mode.
Active/de-active timer function
- To active the timer, press once the "Timer" button on remote handset until the timer indicator "①" is shown on LCD display (2).
- To cancel timer function by press once again " Timer " button until the timer indicator " " disappear.
C. Pre-set EQ function
This unit provides 4 differences sound mode to enhance your listening experience. You can select the desired effect by pressing the "Preset EQ" button (22) repeatedly at following sequence:-

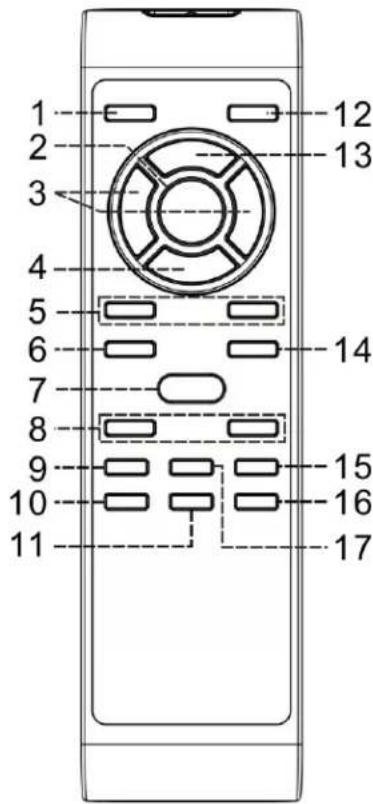
Control functions
Battery installation (battery not provided)
The infra-red transmitter require 2 pc "AAA" size battery for operation
Button description
1) On/standby Press to power on / standby the system
2) Play/pause II/Band
In CD/USB mode : press to start playback / pause mode
In DAB mode, press to select DAB/FM
3) Skip up down / Time+/- Press to select previous / next tracks at CD/USB mode Press to step up/down of radio frequency at tuner mode
4) Stop Enter
In CD/USB mode : press to stop the playback In Tuner mode : select stereo/mono mode
5) Folder/Pre Up-Down In Tuner mode : press to select preset memory up/down
In USB mode : press to select folder up/down
6) Play mode In CD mode: press to active random/repeat function
7) Open/close Press to open/close the CD tray
8) Volume - / + Press to adjust volume level up/down
9) Sleep/Timer In power on mode: press to active sleep function
In standby mode: press and hold to enter timer set up
mode
and press once to active/de-active timer function
10) Del/info In USB mode : press to delete the file in the USB/SD memory In MP3 playback mode : press to active ID3 function In DAB/FM mode, press to see the broadcast information
11) Rec Press to active encoding/MP3 file copy function
12) Function Press to select the function
13) Mem / Clk-adj In standby mode: press & hold to adjust clock In CD/USD/SD/Tuner mode: press to preset memory
14) Scan In FM/DAB mode, press to search the station
15) Preset EQ Press to select difference EQ mode for enjoyment
16) T9 In encoding mode: press to active track separation function
17) Mute Press to cut the sound temporarily
Specification
UKW/FM :87.5-108MHz
DAB: Band III : 174.92-239.2 MHz
Power Supply : AC230V~50Hz
Power consumption : 20W
Remark
Due to ErP stage two requirement and protect the environment. The unit will switch to standby mode automatically once no any music playing over 15 minutes.
DENVER
www.denver-electronics.com

Electric and electronic equipment contains materials, components and substances that can be hazardous to your health and the environment, if the waste material (discarded electric and electronic equipment) is not handled correctly.
Electric and electronic equipment is marked with the crossed out trash can symbol, seen below. This symbol signifies that electric and electronic equipment should not be disposed of with other household waste, but should be disposed of separately.
All cities have established collection points, where electric and electronic equipment can either be submitted free of charge at recycling stations and other collection sites, or be collected from the households. Additional information is available at the technical department of your city.
Hereby, Inter Sales A/S declares that the radio equipment type MRD-165 is in compliance with Directive 2014/53/EU. The full text of the EU declaration of conformity is available at the following internet address: www.denver-electronics.com and then click the search ICON on topline of website. Write modelnumber: mrd-165.Now enter product page, and red directive is found under downloads/other downloads
FM Frequency 87.5-108 MHz
DAB: Band III 174.92-239.2 MHz
Max output power: 20W
DENVER ELECTRONICS A/S
Omega 5A, Soeften,
DK-8382 Hinnerup,
Denmark
www.facebook.com/denverelectronics

Lynsymbololet i trekanten er
et adverselssymbol, der
advarer dig om, at der er
farlig spanding inden i
produkter
FORSIGTIG
RISIKOFOREELEKTRISKSToD
MAIKKE ABNES
FORSIGTIG: SADAN REDUCERER DU RISIKOEN FOR ELEKTRISK STØD. FJERN IKKE DAEKSLET (ELLER BAGSIDEN). DER FINDES INGEN INDVENDIGE DELE, DER KAN SERVICERES AF BRUGEREN. OVERLAD SERVICE TIL UDDANNET SERVICEPERSONALE.

DAB-radio (Digital audio broadcasting)
Tryk for at taende/saete systemet i standby
2) Afspil/Pause II/Band
I CD-/USB-tilstand: Tryk for at starte tilstanden Afspil/Pause
I DAB-tilstand: Tryk for at vaelge DAB/FM
3) Spring fremad /tilbage /Sog station +/-
KLASSE I LASERPRODUCT
BATTERIJ PLAATSEN
Digitale audiobroadcasting (DAB) radio
Nopeasti eteenpain / taaksepain -nappain
PRODUIT LASER DE CLASSE I
INSTALLATION DES PILES
- CAUTION
- RISK OF ELECTRIC SHOCK DO NOT OPEN
- IMPORTANT SAFETY INSTRUCTIONS:
- CLASS I LASER PRODUCT
- BATTERY INSTALLATION
- Battery Precautions
- Location of controls
- Important:
- Precautions for use
- Installation
- AC connection
- Setting the clock
- Listening to radio
- Operation
- Auto tuning (on the remote control only)
- Radio data system (RDS)
- Digital audio broadcasting (DAB) radio
- Preset stations
- Recall preset stations
- FM-Stereo reception
- Hints for best reception:-
- Aux-in connection
- Playing Compact Disc
- - Getting start
- Play/Pause mode
- - Stop mode
- - Skip mode (skip up / skip down
- For MP3 Disc
- ID3/Display function (on remote control only)
- Remark:
- MP3 track format requirement:-
- - Repeat/Random mode (on remote control only)
- For CD
- Repeat play
- - Random play
- CD programming
- Playback of MP3 song via USB storage media or memory card
- Connecting
- Remark
- Removing of USB / memory card
- Encoding into MP3 file
- A) CD encoding
- I) encoding 1 track / 1 disc at 1x speed
- Remark:-
- B) Copying of MP3 file
- C) DAB encoding
- D) Cassette/Phono encoding
- E) track separation(On remote control only)
- F) Copying of MP3 file
- File delete at USB / SD card (by remote control)
- Remark :
- Phono
- noted:
- Listing to tape
- General operation
- Playback
- More features
- Sleep function (on remote control only)
- Timer clock setting (on remote control only)
- Active/de-active timer function
- Pre-set EQ function
- Control functions
- Battery installation (battery not provided)
- Button description
- Specification
- DENVER
- DAB-radio (Digital audio broadcasting)
- KLASSE I LASERPRODUCT
- BATTERIJ PLAATSEN
- Digitale audiobroadcasting (DAB) radio
- PRODUIT LASER DE CLASSE I
- INSTALLATION DES PILES
Brand : DENVER
Model : MRD165
Category : Turntable