
JO1FD - Intercom Aiphone - Free user manual and instructions
Find the device manual for free JO1FD Aiphone in PDF.

| Product Type | Expansion Monitor Station for intercom system |
| Brand | Aiphone |
| Model | JO-1FD |
| Monitor Type | 7-inch color LCD screen |
| Screen Size | 7 inches (diagonal) |
| Dimensions (H x W x D) | 130 x 230 x 21 mm (5-1/8 x 9-1/16 x 13/16 inches) |
| Weight | Approx. 480 g (1.06 lbs) |
| Power Supply | DC 18V (from specified Aiphone power supply) |
| Current Consumption (Standby) | 38 mA |
| Current Consumption (Max) | 420 mA |
| Communication Mode | Hands-free (auto-voice actuation) and Press-to-Talk (PTT) |
| Communication Volume Levels | 3 levels (Minimum, Medium, Maximum); default Medium |
| Call Tone Volume Levels | 4 levels (Mute, Minimum, Medium, Maximum); default Medium |
| Screen Brightness Levels | 6 levels (0 darkest to 5 brightest); default 3 |
| Door Release Function | Press -0 to activate door release (N/O dry closure contact) |
| Monitoring Function | Video and audio monitoring of door station; automatic turn-off after approx. 1 minute |
| Night Illumination | White light LED on door station illuminates automatically in low light during call or monitor |
| Three-way Communication | Possible when master monitor station joins expansion station communication with door station |
| Mounting Type | Wall-mount (3-gang electrical box) |
| Material | Flame resistant ABS resin |
| Color | White |
| Operating Temperature | 0°C to 40°C (32°F to 104°F) |
| Cleaning Instructions | Clean with soft cloth and gentle cleaner; do not spray directly on unit |
| Safety Precautions | Do not dismantle; keep away from water; use only specified power supply; install by qualified technician |
| Warranty | 2 years against defects in material and workmanship (bench repairs only) |
Frequently Asked Questions - JO1FD Aiphone
User questions about JO1FD Aiphone
0 question about this device. Answer the ones you know or ask your own.
Ask a new question about this device
Download the instructions for your Intercom in PDF format for free! Find your manual JO1FD - Aiphone and take your electronic device back in hand. On this page are published all the documents necessary for the use of your device. JO1FD by Aiphone.
USER MANUAL JO1FD Aiphone
Thank you for selecting Aiphone for your communication and security needs. Please read this manual carefully for proper system operation. For future reference, keep manual in a safe place.
PRECAUTIONS

Prohibited Do not dismantle unit Keep unit away from water general precautions

WARNING
Negligence could result in death or serious injury.
- Do not dismantle or alter the unit. Fire or electric shock could result.
- Keep the unit away from water or any other liquid. Fire or electric shock could result.
- High voltage is present internally. Do not open the case. Electric shock could result.
- Do not connect any non-specified power source to the + , - terminals. Also, do not install two power supplies in parallel to a single input. Fire or damage to the unit could result.
- Do not use power supply with a voltage other than specified. Fire or electric shock could result.
- Do not put any metal or flammable material into the unit through the openings. Fire, electric shock, or unit trouble could result.
- The unit must be installed and wired by a qualified technician.
CAUTION
Negligence could result in injury or damage to property.
- Do not install or make any wire terminations while power supply is plugged in. It can cause electrical shock or damage to the unit.
- When mounting the unit on a wall, install the unit in a convenient location, but not where it could be jarred or bumped. Injury could result.
- Before turning on power, make sure wires are not crossed or shorted. Fire or electric shock could result.
- Do not install the unit in locations subject to frequent vibration or impact. It may fall or tip over, resulting in damage to the unit or personal injury.
- For power supply, use Aiphone power supply model specified for use with system. If non-specified product is used, fire or malfunction could result.
- Do not put anything on the unit or cover the unit with cloth, etc. Fire or unit trouble could result.
-
Do not install the unit in any of the following locations. First, electric shock, or unit trouble could result.
-
Places under direct sunlight or near heating equipment that varies in temperature.
- Places subject to dust, oil, chemicals, hydrogen sulfide (hot spring).
- Places subject to moisture and humidity extremes, such as bathrooms, collars, greenhouses, etc.
- Places where the temperature is quite low, such as inside a refrigerated area or in front of an air conditioner.
- Places subject to steam or smoke (near heating or cooking surfaces).
-
Where noise generating devices such as dimmer switches or inverter electrical appliances are closby.
-
Do not apply high pressure on the screen. If fractured, injury could result.
-
If the LCD is punctured, do not allow skin contact with the liquid crystal inside. Inflammation could result.
-
If liquid crystal is ingested, immediately gargle with water and seek medical attention.
- If contact with the eyes or skin occurs, clean with pure water and seek medical attention.
GENERAL PRECAUTIONS
- Keep the unit more than 1m (3.3) away from radio or TV set.
- Keep the intercom wires more than 30cm (12^) away from AC 100-240V wiring. AC induced noise and/or unit malfunction could result.
- Comply with all third party manufacturing specifications that will be used with this system (sensors, door releases, etc.).
- If the unit is down or does not operate properly, unplug the power supply.
- When wall-mounted, the top of the unit may darken. This does not indicate a malfunction.
- The unit case may become warm with use, but this is not a unit malfunction.
- If it is used close to a cellular phone, the unit may malfunction.
- The unit can be damaged if dropped. Handle with care.
- The unit will not work during power failure.
-
In areas where broadcasting station antennas are close by, the intercom system may be affected by radio frequency interference.
-
The unit is designed for indoor use only. Do not use at outdoor locations.
- This product, providing door release, should not be used as a crime prevention device.
- Please note the LCD panel, though manufactured with very high precision techniques, inevitably will have a very small portion of its image elements always lit or not lit at all. This is not considered a unit malfunction.
- Environmental sound around the unit may hinder smooth communication, but this is not a malfunction.
- At night, due to reduced lighting on the object, the screen sees more noise and faces become more difficult to see, but this is not a malfunction.
- For hands-free communication: If you stand too far away, it may be difficult for the other person to hear the communication.
- If there are loud noises around the unit (such as music playing or children crying), the sound may break up and be difficult to hear.
- During communication, if you speak before the other person has finished talking, your voice may not come through clearly. Communication will proceed smoothly if you wait until the other person has finished before speaking.
- At a gate or porch illuminated by a fluorescent lamp, the image may vary, but this is not a malfunction.
- The outline of video images displayed by the video door station may differ from that of the actual person(s) or background, but this is not a malfunction.
- When the unit's screen is illuminated with strong light, the image looks white or silhouetted, but this is not a malfunction.
NOTICES
- We will under no conditions be liable for damage occurring due to the inability to communicate due to malfunctions, problems, or operational errors in this product.
- We will under no conditions be liable for any damages or losses resulting from this product's contents or specifications.
- This manual was created by Aiphone Co., Ltd., all rights reserved. Copying, in part or in whole, this manual without prior permission from Aiphone Co., Ltd. is strictly forbidden.
- Please note that images and illustrations depicted in this manual may differ from the actual ones.
- Please note that this manual may be revised or changed without prior notice.
- Please note that product specifications may be changed for the sake of improvement without prior notice.
- This system is not intended for life support or crime prevention. It is a supplementary means of conveying information. Aiphone will under no conditions be liable for loss of life or property which occurs while the system is being operated.
- Lighting adjustments are made automatically by the door station. Adjustment results may vary depending on installation environment.
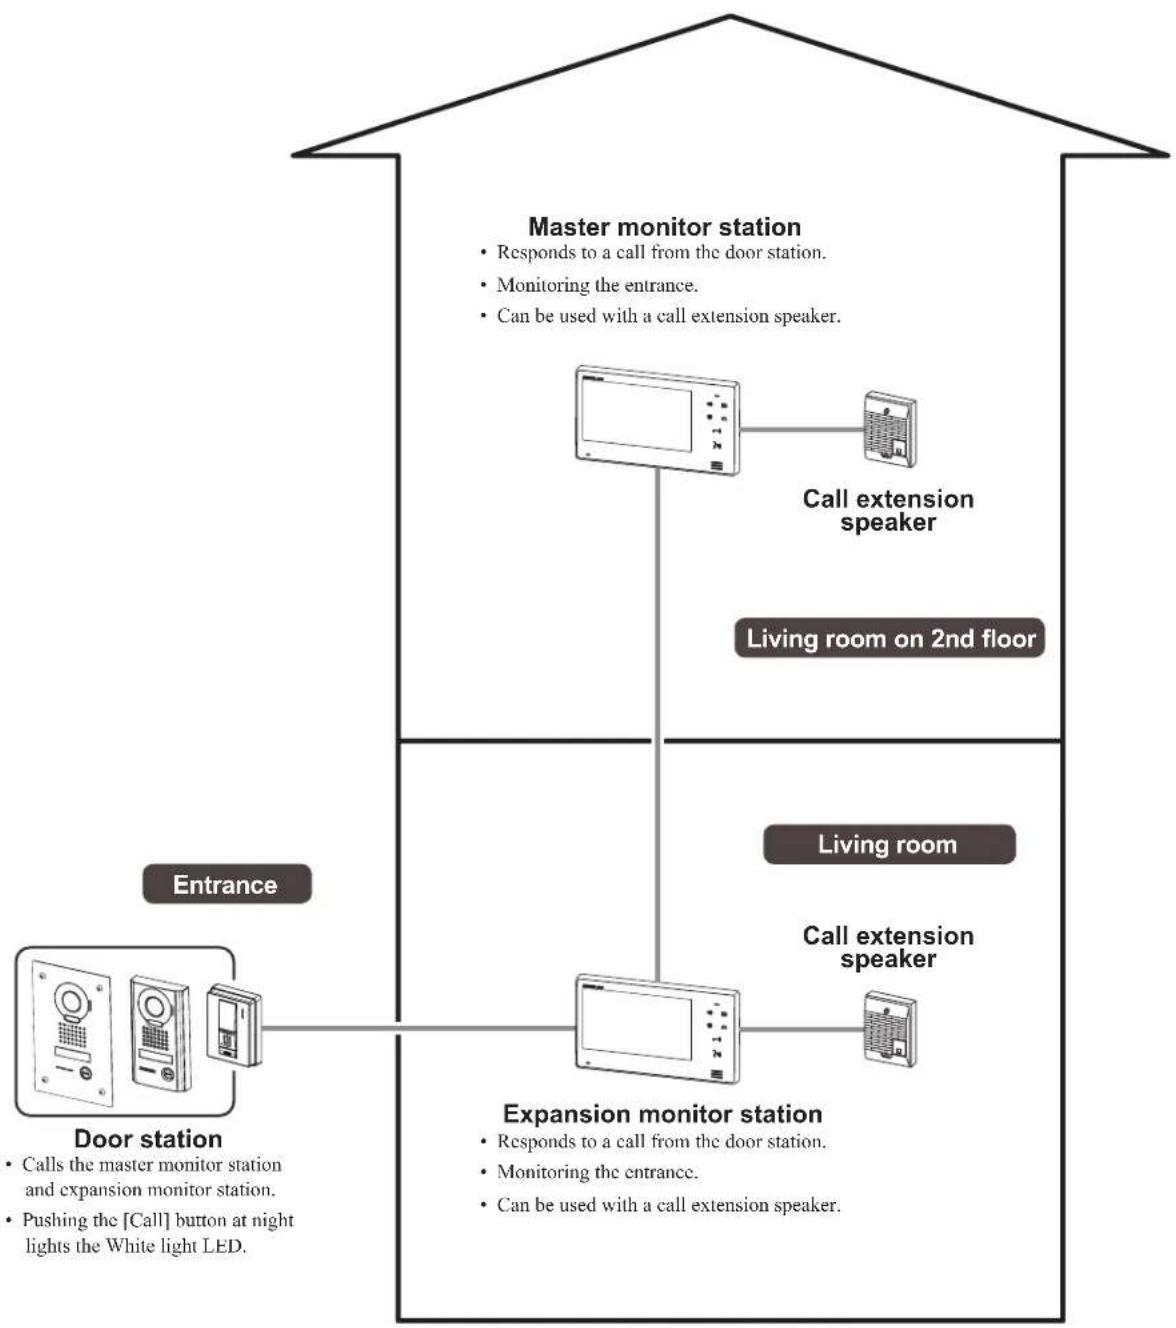
FEATURE AND SYSTEM EXAMPLE
PACKAGE CONTENTS
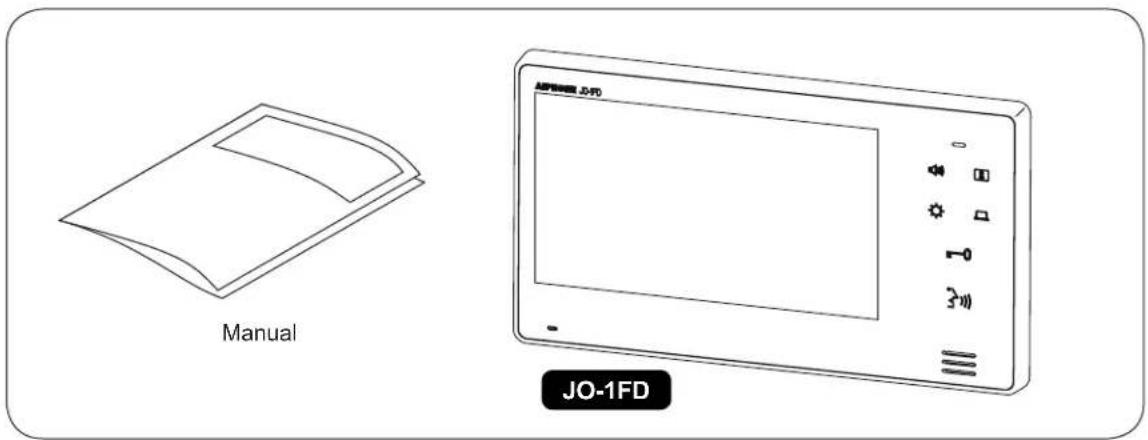
NOTES:
- Mounting and Wood mounting screws not included
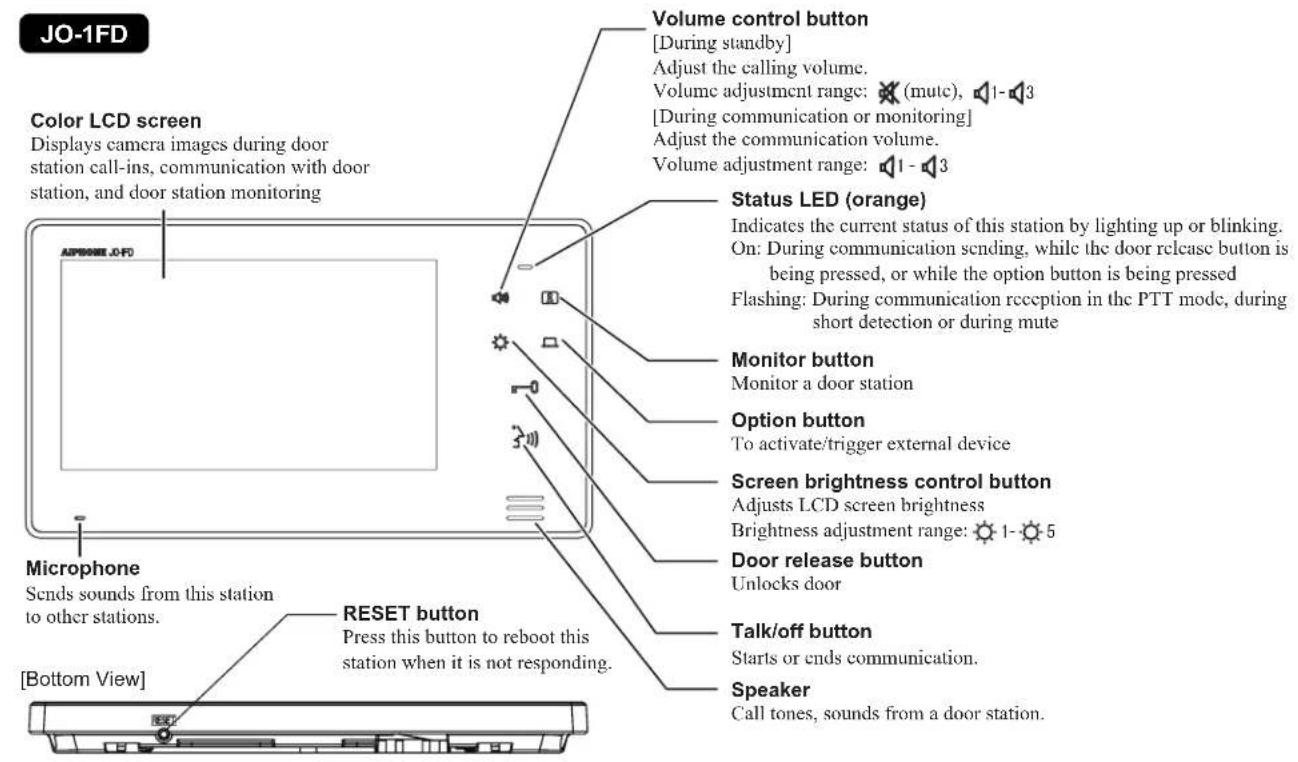
PART NAMES
Remove protective film before use.
INSTALLING EXPANSION MONITOR STATION
When installing the expansion monitor station with the master monitor station A
Install and connect the expansion monitor station between the master monitor station and the door station.

Door station Master monitor stationExpansion monitor station
See Procedure A below.
When adding the expansion master monitor station to an existing system B
When adding the expansion monitor station, remove the master monitor station and install the expansion monitor station to where the master monitor station has been installed. Install the master monitor station so that the expansion monitor station is between the master monitor station and the door station.

See Procedure B below.
Installation procedures
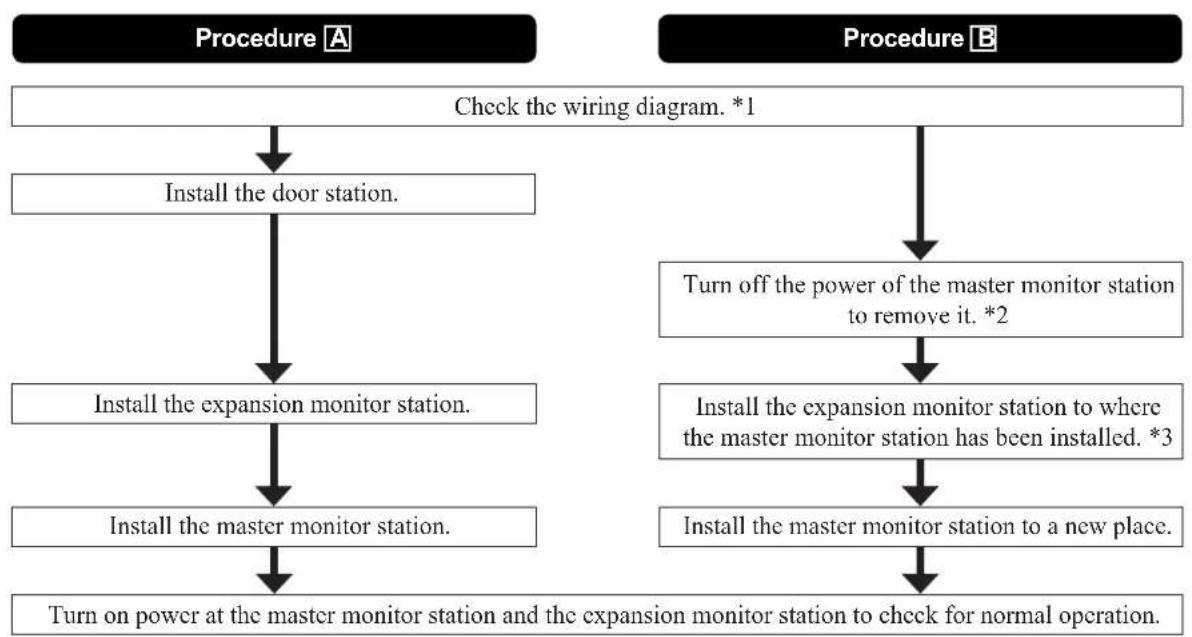
1 Refer to WIRING on page 8 for wiring and connection with optional accessories.
2 When disconnecting wires from the master monitor station, label or mark wires to identify where each wire is connected.
*3 Mounting brackets used for the master monitor station can be used for the expansion monitor station.
INSTALLATION
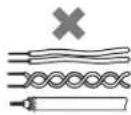
Cable
Use PE (polyethylene)-insulated PVC jacket cable. Parallel or jacketed 2-conductor, mid-capacitance, non-shielded cable is recommended.

Never use individual conductors, twisted pair cable, or coaxial cable.
Wiring method, wiring distance
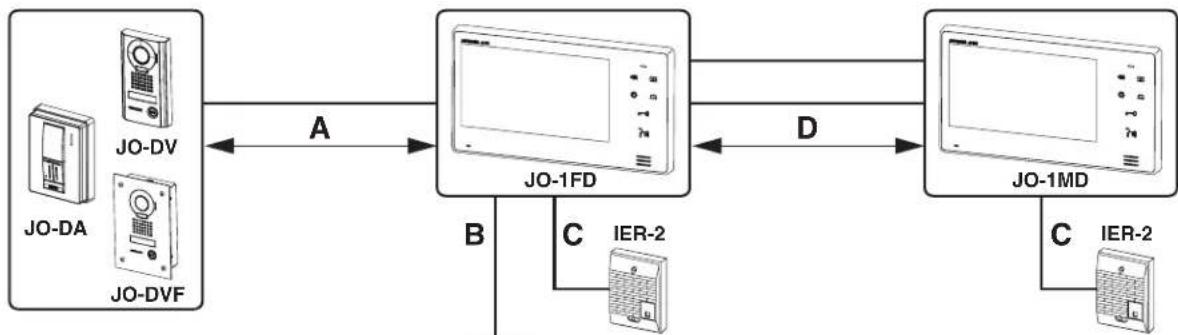
PS18 : PS-1820, PS-1820S, PS1820UL, PS-1820D
| 0 0.65 mm | 22 AWG | 0.8-1.2 mm | 20-16 AWG | |
| A 50 m | 165' 100 m | 330' | ||
| B | 5 m | 16' | 10 m | 33' |
| C | 50 m | 165' 150 m | 495' | |
| D 50 m | 165' 100 m | 330' |
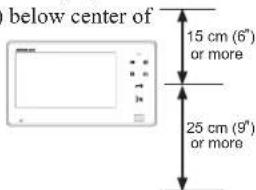
Mounting locations
Do not install expansion monitor station in any of the following locations where lighting or the ambient environment could impact the display on the video monitor.
a In direct sunlight
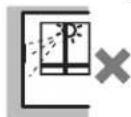
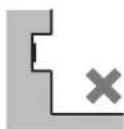
b Avoid installing the expansion monitor
station in a concave space of a wall to prevent disconnection of communication
c Allow at least 15cm(6^ ) above
and 25cm (9) the mounting bracket for installation of the station
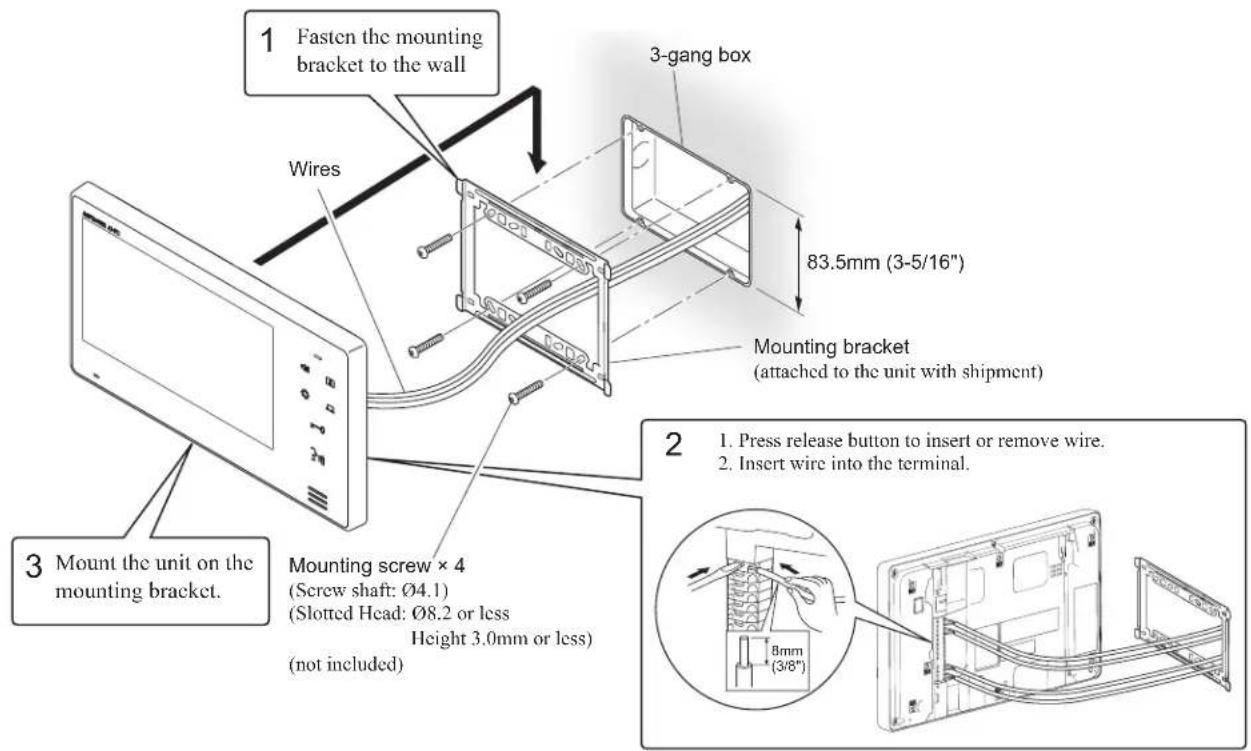
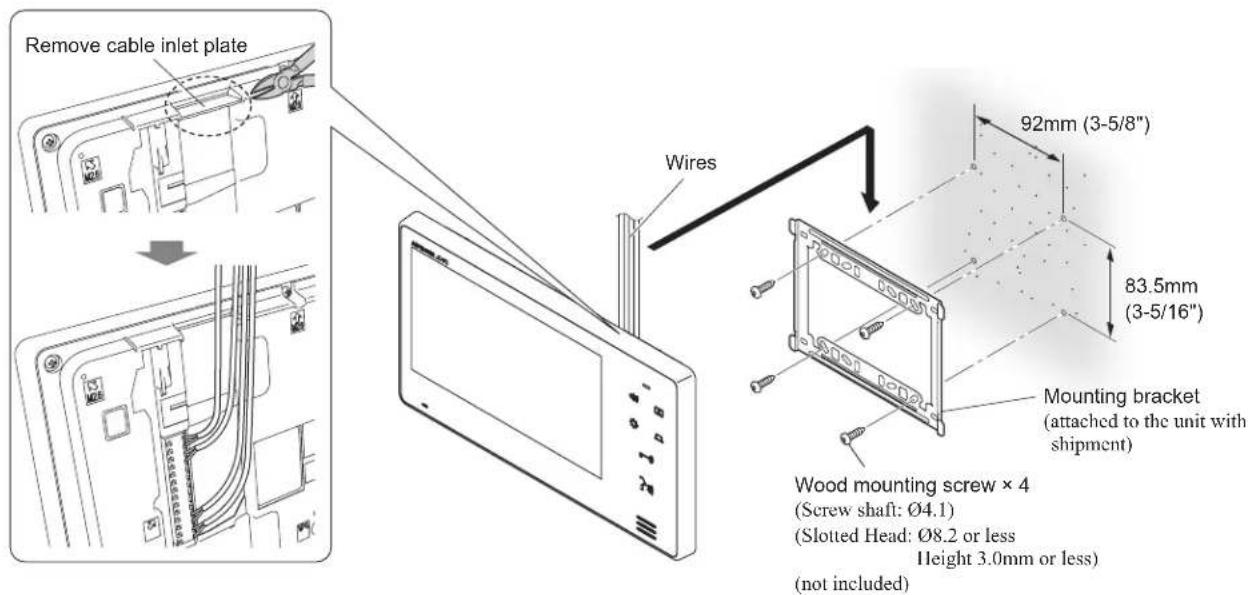
MOUNTING
JO-1FD
When the wiring is not coming through the wall, the wires can be routed to the top or bottom of the unit. Remove a cable inlet plate on the upper part of the unit to allow passage of the wiring into the unit.
WIRING
Insert wires securely into each terminal as shown.
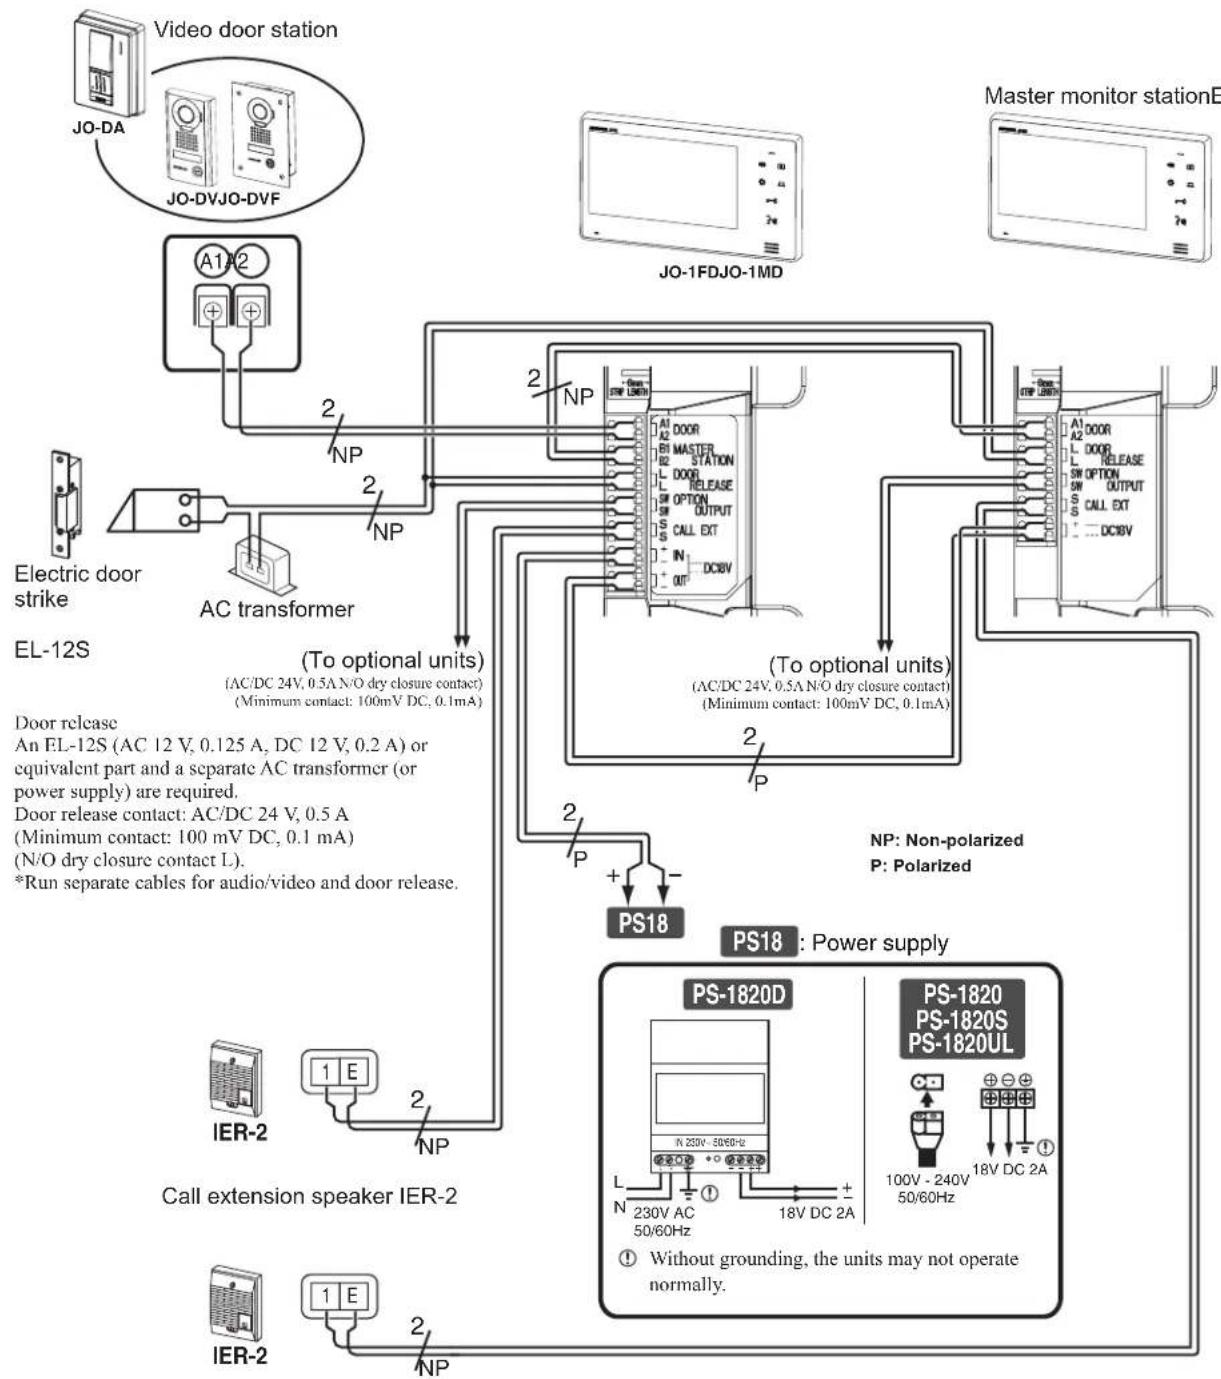
Presence of sound from IER-2
Call tone from door station.
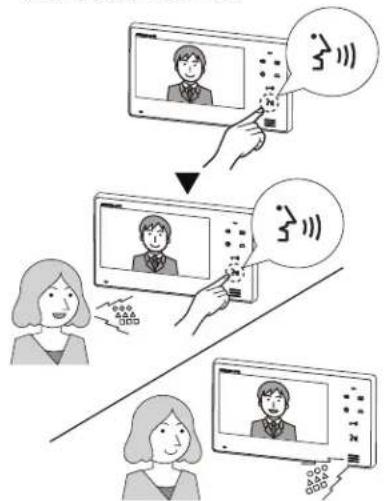
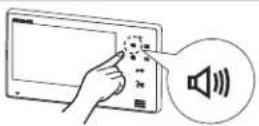
OPERATIONS
1 Push Call button.
2 The call tone sounds, an image appears on screen.
The screen turns off after approx. 45 seconds if not answered.
3 Push and after the beep, communicate hands-free (hands-free mode).
4 After finishing communication, push 3 and communication will end after the beep.
NOTES:
- Communication ends automatically after approx. 1 minute.
The communication volume can be adjusted during the monitoring or the communication by pressing
There are three communication volume setting to cycle through: [1] (Minimum), [2] (Medium), and [3] (Maximum). The current volume level is displayed on the screen and disappears in approx. 5 seconds. The default setting is [2] (Medium).
- Even when the expansion monitor station has responded to a call from the door station, the master monitor station displays the image for approx. 45 seconds.
- While either of the expansion monitor station or the master monitor station is displaying an image, the White light LED of the door station remains on at night.
- Pushing 3 ~m of the master monitor station while the expansion monitor station is communicating with the door station results in three-way communication.
- The master monitor station and the expansion monitor station cannot call or communicate each other.
- Pushing the master monitor station while the expansion monitor station is communicating with the door station can display the entrance and enable monitoring of the communication.

For loud outdoor areas, use Press-to-Talk mode (PTT)
After 2 seconds or more
1 Press and hold 2 or 2 seconds or more. After approx. 2 seconds beep sounds, PTT mode is engaged.
- If is pressed briefly, PTT mode is not engaged.
2 When communicating, keep stressed. To hear the caller's voice, release
Status LED lights when you talk, and flashes slowly as you listen to caller (or hear outside sounds).
NOTES:
- It is not possible to switch back to hands-free mode (from PTT mode during communication).
Activating door release
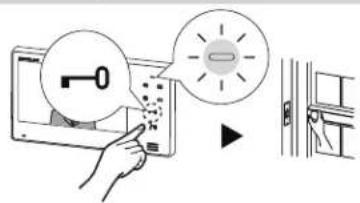
1 Press -0
2 Door release is activated and door can be opened. During release: Status LED lights.
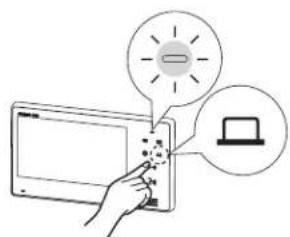
Monitoring door station
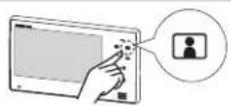
1 Push standby mode.

2 The video image from the door station and the incoming audio is heard. If you do not push the caller will not hear sounds from the inside station.
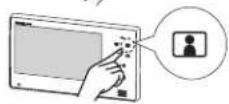
3 Push end monitoring.
NOTES:
To talk to door station during monitoring, momentarily push 3). This allows communication with door station.
- The monitoring turns off automatically after approx. 1 minute.
- Pushing of the master monitor station while the expansion monitor station is used to monitor the entrance enables monitoring the entrance with both the master monitor station and the expansion monitor station.
- Pushing of the master monitor station while the expansion monitor station is used to monitor the entrance enables communication between the master monitor station and the door station. The expansion monitor station continues monitoring and the communication come from stations.
- Pushing of the expansion monitor station while the master monitor station is used to monitor the entrance enables communication between the expansion monitor station and the door station. The master monitor station continues monitoring.
Adjust call tone volume
Push standby mode to adjust call tone volume and display the volume level.
Push until the desired call tone volume level is heard.
NOTES:
- There are four call tone volume settings to cycle through: [Mute), [Minimun] (Maximum) - [3] (Maximum). The current volume level is displayed on the screen and disappears in approx. 5 seconds. The default setting is [2] (Medium).
Night illumination
At night, the door station White light LED lights up during calling or monitoring door station.
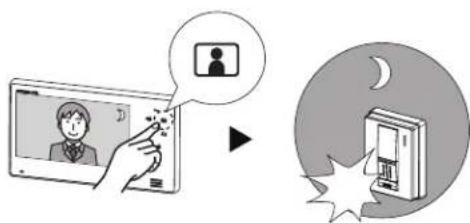
When is pushed during monitoring door station, the White light LED will light up.
When monitoring door station ends, the White light LED will turn off.
NOTES:
- The door station evaluates lighting conditions to automatically turn on the white light LED when necessary.
Adjust screen brightness

1 Push when the screen is difficult to see. The screen brightness changes from [0 (the darkest) to 5] the brightest) during communication or monitoring.
NOTES:
The current brightness level is displayed on the screen and disappears in approx. 5 seconds.
The default setting is [3].
Activating/Triggering external devices (if installed)
1 Press to operate to the unit's option output.
NOTES:
- Optional devices must be installed and connected properly. The can control lights, secondary doors, garages, etc.
While the button is pressed, the N/O dry closure contact signal is kept being output.
TECHNICAL PRECAUTIONS
Cleaning:
- Clean all units with a soft cloth and gentle cleaner. Do not spray cleaner directly on unit. Do not use an abrasive cleaner or cloth.
Wiring:
- When a short is detected between the door station and the expansion monitor station, the expansion monitor station stops functioning and the Status LED flashes rapidly until the short is removed. The master monitor station does not indicate the short and stops its operation with the door station. Check the wires.
- When a short is detected between the expansion monitor station and the master monitor station, the master monitor station stops functioning and the Status LED flashes rapidly until the short is removed. The expansion monitor station operates with the door station normally.
- If noise is heard from the expansion monitor station, the wiring is disconnected between the video door station and the expansion monitor station.
- If noise is heard from the master monitor station, the wiring is disconnected between the video door station and expansion monitor station or between the master monitor station and the expansion monitor station.
Trouble:
- If the station does not respond, reboot this station by pressing the RESET button.
- When the power supply is turned off, power failure, or the RESET button is pressed, the setting of brightness, communication volume, and call tone volume are returned to the default setting.
SPECIFICATIONS
JO-1FD (Expansion monitor station)
| Power supply DC 18V (from power supply) | Electrical box | 3-gang box | |
| Current consumption (standby) 38mA (max) 420mA | Material | Flame resistant ABS resin | |
| Communication Hands-free: Auto-voice actuation | Color | White | |
| PTT: Press-to-talk, relcase to listen | Dimension | 130 (H) x 230 (W) x 21 (D) (mm) | |
| Ambient temperature 0 - 40°C (+32°F - +104°F) | 5-1/8 (H) x 9-1/16 (W) x 13/16 (D) (inches) | ||
| Monitor 7 inch color LCD screen | Weight | Approx. 480g (1.06 lbs.) | |
| Mounting | Wall-mount | ||
PRECAUTIONS

VOORZORGSGMAATREGELEN

| ∅0,65mm | ∅0,8-1,2mm | |
| A 50m | 100m | |
| B 5m | 0m | |
| C 50m | 150m | |
| D 50m | 100m |
Montageorte
Aiphone warrants its products to be free from defects of material and workmanship under normal use and service for a period of two years after delivery to the ultimate user and will repair free of charge or replace at no charge, should it become defective upon which examination shall disclose to be defective and under warranty. Aiphone reserves unto itself the sole right to make the final decision whether there is a defect in materials and/or workmanship; and whether or not the product is within the warranty. This warranty shall not apply to any Aiphone product which has been subject to misuse, neglect, accident, power surge, or to use in violation of instructions furnished, nor extended to units which have been repaired or altered outside of the factory. This warranty does not cover batteries or damage caused by batteries used in connection with the unit. This warranty covers bench repairs only, and any repairs must be made at the shop or place designated in writing by Aiphone. This warranty is limited to the standard specifications listed in the operation manual. This warranty does not cover any supplementary function of a third party product that is added by users or suppliers. Please note that any damage or other issues caused by failure of function or interconnection with Aiphone products is also not covered by this warranty. Aiphone will not be responsible for any costs incurred involving on site service calls. Aiphone will not provide compensation for any loss or damage incurred by the breakdown or malfunction of its products during use, or for any consequent inconvenience or losses that may result.
The object area of the EU.