PAS 500 D3 - Vacuum Cleaner PARKSIDE - Free user manual and instructions
Find the device manual for free PAS 500 D3 PARKSIDE in PDF.
Frequently Asked Questions - PAS 500 D3 PARKSIDE
Download the instructions for your Vacuum Cleaner in PDF format for free! Find your manual PAS 500 D3 - PARKSIDE and take your electronic device back in hand. On this page are published all the documents necessary for the use of your device. PAS 500 D3 by PARKSIDE.
USER MANUAL PAS 500 D3 PARKSIDE
Translation of original operation manual
- Contents Introduction p. 28
- Application p. 29
- General description p. 29
- Delivery Contents p. 29
- Overview p. 29
- Description of operation p. 29
- Technical data p. 30
- Safety information p. 30
- Device symbols p. 30
- Symbols used in the instructions p. 31
- General notes on safety p. 31
- Assembly p. 32
- Switching on/off p. 33
- Operating Instructions p. 33
- Cleaning/Maintenance p. 34
- General Cleaning Work p. 34
- Cleaning the Metal lter cage and Pleated Filter p. 34
- Cleaning the Air Filter p. 34
- Storage p. 35
- Disposal/Environmental protection p. 35
- Spare Parts/Accessories p. 35
- Trouble shooting p. 36
- Guarantee p. 37
- Repair Service p. 38
- Service-Center p. 38
- Importer p. 38
- Translation of the original EC declaration of conformity p. 39
- Exploded Drawing This appliance can be used by children aged from 8 years and above and persons with reduced physical, sensory or mental capa- bilities or lack of experience and knowledge if they have been given supervision or instruction concer- ning use of the appliance in a safe way and understand the hazards in- volved. Children shall not play with the appliance. Cleaning and user maintenance shall not be made by children without supervision. Introduction Congratulations on the purchase of your new device. With it, you have chosen a high quality product. During production, this equipment has been checked for quality and subjected to a nal inspection. The functionality of your equipment is therefore guaranteed. It cannot be ruled out that residual quantities of water or lubricants will remain on or in the equipment/hose lines in isolated cases. This is not a fault or defect and it repre- sents no cause for concern. The operating instructions constitute part of this product. They contain important infor- mation on safety, use and disposal. Before using the product, familiarise your- self with all of the operating and safety instructions. Use the product only as de- scribed and for the applications specied. Keep this manual safely and in the event that the product is passed on, hand over all documents to the third party.29 p. 41
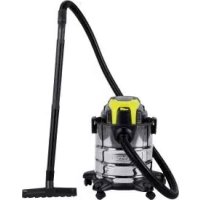
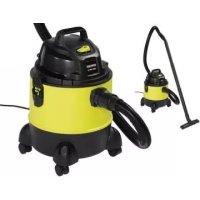
Application The motorised ash vacuum cleaner is a household appliance intended for remov- ing cold ash and other cold small objects from chimneys, charcoal stoves, ashtrays or barbecue grills. The equipment is not suitable for vacuum- ing liquids, soot or cement dust or for vacuuming heating boilers and oil-burning ovens. The vacuuming of glowing embers and of materials that are combustible, ex- plosive or harmful to health is prohibited. This equipment is not suitable for commer- cial use. Commercial use will invalidate the guarantee. The manufacturer will not be held respon- sible for injuries resulting from use which does not comply with the directions, or from incorrect use. General description See the front fold-out page for illustrations. Delivery Contents Unpack the equipment and check that it is complete. Dispose of the packaging material in a proper manner. 5 Container lid incl. motor hous- ing 10 Metal container 11 Metal suction hose 12 Suction tube 13 Pleated lter (already mounted) 14 Metal lter cage (already mounted) 15 Pre-lter - Instruction Manual Overview 1 Power cord 2 Suction tube holder
Inspection window blockage indicator 4a Carry handle 4b Retaining bracket for hose and power cord 5 Container lid 6 On/off switch 7 Hose connection 8 Seal clips 9 Arched handle for metal con- tainer 10 Metal container 11 Metal suction hose 12 Suction tube 13 Pleated lter 14 Metal lter cage 15 Pre-lter 15a Lip seal on pre-lter 16a Safety stop pleated lter 16b Safety stop metal lter cage 17 Metal lugs for fastening the metal lter cage 18 Air lter 19 Filter housing 20 Motor housing Description of operation The ash vacuum cleaner is tted with a stable metal container with a cover. The vacuum set comprises a exible metal suc- tion hose and an aluminium suction hose. The pre-lter protects the metal lter cage against contamination and thus, facilitates cleaning. A safety stop prevents the vac- uum cleaner from being operated without the lter or lter basket.30
A single-use thermal fuse permanently disconnects the power circuit in event of overheating or re inside the device. The following describes the function of the operating parts. Technical data Ash vacuum cleaner .....PAS 500 D3 Mains voltage ........... 230-240 V~, 50 Hz Rated power input (Power consumption) .................... 500 W Power cord length ......................... 2.5 m Safety class ......................................
uction hose ...................approx. 120 cm Suction tube Length ..........................approx. 30 cm Diameter ...................... approx. 40 mm Weight (incl. all accessories) ..................... approx. 4.0 kg Technical and visual modications may be carried out due to further development without prior notice. All dimensions, infor- mation and statements provided in these Operating Instructions are therefore subject to amendment. Legal claims which are based on the Operating Instructions can therefore not be recognised. Safety information Device symbols Warning! Read carefully before use. Retain for reference. Do not expose the unit to rain. For cold ashes only*! Matter exceeding a temperature of 40°C (104°F) poses a re risk!
- “Cold ashes” are ashes that have cooled for a sufcient time and no longer contain pockets of embers. This can be determined by sifting through the ashes with a metal implement before using the equipment. The cold ashes emit no fur- ther perceptible heat radiation. 1 Do not vacuum up soot or combusti- ble materials. During vacuuming, constantly check the hoses and vacuum for heating. The vacuumed material must not exceed a temperature of 40°C (104°F).
2 - 4 Open, empty and clean the vacuum
outdoors before and after vacuum- ing. Electrical machines do not belong with domestic waste. Safety class II31
Symbols used in the instructions Hazard symbols with in- formation on prevention of personal injury and property damage. Precaution symbol with information on prevention of harm / damage. Notice symbol with information on how to handle the device properly. General notes on safety The information contained in these operating instructions must be ob- served. In addition, legal safety and accident prevention regulations must also be observed. Caution: when using the equip- ment, observe the following basic safety measures in order to protect against the risks of injury and re: To avoid accidents and injuries from electric shocks:
- Ensure that the power cord is not damaged by being pulled over sharp edges, by jamming, or by pulling on the power cord.
- Before each use, check the power sup- ply lead and the extension cable for damage and ageing. Do not use the equipment if the cable is damaged or worn. Danger of electric shock hazard.
- If the power cord for this equipment is damaged, it must be replaced by the manufacturer, a customer service agent of the same or a similarly qualied per- son in order to prevent hazards.
- Switch the machine off and disconnect the mains plug: - when the machine is not in use, - before the machine is opened up, - for all maintenance and cleaning work, - if the connecting cable is damaged or tangled up.
- Do not use the power cord to pull the plug out of the socket. Protect the power cord from heat, oil, and sharp edges.
- Make sure that the mains voltage cor- responds with the information on the rating plate.
- Only plug the appliance into a socket which is safeguarded by at least 13A.
- The device must be connected to a mains socket via a residual-current circuit breaker (RCD) with a rated leak- age current of not more than 30mA.
- Do not expose the equipment to the rain. Do not use the equipment in a damp or wet environment.
- Protect yourself from electric shocks. Avoid bodily contact with earthed parts (e.g. pipes, radiators, electric cookers, cooling devices).
- Use extension cables outdoors. Use only extension cables that are ap
proved and labelled accordingly for outdoor use.
- Avoid accidental starting. Ensure that the switch is off when plugging into the socket. To avoid accidents and injuries:
- Never leave a machine which is ready for operation unattended at the work- place.
- People and animals must not be vacu- umed with the machine.
- Nozzles and suction tubes must not32
reach head level whilst in use. Personal injury could occur.
- Do not vacuum up substances or dusts that are hot, glowing, combustible, explosive or hazardous to health (dust classes L, M, H). This includes hot ashes, petrol, solvents, acids or caustic solutions. Personal injury could occur.
- Caution! Do not vacuum up hazardous substances (e.g. petrol, solvents, acids or lyes) and ash from unauthorised fu- els (e.g. from oil-burning ovens or heat- ing boilers). There is a risk of injury.
- Do not vacuum up ne, combustible dusts. There is a risk of explosion.
- Do not vacuum up hot ashes and hot, glowing or combustible objects (e.g. charcoal, cigarettes...). There is a risk of re.
- Do not vacuum up liquids, soot or plas- ter and cement dust. You could dam- age the equipment.
- The vacuum must not exceed a tem- perature of 40°C. Vacuum material that appears cool from the outside may still be hot inside. Hot vacuum material can re-ignite in the air stream. Further- more, the equipment can be damaged. In the event of a rise in temperature, switch off the equipment and discon- nect at the plug. Place the equipment outside and monitor it as it cools. The following states how damage to the appliance and possible in- jury to people can be avoided:
- Ensure that the equipment is assembled correctly and the lter is in the correct position.
- When vacuuming, do not place the equipment on heat sensitive oors. For safety reasons, use a reproof base when cleaning ovens, chimneys or bar- becue equipment.
- Do not extinguish hot ash particles with water, as the sudden temperature differences can cause cracks in your chimney.
- Use only replacement parts and acces- sories supplied and recommended by our service centre. The use of foreign parts will result in immediate invalida- tion of the guarantee.
- Have repairs carried out only by customer service points that we have authorised.
- Observe the instructions for the clean- ing and maintenance of the equip- ment.
- Empty and clean the vacuum before and after vacuuming in order to pre- vent the accumulation in the vacuum of materials that represent a re load.
- Keep the equipment in a dry place, out of reach of children. Assembly Disconnect at the plug before carry- ing out any work on the equipment. Risk of electric shock!
Put the lip seal (15a) of the pre- lter (15) over the edge of the metal container (10) (see small image).
2. Check that the pleated lter
14) are sitting correctly and
4. Connect the suction hose (11).
plastic end piece (with the printed symbol) into the hose connection (7) and screw it tight (bayonet con- nection). When assembling/detaching the suction hose, hold the black plastic end piece and not the metal suction hose. Twisting or bending could damage the hose.
5. Plug the suction tube (12) onto
the rigid end piece of the suc- tion hose (11). Switching on/off Connect the mains plug. The equipment is tted with a safety stop, which allows operation only with the pleated lter and metal lter cage installed correctly. Switching On: On/Off Switch (see
Switching Off: On/Off Switch (see
Operating Instructions The vacuuming of glowing embers and of materials that are combustible, explosive or harmful to health is prohib- ited. There is a risk of injury!
- Place the equipment on a level surface that is not heat sensitive.
- Use the pre-lter (15) when vacuum- ing ne, cold ashes or dust in order to protect the metal lter cage (14) and the folded lter (13) against contami- nation.
- The pre-lter (15) can be removed to vacuum coarse dirt. This increases the suction power.
- Always use the suction tube for vacu- uming. In case of minor contamination, hold the suction pipe approx. 1cm above the ash. Remove large ash vol- umes by directly immersing the suction pipe.
- Vacuum only cooled ash at less than 40°C.
- When vacuuming, keep checking the metal container and suction hose for rises in temperature.
- In the event of a rise in temperature, switch off the equipment and discon- nect at the plug. Place the equipment outside and monitor it as it cools.
- During breaks, you can place the suc- tion hose (
12) in the suction tube
- Always use the carry handle ( 4a) for transporting the equipment.
- The metal container may be lled to no more than half, so the pleated lter always remains clear.
- Empty the container outside in order to avoid mess (see “cleaning/mainte- nance“).
- Clean the pre-lter (
required, the folder lter (
“Cleaning/Maintenance”): - if suction power declines - if the inspection window on the con- tainer lid of the blockage indication system (
Cleaning/Maintenance Pull out the mains plug. Danger of electric shock. Never hose the appliance down with water. Never use aggressive cleaning agents or solvents. This could damage the appliance. If the single-use thermal fuse has permanently disconnected the pow- er circuit, the device must be sent to a service centre for repair. General Cleaning Work Clean the equipment after each use:
- Carry out cleaning outside in order to avoid mess.
metal container ( 10). Clean the metal container with water and allow it to dry.
with a brush or hand-brush.
- After removing the suction hose ( 11), clean the dust and soot particles from the connections. This ensures that the suction hose can be inserted again easily.
- Clean the metal lter cage and the pleated lter (see below). Cleaning the Metal lter cage and Pleated Filter Replace the pleated lter if it is worn, damaged or heavily soiled (see “replacement parts“).
1. Take off the container cover (5).
2. Turn the metal lter cage (14)
anticlockwise and take it off. Tap out the metal lter cage.
3. Tap out the pleated lter (13)
and clean it with a paintbrush or hand brush. Don‘t wash the pleated lter in water.
4. Place the pleated lter (13) on
the rotated container lid (5) (see small image
Here, the 0mm 16a16b rubber ring must be on the contain- er lid and press the safety stop switch (16a) down- wards. Make sure that the pres- sure mark on the rubber ring is re-positioned on the switch of the safety stop.
5. Pull the metal lter cage (14)
over the pleated lter (13) and turn it clockwise until it stops. The safety stop (16b) must be pressed down. If there is play in the metal lter cage (14), use a nger to press down the metal lugs (17). Cleaning the Air Filter
1. Take off the container cover (5),
2. Take the air lter (18) out of the
3. Clean the lter with soap and
water and allow it to dry in the air.
4. Place the air lter (18) back in
the lter housing (19).35
- To store, wind the power cord (1) around the retaining bracket (4) on the container lid (5).
- Push the end of the suction hose (11) under the retaining bracket (4).
- Push the suction tube (12) onto the suc- tion tube holder (2).
- Keep the equipment in a dry place, out of reach of children. Disposal/Environmental protection Be environmentally friendly. Return the tool, accessories and packaging to a recy- cling centre when you have nished with them. Machines must not be disposed of with household refuse. Take the machine to a recycling point. The waste plastic and metal parts can be sepa- rated, accurately graded and passed on for recycling. Contact our Service Centre for more details. Defective units returned to us will be dis- posed of for free. Spare Parts/Accessories Spare parts and accessories can be obtained at www.grizzly-service.eu If you do not have internet access, please contact the Service Centre via telephone (see “Service-Center” Page 38). Please have the order number mentioned below ready. Position Position Description Order No. instruction exploded manual drawing 11 11 Metal suction hose 91099243 12 12 Suction tube 91099242 13 13 Pleated lter 91099216 14 14 Metal lter cage 91099217 15 20 Pre-lter 91102315 18 17 Air lter 9109690036
Trouble shooting Problem Possible cause Fault correction Device does not start Mains voltage is not present Check plug socket, power cord, line, plug and fuse, where ap- propriate, repair through electri- cal specialist The equipment is not switched on Switch on the equipment (see “switching on/off“) Safety stop due to missing or incorrectly inserted pleat- ed lter (
lter cage ( 14) Insert the pleated lter correctly (see “cleaning/maintenance“) Defective on/off switch
Repair through customer service Defective motor The single-use thermal fuse has disconnected the power circuit Low or lack of suction Suction hose (
Remove obstructions and block- ages The metal container ( 10) is not closed Close the metal container The metal container ( 10) is full Empty the metal container (see “cleaning/maintenance“) The pleated lter (
clogged Clean or replace the pleated lter (see “cleaning/mainte- nance“) The air lter (
clogged Clean the air lter (see “clean- ing/maintenance“) Pre-lter (
Clean or replace pre-lter (see "Cleaning/Maintenance") Pre-lter (
the suction power To vacuum coarse dirt, remove the pre-lter37
Guarantee Dear Customer, This equipment is provided with a 3-year guarantee from the date of purchase. In case of defects, you have statutory rights against the seller of the product. These statutory rights are not restricted by our guarantee presented below. Terms of Guarantee The term of the guarantee begins on the date of purchase. Please retain the original receipt. This document is required as proof of purchase. If a material or manufacturing defect occurs within three years of the date of purchase of this product, we will repair or replace – at our choice – the product for you free of charge. This guarantee requires the defective equipment and proof of pur- chase to be presented within the three-year period with a brief written description of what constitutes the defect and when it oc- curred. If the defect is covered by our guarantee, you will receive either the repaired product or a new product. No new guarantee pe- riod begins on repair or replacement of the product. Guarantee Period and Statutory Claims for Defects The guarantee period is not extended by the guarantee service. This also applies for replaced or repaired parts. Any damages and defects already present at the time of purchase must be reported immediately af- ter unpacking. Repairs arising after expiry of the guarantee period are chargeable. Guarantee Cover The equipment has been carefully pro- duced in accordance with strict quality guidelines and conscientiously checked prior to delivery. The guarantee applies for all material and manufacturing defects. This guarantee does not extend to cover product parts that are subject to normal wear and may there- fore be considered as wearing parts (e.g. lters or attachments) or to cover damage to breakable parts (e.g. switches, batteries, or parts made of glass). This guarantee shall be invalid if the prod- uct has been damaged, used incorrectly or not maintained. Precise adherence to all of the instructions specied in the operating manual is required for proper use of the product. Intended uses and actions against which the operating manual advises or warns must be categorically avoided. The product is designed only for private and not commercial use. The guarantee will be invalidated in case of misuse or improper handling, use of force, or inter- ventions not undertaken by our authorised service branch. Processing in Case of Guarantee To ensure efcient handling of your query, please follow the directions below:
- Please have the receipt and identica- tion number (IAN 100052) ready as proof of purchase for all enquiries.
- Please nd the item number on the rat- ing plate.
- Should functional errors or other de- fects occur, please initially contact the service department specied below by telephone or by e-mail. You will then receive further information on the pro- cessing of your complaint.38
- After consultation with our customer service, a product recorded as defec- tive can be sent postage paid to the service address communicated to you, with the proof of purchase (receipt) and specication of what constitutes the defect and when it occurred. In or- der to avoid acceptance problems and additional costs, please be sure to use only the address communicated to you. Ensure that the consignment is not sent carriage forward or by bulky goods, express or other special freight. Please send the equipment inc. all accessories supplied at the time of purchase and ensure adequate, safe transport pack- aging. Repair Service For a charge, repairs not covered by the guarantee can be carried out by our ser- vice branch, which will be happy to issue a cost estimate for you. We can handle only equipment that has been sent with adequate packaging and postage. Attention: Please send your equipment to our service branch in clean condition and with an indication of the defect. Equipment sent carriage forward or by bulky goods, express or other special freight will not be accepted. We will dispose of your defective devices free of charge when you send them to us. Service-Center Service Great Britain Tel.: 0871 5000 720 (£ 0.10/Min.) E-Mail: grizzly@lidl.co.uk IAN 100052 Importer Please note that the following address is not a service address. Please initially con- tact the service centre specied above. Grizzly Tools GmbH & Co. KG Am Gewerbepark 2 64823 Groß-Umstadt Germany www.grizzly-service.eu39 Traduction de la dé- claration de confor- mité CE originale Translation of the original EC declara- tion of conformity Nous certions par la présente que l‘aspirateur de cendres série PAS 500 D3 Numéro de série 201405000001 - 201407188171 We hereby conrm that the Ash vacuum cleaner model series PAS 500 D3 Serial no. 201405000001 - 201407188171 est conforme aux directives UE actuellement en vigueur : conforms with the following applicable relevant version of the EU guidelines: 2004/108/EC • 2006/95/EC • 2009/125/EC • 2011/65/EU* En vue de garantir la conformité les nor- mes harmonisées ainsi que les normes et décisions nationales suivantes ont été appliquées : In order to guarantee consistency, the fol- lowing harmonised standards as well as national standards and stipulations have been applied: EN 60335-1:2012 • EN 60335-2-2/A1:2013 • PPP 52341C:2011