SDR 1100 B2 - Steam cleaner SILVERCREST - Free user manual and instructions
Find the device manual for free SDR 1100 B2 SILVERCREST in PDF.
| Product Type | Steam Cleaner |
| Brand | SilverCrest |
| Model | SDR 1100 B2 |
| Power Supply | 220-240 V ~, 50 Hz |
| Rated Power | 950-1100 W |
| Protection Type | IPX4 (splash water protection) |
| Water Tank Capacity | 350 ml (max 250 ml for about 5 minutes of steam) |
| Package Contents | Steam cleaner, flexible extension, lance, curved nozzle, upholstery nozzle, round brush, safety cap, squeegee, textile cover, funnel, measuring cup, instruction manual |
| Main Functions | Steam cleaning for smooth surfaces (worktops, tiles, windows, mirrors), hard-to-reach areas (corners, joints, blinds, toilets, faucets) and textiles (curtains, upholstered furniture, clothes, car seats) |
| Included Accessories | Flexible extension, lance, curved nozzle, upholstery nozzle, round brush, squeegee, textile cover |
| Indicator Lights | Red indicator (power on), green indicator (ready to operate) |
| Child Safety | Child safety switch (locks steam trigger) |
| Overheat Protection | Automatic shut-off in case of overheating (e.g., empty tank) |
| Cleaning and Maintenance | Clean the appliance with a damp cloth; textile cover machine washable at 60 °C; descale with distilled water if necessary |
| Warranty | 3 years from date of purchase |
| Weight | Approximately 1.2 kg (estimate) |
| Dimensions (approx.) | 30 x 15 x 25 cm (estimate) |
| Intended Use | Domestic use only, not for commercial or outdoor use |
Frequently Asked Questions - SDR 1100 B2 SILVERCREST
User questions about SDR 1100 B2 SILVERCREST
0 question about this device. Answer the ones you know or ask your own.
Ask a new question about this device
Download the instructions for your Steam cleaner in PDF format for free! Find your manual SDR 1100 B2 - SILVERCREST and take your electronic device back in hand. On this page are published all the documents necessary for the use of your device. SDR 1100 B2 by SILVERCREST.
USER MANUAL SDR 1100 B2 SILVERCREST
HANDDDAMPFREINIGER HANDHELD STEAM CLEANER NETTOYEUR VAPEUR À MAIN SDR 1100 B2
DE AT CH
HANDDDAMPFREINIGER
Bedienungsanleitung
FR BE
NETTOYEUR VAPEUR À MAIN
Mode d'emploi
PL
RECZNE, PAROWE
URZADZENIE CZYSZCZACE
Instrukcja obstugi
SK
RUCNY PARNY CISTIC
Návod na obsluhu
GB IE
HANDHELD STEAM CLEANER
Operating instructions
NL BE
HANDSTOOMREINIGER
Gebruksaanwijzing
CZ
RUCNI PARNI CISTIC
Návod k obsluze
IAN 345214_2004
DE AT CH
Before reading, unfold the page containing the illustrations and familiarise yourself with all functions of the device.
FR BE
KOMPERNASS HANDELS GMBH
BURGSTRASSE 21
44867 BOCHUM
DEUTSCHLAND
www.kompernass.com
Contents
Introduction 20
Copyright 20
Intended use 20
Warning notes 21
Safety guidelines 22
Package contents 25
Description of appliance/accessories 26
Technical data 26
Operating the appliance 27
Filling/refilling with water 27
Operating the appliance 29
Areas of application 30
Fitting/removing attachments 30
Child safety lock 32
Cleaning 32
Storage 33
Troubleshooting 33
Disposal 34
Disposal of the appliance 34
Disposal of packaging materials 34
Attachment 34
Notes on the Declaration of Conformity 34
Kompernass Handels GmbH warranty 35
Service 36
Importer 36
Introduction
Congratulations on the purchase of your new appliance.
You have selected a high quality product. The operating instructions are part of this product. They contain important information on safety, usage and disposal. Before using the product, familiarise yourself with all handling and safety instructions. Use the product only as described and for the range of applications specified. Keep these operating instructions in a safe place. Please also pass these operating instructions on to any future owner(s).
Copyright
This documentation is protected by copyright.
Any copying or reproduction, including in the form of extracts, or any reproduction of images (even in a modified state), is permitted only with the written authorisation of the manufacturer.
Intended use
This appliance is a steam cleaner designed for the removal of dirt and stains in domestic households, for example ...
- smooth surfaces: work surfaces, tiles, glazed tiles, windows, mirrors
- hard-to-reach areas: corners, joints, blinds, WC, bathroom fittings, etc.
- textiles: curtains, cushions, clothing, car seats.
This appliance is not intended:
- for outdoor use,
for use with liquids other than water, - for use in commercial or industrial applications.
Incorrect use of the appliance and/or using it for an alternative purpose can be dangerous. Use the appliance only for its intended purpose.
Observe the procedures described in these operating instructions.
Claims of any kind for damage resulting from misuse, incompetent repairs, unauthorised modification or the use of unauthorised spare parts will not be accepted. The risk shall be borne solely by the user.
Warning notes
The following warnings are used in these operating instructions:

DANGER
A warning at this hazard level indicates a potentially hazardous situation.
Failure to avoid this hazardous situation could result in serious injuries or even death.
Follow the instructions in this warning notice to avoid the risk of serious injuries or death.

WARNING
A warning at this hazard level indicates a potentially hazardous situation.
Failure to avoid this hazardous situation could result in physical injury.
Follow the instructions in this warning to prevent physical injury.
CAUTION
A warning at this hazard level indicates potential property damage.
Failure to avoid this situation could result in property damage.
Follow the instructions in this warning to prevent property damage.
NOTE
A note provides additional information that will assist you in using the appliance.
Safety guidelines

RISK OF ELECTRIC SHOCK
- Connect the appliance only to mains power sockets supplying a mains power voltage of 220 - 240V /50Hz .
In the event of operating malfunctions, and before cleaning the appliance, disconnect the plug from the mains power socket. - To disconnect the power cable, always pull the plug from the socket, do not pull the power cable itself.
- Do not kink or crush the power cable, and route the cable so that it cannot be stepped on or tripped over.
- To avoid risks, arrange for defective plugs and/or power cables to be replaced at once by qualified technicians or our Customer Service Department.
- Ensure that the power cable does not become wet or moist during use. Route the cable in such a way that it cannot be crushed or damaged.
- Should the appliance, the power cable or the plug become damaged, arrange for them to be repaired by Customer Services to avoid hazardous situations.
- Disconnect the appliance from the mains power socket before filling it with water, changing accessories or cleaning it.
- Use the appliance only in dry indoor areas, not outdoors.
- Never submerse the appliance in water or other liquids!
- Never aim the steam jet directly at electrical appliances or equipment which contains electrical components, such as the interior of ovens.
- Never leave a heat-generating device unattended! After use or during work pauses, always remove the plug from the mains power socket. The appliance heats up and generates steam pressure continuously when the plug is connected to a mains power socket!

RISK OF ELECTRIC SHOCK
- Use the appliance only with dry hands and never without shoes (i.e. not barefoot). This will help reduce the effect of an electric shock in the event of a malfunction.
- Never aim the appliance at moisture-sensitive objects.
This appliance may be used by persons with limited physical, sensory or mental capabilities or lack of experience and knowledge, provided that they are under supervision or have been told how to use the appliance safely and are aware of the potential risks. The appliance must not be used as a plaything by children.

WARNING! RISK OF INJURY!
- Never remove the safety valve if steam is still exiting the steam nozzle!
- Do not operate the appliance with an empty water tank. When the water reserve is used up, remove the power cable to prevent the appliance from overheating.
The accessories will get hot during use! There is a risk of scalding! - Allow the accessories used to cool down before dismantling them.
- Use only the original accessory parts for this appliance. Other accessories may not meet the safety requirements.
The appliance may not be used if it has been dropped, if there are any obvious signs of physical damage or if it is leaking.
The appliance must be kept out of the reach of children if it is switched on or is cooling down.
Wear gloves, protective glasses and breathing protection equipment when attempting to remove substances that could be hazardous to health. - Never direct the steam toward people or animals. Hot steam can cause serious injuries!
WARNING!RISK OF SCALDING!
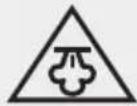
This symbol warns you about escaping steam. Please follow the safety instructions!
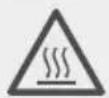
Caution! Hot surface!
CAUTION - PROPERTY DAMAGE!
- Start by carrying out a test on an unobtrusive area to be certain that the material is suitable for cleaning with a steam cleaner, for instance:
- Painted/varnished wood or leather can be bleached by steam.
- Unprotected wood can swell up.
- Protective wax coatings can be dissolved by steam.
Plastics can become tarnished from the effects of steam. - Soft plastics can deform when exposed to steam.
- Cold glass or mirror surfaces can crack when sprayed with hot steam.
If you wish to clean windows, you must first preheat them, for instance by applying the steam over large areas from a greater distance, then moving in progressively closer.
Acrylics, velvet and silk react sensitively to hot steam, as do plastic fibres.
Package contents
The appliance is supplied with the following components as standard:
- Steam cleaner
- Extension hose
- Extension nozzle
Angle nozzle - Upholstery nozzle
- Round brush
Safety valve
Pulling attachment
Fabric cover
Funnel
Measuring cup - Operating instructions
Remove all parts of the appliance from the packaging and remove all packaging materials.

DANGER
- Packaging material must not be used as a plaything. Risk of suffocation. Risk of suffocation!
NOTE
Check the package for completeness and for signs of visible damage.
If the consignment is incomplete or damaged due to defective packaging or carriage, contact the Service hotline (see the section Service).
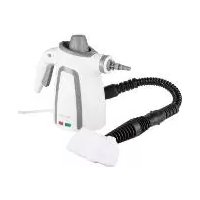
Description of appliance/accessories
Steam lever
"Child safety lock" button
Water tank
Red control lamp ①
Green control lamp
6 Steam nozzle
Water tank filler opening
8 Safety valve
9 Extension hose
10 Extension nozzle
Round brush
Angle nozzle
Squeegee attachment
14Upholstery nozzle
Fabric cover
16 Measuring cup
Funnel
Technical data
| Mains voltage 220–240 V | ~ (alternating current) 50 Hz |
| Rated power 950 – 1100 W | |
| Appliance protection rating IPX4 (splashproof) | |
| Water tank capacity | 350 ml With a water filling of 250 ml (MAX), steam can be generated for about 5 minutes. |
Operating the appliance
WARNING!RISKOFINJURY!
To ensure fault-free operation and a long service life for the appliance, pay heed to the following instructions:
Do not press the steam level until the green control lamp lights up. If you press too early, it may cause an accumulation of hot water in the steam nozzle which will drip or spray from the nozzle. There is a risk of scalding.
Before switching off, allow all of the steam to escape from the appliance. Press the steam lever until no more steam comes out of the steam nozzle 6.
Filling/refilling with water
RISK OF ELECTRIC SHOCK
Always disconnect the plug from the mains power socket before you add water to the water tank 3!
CAUTION - PROPERTY DAMAGE!
Do not put any additives or cleaning agents in the water tan 3!
Open the safely valve8.
NOTE
The safety valve can only be opened if all the steam has been let out of the water tank.
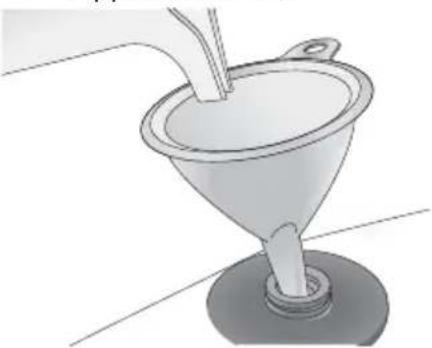
Ensure that you fill the appliance's water tan 3 with around 250~ml of water.
Fill the water tank with water through the filler opening 7.
To do this, use the supplied measuring cup 16 and the funnel 17 for assistance (see figure). Fill the measuring cup 16 with water up to the marking line (approx. 250ml
Reclose the safety valve.
If there is no more water in the water tank, no steam will come out when the steam lever is pressed. The water tank must be filled as follows:
Remove the plug from the mains power socket.
Press the steam lever until no more steam comes out of the steam nozzle 6.
Wait about 30 seconds.
Open the safety valve slowly. Wait a few seconds for the steam to stop hissing out before unscrewing it completely.
Fill the water tank with water.
Reclose the safety valve8.
If the mains water at your locality is rated as hard, it is recommended that you mix the mains water with distilled water. Otherwise, the appliance could calcify prematurely and clog the steam nozzle 6.
To extend the optimal functioning of the appliance, mix the mains water with distilled water as per the following table.
| Water hardness | Ratio of distilled water to mains water |
| very soft/soft 0 | |
| medium 1:1 | |
| hard 2:1 | |
| very hard 3:1 |
The water hardness level of your tap water can be queried at your local water works.
Operating the appliance
1) Insert the plug into a mains power socket.
The red control lamp ① ④ lights up to indicate that there is a connection to the mains electricity.
2) As soon as the appliance is ready to use, the green control lamp lights up. The red control lamp ① ④ stays lit.
NOTE
While heating up, steam may occasionally escape from the steam nozzle.
3) Press the steam lever ① downwards. Steam comes out of the steam nozzle ⑥ . If the steam pressure drops, the green control lamp ⑤ will go out.
Release the steam lever 1 until the green control lamp 5 comes back on.
NOTE
If water drips out of the steam nozzle during operation or the steam pressure falls, release the steam lever The appliance needs to heat up again. Wait until the green control lamp lights up again.
The steam cleaner has a thermal cut-out. It switches itself off automatically in case of overheating (e.g. due to an empty water tank). If this happens, pull out the mains plug and refill the water tank 3.

WARNING! RISK OF INJURY!
If you stop working for an extended period of time and leave the appliance switched on, steam may occasionally escape even though the steam lever is not pressed.
Areas of application
You can clean either by using steam directly from the steam nozzle or you can fit an accessory.
NOTE
The closer you hold the steam nozzle to the surface to be cleaned, the better the effect. The steam pressure and temperature are at their highest directly after leaving to the steam nozzle.
- Stubborn stains and dirt must be soaked with water beforehand.
Use the squeegee attachment 13 to steam clean glass surfaces.
Use the upholstery nozzl with the fabric cover for cleaning sofas and armchairs.
Use the angle nozzl12 for tight corners or joints, or hard-to-reach places.
Use the round brus for stubborn soiling, for example, on wheel rims.
Fitting/removing attachments
WARNING! RISK OF INJURY!
Always remove the plug from the mains power socket before you fit/remove an attachment.
- Wait until the appliance has cooled down before you fit/remove an attachment.
- Wait until all of the steam has dissipated before you fit/remove an attachment.
Extension hose
Push the extension hose onto the steam nozzle up to the stop. The marking line on the extension hose and the marking lines on the appliance must be aligned with each other (see fig. A on the fold-out page).
Turn anticlockwise until both marking lines on the extension hose are aligned with both marking lines on the appliance. The extension hose remains locked in this position (see fold-out page Figure B).
NOTE
The fixture on the appliance has a joint so that the attachment can be aligned to the best usage position. This is, however, not possible with the extension hose.
The extension has is removed in the reverse order.
Extension nozzle
Slide the extension nozzle onto the steam nozzle ⑥ up to the stop. The marking line on the extension nozzle ① and the two marking lines on the appliance must be aligned with each other (see fig. A on the fold-out page).
Turn anticlockwise until both marking lines on the extension nozzle are aligned with both marking lines on the appliance. The extension nozzle remains locked in this position (see fold-out page Figure B).
NOTE
The fixture on the appliance has a joint so that the attachment can be aligned to the best usage position. This is, however, not possible with the extension nozzle 10.
The extension nozzl is removed in the reverse order.
Assembling the squeezegee
Remove the upholstery nozzle14 and place this together with the two brackets onto the squeezegee attachment 13.
Then press the upholstery nozzle under the mount of the squeezegee attachment (see fold-out page).
Upholstery nozzle
Slide the upholstery nozzle 14 onto the steam nozzle 6 up to the stop. The marking line on the upholstery nozzle 14 and the marking lines on the appliance must be aligned with each other (see fold-out page Fig. A).
Turn anticlockwise until both marking lines on the upholstery nozzle 14 are aligned with both marking lines on the appliance. The upholstery nozzle 14 remains locked in this position (see fold-out page Figure B).
A fabric cove15 is supplied for use with the upholstery nozzle 14. This can be used for the cleaning of sensitive surfaces, such as sofas and armchairs.
NOTE
The fixture on the appliance has a joint so that the attachment can be aligned to the best usage position. This is, however, not possible with the upholstery nozzle 14.
The upholstery nozzl14 is removed in the reverse order.
Angle nozzle and round brush
Both of these attachments can be used either on the extension hos or on the extension nozzle or directly onto the steam nozzle.
Push the respective attachment on the hexagonal mount.
NOTE
The fixture on the appliance has a joint so that the attachment can be aligned to the best usage position.
The respective attachment can now be turned to the desired position.
Child safety lock
This appliance is equipped with a child safety lock 2
To activate the child safety loc, press the "Child safety lock" button with the icon. The steam lever 1 an now no longer be pressed down.
To deactivate the child safety lock, press the "Child safety lock" button with the icon. The steam lever can now be activated again.
Cleaning

RISK OF ELECTRIC SHOCK
Always remove the plug from the mains power socket before cleaning the appliance.


You must never immerse the appliance in water when cleaning it or hold it under running water.

WARNING! RISK OF INJURY!
Allow the appliance to cool sufficiently before cleaning it.
CAUTION - PROPERTY DAMAGE!
Do not use aggressive, chemical or abrasive cleaning agents! They could irreparably damage the surface!
Remove the power plug from the socket.
Allow the appliance to cool down.
Empty the water tank3.
Clean the appliance and the accessories with a moist cloth. For stubborn dirt, wipe, adding mild detergent to the cloth.
If it is dirty, the removable fabric covers can be cleaned in accordance with the symbols on the label:
| The fabric cover 15 is machine washable at 60°C. |
| Do not bleach the fabric cover 15. |
| Do not dry the fabric cover 15 in a tumble dryer. |
| Do not iron the fabric cover 15. |
Storage
Store the cleaned and dried appliance in a clean and dust-free location.
Troubleshooting
| PROBLEM | POSSIBLE CAUSE | POSSIBLE SOLUTIONS |
| The appliance is not working. | The plug is not con- nected. | Connect the appliance to a mains power socket. |
| The appliance is damaged. | Contact the Customer Service department. | |
| No steam is produced. | The water tank 3 is empty. | Fill the water tank 3 with water. |
| The appliance is not yet heated up. | Wait until the green control lamp 5 lights up. | |
| The green control lamp 5 lights up and then goes out again. | This is not a fault: the temperature dropped for a short time and the appliance started heating up again. | - |
| The steam volume is low. | The temperature is too low. | Wait until the appliance has heated up again. |
| Water drips from the steam nozzle 6. | The temperature is too low. | Wait until the appliance has heated up again. |
| The safety valve 8 cannot be opened. | The pressure in the water tank 3 is too high. | Press the steam lever 1 until no more steam comes out. |
Disposal
Disposal of the appliance
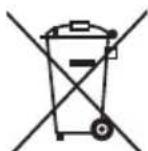
Under no circumstances should you dispose of the appliance with the normal household waste. This product is subject to the provisions of European Directive 2012/19/EU.
Dispose of the appliance via an approved waste disposal company or your municipal waste disposal facility. Please observe applicable regulations. Please contact your waste disposal facility if you are in any doubt.

Your local community or municipal authorities can provide information on how to dispose of the worn-out product.

The product is recyclable, subject to extended producer responsibility and is collected separately.
Disposal of packaging materials
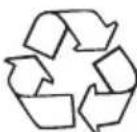
The packaging materials have been selected for their environmental friendliness and ease of disposal and are therefore recyclable. Dispose of packaging materials that are no longer needed in accordance with applicable local regulations.
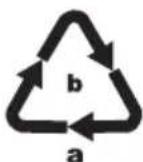
Dispose of the packaging in an environmentally friendly manner. Note the labelling on the packaging and separate the packaging material components for disposal if necessary. The packaging material is labelled with abbreviations (a) and numbers (b) with the following meanings:
1-7:Plastics,
20-22:Paper and cardboard,
80-98:Composites.
Attachment
Notes on the Declaration of Conformity

This appliance complies with the essential requirements and other relevant provisions of the European Electromagnetic Compatibility Directive 2014/30/EU, the Low Voltage Directive 2014/35/EU and the RoHS Directive 2011/65/EU.
The complete Declaration of Conformity, in its original form, is available from the importer.
This appliance has a 3-year warranty valid from the date of purchase. If this product has any faults, you, the buyer, have certain statutory rights. Your statutory rights are not restricted in any way by the warranty described below.
Warranty conditions
The warranty period starts on the date of purchase. Please keep your receipt in a safe place. This will be required as proof of purchase.
If any material or manufacturing fault occurs within three years of the date of purchase of the product, we will either repair or replace the product for you or refund the purchase price (at our discretion). This warranty service requires that you present the defective appliance and the proof of purchase (receipt) within the three-year warranty period, along with a brief written description of the fault and of when it occurred.
If the defect is covered by the warranty, your product will either be repaired or replaced by us. The repair or replacement of a product does not signify the beginning of a new warranty period.
Warranty period and statutory claims for defects
The warranty period is not prolonged by repairs effected under the warranty. This also applies to replaced and repaired components. Any damage and defects present at the time of purchase must be reported immediately after unpacking. Repairs carried out after expiry of the warranty period shall be subject to a fee.
Scope of the warranty
This appliance has been manufactured in accordance with strict quality guidelines and inspected meticulously prior to delivery.
The warranty covers material faults or production faults. The warranty does not extend to product parts subject to normal wear and tear or to fragile parts which could be considered as consumable parts such as switches, batteries or parts made of glass.
The warranty does not apply if the product has been damaged, improperly used or improperly maintained. The directions in the operating instructions for the product regarding proper use of the product are to be strictly followed. Uses and actions that are discouraged in the operating instructions or which are warned against must be avoided.
This product is intended solely for private use and not for commercial purposes. The warranty shall be deemed void in cases of misuse or improper handling, use of force and modifications / repairs which have not been carried out by one of our authorised Service centres.
Warranty claim procedure
To ensure quick processing of your case, please observe the following instructions:
Please have the till receipt and the item number (e.g. IAN 123456_7890) available as proof of purchase.
■ You will find the item number on the type plate on the product, an engraving on the product, on the front page of the operating instructions (below left) or on the sticker on the rear or bottom of the product.
If functional or other defects occur, please contact the service department listed either by telephone or by e-mail.
You can return a defective product to us free of charge to the service address that will be provided to you. Ensure that you enclose the proof of purchase (till receipt) and information about what the defect is and when it occurred.
You can download these instructions along with many other manuals, product videos and installation software at www.lidl-service.com.
This QR code will take you directly to the Lidl service page (www.lidl-service.com) where you can open your operating instructions by entering the item number (IAN) 345214.
Service
GB Service Great Britain
Tel.: 0800 404 7657
E-Mail: kompernass@lidl.co.uk
IE Servicelreland
Tel.: 1890 930 034
(0,08 EUR/Min., (peak))
(0,06 EUR/Min., (off peak))
E-Mail: kompernass@lidl.ie
IAN 345214_2004
Importer
Please note that the following address is not the service address. Please use the service address provided in the operating instructions.
KOMPERNASS HANDELS GMBH
BURGSTRASSE 21
44867BOCHUM
GERMANY
www.kompernass.com
Table des matieres
Introduction 38
Droits d'auteur 38
Attention! Surface chaude!
ATTENTION - RISQUE DE DOMMAGES MATÉRIELS!
Chere cliente, cher client,
Chere cliente, cher client,
KOMPERNASS HANDELS GMBH
BURGSTRASSE 21
44867 BOCHUM
ALLEMAGNE
www.kompernass.com
Inhoud
Inleiding 60
Auteursrecht 60
WAARSCHUWING! LETSELGEVAAR!
WAARSCHUWING! LETSELGEVAAR!
WAARSCHUWING! LETSELGEVAAR!
WAARSCHUWING! LETSELGEVAAR!
WAARSCHUWING! LETSELGEVAAR!
KOMPERNASS HANDELS GMBH
BURGSTRASSE 21
44867 BOCHUM
DUITSLAND
www.kompernass.com
Spis tresci
Wstep. 78
Prawa autorskie 78
KOMPERNASS HANDELS GMBH
BURGSTRASSE 21
44867 BOCHUM
NIEMCY
www.kompernass.com
Obsah
Uvod. 96
Autorske pravo
Pouzitivsouladusurcenim 96
KOMPERNASS HANDELS GMBH
BURGSTRASSE 21
44867 BOCHUM
NEMECKO
www.kompernass.com
Obsah
Uvod. 114
Autorske pravo 114
Pouzivanie v sulade s urcenim 1 14
KOMPERNASS HANDELS GMBH
BURGSTRASSE 21
44867 BOCHUM
NEMECKO
www.kompernass.com

KOMPERNASS HANDELS GMBH
BURGSTRASSE 21
44867 BOCHUM
GERMANY
www.kompernass.com