
SKW EDS B2 - Scale SILVERCREST - Free user manual and instructions
Find the device manual for free SKW EDS B2 SILVERCREST in PDF.

| Product type | Digital kitchen scale |
| Brand | SilverCrest |
| Model | SKW EDS B2 |
| Power supply | 2 x 1.5V AAA batteries (included) |
| Weighing range | 0 to 5000 g |
| Resolution | 1 g |
| Temperature display | 0 to 40 °C (accuracy ±2 °C) |
| Units of measurement | g, kg, lb:oz, ml (water/milk), fl oz (water/milk) |
| Functions | Weighing, tare, timer, temperature display, unit selection |
| Tare function | Yes (resets to zero for adding ingredients) |
| Timer | Yes (adjustable countdown timer up to 99 min 59 s) |
| Auto-off | After approx. 2 minutes of inactivity |
| Overload indicator | Displays "Err" if weight > 5 kg |
| Low battery indicator | Displays "Lo" |
| Platform material | Stainless steel (estimated) |
| Package contents | 1 scale, 2 AAA batteries, 1 user manual |
| Care | Wipe with a soft, dry cloth; do not immerse |
| Safety | Do not exceed 5 kg; do not open the casing; use on a flat surface |
| Warranty | 3 years |
Frequently Asked Questions - SKW EDS B2 SILVERCREST
User questions about SKW EDS B2 SILVERCREST
0 question about this device. Answer the ones you know or ask your own.
Ask a new question about this device
Download the instructions for your Scale in PDF format for free! Find your manual SKW EDS B2 - SILVERCREST and take your electronic device back in hand. On this page are published all the documents necessary for the use of your device. SKW EDS B2 by SILVERCREST.
USER MANUAL SKW EDS B2 SILVERCREST
KITCHENSCALE
GB IE
KITCHEN SCALE
Operation and Safety Notes
FI
KEITTIÖVAAKA
GB / IE Operation and Safety Notes Page 4
| FI Käyttö- ja turvallisuusohjeet Sivu 18 | ||
| SE Bruksanvisning och säkerhetsanvisningar Sidan 31 | ||
| DK Brugs- og sikkerhedsanvisninger Side 45 | ||
| FR/BE | Instructions d’utilisation et consignes de sécurité Page 58 | |
| NL/BE | Bedienings- en veiligheidsinstructies | Pagina 73 |
| DE/AT/CH | Bedienungs- und Sicherheitshinweise | Seite 88 |
Intended Use Page 5
Description of parts and features.....Page 5
Technical data......Page 5
Scope of delivery...... Page 6
Safety advice
General Safety Instructions ...... Page 6
Safety instructions for batteries...... Page 8
Before use
Inserting / replacing the batteries...... Page 10
Adjusting the time...... Page 10
Setting up the appliance...... Page 11
Operation
Setting the units of weight and weighing......Page 11
Tare (TARE function) Page 12
Removing weighed product ...... Page 13
Setting the timer...... Page 13
Switching off the weighing function....Page 14
Temperature display ...... Page 14
Troubleshooting Page 15
Cleaning, care and storage ...... Page 15
Disposal Page 16
Warranty Page 16
Kitchen Scale
- IntendedUse
This product is suitable for weighing and tare weighing of typical domestic quantities of foodstuffs. The digital kitchen scales are used to determine the weight and / or volume of non-aggressive, non-corrosive and non-abrasive liquids or solids. The product is for private use only and is not intended for medical or commercial use.
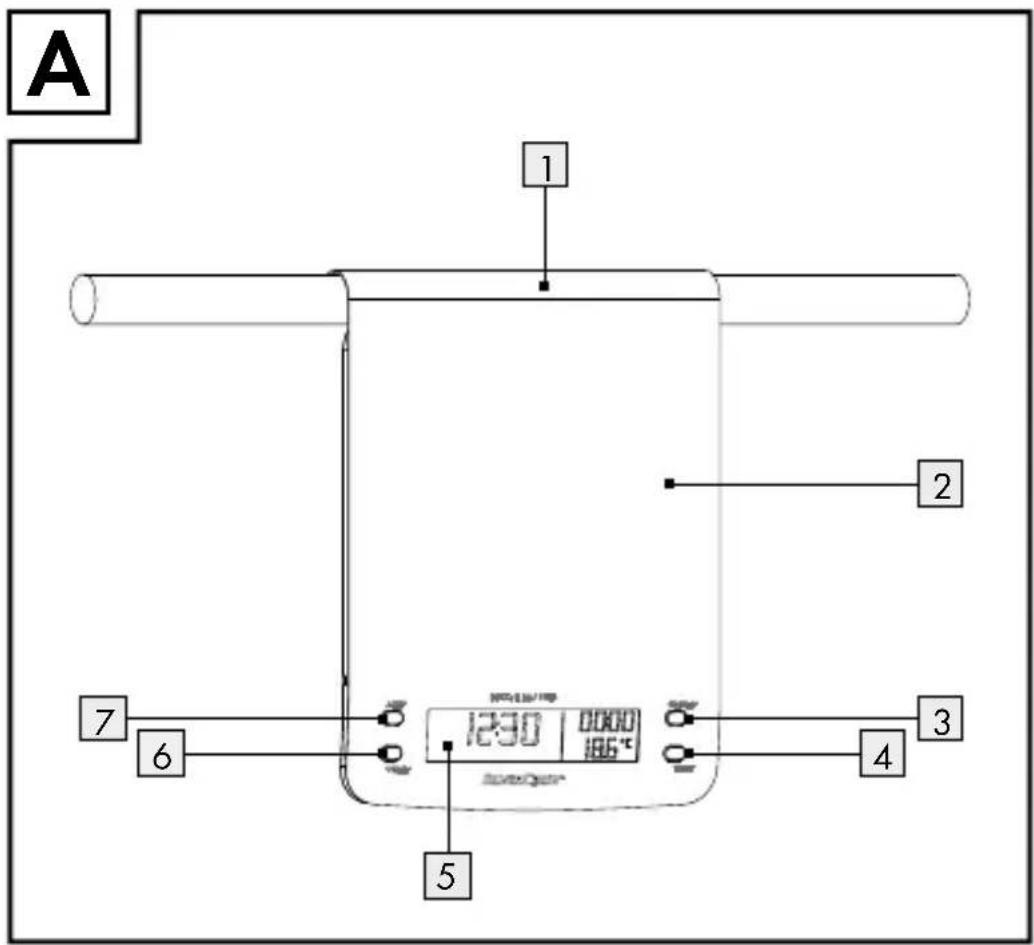
● Description of parts and features
1 Suspensionbracket
2 Balancetray
3 ON/OFF button
4 T-SET button (timer / adjustment of clock)
5 LCdisplay
6 ▼ UNIT button (adjustment of the measurement unit)
7 ▲ Z/T button (ZERO/TARE)
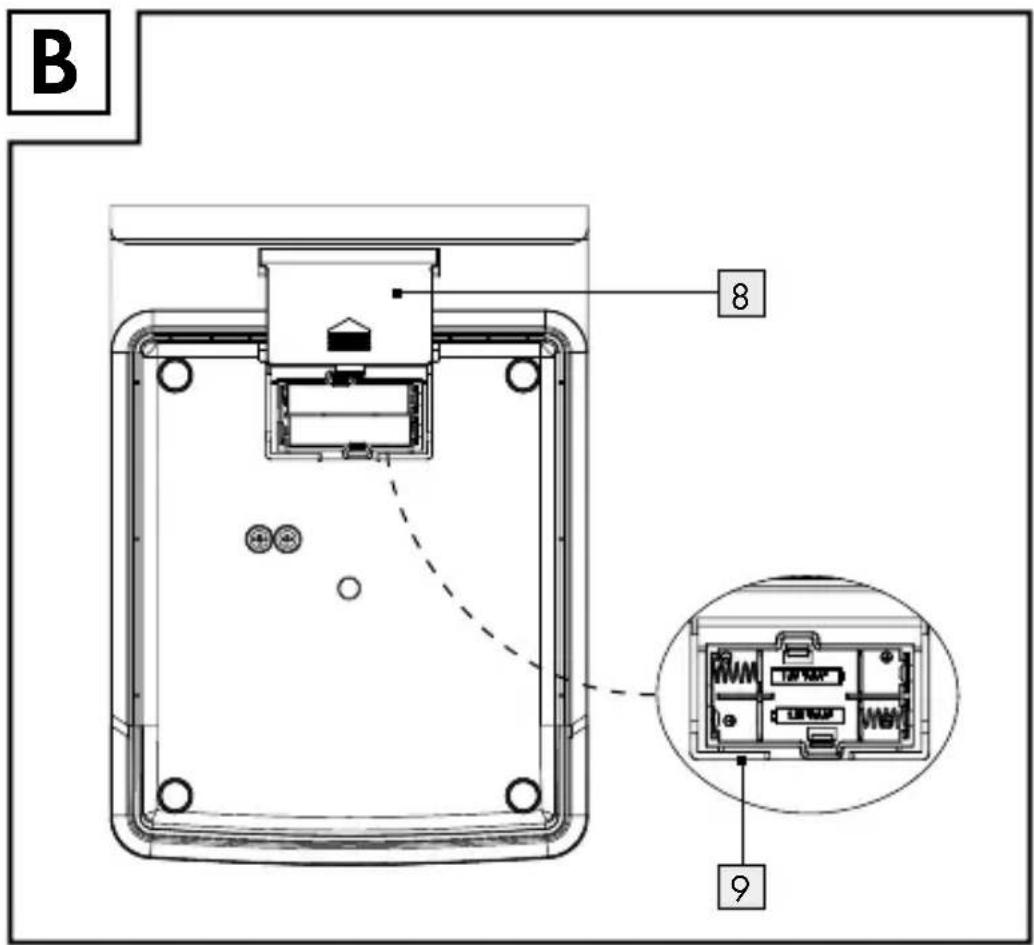
8 Battery compartment cover
9 Batterycompartment
●Technicaldata
Power supply: 2 x 1.5V AAA
Temperature display: 0–40 °C, to an accuracy of ±2 °C
Weighing range: 0–5000 g, in 1 g intervals
- Scope of delivery
1 Digital kitchen scale
2 Batteries 1.5 V---AAA
1 Operating manual

Safety advice
PLEASE RETAIN ALL SAFETY INFORMATION AND INSTRUCTIONS FOR FUTURE REFERENCE!

General Safety Instructions
RISK OF WARNING!
FATAL INJURY AND
ACCIDENTS FOR INFANTS AND SMALL CHILDREN! Never leave chil- dren unsupervised with the packaging materials. The packaging material pre- sents a danger of suffocation. Children often underestimate dangers. Always keep children away from the packaging material.

WARNING! RISK OF FATAL
INJURY! Batteries could be swallowed, which could pose a lethal hazard. If a
battery has been swallowed, seek medical help immediately.
This appliance can be used by children aged from 8 years and above and persons with reduced physical, sensory or mental capabilities or lack of experience and knowledge if they have been given supervision or instruction concerning use of the appliance in a safe way and understand the hazards involved. Children shall not play with the appliance. Cleaning and user maintenance shall not be made by children without supervision.
CAUTION! Do not load the scales beyond 5 kg. Otherwise the product may be damaged.
- Protect the product from electrostatic charge / discharge. This could hinder the internal data exchange, which can cause errors in the LC display readout. - Check the product for damage before use. Never use a damaged product.

WARNING!
Never open the
housing of the product.
This can result in injury and damage to the product. Repairs must only be carried out by a qualified electrician.
■ Make sure that anyone intending to use the product has read the operating manual and is capable of operating the product safely.
- Place the product on a solid, horizontal and flat surface.
■ Magnetic fields may cause the product to function incorrectly. If this happens, briefly remove the batteries from the product and then re-insert them.
FOOD SAFE! This product has no adverse effect on taste or smell.

Safety instructions for batteries
■ Remove the batteries from the device if they have not been used for a long period.
CAUTION! EXPLOSION HAZARD! The batteries must never be recharged!
- When inserting the batteries, ensure the correct polarity! This is shown inside the battery compartment.
If necessary, clean the contacts on the batteries and on the device itself before inserting them.
■ Remove spent batteries immediately from the device. There is an increased danger of leaks!
■ Batteries must not be disposed of in the normal domestic waste!
■ Every consumer is legally obliged to dispose of batteries in the proper manner! - Keep batteries away from children; do not throw them in the fire, short-circuit them or take them apart.
If the above instructions are not complied with, the batteries may discharge themselves beyond their minimum voltage.
There is then a danger of leaking. If the batteries have leaked inside your appliance, you should remove them immediately in order to prevent damage to the appliance!
- Avoid contact with the skin, eyes and mucous membranes. Any parts of the body coming into contact with battery acid should be rinsed off with copious amounts of water and / or contact a doctor!
●Beforeuse
- Inserting / replacing the batteries
Note: Always switch off the appliance before changing the battery.
☐ Remove the battery compartment cover 8 from the back of the appliance.
☐ If necessary, remove the spent batteries.
☐ Insert 2 x 1.5 V—AAA batteries into the battery compartment 9.
Note: Ensure the correct polarity. This is shown inside the battery compartment.
☐ Close the battery compartment again.
The appliance is now in the time mode, and ready for use.
- Adjusting the time
The clock must be adjusted before using for the first time and after the batteries have been changed.
As soon as the batteries have been inserted, the hour display begins to flash. To set the hour press the ▲ Z / T button 7 or the ▼ UNIT button 6.
☐ Press the T-SET button 4, to go to the minute display.
☐ Press the ▲ Z / T button or ▼ UNIT button to set the minutes.
☐ Press the T-SET button. The clock is now set.
Note: If you need to reset the time, press and hold the T-SET button until the time display flashes. Proceed as described above.
- Setting up the appliance
Place the appliance on a flat, non-slip surface.
Note: Because furniture surfaces are made of a variety of materials and treated with very different products, it cannot be ruled out that some of these materials may contain chemicals that will attack and soften the rubber feet. If necessary, place an anti-slip mat under the feet of the appliance.
Note: Remove the protective film from the balance tray
Operation
- Setting the units of weight and weighing
You can choose between metric and imperial / avoirdupois units of weight. For the range 0 g–999 g, the unit of weight is in g; from 0 oz–15.9 oz, the unit of weight is shown in oz. For the range from 1000 g upwards, the unit of weight is in kg; from 16 oz the unit of weight is shown in lb:oz. Likewise, you can weigh liquids, in which case press the ▼ UNIT button 6.
In the metric system:
- Millimetre (ml) water: "WATER" is shown in the LC display.
- Millimetre (ml) milk: "MILK" is shown in the LC display.
In the imperial / avoirdupois system:
- Fluid ounces (fl. oz) water: "WATER" is shown in the LC display.
- Fluid ounces (fl. oz) milk: "MILK" is shown in the LC display.
☐ Press the ON / OFF button 3. The appliance is now in weighing mode. The set unit of weight appears under to the right of the weight in the LC display 5.
☐ Press and hold the ▼ UNIT button 6 for about 2 seconds to change the unit of weight (g / lb'oz).
☐ The weight "0" is shown in the LC display. Place a suitable bowl or container on the balance tray 2 and press the ▲ Z/T button 7. Again, the weight "0" is shown in the LC display. The weight of the bowl / container is not displayed.
Place the product to be weighed in the bowl / container. The weight of the product is shown in the LC display.
Note: If no button is pressed for 2 minutes, or the weight is not changed, the readout in the LC display always returns to the time mode.
Tare (TARE function)
You can set the appliance to "0" again, so that you can weigh out another product.
Note: A small circle-symbol appears in the left of the LC display as soon as the appliance is switched on. The display is now in
the standard zero-setting. The circle-symbol disappears as soon as the TARE function is used.
☐ To do this press the ▲ Z / T button 7 once. The message "TARE" appears in the LC display 5. Again, the weight "0" is shown in the LC display.
Place the next product to be weighed in the bowl / container. The weight of the newly added product is shown in the LC display.
Note: You can repeat this process many times. Never place more than 5 kg onto the appliance.
☐ Remove the bowl / container and the weighed product from the balance tray. Press the ▲ Z / T button. Again, the weight "0" is shown in the LC display.
- Removing weighed product
☐ Press the ▲ Z / T button 7. The message "TARE" appears in the LC display 5. Again, the weight "0" is shown in the LC display.
☐ Remove the desired amount of the weighed product. The weight of the product is shown in the LC display as a negative value.
Note: You can repeat this process many times.
☐ Remove the bowl / container and the weighed product from the balance tray. Press the ▲ Z / T button. Again, the weight "0" is shown in the LC display.
- Setting the timer
The timer can be used in the clock and weighing modes. Set the timer for a defined time period. A signal sounds at the end of the period. The set time runs as a countdown.
☐ Press the T-SET button 4 once in the clock mode or twice in the weighing mode. A bell-symbol appears in the LC display 5.
Note: You can set the time period precisely to the second. Press and hold the ▲ Z / T button 7 or ▼ UNIT button 6, so that the time readout in the LC display runs faster.
☐ Press the ▲ Z / T button or ▼ UNIT button to set the time in 10 minute intervals.
☐ Press the T-SET button once. Press the ▲ Z / T button or ▼ UNIT button to set the time in 1 minute intervals.
☐ Press the T-SET button once. Press the ▲ Z / T button or ▼ UNIT button to set the time in 10 second intervals.
☐ Press the T-SET button once. Press the ▲ Z / T button or ▼ UNIT button in set time in 1 second intervals.
☐ Press the T-SET button to start the countdown.
Note: You can reset the timer. To do this press the T-SET button.
☐ A signal sounds as soon as set time period has elapsed. Press any button to switch off the signal.
- Switching off the weighing function
Note: If the appliance has not been used for about 2 minutes, it switches automatically to the time mode.
☐ Press the ON / OFF button 3 to return manually to the time mode.
●Temperaturedisplay
The temperature is shown in ^ C in the lower right of the LC display 5.
●Troubleshooting
- If the LC display 5 shows "Err", there is too much weight on the appliance. Remove the excess load. Never place a load of more than 5 kg onto the appliance.
- If the LC display shows "Lo", the batteries are discharged. Change the batteries.
Note: The message "Lo" only appears in the weighing mode.
- If the LC display shows "UNST", wait for a few seconds.
- If the appliance does not work as expected, change the batteries.
Note: The device contains delicate electronic components.
This means that if it is placed near an object that transmits radio signals, it could cause interference. If the display indicates a problem, move such objects away from it. Electrostatic discharges can lead to malfunctions. In the case of such malfunctions remove the batteries briefly and then insert them again.
● Cleaning, care and storage
Note: For storage you can hang the appliance using the hanger 1 (see Fig. A).
■ Under no circumstances should you use liquids or detergents, as these will damage the appliance.
☐ The appliance should only be cleaned on the outside with a soft, dry and lint-free cloth.
☐ For stubborn dirt use a cloth with soapy water or stainless steel cleaner.
●Disposal

The packaging is made entirely of recyclable materials which you can dispose of at your local recycling facilities.
Contact your local waste disposal authority for more details on how to dispose of the product when it is no longer needed.

To help protect the environment, please dispose the product properly, and not in the household waste, when it has reached the end of its useful life. Contact your municipal authorities for information regarding collection points and their opening hours.
Faulty or used batteries must be recycled in accordance with Directive 2006/66/EC. Return batteries and/or the equipment through the collection facilities provided.
Environmental damage through incorrect disposal of the batteries!
Never dispose of batteries in your household waste. They may contain toxic heavy metals and are subject to hazardous waste regulations. The chemical symbols of the heavy metals are: Cd = cadmium, Hg = mercury, Pb = lead. Therefore dispose of used batteries through your local collection site.
- Warranty
The device has been manufactured to strict quality guidelines and meticulously examined before delivery. In the event of product defects you have legal rights against the retailer of this product. Your legal rights are not limited in any way by our warranty detailed below.
The warranty for this device is 3 years from the date of purchase. Should this device show any fault in materials or manufacture within three years from the date of purchase, we will repair or replace it - at our choice - free of charge to you.
The warranty period begins on the date of purchase. Please keep the original sales receipt in a safe location. This document is required as your proof of purchase. This warranty becomes void if the device has been damaged or improperly used or maintained.
The warranty applies to faults in material or manufacture. This warranty does not cover product parts subject to normal wear, thus possibly considered consumables (e.g. batteries) or for damage to fragile parts, e.g. switches, rechargeable batteries or glass parts.
CE