Athyss AS71 AS07011 - Broom HOOVER - Free user manual and instructions
Find the device manual for free Athyss AS71 AS07011 HOOVER in PDF.
| Brand | Hoover |
| Model | Athyss AS71 AS07011 |
| Appliance type | Canister vacuum (stick) |
| Power supply | Mains (corded) |
| Power | Variable (adjustable by button) |
| Bag type | Disposable paper bag |
| Filtration | Pre-motor filter, motor exhaust filter, washable HEPA filter (bagless mode) |
| Operating modes | With bag / Bagless (cyclonic cassette) |
| Functions | Foldable handle, portable suction, bag full indicator |
| Included brushes | Carpet and hard floor brush (GP), carpet brush (CA), hard floor nozzle (HF), small nozzle, crevice tool, parquet brush |
| Cord length | Not specified (hook winding) |
| Maintenance | Bag replacement (after 5 full bags, replace filters), HEPA filter cleaning (wash with warm water, dry 24h) |
| Safety | Unplug before maintenance, do not use outdoors, do not vacuum liquids or hot objects |
| Spare parts | Bag H59 (35600279), filter U37 (35600280), portable kit C48 (35600191), brush G266PE (35601647), brush G215EE (35601608), parquet brush G80 (35600282), HEPA filter T98 (35600862) |
| Warranty | According to retailer conditions |
| Compliance | European directives 2006/95/CE, 2004/108/CE, 2011/65/UE |
| Usage | Household only |
Frequently Asked Questions - Athyss AS71 AS07011 HOOVER
User questions about Athyss AS71 AS07011 HOOVER
0 question about this device. Answer the ones you know or ask your own.
Ask a new question about this device
Download the instructions for your Broom in PDF format for free! Find your manual Athyss AS71 AS07011 - HOOVER and take your electronic device back in hand. On this page are published all the documents necessary for the use of your device. Athyss AS71 AS07011 by HOOVER.
USER MANUAL Athyss AS71 AS07011 HOOVER
INSTRUCTIONS FOR SAFE USE
This appliance should only be used for domestic cleaning, as described in this user guide. Please ensure that this guide is fully understood before operating the appliance.
Do not leave the appliance plugged in. Always switch off and remove the plug from the socket after use, or before cleaning the appliance or any maintenance task.
This appliance can be used by children aged from 8 years and above and persons with reduced physical, sensory or mental capabilities or lack of experience and knowledge if they have been given supervision or instruction concerning use of the appliance in a safe way and understand the hazards involved. Children shall not play with the appliance. Cleaning and user maintenance shall not be made by children without supervision.
If the power cord is damaged stop using the appliance immediately. To avoid a safety hazard, an authorised HOOVER service engineer must replace the power cord.
Keep hands, feet, loose clothing and hair away from rotating brushes.
Use only attachments, consumables or spares recommended or supplied by HOOVER.
Static electricity: Some carpets can cause a small build up of static electricity. Any static discharge is not hazardous to health.
Do not use your appliance out of doors or on any wet surface or for wet pick up.
Do not pick up hard or sharp objects, matches, hot ashes, cigarette ends or other similar items.
GB
Do not spray with or pick up flammable liquids, cleaning fluids, aerosols or their vapours.
Do not run over the power cord when using your appliance or remove the plug by pulling on the power cord.
Do not continue to use your appliance if it appears faulty.
HOOVER service: To ensure the continued safe and efficient operation of this appliance we recommend that any servicing or repairs are only carried out by an authorised HOOVER service engineer.
Do not stand on or wrap the cord around arms or legs when using your appliance.
Do not use the appliance to clean animals or people.
Do not position the appliance above you when cleaning the stairs.
The Environment
The symbol on this appliance indicates that this appliance may not be treated as household waste. Instead it must be handed over to the applicable collection point for the recycling of electrical and electronic equipment. Disposal must be carried out in accordance with local environmental regulations for waste disposal. For more detailed information about treatment, recovery and recycling of this appliance, please contact your local city office, your household and waste disposal service or the shop where you purchased the appliance.

This appliance complies with the European Directives 2006/95/EC, 2004/108/EC and 2011/65/EU.
HOOVER Limited, Pentrebach, Merthyr Tydfil, Mid Glamorgan, CF48 4TU, UK
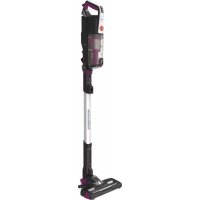
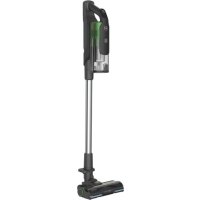
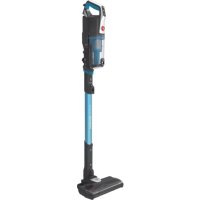
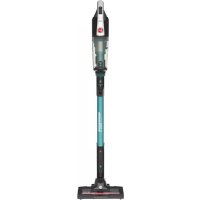
GETTING TO KNOW YOUR CLEANER
A. Foldaway Handle
B. Foldaway Handle Release Button
C. Mini Pop-Up Handle
D. On / Off Button or Variable Power Control
E. Quick Release Cord Storage Hook
F. Exhaust Filter
G. Power Cord
H. Integrated Clip
I. Bag Door
J. Bag Check Indicator
K. Carpet and Floor Nozzle (GP)
K1. Carpet Nozzle (CA)
K2. Hard Floor Nozzle (HF)*
L. Extension Tube
M. Furniture Nozzle
N. Crevice Tool
O. Accessory Holder
P. Parquet Nozzle
GETTING TO KNOW YOUR CLEANER
Remove all components from the packaging.
- Unclip foldaway handle from base of main body and fold upward into place.
- Open the bag door and check if the dust paper bag is correctly fitted.
- Ensure the pre-motor and exhaust filters are correctly fitted.
- Fit the Carpet and Floor Nozzle.
Fully unwind cord. - On fixed power version depress button to switch power On/Off. On variable power version rotate the knob to switch on and control the power.
USING YOUR CLEANER
POWER CORD STORAGE
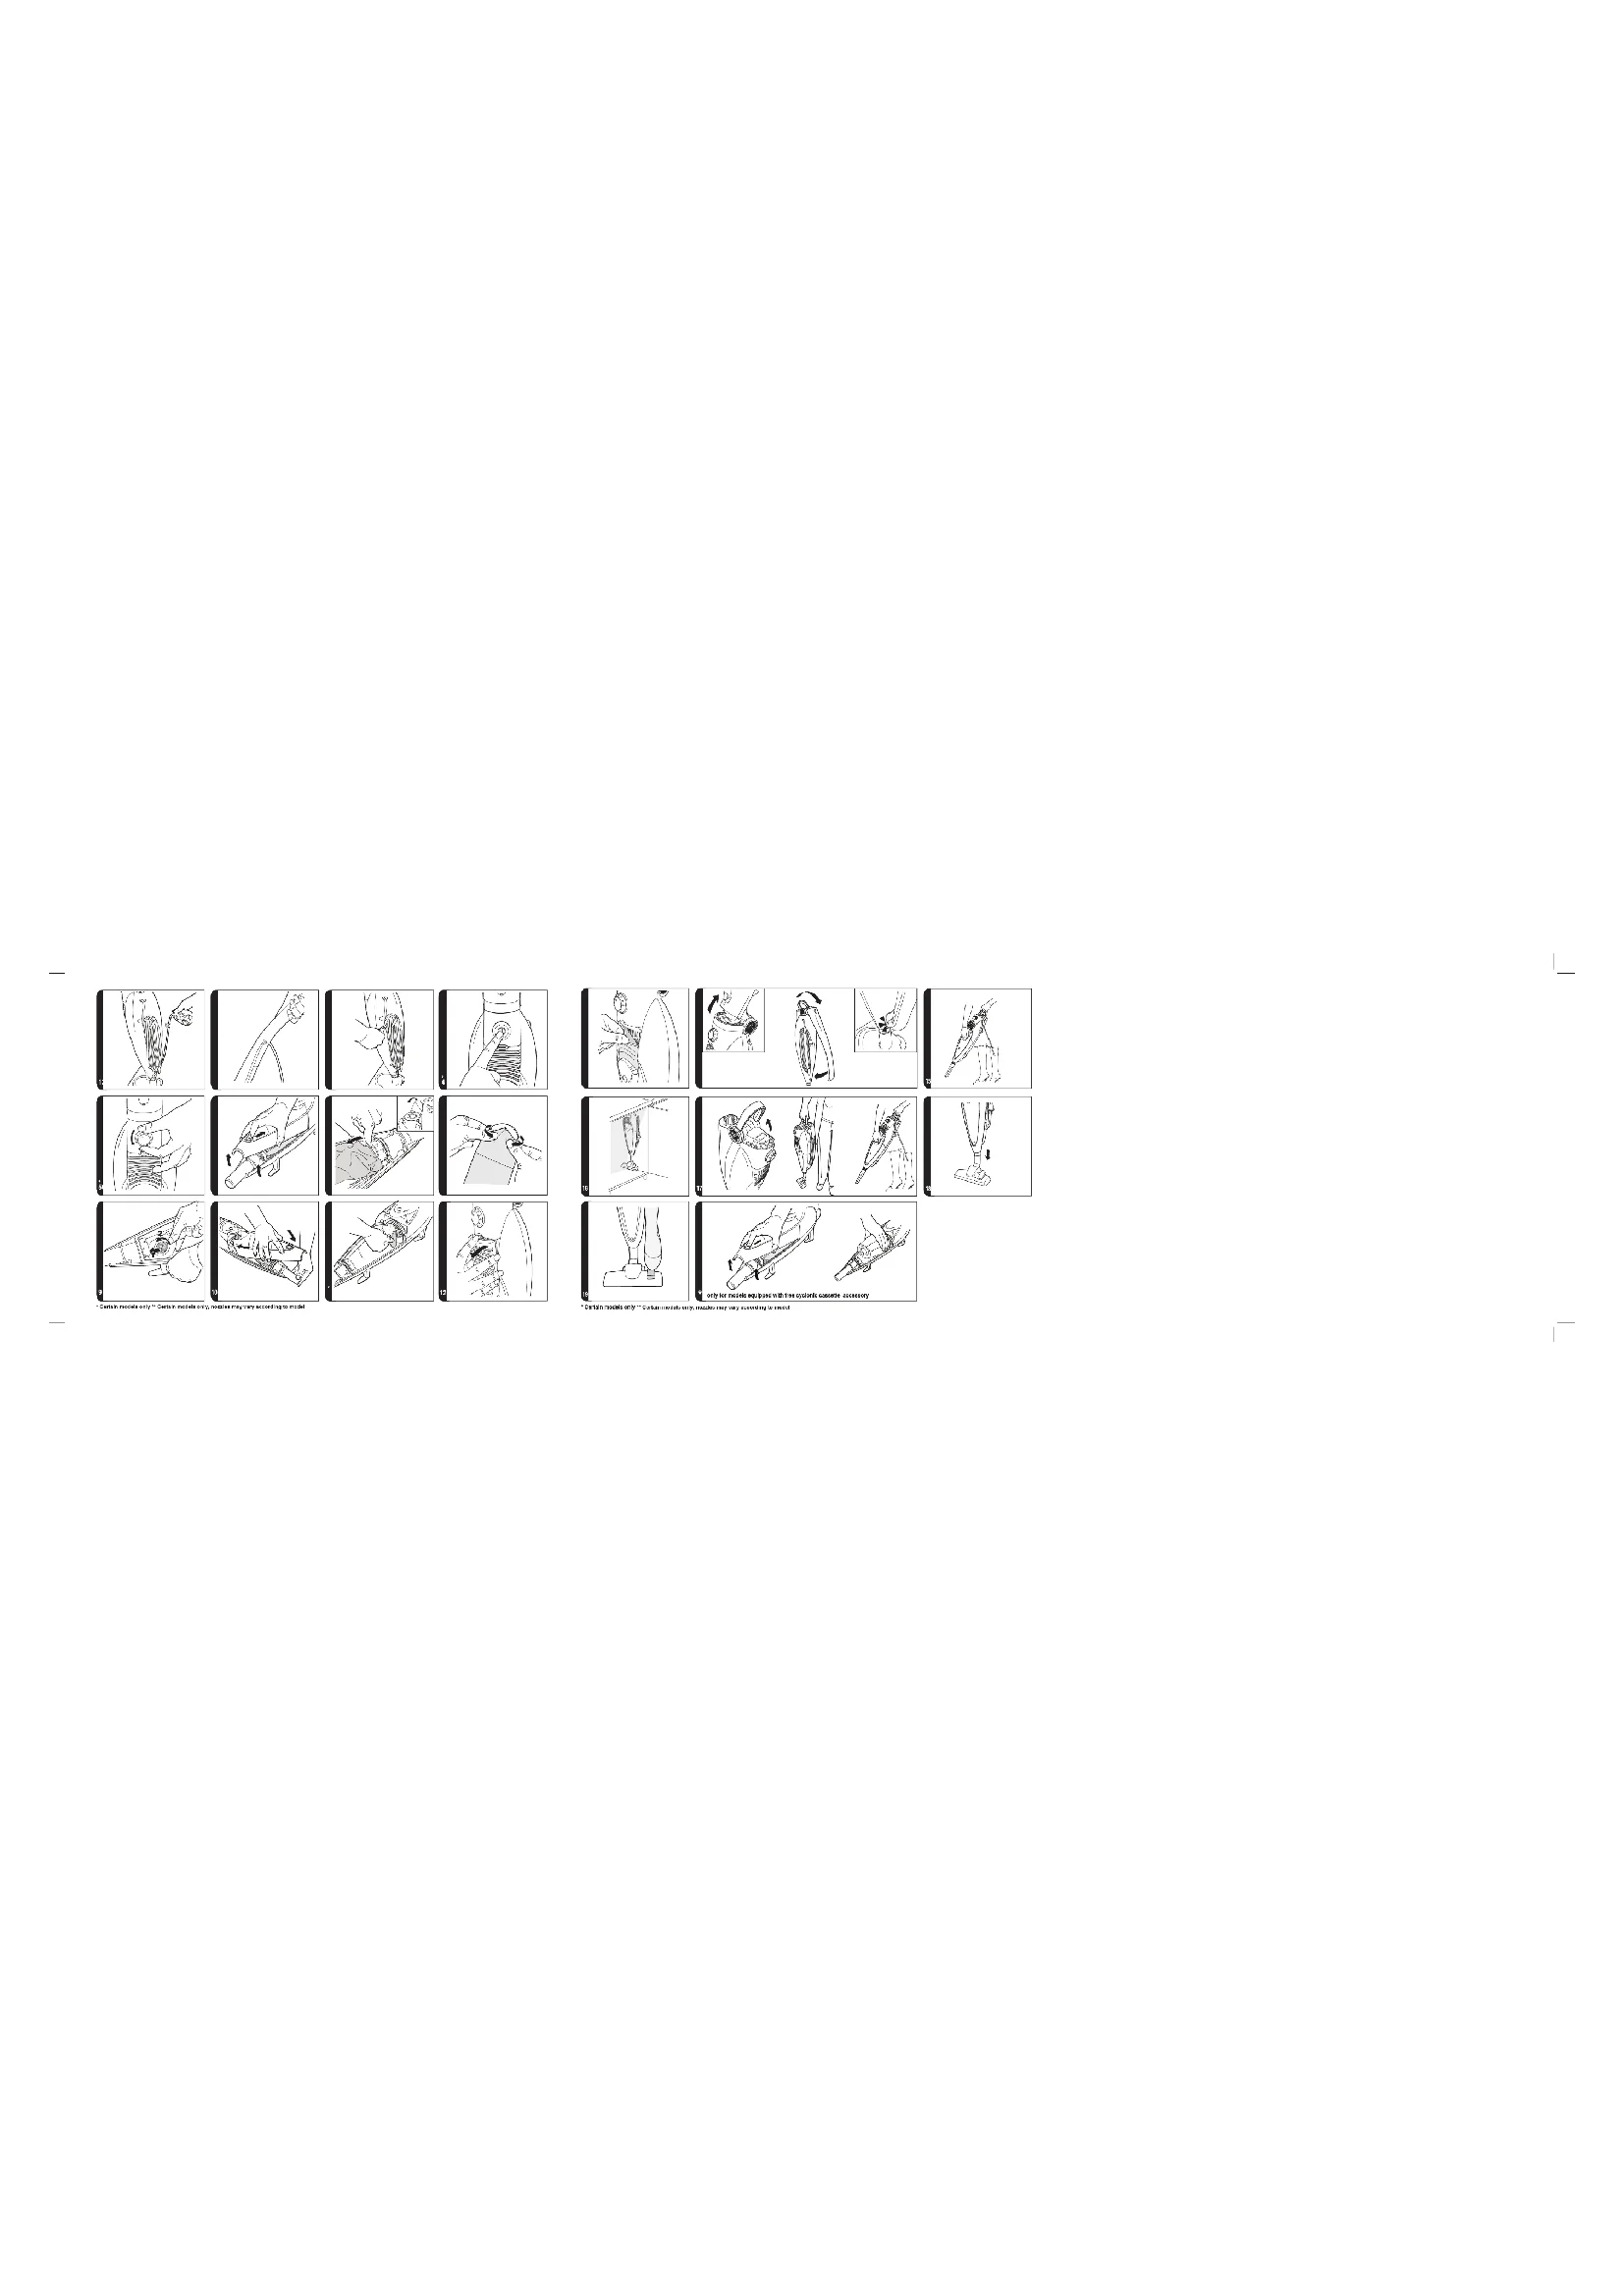
- Before use undo integrated clip, turn top hook and release power cord. [Fig. 1]
- During use as a stick cleaner clip power cord into back of main handle. [Fig. 2]
After use, unclip power cord from handle and wind it around storage hooks before securing with integrated clip. [Fig. 3]
CONTROLS*
- On/Off switch. Push to switch On. Push again to switch Off. [Fig. 4]
- Variable power control. Switch On and set the desired power by rotating the selector. Rotate back to switch Off. [Fig. 5]
CLEANER MAINTENANCE
BAG & FILTERS
MPORTANT: Switch cleaner Off and remove plug from electricity supply before changing paper bag or removing any filters.
CHANGING THE PAPER BAG
When the bag check indicator shows red, check to see if the bag is full and requires replacement.
The bag check indicator may show red even if there is a blockage elsewhere in the product.
For accurate bag check indication, the power control must be set to maximum. Replace the paper bag frequently when picking up material such as powder or fine dust or when cleaning new carpets.
DO NOT overfill the paper bag.
To change the paper bag:
- Lay the cleaner on a flat surface, pull back catch and remove bag door. [Fig. 6]
- Remove bag by pulling bag collar from hose inlet. Remove sticky backing from the dust flap and fold it over the inlet to avoid dust escaping from the bag. [Fig. 7]
- Before fitting a new bag, fold the corners of the bag behind the collar. [Fig. 8]
- Slide the collar along the guides and lift over the inlet tube. Collar should 'click' into place. [Fig. 9]
- Locate tabs on bag door as shown and close bag door. [Fig. 10] DO NOT use the vacuum cleaner without a paper bag in place.
IMPORTANT: Hoover recommends that filters are replaced after five full bags have been used.
REPLACING THE STANDARD PRE-MOTOR FILTER* [Fig. 11]
With paper bag removed lift the pre-motor filter from the bag housing.
Fit the new filter and replace the paper bag.
DO NOT use the vacuum cleaner without the pre-motor filter in place. Replace the standard pre-motor filter after five full bags have been used.
REPLACING THE EXHAUST FILTER 1. Lift off filter cover. [Fig. 12]
- Peel off filter, fit new filter and replace cover. [Fig. 13] DO NOT use cleaner without the exhaust filter in place. Replace the exhaust filter after five full bags have been used.
USING IN BAGLESS MODE*
This product can be used in bagless and bagged mode. This section will describe how to use the product with free bagless cassette and the relative filters.
MPORTANT: Switch cleaner Off and remove plug from electricity supply before removing the bag.
TO CHANGE FROM THE BAGGED TO BAGLESS MODE* Please follow the following steps:
a) Lay the cleaner on a flat surface, pull back the door release button and remove the transparent door.
b) Remove the bag.
c) Fit the bagless cassette.
e) Locate tabs on door and close door.
a) Lay the cleaner on a flat surface, pull back the door release button and remove the transparent door.
b) Remove the bagless cassette.
c) Remove the cassette closure (red) by rotating the container and upper closure in opposite directions.
d) Empty the debris from the container into a bin. Check if it is necessary to clean the relative filters, as described in the "Maintaining the bagless filters" section.
e) To refit the bagless cassette and the filters to the product, simply repeat all steps in reverse.
NOTE: Hoover recommends to inspect and wash if necessary, the cassette and the filters after each full container, see maintaining filters section.
a) To access the washable HEPA filter (BLUE), rotate the mesh filter in the opposite direction from the cassette upper closure and remove the mesh.
b) Gently tap filters to release excess dust.
c) Wipe clean the mesh filter (RED) and wash thoroughly the HEPA filter from the Inside under hand warm water until the water runs clean.
d) Remove excess water by shaking and leave to dry for 24 hours. Refit filters to the cleaner only when completely dry.
DO NOT USE HOT WATER OR DETERGENTS.
MPORTANT: Ensure the bagless filters, mesh and HEPA, are fitted before use.
SPECIALITIES
FOLDAWAY HANDLE
- To use the product as portable vacuum cleaner together with the accessories, press the handle release button and fold the handle backwards until it clips into place at the base of the main body. [Fig. 14,15]
- Fold handle for easy storage. [Fig. 16]
MINI POP-UP HANDLE
As main handle is folded backward the Mini Pop-Up handle automatically rises to allow the product to be easily carried or used as a portable vacuum cleaner. [Fig. 17]
NOZZLES
Carpet & Floor and Carpet* nozzles
- Secure the nozzle to the product. [Fig. 18] Press the floor type selector pedal on the nozzle [19] to select the ideal cleaning mode for the floor type. Hard Floor -Brushes are lowered to protect the floor. Carpet -Brushes are raised for the deepest clean.
- Parquet nozzle for wooden and delicate floors.
ACCESSORIES
To obtain the best performance and energy efficiency #1 it is recommended that the correct nozzles are used for the main cleaning operations. These nozzles are indicated in the diagrams by the letters GP, HF or CA.
A nozzle type GP can be used to clean both carpet and hard floor.
A nozzle type HF is suitable for use only on hard floor.
A nozzle of type CA is suitable for use only on carpet.
The other nozzles are accessories for specialist cleaning tasks and are recommended for occasional use only.
It is important to note that this vacuum cleaner is supplied with an Energy Label as required by European Regulation (EU) 665/2013.
If the label shows a red prohibition circle on the left covering the carpet symbol, then this indicates that the vacuum cleaner is not suitable use on carpets.
If the label shows a red prohibition circle on the right covering the hard floor symbol, then this indicates that the vacuum cleaner is not suitable for use on hard floors.
1 NOTE: Dust pick up ability carpet, dust pick up ability hard floor, and energy efficiency in accord with Commission Regulations (EU) 665/2013 and (EU) 666/2013.
USER CHECKLIST
A charge will be made if the cleaner is found to be in working order, has not been assembled In accordance with these Instructions or has been used Incorrectly. Before calling Hoover Service run through the following checklist:
- Is there a working electricity supply to the cleaner? Check with another appliance.
- Is the paper bag full? See 'Bag & Filters' section.
- Are the filters blocked? See 'Bag & Filters' section.
- Is the hose or inlet blocked? Remove any obstruction.
If there is any doubt call your local Hoover Service Office for advice, they may be able to assist you over the telephone.
IMPORTANT INFORMATION
HOOVER spares and Consumables
Always replace parts with genuine HOOVER spares. These are available from your local HOOVER dealer or direct from Hoover. When ordering parts always quote your model number. Consumables
- Paper Bag (X5) H59-35600279
Pre-Motor & Exhaust Filter Kit U37-35600280 - Exhaust Filter T92-35600714
- Filter With Mesh
(Only For Models Equipped With Cyclonic Cassette) T98-35600862
Spares
- Portable Kit (1 Shoulder Strap + 1 Hose + 1 Dusting Brush) C48-35600191
Carpet & Floor Plus Nozzle G226PE-35601647
Hard Floor Smart Nozzle G218SE-35601618 - Parquet Extra Nozzle G87PC-35600655
Quality
HOOVER's factories have been independently assessed for quality. Our products are made using a quality system which meets the requirements of ISO 9001.
Your Guarantee
The guarantee conditions for this appliance are as defined by our representative in the country in which it is sold. Details regarding these conditions can be obtained from the
dealer from whom the appliance was purchased. The bill of sale or receipt must be produced when making any claim under the terms of this guarantee. Subject to change without notice.
INSTRUCTIONS DE SECURITE D'UTILISATION
MINI POIGNEE AMOVIBLE
PER PASSARE DALLA MODALITA CON SACCO ALLA MODALITA SENZA SACCO*
MINI IMPGNATURA A SCOMPARSA
AAAATTHXAPTINHEZAKOYAA
Otav n Eeienan mnpntac ntc oaklaac yiveo kokkvi, eEYE ia va diamatioet eav n oakoa elvayn kxpeiaet avitkaiaotao.
H Evéšéni nπροτιτac τις ακούλει κμορείνα γανίνε κόκουνι ακούŋ καὶ ἀνιράλει ενα εμμδίοι σε. kátroi Δλλο Απογίτη τις ακούται.
Ia kApBnEvbEiN mnpOtnTac nC aokoulac, to xepoiTnpo ioxuoc* npTei va eke puiotei ot nI meyoiTn tum.
Na vtiaotate ouxvotepa t xaptivn oakoula otav maEvete uikua otocokve n aeitnn okovn tvakapicke kaiovopiyia iaia.
MHNnpayepicettnapivnakoula.