STB 20 - Vacuum without a bag MIELE - Free user manual and instructions
Find the device manual for free STB 20 MIELE in PDF.

Frequently Asked Questions - STB 20 MIELE
User questions about STB 20 MIELE
0 question about this device. Answer the ones you know or ask your own.
Ask a new question about this device
Download the instructions for your Vacuum without a bag in PDF format for free! Find your manual STB 20 - MIELE and take your electronic device back in hand. On this page are published all the documents necessary for the use of your device. STB 20 by MIELE.
USER MANUAL STB 20 MIELE
natural_image
Illustration of a car wheel assembly with a lever and handle (no text or symbols)natural_image
Illustration of a robotic arm connecting a device to a box, showing mechanical components and motion arrows (no text or symbols)natural_image
Cross-sectional diagram of a mechanical device with a tool inserted, showing internal components and no visible text or symbols.
natural_image
3D technical illustration of a mechanical component with directional arrows indicating flow or movement (no text or symbols)
natural_image
Illustration of a hand using a flashlight to adjust internal components of a battery (no text or symbols visible)This hand-held Turbobrush conforms to current safety requirements. Please be aware that inappropriate use can lead to personal injury and damage.
To avoid the risk of accidents and damage to this turbobrush, please read these instructions carefully before using it for the first time. They contain important information on its safety, use and maintenance.
Keep these instructions in a safe place and ensure new users are familiar with the content. Pass them on to any future owner.
Correct application
This hand-held Turbobrush must only be used in a domestic situation for vacuuming dry surfaces. It must not be used on people or animals. Any other use, modification or alteration to the brush, is not permitted. Miele cannot be held liable for damage resulting from incorrect or improper use or operation of the brush.
Safety with children
Keep young children away from the Turbobrush at all times and do not let them play with it whilst you are using it. They could catch hold of the rotating roller brush and injure themselves. Please supervise its use by older children and the elderly or infirm.
Technical safety
▶ Always disconnect the vacuum cleaner from the mains supply when you have finished using it, as well as for maintenance work and cleaning. Switch the cleaner off at the wall socket and unplug it. ▶ Do not let the hand-held Turbobrush get wet. If it needs cleaning only do so with a dry cloth or slightly damp cloth. If moisture gets into the appliance, there is a risk of electric shock.
Correct use
▶ Never touch the roller brush while it is rotating. Danger of injury.
Do not use the hand-held
Turbobrush at head height. Long hair,
ties, scarves etc. could be sucked in
and become entangled in the roller.
Keep the hand-held Turbobrush away from curtains, clothing etc, as these could be vacuumed in and become entangled in the roller.
▶ Always switch the vacuum cleaner off during pauses to avoid danger.
Do not vacuum up any inflammable or combustible liquids or gases and do not vacuum in areas where such substances are stored.
Do not vacuum surfaces where there is a danger of it being sucked up or becoming entangled in the roller.
Do not vacuum up any water, liquid or damp dirt. This will cause major faults. It could also seriously impair the functioning and electrical safety of the Turbobrush and of the vacuum cleaner. Wait until any freshly cleaned or shampooed carpets or floor coverings are completely dry before vacuuming.
Do not vacuum up items which are heavy, hard or have sharp edges. They could block the hand-held Turbobrush and the vacuum cleaner and cause damage.
Do not vacuum up ashes or coal, whether glowing or apparently extinguished. The hand-held Turbobrush and the cleaner might catch fire.
Disposing of an old Turbobrush
▶ Make appropriate arrangements for its safe disposal.
The manufacturer cannot be held liable for damage caused by non-compliance with these Warning and Safety instructions.
Recommended use
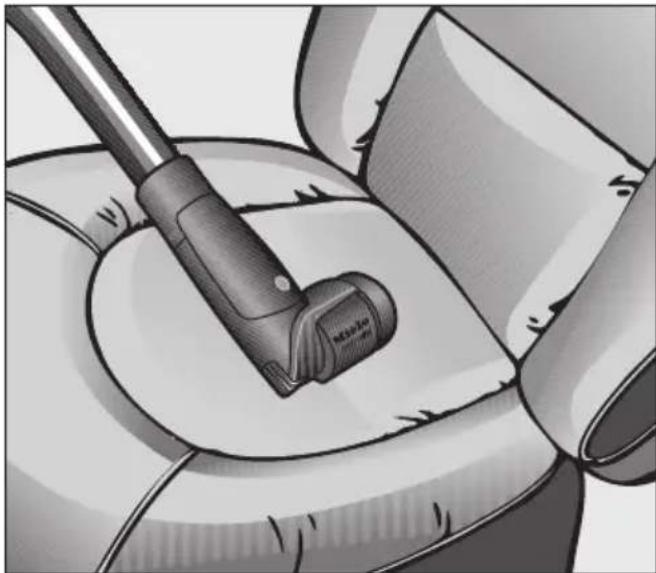
The hand-held Turbobrush is intended for vacuuming upholstery, mattresses, car seats, carpeted stairs and other areas inaccessible to the standard Turbobrush.
It is important to observe the flooring manufacturer's cleaning and care instructions.
The following should not be vacuumed using the hand-held Turbobrush:
- hard surfaces, such as furniture doors, wooden and stone flooring etc. The direct contact of the Turbobrush could damage such surfaces or the Turbobrush itself.
- carpets such saxony with very long-pile and valuable hand-knotted carpets, e.g. Persian and similar. There is a danger of the threads being pulled out. If in doubt, contact the carpet manufacturer/retailer.
natural_image
Illustration of a car wheel switch mechanism (no text or symbols)Attaching the hand-held Turbobrush
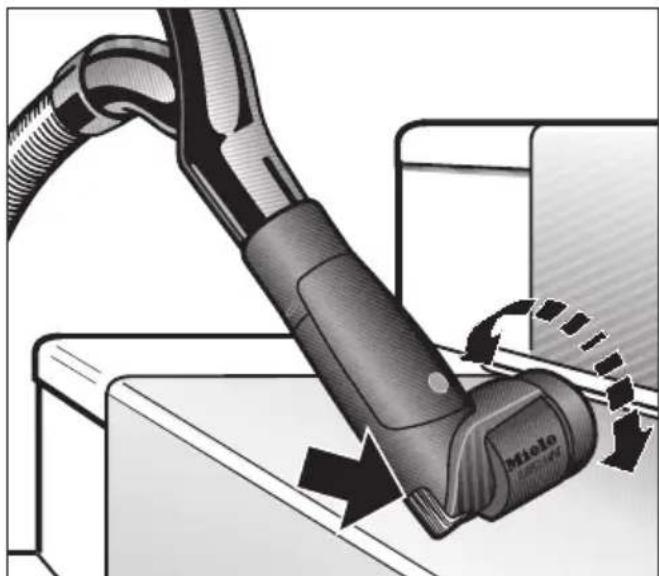
■ Attach the hand-held Turbobrush to the suction tube or the hand-piece, as required.
You can also remove the hand-piece from the suction hose and then attach the Turbobrush directly to the suction hose.
■ To do this, insert the suction hose into the end of the Turbobrush by turning it so that it clicks into position.
■ Press the release buttons on the suction hose when you want to separate the Turbobrush from the hose.
Using the hand-held Turbobrush
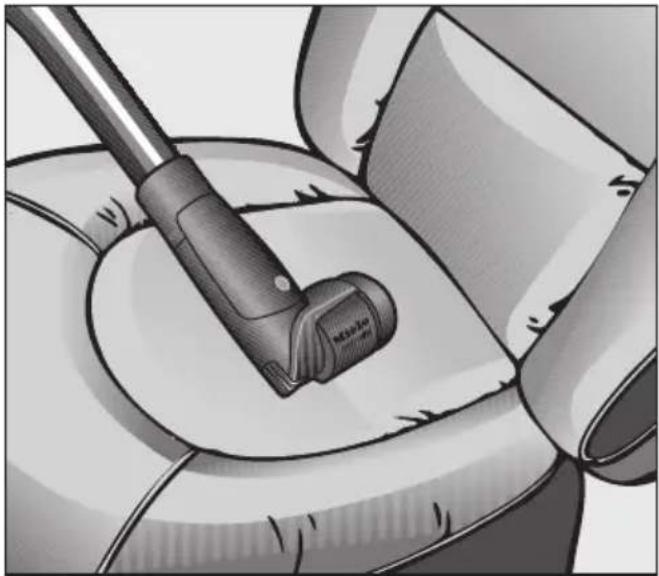
■ To achieve the best results, pass the Turbobrush slowly backwards and forwards over the surface you are cleaning, using a medium power setting.
The brush rotates enabling excellent cleaning into corners.
It also has ribs on the sides for removing stubborn soiling.
natural_image
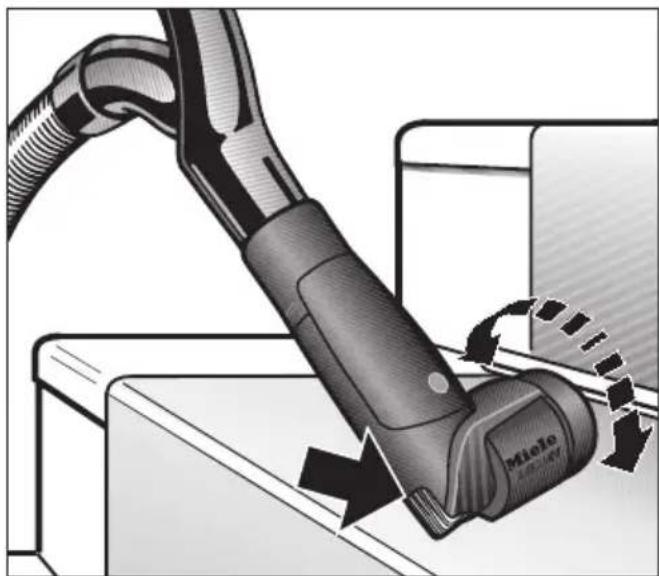
Illustration of a robotic arm connecting a device to a box, showing motion arrows (no text or symbols)△! Always disconnect the vacuum cleaner from the electrical supply for maintenance work and for cleaning. Switch off at the wall socket and remove the plug.
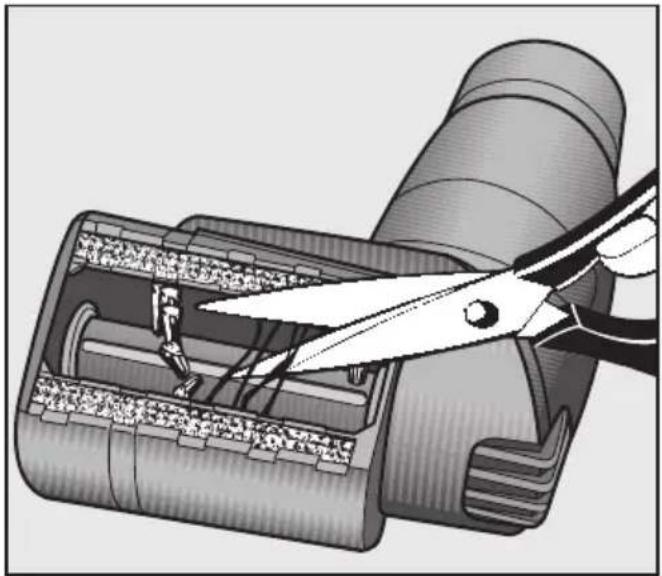
Removing threads and hairs
■ Cut any threads or hairs that have become entangled in the roller with a pair of scissors. There is a groove along the roller to help you.
Then run the vacuum cleaner to vacuum up the bits.
For more obstinate tangles or blockages inside the hand-held Turbobrush, the cover can be opened. Any large particles inside it can then be easily removed.
■ Press the release button and remove the service panel.
■ Remove any soiling from the cavity and from the roller brush.
■ Replace the service panel.

natural_image
Cross-sectional diagram of a mechanical device with a tool inserted, showing internal components and no visible text or symbols.
natural_image
3D mechanical component diagram showing internal flow arrows (no text or symbols)Changing threads lifters
Check the thread lifters on the suction inlet from time to time and replace them if the pile has worn down.
■ Using a knife or similar object lever the thread lifters out of their holders. See positions marked red at the sides.
■ Fit new thread lifters.

natural_image
Illustration of a hand using a flashlight to adjust internal components (no text or symbols visible)natural_image
Illustration of a car wheel assembly with a mounted tool (no text or symbols visible)natural_image
Illustration of a robotic arm connecting a device to a box, showing motion arrows (no text or symbols)natural_image
Cross-sectional diagram of a mechanical device with a tool inserted, showing internal components and no visible text or symbols.
natural_image
3D mechanical component diagram showing internal structure with directional arrows indicating flow or movement (no text or symbols)
natural_image
Illustration of a hand using a flashlight to adjust internal components (no text or symbols visible)natural_image
Illustration of a car wheel assembly with a tool inserted into the seat (no text or symbols visible)natural_image
Illustration of a robotic arm connecting a device to a box, showing mechanical components and motion arrows (no text or symbols)natural_image
Cross-sectional diagram of a mechanical device with a tool inserted, showing internal components and no visible text or symbols.
natural_image
3D technical illustration of a mechanical component with directional arrows indicating flow or movement (no text or symbols)
natural_image
Illustration of a hand using a flashlight to adjust internal components (no text or symbols visible)natural_image
Illustration of a car wheel with a lever and handle, showing mechanical components (no text or symbols)natural_image
Illustration of a robotic arm connecting a device to a box, showing mechanical components and motion arrows (no text or symbols)natural_image
Cross-sectional diagram of a mechanical device with a tool inserted, showing internal components and no visible text or symbols.
natural_image
3D mechanical component diagram showing internal structure with directional arrows indicating flow or movement (no text or symbols)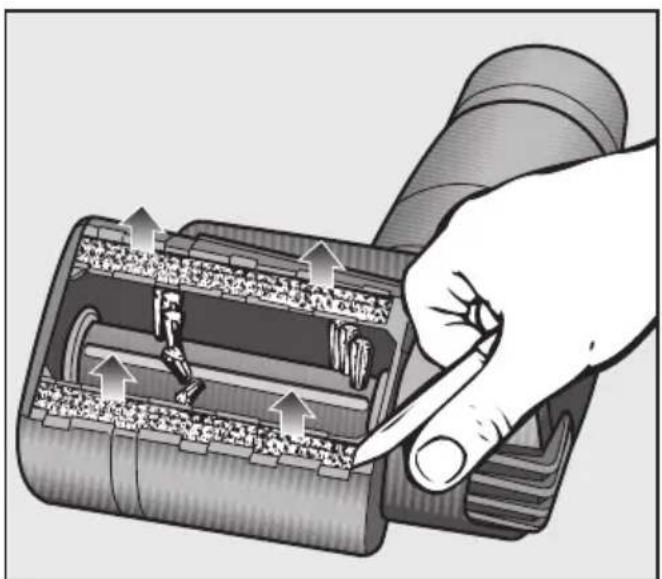
natural_image
Illustration of a hand using a flashlight to adjust internal components (no text or symbols visible)natural_image
Illustration of a car wheel assembly with a lever and handle (no text or symbols)natural_image
Illustration of a robotic arm connecting a device to a box, showing mechanical components and motion arrows (no text or symbols)natural_image
Cross-sectional diagram of a mechanical device with a tool inserted, showing internal components and no visible text or symbols.
natural_image
3D diagram of a mechanical component with directional arrows indicating flow or movement (no text or symbols)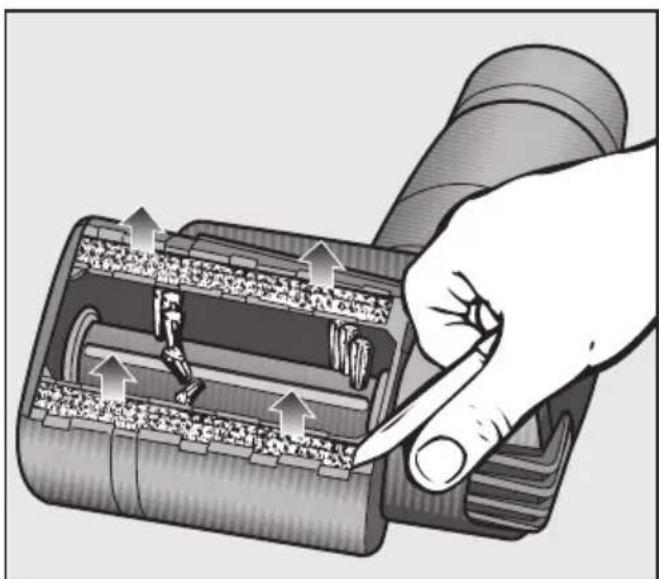
natural_image
Illustration of a hand inserting a device into a battery casing, showing internal components and arrows indicating movement (no text or symbols)natural_image
Illustration of a car wheel with a lever and handle, showing mechanical components (no text or symbols)Utilização
natural_image
Illustration of a robotic arm connecting a device to a box, showing mechanical components and motion arrows (no text or symbols)natural_image
Cross-sectional diagram of a mechanical device with a tool inserted, showing internal components and no visible text or symbols.
natural_image
3D mechanical component diagram showing internal flow arrows (no text or symbols)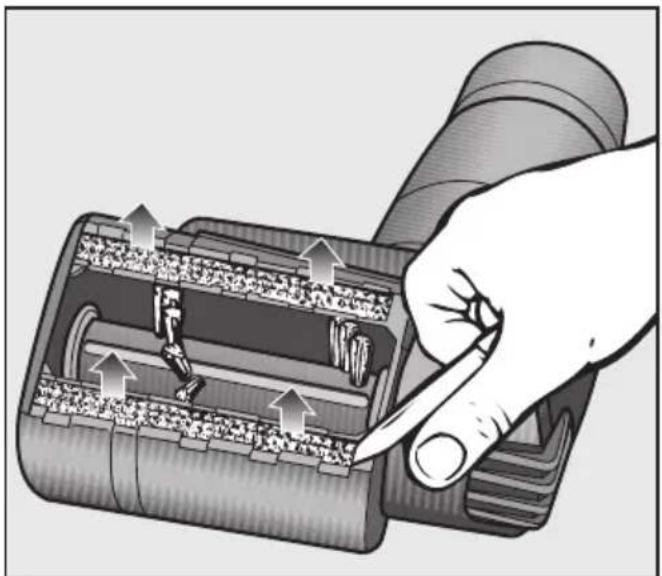
natural_image
Illustration of a hand using a flashlight to adjust internal components (no text or symbols visible)natural_image
Illustration of a car wheel assembly with a mounted tool (no text or symbols visible)natural_image
Illustration of a robotic arm connecting a device to a box, showing motion arrows (no text or symbols)natural_image
Cross-sectional diagram of a mechanical device with a tool inserted, showing internal components and no visible text or symbols.
natural_image
3D technical illustration of a mechanical component with directional arrows indicating flow or movement (no text or symbols)Ýplik Toplama Bandýnýn Deðiptirilmesi
natural_image
Illustration of a hand using a flashlight to adjust internal components (no text or symbols visible)natural_image
Illustration of a car's seatbelt switch with a tool inserted, showing mechanical components (no text or symbols)natural_image
Illustration of a robotic arm connecting a device to a surface, showing mechanical components and motion arrows (no text or symbols)natural_image
Cross-sectional diagram of a mechanical device with a tool inserted, showing internal components and no visible text or symbols.
natural_image
3D technical illustration of a mechanical component with directional arrows indicating flow or movement (no text or symbols)natural_image
Illustration of a hand using a tool to adjust internal components of a battery (no text or symbols visible)natural_image
Illustration of a car wheel with a lever and handle, showing mechanical components (no text or symbols)natural_image
Illustration of a robotic arm connecting a device to a box, showing mechanical components and motion arrows (no text or symbols)natural_image
Cross-sectional diagram of a mechanical device with a tool inserted, showing internal components and no visible text or symbols.
natural_image
3D technical illustration of a mechanical component with directional arrows indicating flow or movement (no text or symbols)Trådfang udskiftes
natural_image
Illustration of a hand using a flashlight to adjust internal components (no text or symbols visible)natural_image
Illustration of a car wheel assembly with a mounted tool (no text or symbols visible)natural_image
Illustration of a robotic arm connecting a device to a box, showing mechanical components and motion arrows (no text or symbols)natural_image
Cross-sectional diagram of a mechanical device with a tool inserted, showing internal components and no visible text or symbols.
natural_image
3D mechanical component diagram showing internal flow arrows (no text or symbols)natural_image
Illustration of a hand using a flashlight to adjust internal components of a battery (no text or symbols visible)natural_image
Illustration of a car wheel assembly with a lever and handle (no text or symbols)natural_image
Illustration of a robotic arm connecting a device to a box, showing mechanical components and motion arrows (no text or symbols)natural_image
Cross-sectional diagram of a mechanical device with scissors inserted, showing internal components and no text or symbols
natural_image
3D mechanical component diagram showing internal flow arrows (no text or symbols)Byta trådlyftarna
natural_image
Illustration of a hand using a tool to adjust internal components of a battery (no text or symbols visible)natural_image
Illustration of a car's seatbelt switch with a tool inserted, showing mechanical components (no text or symbols)natural_image
Illustration of a robotic arm connecting a device to a box, showing mechanical components and motion arrows (no text or symbols)natural_image
Cross-sectional diagram of a mechanical device with a tool inserted, showing internal components and no visible text or symbols.
natural_image
3D diagram of a mechanical component with directional arrows indicating flow or movement (no text or symbols)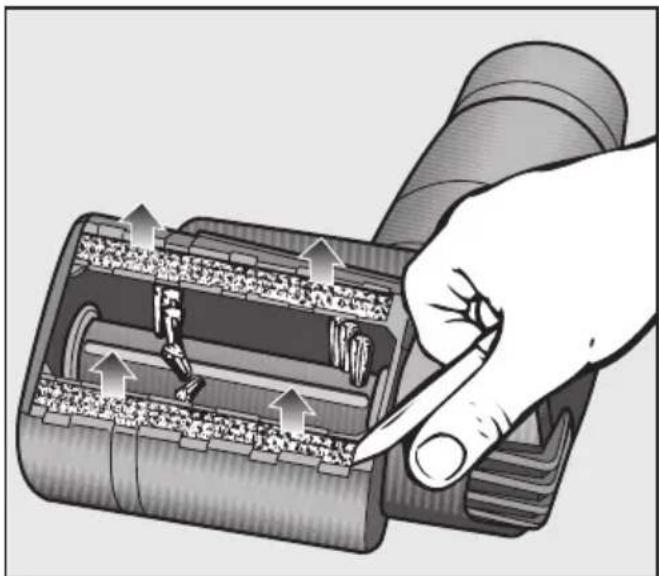
natural_image
Illustration of a hand inserting a cylindrical device into a battery casing, showing internal components and arrows indicating movement (no text or symbols present)When using an electrical appliance, always observe basic safety precautions, including the following:
READ THESE INSTRUCTIONS COMPLETELY BEFORE USING THIS ACCESSORY FOR THE FIRST TIME.
KEEP THESE OPERATING INSTRUCTIONS FOR FUTURE REFERENCE
Intended use
The handheld Turbobrush must only be used for household purposes to vacuum and brush dry surfaces. Do not use on people or animals.
Do not modify or alter the handheld Tur- bobrush.
Safety with children
Keep children at a distance when using the handheld Turbobrush. They could catch hold of the rotating roller brush and injure themselves.
Do not allow the vacuum cleaner to be used as a toy. Close attention is necessary when used near children.
Technical safety
▶ Turn the vacuum cleaner off after each use, and before any cleaning or maintenance. Unplug the vacuum cleaner from the electrical socket.
Do not allow the vacuum cleaner or Turbobrush to get wet. Clean only with a dry or slightly damp cloth. If any moisture gets into the appliance, there is a danger of electric shock.
Use
To avoid risk of injury while vacuuming, do not reach into the rotating roller brush while the Turbobrush is in operation. Danger of injury.
Keep the power cord, hair, loose clothing, fingers and other parts away from openings and moving parts.
Keep loose items, such as drapes, scarves, and other clothing away from the Turbobrush. They could be sucked up into the Turbobrush and wound around the rotating roller brush.
▶ Turn the vacuum cleaner off during breaks to avoid danger.
Do not use the vacuum to pick up any flammable or combustible liquids such as gasoline, or use in areas where they may be present.
Do not vacuum any surfaces where there is a danger of items being sucked up or becoming entangled in the roller brush.
Do not use the vacuum cleaner to pick up liquids or damp dirt. This can cause major faults and could seriously impair the function and electrical safety of the vacuum cleaner and the handheld Turbobrush. Danger of electric shock! Wait until any freshly cleaned or shampooed carpets or floor coverings are completely dry before vacuuming.
Do not vacuum up items that are heavy, hard or have sharp edges. They could cause a blockage and damage the Turbobrush.
Do not vacuum up ashes or coals, whether glowing or apparently extinguished. The handheld Turbobrush and the vacuum cleaner might catch fire.
Disposing of the handheld Tur- bobrush
The Turbobrush should be made unusable before being disposed.
SAVE THESE
INSTRUCTIONS
Recommended use
The handheld Turbobrush is designed for vacuuming and brushing upholstered furniture, mattresses, car seats, carpeted stairs, etc.
It is important to observe the cleaning and care instructions of the manufacturer of the surface to be vacuumed.
Do not use the handheld Turbobrush on the following surfaces:
- hard surfaces such as furniture doors, wood and stone flooring, etc. Direct contact with the handheld Turbobrush could damage such surfaces or the handheld Turbobrush itself.
- handmade or knitted items or surfaces with long, loose threads, and on any fabric that can unravel.
Installing the handheld Turbo-brush
■ Fit the handheld Turbobrush on the suction wand or on the handpiece, depending on the type of vacuuming you will be doing.
You can also attach the handheld Tur- bobrush to the suction hose separate from the handpiece.
■ To do this, fit the suction hose into the handheld Turbobrush and turn it until it clicks firmly into place.
■ To separate the components, press the release button on the suction hose.
natural_image
Illustration of a car wheel assembly with a lever and handle (no text or symbols)Using the handheld Turbo-brush
■ For best results, use a medium suction power setting and pass the handheld Turbobrush slowly back and forth over the surface to be vacuumed.
The brush head can be turned for optimal use.
Use the ribs on the side of the Turbo-brush to aid in the removal of stubborn dirt.
natural_image
Illustration of a robotic arm connecting a device to a surface, showing motion arrows (no text or symbols)△! Always turn the vacuum cleaner off before cleaning or maintenance work on the handheld Turbobrush, and pull the plug from the electrical outlet.
Removing threads and hairs
■ With a pair of scissors, cut any threads or hairs that have become entangled on the brush roller. To guide the scissors, move along the guide track in the roller.
■ Then run the vacuum cleaner to vacuum up the pieces.
For more stubborn dirt or blockages inside the handheld Turbobrush, the cover can be opened. Any large particles inside it can then be easily removed.
■ Press the release button and remove the service flap opposite it.
■ Remove any dirt adhering to the inside of the casing and the roller brush.
■ Put the service flap back on.
natural_image
Cross-sectional diagram of a mechanical device with a tool inserted, showing internal components and no visible text or symbols.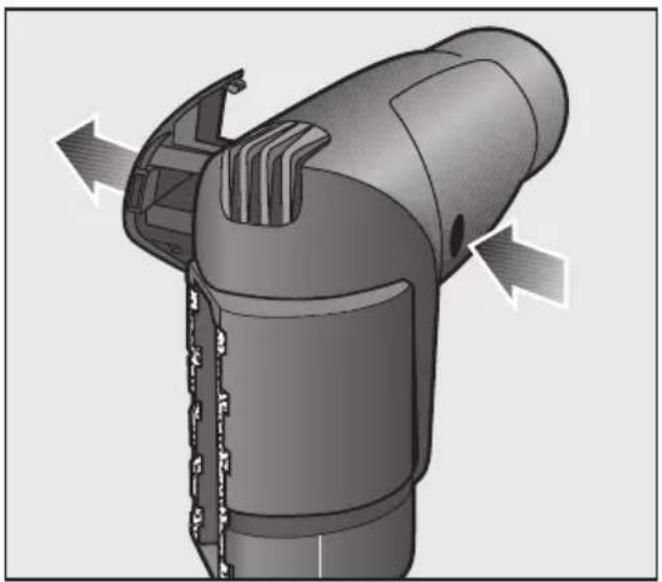
natural_image
3D mechanical component diagram showing internal structure with directional arrows indicating flow or movement (no text or symbols)Changing the thread collector
When the pile is worn replace the thread catcher located at the suction hole of the handheld Turbobrush.
■ Using a knife or similar object remove the thread catcher pads from the slots at the red markings on the side.
■ Press the new thread catcher into the slots.

natural_image
Illustration of a hand using a flashlight to adjust internal components (no text or symbols visible)natural_image
Illustration of a car wheel switch and lever mechanism (no text or symbols)natural_image
Illustration of a robotic arm connecting a device to a box, showing mechanical components and motion arrows (no text or symbols)natural_image
Cross-sectional diagram of a mechanical device with scissors inserted, showing internal components and wiring (no text or symbols)
natural_image
3D mechanical component diagram showing internal flow arrows (no text or symbols)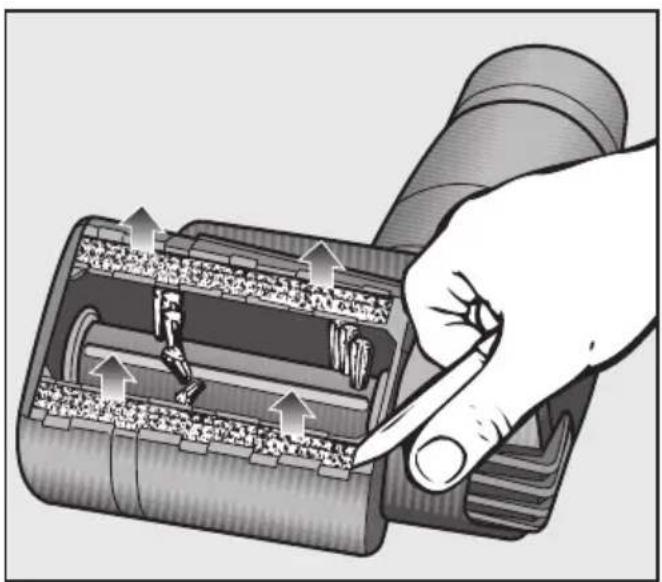
natural_image
Illustration of a hand using a flashlight to adjust internal components (no text or symbols visible)natural_image
Illustration of a car wheel assembly with a tool inserted into the seat (no text or symbols visible)natural_image
Illustration of a robotic arm connecting a device to a box, showing mechanical components and motion arrows (no text or symbols)natural_image
Cross-sectional diagram of a mechanical device with a tool inserted, showing internal components and no visible text or symbols.
natural_image
3D technical illustration of a mechanical component with directional arrows indicating flow or movement (no text or symbols)