
HR3752 - Blender PHILIPS - Free user manual and instructions
Find the device manual for free HR3752 PHILIPS in PDF.
| Product Type | Blender with vacuum function |
| Brand | Philips |
| Model | HR3752 |
| Bowl capacity | 1.8 L (max), 1 L for frothy ingredients |
| Bowl material | BPA-free Tritan plastic |
| Main functions | Vacuum blending, preset vacuum+blend, manual, pulse, crushed ice, MIN/MAX speeds |
| Control type | Rotary knob + preset buttons |
| LED indicator | LED ring for vacuum |
| Safety | Safety lock, overheat protection, automatic stop after 3 min |
| Max operating time | 3 minutes continuous |
| Max ingredient temperature | 40 °C |
| Cleaning | Dishwasher-safe parts (except motor unit), easy cleaning with pulse function |
| Included accessories | Vacuum module, filter, vacuum lid, jar, blade assembly, motor unit |
| Dimensions (approx.) | Height 40 cm, width 20 cm, depth 20 cm |
| Weight (approx.) | 3.5 kg |
| Power supply | Mains (voltage depends on country, see rating plate) |
| Warranty | International (see leaflet) |
| After-sales service | www.philips.com/support |
Frequently Asked Questions - HR3752 PHILIPS
User questions about HR3752 PHILIPS
0 question about this device. Answer the ones you know or ask your own.
Ask a new question about this device
Download the instructions for your Blender in PDF format for free! Find your manual HR3752 - PHILIPS and take your electronic device back in hand. On this page are published all the documents necessary for the use of your device. HR3752 by PHILIPS.
USER MANUAL HR3752 PHILIPS
2013-027-046 08:00 PM 95.0000000000000000000000000000


EN User manual 7
14
Bu Bausenlosterung 14
Bn Benutzherhandbuch 20
EL Equipabryungen 30
LS Manual del usuo 38
K Hiattkopf 46
TR Mode diempiio 53
1
2 A
1 Important
Read this user manual carefully before you use the appliance and save it for future reference.
Warning
- Do not misuse the appliance to avoid potential injury.
- Do not pour hot liquid into the blender as it can be ejected out of the appliance due to a sudden steaming.
- Do not touch the sharp blades when the appliance is plugged in. If the blades get stuck, unplug the appliance before you remove the ingredients. Be careful when handling the sharp cutting blades, emptying the jar and during cleaning.
-
Switch off and unplug the appliance from the power supply before:
-
Removing the jar from the base, changing accessories or approaching parts that move in use.
-
Assembling, disassembling or cleaning it.
It is left unattended. -
Do not immerse the motor unit or vacuum lid in water or any other liquid.
- Check if the voltage indicated on the appliance corresponds to the local mains voltage before you connect the appliance.
- Do not use the appliance if the plug or the mains cord is damaged or has visible cracks. If the mains cord is damaged, you must have it replaced by Philips, a service centre authorised by Philips or similarly qualified persons in order to avoid a hazard.
- Make sure the blade unit is securely fastened and the lid is properly assembled to the blender jar before you use the appliance.
-
This appliance shall not be used by children. Keep the appliance and its cord out of reach of children.
-
This appliance can be used by persons with reduced physical, sensory or mental capabilities or lack of experience and knowledge if they have been given supervision or instruction concerning use of the appliance in a safe way and if they understand the hazards involved.
- Children should be supervised to ensure that they do not play with the appliance.
- Never assemble or disassemble the blender jar to the motor base while the power is on. Switch off the appliance and unplug it first.
This appliance is for household use only. - Read the cleaning procedure from section 7 "Cleaning" before use.
- Do not operate the blender for more than 30 seconds without any ingredient(s). It may lead to overheating.
Caution
- In order to avoid a hazard due to inadvertent resetting of the thermal cut-out, this appliance must not be powered through an external switching device, such as a timer, or connected to a circuit that is regularly switched on and off by the utility.
- Never use any accessories or parts from other manufacturers or that Philips does not specifically recommend. If you use such accessories or parts, your guarantee becomes invalid.
- Do not exceed the maximum volume indication on the blender jar.
- Do not exceed the maximum quantities and processing times indicated in the relevant table.
If food sticks to the wall of the blender jar, switch off the appliance and unplug
it. Then use a spatula (not supplied with the product) to remove the food from the wall.
Blender
Warning
- Never reach into the blender jar with your fingers or an object while the appliance is running.
Caution
- To prevent spillage, do not put more than 1.8 litres of liquid in the blender jar, especially when you process at a high speed. Do not put more than 1 litre in the blender jar when you process ingredients that tend to foam.
- Do not let the appliance run for more than 3 minutes at a time. Let the appliance cool down to room temperature before you continue blending.
Always make sure the lid is properly closed and assembled on the jar before you switch on the appliance.
Built-in safety lock
This feature ensures that you can only switch on the appliance if the blender jar is assembled on the motor unit properly. If the blender jar is not correctly assembled, the built-in safety lock will be locked.
Safety Feature
This blender is fitted with a safety feature which safeguards against excessive loads. In case of overloading, the blender automatically activates the protection and operation will stop and the overloading symbol will light up on the control panel. If this occurs, set the rotary knob to OFF, unplug the appliance and allow it to cool down for 15 minutes. Remove the ingredients and clean up the blender jar before starting operation.
Electromagnetic fields (EMF)
This Philips appliance complies with all applicable standards and regulations regarding exposure to electromagnetic fields.
Recycling
This symbol means that this product shall not be disposed of with normal household waste (2012/19/EU).

Follow your country's rules for the separate collection of electrical and electronic products. Correct disposal helps prevent negative consequences for the environment and human health.
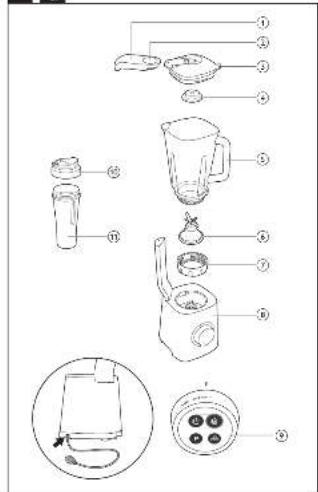
2 Overview (Fig. 1)
① Vacuum module
② Air release button
③ Vacuum lid
④ Filter
⑤ Blender jar
⑥ Blade unit
⑦ Collar
⑧ Motor unit
⑨ Rotary knob and preset buttons:
MIN/MAX/ON
To turn on the blender and select a blending speed setting.
- OFF
To turn off the blender.
- acuum button
To vacuum the blender jar.
Vacuum and blending preset button
To vacuum the blender jar and process the ingredients as programmed.
- -crushing button
To crush ice. - Pulse button
To blend briefly and for easy cleaning.
⑩ Lid of on-the-go bottle (HR3756 only)
① On-the-go bottle (HR3756 only)
3 Before first time use
Before you use the appliance and accessories for the first time, thoroughly clean the parts that come into contact with food. You can follow the cleaning procedure from section 7 "Cleaning".
For more recipes, go to www.kitchen.philips.com.

Note
If you want to prepare a larger quantity, let the appliance cool down to room temperature before you process the next batch of ingredients.
4 Important notes
Stop and unplug the appliance if there is a pungent appliance smell or smoke. Let it cool down for 15 minutes.
Do not add heavy ingredients such as bread dough or mash potatoes - the ingredient mixture will become too thick or too heavy to process.
To avoid overloading the appliance, you can
Add more liquid ingredient
Process in several small batches
Use a higher speed setting
5 Safety protection
The blender has a safety protection system. When the blender runs over 3 minutes continuously, it will stop processing automatically. If you have not finished processing after 3 minutes, switch off the appliance and let it cool down to room temperature. Never use over 3 minutes consecutively without allowing to cool to room temperature first.
When assembling the blender jar to the motor unit (8), make sure the rotary knob is in the OFF position first.
6 Using your blender
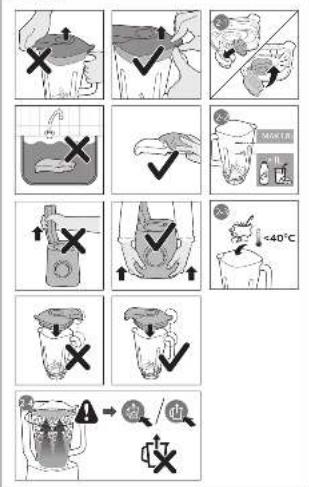
Vacuum blending (Fig. 3)


Warning
- Do not blend dry ingredients (for example pepper, beans, corn or star anise) without liquid.
- The blender jar cannot be used for vacuum storage.
Make sure the vacuum lid is completely dry before use.

Caution
Make sure the filter is securely attached to the vacuum lid before using (Fig. 2-1).
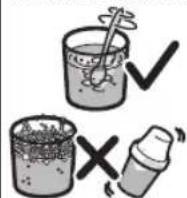
- For the ingredients that are easy to froth, such as milk and soymilk, the maximum volume is 1000ml . Do not exceed the maximum volume indication on the blender jar (Fig. 2-2).
- Never fill the blender jar with ingredients hotter than 40^ (Fig. 2-3).
- If bubbles / foam expand beyond the MAX 1800 ml indication, stop the vacuum operation at once (Fig. 2-4).

Note
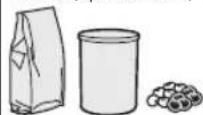
- Precut food into pieces of approx. 2 × 2 × 2 cm.
To avoid the device failure, refer to the solutions in the table below to prepare ingredients.
Ingredients Solution
Powdered ingredients, (powdered sugar, cocoa powder, roasted soybean flour, protein, etc.)
Ingredients with steam

Mixed ingredients with air bubbles or foam formation
Blend them briefly with liquid or dissolve them completely in a separated container before using.
Cool them down below 40^ before using.
Pour them to the blending jar carefully to avoid any formation of air bubble or foam. Do not exceed the maximum volume indication on the blender jar.
Do not mix ingredients by shaking as this may cause a failure due to the suction of bubbles produced during shaking.
Vacuum blending allows you to prepare drinks and smoothies using fruits, vegetables and water or other liquids that do not oxidise.
Preset vacuum and blending mode
1 Prepare your blender (step 1 to step 6 in fig.3).
2 Press the vacuum and blending button
The blender automatically prepares a vacuum connection to the vacuum module. It then starts to vacuum the jar and the LED ring lights up to indicate the vacuum progress.
To stop, press the vacuum and blending button gain.
If you accidentally rotate the speed knob during the vacuum process, the blender enters the error mode and the error message (vacuum error icon lights up (fig. 3-1). To reset the blender, turn the knob to OFF position and then to ON position again.
- When the vacuum operation completes, the blender automatically starts to process the ingredients (i.e. smoothies) for the preset time and then stop.
3 Press the air release button on the lid when the processing is completed (the LED light ring is fully on) (step 9 in fig.3).
4 Remove the jar from the motor unit and open the lid.
5 Pour out the jar contents.
Manual vacuum and blending mode

1 Prepare your blender (step 1 to step 6 in fig.3).
2 Press the vacuum button The blender automatically prepares a vacuum connection to the vacuum module. It then starts to vacuum the jar and the LED ring lights up to indicate the vacuum progress. When the vacuum process is completed (the LED light ring is fully on), the blender enters the standby mode.
To stop during the vacuum process, press the vacuum button again.
If you accidentally rotate the speed knob during the vacuum process, the blender enters the error mode and the error message (vacuum error icon lights up (fig. 3-1). To reset the blender, turn the knob
to OFF position and then to ON position again.
3 Turn the knob to a blending speed setting (min to max) or press the pulse button process ingredients as needed.
4 Press the air release button on the lid when you finish processing (the LED light ring is fully on) (step 9 in fig.3).
5 Remove the jar from the motor unit and open the lid.
6 Pour out the jar contents.
Pulse and ice crushing functions
To process ingredients briefly (such as garlic), press and hold the pulse button for a few seconds, and then release it. Repeat the procedure several times.
To crush ice, press the ice crushing button to stop processing before the program ends, press the selected program button again or turn the rotary knob to the OFF position.

After one minute processing for ice crushing, the blender will stop the process automatically.
- Do not blend dry ingredients (for example pepper corn or star anise).
If you press the vacuum button or the vacuum and blending button curing or after blending, the blender enters the error mode and the error message (vacuum error icon highlights up (Fig. 3-1). To reset the blender, turn the knob to OFF position and then to ON position again.
7 Cleaning (Fig. 4)

Caution
- Before you clean the appliance, unplug it.
The cutting edges are sharp. Be careful when you clean the blade unit.
Make sure that the cutting edges of the blade do not come into contact with hard objects. This may cause the cutting edges to become blunt. - Do not pour water directly to the vacuum module under the tap water during cleaning. This may allow water to be sucked to the vacuum system and damage the appliance.
Make sure wipe the filter dry after cleaning.
Clean the motor unit with a moist cloth.
Clean the other parts in lukewarm water with some cleaning agent or in a dishwasher.
Easy cleaning
Follow the steps in Fig. 4.

Note
- Press and hold the pulse button P a few times.
8 Guarantee and service
If you have a problem, need service, or need information, see www.philips. com/support or contact the Philips Consumer Care Center in your country. The phone number is in the worldwide guarantee leaflet. If there is no Consumer Care Center in your country, go to your local Philips dealer.
9 Troubleshooting
Problem Solution
Blender stops operating during the vacuum process and the error message (vacuum error icon lights up.
There are two maximum indication levels on the jar and which one I should use?
Switch off the appliance and make sure the lid is assembled properly and closed fully. Make sure to clean the vacuum lid completely to avoid any substance on the air release valve.
The lower maximum indication level for milk, soy milk and other foamy ingredients as they are easy to froth during the vacuum process.
10 Recipe
Ingredients:
100 g corn salad
4 pcs Kiwifruit (peeled)
400 ml water
Procedure:
- Cut ingredients to roughly 2 × 2 × 2 cm size.
- Add all ingredients into the jar and close the lid.
- Blend with pre-set vacuum and blending function or on maximum speed for 1 minute.
600 g pork
20 g scallion
180 ml water
- Cut the pork into pieces of 2 × 2 × 2 cm.
- Put the pork, scallion and water into jar.
- Blend the recipe for 10 seconds at max speed.
1 Vigtigt
Tia 0pumuatioo npayou.
Koupiotiymuiaac I oupyia
Ia yphynopn avaeiign kal ukoLo kaapioo.
(10) Kaπaki δoxεiou γia μετakivnoεις (μovo HR3756)
⑪ oxεio yia μετακινησεις (óvO HR3756)
3 Piv aTnv Pwtn Xpno
Piv xpoiouotnoeTe m oukeun kal ta aoeouap yia npwnf opa, kaapiote kala ola ta jepn nou epxovtal e tia fto aynto. Mnpetie va akolounoeTe m diaikacia kaepiaou oyn evotnta 7 "Kaepiaogos".
Tia nepioootepec ouvtayec, eiokefoite Tn 6ieuovon www.kitchen.philips.com.

Σημειωη
Av 0EETe va npaaokeuaete meyauteepn noootna, aonote m ouakeun va kpuoei oe cepokpaoia duuatio npiv enegepyaeite mv enouen naptida uikuv.
7 Schoonmaken (afb. 4)
