
CNS 100 F - Wall electric heater STIEBEL ELTRON - Free user manual and instructions
Find the device manual for free CNS 100 F STIEBEL ELTRON in PDF.
| Product type | Wall-mounted electric convector (also usable as a mobile version on feet) |
| Brand | Stiebel Eltron |
| Model | CNS 100 F |
| Power | 1.0 kW |
| Power supply | 1/N ~ 230 V |
| Dimensions (wall-mounted version) | Height 450 mm, Width 445 mm, Depth 100 mm |
| Dimensions (mobile version on feet) | Height 555 mm (appliance 450 mm + feet 105 mm), Width 445 mm, Depth 305 mm |
| Weight | 4.6 kg |
| Temperature adjustment range | 6 °C to 30 °C |
| Frost protection | ~6 °C (automatic heating activation below this temperature) |
| Protection class | II |
| Protection rating (IP) | IP24 (protected against water splash) |
| Heating type | Natural convection (air heated by the heating element, exits through the top grille) |
| Main functions | Supplemental or primary heating, frost protection mode, temperature limiter, on/off switch |
| Maintenance and cleaning | Clean when cold with a damp cloth and non-abrasive cleaners. Do not spray any cleaning product into the ventilation slots. Periodic inspection of controls every 10 years by a professional. |
| Safety | Do not cover the appliance, maintain minimum clearances (250 mm above, 100 mm below and sides, 500 mm in front, 22 mm behind). Do not use in the presence of flammable materials. Safety temperature limiter in case of overheating. |
| Spare parts and repairability | Use only original spare parts. Replacement of the power cord and repairs must be carried out by a qualified installer. |
| General information | Warranty valid in the country of purchase. CE marking. Comply with national and local regulations. Manual available in multiple languages at notice-facile.com. |
Frequently Asked Questions - CNS 100 F STIEBEL ELTRON
User questions about CNS 100 F STIEBEL ELTRON
0 question about this device. Answer the ones you know or ask your own.
Ask a new question about this device
Download the instructions for your Wall electric heater in PDF format for free! Find your manual CNS 100 F - STIEBEL ELTRON and take your electronic device back in hand. On this page are published all the documents necessary for the use of your device. CNS 100 F by STIEBEL ELTRON.
USER MANUAL CNS 100 F STIEBEL ELTRON
BEDIENUNG UND INSTALLATION OPERATION AND INSTALLATION UTILISATION ET INSTALLATION BEDIENING EN INSTALLATIE OPERACION E INSTALACION OBSŁUGA I INSTALACJA OBSLUHA A INSTALACE ΘΚΝΥΑΤΑΝΑ ΜΟΤΑχ
WANDKONVEKTOR | WALL MOUNTED CONVECTOR HEATER | CONVECTEUR MURAL | WANDCONVECTOR | CONVECTOR DE PARED | KONWEKTOR WISZACY | NASTENNY KONVEKTOR | HACTEHBI KOHBEKTOP
- General information 12
1.1 Document information 12
1.2 Key to symbols 12 - Safety
2.1 Intended use 13
2.2 Safety information 13
2.3 CE designation 14
2.4 Test symbols 14
3.Appliance description 14 - Operation 14
4.1 Description of the user interface 14
4.2 Frost protection 14
4.3 Limiting the temperature controller 15
4.4 Shutting down 15 - Cleaning, care and maintenance 15
6.What to do if ... 15
INSTALLATION
- Safety 16
7.1 General safety instructions 16
7.2 Instructions, standards and regulations 16
8.Appliance description 16
8.1 Standard delivery 16 - Installation 16
9.1 Installation with wall mounting bracket 16
9.2 Installation with feet 17
9.3 Power supply 17 - Troubleshooting 17
11.Appliance handover 17 - Specification 18
12.1 Dimensions of wall mounted version 18
12.2 Dimensions of mobile floorstanding version 18
12.3 Specification table 19
ENVIRONMENT AND RECYCLING
CUSTOMER SERVICE AND WARRANTY
1. General information
1.1 Document information

Read these instructions carefully before using the appliance and retain them for future reference. Pass on the instructions to any new users.
1.2 Key to symbols
1.2.1 Layout of safety information
Safety information comprises a warning symbol, a keyword and a text giving information. Safety information is printed on a grey background.
Example:

DANGER Electrocution Install the appliance in such a way that control equipment...
1 Symbol (see chapter on warning symbols/symbols)
2 Keyword (see chapter on keywords)
3 Description (see chapter on warning symbols/symbols)
4 Information text
1.2.2 Keywords
| KEYWORD Description | |
| DANGER | The keyword DANGER indicates information which must be observed, otherwise serious injury or death will result. |
| WARNING | The keyword WARNING indicates information that must be observed, otherwise serious injury or death may result. |
| CAUTION | The keyword CAUTION indicates information that must be observed, otherwise relatively serious or light injuries may result. |
1.2.3 Warning symbols/symbols
| Warning symbol | Description |
| Injury | |
| Electrocution | |
| Burns or scalding | |
| Other situations | |
| Fire | |
| Never cover the appliance | |
| Appliance disposal |
1.2.4 Text symbols and layout in this documentation

Read the text next to this symbol carefully.
» The "»" symbol indicates that you should do something. The action you need to take is described step by step.
Passages with the"symbol show you lists of items.
1.2.5 Information on the appliance

Never cover the appliance
1.2.6 Units of measurement

The dimensions in this document are given in mm. Any alternative units of measurements are specified accordingly.
2. Safety
2.1 Intended use
This appliance is designed to heat living areas.
Any other use beyond that described shall be deemed inappropriate. Observation of these instructions is also part of the correct use of this appliance. Any modifications or conversions to the appliance void all warranty rights.
2.2 Safety information
Operate the appliance only when fully installed and with all safety equipment fitted.

WARNING Fire
Never operate this appliance ...
- in rooms where the appliance is at risk of fire or explosion as a result of chemicals, dust, gases or vapours.
- in the direct proximity of pipes or receptacles that carry or contain flammable or explosive materials.
- if work such as laying cables, grinding or sealing is carried out in the installation room.
- if sprays, floor polish or similar products containing napsan are used. Vent the room sufficiently before heating.
- if the minimum clearances to adjacent object surfaces are not maintained, for example to furniture, net curtains, curtains, textiles or other flammable materials (for minimum clearances, see specification chapter).
- if an appliance component is damaged, the appliance has fallen over or already had a fault.

WARNING Injury
Where children or persons with limited physical, sensory or mental capabilities are allowed to control this appliance, ensure that this will only happen under supervision or after appropriate instructions by a person responsible for their safety.
Children must be supervised to ensure that they never play with the appliance.

WARNING Fire
Never place any flammable, combustible or insulating objects or materials, such as laundry, blankets, magazines, containers with floor polish or napsan, spray cans or similar on the appliance or in direct proximity to it.

WARNING Burns
The surfaces of the appliance casing and the expelled air become hot during operation (more than 80^ ).

CAUTION Overheating
Never cover the appliance

Never step on the appliance.

When using the mobile floorstanding unit, observe the following:
-
Never cover the power cable with a carpet or rug. Route the power cable away from walkways to prevent anyone tripping over the cable or knocking the appliance over.
-
Avoid using an extension cable. If this is unavoidable, only use an undamaged extension cable with a sufficient cable cross-section for the full appliance output, as well as undamaged plugs or coupler plugs and adequate protective measures.
-
Position the appliance on a solid base. On a soft base, the appliance can tip over or the air apertures can become blocked.
-
Never move or carry the appliance by pulling on the power cable.
-
If you use the appliance as a floorstanding unit, never install it in the bathroom, in similarly damp rooms or outside.
2.3 CE designation
The CE designation shows that the appliance meets all essential requirements according to the:
Electromagnetic Compatibility Directive
-Low Voltage Directive
2.4 Test symbols
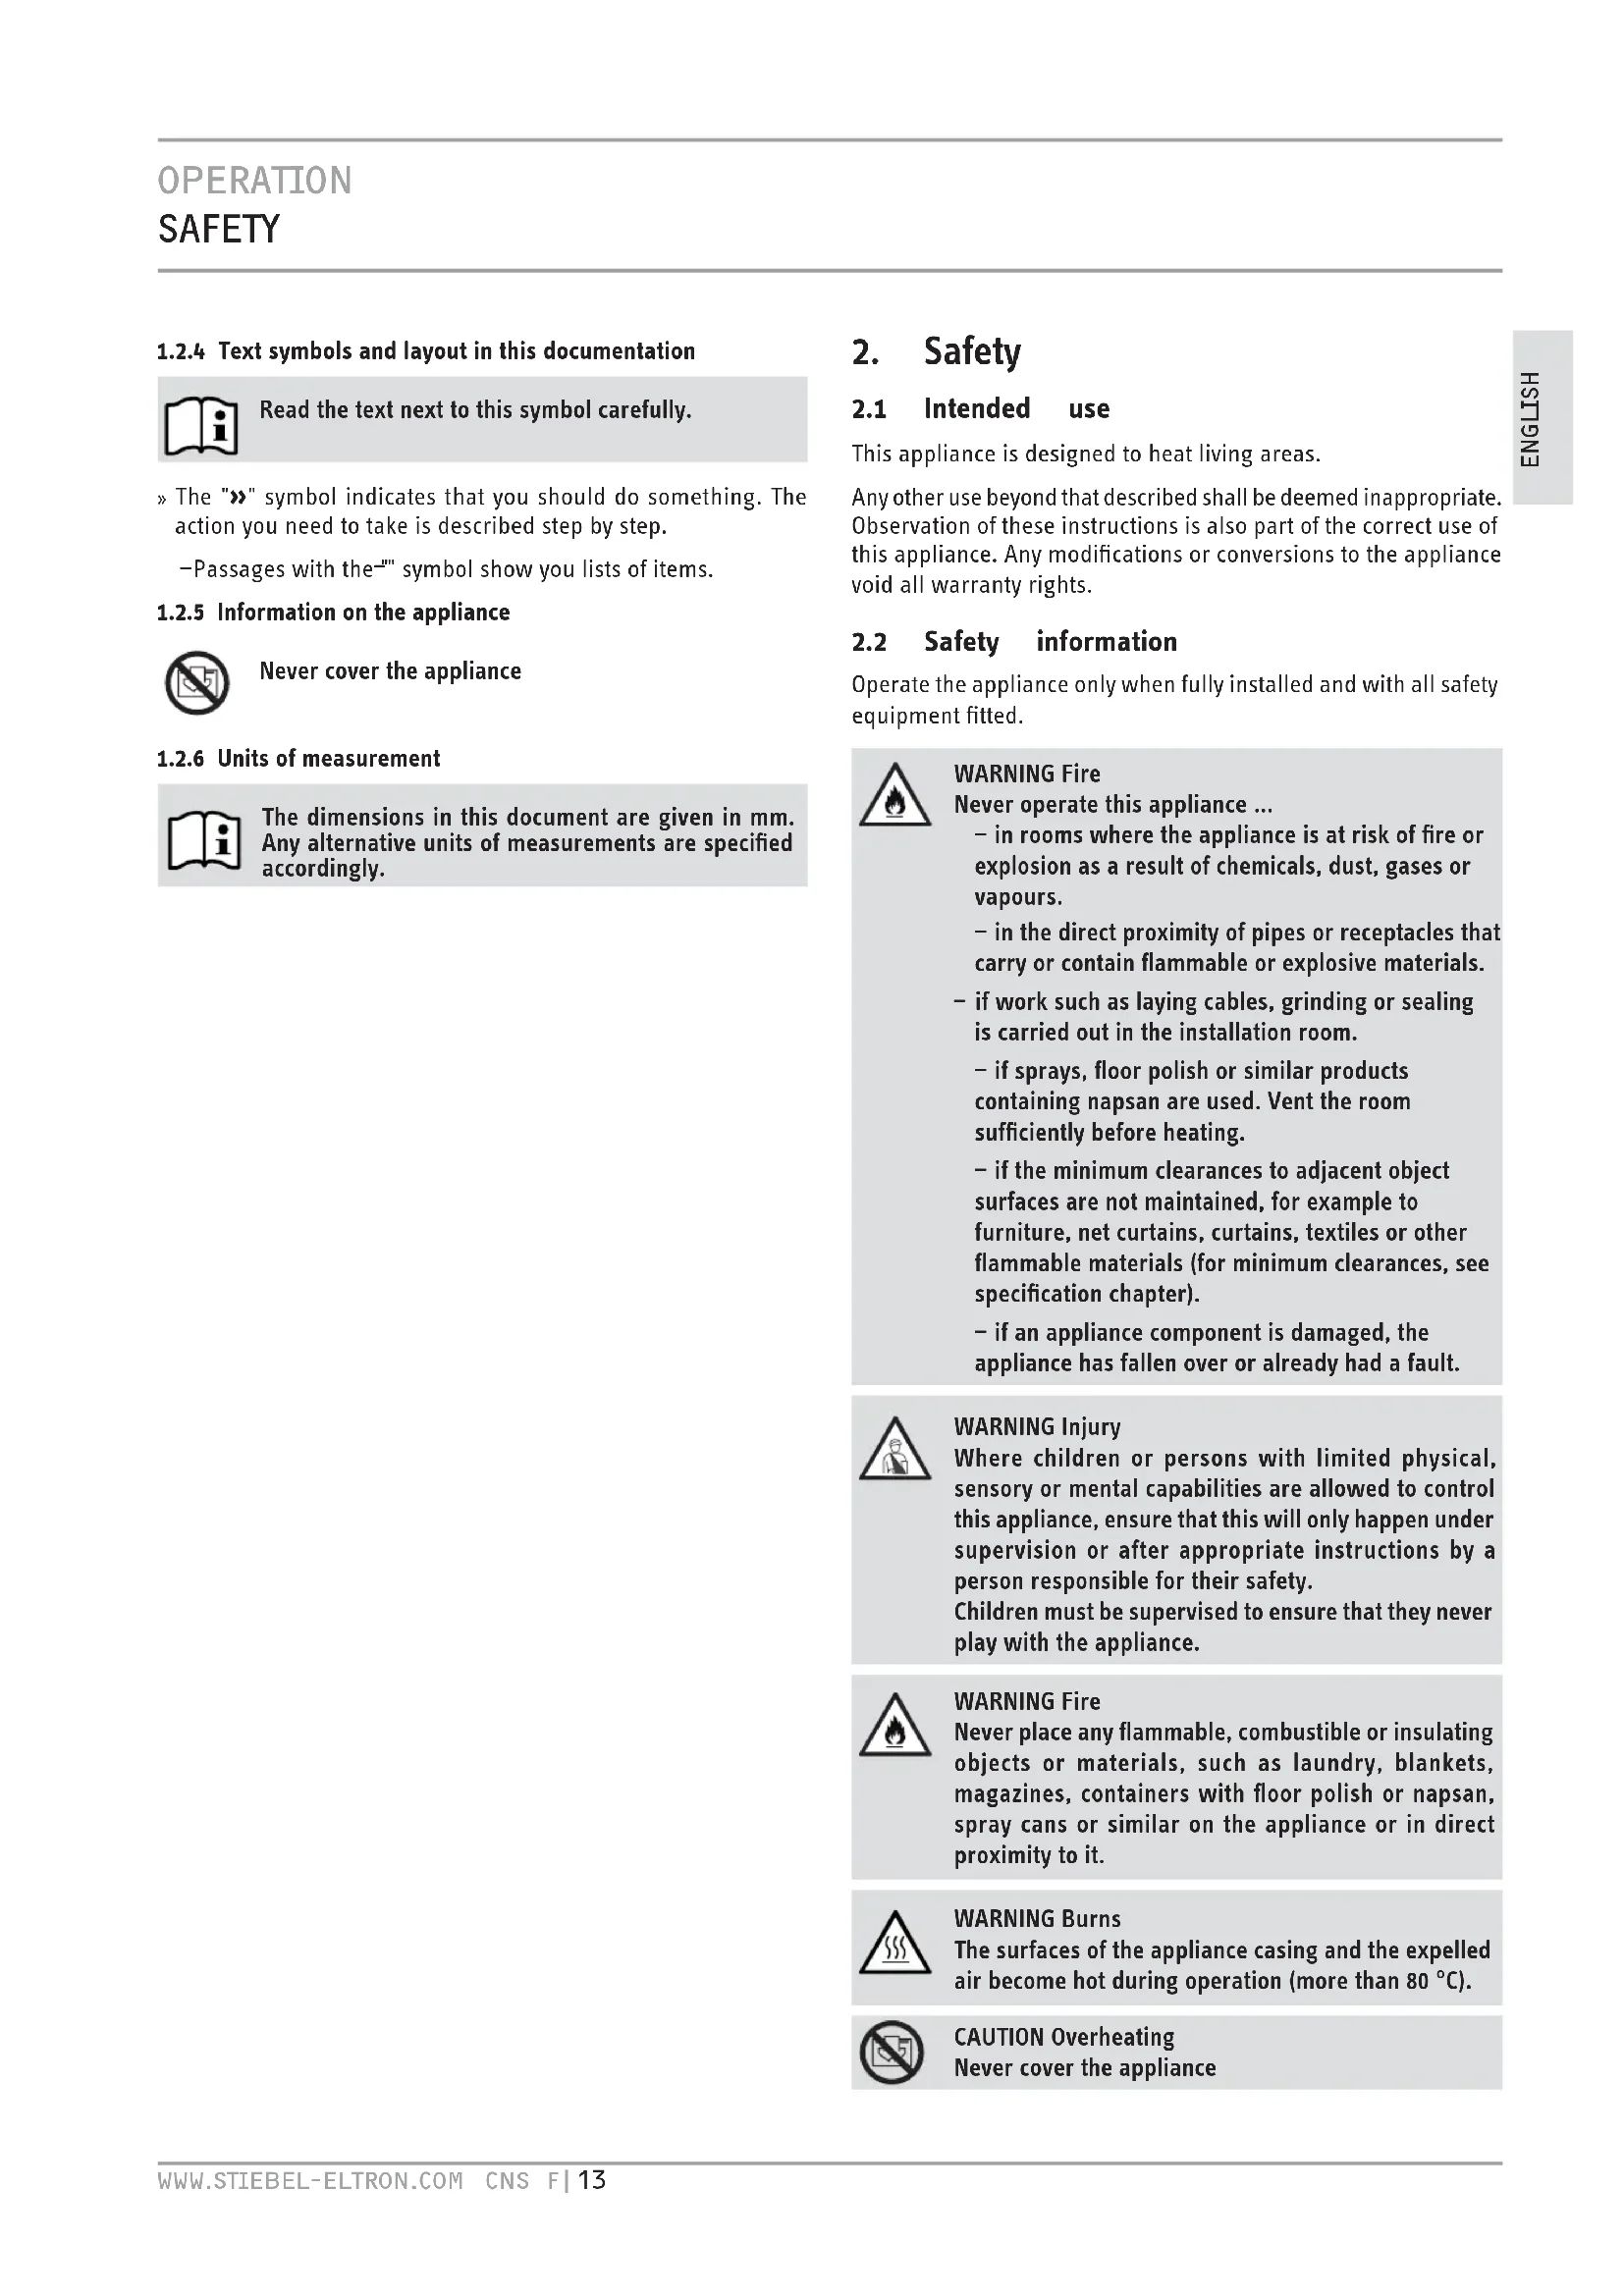
See type plate.
The type plate is located on the right on the exterior of the appliance.
3. Appliance description
The appliance is an electric direct heater and can be used as a wall mounted appliance or alternatively as a mobile floorstanding appliance with feet attached.
The appliance is suitable as a full heating system in bathrooms, for example, or for use between seasons and as a booster heater in smaller rooms, such as hobby and guest rooms.
The air in the appliance is heated by a heating element and expelled via natural convection through the air outlet grille at the top. Cool room air flows in through the apertures at the bottom of the appliance.
After mounting the appliance to the wall or attaching the feet, and making the electrical connection via the mains plug, the appliance is ready for operation.
4. Operation
4.1 Description of the user interface
Switch the appliance ON via the switch on the r.h. side of the appliance.
Set the required room temperature via the continuously variable temperature selector (for temperatures see specification chapter).
As soon as the selected room temperature is reached, it is constantly maintained at this selected temperature through periodic heating (the output of the appliance must correspond at least to the required heat demand of the room).
If several appliances are installed in a single room, the setting at the temperature selector on each appliance can be different.
To avoid excessive power consumption when windows are open, you should stop the appliance while venting.
4.2 Frost protection
Turn the temperature selector as far to the right as possible. In this position, the temperature controller switches on the heating element automatically if the room temperature drops below the frost protection temperature.
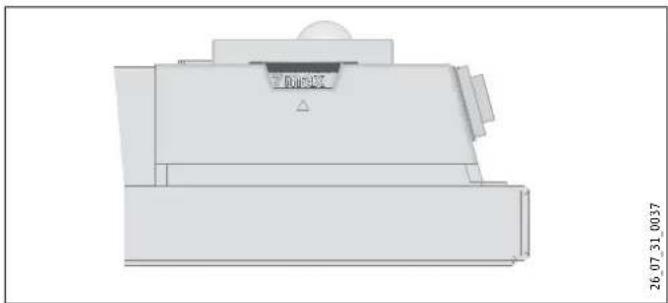
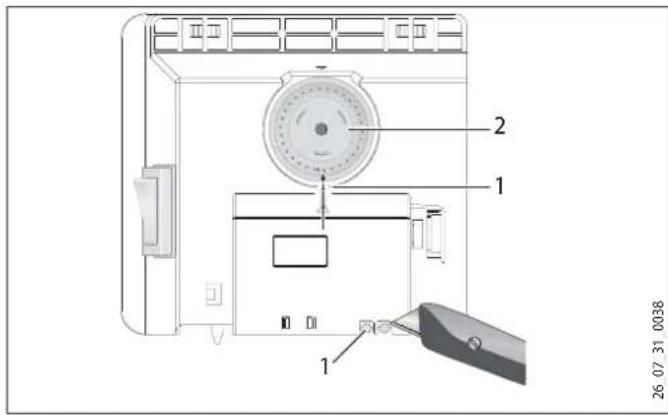
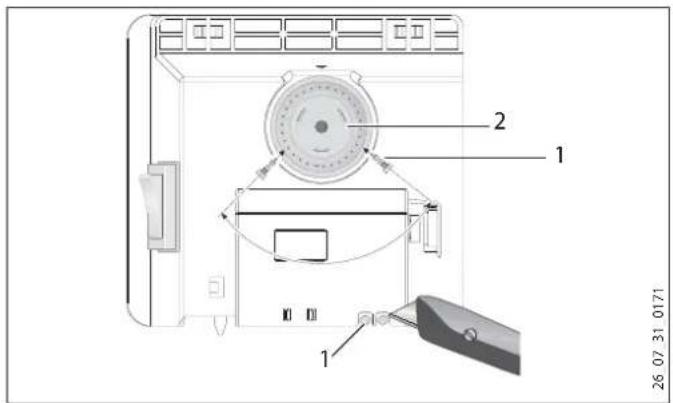
4.3 Limiting the temperature controller
Using the two pins fitted to the back of the control casing, you can fix the temperature controller at a certain setting or limit the temperature setting range.
Break out the pins.
To fix the selected temperature, push a pin into the hole opposite (see diagram).
1 Pin
2 Temperature selector
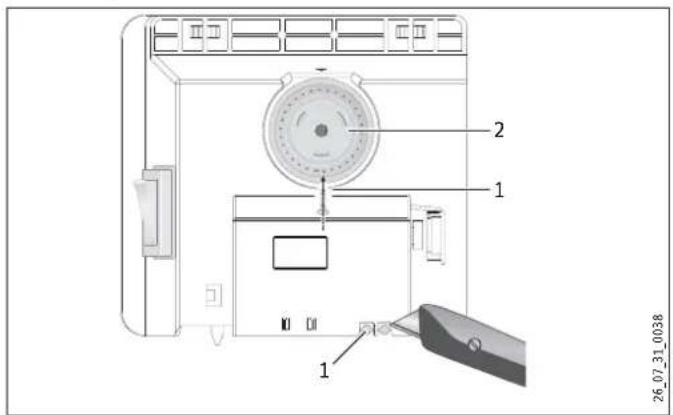
To limit the temperature setting range, set the minimum and maximum values at the temperature selector, and push a pin for each into the slightly offset hole opposite (see diagram).
1 Pin
2 Temperature selector
4.4 Shutting down
Move the switch on the right of the appliance to OFF.
5. Cleaning, care and maintenance
If a pale brownish discolouration appears on the appliance casing, wipe this off as soon as possible with a damp cloth. Clean the appliance when cold with ordinary cleaning products. Avoid abrasive or corrosive cleaning products.

CAUTION Fire
Never spray cleaning spray into the air slot.
Ensure that no moisture can enter the appliance.
As part of regular maintenance, we recommend also having the control components checked. The safety and control components should be checked by a contractor no more than ten years after commissioning.
6. What to do if ...
... the appliance does not heat up:
Check the temperature set at the appliance and the MCB/fuse in your fuse box.
The appliance has a safety temperature controller that shuts the appliance down if it overheats. After the cause has been removed (for example air outlet or inlet apertures covered) and the appliance has cooled down for a few minutes, operation starts again.
If you cannot remedy the fault, contact your contractor. To facilitate and speed up your enquiry, please provide the number on the type plate (no.XXXXXXXX - XXXX - XXXXX):
7. Safety
Only qualified contractors should carry out the maintenance and repair of this appliance.
7.1 General safety instructions
We guarantee trouble-free function and operational reliability only if the original accessories and spare parts intended for the appliance are used.

DANGER Electrocution
If you mount the appliance on the wall, do so in such a way that control equipment cannot be touched by a person in the bath or shower.

CAUTION
Only fit the wall mounted appliance to a vertical wall that is temperature-resistant to at least 85^
- Observe the minimum clearances to adjacent object surfaces (for minimum clearances see specification chapter).
- Never install the appliance directly below a wall socket.
- Ensure that the power cable is not in contact with any appliance components.
7.2 Instructions, standards and regulations

Observe all applicable national and regional regulations and instructions.

Observe the Building and Garage Regulations [or local regulations].
8. Appliance description
8.1 Standard delivery
Wall mounting bracket (hooked into the appliance)
-Feet
-One-way Screws
9. Installation
9.1 Installation with wall mounting bracket
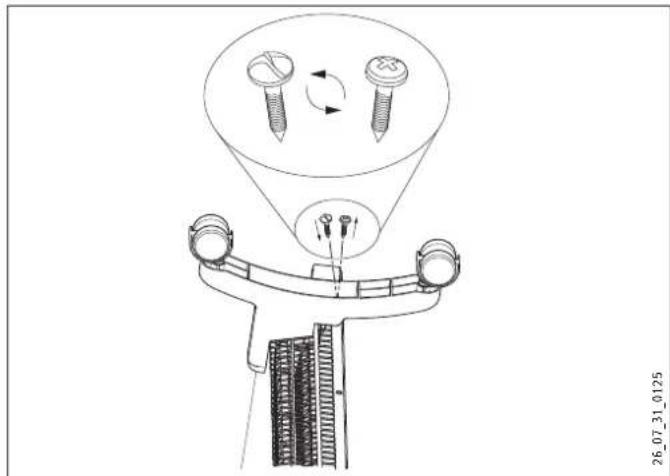
9.1.1 Installing the wall mounting bracket
You can also use the wall mounting bracket as a template for wall mounting; this ensures the required floor clearance.
Unhook the wall mounting bracket.
» Place the centred wall mounting bracket level on the ground and mark holes 1 and 2.
Lift up the wall mounting bracket so that its lower holes match up with the markings you have just made on the installation wall.
» Mark holes 3 and 4 on the installation wall.

Drill holes at all four markings. Secure the wall mounting bracket with suitable materials (screws, rawl plugs) depending on the type of wall. With the vertical slots, you can compensate for an offset fixing hole.
9.1.2 Appliance installation
» Hook the appliance by its slots in the back of the appliance on to all four tabs of the wall mounting bracket simultaneously.
Push the appliance to latch it in position.
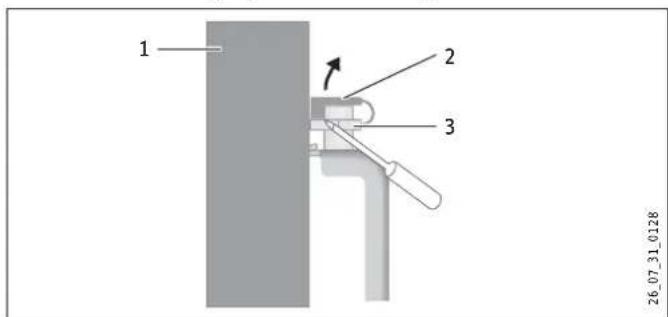
Turn the locking bolt in the wall mounting bracket fully clockwise; this locks the appliance in place.
Push the safety cap onto the locking bolt to prevent it from loosening.

1 Locking bolt 2 Wall mounting bracket
1 Appliance 2 Safety cap 3 Locking bolt
9.1.3 Dismounting the appliance
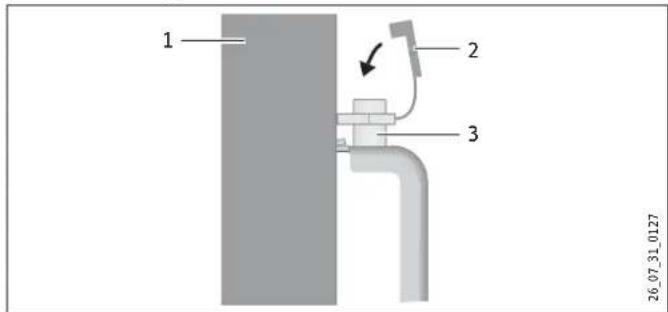
» Remove the safety cap from the locking bolt.
1 Appliance 2 Safety cap 3 Locking bolt
» Undo the locking bolt on the wall mounting bracket.
Lift the appliance up slightly and pull it forwards and away from the wall mounting bracket.
9.2 Installation with feet
Unhook the wall mounting bracket.
Only remove both external left and right screws at the bottom of the appliance.
Fit the feet to the bottom of the appliance in such a way that they are inserted into the recess at the back of the appliance.
Secure the feet with the One-way Screws supplied.
9.3 Power supply
Ensure the on-site supply cable has an adequate cross-section.
Ensure that a socket is installed at a distance of at least 10 cm from the side of the appliance.
DANGER Electrocution! Carry out all electrical connection and installation work in accordance with relevant regulations.
DANGER Electrocution! The appliance must be able to be separated from the mains power supply by an isolator that disconnects all poles with at least 3mm contact separation.
DANGER Electrocution! Do not install the appliance with a fixed power cable.
Observe the type plate. The specified voltage must match the mains voltage.
10. Troubleshooting
The power cable must only be replaced by a contractor using our original spare parts.
11. Appliance handover
Explain the functions of the appliance to the user. Draw special attention to the safety information. Hand the operating and installation instructions to the user.
12. Specification
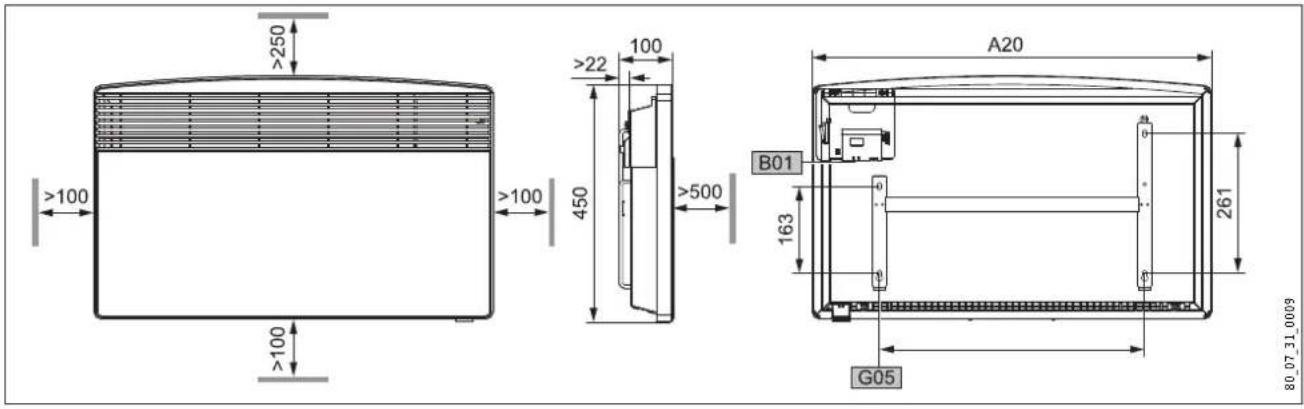
12.1 Dimensions of wall mounted version
CNS 75 F CNS 100 F CNS 125 F CNS 150 F CNS 175 F CNS 200 F CNS 250 F
| A10 Appliance Height mm 450 | ||||||||||
| A20 | Appliance | Width | mm | 445 | 445 | 590 | 590 | 740 | 740 | 890 |
| A30 | Appliance | Depth | mm | 100 | ||||||
| A50 | Appliance | Minimum top clearance | mm | 250 | ||||||
| A51 | Appliance | Minimum bottom clearance | mm | 100 | ||||||
| A52 | Appliance | Minimum r.h. clearance | mm | 100 | ||||||
| A53 | Appliance | Minimum l.h. clearance | mm | 100 | ||||||
| A54 | Appliance | Minimum front clearance | mm | 500 | ||||||
| A55 | Appliance | Minimum rear clearance | mm | 22 | ||||||
| B01 | Electrical cable entry | |||||||||
| G05 | Wall mounting bracket | Hole spacing | mm | 195 | 195 | 343 | 343 | 491 | 491 | 639 |
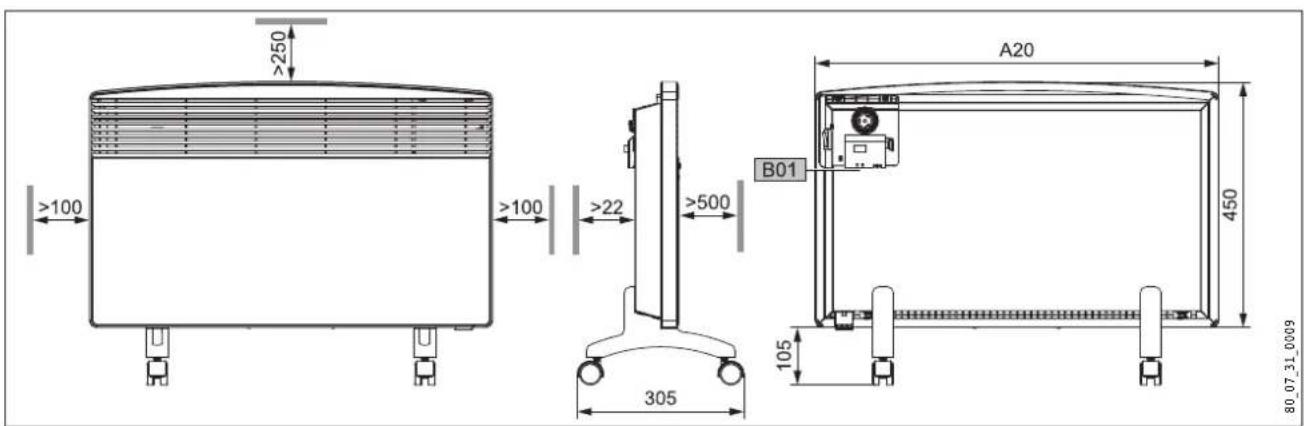
12.2 Dimensions of mobile floorstanding version
| CNS 75 F | CNS 100 F | CNS 125 F | CNS 150 F | CNS 175 F | CNS 200 F | CNS 250 F | |||
| A10 | Appliance | Height | mm | 450 | |||||
| A13 | Appliance | Height of adjustable feet | mm | 105 | |||||
| A20 | Appliance | Width | mm | 445 | 445 | 590 | 590 | 740 | 740 |
| A30 | Appliance | Depth | mm | 305 | |||||
| A50 | Appliance | Minimum top clearance | mm | 250 | |||||
| A52 | Appliance | Minimum r.h. clearance | mm | 100 | |||||
| A53 | Appliance | Minimum l.h. clearance | mm | 100 | |||||
| A54 | Appliance | Minimum front clearance | mm | 500 | |||||
| A55 | Appliance | Minimum rear clearance | mm | 22 | |||||
| B01 | Electrical cable entry | ||||||||
12.3 Specification table
| Model | ||||||||
| Type | CNS 75 F | CNS 100 F | CNS 125 F | CNS 150 F | CNS 175 F | CNS 200 F | CNS 250 F | |
| Part number | 229789 | 229790 | 229791 | 229792 | 229793 | 229794 | 229795 | |
| Operating details | ||||||||
| Output | kW | 0.75 | 1.0 | 1.25 | 1.5 | 1.75 | 2.0 | 2.5 |
| Power connection | 1/N ~ 230 V | 1/N ~ 230 V | 1/N ~ 230 V | 1/N ~ 230 V | 1/N ~ 230 V | 1/N ~ 230 V | 1/N ~ 230 V | |
| Temperature setting range | ~ °C | 6 ... 30 | 6 ... 30 | 6 ... 30 | 6 ... 30 | 6 ... 30 | 6 ... 30 | 6 ... 30 |
| Frost protection | ~ °C | 6 | 6 | 6 | 6 | 6 | 6 | 6 |
| Safety class | II | II | II | II | II | II | II | |
| Protection IP 24, splash-proof | X | X | X | X | X | X | X | |
| Dimensions and weights | ||||||||
| Weight | kg | 4.6 | 4.6 | 6.0 | 6.0 | 7.2 | 7.2 | 8.4 |
Guarantee
For guarantees please refer to the respective terms and conditions of supply for your country.

The installation, electrical connection and first operation of this appliance should be carried out by a qualified

The company does not accept liability for failure of any goods supplied which have not been installed and ope-cordance with the manufacturer's instructions.
Environment and recycling
Please help us to protect the environment by disposing of the packaging in accordance with the national regulations for waste processing.
UTILISATION 21
1.2.6 EdHHnCbI n3MepeHn

Pa3mepbB daHHOM DOKymeHTe npNBedeHb B MM. Dpyrne eHNuCb N3MepeHncooTBeTCTBeHHO yKa3bBAOTc DOONHnTeJIbHO.
2. TexHnka 6e3oNaChOCTn
2.1 IcnoIb3OBAHne no Ha3HaueHmIO
Pnp6op npedHa3NaeHdIy o6OrpeBa XnIbIX nOmeUeHm.
HnOe nCnoB3OBaHne daHHoro yctpoNCTBa He ABnEeTcnaNoB3OBaHem no Ha3NaueHIO. NcNoB3OBaHne noHa3NaueHIO TaKHe NoDpaZymeBaET co6IoudeHne NOLOKeHnHaCToAeero pykoBODCTBa. B cnUyae n3MeHEnu nnNepeo6OpdyobAHn yctpoNCTBa rapaHTnHOe 06cnykBaHne He npedocTabnreTc!
2.2 Yka3aHnno TeXHmke 6e3oNaCHOCTN
IcnoJb3yIte np60p TOnbKO B noJIHOCTbIO CO6paHHOM BnDe n C yCTaHOBJIeHHbIMN 3aUINTHbIMN yCTPOINCTBaMNI.

IPEUYIPXEKDEHNEOBO3ropaHHe nCnoB3yTe np6op ...
B NOMeueHnax, Ige n3-3a Hauuynx XmMuecknx BeueCTb, nblln, ra3OB nnnapoB ectb ONaCHOCTb BOCnnaMeHeHHnn B3pbIbA;
B HENOCpeCTBeHHo6IIN3OCTOnOT MarNCTpanei IIN EMKocTeI DnTpaHCnpOpTupOBKn IIN XpaHEnHraTopUChN IN B3pbIBOONacbIx MaTePnaNoB;
-ecnB nomeeHnn, rye yctanobJeH np6op, npoBOJrTaKne pa6Otbl, KaK yKnlaKa, WnΦOBka, repMeTu3aun;
-ecnBnomeuehen BedyTcpa6oTbI CncnoB3OBaHnem 6eH3nHa,cnpeEB,MactNK dna noOB nna ananorunhbx Beuectb.Xopowo npobetpntb nomeeHne nepeed harpeBom;
- npn npbeBbIeHm MmHmMaJIbHbIX pacCTOHH nO nobepxHOctTe TAKnx OBeKTOB, KaK, HApnpMep, Me6enb, 3aHaBeCKn, WToPbN TKAHN nn npoue BOCnnaMeHIOUeNCs MaTepnaJIbl (MmHmMaJIbHbIe pacCTOHH NOnCaHbI B rJaBe «TexHnueckne daHbIe»);
- npn noBpeKdEHH KOHCTpykTNBHO 3JeMeHTa npn6opa, naDeHH npn6opa nnn HapyuweHH erpa60tbl.

PPEyIPEXJEHNEoTpaBmax
UnpaBHeHne np6Opom DeTbMn nn LnuaMn C orpaHueHHbIMn fN3uYeCKmN, ceHCOPbIMn UymCTBeHHbIMn cNoC6HoCTAmn DOJXHO npocxOAnTb Toblko NOD npncmOTpmn nn nocne COoTBcTcByUoIero NHCTpyKtaxa, npOBedeHHoro Iuom, OTBeauOuIm 3a ux 6e3onacHoctb. He donyckaTe, yTo6bl Detn 6alOBaNNcb cn np6Opom!

PTEUYIPEXKDEHNEo BO3rpaHH
3anpeaetcpa3Meaatb ropoune, Bocnnaemehoounecra nn Tennon30nnpuyounie npedmetblnn MaTePnAbI, KaHapmep, Odekda, OdeJana, KypHaJIb, EMKoCTN C MaCTNKoN nn 6eH3nHom, fakohbo Co cnpeem nT.I. Ha np6ope nnB H enocpeDCTBeHHoN 6n3OCTOn OT Hero.

PPEyIPEKDEHNEo6oxorax
PobepxHocTn np60pa n BbIXoAun n3 Hero BO3dyx npn pa60Te HarpeBaIOTc (Bblwe 80°C).

OCTOPOXHO - neperpeB
He hakpbBaTb npn6op.

He hactynatb npn6op.

Pn nCnoB3OBaHnn nepeBnXHoro HanoBHorO yctpOcTBA HxNHO yuTbIBaTb CneDyUoee:
-HeIb3aHaKpbBaTb KOBpOM nIN NOIOBnKOM coeHNHTeNbHbN Ka6eNb. PpOKNaDbBaNTe coeHNHTeNbHbN Ka6eNb TaK, YTO6bl OH He nonaDcra NOD HOrn uNCKJIouaNcB BepoTHocTb HaCTyNaHnHa Ka6eNb nIN ONpOKuDbAHaHn np6opa.
-
NcknoHTe nCNOB3OBaHne yDnHnTeIa. Pn HEO6XoDMOCTN HyKHO nCNoB3OBaTb TOnbKO HENOBpeKdEHhbl yDnHnTeIb c DOCTaTOHbIM ceHHem Ka6eJIa, CpacETOM Ha NOHyO MOuHocTb npu6opa, a TaKke HENOBpeKdEHHyIO BUNKy mN CoeINHeHMy, pN DoCTaTOH0 3ΦΦeKTNBbIX MEPax 3auNTbl.
-
YctahOBHTb npn6Op Ha npouHyIO nobepxHocTb. Ecnn OCHOBaHHe HENpOuHoe, np6Op MoKet ONpOKnHyTBcA, n6oMOryT 6bITb nepeKpbItb BO3dyuHbIe OTBepCTnI.
-
HnB KOem cnyae HeIb3a CdBVaTb nI npenocntb np6op, 6epc3a ceTeBOHyp.
-Пинспьзовани пибopaВ КачесТБ HANOьНУ YCTaHOBKN erO HeNB3A pacnoJaRaTb B BaHHоK KomHate NIM aHaNoRnUHbIX BnaXhBIX NOMeSeHnIX, a TakKe Ha OTKpbITOM BO3dYxe.
3HaK CE
3HaK CE cBnTeIbCTByET, yTo np6Op COOTBeTCTByET BcEM OCHOBHbIM Tpe6OBAHnM:
-ДирекТиВа 06 3лeКТрмогнTHоь COBmecTnMOCTN
-ДирекиваEC no HN3KOBOLTHOMy O6OpyOBOAHIO
2.3 3NaKTexHnueckoro KOHTpon
Cm.3aBODckyToTa6nUky.
3aBODsKa Ta6nUcKa HaxOuNTcHapyKcnPpBaHa np6ope.
3. Onincanhe npnbopa
DaHHbI npn6op RaBnaTeCA 3neKtpnueckm yCTpoNCTBOM, OcUyecTBnHOUM npraMoH HarpeB, m MoKeT NODBeuINBaTBCa K CTHe IIN Jx eYCTaHaBnBaTBCa Ha NOny (KaK nepeDbXHOB BapNaHT) C cytAHOBkoONOp.
Pnp6op npedha3nueh nnonhoro oborpeba nnB kaheCTBe yctaHOKn dnn pomexkytoHoro nn dononHntelbHoro
06orpbeHa6oBbIINX NOMEueHn, HApPmep, IIO6nteBcknx Mactepcknx IN KOMHaT dIra roCTeN.
Bo3dyx B np6ope HarpeBaetc3a cuet HarpeBaTeIbHoro 3JemeHTa N BblnycKaETcB npocece eCTeBHHO KOHBekCmU uepe3 BblnyckHyIO peWetKy. UpeepacnoNoXKeHHbIe B HnKHeu actn np6opora OTBepctna NoCTynae TpOxAndHbI Bo3dyx.
Iocne 3akpenenne Ha cteHe nn ero yctahOBKe Ha onopbln nodklueyHn K 3neKtpnuyecko CETn C NOMOuB BuNKnp60p rotOB Ka6ote.
4. 3Kcnpnyatauia
4.1 OnucaHne naHn ynpabHeHna
Pn6op BkIOaETcC nOMObBbIKIOaTeIe C npaBOI CTOpHbI.
»UcTaHOBnTe HxKHyTo Tempepatpy NomeeHnna (ctyneHauTO) C NOMOsbI pyuKn nepeKluoyehn TaMepaTpyb (3haueHnna Tempepatpyb npuBeHb B rJaBe «TexHnueckne daHbIe).
No DocnHexHn yctahOBHeHHo TemnepaTpyb B nomeeHn OHa noDpeKnaeTaHa NoCTOAnHom ypOBHe 6laorapy BpemEHOMy HarpBy (Mouchob60rpeBa np6opAp np3TOM DOLXHA COOTBcTcBOBaT TeNIOOTpe6neHIO nomeeHn).
PnHaNnB NomeeHn HeckoBkx np6opOB nonoKeHnpeyIaTOPOB TemnepaTpyb Ha KaJdOM n3 HnX MOrYt 6bIb pa3nHbIM.
Bo n36ekhaHne BbICOKO NoTpe6NeHnE 3JIeKtpo3Heprn npu6op CJeNyET BbIKHOaTb Ha Bpem npOBeTpBaHn.
4.2 3aunta oT 3amep3aHnA
Ipepebcn pereyraTOp TemnepaTpyb B npaboe KpaHnee noLoxHeHne. B TAKOM noLoxHeHH NepmoperyJrTOp ABtOMaTnueckn BkIIOuHaET peKIM o6oRpeBa,ecNI TemnepaTypa B NOMeHnn nadaet HNKe TemnepaTpybl dAaunTbI OT 3aep3aHn.
4.3 OrpauHueHne peryIaTopa TempeaTypbl
C nomooubO o6oNX cTePxHHe, pacnoJoxKeHHbIX Ha TbIbHO CTopoHE KOpNyCa KOMMyTaunOHOro annapata, MOXHO 3aOKCuPoBaTb NOJoxKeHne peryIaTopa Tempeatpybl NnN 3aDaTb IJa TEMpepatpybl OnpeJeHHbe npedeJIb.
CTepKHNn3BNeueb cynnnneM.
ДлдфнкациуctановпснгтмпатуblHyхнвбctавпБОднСтржевьnpOTNBOJNOJOXHoeOTBepCTne(cM.pnC.).
1 CTepeKeHb
2 Perynatop Temnepaotypb
Дусановпграич Temпатурно рпеда на ручkeperултopa Temперatypeby yctahabnbaiaTc COOTBeCTBHeHOMINHMaJIbHOe n MaKcIMaJIbHOe 3HaueHHe, a CTePxeHb BCTaBLaTcCOOTBeTCTBeHHO B npOTUBONIOJXHoe OTBepCTne HeCKoJIbKOДальш (CM.pnc.).
1 CTepeKeHb
2 PerynTop Tempeatypbl
4.4 BbIBoI n3 3Kcnnyatauun
»YcTaHOBnTb nepeKlOuateIb Ha npIbope B noIoXeHne «BbIKIOUeHO» (AUS).
OCTOPOXHO-BO3MOxHO BO3ropaHne He paCnblTb YnCTaun cnpeB na3b BbInyCKHO peWetKn.
He donyckaute nonadaHn BnaHn BHytpb np6opa.
IpnperynapHom yxode pekomehnyetc TaKke npobepaTb opraHbI npabLeHn n perynipOBKn. He no3dhee cem uepe3 10 Iet nocne nepBBO BBOda B kcnlyatauio npedoxpaHntbHbIe yctpOCTBa, opraHbI npabLHeHn n perynipOBKn doJXHbI 6blTb npobepeHbI cneuaJIInCTOM.
6. YTo DeLaTb,ecnI ...
...npnbop He HaraepBaetc:
PpOBepuB yCTaHOBLeHHyIO Tempepaty nn npedoxpaHnte b domaHeN 3NeKTPocetn.
B npnbope yctahOBlen 3aunThbI peryIaTOp TemnepaTypbI, KOtOpbI OTKnIOUaET erO npI neperpeBe. Nocne yctpaHEnn npuHHI (HaNPmep, nepeKpbITN BblNyCKHO rIN BnyCKHO OTBepCTNA) np6Op ONrTa HauHnaeT pa6oTaTb Nocne nepnoDa OCTbIBAHN B TeueHne HeCKOJIbKxMHyT.
Ecn yctpaHntb HencnpaBHOCTb cAmocToTeIbHO He ydaetc,TO HxKHO Bbl3BaTb CneuaAIncTa.ДЯ Oka3aHnJnyuweN 6bICTpoi NOMOUs COo6UnTE emy Homep yCTpoiCTBa,yka3aHHbI Ha MapKnipOBouHOn Ta6nUke (N XXXXX-XXXX-XXXXXX):
7. TexHnka 6e3oNaChOCTn
Texnueckoe 6cnykubahne npmoHT npnbopa doJkhbl npon3bodntbocra TOIbKO KBaIIHnnpOBaHHbIM CneuaanCTOM.
7.1 06uye yka3aHnno TeXnKe 6e3oNaChocTu
Mb rapaHTnpyem 6e3ynpeHyu pa60Ty yctpoiCTBa n 6e3oNaCHOCTb 3KcNlyaTaun ToIbKO npn nCNoNb3OBAHn OpuRHaHbHorO DOnONHteJbHorO o6OpyDoBAHn n OpuRHaJIbHbIX 3aNuaCTeN.

ONACHOCTb npaKeHHaJIeKtpueckm TOKOM Pn moTaxe Ha CTHe yCTaHOBHTb np6Op TaK, 106bl nUca, npHnMaIOuIe BaHHy nn dyu, He MOrnn DoTPOHyTBcA DO KOMMyTpUoIux N perynpuyuix yCTpoiCTB.

OCTOPOXHO
- YctaHaBnBaHte HAcTeHHbI np6Op TOnbKO Ha BepTnKaJIbHOI CTeHE C TepMOCTOIOKOCtBu He MeHee 85 ^ C
-Co6nOdaIte MNHmAlNbHbIe paCCToHnIO NOBepXHOCTe COCEdHIX OBeKTOB(MNHMaJIbHbIe paCCTOHN ONcAHI B rIabe《TexHueckne daHHbIe》). - He yctaHaBnBaIte npu6Op HEnocpeCTBeHNO nOHaCTeHHo p03eTKoN.
-He donyckaTe KacaHn CoeHNHTbHbIM npoBODm DeTaeN npu6opa.
7.2 PpeDnncanHn, HopMbI n noLoXeHHa

Heo6xoJIMO co6IoudaTb BCE haonohBhble n pernohaBhle npedncaHn noctaHObnHeHn.

Cneyuetco6nOaTbHaunOHbHbIeCTponTeNbHbIe npedncaHn.
8. OnscaHne np6opa
8.1 06bem noCTaBku
-HaTeHHbKpOnHtEIn (npKpeIeTcK np60py)
-Hoxx
- OdHopa3ObIe BnHTbl
9. MoHTaJx
9.1 MoHTaK c HacteHHbIM KPOHtTeiHOM
9.1.1 MoHTaX HAcTeHHoro KpOuHTeHa
HacteHHbKnKpOHHTeH TaKke MoXHO NcNoB3OBaTb B KaueCTBe 7a6nOHa npK pKeNneHm K CTeHe - OH oecneuBaet HeoXoMyIO BvCOTy NaI NOBepxHOCTbIO nOla.
》OtceINITb HacteHHb KPOHHTeH.
» YctaHOBt b HAcTeHHbI KPOHtTeH, OpiEHTnpoBaHHbI NO CEHTpy, Ropu3OHTaJIbHO Ha IOn I pa3MeTtB OTBepCTnB ToUkax 1 n 2.
》POnHrTb HAcTeHHbI KPOHHTeIH BBePx HAcToIbKO, YTO6bl HxKHe OTBepCTnB HEM COBnaJann C pa3MeTKamn Ha CTeHe, PpeHa3NaueHHo JnMa MONTaKa.
» Pa3MeNTb OTBepCTn8 3 n 4 Ha cTeHe, npedHa3HaueHHOJ dIa MOHTaJa.
PpocBepnntb OTBepTna BO Bcex 4 HameueHHbx Toqkax. 3aKpeHnTb HaceHHbI KPOHHTeIH NIOXODAUM KpeNEXHBIM MaTePnAton (BnHTAmu, IIO6eJIaM) C yUeTOM OCO6EHHOCTe CTHebl. bIarOdaR BPtKaJbHbIM PpOJObHbIM na3am MOxHO KOMneHCupoBaT NorpeWHOCTn CbePleHn.
9.1.2 MoTax np6opa
Повьситbpnp6op,npoDEBчep3 npnemHbIe npope3n C TblbHON CTOPOHb np6Opa OndHOBpeMeHHO BCE YeTbipe Ra3bUka HacteHHORO KPOHHTeHa.
PnKataB npu6op nla qkaun.
ПовернтуnpedoxphaNTeHbHn wTnΦT hAcTeHHoro KpoHHTeHaNo yacOBo CTpeNke Do ynopa,Bpe3yNbTaTe Yero npOn3OJETKKncaUKNpennHeHn.
PnjkaTb 3aunThbI KOJNaQK K 3aHnpauOeMy 6oNtY, YTo6bl OH 6oJbSe He npOBopaUbaIcra O6paTHO.
1PepdoxpaHnteBbHbIuTnΦT
2 HacteHHbIK KpoHHTeH
1 Pnp6op
2 3aunTHbIKoNnaQOK
3 3anpaouu6oT
9.1.3 Demontax npu6opa
CHATb 3aunTHbI KOJINaUOK c 3aIIpaIOJero 6oNTa.

1Пибор
2 3aunTHbI KOJNaQK
3 3anpaiouou 6oT
»OTBepHyTb npedoxpaHntbHbI uTnΦT Ha HAcTeHHOM KpoHwTeHHe.
Cnerka npnoHnB np6op n ChrB ero uepe3 nepeC HacteHHoro KpOHHTeHa.
9.2 YctaHOBka Ha onope
» OTuENITb HAcTeHHbI KPOHHTeINH.
Ha ochobaHn np6opa Heo6xoJMo ydaHTb TOnbko Dba BHeuHX BNHTa.
COOTBETCTBEHNO yCTaHOBNTb HOXKN B HNXKHeu qactn npi6opa TaK, YTO6bl OHN BOUIN C3aDn pnp6opa B BbEMky.
» 3aKpeINITb HOKKN, 3aTAYHb INX BbIbepHyTbIM NBUHTaM.

PpknpenTe HOKKn np6opa npnlaeraembIM ODHopa3OBbIM BnHTaMn, 3aTaNTE ux do ynopa.

9.3 3neKtponoknloueHne
Co ctopohb3aka3uKa doljxhen 6bItb o6ecneueh coeHNHTenbHbI npoBc C NOXOJUM nonepueHbIM ceehnem.
HyXHO NO3a6OTbCROTom, YTO6bHa paCCToHn He MeHee 10cmOT6OKOBONOBepxHOCTn np6opa 6bIa yCTAHOBHeHa po3eTKa.

ONACHOCTb npaxeHHN 3NeKtpnueckm TOkOM! Bce pa60tbl no yctahOBHeHIO 3NeKtpnuecknx coeHNHeH N MOHTaKy Heo6xOJMo npON3BOIDTB COOTBeTCTBUN C HHTpyKUnei.

ONACHOCTb npaxenna 3neKtpnueckm TOKOM! Pnp6opdoJxepnacpenuaTbcra c cetboc nomoobpo pa3denaioero yactka pa3Mepom He Mehee 3 MM Ha BceX nonocax.

ONACHOCTb npaxeHn 3neKtpnuyeckm TOKOM! MoHTax co ctaunoHaPHO npoloxeHHbIM coeHNHTeJbHbIM npOBoDM He donyckaetc.

CneNyET yuHTbIBaHbIe Ha 3aBOcKoT a6nueKe. HanpJxHeHne cTe NdoJXHO COBnaTa b Cyka3aHHbIM Ha Ta6nueKe.
10. YcTpaHne HEnoJaOK
Pn Heo6xOaUMocTn 3aMeHbI npOBoJa nNoKKnUeHn K cTeN o6paauTecb TOnbKO K CneuHaNCTy. 3aMeHa pa3peWeHa ToJbKO C nCnoB3OBaHNem OpurHaNbHbIX DeTanei HaWero npou3BOdCTBa.
12.2 Pa3Mepbl nepeBnXhBix BapnaHTOB Ha cToiKe
HenpuHMaIOTcI npTeH3nIO HeuCnpaBHOCTM,
BO3HNKWM BCNECTBNE HenpaBnblHOH
yctaHOBKn n 3Kcnnyataaun npu6opa.
Okpykaioa cpea n BtOpcbipbe
MbInpocIMBaUeROCoDeIECTBnB3aUHTeOKpyXaHOJIeI
Cpebl. Bblbpaacbbar ynaKOBky, co6nloaTe npabuna
pepepaotkn OTXoIOB, yCTaHOBJIeHHbIe B BaWei CTpaHe.
Deutsch
Unit 12 Stadium Court | Stadium Road
Bromborough | Wirral | CH62 3RP
Tel. 0151 346-2300 | Fax 0151 334-2913
info@stiebel-eltron.co.uk
www.stiebel-eltron.co.uk
Hungary
STIEBEL ELTRON Kft.
Nihon Stiebel Co. Ltd.
Ebara building 3F | 2-9-3 Hamamatsu-cho
Minato-ku | Tokyo 105-0013
Tel. 03 34364662 | Fax 03 34594365
info@nihonstiebel.co.jp
Netherlands
STIEBEL ELTRON Nederland B.V.
Daviottenweg 36
5222 BH 's-Hertogenbosch
Tel. 073 623-000 | Fax 073 623-1141
Urzhumskaya street, 4. | 129343 Moscow
Tel. 0495 775-3889 | Fax 0495 775-3887
info@stiebel-eltron.ru
www.stiebel-eltron.ru
Slovakia
TATRAMAT - ohrievace vody, s.r.o.
Hlavna 1 | 058 01 Poprad
Tel. 052 7127-125 | Fax 052 7127-148
info@stiebel-eltron.sk
www.stiebel-eltron.sk
Sweden
STENERGY
Vasagatan 14 | 545 30 Toreboda
Sales:
Tel. 0722 371900 | info@stiebel-eltron.se
Technique & Service:
Tel. 0150 54200 | info@heatech.se
www.stiebel-eltron.se
Switzerland
STIEBEL ELTRON AG
United States of America
STIEBEL ELTRON Inc.
17 West Street | West Hatfield, MA 01088
Tel. 413 247-3380 | Fax 413 247-3369
info@stiebel-eltron-usa.com
www.stiebel-eltron-usa.com
- INSTALLATION
- ENVIRONMENT AND RECYCLING
- CUSTOMER SERVICE AND WARRANTY
- General information
- Document information
- Key to symbols
- Layout of safety information
- Keywords
- Warning symbols/symbols
- Text symbols and layout in this documentation
- Information on the appliance
- Units of measurement
- Safety
- Intended use
- Safety information
- WARNING Fire
- WARNING Injury
- WARNING Burns
- CAUTION Overheating
- CE designation
- Test symbols
- Appliance description
- Operation
- Description of the user interface
- Frost protection
- Limiting the temperature controller
- Shutting down
- Cleaning, care and maintenance
- What to do if ...
- Safety
- General safety instructions
- DANGER Electrocution
- CAUTION
- Instructions, standards and regulations
- Appliance description
- Standard delivery
- Installation
- Installation with wall mounting bracket
- Installing the wall mounting bracket
- Appliance installation
- Installation with feet
- Power supply
- Troubleshooting
- Appliance handover
- Specification
- Guarantee
- EdHHnCbI n3MepeHn
- TexHnka 6e3oNaChOCTn
- IcnoIb3OBAHne no Ha3HaueHmIO
- Yka3aHnno TeXHmke 6e3oNaCHOCTN
- 3HaK CE
- 3NaKTexHnueckoro KOHTpon
- Onincanhe npnbopa
- 3Kcnpnyatauia
- OnucaHne naHn ynpabHeHna
- 3aunta oT 3amep3aHnA
- OrpauHueHne peryIaTopa TempeaTypbl
- BbIBoI n3 3Kcnnyatauun
- YTo DeLaTb,ecnI ...
- TexHnka 6e3oNaChOCTn
- 06uye yka3aHnno TeXnKe 6e3oNaChocTu
- OCTOPOXHO
- PpeDnncanHn, HopMbI n noLoXeHHa
- OnscaHne np6opa
- 06bem noCTaBku
- MoHTaJx
- MoHTaK c HacteHHbIM KPOHtTeiHOM
- MoHTaX HAcTeHHoro KpOuHTeHa
- MoTax np6opa
- Demontax npu6opa
- YctaHOBka Ha onope
- 3neKtponoknloueHne
- YcTpaHne HEnoJaOK
- Pa3Mepbl nepeBnXhBix BapnaHTOB Ha cToiKe
- Okpykaioa cpea n BtOpcbipbe
- Deutsch
- Hungary
- Netherlands
- Slovakia
- Sweden
- Switzerland
- United States of America
Brand : STIEBEL ELTRON
Model : CNS 100 F
Category : Wall electric heater